Java: Edit a Word Document
Editing a Word document is a common task that many people encounter in their daily lives, whether it's for work, school, or personal projects. From correcting spelling and grammar errors to rearranging content and formatting the document, the ability to edit a Word document efficiently is a valuable skill.
In this article, you will learn how to programmatically edit or modify a Word document using Spire.Doc for Java.
- Modify Text in a Word Document
- Change Formatting of Text in a Word Document
- Add New Elements to a Word Document
- Remove Paragraphs from a Word Document
Install Spire.Doc for Java
First of all, you're required to add the Spire.Doc.jar file as a dependency in your Java program. The JAR file can be downloaded from this link. If you use Maven, you can easily import the JAR file in your application by adding the following code to your project's pom.xml file.
<repositories>
    <repository>
        <id>com.e-iceblue</id>
        <name>e-iceblue</name>
        <url>https://repo.e-iceblue.com/nexus/content/groups/public/</url>
    </repository>
</repositories>
<dependencies>
    <dependency>
        <groupId>e-iceblue</groupId>
        <artifactId>spire.doc</artifactId>
        <version>12.11.0</version>
    </dependency>
</dependencies>
Modify Text in a Word Document in Java
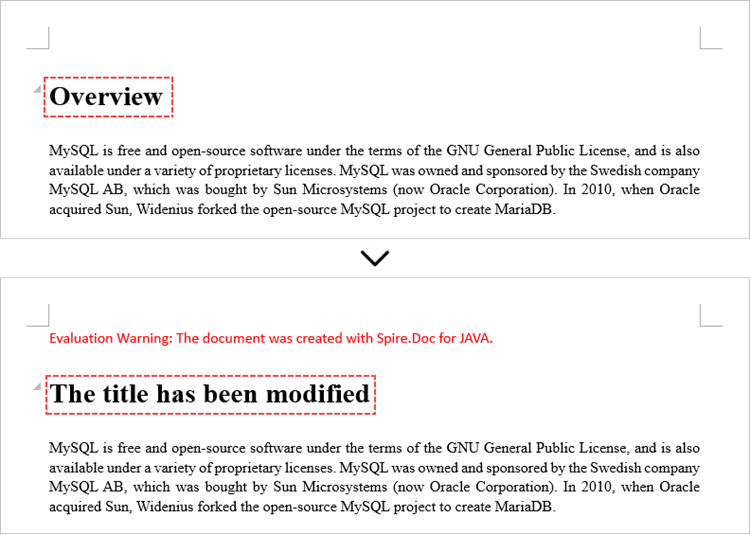
To retrieve the paragraph from a particular section, you can use the Section.getParagraphs().get() method. Once you have the target paragraph, you can then update its text content by calling the Paragraph.setText() method and passing in the new text you want to assign.
The following are the steps modify text in a Word document using Java:
- Create a Document object.
- Load a Word file from the given file path.
- Get a specific section using Document.getSections().get() method.
- Get a specific paragraph using Section.getParagraphs().get() method.
- Reset the text of the paragraph using Paragraph.setText() method.
- Save the updated document to a different Word file.
- Java
import com.spire.doc.Document;
import com.spire.doc.FileFormat;
import com.spire.doc.Section;
import com.spire.doc.documents.Paragraph;

public class ModifyText {
https://ok.166.net/reunionpub/2023-06-06/ntesgod_cms/1686032662375_vfdeuv.png
    public static void main(String[] args) {

        // Create a new document object
        Document document = new Document();

        // Load an existing Word file
        document.loadFromFile("C:\\Users\\Administrator\\Desktop\\input.docx");

        // Get a specific section
        Section section = document.getSections().get(0);

        // Get a specific paragraph
        Paragraph paragraph = section.getParagraphs().get(0);

        // Modify the text of the paragraph
        paragraph.setText("The title has been modified");

        // Save the document to a different Word file
        document.saveToFile("ModifyText.docx", FileFormat.Docx);

        // Dispose resource
        document.dispose();
    }
}
Change Formatting of Text in a Word Document in Java
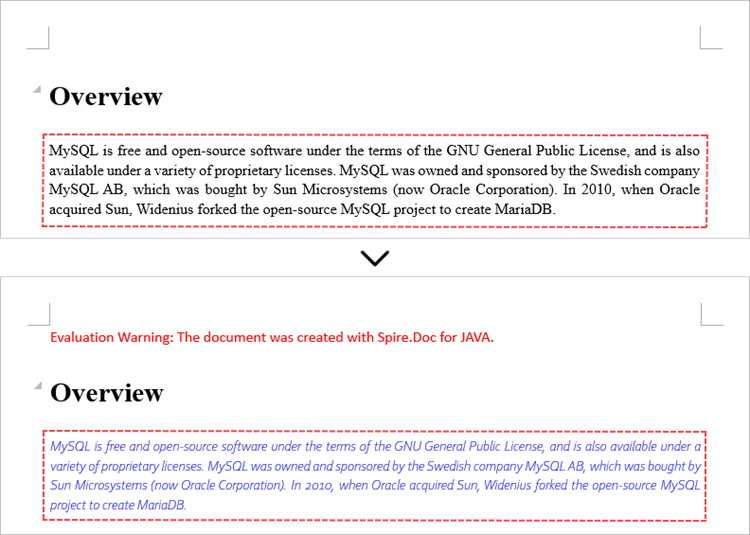
To modify the formatting of specific text within a paragraph, you first need to access the target paragraph object. Once you have the paragraph, you can then iterate through its child elements to locate the individual text ranges.
For each text range found, you can update the formatting by using the methods under the CharacterFormat object. This allows you to set properties like font name, size, color, and other text-level formatting options for the selected text.
The steps to change text formatting in a Word document are as follows:
- Create a Document object.
- Load a Word file from the given file path.
- Get a specific section using Document.getSections().get() method.
- Get a specific paragraph using Section.getParagraphs().get() method.
- Iterate through the child objects in the paragraph.
- Determine if a child object is a text range.
- Get a specific text range.
- Reset the text formatting using the methods under the CharacterFormat object.
- Save the updated document to a different Word file.
- Java
import com.spire.doc.Document;
import com.spire.doc.FileFormat;
import com.spire.doc.Section;
import com.spire.doc.documents.Paragraph;
import com.spire.doc.fields.TextRange;

import java.awt.*;

public class ChangeTextFormatting {

    public static void main(String[] args) {

        // Create a new document object
        Document document = new Document();

        // Load an existing Word file
        document.loadFromFile("C:\\Users\\Administrator\\Desktop\\input.docx");

        // Get a specific section
        Section section = document.getSections().get(0);

        // Get a specific paragraph
        Paragraph paragraph = section.getParagraphs().get(1);

        // Iterate through the child objects in the paragraph
        for (int i = 0; i < paragraph.getChildObjects().getCount(); i++)
        {
            // Determine if a child object is text range
            if (paragraph.getChildObjects().get(i) instanceof TextRange)
            {
                // Get a specific text range
                TextRange textRange = (TextRange)paragraph.getChildObjects().get(i);

                // Reset font name for it
                textRange.getCharacterFormat().setFontName("Corbel Light");

                // Reset font size for it
                textRange.getCharacterFormat().setFontSize(11);

                // Reset text color for it
                textRange.getCharacterFormat().setTextColor(Color.blue);

                // Apply italic to the text range
                textRange.getCharacterFormat().setItalic(true);
            }
        }

        // Save the document to a different Word file
        document.saveToFile("ChangeFont.docx", FileFormat.Docx);

        // Dispose resource
        document.dispose();
    }
}
Add New Elements to a Word Document in Java
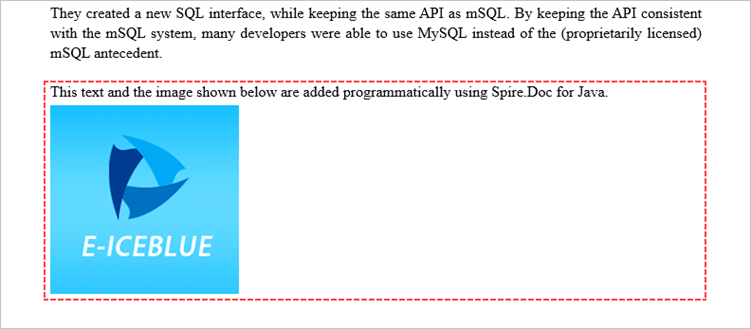
When working with Word documents, the paragraph serves as the foundational unit for incorporating diverse elements like text, images, lists, and charts. To introduce a new paragraph within a specific section, you can leverage the Section.addParagraph() method.
Once the paragraph has been added, you can then proceed to add various other elements to it by utilizing the methods available within the Paragraph object.
The following are the steps to add new elements (text and images) to a Word document using Java:
- Create a Document object.
- Load a Word file from the given file path.
- Get a specific section using Document.getSections() method.
- Add a paragraph to the section using Section.addParagraph() method.
- Add text to the paragraph using Paragraph.appendText() method.
- Add an image to the paragraph using Paragraph.appendPicture() method.
- Save the updated document to a different Word file.
- Java
import com.spire.doc.Document;
import com.spire.doc.FileFormat;
import com.spire.doc.Section;
import com.spire.doc.documents.Paragraph;
import com.spire.doc.documents.ParagraphStyle;

public class AddNewElements {

    public static void main(String[] args) {

        // Create a new document object
        Document document = new Document();

        // Load an existing Word file
        document.loadFromFile("C:\\Users\\Administrator\\Desktop\\input.docx");

        // Get the last section
        Section lastSection = document.getLastSection();

        // Add a paragraph to the section
        Paragraph paragraph = lastSection.addParagraph();

        // Add text to the paragraph
        paragraph.appendText("This text and the image shown below are added programmatically using Spire.Doc for Java.");

        // Add an image to the paragraph
        paragraph.appendPicture("C:\\Users\\Administrator\\Desktop\\logo.png");

        // Create a paragraph style
        ParagraphStyle style = new ParagraphStyle(document);
        style.setName("FontStyle");
        style.getCharacterFormat().setFontName("Times New Roman");
        style.getCharacterFormat().setFontSize(12);
        document.getStyles().add(style);

        // Apply the style to the paragraph
        paragraph.applyStyle(style.getName());

        // Save the document to a different Word file
        document.saveToFile("AddNewElements.docx", FileFormat.Docx);

        // Dispose resource
        document.dispose();
    }
}
Remove Paragraphs from a Word Document in Java
To remove a specific paragraph from the collection of paragraphs within a document, you can call the ParagraphCollection.removeAt() method. This method takes the index of the paragraph you wish to remove as an argument, allowing you to selectively delete the desired paragraph from the document.
The steps to remove paragraphs from a Word document using Java are as follows:
- Create a Document object.
- Load a Word file from the given file path.
- Get a specific section using Document.getSections().get() method.
- Remove a specific paragraph from the section using ParagraphCollection.removeAt() method.
- Save the updated document to a different Word file.
- Java
import com.spire.doc.Document;
import com.spire.doc.FileFormat;
import com.spire.doc.Section;

public class RemoveParagraph {

    public static void main(String[] args) {

        // Create a new document object
        Document document = new Document();

        // Load an existing Word file
        document.loadFromFile("C:\\Users\\Administrator\\Desktop\\input.docx");

        // Get a specific section
        Section section = document.getSections().get(0);

        // Remove a specific paragraph
        section.getParagraphs().removeAt(0);

        // Save the document to a different Word file
        document.saveToFile("RemoveParagraph.docx", FileFormat.Docx);

        // Dispose resource
        document.dispose();
    }
}
Apply for a Temporary License
If you'd like to remove the evaluation message from the generated documents, or to get rid of the function limitations, please request a 30-day trial license for yourself.
C#: Create Charts in PowerPoint Slides with Excel Data
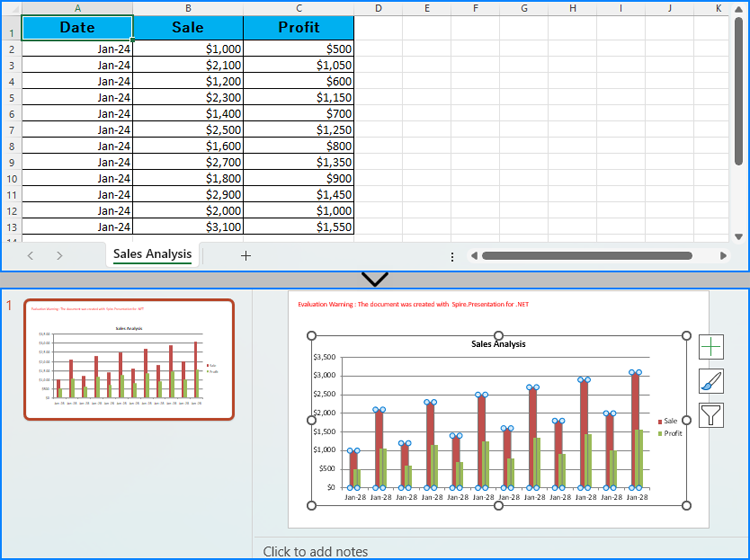
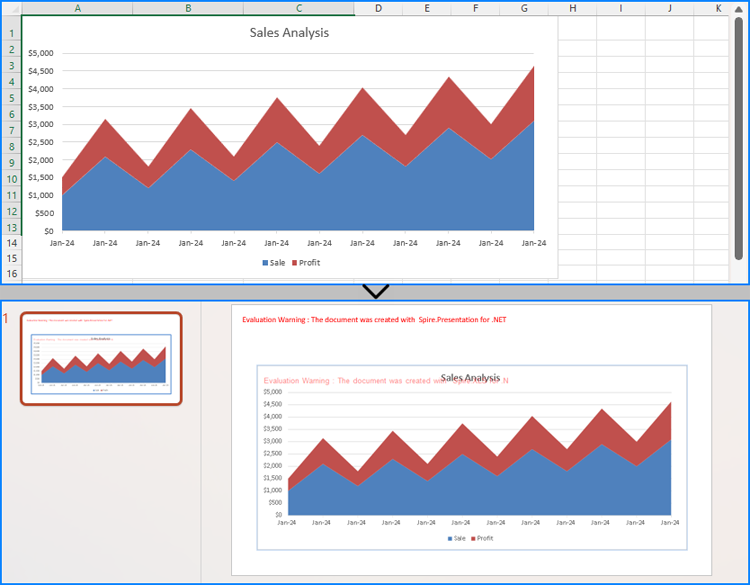
Creating charts in PowerPoint slides is a powerful way to enhance presentations by visually representing complex information, making it easier for audiences to grasp key insights. By reading Excel data directly to generate charts, you can streamline the data entry process and ensure data accuracy. Or, if you want to use charts from Excel files directly in PowerPoint presentations, you can directly insert them as pictures into PowerPoint slides, thus maximizing the original formatting and appearance. This article will show how to create charts in PowerPoint slides from Excel data using Spire.Office for .NET in .NET programs.
- Create Charts in PowerPoint Slides with Excel Data using C#
- Insert Excel Charts into PowerPoint Slides as Images using C#
Install Spire.Office for .NET
To begin with, you need to add the DLL files included in the Spire.Office for.NET package as references in your .NET project. The DLL files can be either downloaded from this link or installed via NuGet.
PM> Install-Package Spire.Office
Create Charts in PowerPoint Slides with Excel Data using C#
Developers can read data from Excel worksheets with Spire.XLS for .NET and then create charts in PowerPoint slides with Spire.Presentation for .NET using the read data as the charts' data source. The detailed steps for creating charts in PowerPoint presentations with Excel file data are as follows:
- Create an instance of Presentation class.
- Create an instance of Workbook class and load an Excel file using Workbook.LoadFromFile() method.
- Get the first slide in the presentation through Presentation.Slides[] property and create a chart in the first slide of the presentation using ISlide.Shapes.AppendChart() method.
- Clear the default dummy data using IChart.ChartData.Clear() method.
- Get the first worksheet in the workbook through Workbook.Worksheets[] property.
- Iterate through rows in the worksheet and then the columns in the worksheet:
- Get the cell values in the worksheet through Worksheet.AllocatedRange[].Value2 property and set them as the values of the chart’s data through IChart.ChartData[].Value property.
- Set the chart title using properties under IChart.ChartTitle property.
- Set the chart series labels and category labels through IChart.Series.SeriesLabel and IChart.Categories.CategoryLabels properties.
- Set the series values through IChart.Series[].Values property.
- Set the number format of the axis through IChart.PrimaryCategoryAxis.NumberFormat and IChart.PrimaryValueAxis.NumberFormat properties.
- Set the style of the chart through IChart.ChartStyle property.
- Save the presentation using Presentation.SaveToFile() method.
- C#
using Spire.Presentation;
using Spire.Presentation.Charts;
using Spire.Xls;
using System.Drawing;
using FileFormat = Spire.Presentation.FileFormat;
using IChart = Spire.Presentation.Charts.IChart;

namespace PresentationChartExcelData
{
    class Program
    {
        public static void Main(string[] args)
        {
            // Create an instance of Presentation class
            Presentation presentation = new Presentation();

            // Set the slide size
            presentation.SlideSize.Type = SlideSizeType.Screen16x9;

            // Create an instance of Workbook class and load an Excel file
            Workbook workbook = new Workbook();
            workbook.LoadFromFile("Sample.xlsx");

            // Get the first worksheet in the workbook
            Worksheet sheet = workbook.Worksheets[0];

            // Create a chart in the presentation
            RectangleF rect = new RectangleF(50, 100, presentation.SlideSize.Size.Width - 100, presentation.SlideSize.Size.Height - 150);
            ISlide slide = presentation.Slides[0];
            IChart chart = slide.Shapes.AppendChart(ChartType.ColumnClustered, rect);

            // Clear the default dummy data
            chart.ChartData.Clear(0, 0, 5, 5);

            // Iterate through the rows in the worksheet
            for (int i = 0; i < sheet.AllocatedRange.RowCount; i++)
            {
                // Iterate through the columns in the worksheet
                for (int j = 0; j < sheet.AllocatedRange.ColumnCount; j++)
                {
                    // Set the cell values in the worksheet as the values of the chart data
                    chart.ChartData[i, j].Value = sheet.AllocatedRange[i + 1, j + 1].Value2;
                    // Copy number formats
                    chart.ChartData[i, j].NumberFormat = sheet.AllocatedRange[i + 1, j + 1].NumberFormat;
                }
            }

            // Set the chart title
            chart.ChartTitle.TextProperties.Text = sheet.Name;
            chart.ChartTitle.TextProperties.IsCentered = true;
            chart.ChartTitle.Height = 25;
            chart.HasTitle = true;

            // Set the series labels and category labels
            chart.Series.SeriesLabel = chart.ChartData["B1", "C1"];
            chart.Categories.CategoryLabels = chart.ChartData["A2", "A" + sheet.AllocatedRange.RowCount];

            // Set the series values
            chart.Series[0].Values = chart.ChartData["B2", "B" + sheet.AllocatedRange.RowCount];
            chart.Series[1].Values = chart.ChartData["C2", "C" + sheet.AllocatedRange.RowCount];

            // Set the number format of the axis
            chart.PrimaryCategoryAxis.NumberFormat = sheet.AllocatedRange["A2"].NumberFormat;
            chart.PrimaryValueAxis.NumberFormat = sheet.AllocatedRange["B2"].NumberFormat;

            // Set the style of the chart
            chart.ChartStyle = ChartStyle.Style2;

            // Set the overlap and gap width
            chart.OverLap = 50;
            chart.GapWidth = 200;

            // Save the presentation
            presentation.SaveToFile("output/PresentationChartExcelData.pptx", FileFormat.Pptx2019);
            presentation.Dispose();
            workbook.Dispose();
        }
    }
}
Insert Excel Charts into PowerPoint Slides as Images using C#
To insert an existing chart from an Excel worksheet into a PowerPoint slide while maintaining its appearance and formatting precisely, the Workbook.SaveChartAsImage() method can be employed. This method allows the Excel chart to be saved as an image, which can then be added to the slide. The specific steps are as follows:
- Create an instance of Presentation class.
- Create an instance of Workbook class and load an Excel file using Workbook.LoadFromFile() method.
- Save a chart in a worksheet as an image using Workbook.SaveChartAsImage() method.
- Embed the image into the presentation using Presentation.Images.Append() method.
- Add the image to a slide using Presentation.Slides[].AppendEmbedImage() method.
- Save the presentation using Presentation.SaveToFile() method.
- C#
using Spire.Presentation;
using Spire.Presentation.Drawing;
using Spire.Xls;
using System.Drawing;
using FileFormat = Spire.Presentation.FileFormat;

namespace PresentationChartExcelChart
{
    class Program
    {
        public static void Main(string[] args)
        {
            // Create an instance of Presentation class
            Presentation presentation = new Presentation();

            // Set the slide size
            presentation.SlideSize.Type = SlideSizeType.Screen16x9;

            // Create an instance of Workbook class and load an Excel file
            Workbook workbook = new Workbook();
            workbook.LoadFromFile("Sample.xlsx");

            // Save the first chart in the first worksheet as an image
            Image image = workbook.SaveChartAsImage(workbook.Worksheets[0], 0);

            // Embed the image into the presentation
            IImageData imageData = presentation.Images.Append(image);

            // Add the image to the first slide
            RectangleF rect = new RectangleF(50, 120, presentation.SlideSize.Size.Width - 100, presentation.SlideSize.Size.Height - 170);
            presentation.Slides[0].Shapes.AppendEmbedImage(ShapeType.Rectangle, imageData, rect);

            // Save the presentation
            presentation.SaveToFile("output/PresentationChartExcelChart.pptx", FileFormat.Pptx2019);
            presentation.Dispose();
            workbook.Dispose();
        }
    }
}
Apply for a Temporary License
If you'd like to remove the evaluation message from the generated documents, or to get rid of the function limitations, please request a 30-day trial license for yourself.
Python: Add Barcodes to PDF
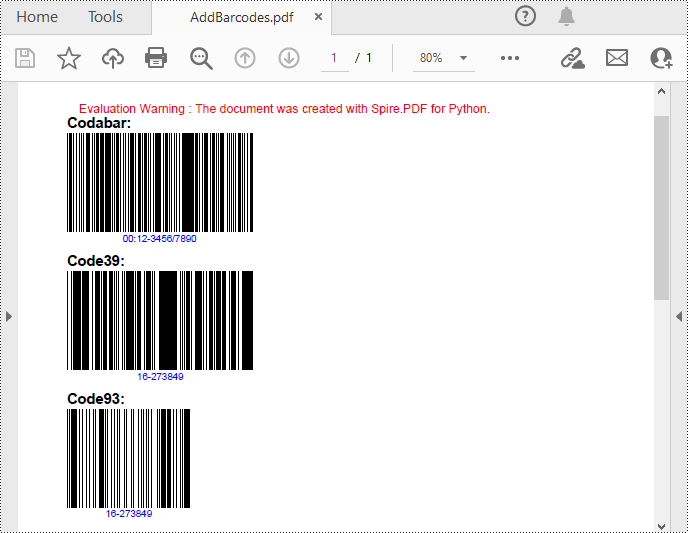
Barcodes in PDFs can facilitate quicker data retrieval and processing. You can add barcodes to PDF files that contain detailed information such as the document's unique identifier, version number, creator, or even the entire document content. When scanned, all information is decoded immediately. This instant access is invaluable for businesses dealing with large volumes of documents, as it minimizes the time and effort required for manual searching and data entry. In this article, you will learn how to add barcodes to PDF in Python using Spire.PDF for Python and Spire.Barcode for Python.
Install Spire.PDF for Python
This scenario requires Spire.PDF for Python and Spire.Barcode for Python. They can be easily installed in your Windows through the following pip command.
pip install Spire.PDF
pip install Spire.Barcode
If you are unsure how to install, please refer to this tutorial: How to Install Spire.PDF for Python on Windows
Add Barcodes to PDF in Python
Spire.PDF for Python support several 1D barcode types represented by different classes, such as PdfCodabarBarcode, PdfCode11Barcode, PdfCode32Barcode, PdfCode39Barcode, PdfCode93Barcode.
Each class provides corresponding properties for setting the barcode text, size, color, etc. The following are the steps to draw the common Codabar, Code39 and Code93 barcodes at the specified locations on a PDF page.
- Create a PdfDocument object.
- Add a PDF page using PdfDocument.Pages.Add() method.
- Create a PdfTextWidget object and draw text on the page using PdfTextWidget.Draw() method.
- Create PdfCodabarBarcode, PdfCode39Barcode, PdfCode93Barcode objects.
- Set the gap between the barcode and the displayed text through the BarcodeToTextGapHeight property of the corresponding classes.
- Sets the barcode text display location through the TextDisplayLocation property of the corresponding classes.
- Set the barcode text color through the TextColor property of the corresponding classes.
- Draw the barcodes at specified locations on the PDF page using the Draw(page: PdfPageBase, location: PointF) method of the corresponding classes.
- Save the result PDF file using PdfDocument.SaveToFile() method.
- Python
from spire.pdf.common import *
from spire.pdf import *

# Create a PDF document
pdf = PdfDocument()

# Add a page
page = pdf.Pages.Add(PdfPageSize.A4())

# Initialize y-coordinate
y = 20.0

# Create a true type font
font = PdfTrueTypeFont("Arial", 12.0, PdfFontStyle.Bold, True)

# Draw text on the page
text = PdfTextWidget()
text.Font = font
text.Text = "Codabar:"
result = text.Draw(page, 0.0, y)
page = result.Page
y = result.Bounds.Bottom + 2

# Draw Codabar barcode on the page
Codabar = PdfCodabarBarcode("00:12-3456/7890")
Codabar.BarcodeToTextGapHeight = 1.0
Codabar.EnableCheckDigit = True
Codabar.ShowCheckDigit = True
Codabar.TextDisplayLocation = TextLocation.Bottom
Codabar.TextColor = PdfRGBColor(Color.get_Blue())
Codabar.Draw(page, PointF(0.0, y))
y = Codabar.Bounds.Bottom + 6

# Draw text on the page
text.Text = "Code39:"
result = text.Draw(page, 0.0, y)
page = result.Page
y = result.Bounds.Bottom + 2

# Draw Code39 barcode on the page
Code39 = PdfCode39Barcode("16-273849")
Code39.BarcodeToTextGapHeight = 1.0
Code39.TextDisplayLocation = TextLocation.Bottom
Code39.TextColor = PdfRGBColor(Color.get_Blue())
Code39.Draw(page, PointF(0.0, y))
y = Code39.Bounds.Bottom + 6

# Draw text on the page
text.Text = "Code93:"
result = text.Draw(page, 0.0, y)
page = result.Page
y = result.Bounds.Bottom + 2

# Draw Code93 barcode on the page
Code93 = PdfCode93Barcode("16-273849")
Code93.BarcodeToTextGapHeight = 1.0
Code93.TextDisplayLocation = TextLocation.Bottom
Code93.TextColor = PdfRGBColor(Color.get_Blue())
Code93.QuietZone.Bottom = 5.0
Code93.Draw(page, PointF(0.0, y))

# Save the document
pdf.SaveToFile("AddBarcodes.pdf")
pdf.Close()
Add QR Codes to PDF in Python
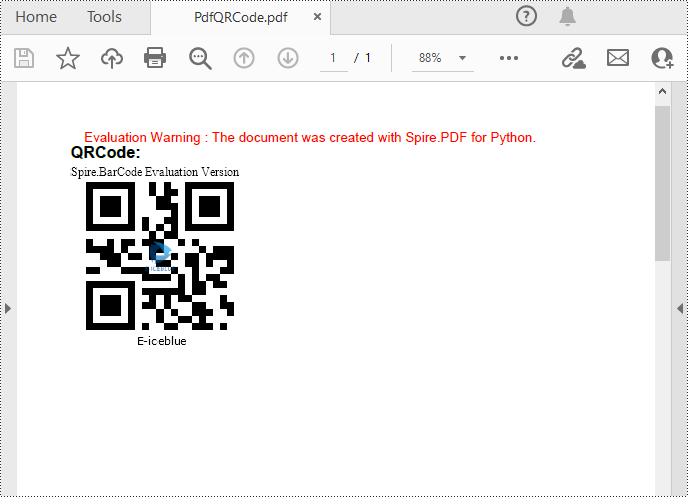
To add 2D barcodes to a PDF file, the Spire.Barcode for Python library is required to generate QR code first, and then you can add the QR code image to the PDF file with the Spire.PDF for Python library. The following are the detailed steps.
- Create a PdfDocument object.
- Add a PDF page using PdfDocument.Pages.Add() method.
- Create a BarcodeSettings object.
- Call the corresponding properties of the BarcodeSettings class to set the barcode type, data, error correction level and width, etc.
- Create a BarCodeGenerator object based on the settings.
- Generate QR code image using BarCodeGenerator.GenerateImage() method.
- Save the QR code image to a PNG file.
- Draw the QR code image at a specified location on the PDF page using PdfPageBase.Canvas.DrawImage() method.
- Save the result PDF file using PdfDocument.SaveToFile() method.
- Python
from spire.pdf.common import *
from spire.pdf import *
from spire.barcode import *

# Create a PdfDocument instance
pdf = PdfDocument()
# Add a page
page = pdf.Pages.Add()

# Create a BarcodeSettings object
settings = BarcodeSettings()

# Set the barcode type to QR code
settings.Type = BarCodeType.QRCode
# Set the data of the QR code
settings.Data = "E-iceblue"
settings.Data2D = "E-iceblue"
# Set the width of the QR code
settings.X = 2
# Set the error correction level of the QR code
settings.QRCodeECL = QRCodeECL.M
# Set to show QR code text at the bottom
settings.ShowTextOnBottom = True

# Generate QR code image based on the settings
barCodeGenerator = BarCodeGenerator(settings)
QRimage = barCodeGenerator.GenerateImage()

# Save the QR code image to a .png file
with open("QRCode.png", "wb") as file:
    file.write(QRimage)

# Initialize y-coordinate
y = 20.0

# Create a true type font
font = PdfTrueTypeFont("Arial", 12.0, PdfFontStyle.Bold, True)

# Draw text on the PDF page
text = PdfTextWidget()
text.Font = font
text.Text = "QRCode:"
result = text.Draw(page, 0.0, y)
page = result.Page
y = result.Bounds.Bottom + 2

# Draw QR code image on the PDF page
pdfImage = PdfImage.FromFile("QRCode.png")
page.Canvas.DrawImage(pdfImage, 0.0, y)

# Save the document
pdf.SaveToFile("PdfQRCode.pdf")
pdf.Close()
Apply for a Temporary License
If you'd like to remove the evaluation message from the generated documents, or to get rid of the function limitations, please request a 30-day trial license for yourself.
Python: Add Superscript and Subscript to Word
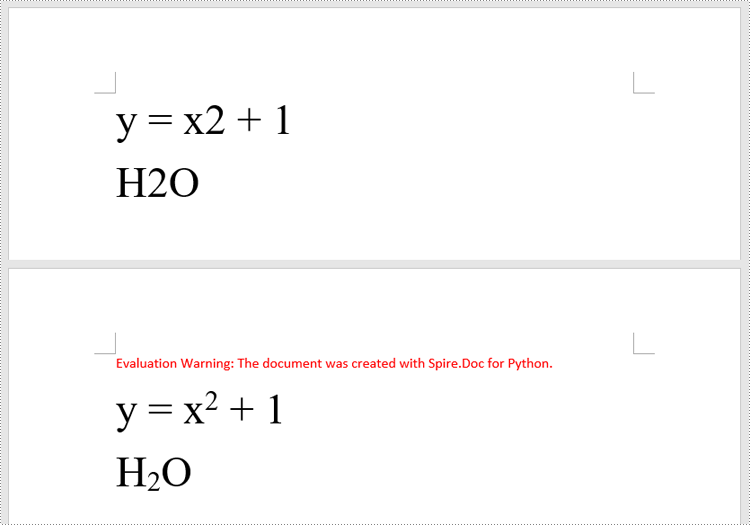
Superscript and subscript are formatting options that allow you to raise or lower characters in relation to the main text. Superscript is typically used for mathematical expressions, footnotes, ordinal indicators (such as "1st" or "2nd"), and chemical formulas. Subscript is commonly employed in chemical equations, mathematical notation, and certain linguistic elements. By adding superscripts and subscripts, you can enhance the readability and professionalism of your documents, especially in scientific, mathematical, and technical writing. In this article, we will demonstrate how to add superscripts and subscripts to Word documents in Python using Spire.Doc for Python.
- Add Superscript and Subscript Text to Word in Python
- Apply Superscript and Subscript Formatting to Existing Text in Word in Python
Install Spire.Doc for Python
This scenario requires Spire.Doc for Python and plum-dispatch v1.7.4. They can be easily installed in your Windows through the following pip command.
pip install Spire.Doc
If you are unsure how to install, please refer to this tutorial: How to Install Spire.Doc for Python on Windows
Add Superscript and Subscript Text to Word in Python
You can add text to a paragraph using the Paragraph.AppentText() method. After that, you can apply superscript or subscript formatting to the text through the TextRange.CharacterFormat.SubSuperScript property. The detailed steps are as follows.
- Create an object of the Document class.
- Add a section to the document using Document.AddSection() method.
- Add a paragraph to the section using Section.AddParagraph() method.
- Add normal text to the paragraph using Paragraph.AppendText() method.
- Add superscript or subscript text to the paragraph using Paragraph.AppendText() method.
- Apply superscript or subscript formatting to the superscript or subscript text using TextRange.CharacterFormat.SubSuperScript property.
- Save the resulting document using Document.SaveToFile() method.
- Python
from spire.doc import *
from spire.doc.common import *

# Create a Document instance
document = Document()
# Add a section to the document
section = document.AddSection()

# Add a paragraph to the section
paragraph = section.AddParagraph()

# Add normal text to the paragraph
paragraph.AppendText("E = mc")
# Add superscript text to the paragraph
superscript_text = paragraph.AppendText("2")
# Apply superscript formatting to the superscript text
superscript_text.CharacterFormat.SubSuperScript = SubSuperScript.SuperScript

# Start a new line
paragraph.AppendBreak(BreakType.LineBreak)

# Add normal text to the paragraph
paragraph.AppendText("H")
# Add subscript text to the paragraph
subscript_text = paragraph.AppendText("2")
# Apply subscript formatting to the subscript text
subscript_text.CharacterFormat.SubSuperScript = SubSuperScript.SubScript
# Add normal text to the paragraph
paragraph.AppendText("O")

# Set the font size for the text in the paragraph
for i in range(paragraph.Items.Count):
    item = paragraph.Items[i]
    if isinstance(item, TextRange):
        text_range = item
        text_range.CharacterFormat.FontSize = 36

# Save the resulting document
document.SaveToFile("AddSuperscriptAndSubscriptText.docx", FileFormat.Docx2013)
document.Close()

Apply Superscript and Subscript Formatting to Existing Text in Word in Python
To apply superscript or subscript formatting to a specific text, you need to search for the text using the Document.FindAllString() method, then apply superscript or subscript formatting to the instances of that text through the TextRange.CharacterFormat.SubSuperScript property. The detailed steps are as follows.
- Create an object of the Document class.
- Load a Word document using Document.LoadFromFile() method.
- Find a specific text in the document using Document.FindAllString() method. This method will return a list of TextSelection objects, each representing an instance of the text in the document.
- Get the first instance of the text as a single text range using TextSelection.GetAsOneRange() method, then apply superscript formatting to the text range by setting the TextRange.CharacterFormat.SubSuperScript property to SubSuperScript.SuperScript.
- Get the second instance of the text as a single text range using TextSelection.GetAsOneRange() method, then apply subscript formatting to the text range by setting the TextRange.CharacterFormat.SubSuperScript property to SubSuperScript.SubScript.
- Save the resulting document using Document.SaveToFile() method.
- Python
from spire.doc import *
from spire.doc.common import *

# Create a Document instance
document = Document()
# Load a Word document
document.LoadFromFile("Sample.docx")

# Find a specific number in the document
text_selections = document.FindAllString("2", False, False)

# Apply superscript formatting to the first instance of the number
superscript_text = text_selections[0].GetAsOneRange()
superscript_text.CharacterFormat.SubSuperScript = SubSuperScript.SuperScript

# Apply subscript formatting to the second instance of the number
subscript_text = text_selections[1].GetAsOneRange()
subscript_text.CharacterFormat.SubSuperScript = SubSuperScript.SubScript

# Save the resulting document
document.SaveToFile("ApplySuperscriptAndSubscriptFormatting.docx", FileFormat.Docx2013)
document.Close()
Apply for a Temporary License
If you'd like to remove the evaluation message from the generated documents, or to get rid of the function limitations, please request a 30-day trial license for yourself.
Spire.XLS 14.8.2 supports enabling revision mode
We are excited to announce the release of Spire.XLS 14.8.2. This version supports enabling revision mode and setting global custom font folders. What’s more, some known bugs are fixed in this update, such as the issue that the checkbox was not converted to image format when converting Excel to PDF. More details are listed below.
Here is a list of changes made in this release
| Category | ID | Description |
| New feature | SPIREXLS-5254 | Supports enabling revision mode.
Workbook.TrackedChanges=true;//default value is false |
| New feature | SPIREXLS-5348 | Supports setting global custom font folders.
Workbook.SetGlobalCustomFontsFolders(string[] fontPath); |
| Bug | SPIREXLS-5196 | Fixes the issue that the checkbox was not converted to image format when converting Excel to PDF. |
| Bug | SPIREXLS-5305 | Fixes the issue that multiple calls to the ApplyStyleToRange method in pivot tables result in incorrect results. |
| Bug | SPIREXLS-5308 | Fixes the issue that setting the color transparency of rich text did not take effect. |
| Bug | SPIREXLS-5317 | Fixes the issue that the Filter formula is calculated incorrectly. |
| Bug | SPIREXLS-5330 | Fixes the issue that pivot table column names are incorrect when converting Excel to images. |
| Bug | SPIREXLS-5345 | Fixes the issue that the text location is incorrect when converting Excel to PDF. |
| Bug | SPIREXLS-5349 | Fixes the issue that ChartSheet retrieval is incorrect. |
| Bug | SPIREXLS-5352 | Fixes the issue that cell content is incorrect when converting Excel to HTML or images. |
Spire.PDF for Java 10.8.1 enhances the conversions from PDF to SVG, Word and PPTX
We're pleased to announce the release of Spire.PDF for Java 10.8.1. This version fixes some known issues that occurred when converting PDF to SVG/Word/PPTX, converting OFD to PDF, reading Tiff files and extracting table text. More details are listed below.
Here is a list of changes made in this release
| Category | ID | Description |
| Bug | SPIREPDF-6851 | Fixes the issue that the program threw "NullPointerException" when converting PDF to SVG. |
| Bug | SPIREPDF-6881 | Fixes the issue that some punctuation marks were missing when extracting table text. |
| Bug | SPIREPDF-6895 | Fixes the issue that the content was lost when converting OFD to PDF. |
| Bug | SPIREPDF-6923 | Fixes the issue that the program threw "doc-0/res/doc-0/res/res7651308984730378845.png cannot be found!" when converting OFD to PDF. |
| Bug | SPIREPDF-6924 | Fixes the issue that the program threw "ArrangStoreException" while reading Tiff files. |
| Bug | SPIREPDF-6939 | Fixes the issue that the program threw "NullPointerException" when converting PDF to Word. |
| Bug | SPIREPDF-6947 | Fixes the issue that the font styles were incorrect when converting PDF to PPTX. |
Python: Insert, Rotate, Resize, Reposition, and Reorder Shapes in PowerPoint
Shapes are the fundamental building blocks that bring your PowerPoint slides to life. From simple geometric forms to complex icons and illustrations, these versatile visual elements enable you to add interest, highlight key information, and craft visually striking layouts. Whether you are creating professional-looking slides from scratch or enhancing existing ones, knowing how to insert and manipulate shapes is an essential skill. In this guide, we'll cover how to insert, rotate, resize, reposition, and reorder shapes in PowerPoint presentations in Python using Spire.Presentation for Python.
- Insert Shapes in PowerPoint in Python
- Rotate Shapes in PowerPoint in Python
- Resize and Reposition Shapes in PowerPoint in Python
- Reorder Shapes in PowerPoint in Python
Install Spire.Presentation for Python
This scenario requires Spire.Presentation for Python and plum-dispatch v1.7.4. They can be easily installed in your Windows through the following pip command.
pip install Spire.Presentation
If you are unsure how to install, please refer to this tutorial: How to Install Spire.Presentation for Python on Windows
Insert Shapes in PowerPoint in Python
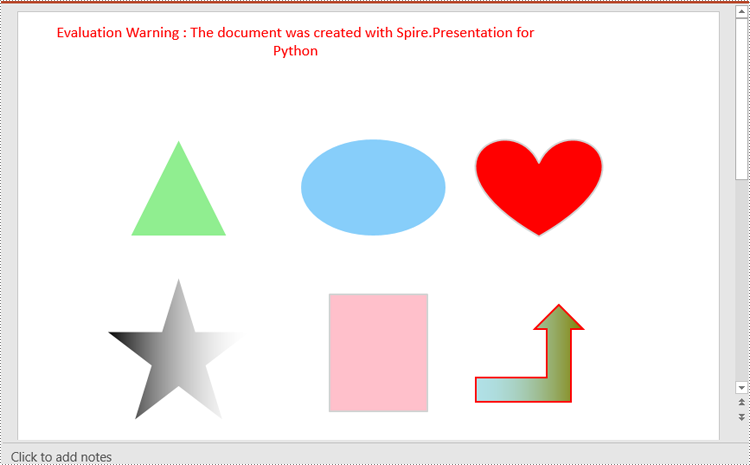
Spire.Presentation for Python enables you to add various types of shapes such as rectangles, circles, triangles, arrows, and eclipses to a PowerPoint slide by using the ISlide.Shapes.AppendShape() method.
Here are the steps to insert shapes in PowerPoint using Spire.Presentation for Python:
- Create an object of the Presentation class.
- Load a PowerPoint presentation using Presentation.LoadFromFile() method.
- Get a specific slide in the presentation using Presentation.Slides[index] property.
- Add various types of shapes to the slide using ISlide.Shapes.AppendShape() method and then set styles for the shapes.
- Save the resulting presentation using Presentation.SaveToFile() method.
- Python
from spire.presentation import *

# Create an object of the Presentation class
ppt = Presentation()

# Get the first slide
slide = ppt.Slides[0]

# Add a triangle shape to the slide
shape = slide.Shapes.AppendShape(ShapeType.Triangle, RectangleF.FromLTRB (115, 130, 215, 230))
shape.Fill.FillType = FillFormatType.Solid
shape.Fill.SolidColor.Color = Color.get_LightGreen()
shape.ShapeStyle.LineColor.Color = Color.get_White()

# Add an ellipse shape to the slide
shape = slide.Shapes.AppendShape(ShapeType.Ellipse, RectangleF.FromLTRB (290, 130, 440, 230))
shape.Fill.FillType = FillFormatType.Solid
shape.Fill.SolidColor.Color = Color.get_LightSkyBlue()
shape.ShapeStyle.LineColor.Color = Color.get_White()

# Add a heart shape to the slide
shape = slide.Shapes.AppendShape(ShapeType.Heart, RectangleF.FromLTRB (470, 130, 600, 230))
shape.Fill.FillType = FillFormatType.Solid
shape.Fill.SolidColor.Color = Color.get_Red()
shape.ShapeStyle.LineColor.Color = Color.get_LightGray()

# Add a five-pointed star shape to the slide
shape = slide.Shapes.AppendShape(ShapeType.FivePointedStar, RectangleF.FromLTRB (90, 270, 240, 420))
shape.Fill.FillType = FillFormatType.Gradient
shape.Fill.SolidColor.Color = Color.get_Black()
shape.ShapeStyle.LineColor.Color = Color.get_White()

# Add a rectangle shape to the slide
shape = slide.Shapes.AppendShape(ShapeType.Rectangle, RectangleF.FromLTRB (320, 290, 420, 410))
shape.Fill.FillType = FillFormatType.Solid
shape.Fill.SolidColor.Color = Color.get_Pink()
shape.ShapeStyle.LineColor.Color = Color.get_LightGray()

# Add an arrow shape to the slide
shape = slide.Shapes.AppendShape(ShapeType.BentUpArrow, RectangleF.FromLTRB (470, 300, 580, 400))
shape.Fill.FillType = FillFormatType.Gradient
shape.Fill.Gradient.GradientStops.AppendByKnownColors(1, KnownColors.Olive)
shape.Fill.Gradient.GradientStops.AppendByKnownColors(0, KnownColors.PowderBlue)
shape.ShapeStyle.LineColor.Color = Color.get_Red()

# Save the resulting presentation to a new file
ppt.SaveToFile("InsertShapes.pptx", FileFormat.Pptx2010)
ppt.Dispose()
Rotate Shapes in PowerPoint in Python
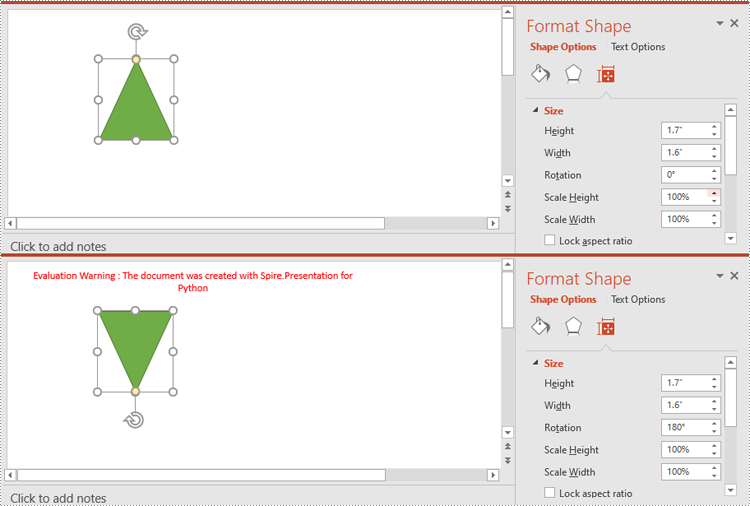
The IShape.Rotation property in Spire.Presentation for Python is used to rotate a shape on a PowerPoint slide. Setting this property to a positive value will rotate the shape clockwise, while setting it to a negative value will rotate the shape counterclockwise.
Here are the steps to rotate a shape in PowerPoint using Spire.Presentation for Python:
- Create an object of the Presentation class.
- Load a PowerPoint presentation using Presentation.LoadFromFile() method.
- Get a specific slide in the presentation using Presentation.Slides[index] property.
- Get a specific shape on the slide using ISlide.Shapes[index] property.
- Rotate the shape by specific degrees using IShape.Rotation property.
- Save the resulting presentation using Presentation.SaveToFile() method.
- Python
from spire.presentation import *

# Create an object of the Presentation class
ppt = Presentation()
# Load a PowerPoint presentation
ppt.LoadFromFile("ShapeTemplate1.pptx")

# Get the first slide
slide = ppt.Slides[0]

# Get the first shape on the slide
shape = slide.Shapes[0] if isinstance(slide.Shapes[0], IAutoShape) else None

# Rotate the shape 180 degrees clockwise
shape.Rotation = 180

# Save the resulting presentation to a new file
ppt.SaveToFile("RotateShape.pptx", FileFormat.Pptx2016)
ppt.Dispose()
Resize and Reposition Shapes in PowerPoint in Python
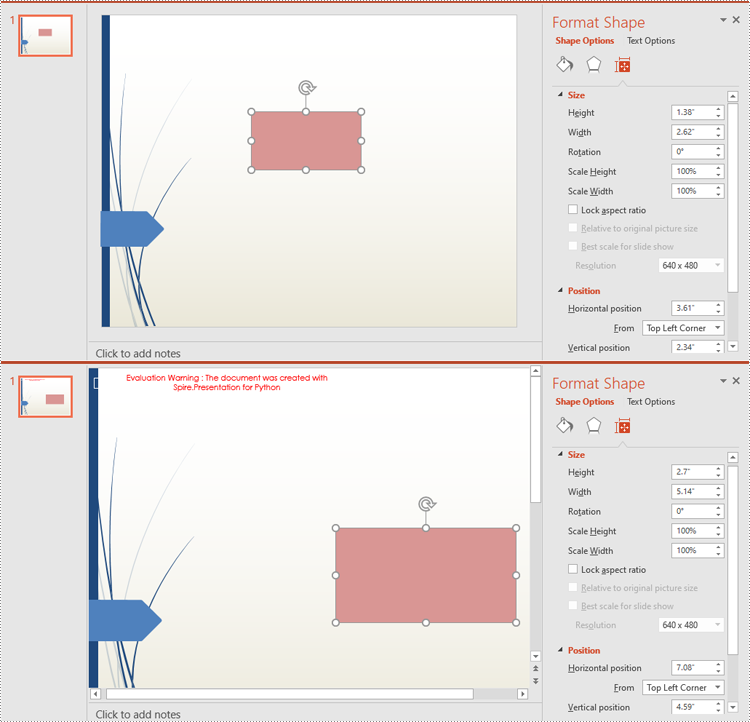
The size and position of a shape can be reset through the IShape.Height, IShape.Width and IShape.Left, IShape.Top properties.
Here are the steps to reset the size and position of shapes in PowerPoint using Spire.Presentation for Python:
- Create an object of the Presentation class.
- Load a PowerPoint presentation using Presentation.LoadFromFile() method.
- Get the original slide height and width using Presentation.SlideSize.Size.Height and Presentation.SlideSize.Size.Width properties.
- Change the slide size using Presentation.SlideSize.Type property, and then get the new slide height and width.
- Calculate the ratio for resetting the size and position of the shapes based on the original and new slide heights and widths.
- Iterate through the slides in the presentation and the shapes on each slide.
- Reset the size and position of each shape based on the specified ratio using IShape.Height, IShape.Width, IShape.Left and IShape.Top properties.
- Save the resulting presentation using Presentation.SaveToFile() method.
- Python
from spire.presentation import *

# Create an object of the Presentation class
ppt = Presentation()
# Load a PowerPoint presentation
ppt.LoadFromFile("ShapeTemplate.pptx")

# Get the original slide height and width
currentHeight = ppt.SlideSize.Size.Height
currentWidth = ppt.SlideSize.Size.Width

# Change the slide size to A3
ppt.SlideSize.Type = SlideSizeType.A3

# Get the new slide height and width
newHeight = ppt.SlideSize.Size.Height
newWidth = ppt.SlideSize.Size.Width

# Calculate the ratio for resizing shapes based on the original and new slide heights and widths
ratioHeight = newHeight / currentHeight
ratioWidth = newWidth / currentWidth

# Iterate through the slides in the presentation
for slide in ppt.Slides:
    # Iterate through the shapes on the slide
    for shape in slide.Shapes:
        if isinstance(shape, IAutoShape):
            # Reset the size of the shape based on the specified ratio
            shape.Height = shape.Height * ratioHeight
            shape.Width = shape.Width * ratioWidth
            # Reset the position (x and y coordinates) of the shape based on the specified ratio
            shape.Top = shape.Top * ratioHeight
            shape.Left = shape.Left * ratioWidth

# Save the resulting presentation to a new file
ppt.SaveToFile("ResizeAndRepositionShapes.pptx", FileFormat.Pptx2016)
ppt.Dispose()
Reorder Shapes in PowerPoint in Python
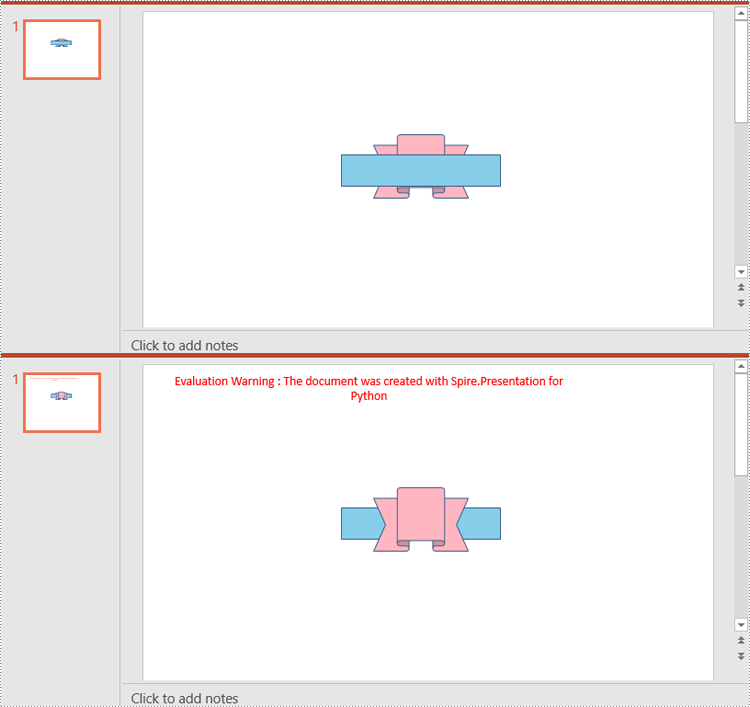
The order in which shapes are arranged determines which shapes appear in front of or behind others. Using the ISlide.Shapes.ZOrder() method, you can easily change the order of multiple overlapping shapes on a PowerPoint slide.
Here are the steps to change the order of shapes in PowerPoint using Spire.Presentation for Python:
- Create an object of the Presentation class.
- Load a PowerPoint presentation using Presentation.LoadFromFile() method.
- Get a specific slide in the presentation using Presentation.Slides[index] property.
- Get a specific shape on the slide using ISlide.Shapes[index] property.
- Change the stacking order of the shape using ISlide.Shapes.ZOrder() method.
- Save the resulting presentation using Presentation.SaveToFile() method.
- Python
from spire.presentation import *

# Create an object of the Presentation class
ppt = Presentation()
# Load a PowerPoint presentation
ppt.LoadFromFile("ShapeTemplate3.pptx")

# Get the first slide
slide = ppt.Slides[0]

# Get the first shape on the slide
shape = slide.Shapes[0] if isinstance(slide.Shapes[0], IAutoShape) else None

# Change the stacking order of the shape
slide.Shapes.ZOrder(1, shape)

# Save the resulting presentation to a new file
ppt.SaveToFile("ReorderShapes.pptx", FileFormat.Pptx2016)
ppt.Dispose()
Apply for a Temporary License
If you'd like to remove the evaluation message from the generated documents, or to get rid of the function limitations, please request a 30-day trial license for yourself.
Spire.Doc for Java 12.8.4 improves clarity of images when converting Word documents to HTML
We are delighted to announce the release of Spire.Doc for Java 12.8.4. This version improves clarity of images when converting Word documents to HTML. Moreover, some known issues are fixed successfully in this version, such as the issue that the images were lost when converting HTML to Word. More details are listed below.
Here is a list of changes made in this release
| Category | ID | Description |
| Optimization | SPIREDOC-10600 | Improves clarity of images when converting Word documents to HTML. |
| Bug | SPIREDOC-10546 SPIREDOC-10601 |
Fixes the issue that the images were lost when converting HTML to Word. |
| Bug | SPIREDOC-10562 | Fixes the problem that the program threw "Unknown boolex value" exception when converting Word to PDF. |
| Bug | SPIREDOC-10688 | Fixes the issue that the table borders were lost when the saved Doc document was opened in WPS tool. |
Python: Copy Slides in PowerPoint Presentations
When preparing multiple PowerPoint presentations with similar themes, copying slides helps to maintain consistency in terms of design, layout and content. This ensures that all presentations have a uniform appearance, which can enhance the aesthetics of your document. In this article, you will learn how to copy or clone slides in PowerPoint presentations in Python using Spire.Presentation for Python.
- Copy Slides Within the Same Presentation with Python
- Copy Slides to Another Presentation with Python
Install Spire.Presentation for Python
This scenario requires Spire.Presentation for Python and plum-dispatch v1.7.4. They can be easily installed in your Windows through the following pip command.
pip install Spire.Presentation
If you are unsure how to install, please refer to this tutorial: How to Install Spire.Presentation for Python on Windows
Copy Slides Within the Same Presentation with Python
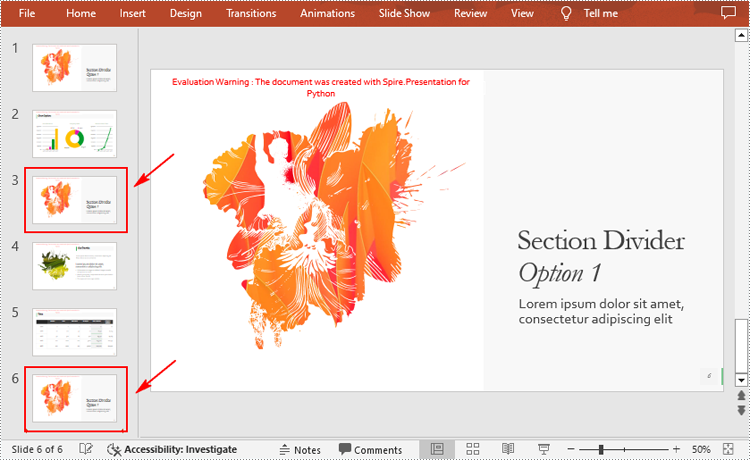
You can clone a slide either at a specified location or at the end of a PowerPoint presentation through the Presentation.Slides.Insert(Index: int, slide: ISlide) or Presentation.Slides.AppendBySlide(slide: ISlide) methods. The following are the detailed steps.
- Create a Presentation instance.
- Load a PowerPoint presentation using Presentation.LoadFromFile() method.
- Get a specified slide using Prenstion.Slides[] property.
- Clone the slide to the end of the same presentation using Presentation.Slides.AppendBySlide() method.
- Clone the slide to a specific position within the same presentation using Presentation.Slides.Insert() method.
- Save the result file using Presentation.SaveToFile() method.
- Python
from spire.presentation.common import *
from spire.presentation import *

inputFile ="Input1.pptx"
outputFile ="CloneSlidesWithinTheSame.pptx"

# Create a Presentation instance
ppt = Presentation()

#Load a PowerPoint presentation
ppt.LoadFromFile(inputFile)

# Get the first slide in the presentation
slide = ppt.Slides[0]

# Clone the slide to the end of the presentation
ppt.Slides.AppendBySlide(slide)

# Clone the slide to the third position within the presentation
ppt.Slides.Insert(2, slide)

# Save the result file
ppt.SaveToFile(outputFile, FileFormat.Pptx2016)
ppt.Dispose()
Copy Slides to Another Presentation with Python
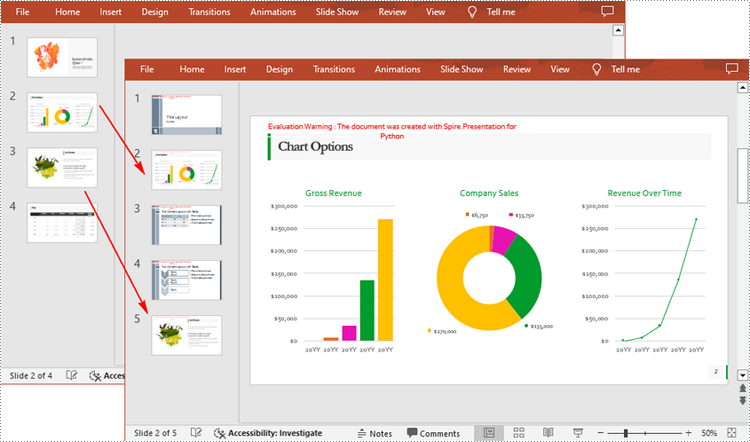
Spire.Presentation for Python also allows you to load two PowerPoint files and then clone the slides from one presentation to another presentation. The following are the detailed steps.
- Create a Presentation instance.
- Load two PowerPoint presentations using Presentation.LoadFromFile() method.
- Get two slides in the first presentation using Prenstion.Slides[] property.
- Clone the first slide to a specific position in the second presentation using Presentation.Slides.Insert() method.
- Clone the second slide to the end of the second presentation using Presentation.Slides.AppendBySlide() method.
- Save the result file using Presentation.SaveToFile() method.
- Python
from spire.presentation.common import *
from spire.presentation import *

inputFile_1 = "Input1.pptx"
inputFile_2 = "Input2.pptx"
outputFile ="CloneSlidesToAnother.pptx"

# Load the first PowerPoint presentation
sourcePPT = Presentation()
sourcePPT.LoadFromFile(inputFile_1)

# Load the second PowerPoint presentation
destPPT = Presentation()
destPPT.LoadFromFile(inputFile_2)

# Get two slides in the first presentation
slide1 =sourcePPT.Slides[1]
slide2 =sourcePPT.Slides[2]

# Clone slide1 to the second position in the second presentation
destPPT.Slides.Insert(1, slide1)

# Clone slide2 to the end of the second presentation
destPPT.Slides.AppendBySlide(slide2)

# Save the second presentation
destPPT.SaveToFile(outputFile, FileFormat.Pptx2016)
destPPT.Dispose()
Apply for a Temporary License
If you'd like to remove the evaluation message from the generated documents, or to get rid of the function limitations, please request a 30-day trial license for yourself.
Spire.Presentation 9.8.1 fixes the issues when copying slides
We're glad to announce the release of Spire.Presentation 9.8.1. This version mainly fixes two issues that occurred when copying slides to a new PowerPoint presentation. Check below for more details.
Here is a list of changes made in this release
| Category | ID | Description |
| Bug | SPIREPPT-2547 | Fixes the issue that the application threw the exception "System.ArgumentOutOfRangeException" when copying slides to a new PowerPoint presentation. |
| Bug | SPIREPPT-2549 | Fixes the issue that the message "PowerPoint found a problem with content" prompted when opening the resulting file generated after copying slides to a new PowerPoint presentation. |