Python: Change PDF Version
PDF files have different versions, each with unique features and compatibility standards. Changing the version of a PDF can be important when specific versions are required for compatibility with certain devices, software, or regulatory requirements. For instance, you may need to use an older PDF version when archiving or sharing files with users using older software. This article will introduce how to change the version of a PDF document in Python using Spire.PDF for Python.
Install Spire.PDF for Python
This scenario requires Spire.PDF for Python and plum-dispatch v1.7.4. They can be easily installed in your Windows through the following pip command.
pip install Spire.PDF
If you are unsure how to install, please refer to this tutorial: How to Install Spire.PDF for Python on Windows
Change PDF Version in Python
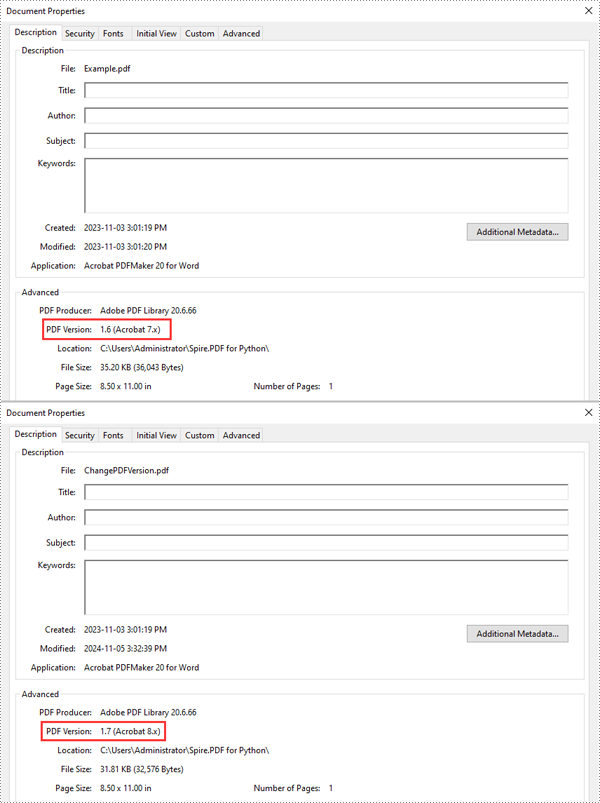
Spire.PDF for Python supports PDF versions ranging from 1.0 to 1.7. To convert a PDF file to a different version, simply set the desired version using the PdfDocument.FileInfo.Version property. The detailed steps are as follows.
- Create an object of the PdfDocument class.
- Load a sample PDF document using the PdfDocument.LoadFromFile() method.
- Change the version of the PDF document to a newer or older version using the PdfDocument.FileInfo.Version property.
- Save the resulting document using the PdfDocument.SaveToFile() method.
- Python
from spire.pdf.common import *
from spire.pdf import *

# Create an object of the PdfDocument class
pdf = PdfDocument()
# Load a PDF document
pdf.LoadFromFile("Example.pdf")

# Change the version of the PDF to version 1.7
pdf.FileInfo.Version = PdfVersion.Version1_7

# Save the resulting document
pdf.SaveToFile("ChangePDFVersion.pdf")
pdf.Close()
Apply for a Temporary License
If you'd like to remove the evaluation message from the generated documents, or to get rid of the function limitations, please request a 30-day trial license for yourself.
Python: Set Viewer Preferences of PDF Documents
Setting view preferences in PDF documents is a crucial feature that can significantly enhance user experience. By configuring options like page layout, display mode, and zoom level, you ensure recipients view the document as intended, without manual adjustments. This is especially useful for business reports, design plans, or educational materials, where consistent presentation is crucial for effectively delivering information and leaving a professional impression. This article will show how to set view preferences of PDF documents with Python code using Spire.PDF for Python.
Install Spire.PDF for Python
This scenario requires Spire.PDF for Python and plum-dispatch v1.7.4. They can be easily installed in your Windows through the following pip command.
pip install Spire.PDF
If you are unsure how to install, please refer to: How to Install Spire.PDF for Python on Windows
Set PDF Viewer Preferences with Python
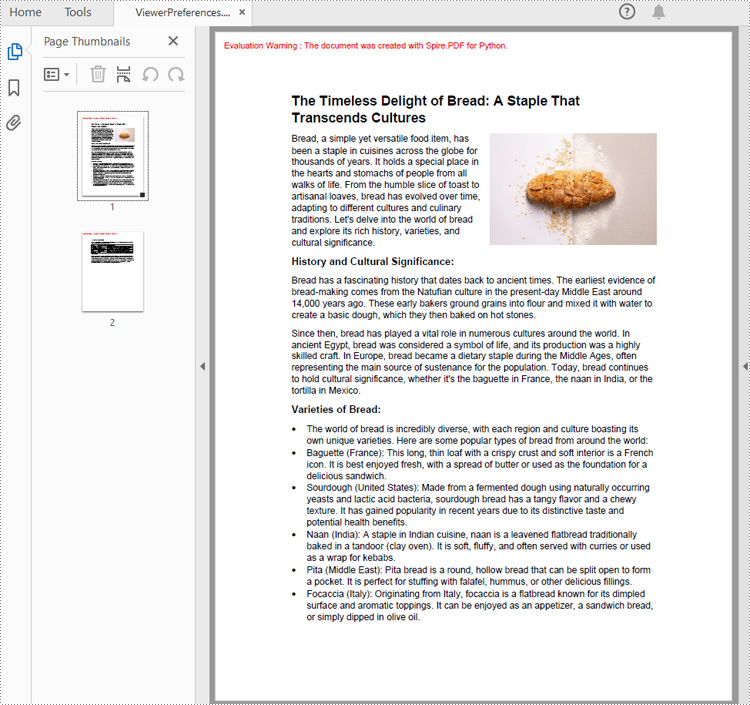
Viewer preferences allow document creators to define how a PDF document is displayed when opened, including page layout, window layout, and display mode. Developers can use the properties under ViewerPreferences class to set those display options. The detailed steps are as follows:
- Create a PdfDocument object.
- Load a PDF document using PdfDocument.LoadFromFile() method.
- Get the ViewerPreferences through using PdfDocument.ViewerPreferences property.
- Set the viewer preferences using properties under ViewerPreferences class.
- Save the document using PdfDocument.SaveToFile() method.
- Python
from spire.pdf import *

# Create a PdfDocument object
pdf = PdfDocument()

# Load a PDF file
pdf.LoadFromFile("Sample.pdf")

# Get the viewer preferences
preferences = pdf.ViewerPreferences

# Set the viewer preferences
preferences.FitWindow = True
preferences.CenterWindow = True
preferences.HideMenubar = True
preferences.HideToolbar = True
preferences.DisplayTitle = True
preferences.HideWindowUI = True
preferences.PageLayout = PdfPageLayout.SinglePage
preferences.BookMarkExpandOrCollapse = True
preferences.PrintScaling = PrintScalingMode.AppDefault
preferences.PageMode = PdfPageMode.UseThumbs

# Save the document
pdf.SaveToFile("output/ViewerPreferences.pdf")
pdf.Close()
Set the Opening Page and Zoom Level with Python
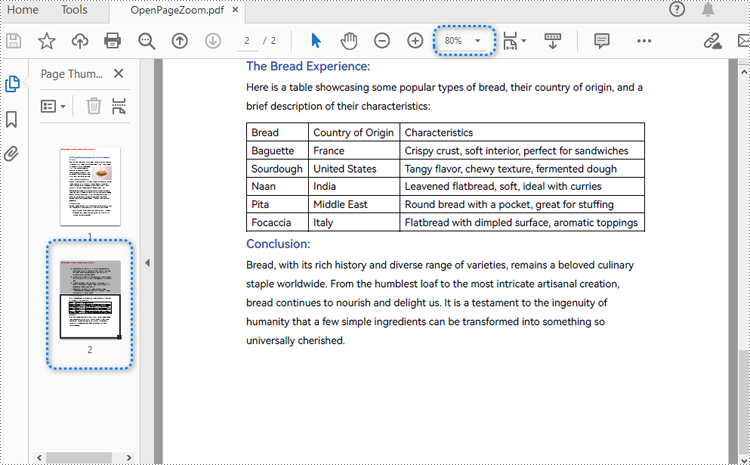
By creating PDF actions and setting them to be executed when the document is opened, developers can configure additional viewer preferences, such as the initial page display and zoom level. Here are the steps to follow:
- Create a PdfDocument object.
- Load a PDF document using PdfDocument.LoadFromFile() method.
- Get a page using PdfDocument.Pages.get_Item() method.
- Create a PdfDestination object and set the location and zoom factor of the destination.
- Create a PdfGoToAction object using the destination.
- Set the action as the document open action through PdfDocument.AfterOpenAction property.
- Save the document using PdfDocument.SaveToFile() method.
- Python
from spire.pdf import *

# Create a PdfDocument object
pdf = PdfDocument()

# Load a PDF file
pdf.LoadFromFile("Sample1.pdf")

# Get the second page
page = pdf.Pages.get_Item(1)

# Create a PdfDestination object
dest = PdfDestination(page)
# Set the location and zoom factor of the destination
dest.Mode = PdfDestinationMode.Location
dest.Location = PointF(0.0, page.Size.Height / 2)
dest.Zoom = 0.8

# Create a PdfGoToAction object
action = PdfGoToAction(dest)

# Set the action as the document open action
pdf.AfterOpenAction = action

# Save the document
pdf.SaveToFile("output/OpenPageZoom.pdf")
pdf.Close()
Apply for a Temporary License
If you'd like to remove the evaluation message from the generated documents, or to get rid of the function limitations, please request a 30-day trial license for yourself.
Python: Create Actions in PDF Documents
One powerful feature that enhances the interactivity and utility of PDF documents is the actions in these documents. By embedding actions such as document jumping, navigation controls, or even media playing, users can transform static documents into dynamic tools that streamline workflows, improve user engagement, and automate routine tasks, making the use of PDFs more efficient and versatile than ever before. This article will show how to use Spire.PDF for Python to create actions in PDF documents with Python code effortlessly.
- Create a Navigation Action in PDF with Python
- Create a Sound Action in PDF with Python
- Create a File Open Action in PDF with Python
Install Spire.PDF for Python
This scenario requires Spire.PDF for Python and plum-dispatch v1.7.4. They can be easily installed in your Windows through the following pip command.
pip install Spire.PDF
If you are unsure how to install, please refer to: How to Install Spire.PDF for Python on Windows
Create a Navigation Action in PDF with Python
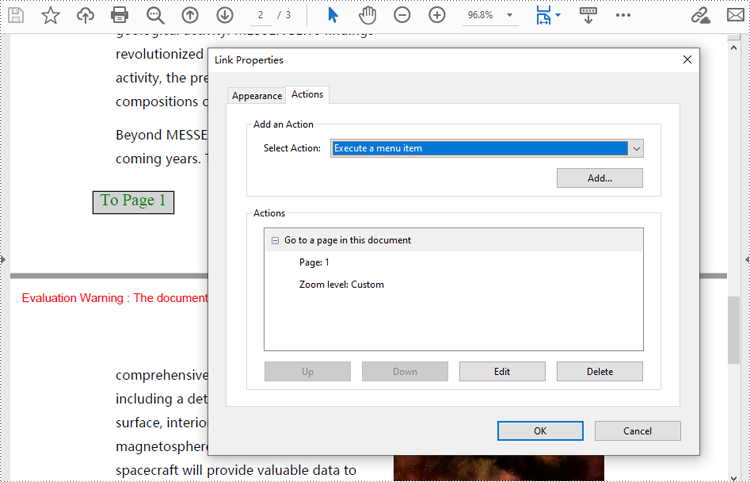
A navigation button is an action that allows users to jump to a specified position on a designated page within a document. Developers can create a PdfDestination object, use it to create a PdfGoToAction, and then create an annotation based on this object and add it to the page to complete the creation of the navigation button. The following are the detailed steps:
- Create an object of PdfDocument class and load a PDF document using PdfDocument.LoadFromFile() method.
- Create a PdfDestination object and set its property.
- Create a PdfGoToAction object based on the destination.
- Draw a rectangle on a page using PdfPageBase.Canvas.DrawRectangle() method.
- Create a PdfActionAnnotation object based on the action and add it to the page using PdfPageBase.Annotations.Add() method.
- Save the document using PdfDocument.SaveToFile() method.
- Python
from spire.pdf import *

# Create an instance of PdfDocument class and load a PDF document
pdf = PdfDocument()
pdf.LoadFromFile("Sample.pdf")

# Create a PdfDestination instance and set its properties
destination = PdfDestination(pdf.Pages[0])
destination.Location = PointF(0.0, 0.0)
destination.Mode = PdfDestinationMode.Location
destination.Zoom = 0.8

# Create a rectangle
rect = RectangleF.FromLTRB(70, pdf.PageSettings.Size.Height - 120, 140, pdf.PageSettings.Size.Height - 100)

# Create a PdfGoToAction instance
action = PdfGoToAction(destination)

# Draw a rectangle on the second page
pdf.Pages.get_Item(1).Canvas.DrawRectangle(PdfBrushes.get_LightGray(), rect)

# Draw text of the button
font = PdfFont(PdfFontFamily.TimesRoman, 14.0)
stringFormat = PdfStringFormat(PdfTextAlignment.Center)
pdf.Pages.get_Item(1).Canvas.DrawString("To Page 1", font, PdfBrushes.get_Green(), rect, stringFormat)

# Create a PdfActionAnnotation instance
annotation = PdfActionAnnotation(rect, action)

# Add the annotation to the second page
pdf.Pages.get_Item(1).Annotations.Add(annotation)

# Save the document
pdf.SaveToFile("output/AddPDFNavigationButton.pdf")
pdf.Close()
Create a Sound Action in PDF with Python
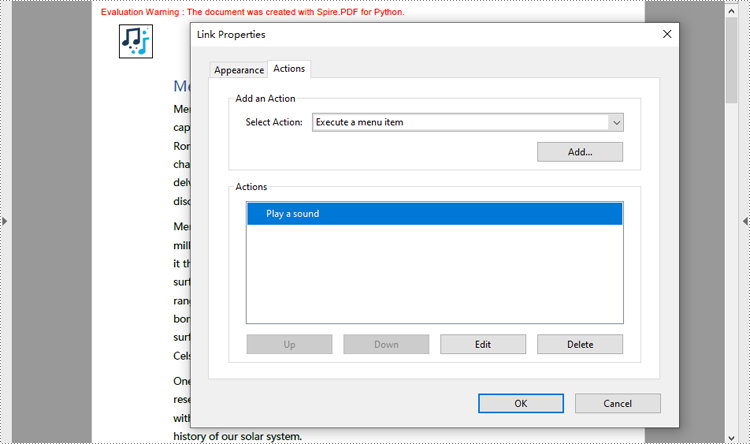
Developers can embed audio as actions in PDF documents, which allows the audio to play when the user performs a specified action, such as playing when the file opens or when a button is clicked. The following are the steps for creating a sound action:
- Create an instance of PdfDocument class.
- Load a PDF document using PdfDocument.LoadFromFile() method.
- Create an instance of PdfSoundAction class with an audio file.
- Set the audio parameters through properties under PdfSound class.
- Set the playing parameters through properties under PdfSoundAction class.
- Get a page using PdfDocument.Pgaes.get_Item(() method.
- Draw an image on the page using PdfPageBase.Canvas.Draw() method.
- Create a PdfActionAnnotation object with the sound action at the location of the image.
- Add the annotation to the page
- Or you can only set the sound action as the action performed after the document is opened through PdfDocument.AfterOpenAction property. This doesn’t need to add it as an annotation on a PDF page.
- Save the document using PdfDocument.SaveToFile() method.
- Python
from spire.pdf import *

# Create a PdfDocument instance and load a PDF file
pdf = PdfDocument()
pdf.LoadFromFile("Sample.pdf")

# Get the first page of the document
page = pdf.Pages.get_Item(0)

# Create an instance of PdfSoundAction with the sound file path
soundAction = PdfSoundAction("Wave.wav")

# Set the audio parameters
soundAction.Sound.Bits = 16
soundAction.Sound.Channels = PdfSoundChannels.Stereo
soundAction.Sound.Encoding = PdfSoundEncoding.Signed
soundAction.Sound.Rate = 44100

# Set the playing parameters
soundAction.Volume = 0.5
soundAction.Repeat = True
soundAction.Mix = True
soundAction.Synchronous = False

# Draw an image on the page
image = PdfImage.FromFile("Sound.png")
page.Canvas.DrawImage(image, PointF(30.0, 30.0))

# Create an instance of PdfActionAnnotation with the sound action
rect = RectangleF.FromLTRB(30.0, 30.0, image.GetBounds().Width + 30.0, image.GetBounds().Height + 30.0)
annotation = PdfActionAnnotation(rect, soundAction)

# Add the annotation to the page
page.Annotations.Add(annotation)

# Set the sound action to play after the document is opened
# pdf.AfterOpenAction = soundAction

# Save the document
pdf.SaveToFile("output/AddMusicPDF.pdf")
pdf.Close()
Create a File Open Action in PDF with Python
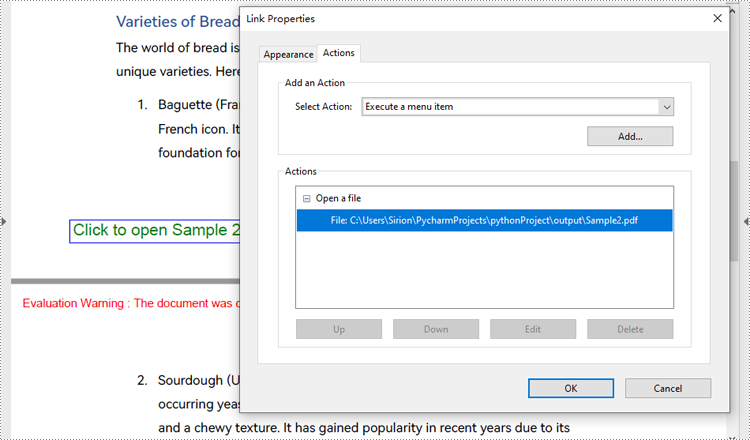
The PdfLaunchAction class represents a file open action in PDF that allows users to open the corresponding file by clicking on a button on a PDF page. Developers can specify the absolute or relative path of the file to be opened and whether to open in a new window when creating a file open action. The detailed steps for creating a file open action in a PDF document are as follows:
- Create an object of PdfDocument class and load a PDF document using PdfDocument.LoadFromFile() method.
- Get a page of the document using PdfDocument.Pages.get_Item() method.
- Draw a rectangle on the page using PdfPageBase.Canvas.DrawRectangle() method.
- Create an object of PdfLaunchAction class and specify the file path and path type.
- Set the opening mode to new window through PdfLaunchAction.IsNewWindow property.
- Create an object of PdfActionAnnotation class based on the action and set its color through PdfActionAnnotation.Color property.
- Add the annotation to the page using PdfPageBase.Annotations.Add() method.
- Save the document using PdfDocument.SaveToFile() method.
- Python
from spire.pdf import *

# Create an instance of PdfDocument class
pdf = PdfDocument()

# Load a PDF file
pdf.LoadFromFile("Sample.pdf")

# Get the first page of the document
page = pdf.Pages.get_Item(0)

# Draw a rectangle on the page
rect = RectangleF.FromLTRB(50, pdf.PageSettings.Size.Height - 100, 200, pdf.PageSettings.Size.Height - 80)
page.Canvas.DrawRectangle(PdfPens.get_LightGray(), rect)

# Draw text in the rectangle
page.Canvas.DrawString("Click to open Sample 2", PdfFont(PdfFontFamily.Helvetica, 14.0), PdfBrushes.get_Green(), rect, PdfStringFormat(PdfTextAlignment.Center))

# Create a PdfLaunchAction object
action = PdfLaunchAction("Sample2.pdf", PdfFilePathType.Relative)
action.IsNewWindow = True

# Create a PdfActionAnnotation object based on the action
annotation = PdfActionAnnotation(rect, action)
annotation.Color = PdfRGBColor(Color.get_Blue())

# Add the annotation to the page
page.Annotations.Add(annotation)

# Save the document
pdf.SaveToFile("output/CreatePDFLaunchAction.pdf")
pdf.Close()
Apply for a Temporary License
If you'd like to remove the evaluation message from the generated documents, or to get rid of the function limitations, please request a 30-day trial license for yourself.
Python: Add Barcodes to PDF
Barcodes in PDFs can facilitate quicker data retrieval and processing. You can add barcodes to PDF files that contain detailed information such as the document's unique identifier, version number, creator, or even the entire document content. When scanned, all information is decoded immediately. This instant access is invaluable for businesses dealing with large volumes of documents, as it minimizes the time and effort required for manual searching and data entry. In this article, you will learn how to add barcodes to PDF in Python using Spire.PDF for Python and Spire.Barcode for Python.
Install Spire.PDF for Python
This scenario requires Spire.PDF for Python and Spire.Barcode for Python. They can be easily installed in your Windows through the following pip command.
pip install Spire.PDF
pip install Spire.Barcode
If you are unsure how to install, please refer to this tutorial: How to Install Spire.PDF for Python on Windows
Add Barcodes to PDF in Python
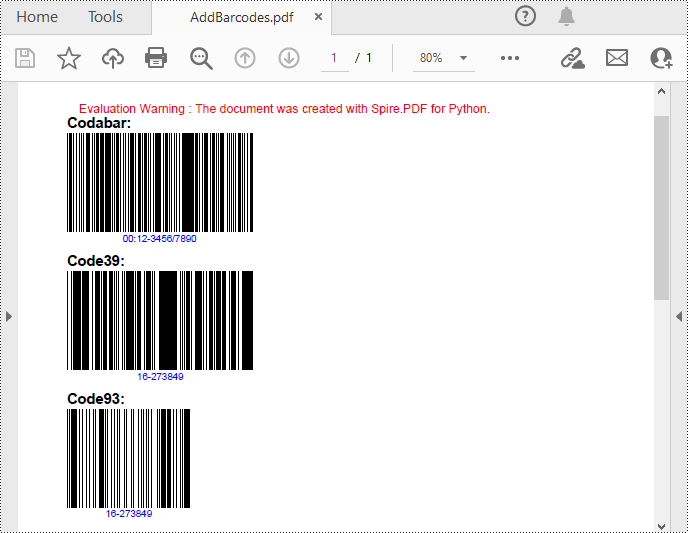
Spire.PDF for Python support several 1D barcode types represented by different classes, such as PdfCodabarBarcode, PdfCode11Barcode, PdfCode32Barcode, PdfCode39Barcode, PdfCode93Barcode.
Each class provides corresponding properties for setting the barcode text, size, color, etc. The following are the steps to draw the common Codabar, Code39 and Code93 barcodes at the specified locations on a PDF page.
- Create a PdfDocument object.
- Add a PDF page using PdfDocument.Pages.Add() method.
- Create a PdfTextWidget object and draw text on the page using PdfTextWidget.Draw() method.
- Create PdfCodabarBarcode, PdfCode39Barcode, PdfCode93Barcode objects.
- Set the gap between the barcode and the displayed text through the BarcodeToTextGapHeight property of the corresponding classes.
- Sets the barcode text display location through the TextDisplayLocation property of the corresponding classes.
- Set the barcode text color through the TextColor property of the corresponding classes.
- Draw the barcodes at specified locations on the PDF page using the Draw(page: PdfPageBase, location: PointF) method of the corresponding classes.
- Save the result PDF file using PdfDocument.SaveToFile() method.
- Python
from spire.pdf.common import *
from spire.pdf import *

# Create a PDF document
pdf = PdfDocument()

# Add a page
page = pdf.Pages.Add(PdfPageSize.A4())

# Initialize y-coordinate
y = 20.0

# Create a true type font
font = PdfTrueTypeFont("Arial", 12.0, PdfFontStyle.Bold, True)

# Draw text on the page
text = PdfTextWidget()
text.Font = font
text.Text = "Codabar:"
result = text.Draw(page, 0.0, y)
page = result.Page
y = result.Bounds.Bottom + 2

# Draw Codabar barcode on the page
Codabar = PdfCodabarBarcode("00:12-3456/7890")
Codabar.BarcodeToTextGapHeight = 1.0
Codabar.EnableCheckDigit = True
Codabar.ShowCheckDigit = True
Codabar.TextDisplayLocation = TextLocation.Bottom
Codabar.TextColor = PdfRGBColor(Color.get_Blue())
Codabar.Draw(page, PointF(0.0, y))
y = Codabar.Bounds.Bottom + 6

# Draw text on the page
text.Text = "Code39:"
result = text.Draw(page, 0.0, y)
page = result.Page
y = result.Bounds.Bottom + 2

# Draw Code39 barcode on the page
Code39 = PdfCode39Barcode("16-273849")
Code39.BarcodeToTextGapHeight = 1.0
Code39.TextDisplayLocation = TextLocation.Bottom
Code39.TextColor = PdfRGBColor(Color.get_Blue())
Code39.Draw(page, PointF(0.0, y))
y = Code39.Bounds.Bottom + 6

# Draw text on the page
text.Text = "Code93:"
result = text.Draw(page, 0.0, y)
page = result.Page
y = result.Bounds.Bottom + 2

# Draw Code93 barcode on the page
Code93 = PdfCode93Barcode("16-273849")
Code93.BarcodeToTextGapHeight = 1.0
Code93.TextDisplayLocation = TextLocation.Bottom
Code93.TextColor = PdfRGBColor(Color.get_Blue())
Code93.QuietZone.Bottom = 5.0
Code93.Draw(page, PointF(0.0, y))

# Save the document
pdf.SaveToFile("AddBarcodes.pdf")
pdf.Close()
Add QR Codes to PDF in Python
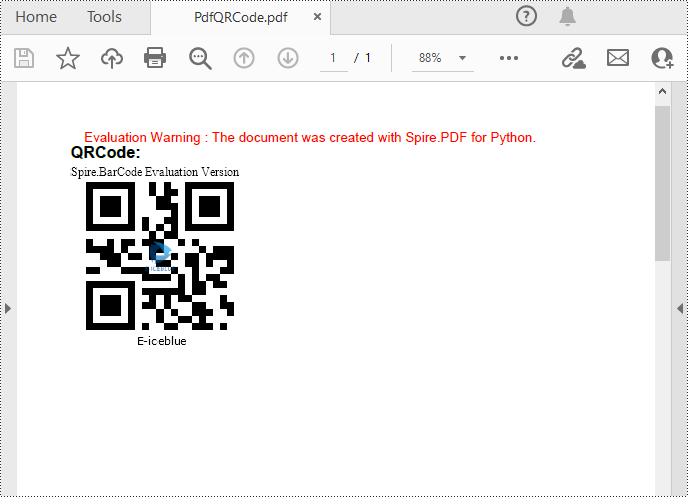
To add 2D barcodes to a PDF file, the Spire.Barcode for Python library is required to generate QR code first, and then you can add the QR code image to the PDF file with the Spire.PDF for Python library. The following are the detailed steps.
- Create a PdfDocument object.
- Add a PDF page using PdfDocument.Pages.Add() method.
- Create a BarcodeSettings object.
- Call the corresponding properties of the BarcodeSettings class to set the barcode type, data, error correction level and width, etc.
- Create a BarCodeGenerator object based on the settings.
- Generate QR code image using BarCodeGenerator.GenerateImage() method.
- Save the QR code image to a PNG file.
- Draw the QR code image at a specified location on the PDF page using PdfPageBase.Canvas.DrawImage() method.
- Save the result PDF file using PdfDocument.SaveToFile() method.
- Python
from spire.pdf.common import *
from spire.pdf import *
from spire.barcode import *

# Create a PdfDocument instance
pdf = PdfDocument()
# Add a page
page = pdf.Pages.Add()

# Create a BarcodeSettings object
settings = BarcodeSettings()

# Set the barcode type to QR code
settings.Type = BarCodeType.QRCode
# Set the data of the QR code
settings.Data = "E-iceblue"
settings.Data2D = "E-iceblue"
# Set the width of the QR code
settings.X = 2
# Set the error correction level of the QR code
settings.QRCodeECL = QRCodeECL.M
# Set to show QR code text at the bottom
settings.ShowTextOnBottom = True

# Generate QR code image based on the settings
barCodeGenerator = BarCodeGenerator(settings)
QRimage = barCodeGenerator.GenerateImage()

# Save the QR code image to a .png file
with open("QRCode.png", "wb") as file:
    file.write(QRimage)

# Initialize y-coordinate
y = 20.0

# Create a true type font
font = PdfTrueTypeFont("Arial", 12.0, PdfFontStyle.Bold, True)

# Draw text on the PDF page
text = PdfTextWidget()
text.Font = font
text.Text = "QRCode:"
result = text.Draw(page, 0.0, y)
page = result.Page
y = result.Bounds.Bottom + 2

# Draw QR code image on the PDF page
pdfImage = PdfImage.FromFile("QRCode.png")
page.Canvas.DrawImage(pdfImage, 0.0, y)

# Save the document
pdf.SaveToFile("PdfQRCode.pdf")
pdf.Close()
Apply for a Temporary License
If you'd like to remove the evaluation message from the generated documents, or to get rid of the function limitations, please request a 30-day trial license for yourself.
Python: Compare Two PDF Documents for Differences
Comparing PDF documents is a common task when collaborating on projects or tracking changes. This allows users to quickly review and understand what has been modified, added, or removed between revisions. Effective PDF comparison streamlines the review process and ensures all stakeholders are aligned on the latest document content.
In this article, you will learn how to compare two PDF documents using Python and the Spire.PDF for Python library.
Install Spire.PDF for Python
This scenario requires Spire.PDF for Python and plum-dispatch v1.7.4. They can be easily installed in your Windows through the following pip command.
pip install Spire.PDF
If you are unsure how to install, please refer to this tutorial: How to Install Spire.PDF for Python on Windows
Compare Two PDF Documents in Python
Spire.PDF for Python provides the PdfComparer.Compare() method allowing developers to compare two PDF documents and save the comparison result to another PDF document. Here are the detailed steps.
- Load the first PDF document while initializing the PdfDocument object.
- Load the second PDF document while initializing another PdfDocument object.
- Initialize an instance of PdfComparer class, passing the two PdfDocument objects are the parameter.
- Call Compare() method of the PdfComparer object to compare the two PDF documents and save the result to a different PDF document.
- Python
from spire.pdf.common import *
from spire.pdf import *

# Load the first document
doc_one = PdfDocument("C:\\Users\\Administrator\\Desktop\\PDF_ONE.pdf")

# Load the section document
doc_two = PdfDocument("C:\\Users\\Administrator\\Desktop\\PDF_TWO.pdf")

# Create a PdfComparer object
comparer = PdfComparer(doc_two, doc_one)

# Compare two documents and save the comparison result in a pdf document
comparer.Compare("output/CompareResult.pdf")

# Dispose resources
doc_one.Dispose()
doc_two.Dispose()

Compare Selected Pages in PDF Documents in Python
Instead of comparing two entire documents, you can specify the pages to compare using the PdfComparer.PdfCompareOptions.SetPageRanges() method. The following are the detailed steps.
- Load the first PDF document while initializing the PdfDocument object.
- Load the second PDF document while initializing another PdfDocument object.
- Initialize an instance of PdfComparer class, passing the two PdfDocument objects are the parameter.
- Specify the page range to compare using PdfComparer.PdfCompareOptions.SetPageRanges() method
- Call PdfComparer.Compare() method to compare the selected pages and save the result to a different PDF document.
- Python
from spire.pdf.common import *
from spire.pdf import *

# Load the first document
doc_one = PdfDocument("C:\\Users\\Administrator\\Desktop\\PDF_ONE.pdf")

# Load the section document
doc_two = PdfDocument("C:\\Users\\Administrator\\Desktop\\PDF_TWO.pdf")

# Create a PdfComparer object
comparer = PdfComparer(doc_two, doc_one)

# Set page range for comparison
comparer.PdfCompareOptions.SetPageRanges(1, 3, 1, 3)

# Compare the selected pages and save the comparison result in a pdf document
comparer.Compare("output/CompareResult.pdf")

# Dispose resources
doc_one.Dispose()
doc_two.Dispose()
Apply for a Temporary License
If you'd like to remove the evaluation message from the generated documents, or to get rid of the function limitations, please request a 30-day trial license for yourself.
Python: Compress PDF Documents
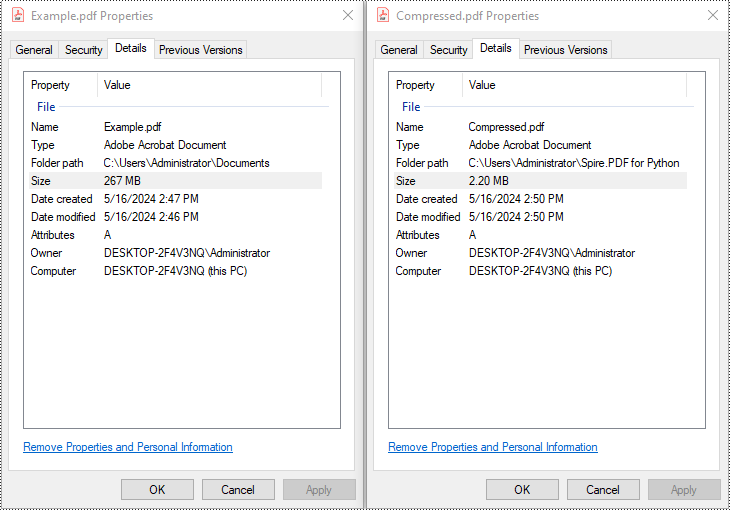
PDF has become the standard for sharing documents across various platforms and devices. However, large PDF files can be cumbersome to share, especially when dealing with limited storage space or slow internet connections. Compressing PDF files is an essential skill to optimize file size and ensure seamless document distribution. In this article, we will demonstrate how to compress PDF documents in Python using Spire.PDF for Python.
Install Spire.PDF for Python
This scenario requires Spire.PDF for Python. It can be easily installed in your Windows through the following pip command.
pip install Spire.PDF
If you are unsure how to install, please refer to this tutorial: How to Install Spire.PDF for Python on Windows
Compress PDF Documents in Python
PDF files are often large when they include high-resolution images or embedded fonts. To reduce the size of PDF files, consider compressing the images and fonts contained within them. The following steps explain how to compress PDF documents by compressing fonts and images using Spire.PDF for Python:
- Create a PdfCompressor object to compress a specified PDF file at a given path.
- Get the OptimizationOptions object using PdfCompressor.OptimizationOptions property.
- Enable font compression using OptimizationOptions.SetIsCompressFonts(True) method.
- Set image quality using OptimizationOptions.SetImageQuality(imageQuality:ImageQuality) method.
- Enable image resizing using OptimizationOptions.SetResizeImages(True) method.
- Enable image compression using OptimizationOptions.SetIsCompressImage(True) method.
- Compress the PDF file and save the compressed version to a new file using PdfCompressor.CompressToFile() method.
- Python
from spire.pdf.common import *
from spire.pdf import *

 # Create a PdfCompressor object to compress the specified PDF file at the given path
compressor = PdfCompressor("C:/Users/Administrator/Documents/Example.pdf")

# Get the OptimizationOptions object
compression_options = compressor.OptimizationOptions

# Enable font compression
compression_options.SetIsCompressFonts(True)
# Enable font unembedding
# compression_options.SetIsUnembedFonts(True)

# Set image quality
compression_options.SetImageQuality(ImageQuality.Medium)
# Enable image resizing
compression_options.SetResizeImages(True)
# Enable image compression
compression_options.SetIsCompressImage(True)

# Compress the PDF file and save the compressed version to a new file
compressor.CompressToFile("Compressed.pdf")
Apply for a Temporary License
If you'd like to remove the evaluation message from the generated documents, or to get rid of the function limitations, please request a 30-day trial license for yourself.
Python: Extract Tables from PDF
Tables in PDFs often contain valuable data that may need to be analyzed, processed, or visualized. Extracting tables from PDFs enables you to import the data into spreadsheet software or data analysis tools, where you can perform calculations, generate charts, apply statistical analysis, and gain insights from the information. In this article, we will demonstrate how to extract tables from PDF in Python using Spire.PDF for Python and Spire.XLS for Python.
Install Spire.PDF for Python
This scenario requires Spire.PDF for Python and Spire.XLS for Python. Spire.PDF is responsible for extracting data from PDF tables, and Spire.XLS is responsible for creating an Excel document based on the data obtained from PDF.
Spire.PDF for Python and Spire.XLS for Python can be easily installed in your Windows through the following pip commands.
pip install Spire.PDF
pip install Spire.XLS
If you are unsure how to install, please refer to these tutorials:
Extract Tables from PDF in Python
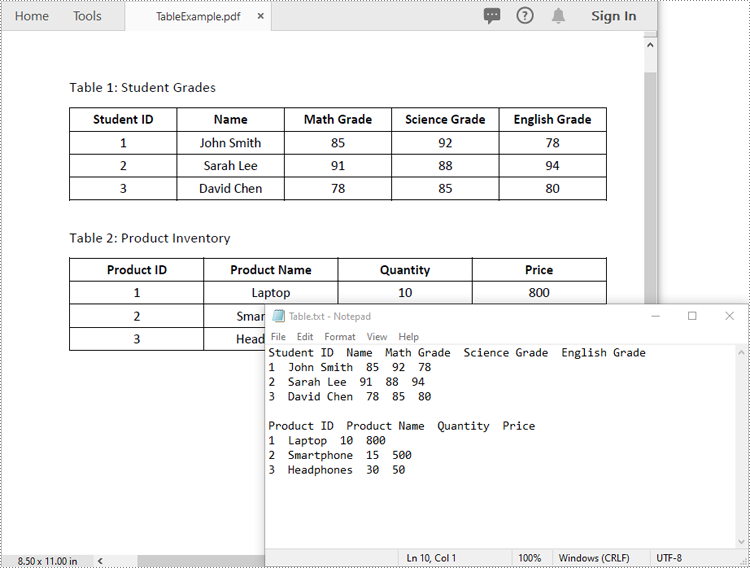
Spire.PDF for Python offers the PdfTableExtractor.ExtractTable(pageIndex) method to extract tables from a page in a searchable PDF document. After the tables are extracted, you can loop through the rows and columns in each table and then get the text contained within each table cell using the PdfTable.GetText(rowIndex, columnIndex) method. The detailed steps are as follows:
- Create an instance of PdfDocument class.
- Load a sample PDF document using PdfDocument.LoadFromFile() method.
- Loop through the pages in the PDF document.
- Extract tables from the pages using PdfTableExtractor.ExtractTable() method.
- Loop through the extracted tables.
- Get the text of the cells in the tables using PdfTable.GetText() method and save them to a list.
- Write the content of the list into a .txt file.
- Python
from spire.pdf.common import *
from spire.pdf import *

# Create a PdfDocument object
doc = PdfDocument()
# Load the sample PDF file
doc.LoadFromFile("TableExample.pdf")

# Create a list to store the extracted data
builder = []

# Create a PdfTableExtractor object
extractor = PdfTableExtractor(doc)

# Loop through the pages
for pageIndex in range(doc.Pages.Count):
    # Extract tables from a specific page
    tableList = extractor.ExtractTable(pageIndex)

    # Determine if the table list is not empty
    if tableList is not None and len(tableList) > 0:
        # Loop through the tables in the list
        for table in tableList:
            # Get row number and column number of a certain table
            row = table.GetRowCount()
            column = table.GetColumnCount()

            # Loop through the row and column
            for i in range(row):
                for j in range(column):
                    # Get text from the specific cell
                    text = table.GetText(i, j)

                    # Add the text to the list
                    builder.append(text + " ")
                builder.append("\n")
            builder.append("\n")

# Write the content of the list into a text file
with open("Table.txt", "w", encoding="utf-8") as file:
    file.write("".join(builder))
Extract Tables from PDF to Excel in Python
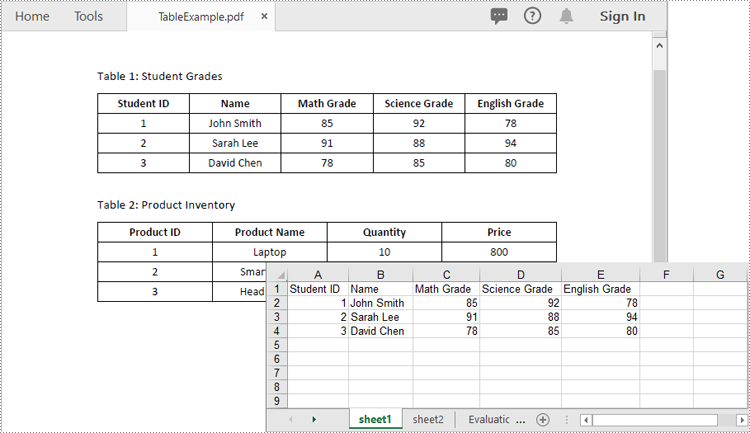
After you get the text of each table cell, you can write it into an Excel worksheet for further analysis by using the Worksheet.Range[rowIndex, columnIndex].Value property offered by Spire.XLS for Python. The detailed steps are as follows:
- Create an instance of PdfDocument class.
- Load a sample PDF document using PdfDocument.LoadFromFile() method.
- Create an instance of Workbook class and clear the default worksheets in it.
- Loop through the pages in the PDF document.
- Extract tables from the pages using PdfTableExtractor.ExtractTable() method.
- Loop through the extracted tables.
- For each table, add a worksheet to the workbook using Workbook.Worksheets.Add() method.
- Get the text of the cells in the table using PdfTable.GetText() method.
- Write the text to specific cells in the worksheet using Worksheet.Range[rowIndex, columnIndex].Value property.
- Save the resultant workbook to an Excel file using Workbook.SaveToFile() method.
- Python
from spire.pdf import *
from spire.xls import *

# Create a PdfDocument object
doc = PdfDocument()

# Load the sample PDF file
doc.LoadFromFile("TableExample.pdf")

# Create a Workbook object
workbook = Workbook()

# Clear default worksheets
workbook.Worksheets.Clear()

# Create a PdfTableExtractor object
extractor = PdfTableExtractor(doc)

sheetNumber = 1

# Loop through the pages
for pageIndex in range(doc.Pages.Count):
    # Extract tables from a specific page
    tableList = extractor.ExtractTable(pageIndex)

    # Determine if the table list is not empty
    if tableList is not None and len(tableList) > 0:
        # Loop through the tables in the list
        for table in tableList:
            # Add a worksheet
            sheet = workbook.Worksheets.Add(f"sheet{sheetNumber}")

            # Get row number and column number of a certain table
            row = table.GetRowCount()
            column = table.GetColumnCount()

            # Loop through the rows and columns
            for i in range(row):
                for j in range(column):
                    # Get text from the specific cell
                    text = table.GetText(i, j)

                    # Write text to a specified cell
                    sheet.Range[i + 1, j + 1].Value = text

            # Auto-fit columns
            sheet.AllocatedRange.AutoFitColumns()

            sheetNumber += 1

# Save to file
workbook.SaveToFile("ToExcel.xlsx", ExcelVersion.Version2013)
Apply for a Temporary License
If you'd like to remove the evaluation message from the generated documents, or to get rid of the function limitations, please request a 30-day trial license for yourself.
Python: Draw Shapes in PDF Documents
Shapes play a vital role in PDF documents. By drawing graphics, defining outlines, filling colors, setting border styles, and applying geometric transformations, shapes provide rich visual effects and design options for documents. The properties of shapes such as color, line type, and fill effects can be customized according to requirements to meet personalized design needs. They can be used to create charts, decorations, logos, and other elements that enhance the readability and appeal of the document. This article will introduce how to use Spire.PDF for Python to draw shapes into PDF documents from Python.
- Draw Lines in PDF Documents in Python
- Draw Pies in PDF Documents in Python
- Draw Rectangles in PDF Documents in Python
- Draw Ellipses in PDF Documents in Python
Install Spire.PDF for Python
This scenario requires Spire.PDF for Python and plum-dispatch v1.7.4. They can be easily installed in your Windows through the following pip command.
pip install Spire.PDF
If you are unsure how to install, please refer to this tutorial: How to Install Spire.PDF for Python on Windows
Draw Lines in PDF Documents in Python
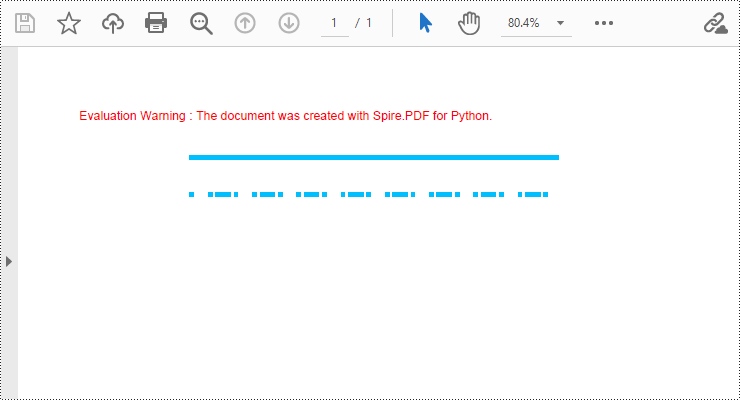
Spire.PDF for Python provides the PdfPageBase.Canvas.DrawLine() method to draw lines by specifying the coordinates of the starting point and end point and a brush object. Here is a detailed step-by-step guide on how to draw lines:
- Create a PdfDocument object.
- Use the PdfDocument.Pages.Add() method to add a blank page to the PDF document.
- Save the current drawing state using the PdfPageBase.Canvas.Save() method so it can be restored later.
- Define the start point coordinate (x, y) and the length of a solid line segment.
- Create a PdfPen object.
- Draw a solid line segment using the PdfPageBase.Canvas.DrawLine() method with the previously created pen object.
- Set the DashStyle property of the pen to PdfDashStyle.Dash to create a dashed line style.
- Draw a dashed line segment using the pen with a dashed line style via the PdfPageBase.Canvas.DrawLine() method.
- Restore the previous drawing state using the PdfPageBase.Canvas.Restore(state) method.
- Save the document to a file using the PdfDocument.SaveToFile() method.
- Python
from spire.pdf.common import *
from spire.pdf import *

# Create PDF Document Object
doc = PdfDocument()

# Add a Page
page = doc.Pages.Add()

# Save the current drawing state
state = page.Canvas.Save()

# The starting X coordinate of the line
x = 100.0

# The starting Y coordinate of the line
y = 50.0

# The length of the line
width = 300.0

# Create a pen object with deep sky blue color and a line width of 3.0
pen = PdfPen(PdfRGBColor(Color.get_DeepSkyBlue()), 3.0)

# Draw a solid line
page.Canvas.DrawLine(pen, x, y, x + width, y)

# Set the pen style to dashed
pen.DashStyle = PdfDashStyle.Dash

# Set the dashed pattern to [1, 4, 1]
pen.DashPattern = [1, 4, 1]

# The Y coordinate for the start of the dashed line
y = 80.0

# Draw a dashed line
page.Canvas.DrawLine(pen, x, y, x + width, y)

# Restore the previously saved drawing state
page.Canvas.Restore(state)

# Save the document to a file
doc.SaveToFile("Drawing Lines.pdf")

# Close the document and release resources
doc.Close()
doc.Dispose()
Draw Pies in PDF Documents in Python
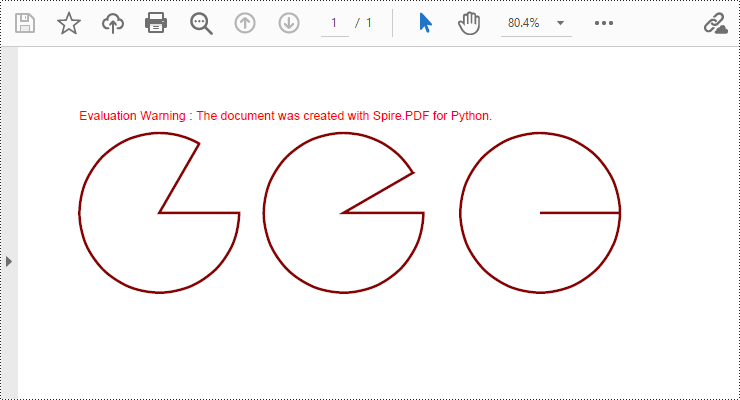
To draw pie charts with different positions, sizes, and angles on a specified page, call the PdfPageBase.Canvas.DrawPie() method and pass appropriate parameters. The detailed steps are as follows:
- Create a PdfDocument object.
- Add a blank page to the PDF document using the PdfDocument.Pages.Add() method.
- Save the current drawing state using the PdfPageBase.Canvas.Save() method so it can be restored later.
- Create a PdfPen object.
- Call the PdfPageBase.Canvas.DrawPie() method and pass various position, size, and angle parameters to draw three pie charts.
- Restore the previous drawing state using the PdfPageBase.Canvas.Restore(state) method.
- Save the document to a file using the PdfDocument.SaveToFile() method.
- Python
from spire.pdf.common import *
from spire.pdf import *

# Create PDF Document Object
doc = PdfDocument()

# Add a Page
page = doc.Pages.Add()

# Save the current drawing state
state = page.Canvas.Save()

# Create a pen object with dark red color and a line width of 2.0
pen = PdfPen(PdfRGBColor(Color.get_DarkRed()), 2.0)

# Draw the first pie chart
page.Canvas.DrawPie(pen, 10.0, 30.0, 130.0, 130.0, 360.0, 300.0)

# Draw the second pie chart
page.Canvas.DrawPie(pen, 160.0, 30.0, 130.0, 130.0, 360.0, 330.0)

# Draw the third pie chart
page.Canvas.DrawPie(pen, 320.0, 30.0, 130.0, 130.0, 360.0, 360.0)

# Restore the previously saved drawing state
page.Canvas.Restore(state)

# Save the document to a file
doc.SaveToFile("Drawing Pie Charts.pdf")

# Close the document and release resources
doc.Close()
doc.Dispose()
Draw Rectangles in PDF Documents in Python
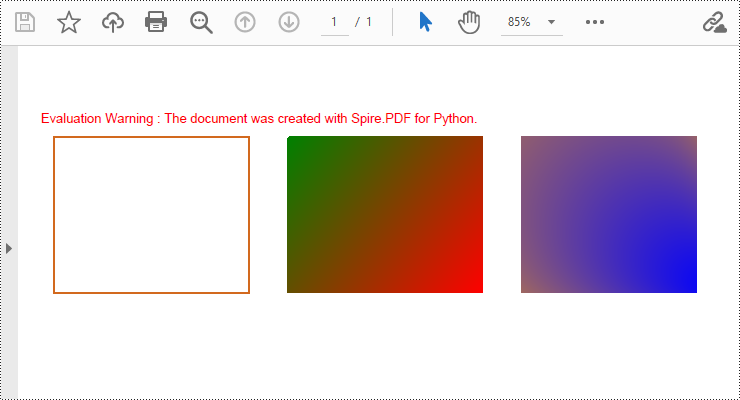
Spire.PDF for Python provides the PdfPageBase.Canvas.DrawRectangle() method to draw rectangular shapes. By passing position and size parameters, you can define the position and dimensions of the rectangle. Here are the detailed steps for drawing a rectangle:
- Create a PdfDocument object.
- Use the PdfDocument.Pages.Add() method to add a blank page to the PDF document.
- Use the PdfPageBase.Canvas.Save() method to save the current drawing state for later restoration.
- Create a PdfPen object.
- Use the PdfPageBase.Canvas.DrawRectangle() method with the pen to draw the outline of a rectangle.
- Create a PdfLinearGradientBrush object for linear gradient filling.
- Use the PdfPageBase.Canvas.DrawRectangle() method with the linear gradient brush to draw a filled rectangle.
- Create a PdfRadialGradientBrush object for radial gradient filling.
- Use the PdfPageBase.Canvas.DrawRectangle() method with the radial gradient brush to draw a filled rectangle.
- Use the PdfPageBase.Canvas.Restore(state) method to restore the previously saved drawing state.
- Use the PdfDocument.SaveToFile() method to save the document to a file.
- Python
from spire.pdf.common import *
from spire.pdf import *

# Create PDF Document Object
doc = PdfDocument()

# Add a Page
page = doc.Pages.Add()

# Save the current drawing state
state = page.Canvas.Save()

# Create a Pen object with chocolate color and line width of 1.5
pen = PdfPen(PdfRGBColor(Color.get_Chocolate()), 1.5)

# Draw the outline of a rectangle using the pen
page.Canvas.DrawRectangle(pen, RectangleF(PointF(20.0, 30.0), SizeF(150.0, 120.0)))

# Create a linear gradient brush
linearGradientBrush = PdfLinearGradientBrush(PointF(200.0, 30.0), PointF(350.0, 150.0), PdfRGBColor(Color.get_Green()), PdfRGBColor(Color.get_Red()))

# Draw a filled rectangle using the linear gradient brush
page.Canvas.DrawRectangle(linearGradientBrush, RectangleF(PointF(200.0, 30.0), SizeF(150.0, 120.0)))

# Create a radial gradient brush
radialGradientBrush = PdfRadialGradientBrush(PointF(380.0, 30.0), 150.0, PointF(530.0, 150.0), 150.0, PdfRGBColor(Color.get_Orange()) , PdfRGBColor(Color.get_Blue()))

# Draw a filled rectangle using the radial gradient brush
page.Canvas.DrawRectangle(radialGradientBrush, RectangleF(PointF(380.0, 30.0), SizeF(150.0, 120.0)))

# Restore the previously saved drawing state
page.Canvas.Restore(state)

# Save the document to a file
doc.SaveToFile("Drawing Rectangle Shapes.pdf")

# Close the document and release resources
doc.Close()
doc.Dispose()
Draw Ellipses in PDF Documents in Python
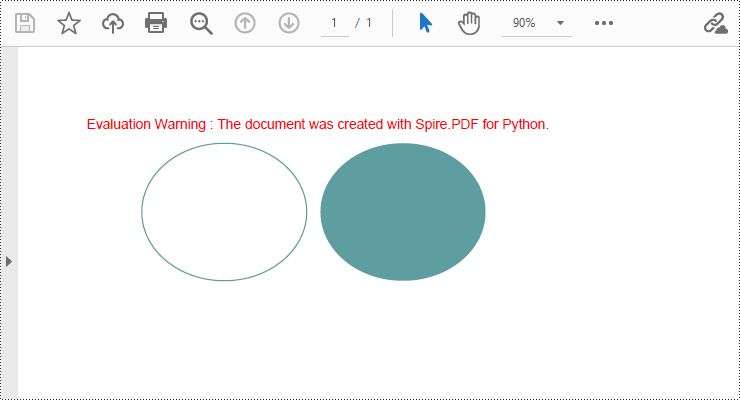
Spire.PDF for Python provides the PdfPageBase.Canvas.DrawEllipse() method to draw elliptical shapes. You can use either a pen or a fill brush to draw ellipses in different styles. Here are the detailed steps for drawing an ellipse:
- Create a PdfDocument object.
- Use the PdfDocument.Pages.Add() method to add a blank page to the PDF document.
- Use the PdfPageBase.Canvas.Save() method to save the current drawing state for later restoration.
- Create a PdfPen object.
- Use the PdfPageBase.Canvas.DrawEllipse() method with the pen object to draw the outline of an ellipse, specifying the position and size of the ellipse.
- Create a PdfSolidBrush object.
- Use the PdfPageBase.Canvas.DrawEllipse() method with the fill brush object to draw a filled ellipse, specifying the position and size of the ellipse.
- Use the PdfPageBase.Canvas.Restore(state) method to restore the previously saved drawing state.
- Use the PdfDocument.SaveToFile() method to save the document to a file.
- Python
from spire.pdf.common import *
from spire.pdf import *

# Create PDF Document Object
doc = PdfDocument()

# Add a Page
page = doc.Pages.Add()

# Save the current drawing state
state = page.Canvas.Save()

# Create a Pen object
pen = PdfPens.get_CadetBlue()

# Draw the outline of an ellipse shape
page.Canvas.DrawEllipse(pen, 50.0, 30.0, 120.0, 100.0)

# Create a Brush object for filling
brush = PdfSolidBrush(PdfRGBColor(Color.get_CadetBlue()))

# Draw the filled ellipse shape
page.Canvas.DrawEllipse(brush, 180.0, 30.0, 120.0, 100.0)

# Restore the previously saved drawing state
page.Canvas.Restore(state)

# Save the document to a file
doc.SaveToFile("Drawing Ellipse Shape.pdf")

# Close the document and release resources
doc.Close()
doc.Dispose()
Apply for a Temporary License
If you'd like to remove the evaluation message from the generated documents, or to get rid of the function limitations, please request a 30-day trial license for yourself.
Python: Split a PDF Page into Multiple Pages
Sometimes, when dealing with PDF documents, there is a need to split a page into different sections based on content or layout. For instance, splitting a mixed-layout page with both horizontal and vertical content into two separate parts. This type of splitting is not commonly available in basic PDF management functions but can be important for academic papers, magazine ads, or mixed-layout designs. This article explains how to use Spire.PDF for Python to perform horizontal or vertical PDF page splitting.
Install Spire.PDF for Python
This scenario requires Spire.PDF for Python and plum-dispatch v1.7.4. They can be easily installed in your Windows through the following pip command.
pip install Spire.PDF
If you are unsure how to install, please refer to this tutorial: How to Install Spire.PDF for Python on Windows
Split PDF Page Horizontally or Vertically with Python
Spire.PDF for Python not only supports splitting a PDF document into multiple PDF documents, but also allows splitting a specific page within a PDF into two or more pages. Here are the detailed steps to split a page:
- Create an instance of the PdfDocument class.
- Load the source PDF document using the PdfDocument.LoadFromFile() method.
- Retrieve the page(s) to be split using PdfDocument.Pages[].
- Create a new PDF document and set its page margins to 0.
- Set the width or height of the new document to half of the source document.
- Add a page to the new PDF document using the PdfDocument.Pages.Add() method.
- Create a template for the source document's page using the PdfPageBase.CreateTemplate() method.
- Draw the content of the source page onto the new page using the PdfTemplate.Draw() method.
- Save the split document using the PdfDocument.SaveToFile() method.
- Python
from spire.pdf.common import *
from spire.pdf import *

# Create a PdfDocument object
pdf = PdfDocument()

# Load the PDF document
pdf.LoadFromFile("Terms of service.pdf")

# Get the first page
page = pdf.Pages[0]

# Create a new PDF document and remove the page margins
newpdf = PdfDocument()
newpdf.PageSettings.Margins.All=0

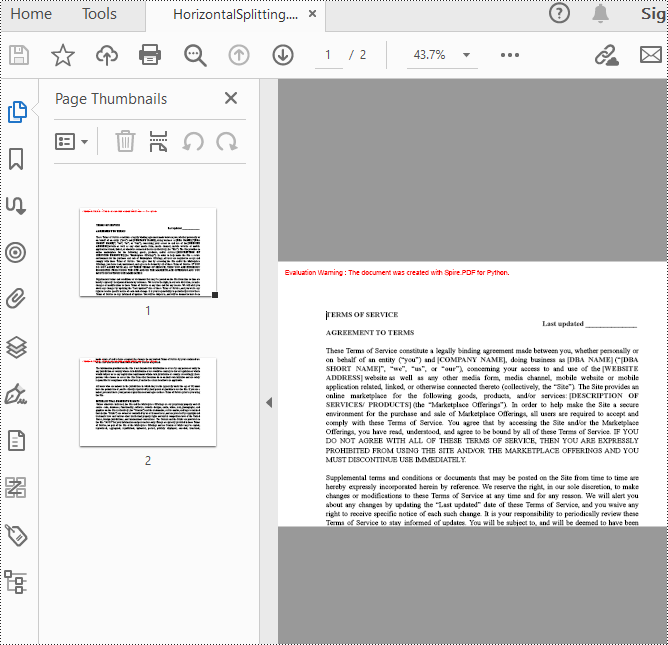
# Horizontal splitting: Set the width of the new document's page to be the same as the width of the first page of the original document, and the height to half of the first page's height
newpdf.PageSettings.Width=page.Size.Width
newpdf.PageSettings.Height=page.Size.Height/2

'''
# Vertical splitting: Set the width of the new document's page to be half of the width of the first page of the original document, and the height to the same as the first page's height
newpdf.PageSettings.Width=page.Size.Width/2
newpdf.PageSettings.Height=page.Size.Height
'''

# Add a new page to the new PDF document
newPage = newpdf.Pages.Add()

# Set the text layout format
format = PdfTextLayout()
format.Break=PdfLayoutBreakType.FitPage
format.Layout=PdfLayoutType.Paginate

# Create a template based on the first page of the original document and draw it onto the new page of the new document, automatically paginating when the page is filled
page.CreateTemplate().Draw(newPage, PointF(0.0, 0.0), format)

# Save the document
newpdf.SaveToFile("HorizontalSplitting.pdf")

# Close the objects
newpdf.Close()
pdf.Close()
The result of horizontal splitting is as follows:
The result of vertical splitting is as follows:

Apply for a Temporary License
If you'd like to remove the evaluation message from the generated documents, or to get rid of the function limitations, please request a 30-day trial license for yourself.
Python: Create Ordered, Unordered, and Nested Lists in PDF
Lists are a fundamental data structure in PDF documents as they allow users to efficiently store and arrange collections of items. The three most commonly utilized list types in PDFs are ordered lists, unordered lists (also known as bulleted lists), and nested lists. These lists facilitate the presentation of information in a well-organized and visually appealing manner within PDF documents. In this article, we will explore how to use Spire.PDF for Python to create ordered, unordered, and nested lists in PDF documents for generating professional-looking PDF documents.
- Create Ordered Lists in PDF with Python
- Create Unordered Lists with Symbol Markers in PDF Using Python
- Create Unordered Lists with Image Markers in PDF Using Python
- Create Nested Lists in PDF with Python
In Spire.PDF for Python, the PdfSortedList class and PdfList class are available for generating various types of lists in PDF documents, such as ordered lists, unordered lists, and nested lists. By utilizing the functionalities provided by Spire.PDF for Python, developers can easily format and incorporate these lists into their PDF pages. The following are the key classes and properties that are particularly useful for creating lists within PDF documents:
| Class or property | Description |
| PdfSortedList class | Represents an ordered list in a PDF document. |
| PdfList class | Represents an unordered list in a PDF document. |
| Brush property | Gets or sets a list's brush. |
| Font property | Gets or sets a list's font. |
| Indent property | Gets or sets a list's indent. |
| TextIndent property | Gets or sets the indent from the marker to the list item text. |
| Items property | Gets items of a list. |
| Marker property | Gets or sets the marker of a list. |
| Draw() method | Draw list on the canvas of a page at the specified location. |
| PdfOrderedMarker class | Represents the marker style of an ordered list, such as numbers, letters, and roman numerals. |
| PdfMarker class | Represents bullet style for an unordered list. |
Install Spire.PDF for Python
This scenario requires Spire.PDF for Python and plum-dispatch v1.7.4. They can be easily installed in your Windows through the following pip commands.
pip install Spire.PDF
If you are unsure how to install, please refer to this tutorial: How to Install Spire.PDF for Python on Windows
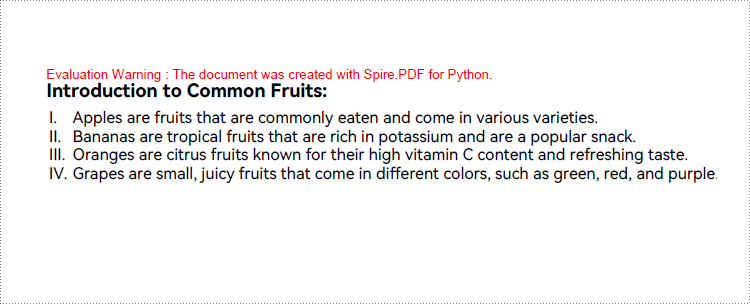
Create Ordered Lists in PDF with Python
Developers can use the PdfSortedList class in Spire.PDF for Python to create ordered lists and format them using the properties available under this class. Afterwards, the list can be drawn on a PDF page using the PdfSortedList.Draw() method. Here is a detailed step-by-step guide for how to create ordered lists in PDF documents:
- Create an object of PdfDocument class and load a PDF document using PdfDocument.LoadFromFile() method.
- Add a page to the document using PdfDocument.Pages.Add() method.
- Create fonts and the brush for the title and the list and draw the list title on the page using PdfPageBase.Canvas.DrawString() method.
- Initialize an instance of PdfSortedList class to create an ordered list with specified items.
- Initialize an instance of PdfOrderedMarker class to create an ordered marker for the list.
- Set the font, item indent, text-indent, brush, and marker for the list using properties under PdfSortedList class.
- Draw the list on the page using PdfSortedList.Draw() method.
- Save the document using PdfDocument.SaveToFile() method.
- Python
from spire.pdf import *
from spire.pdf.common import *

# Create an object of PdfDocument class
pdf = PdfDocument()

# Add a page to the document with specified page size and margins
page = pdf.Pages.Add()

# Create tile font and list font
titleFont = PdfTrueTypeFont("HarmonyOS Sans SC", 14.0, 1, True)
listFont = PdfTrueTypeFont("HarmonyOS Sans SC", 12.0, 0, True)

# Create a brush to draw the list
brush = PdfBrushes.get_Black()

# Specify the initial coordinate
x = 10.0
y = 20.0

# Draw the title
title = "Introduction to Common Fruits:"
page.Canvas.DrawString(title, titleFont, brush, x, y)

# Create a numbered list
listItems = "Apples are fruits that are commonly eaten and come in various varieties.\n" \
    + "Bananas are tropical fruits that are rich in potassium and are a popular snack.\n" \
        + "Oranges are citrus fruits known for their high vitamin C content and refreshing taste.\n"\
            + "Grapes are small, juicy fruits that come in different colors, such as green, red, and purple."
list = PdfSortedList(listItems)

# Create a marker for the list
marker = PdfOrderedMarker(PdfNumberStyle.UpperRoman, listFont)

# Format the list
list.Font = listFont
list.Indent = 2
list.TextIndent = 4
list.Brush = brush
list.Marker = marker

# Draw the list on the page
list.Draw(page.Canvas, x, y + float(titleFont.MeasureString(title).Height + 5))

# Save the document
pdf.SaveToFile("output/CreateNumberedList.pdf")
pdf.Close()
Create Unordered Lists with Symbol Markers in PDF Using Python
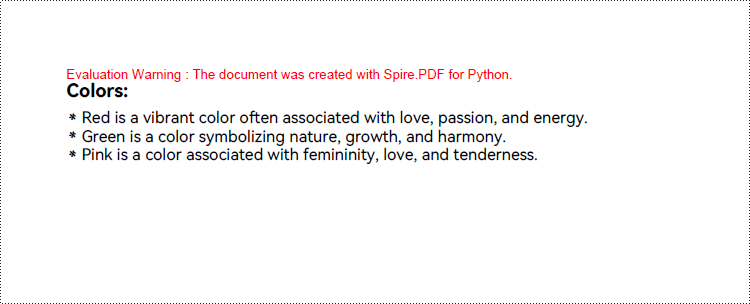
Creating an unordered list in a PDF document with Spire.PDF for Python involves PdfList class and the properties under this class. When creating an unordered list, developers need to set the marker style and font for the unordered list using the PdfList.Marker.Style and PdfList.Marker.Font properties. The detailed steps are as follows:
- Create an object of PdfDocument class and load a PDF document using PdfDocument.LoadFromFile() method.
- Add a page to the document using PdfDocument.Pages.Add() method.
- Create fonts and the brush for the title, the marker, and the list, and draw the list title on the page using PdfPageBase.Canvas.DrawString() method.
- Initialize an instance of PdfList class to create an unordered list with specified items.
- Set the font, item indent, text indent, and brush for the list using properties under PdfList class.
- Set the marker style and font through PdfList.Marker.Style property and PdfList.Marker.Font property.
- Draw the list on the page using PdfList.Draw() method.
- Save the document using PdfDocument.SaveToFile() method.
- Python
from spire.pdf import *
from spire.pdf.common import *

# Create an object of PdfDocument class
pdf = PdfDocument()

# Add a page to the document with specified page size and margins
page = pdf.Pages.Add()

# Create tile font and list font
titleFont = PdfTrueTypeFont("HarmonyOS Sans SC", 14.0, 1, True)
listFont = PdfTrueTypeFont("HarmonyOS Sans SC", 12.0, 0, True)
markerFont = PdfTrueTypeFont("HarmonyOS Sans SC", 8.0, 0, True)

# Create a brush to draw the list
brush = PdfBrushes.get_Black()

# Specify the initial coordinate
x = 10.0
y = 20.0

# Draw the title
title = "Colors:"
page.Canvas.DrawString(title, titleFont, brush, x, y)

# Create an unordered list
listContent = "Red is a vibrant color often associated with love, passion, and energy.\n" \
    + "Green is a color symbolizing nature, growth, and harmony.\n" \
        + "Pink is a color associated with femininity, love, and tenderness."
list = PdfList(listContent)

# Format the list
list.Font = listFont
list.Indent = 2
list.TextIndent = 4
list.Brush = brush

# Format the marker
list.Marker.Style = PdfUnorderedMarkerStyle.Asterisk
list.Marker.Font = markerFont

# Draw the list on the page
list.Draw(page.Canvas, x, float(y + titleFont.MeasureString(title).Height + 5))

# Save the document
pdf.SaveToFile("output/CreateSymbolBulletedList.pdf")
pdf.Close()
Create Unordered Lists with Image Markers in PDF Using Python
Creating an unordered list with image markers follows similar steps to creating a list with symbol markers. Developers just need to set the item marker style to an image through PdfList.Marker.Style property. Here are the detailed steps:
- Create an object of PdfDocument class and load a PDF document using PdfDocument.LoadFromFile() method.
- Add a page to the document using PdfDocument.Pages.Add() method.
- Create fonts and the brush for the title, the marker, and the list, and draw the list title on the page using PdfPageBase.Canvas.DrawString() method.
- Initialize an instance of PdfList class to create an unordered list with specified items.
- Set the font, item indent, text-indent, and brush for the list using properties under PdfList class.
- Load an image using PdfImage.LoadFromFile() method.
- Set the marker style as PdfUnorderedMarkerStyle.CustomImage through PdfList.Marker.Style property and set the loaded image as the marker through PdfList.Marker.Image property.
- Draw the list on the page using PdfList.Draw() method.
- Save the document using PdfDocument.SaveToFile() method.
- Python
from spire.pdf import *
from spire.pdf.common import *

# Create an object of PdfDocument class
pdf = PdfDocument()

# Add a page to the document with specified page size and margins
page = pdf.Pages.Add()

# Create tile font and list font
titleFont = PdfFont(PdfFontFamily.Helvetica, 14.0, PdfFontStyle.Bold)
listFont = PdfFont(PdfFontFamily.Helvetica, 12.0, PdfFontStyle.Regular)

# Create a brush to draw the list
brush = PdfBrushes.get_Black()

# Specify the initial coordinate
x = 10.0
y = 20.0

# Draw the title
title = "Colors:"
page.Canvas.DrawString(title, titleFont, brush, x, y)

# Create an unordered list
listContent = "Blue is a calming color often associated with tranquility, trust, and stability.\n" \
    + "Purple is a color associated with royalty, luxury, and creativity.\n" \
        + "Brown is a natural earthy color often associated with stability, reliability, and warmth."
list = PdfList(listContent)

# Format the list
list.Font = listFont
list.Indent = 2
list.TextIndent = 4
list.Brush = brush

# Load an image
image = PdfImage.FromFile("Marker.png")

# Set the marker as a custom image
list.Marker.Style = PdfUnorderedMarkerStyle.CustomImage
list.Marker.Image = image

# Draw the list on the page
list.Draw(page.Canvas, x, float(y + titleFont.MeasureString(title).Height + 5))

# Save the document
pdf.SaveToFile("output/CreateImageBulletedList.pdf")
pdf.Close()

Create Nested Lists in PDF with Python
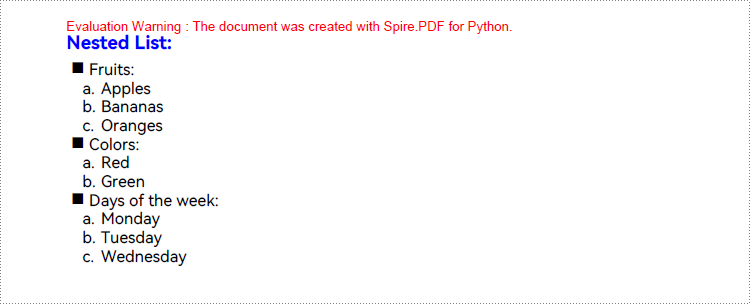
When creating a nested list, both the parent list and each level of sublists can be created as either unordered or ordered lists. Once the lists at each level are created, the PdfListItem.Sublist property can be used to set a list as the sublist of a corresponding item in the parent list. Here are the steps to create a nested list:
- Create an object of PdfDocument class and load a PDF document using PdfDocument.LoadFromFile() method.
- Add a page to the document using PdfDocument.Pages.Add() method.
- Create fonts and the brush for the title, the marker, and the list, and draw the list title on the page using PdfPageBase.Canvas.DrawString() method.
- Create an unordered list as the parent list and format the list and the marker.
- Create three sublists for the items in the parent list and format the list.
- Get an item in the parent list using PdfList.Items.get_Item() method.
- Set a specified list as the sublist of the item through PdfListItem.SubList property.
- Draw the list on the page using PdfList.Draw() method.
- Save the document using PdfDocument.SaveToFile() method.
- Python
from spire.pdf import *
from spire.pdf.common import *

# Create an object of PdfDocument class
pdf = PdfDocument()

# Add a page to the document with specified page size and margins
page = pdf.Pages.Add()

# Create tile font and list font
titleFont = PdfTrueTypeFont("HarmonyOS Sans SC", 14.0, 1, True)
listFont = PdfTrueTypeFont("HarmonyOS Sans SC", 12.0, 0, True)
markerFont = PdfTrueTypeFont("HarmonyOS Sans SC", 12.0, 0, True)

# Create brushs to draw the title and lists
titleBrush = PdfBrushes.get_Blue()
firstListBrush = PdfBrushes.get_Purple()
secondListBrush = PdfBrushes.get_Black()

# Specify the initial coordinate
x = 10.0
y = 20.0

# Draw the title
title = "Nested List:"
page.Canvas.DrawString(title, titleFont, titleBrush, x, y)

# Create a parent list
parentListContent = "Fruits:\n" + "Colors:\n" + "Days of the week:"
parentList = PdfList(parentListContent)

# Format the parent list
indent = 4
textIndent = 4
parentList.Font = listFont
parentList.Indent = indent
parentList.TextIndent = textIndent
# Set the parent list marker
parentList.Marker.Style = PdfUnorderedMarkerStyle.Square
parentList.Marker.Font = markerFont

# Create nested sublists and format them
subListMarker = PdfOrderedMarker(PdfNumberStyle.LowerLatin, markerFont)
subList1Content = "Apples\n" + "Bananas\n" + "Oranges"
subList1 = PdfSortedList(subList1Content, subListMarker)
subList1.Font = listFont
subList1.Indent = indent * 2
subList1.TextIndent = textIndent

subList2Content = "Red\n" + "Green"
subList2 = PdfSortedList(subList2Content, subListMarker)
subList2.Font = listFont
subList2.Indent = indent * 2
subList2.TextIndent = textIndent

subList3Content = "Monday\n" + "Tuesday\n" + "Wednesday"
subList3 = PdfSortedList(subList3Content, subListMarker)
subList3.Font = listFont
subList3.Indent = indent * 2
subList3.TextIndent = textIndent

# Set the created list as the nested sublist of each item in the parent list
item1 = parentList.Items.get_Item(0)
item1.SubList = subList1

item2 = parentList.Items.get_Item(1)
item2.SubList = subList2

item3 = parentList.Items.get_Item(2)
item3.SubList = subList3

# Draw the list
parentList.Draw(page.Canvas, x, float(y + titleFont.MeasureString(title).Height + 5))

# Save the document
pdf.SaveToFile("output/CreateNestedList.pdf")
pdf.Close()
Apply for a Temporary License
If you'd like to remove the evaluation message from the generated documents, or to get rid of the function limitations, please request a 30-day trial license for yourself.