Spire.Doc 12.8.12 optimizes the file size for converting Word to OFD
We're pleased to announce the release of Spire.Doc 12.8.12. This version mainly fixes two issues that occurred when replacing text and converting Word to OFD. More details are listed below.
Here is a list of changes made in this release
| Category | ID | Description |
| Bug | SPIREDOC-10738 | Fixes the issue that the customXml appeared after replacing text. |
| Bug | SPIREDOC-10743 | Optimizes the file size for converting Word to OFD. |
C#: Get Page Size, Orientation and Rotation of PDF
In some cases, checking the size, orientation, and rotation of PDF pages can be part of the quality control process. For example, before publishing or distributing a document, you might need to verify this information to ensure that all pages in the document are correctly presented. In this article, you will learn how to get PDF page size, orientation and rotation angle in C# using Spire.PDF for .NET.
Install Spire.PDF for .NET
To begin with, you need to add the DLL files included in the Spire.PDF for.NET package as references in your .NET project. The DLL files can be either downloaded from this link or installed via NuGet.
PM> Install-Package Spire.PDF
Get PDF Page Size in C#
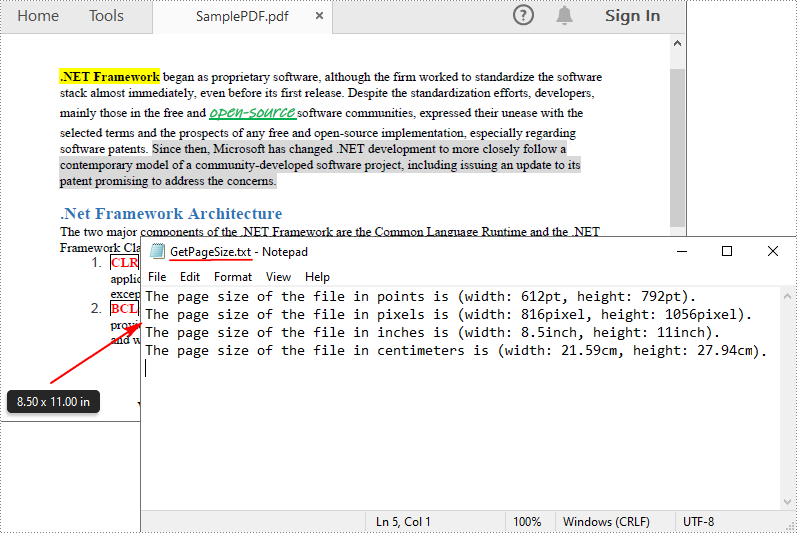
Spire.PDF for .NET offers the PdfPageBase.Size.Width and PdfPageBase.Size.Height properties to get the width and height of a PDF page in points. If you want to convert the default unit of measure to other units, you can use the PdfUnitConvertor class. The following are the detailed steps.
- Create a PdfDocument instance.
- Load a PDF file using PdfDocument.LoadFromFile() method.
- Get a specified page using PdfDocument.Pages[] property.
- Get the width and height of the PDF page using PdfPageBase.Size.Width and PdfPageBase.Size.Height properties.
- Create a PdfUnitConvertor instance, and then convert the size units from points to other units of measure using PdfUnitConvertor.ConvertUnits() method.
- Add the page size information to a StringBuilder instance, and then save the result to a TXT file.
- C#
using System.Text;
using Spire.Pdf;
using Spire.Pdf.Graphics;

namespace GetPDFPageSize
{
    class Program
    {
        static void Main(string[] args)
        {
            //Create a PdfDocument object
            PdfDocument pdf = new PdfDocument();

            //Load a PDF file from disk
            pdf.LoadFromFile("SamplePDF.pdf");

            //Get the first page
            PdfPageBase page = pdf.Pages[0];

            //Get the width and height of the page in "point"
            float pointWidth = page.Size.Width;
            float pointHeight = page.Size.Height;

            //Create PdfUnitConvertor to convert the unit
            PdfUnitConvertor unitCvtr = new PdfUnitConvertor();

            //Convert size units from points to pixels
            float pixelWidth = unitCvtr.ConvertUnits(pointWidth, PdfGraphicsUnit.Point, PdfGraphicsUnit.Pixel);
            float pixelHeight = unitCvtr.ConvertUnits(pointHeight, PdfGraphicsUnit.Point, PdfGraphicsUnit.Pixel);

            //Convert size units from points to inches
            float inchWidth = unitCvtr.ConvertUnits(pointWidth, PdfGraphicsUnit.Point, PdfGraphicsUnit.Inch);
            float inchHeight = unitCvtr.ConvertUnits(pointHeight, PdfGraphicsUnit.Point, PdfGraphicsUnit.Inch);

            //Convert size units from points to centimeters
            float centimeterWidth = unitCvtr.ConvertUnits(pointWidth, PdfGraphicsUnit.Point, PdfGraphicsUnit.Centimeter);
            float centimeterHeight = unitCvtr.ConvertUnits(pointHeight, PdfGraphicsUnit.Point, PdfGraphicsUnit.Centimeter);

            //Create a StringBuilder instance
            StringBuilder content = new StringBuilder();

            //Add the page size information to the StringBuilder instance
            content.AppendLine("The page size of the file in points is (width: " + pointWidth + "pt, height: " + pointHeight + "pt).");
            content.AppendLine("The page size of the file in pixels is (width: " + pixelWidth + "pixel, height: " + pixelHeight + "pixel).");
            content.AppendLine("The page size of the file in inches is (width: " + inchWidth + "inch, height: " + inchHeight + "inch).");
            content.AppendLine("The page size of the file in centimeters is (width: " + centimeterWidth + "cm, height: " + centimeterHeight + "cm).");

            //Save to a txt file
            File.WriteAllText("GetPageSize.txt", content.ToString());
        }
    }
}
Detect PDF Page Orientation in C#
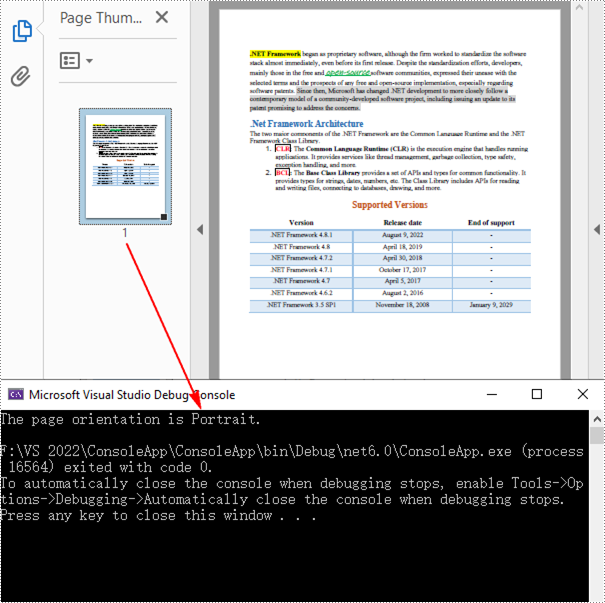
To detect the orientation of a PDF page, you can compare the width and height of the page. If the page width is greater than the height, then the page orientation is landscape, otherwise it is portrait. The following are the detailed steps.
- Create a PdfDocument instance.
- Load a PDF file using PdfDocument.LoadFromFile() method.
- Get a specified page using PdfDocument.Pages[] property.
- Get the width and height of the PDF page using PdfPageBase.Size.Width and PdfPageBase.Size.Height properties.
- Compare the values of page width and height to detect the page orientation.
- Output the result using Console.WriteLine() method.
- C#
using Spire.Pdf;

namespace GetPDFPageOrientation
{
    class Program
    {
        static void Main(string[] args)
        {
            //Create a PdfDocument object
            PdfDocument pdf = new PdfDocument();

            //Load a PDF file from disk
            pdf.LoadFromFile("SamplePDF.pdf");

            //Get the first page
            PdfPageBase page = pdf.Pages[0];

            //Get the width and height of the page
            float width = page.Size.Width;
            float height = page.Size.Height;

            //Compare the values of page width and height
            if (width > height)
            {
                Console.WriteLine("The page orientation is Landscape.");
            }

            else
            {
                Console.WriteLine("The page orientation is Portrait.");
            }
        }
    }
}
Detect PDF Page Rotation Angle in C#
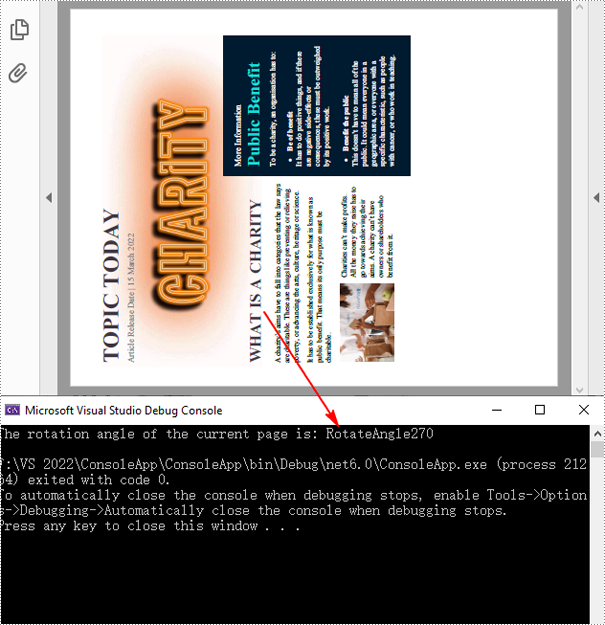
The rotation angle of a PDF page can be obtained through the PdfPageBase.Rotation property. The following are the detailed steps.
- Create a PdfDocument instance.
- Load a PDF file using PdfDocument.LoadFromFile() method.
- Get a specified page using PdfDocument.Pages[] property.
- Get the rotation angle of the page using PdfPageBase.Rotation property, and then convert it to text string.
- Output the result using Console.WriteLine() method.
- C#
using Spire.Pdf;

namespace GetPDFPageRotationAngle
{
    class Program
    {
        static void Main(string[] args)
        {
            //Create a PdfDocument object
            PdfDocument pdf = new PdfDocument();

            //Load a PDF file from disk
            pdf.LoadFromFile("E:\\PythonPDF\\Sample.pdf");

            //Get the first page
            PdfPageBase page = pdf.Pages[0];

            //Get the rotation angle of the current page
            PdfPageRotateAngle rotationAngle = page.Rotation;
            string rotation = rotationAngle.ToString();

            //Output the page rotation angle information
            Console.WriteLine("The rotation angle of the current page is: " + rotation);
        }
    }
}
Apply for a Temporary License
If you'd like to remove the evaluation message from the generated documents, or to get rid of the function limitations, please request a 30-day trial license for yourself.
Spire.XLS for Java 14.8.2 supports embedding images in cells
We are excited to announce the release of Spire.XLS for Java.14.8.2. This version supports embedding images in cells. Besides, some known bugs were successfully fixed in this update, such as the issue that caused incorrect content when saving an Excel document and opening it in Microsoft Excel 2016. More details are listed below.
Here is a list of changes made in this release
| Category | ID | Description |
| New feature | SPIREXLS-5147 | Provides the hideCategoriTags method to support hiding category labels.
Chart chart = sheet.getCharts().get(0);
String[] labels = chart.getCategoryLabels();
chart.hideCategoryLabels(new String[]
{ labels [0], labels [1], ...}
);
|
| New feature | SPIREXLS-5338 | Supports embedding images in cells.
worksheet.getCellRange("B1").insertOrUpdateCellImage("D:\\vs1.png",true);
|
| Bug | SPIREXLS-5331 | Fixes the issue that caused incorrect content when saving an Excel document and opening it in Microsoft Excel 2016. |
| Bug | SPIREXLS-5337 | Fixes the issue that resulted in incorrect pivot table data calculation. |
Java: Create Column Charts in Word Documents
Column charts, also known as bar charts, provide a visual comparison of data points across different categories. Whether you're summarizing sales figures, tracking project milestones, or visualizing survey results, column charts in Word provide a powerful way to translate complex data into an accessible, engaging format within your written materials.
In this article, you will learn how to create a clustered column chart and a stacked column chart in a Word document using Spire.Doc for Java.
Install Spire.Doc for Java
First of all, you're required to add the Spire.Doc.jar file as a dependency in your Java program. The JAR file can be downloaded from this link. If you use Maven, you can easily import the JAR file in your application by adding the following code to your project's pom.xml file.
<repositories>
    <repository>
        <id>com.e-iceblue</id>
        <name>e-iceblue</name>
        <url>https://repo.e-iceblue.com/nexus/content/groups/public/</url>
    </repository>
</repositories>
<dependencies>
    <dependency>
        <groupId>e-iceblue</groupId>
        <artifactId>spire.doc</artifactId>
        <version>12.11.0</version>
    </dependency>
</dependencies>
Create a Clustered Column Chart in Word in Java
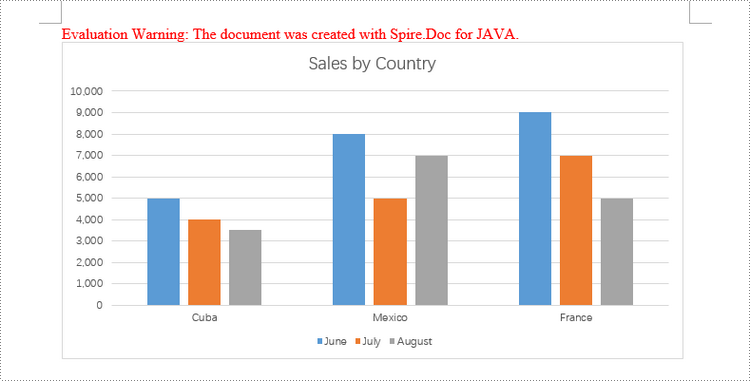
To insert a chart into a Microsoft Word document, you can use the Paragraph.appendChart(ChartType chartType, float width, float height) method. The ChartType enumeration provides various pre-defined chart types available in MS Word. To create a clustered column chart, you would specify the chart type as Column.
The steps to add a clustered column chart to a Word document using Java are as follows:
- Create a Document object.
- Add a section and a paragraph to the document.
- Add a clustered column chart to the paragraph using Paragraph.appendChart() method.
- Add series to the chart using Chart.getSeries().add() method.
- Set the chart title using Chart.getTilte().setText() method.
- Set other attributes of the chart using the methods available in the Chart object.
- Save the document to a different Word file.
- Java
import com.spire.doc.Document;
import com.spire.doc.FileFormat;
import com.spire.doc.Section;
import com.spire.doc.documents.Paragraph;
import com.spire.doc.fields.ShapeObject;
import com.spire.doc.fields.shapes.charts.*;

public class CreateClusteredColumnChart {

    public static void main(String[] args) {

        // Create a Document object
        Document document = new Document();

        // Add a section
        Section section = document.addSection();

        // Add a paragraph
        Paragraph paragraph = section.addParagraph();

        // Add a column chart
        ShapeObject shape = paragraph.appendChart(ChartType.Column, 490, 250);

        // Get the chart
        Chart chart = shape.getChart();

        // Clear the default data
        chart.getSeries().clear();

        // Add a series including series name, category names, and series values to chart
        chart.getSeries().add("June",
                new String[] { "Cuba", "Mexico", "France"},
                new double[] { 5000, 8000, 9000 });

        // Add two more series
        chart.getSeries().add("July",
                new String[] { "Cuba", "Mexico", "France"},
                new double[] { 4000, 5000, 7000 });
        chart.getSeries().add("August",
                new String[] { "Cuba", "Mexico", "France"},
                new double[] { 3500, 7000, 5000 });

        // Set the chart title
        chart.getTitle().setText("Sales by Country");

        // Set the number format of the Y-axis
        chart.getAxisY().getNumberFormat().setFormatCode("#,##0");

        // Set the legend position
        chart.getLegend().setPosition(LegendPosition.Bottom);

        // Save to file
        document.saveToFile("ClusteredColumnChart.docx", FileFormat.Docx_2019);

        // Dispose resources
        document.dispose();
    }
}
Create a Stacked Column Chart in Word in Java
Creating a stacked column chart in a Word document follows a similar process to the clustered column chart. The only difference is specifying the chart type as Column_Stacked instead of Column.
The detailed steps to add a stacked column chart are:
- Create a Document object.
- Add a section and a paragraph to the document.
- Add a stacked column chart to the paragraph using Paragraph.appendChart() method.
- Add series to the chart using Chart.getSeries().add() method.
- Set the chart title using Chart.getTilte().setText() method.
- Set other attributes of the chart using the methods available in the Chart object.
- Save the document to a different Word file.
- Java
import com.spire.doc.Document;
import com.spire.doc.FileFormat;
import com.spire.doc.Section;
import com.spire.doc.documents.Paragraph;
import com.spire.doc.fields.ShapeObject;
import com.spire.doc.fields.shapes.charts.Chart;
import com.spire.doc.fields.shapes.charts.ChartType;
import com.spire.doc.fields.shapes.charts.LegendPosition;

public class CreateStackedColumnChart {

    public static void main(String[] args) {

        //Create a Document object
        Document document = new Document();

        //Add a section
        Section section = document.addSection();

        //Add a paragraph
        Paragraph paragraph = section.addParagraph();

        //Add a stacked column chart
        ShapeObject shape = paragraph.appendChart(ChartType.Column_Stacked, 490, 250);

        //Get the chart
        Chart chart = shape.getChart();

        //Clear the default data
        chart.getSeries().clear();

        //Add a series including series name, category names, and series values to chart
        chart.getSeries().add("Store A",
                new String[] { "Diet Coke", "Mountain Dew", "Diet Pesi", "Cherry Coke" },
                new double[] { 2500, 4600, 2800, 5100 });

        //Add another series
        chart.getSeries().add("Store B",
                new String[] { "Diet Coke", "Mountain Dew", "Diet Pesi", "Cherry Coke" },
                new double[] { 4100, 3200, 3800, 4000 });

        //Set the chart title
        chart.getTitle().setText("Store Wise Soda Soft Drink Sales");

        //Set the number format of the Y-axis
        chart.getAxisY().getNumberFormat().setFormatCode("#,##0");

        //Set the legend position
        chart.getLegend().setPosition(LegendPosition.Bottom);

        //Save to file
        document.saveToFile("StackedColumnChart.docx", FileFormat.Docx_2019);

        // Dispose resources
        document.dispose();
    }
}

Apply for a Temporary License
If you'd like to remove the evaluation message from the generated documents, or to get rid of the function limitations, please request a 30-day trial license for yourself.
Python: Add or Remove Digital Signatures in PDF
Digital signatures are vital for maintaining the authenticity and integrity of PDF documents. They provide a reliable way to verify the signer's identity and ensure that the document's content has not been tampered with since the signature was applied. By using digital signatures, you can enhance the security and trustworthiness of your documents. In this article, we will explore how to add and remove digital signatures in PDF files in Python using Spire.PDF for Python.
- Add a Digital Signature to PDF in Python
- Add an Invisible Digital Signature to PDF in Python
- Remove Digital Signature from PDF in Python
Install Spire.PDF for Python
This scenario requires Spire.PDF for Python and plum-dispatch v1.7.4. They can be easily installed in your Windows through the following pip command.
pip install Spire.PDF
If you are unsure how to install, please refer to this tutorial: How to Install Spire.PDF for Python on Windows
Add a Digital Signature to PDF in Python
You can use the PdfOrdinarySignatureMaker.MakeSignature(sigFieldName: str, page: PdfPageBase, x: float, y: float, width: float, height: float, signatureAppearance: IPdfSignatureAppearance) method to add a visible digital signature with a custom appearance to a specific page of a PDF document. The detailed steps are as follows.
- Create a PdfDocument instance.
- Load a PDF document using PdfDocument.LoadFromFile() method.
- Create a PdfOrdinarySignatureMaker instance and pass the PdfDocument object, certificate (.pfx) file path and certificate password to the class instructor as parameters.
- Set signature details, such as the signer’s name, contact information, location, and signature reason, using the properties of the PdfOrdinarySignatureMaker class.
- Create a PdfSignatureAppearance instance for the signature, and then customize the labels for the signature and set the signature image.
- Get a specific page in the PDF document using PdfDocument.Pages[] property.
- Call the PdfOrdinarySignatureMaker.MakeSignature(sigFieldName: str, page: PdfPageBase, x: float, y: float, width: float, height: float, signatureAppearance: IPdfSignatureAppearance) method to add the digital signature to a specific location of the page.
- Save the result document using the PdfDocument.SaveToFile() method.
- Python
from spire.pdf.common import *
from spire.pdf import *

# Create a PdfDocument instance
doc = PdfDocument()
# Load a PDF file
doc.LoadFromFile("Sample.pdf")

# Create a signature maker
signatureMaker = PdfOrdinarySignatureMaker(doc, "gary.pfx", "e-iceblue")

# Configure the signature properties like the signer's name, contact information, location and signature reason
signature = signatureMaker.Signature
signature.Name = "Gary"
signature.ContactInfo = "+86 12345678"
signature.Location = "China"
signature.Reason = "I am the author."

# Create a custom signature appearance
appearance = PdfSignatureAppearance(signature)
# Set label for the signer's name
appearance.NameLabel = "Signer: "
# Set label for the contact information
appearance.ContactInfoLabel = "Phone: "
# Set label for the location
appearance.LocationLabel = "Location: "
# Set label for the signature reason
appearance.ReasonLabel = "Reason: "
# Set signature image
appearance.SignatureImage = PdfImage.FromFile("SigImg.png")
# Set the graphic render/display mode for the signature
appearance.GraphicMode = GraphicMode.SignImageAndSignDetail
# Set the layout for the signature image
appearance.SignImageLayout = SignImageLayout.none

# Get the first page
page = doc.Pages[0]

# Add the signature to a specified location of the page
signatureMaker.MakeSignature("Signature by Gary", page, 90.0, 600.0, 260.0, 100.0, appearance)

# Save the signed document
doc.SaveToFile("Signed.pdf")
doc.Close()
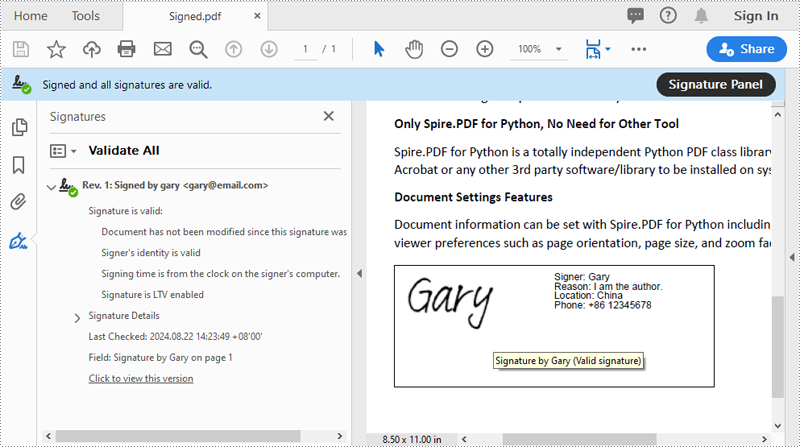
Add an Invisible Digital Signature to PDF in Python
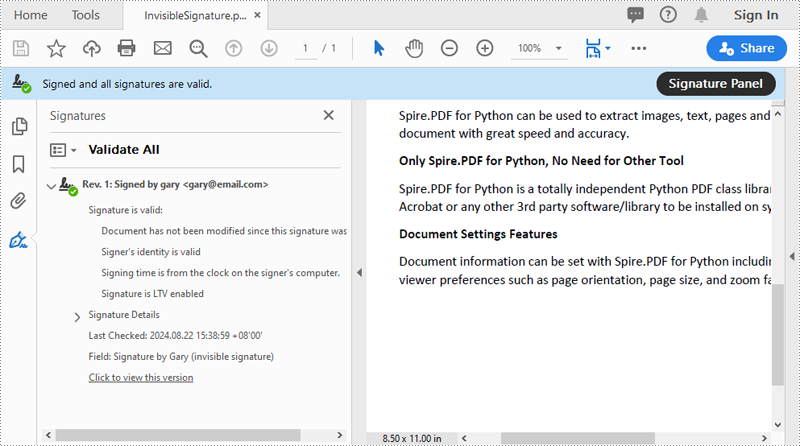
An invisible signature in a PDF is a type of digital signature that provides all the security and authentication benefits of a standard digital signature but does not appear visibly on the document itself. Using the PdfOrdinarySignatureMaker.MakeSignature(sigFieldName: str) method of Spire.PDF for Python, you can add an invisible digital signature to a PDF document. The detailed steps are as follows.
- Create a PdfDocument instance.
- Load a PDF document using PdfDocument.LoadFromFile() method.
- Create a PdfOrdinarySignatureMaker instance and pass the PdfDocument object, certificate (.pfx) file path and password to the class instructor as parameters.
- Add an invisible digital signature to a PDF document using the PdfOrdinarySignatureMaker.MakeSignature(sigFieldName: str) method
- Save the result document using the PdfDocument.SaveToFile() method.
- Python
from spire.pdf.common import *
from spire.pdf import *

# Create a PdfDocument instance
doc = PdfDocument()
# Load a PDF document
doc.LoadFromFile("test2.pdf")

# Create a signature maker
signatureMaker = PdfOrdinarySignatureMaker(doc, "gary.pfx", "e-iceblue")

# Add an invisible signature to the document
signatureMaker.MakeSignature("Signature by Gary")

# Save the signed document
doc.SaveToFile("InvisibleSignature.pdf")
doc.Close()
Remove Digital Signature from PDF in Python
To remove digital signatures from a PDF document, you need to iterate through all form fields in the document, find the form fields that are of PdfSignatureFieldWidget type and then remove them from the document. The detailed steps are as follows.
- Create a PdfDocument instance.
- Load a PDF document using PdfDocument.LoadFromFile() method.
- Get the form field collection of the document using PdfDocument.Form property.
- Iterate through the form fields in the collection from the last to the first.
- Check if the field is a PdfSignatureFieldWidget object.
- If the result is True, remove the field from the document using PdfFormFieldWidgetCollection.FieldsWidget.RemoveAt(index) method.
- Save the result document using the PdfDocument.SaveToFile() method.
- Python
from spire.pdf.common import *
from spire.pdf import *

# Create a PdfDocument instance
doc = PdfDocument()
# Load a PDF document
doc.LoadFromFile("Signed.pdf")

# Get form field collection from the document
pdfForm = doc.Form
formWidget = PdfFormWidget(pdfForm)

# Check if there are any form fields in the collection
if formWidget.FieldsWidget.Count > 0:
    # Loop through all form fields from the last to the first
    for i in range(formWidget.FieldsWidget.Count - 1, -1, -1):
        field = formWidget.FieldsWidget[i]
        # Check if the field is a PdfSignatureFieldWidget
        if isinstance(field, PdfSignatureFieldWidget):
            # Remove the field
            formWidget.FieldsWidget.RemoveAt(i)

# Save the document
doc.SaveToFile("RemoveSignature.pdf")
doc.Close()
Apply for a Temporary License
If you'd like to remove the evaluation message from the generated documents, or to get rid of the function limitations, please request a 30-day trial license for yourself.
Python: Add or Extract Animations in PowerPoint
In Microsoft PowerPoint, animations are not limited to just text; they can also be applied to shapes or other objects to create dynamic and engaging slides. Animations can be used to achieve various effects, such as drawing attention to a specific shape, demonstrating a process, or simply adding a touch of flair to your presentation. For instance, you might want to animate a shape to make it appear, disappear, or move in a particular sequence. Additionally, extracting and reusing animations can save time and ensure consistency across multiple presentations. In this article, we will demonstrate how to add animations to shapes in PowerPoint along with how to extract animation information from slides in PowerPoint in Python using Spire.Presentation for Python.
- Add Animations to Shapes and Text within Shapes in PowerPoint in Python
- Add Exit Animations to Shapes in PowerPoint in Python
- Extract the Animation Information from PowerPoint Slides in Python
Install Spire.Presentation for Python
This scenario requires Spire.Presentation for Python and plum-dispatch v1.7.4. They can be easily installed in your Windows through the following pip command.
pip install Spire.Presentation
If you are unsure how to install, please refer to this tutorial: How to Install Spire.Presentation for Python on Windows
Add Animations to Shapes and Text within Shapes in PowerPoint in Python
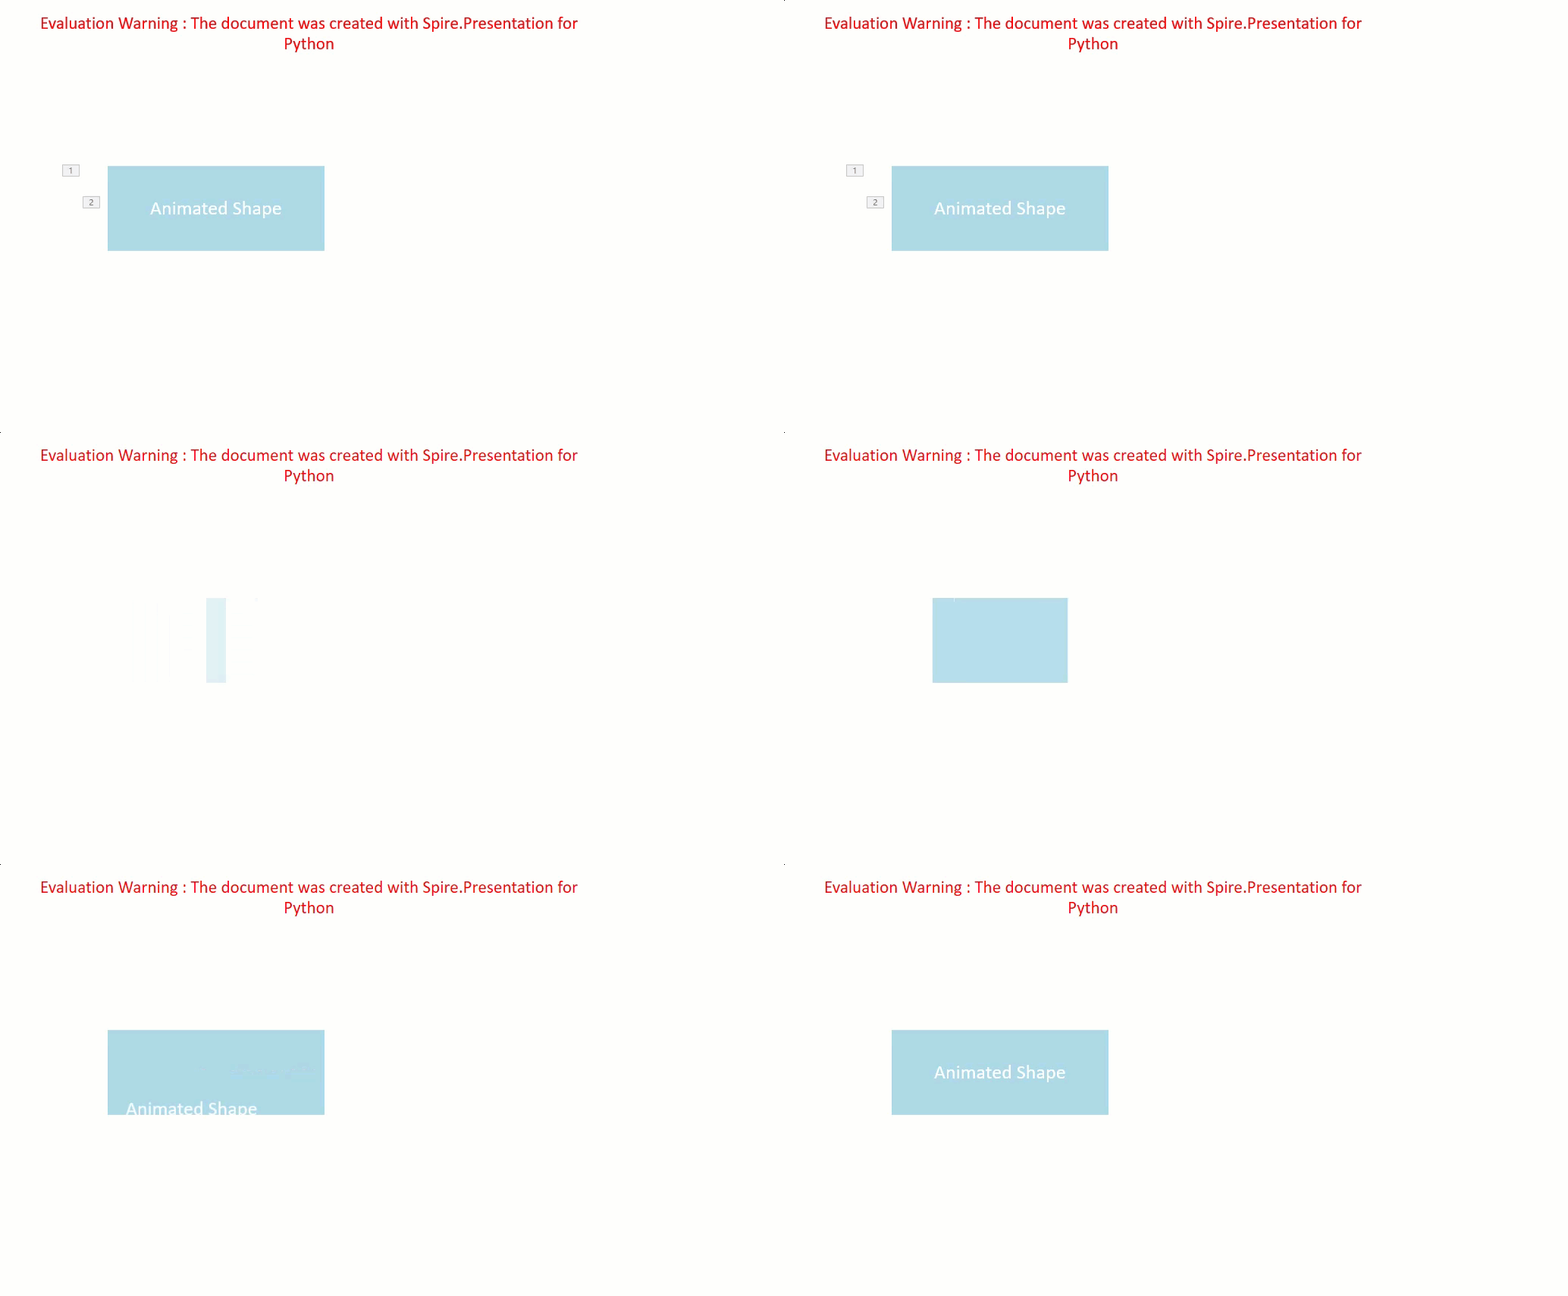
You can use the IShape.Slide.Timeline.MainSequence.AddEffect(shape:IShape, animationEffectType:AnimationEffectType) method to add an animation effect to a shape. If you want to apply the animation effect to the text of a specific paragraph(s) within a shape, you can use the AnimationEffect.SetStartEndParagraph(startParaIndex:int, endParaIndex:int) method. The detailed steps are as follows.
- Create an instance of the Presentation class.
- Load a PowerPoint presentation using the Presentation.LoadFromFile() method.
- Access a specific slide using the Presentation.Slides[] property.
- Add a rectangle shape to the slide using the ISlide.Shapes.AppendShape(shapeType:ShapeType, rectangle:RectangleF) method.
- Set the fill type, fill color, and border color for the rectangle.
- Add a text frame to the rectangle using the IShape.AppendTextFrame() method.
- Add an animation effect to the rectangle using IShape.Slide.Timeline.MainSequence.AddEffect(shape:IShape, animationEffectType:AnimationEffectType) method.
- Add another animation effect to the rectangle. Then apply the animation effect to specific paragraph(s) within the rectangle using the AnimationEffect.SetStartEndParagraph(startParaIndex:int, endParaIndex:int) method.
- Save the result presentation using the Presentation.SaveToFile() method.
- Python
from spire.presentation.common import *
from spire.presentation import *

# Create an object of the Presentation class
ppt = Presentation()
# Get the first slide in the presentation
slide = ppt.Slides[0]

# Add a rectangle shape to the slide
shape = slide.Shapes.AppendShape(ShapeType.Rectangle, RectangleF.FromLTRB(100, 150, 300, 230))
# Set an alternative title for the shape (optional)
shape.AlternativeTitle = "Rectangle"

# Set the fill type, fill color and border color for the shape
shape.Fill.FillType = FillFormatType.Solid
shape.Fill.SolidColor.Color = Color.get_LightBlue()
shape.ShapeStyle.LineColor.Color = Color.get_White()

# Add a text frame to the shape and set the text content
shape.AppendTextFrame("Animated Shape")

# Add the 'fade-out swivel' animation effect to the shape
shape.Slide.Timeline.MainSequence.AddEffect(shape, AnimationEffectType.FadedSwivel)

# Add the 'float' animation effect to the shape
animation = shape.Slide.Timeline.MainSequence.AddEffect(shape, AnimationEffectType.Float)
# Set the start and end index of the paragraph(s) to apply the 'float' animation
animation.SetStartEndParagraphs(0, 0)

# Save the presentation to a new file
ppt.SaveToFile("ApplyAnimation.pptx", FileFormat.Pptx2013)
ppt.Dispose()
Add Exit Animations to Shapes in PowerPoint in Python
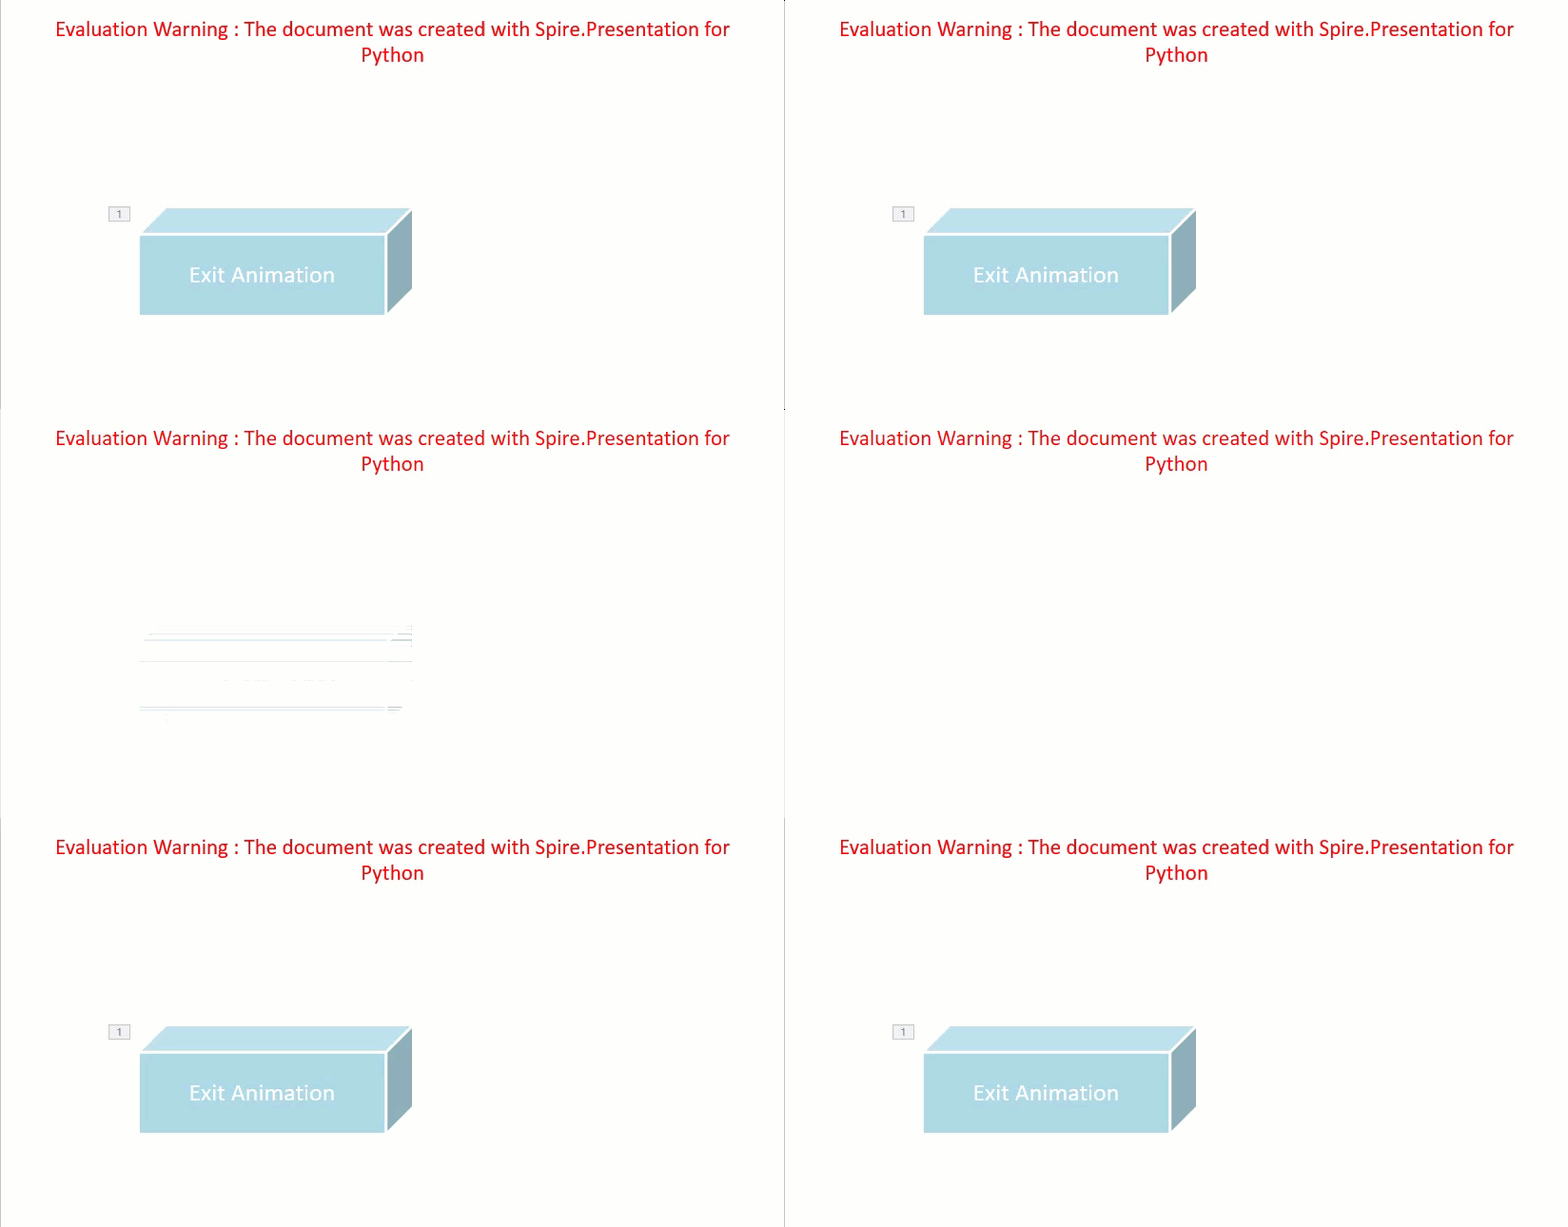
In PowerPoint, animations are categorized into four main types: entrance, emphasis, exit, and motion paths. Some animations, like "fly in" or "fade", can be used as both entrance and exit effects. When using Spire.Presentation to add these animations to shapes in your presentations, these animations are typically set as entrance effects by default. If you want to change the type of the animation to exit, you can use the AnimationEffect.PresetClassType property. The detailed steps are as follows.
- Create an instance of the Presentation class.
- Load a PowerPoint presentation using the Presentation.LoadFromFile() method.
- Access a specific slide using the Presentation.Slides[] property.
- Add a cube shape to the slide using the ISlide.Shapes.AppendShape(shapeType:ShapeType, rectangle:RectangleF) method.
- Set the fill type, fill color, and border color for the cube.
- Add a text frame to the cube using the IShape.AppendTextFrame() method.
- Add an animation effect to the cube using the IShape.Slide.Timeline.MainSequence.AddEffect(shape:IShape, animationEffectType:AnimationEffectType) method.
- Change the animation effect type to exit using the AnimationEffect.PresetClassType property.
- Save the presentation using the Presentation.SaveToFile() method.
- Python
from spire.presentation.common import *
from spire.presentation import *

# Create an object of the Presentation class
ppt = Presentation()
# Get the first slide in the presentation
slide = ppt.Slides[0]

# Add a cube shape to the slide
shape = slide.Shapes.AppendShape(ShapeType.Cube, RectangleF.FromLTRB(100, 150, 300, 230))
# Set an alternative title for the shape (optional)
shape.AlternativeTitle = "Cube"

# Set the fill type, fill color and border color for the shape
shape.Fill.FillType = FillFormatType.Solid
shape.Fill.SolidColor.Color = Color.get_LightBlue()
shape.ShapeStyle.LineColor.Color = Color.get_White()

# Add a text frame to the shape and set the text content
shape.AppendTextFrame("Exit Animation")

# Add a 'random bars' animation effect to the shape
effect = shape.Slide.Timeline.MainSequence.AddEffect(shape, AnimationEffectType.RandomBars)
# Set the animation effect type to exit animation
effect.PresetClassType = TimeNodePresetClassType.Exit

# Save the presentation to a new file
ppt.SaveToFile("ExitAnimation.pptx", FileFormat.Pptx2013)
ppt.Dispose()
Extract the Animation Information from PowerPoint Slides in Python
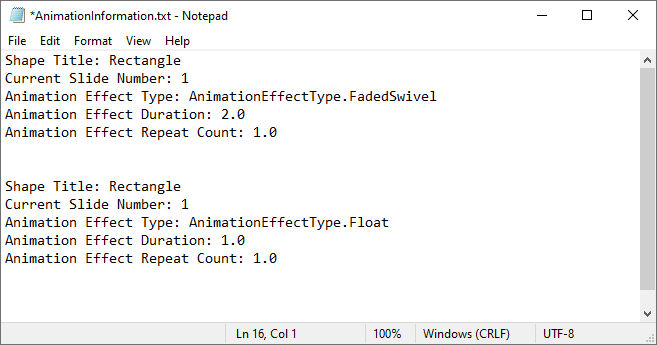
To extract animation information from slides in a PowerPoint presentation, you need to iterate through all slides and all animations within each slide, then use the properties of the AnimationEffect class to retrieve the information of the animations. The detailed steps are as follows.
- Create an instance of the Presentation class.
- Load a PowerPoint presentation using the Presentation.LoadFromFile() method.
- Iterate through all slides in the presentation and all animations within each slide.
- Use the AnimationEffect.ShapeTarget.AlternativeTitle property to get the title of the shape affected by the animation.
- Use the ISlide.SlideNumber property to get the number of the current slide.
- Use the AnimationEffect.AnimationEffectType property to get the type of animation effect.
- Use the AnimationEffect.Timing.Duration property to get the duration of the animation effect.
- Use the AnimationEffect.Timing.RepeatCount property to get the number of repetitions of the animation effect.
- Save the retrieved information to a text file.
- Python
from spire.presentation.common import *
from spire.presentation import *

# Create an object of the Presentation class
ppt = Presentation()
# Load a PowerPoint presentation
ppt.LoadFromFile("ApplyAnimation.pptx")

# Create a list to store the extracted animation information
sb = []

# Iterate through all slides in the presentation
for slide in ppt.Slides:
    # Iterate through all animation effects in the slide
    for effect in slide.Timeline.MainSequence:
        # Get the alternative title of the shape affected by the animation
        shapeTitle = effect.ShapeTarget.AlternativeTitle
        sb.append("Shape Title: " + shapeTitle)
        # Get the number of the current slide
        slideNumber = slide.SlideNumber
        sb.append("Current Slide Number: " + str(slideNumber))
        # Get the type of the animation effect
        animationEffectType = effect.AnimationEffectType
        sb.append("Animation Effect Type: " + str(animationEffectType))
        # Get the duration of the animation effect
        duration = effect.Timing.Duration
        sb.append("Animation Effect Duration: " + str(duration))
        # Get the number of repetitions of the animation effect
        count = effect.Timing.RepeatCount
        sb.append("Animation Effect Repeat Count: " + str(count))
        sb.append("\n")

# Save the extracted animation information to a text file
with open("AnimationInformation.txt", "w") as fp:
    for s in sb:
        fp.write(s + "\n")

ppt.Dispose()
Apply for a Temporary License
If you'd like to remove the evaluation message from the generated documents, or to get rid of the function limitations, please request a 30-day trial license for yourself.
Python: Add Annotations to PDF Documents
Adding annotations to PDFs is a common practice for adding comments, highlighting text, drawing shapes, and more. This feature is beneficial for collaborative document review, education, and professional presentations. It allows users to mark up documents digitally, enhancing communication and productivity.
In this article, you will learn how to add various types of annotations to a PDF document in Python using Spire.PDF for Python.
- Add a Text Markup Annotation to PDF
- Add a Free Text Annotation to PDF
- Add a Popup Annotation to PDF
- Add a Stamp Annotation to PDF
- Add a Shape Annotation to PDF
- Add a Web Link Annotation to PDF
- Add a File Link Annotation to PDF
- Add a Document Link Annotation to PDF
Install Spire.PDF for Python
This scenario requires Spire.PDF for Python and plum-dispatch v1.7.4. They can be easily installed in your Windows through the following pip command.
pip install Spire.PDF
If you are unsure how to install, please refer to this tutorial: How to Install Spire.PDF for Python on Windows
Add a Text Markup Annotation to PDF in Python
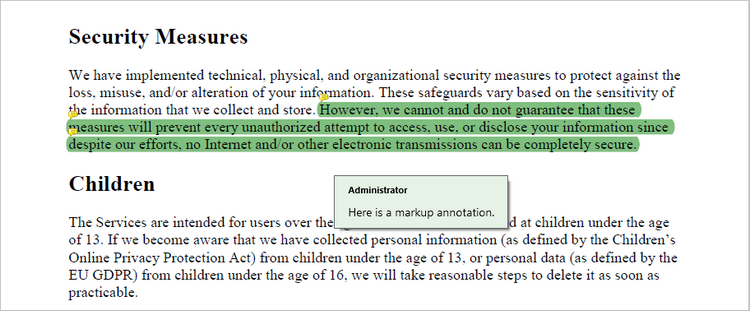
Text markup in PDF refers to the ability to emphasize important text by selecting and highlighting it. To add a text markup annotation to a PDF, you first need to locate the specific text within the document with the help of the PdfTextFinder class. Once the text is identified, you can create a PdfTextMarkupAnnotation object and apply it to the document.
The following are the steps to add a text markup annotation to PDF using Python:
- Create a PdfDocument object.
- Load a PDF file from the specified location.
- Get a page from the document.
- Find a specific piece of text within the page using PdfTextFinder class.
- Create a PdfTextMarkupAnnotation object based on the text found.
- Add the annotation to the page using PdfPageBase.AnnotationsWidget.Add() method.
- Save the modified document to a different PDF file.
- Python
from spire.pdf.common import *
from spire.pdf import *

# Create a PdfDocument object
doc = PdfDocument()

# Load a PDF file
doc.LoadFromFile("C:\\Users\\Administrator\\Desktop\\Input.pdf")

# Get a specific page
page = doc.Pages[0]

# Create a PdfTextFinder object based on the page
finder = PdfTextFinder(page)

# Set the find options
finder.Options.Parameter = TextFindParameter.WholeWord
finder.Options.Parameter = TextFindParameter.IgnoreCase

# Find the instances of the specified text
fragments = finder.Find("However, we cannot and do not guarantee that these measures will prevent "+
                        "every unauthorized attempt to access, use, or disclose your information since "+
                         "despite our efforts, no Internet and/or other electronic transmissions can be completely secure.");

# Get the first instance
textFragment = fragments[0]

# Specify annotation text
text = "Here is a markup annotation."

# Iterate through the text bounds
for i in range(len(textFragment.Bounds)):

    # Get a specific bound
    rect = textFragment.Bounds[i]

    # Create a text markup annotation
    annotation = PdfTextMarkupAnnotation("Administrator", text, rect)

    # Set the markup color
    annotation.TextMarkupColor = PdfRGBColor(Color.get_Green())

    # Add the annotation to the collection of the annotations
    page.AnnotationsWidget.Add(annotation)

# Save result to file
doc.SaveToFile("output/MarkupAnnotation.pdf")

# Dispose resources
doc.Dispose()
Add a Free Text Annotation to PDF in Python
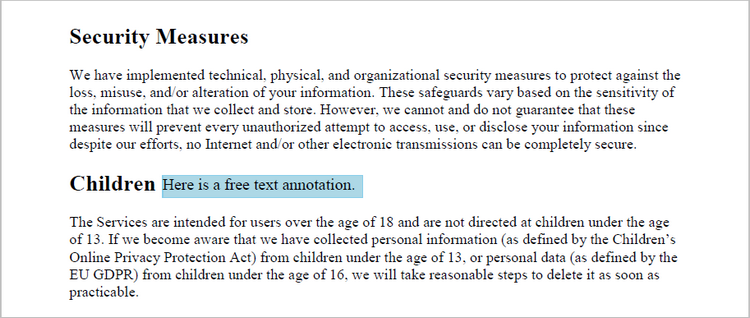
Free text annotations allow adding freeform text comments directly on a PDF. To add a free text annotation at a specific location, you can use the PdfTextFinder class to obtain the coordinate information of the searched text, then create a PdfFreeTextAnnotation object based on that coordinates and add it to the document.
The following are the steps to add a free text annotation to PDF using Python:
- Create a PdfDocument object.
- Load a PDF file from the specified location.
- Get a page from the document.
- Find a specific piece of text within the page using PdfTextFinder class.
- Create a PdfFreeTextAnnotation object based on the coordinate information of the text found.
- Set the annotation content using PdfFreeTextAnnotation.Text property.
- Add the annotation to the page using PdfPageBase.AnnotationsWidget.Add() method.
- Save the modified document to a different PDF file.
- Python
from spire.pdf.common import *
from spire.pdf import *

# Create a PdfDocument object
doc = PdfDocument()

# Load a PDF file
doc.LoadFromFile("C:\\Users\\Administrator\\Desktop\\Input.pdf")

# Get a specific page
page = doc.Pages[0]

# Create a PdfTextFinder object based on the page
finder = PdfTextFinder(page)

# Set the find options
finder.Options.Parameter = TextFindParameter.WholeWord
finder.Options.Parameter = TextFindParameter.IgnoreCase

# Find the instances of the specified text
fragments = finder.Find("Children");

# Get the first instance
textFragment = fragments[0]

# Get the text bound
rect = textFragment.Bounds[0]

# Get the coordinates to add annotation
right = bound.Right
top = bound.Top

# Create a free text annotation
rectangle = RectangleF(right + 5, top + 2, 160.0, 18.0)
textAnnotation = PdfFreeTextAnnotation(rectangle)

# Set the content of the annotation
textAnnotation.Text = "Here is a free text annotation."

# Set other properties of annotation
font = PdfFont(PdfFontFamily.TimesRoman, 13.0, PdfFontStyle.Regular)
border = PdfAnnotationBorder(1.0)
textAnnotation.Font = font
textAnnotation.Border = border
textAnnotation.BorderColor = PdfRGBColor(Color.get_SkyBlue())
textAnnotation.Color = PdfRGBColor(Color.get_LightBlue())
textAnnotation.Opacity = 1.0

# Add the annotation to the collection of the annotations
page.AnnotationsWidget.Add(textAnnotation)

# Save result to file
doc.SaveToFile("output/FreeTextAnnotation.pdf")

# Dispose resources
doc.Dispose()
Add a Popup Annotation to PDF in Python
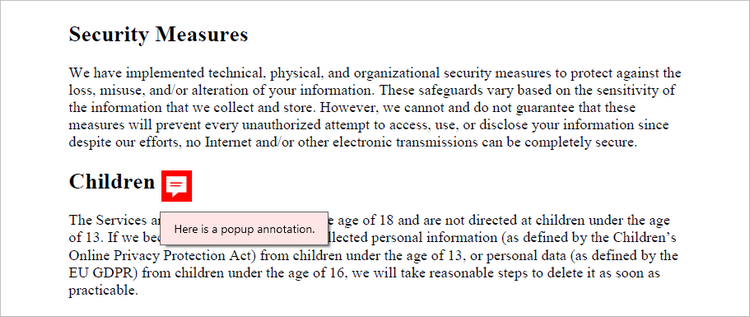
A popup annotation allows for the display of additional information or content in a pop-up window. To get a specific position to add a popup annotation, you can still use the PdfTextFinder class. Once the coordinate information is obtained, you can create a PdfPopupAnnotation object and add it to the document.
The steps to add a popup annotation to PDF using Python are as follows:
- Create a PdfDocument object.
- Load a PDF file from the specified location.
- Get a page from the document.
- Find a specific piece of text within the page using PdfTextFinder class.
- Create a PdfPopupAnnotation object based on the coordinate information of the text found.
- Set the annotation content using PdfPopupAnnotation.Text property.
- Add the annotation to the page using PdfPageBase.AnnotationsWidget.Add() method.
- Save the modified document to a different PDF file.
- Python
from spire.pdf.common import *
from spire.pdf import *

# Create a PdfDocument object
doc = PdfDocument()

# Load a PDF file
doc.LoadFromFile("C:\\Users\\Administrator\\Desktop\\Input.pdf")

# Get a specific page
page = doc.Pages[0]

# Create a PdfTextFinder object based on the page
finder = PdfTextFinder(page)

# Set the find options
finder.Options.Parameter = TextFindParameter.WholeWord
finder.Options.Parameter = TextFindParameter.IgnoreCase

# Find the instances of the specified text
fragments = finder.Find("Children");

# Get the first instance
textFragment = fragments[0]

# Get the text bound
bound = textFragment.Bounds[0]

# Get the coordinates to add annotation
right = bound.Right
top = bound.Top

# Create a free text annotation
rectangle = RectangleF(right + 5, top, 30.0, 30.0)
popupAnnotation = PdfPopupAnnotation(rectangle)

# Set the content of the annotation
popupAnnotation.Text = "Here is a popup annotation."

# Set the icon and color of the annotation
popupAnnotation.Icon = PdfPopupIcon.Comment
popupAnnotation.Color = PdfRGBColor(Color.get_Red())

# Add the annotation to the collection of the annotations
page.AnnotationsWidget.Add(popupAnnotation)

# Save result to file
doc.SaveToFile("output/PopupAnnotation.pdf")

# Dispose resources
doc.Dispose()
Add a Stamp Annotation to PDF in Python
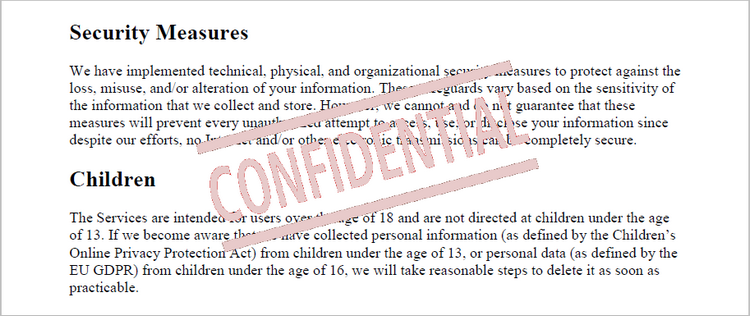
Stamp annotations in PDF documents are a type of annotation that allow users to add custom "stamps" or symbols to a PDF file. To define the appearance of a stamp annotation, use the PdfTemplate class. Then, create a PdfRubberStampAnnotation object and apply the previously defined template as its appearance. Finally, add the annotation to the PDF document.
The steps to add a stamp annotation to PDF using Python are as follows:
- Create a PdfDocument object.
- Load a PDF file from the specified location.
- Get a page from the document.
- Create a PdfTemplate object and draw an image on the template.
- Create a PdfRubberStampAnnotation object and apply the template as its appearance.
- Add the annotation to the page using PdfPageBase.AnnotationsWidget.Add() method.
- Save the modified document to a different PDF file.
- Python
from spire.pdf.common import *
from spire.pdf import *

# Create a PdfDocument object
doc = PdfDocument()

# Load a PDF document
doc.LoadFromFile("C:\\Users\\Administrator\\Desktop\\Input.pdf")

# Get a specific page
page = doc.Pages[0]

# Load an image file
image = PdfImage.FromFile("C:\\Users\\Administrator\\Desktop\\confidential.png")

# Get the width and height of the image
width = (float)(image.Width)
height = (float)(image.Height)

# Create a PdfTemplate object based on the size of the image
template = PdfTemplate(width, height, True)

# Draw image on the template
template.Graphics.DrawImage(image, 0.0, 0.0, width, height)

# Create a rubber stamp annotation, specifying its location and position
rect = RectangleF((float) (page.ActualSize.Width/2 - width/2), 90.0, width, height)
stamp = PdfRubberStampAnnotation(rect)

# Create a PdfAppearance object
pdfAppearance = PdfAppearance(stamp)

# Set the template as the normal state of the appearance
pdfAppearance.Normal = template

# Apply the appearance to the stamp
stamp.Appearance = pdfAppearance

# Add the stamp annotation to PDF
page.AnnotationsWidget.Add(stamp)

# Save the file
doc.SaveToFile("output/StampAnnotation.pdf")

# Dispose resources
doc.Dispose()
Add a Shape Annotation to PDF in Python
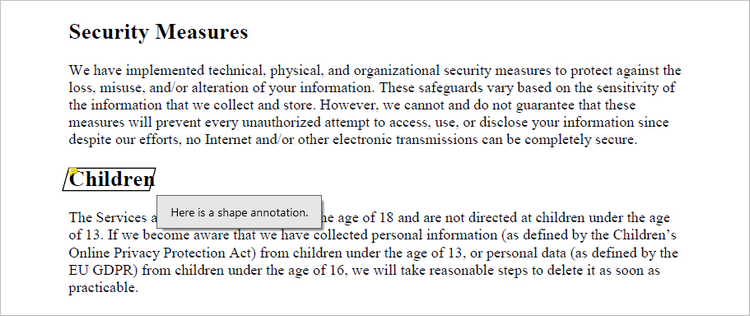
Shape annotations in PDF documents are a type of annotation that allow users to add various geometric shapes to the PDF file. Spire.PDF for Python offers the classes such as PdfPolyLineAnnotation, PdfLineAnnotation, and PdfPolygonAnnotation, allowing developers to add different types of shape annotations to PDF.
The steps to add a shape annotation to PDF using Python are as follows:
- Create a PdfDocument object.
- Load a PDF file from the specified location.
- Get a page from the document.
- Find a specific piece of text within the page using PdfTextFinder class.
- Create a PdfPolyLineAnnotation object based on the coordinate information of the text found.
- Set the annotation content using PdfPolyLineAnnotation.Text property.
- Add the annotation to the page using PdfPageBase.AnnotationsWidget.Add() method.
- Save the modified document to a different PDF file.
- Python
from spire.pdf.common import *
from spire.pdf import *

# Create a PdfDocument object
doc = PdfDocument()

# Load a PDF file
doc.LoadFromFile("C:\\Users\\Administrator\\Desktop\\Input.pdf")

# Get a specific page
page = doc.Pages[0]

# Create a PdfTextFinder object based on the page
finder = PdfTextFinder(page)

# Set the find options
finder.Options.Parameter = TextFindParameter.WholeWord
finder.Options.Parameter = TextFindParameter.IgnoreCase

# Find the instances of the specified text
fragments = finder.Find("Children");

# Get the first instance
textFragment = fragments[0]

# Get the text bound
bound = textFragment.Bounds[0]

# Get the coordinates to add annotation
left = bound.Left
top = bound.Top
right = bound.Right
bottom = bound.Bottom

# Create a shape annotation
polyLineAnnotation = PdfPolyLineAnnotation(page, [PointF(left, top), PointF(right, top), PointF(right - 5, bottom), PointF(left - 5, bottom), PointF(left, top)])

# Set the annotation text
polyLineAnnotation.Text = "Here is a shape annotation."

# Add the annotation to the collection of the annotations
page.AnnotationsWidget.Add(polyLineAnnotation)

# Save result to file
doc.SaveToFile("output/ShapeAnnotation.pdf")

# Dispose resources
doc.Dispose()
Add a Web Link Annotation to PDF in Python
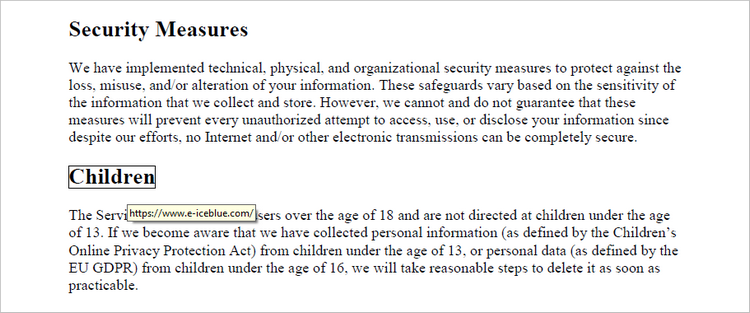
Web link annotations in PDF documents enable users to embed clickable links to webpages, providing easy access to additional resources or related information online. You can use the PdfTextFinder class to find the specified text in a PDF document, and then create a PdfUriAnnotation object based on that text.
The following are the steps to add a web link annotation to PDF using Python:
- Create a PdfDocument object.
- Load a PDF file from the specified location.
- Get a page from the document.
- Find a specific piece of text within the page using PdfTextFinder class.
- Create a PdfUriAnnotation object based on the bound of the text.
- Add the annotation to the page using PdfPageBase.AnnotationsWidget.Add() method.
- Save the modified document to a different PDF file.
- Python
from spire.pdf.common import *
from spire.pdf import *

# Create a PdfDocument object
doc = PdfDocument()

# Load a PDF file
doc.LoadFromFile("C:\\Users\\Administrator\\Desktop\\Input.pdf")

# Get a specific page
page = doc.Pages[0]

# Create a PdfTextFinder object based on the page
finder = PdfTextFinder(page)

# Set the find options
finder.Options.Parameter = TextFindParameter.WholeWord
finder.Options.Parameter = TextFindParameter.IgnoreCase

# Find the instances of the specified text
fragments = finder.Find("Children");

# Get the first instance
textFragment = fragments[0]

# Get the text bound
bound = textFragment.Bounds[0]

# Create a Url annotation
urlAnnotation = PdfUriAnnotation(bound, "https://www.e-iceblue.com/");

# Add the annotation to the collection of the annotations
page.AnnotationsWidget.Add(urlAnnotation)

# Save result to file
doc.SaveToFile("output/WebLinkAnnotation.pdf")

# Dispose resources
doc.Dispose()
Add a File Link Annotation to PDF in Python
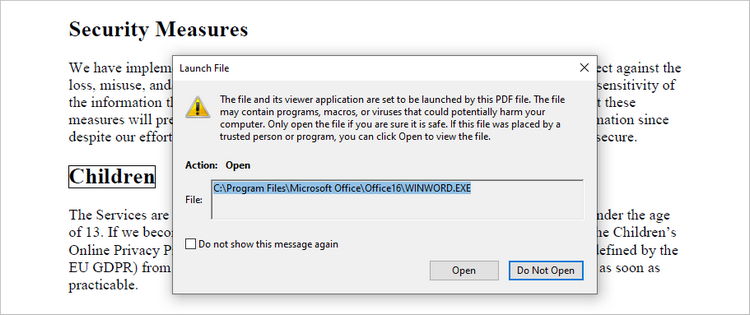
A file link annotation in a PDF document is a type of annotation that allows users to create a clickable link to an external file, such as another PDF, image, or document. Still, you can use the PdfTextFinder class to find the specified text in a PDF document, and then create a PdfFileLinkAnnotation object based on that text.
The following are the steps to add a file link annotation to PDF using Python:
- Create a PdfDocument object.
- Load a PDF file from the specified location.
- Get a page from the document.
- Find a specific piece of text within the page using PdfTextFinder class.
- Create a PdfFileLinkAnnotation object based on the bound of the text.
- Add the annotation to the page using PdfPageBase.AnnotationsWidget.Add() method.
- Save the modified document to a different PDF file.
- Python
from spire.pdf.common import *
from spire.pdf import *

# Create a PdfDocument object
doc = PdfDocument()

# Load a PDF file
doc.LoadFromFile("C:\\Users\\Administrator\\Desktop\\Input.pdf")

# Get a specific page
page = doc.Pages[0]

# Create a PdfTextFinder object based on the page
finder = PdfTextFinder(page)

# Set the find options
finder.Options.Parameter = TextFindParameter.WholeWord
finder.Options.Parameter = TextFindParameter.IgnoreCase

# Find the instances of the specified text
fragments = finder.Find("Children");

# Get the first instance
textFragment = fragments[0]

# Get the text bound
bound = textFragment.Bounds[0]

# Create a file link annotation
fileLinkAnnotation = PdfFileLinkAnnotation(bound, "C:\\Users\\Administrator\\Desktop\\Report.docx")

# Add the annotation to the collection of the annotations
page.AnnotationsWidget.Add(fileLinkAnnotation)

# Save result to file
doc.SaveToFile("output/FileLinkAnnotation.pdf")

# Dispose resources
doc.Dispose()
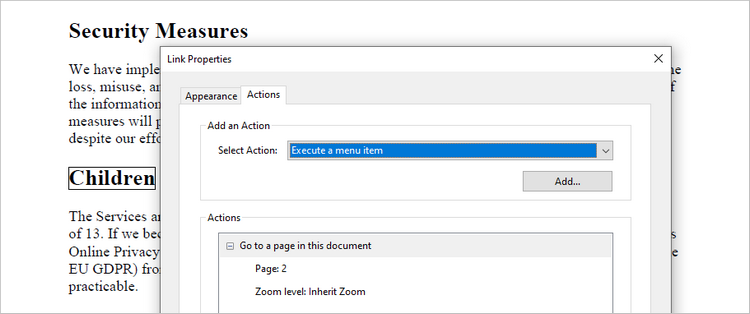
Add a Document Link Annotation to PDF in Python
A document link annotation in a PDF document is a type of annotation that creates a clickable link to a specific location within the same PDF file. To create a document link annotation, you can first use the PdfTextFinder class to identify the target text in the PDF document. Then, a PdfDocumentLinkAnnotation object is instantiated, and its destination property is configured to redirect the user to the specified location in the PDF.
The steps to add a document link annotation to PDF using Python are as follows:
- Create a PdfDocument object.
- Load a PDF file from the specified location.
- Get a page from the document.
- Find a specific piece of text within the page using PdfTextFinder class.
- Create a PdfDocumentLinkAnnotation object based on the bound of the text.
- Set the destination of the annotation using PdfDocumentLinkAnnotation.Destination property.
- Add the annotation to the page using PdfPageBase.AnnotationsWidget.Add() method.
- Save the modified document to a different PDF file.
- Python
from spire.pdf.common import *
from spire.pdf import *

# Create a PdfDocument object
doc = PdfDocument()

# Load a PDF file
doc.LoadFromFile("C:\\Users\\Administrator\\Desktop\\Input.pdf")

# Get a specific page
page = doc.Pages[0]

# Create a PdfTextFinder object based on the page
finder = PdfTextFinder(page)

# Set the find options
finder.Options.Parameter = TextFindParameter.WholeWord
finder.Options.Parameter = TextFindParameter.IgnoreCase

# Find the instances of the specified text
fragments = finder.Find("Children");

# Get the first instance
textFragment = fragments[0]

# Get the text bound
bound = textFragment.Bounds[0]

# Create a document link annotation
documentLinkAnnotation = PdfDocumentLinkAnnotation(bound)

# Set the destination of the annotation
documentLinkAnnotation.Destination = PdfDestination(doc.Pages[1]);

# Add the annotation to the collection of the annotations
page.AnnotationsWidget.Add(documentLinkAnnotation)

# Save result to file
doc.SaveToFile("output/DocumentLinkAnnotation.pdf")

# Dispose resources
doc.Dispose()
Apply for a Temporary License
If you'd like to remove the evaluation message from the generated documents, or to get rid of the function limitations, please request a 30-day trial license for yourself.
Spire.PDF for Python 10.8.1 supports returning imageInfo[i].Image as a byte[] type
We are excited to announce the release of Spire.PDF for Python 10.8.1. This version supports returning imageInfo[i].Image as a byte[] type. Besides, the issue that highlighting positions are inaccurate when searching and highlighting text is fixed in this update. More details are listed below.
Here is a list of changes made in this release
| Category | ID | Description |
| New feature | SPIREPDF-6888 | Supports returning imageInfo[i].Image as a byte[] type.
byteResult = imageInfo[i].Image.ToArray()
fileName = outputFile_1 + "Bug_6888_{0:d}.png".format(i)
with open(fileName,'wb') as f:
    f.write(byteResult)
|
| New feature | SPIREPDF-6902 | Synchronizes the PdfTextReplaceOptions class.
pdf=PdfDocument()
pdf.LoadFromFile(inputFile)
page = pdf.Pages[0]
textreplacer = PdfTextReplacer(page)
options = PdfTextReplaceOptions()
options.ReplaceType = ReplaceActionType.WholeWord
textreplacer.Options = options
textreplacer.ReplaceAllText("text", "text")
pdf.SaveToFile(outputFile)
|
| New feature | SPIREPDF-6903 | Synchronizes the TextStates property with the PdfTextFragment interface.
pdf = PdfDocument()
pdf.LoadFromFile(inputFile)
inder = PdfTextFinder(pdf.Pages[0])
fragments = finder.Find("PDF")
sb = []
for fragment in fragments:
  sb.append(fragment.TextStates[0].FontName)
  sb.append(fragment.TextStates[0].FontFamily)
  sb.append(str(round(fragment.TextStates[0].FontSize,2)))
File.AppendAllText(outputFile,sb)
pdf.Close()
|
| New feature | SPIREPDF-6944 | Supports digital signature functionality.
# Load a Pdf document from disk
doc = PdfDocument()
doc.LoadFromFile(inputFile)

# Create a signature maker with the PDF document and PFX file
signatureMaker = PdfOrdinarySignatureMaker(doc, inputFile_pfx, "e-iceblue")

# Configure the signature properties
signature = signatureMaker.Signature
signature.Name = "Gary"
signature.ContactInfo = "028-81705109"
signature.Location = "Chengdu"
signature.Reason = "The certificate of this document"

# Create a signature appearance
appearance = PdfSignatureAppearance(signature)
appearance.NameLabel = "Signer: "
appearance.ContactInfoLabel = "ContactInfo: "
appearance.LocationLabel = "Location: "
appearance.ReasonLabel = "Reaseon: "
appearance.SignatureImage = PdfImage.FromFile(inputImage)
appearance.GraphicMode = GraphicMode.SignImageAndSignDetail
appearance.SignImageLayout = SignImageLayout.none

# Apply the signature to the PDF document
signatureMaker.MakeSignature("Signer:", doc.Pages.get_Item(0), 90.0, 550.0, 270.0, 90.0, appearance)

# Save the document
doc.SaveToFile(outputFile)
|
| Bug | SPIREPDF-6877 | Fixes the issue that highlighting positions are inaccurate when searching and highlighting text. |
Python: Remove Hyperlinks from PowerPoint Presentations
PowerPoint presentations often contain hyperlinks that guide audiences to additional resources or locations within the presentations. While these links can be useful for providing further information and easy navigation, there are instances where they may detract from the presentation's flow or compromise its professional appearance. Those invalid or unnecessary links in slides can be easily removed using Python, enhancing the overall quality of the presentations.
This article will show how Spire.Presentation for Python can be utilized to remove hyperlinks from PowerPoint presentations efficiently.
- Remove Hyperlinks from Text in PowerPoint Slides
- Remove Hyperlinks from All Shapes in PowerPoint Slides
- Remove Hyperlinks from Specific Types of Shapes in PowerPoint Slides
- Remove Hyperlinks from Table Text in PowerPoint Slides
Install Spire.Presentation for Python
This scenario requires Spire.Presentation for Python and plum-dispatch v1.7.4. They can be easily installed in your Windows through the following pip command.
pip install Spire.Presentation
If you are unsure how to install, please refer to: How to Install Spire.Presentation for Python on Windows
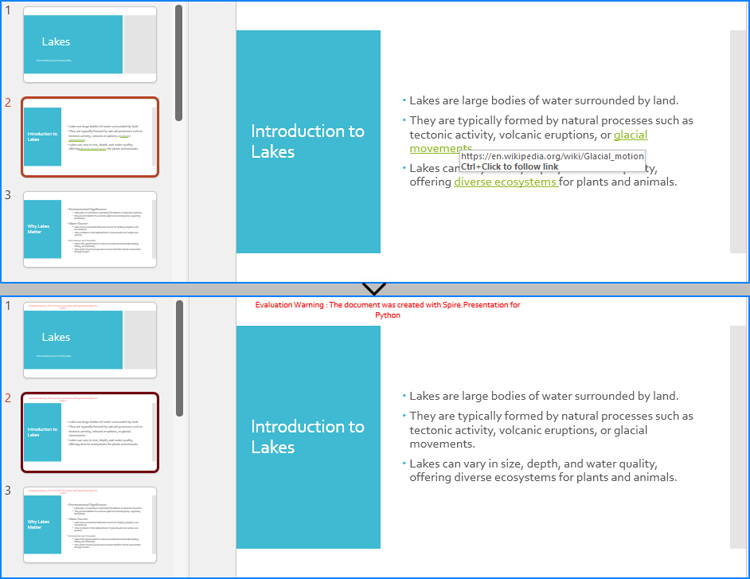
Remove Hyperlinks from Text in PowerPoint Slides
The normal text in a PowerPoint presentation is contained in auto shapes. Developers can access the text ranges within these shapes using the IAutoShape.TextFrame.Paragraphs[].TextRanges[] property and read or set the hyperlinks on them using the TextRange.ClickAction property. Hyperlinks on text can be removed by setting the TextRange.ClickAction property to None.
The detailed steps are as follows:
- Create an instance of Presentation class and load a PowerPoint presentation using Presentation.LoadFromFile() method.
- Iterate through the slides in the presentation and then iterate through the shapes in the slides.
- Check if the shape is an instance of IAutoShape. If it is, iterate through the paragraphs in the shape, and then the text ranges in the paragraphs.
- Check if the TextRange.ClickAction property of a text range is None. If it is not, remove the hyperlink by setting TextRange.ClickAction property to None.
- Save the presentation using Presentation.SaveToFile() method.
- Python
from spire.presentation import Presentation, IAutoShape, FileFormat

# Create an instance of Presentation
presentation = Presentation()

# Load a PowerPoint presentation
presentation.LoadFromFile("Sample.pptx")

# Iterate through the slides in the presentation
for slide in presentation.Slides:
    # Iterate through the shapes
    for shape in slide.Shapes:
        # Check if the shape is an AutoShape instance
        if isinstance(shape, IAutoShape):
            # Iterate through the paragraphs in the shape
            for paragraph in shape.TextFrame.Paragraphs:
                # Iterate through the text ranges in the paragraph
                for textRange in paragraph.TextRanges:
                    # Check if the text range has a hyperlink
                    if textRange.ClickAction is not None:
                        # Remove the hyperlink
                        textRange.ClickAction = None

# Save the presentation
presentation.SaveToFile("output/RemoveSlideTextHyperlink.pptx", FileFormat.Pptx2013)
presentation.Dispose()
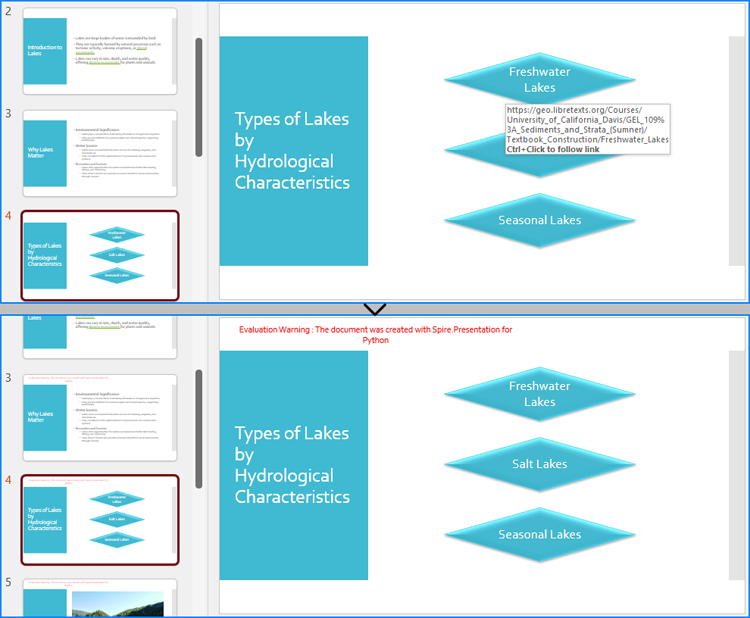
Remove Hyperlinks from All Shapes in PowerPoint Slides
The IShape class represents all types of shapes in a presentation slide, such as auto shapes, images, tables, and more. The hyperlink on all these shapes can be removed by setting the value obtained from the IShape.Click.get_NoAction() method as the value of the shapes’ IShape.Click property. The detailed steps are as follows:
- Create an instance of Presentation class and load a PowerPoint presentation using Presentation.LoadFromFile() method.
- Iterate through the slides in the presentation and then iterate through the shapes in the slides.
- Check if the IShape.Click property is None. If it is not, remove the hyperlink by setting the property to the result of IShape.Click.get_NoAction() method.
- Save the presentation using Presentation.SaveToFile() method.
- Python
from spire.presentation import Presentation, FileFormat

# Create an instance of Presentation
presentation = Presentation()

# Load a PowerPoint presentation
presentation.LoadFromFile("Sample.pptx")

# Iterate through the slides in the presentation
for slide in presentation.Slides:
    # Iterate through the shapes in the slide
    for shape in slide.Shapes:
        # Check if the shape has a hyperlink
        if shape.Click is not None:
            # Remove the click action
            shape.Click = shape.Click.get_NoAction()

# Save the presentation
presentation.SaveToFile("output/RemoveSlideShapeHyperlink.pptx", FileFormat.Pptx2013)
presentation.Dispose()
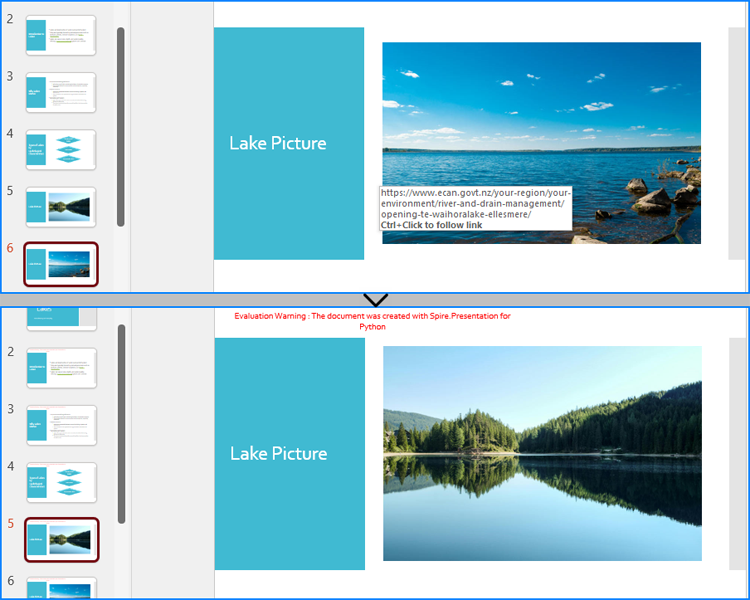
Remove Hyperlinks from Specific Types of Shapes in PowerPoint Slides
In addition to directly removing hyperlinks for all shapes, we can also determine the shape type before removing the hyperlinks to find and remove hyperlinks from shapes of the specified type. The detailed steps are as follows:
- Create an instance of Presentation class and load a PowerPoint presentation using Presentation.LoadFromFile() method.
- Iterate through the slides in the presentation and then iterate through the shapes in the slides.
- Check if the shape is an instance of IEmbedImage, ITable, or IChart. If it is, check if the IShape.Click property of the shape is None. If it is not, remove the hyperlink by setting the property to the result of IShape.Click.get_NoAction() method.
- Save the presentation using Presentation.SaveToFile() method.
- Python
from spire.presentation import Presentation, FileFormat, IEmbedImage, ITable, IChart

# Create an instance of Presentation
presentation = Presentation()

# Load a PowerPoint presentation
presentation.LoadFromFile("Sample.pptx")

# Iterate through the slides in the presentation
for slide in presentation.Slides:
    # Iterate through the shapes in the slide
    for shape in slide.Shapes:
        # Check if the shape is an embedded image
        if isinstance(shape, (IEmbedImage, ITable, IChart)):
            # check if the click action is not None
            if shape.Click is not None:
                # Remove the click action
                shape.Click = shape.Click.get_NoAction()

# Save the presentation
presentation.SaveToFile("output/RemoveSlideShapeTypeHyperlink.pptx", FileFormat.Pptx2013)
presentation.Dispose()
Remove Hyperlinks from Table Text in PowerPoint Slides
To remove hyperlinks from text within a table, it is necessary to iterate through the table's cells and the text ranges within each cell. Afterward, the hyperlinks on the text ranges in each cell can be removed by setting the TextRange.ClickAction property to None. The detailed steps are as follows:
- Create an instance of Presentation class and load a PowerPoint presentation using Presentation.LoadFromFile() method.
- Iterate through the slides in the presentation and then iterate through the shapes in the slides.
- Check if a shape is an instance of ITable class. If it is, iterate through the rows in the table and then the cells in the rows.
- Iterate through the paragraphs in the cells and then the text ranges in the paragraphs.
- Check if the TextRange.ClickAction property of a text range is None. If it is not, remove the hyperlink by setting the value of the property to None.
- Save the presentation using Presentation.SaveToFile() method.
- Python
from spire.presentation import Presentation, ITable, FileFormat

# Create an instance of Presentation
presentation = Presentation()

# Load a PowerPoint presentation
presentation.LoadFromFile("Sample.pptx")

# Iterate through the slides in the presentation
for slide in presentation.Slides:
    # Iterate through the shapes in the slide
    for shape in slide.Shapes:
        # Check if the shape is a table
        if isinstance(shape, ITable):
            # Get the table
            table = ITable(shape)
            # Iterate through the rows in the table
            for row in table.TableRows:
                # Iterate through the cells in the row
                for cell in row:
                    # Iterate through the paragraphs in the cell
                    for para in cell.TextFrame.Paragraphs:
                        # Iterate through the text ranges in the paragraph
                        for range in para.TextRanges:
                            # Check if the text run contains a hyperlink
                            if range.ClickAction is not None:
                                # Remove the hyperlink
                                range.ClickAction = None

presentation.SaveToFile("output/RemoveSlideTableTextHyperlink.pptx", FileFormat.Pptx2013)
presentation.Dispose()
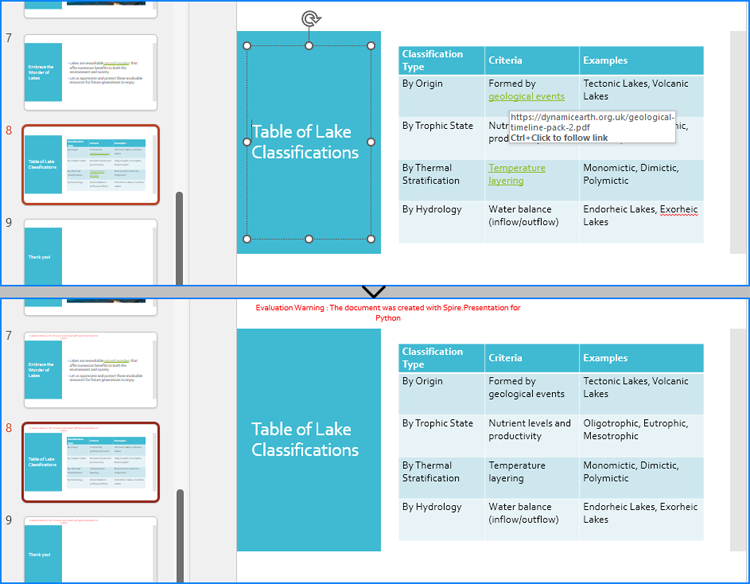
Apply for a Temporary License
If you'd like to remove the evaluation message from the generated documents, or to get rid of the function limitations, please request a 30-day trial license for yourself.
Spire.PDF 10.8.1 optimizes the time consumption of PDF to image conversion
We are happy to announce the release of Spire.PDF 10.8.1. This version optimizes the time consumption of PDF to image conversion. It also enhances the conversion from PDF to Excel and OFD to PDF. Moreover, some known issues are fixed successfully in this version, such as the issue that signatures were reversed by mirroring after flattening form fields. More details are listed below.
Here is a list of changes made in this release
| Category | ID | Description |
| Optimization | SPIREPDF-5744 | Optimizes the time consumption of PDF to image conversion. |
| Bug | SPIREPDF-2659 SPIREPDF-4454 |
Fixes the issue that importing and exporting form data (in FDF, XFDF, and XML formats) was incorrect. |
| Bug | SPIREPDF-6797 | Fixes the issue that highlighting covered the text after converting PDF to images. |
| Bug | SPIREPDF-6896 | Fixes the issue that the program threw an exception System.NullReferenceException when converting an OFD document to a PDF document. |
| Bug | SPIREPDF-6908 | Fixes the issue that the contents were blank after converting a PDF document to images. |
| Bug | SPIREPDF-6910 | Fixes the issue that it failed to get the action script of annotations. |
| Bug | SPIREPDF-6922 | Fixes the issue that the program threw an exception System.ArgumentException when importing FDF file data to PDF. |
| Bug | SPIREPDF-6925 | Fixes the issue that spaces were lost when copying content to Notepad after adding content to a PDF document using the PdfTaggedContent interface. |
| Bug | SPIREPDF-6929 SPIREPDF-6940 |
Fixes the issue that the program threw an exception System.OutOfMemoryException when converting a PDF document to images. |
| Bug | SPIREPDF-6941 | Fixes the issue that signatures were reversed by mirroring after flattening form fields. |
| Bug | SPIREPDF-6949 | Fixes the issue that the program threw an exception System.NullReferenceException when converting a PDF document to an Excel document. |
| Bug | SPIREPDF-6968 | Fixes the issue that the program threw an exception System.NullReferenceException when loading a PDF document. |