

.NET (1290)
Children categories
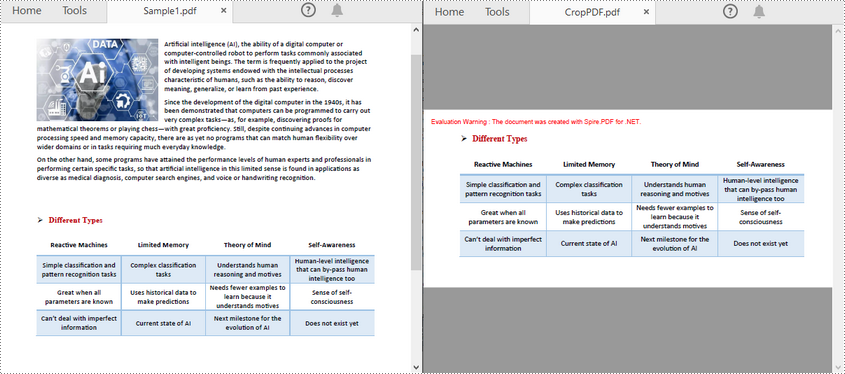
PDF page cropping is particularly useful in scenarios where the original document has excessive margins or borders that are not necessary for the intended use. By cropping pages, you can preserve the designated area for specific use, making the document more efficient for sharing, printing, or digital presentations. In this article, you will learn how to crop pages in PDF in C# using Spire.PDF for .NET.
Install Spire.PDF for .NET
To begin with, you need to add the DLL files included in the Spire.PDF for.NET package as references in your .NET project. The DLL files can be either downloaded from this link or installed via NuGet.
PM> Install-Package Spire.PDF
Crop a PDF Page in C#
Spire.PDF for .NET allows you specify a rectangular area, and then use the PdfPageBase.CropBox property to crop page to the specified area. The following are the detailed steps.
- Create a PdfDocument instance.
- Load a PDF file using PdfDocument.LoadFromFile() method.
- Get a specified page using PdfDocument.Pages[] property.
- Crop the page to the specified area using PdfPageBase.CropBox property.
- Save the result file using PdfDocument.SaveToFile() method.
- C#
using System.Drawing;
using Spire.Pdf;

namespace CropPDFPage
{
    class Program
    {
        static void Main(string[] args)
        {
            //Create a PdfDocument object
            PdfDocument pdf = new PdfDocument();

            //Load a PDF file from disk
            pdf.LoadFromFile("Sample1.pdf");

            //Get the first page
            PdfPageBase page = pdf.Pages[0];

            //Crop the page by the specified area
            page.CropBox = new RectangleF(0, 300, 600, 260);

            //Save the result file
            pdf.SaveToFile("CropPDF.pdf");
            pdf.Close();
        }
    }
}
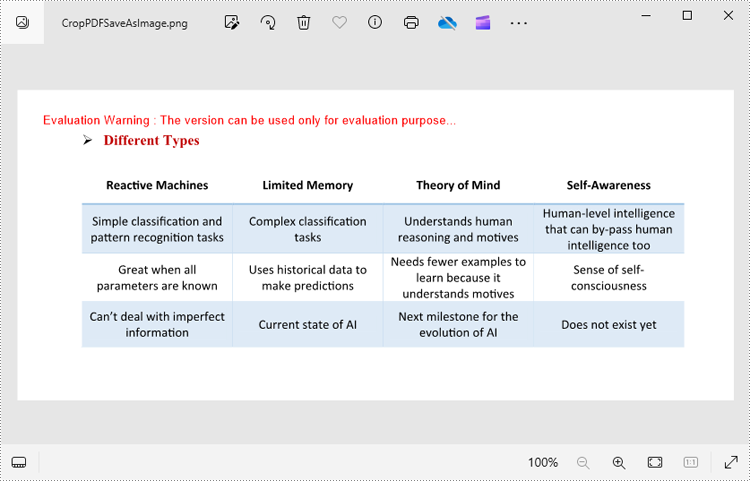
Crop a PDF Page and Export as an Image in C#
To accomplish this task, you can use the PdfDocument.SaveAsImage(int pageIndex, PdfImageType type) method to convert a cropped PDF page to an image. The following are the detailed steps.
- Create a PdfDocument instance.
- Load a PDF file using PdfDocument.LoadFromFile() method.
- Get a specified page using PdfDocument.Pages[] property.
- Crop the page to the specified area using PdfPageBase.CropBox property.
- Convert the copped page to an image using PdfDocument.SaveAsImage() method.
- Save the image as a PNG, JPG or BMP file using Image.Save(string filename, ImageFormat format) method.
- C#
using System.Drawing;
using System.Drawing.Imaging;
using Spire.Pdf;
using Spire.Pdf.Graphics;

namespace CropPDFPageToImage
{
    class Program
    {
        static void Main(string[] args)
        {
            //Create a PdfDocument object
            PdfDocument pdf = new PdfDocument();

            //Load a PDF file from disk
            pdf.LoadFromFile("Sample1.pdf");

            //Get the first page
            PdfPageBase page = pdf.Pages[0];

            //Crop the page by the specified area
            page.CropBox = new RectangleF(0, 300, 600, 260);

            //Convert the page to an image
            Image image = pdf.SaveAsImage(0, PdfImageType.Bitmap);

            //Save the image as a PNG file
            image.Save("CropPDFSaveAsImage.png", ImageFormat.Png);

            //Save the image as a JPG file
            //image.Save("ToJPG.jpg", ImageFormat.Jpeg);

            //Save the image as a BMP file
            //image.Save("ToBMP.bmp", ImageFormat.Bmp);
        }
    }
}
Apply for a Temporary License
If you'd like to remove the evaluation message from the generated documents, or to get rid of the function limitations, please request a 30-day trial license for yourself.
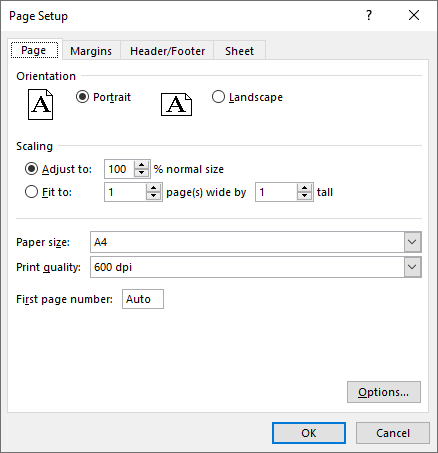
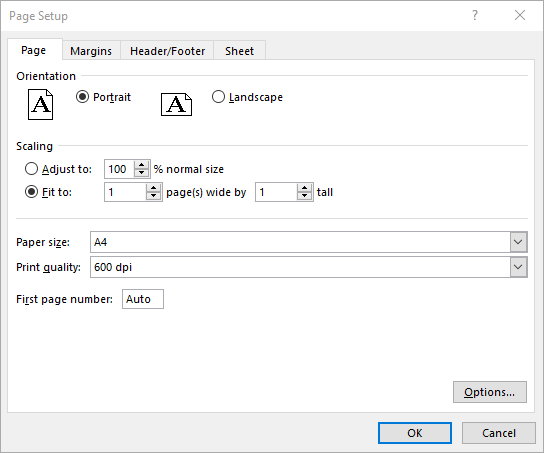
When printing Excel spreadsheets, particularly those containing complex datasets or detailed reports, configuring the page setup properly is crucial. Excel’s page setup options enable you to adjust key factors such as page margins, orientation, paper size, and scaling, ensuring your documents are tailored to fit various printing needs. By customizing these settings, you can control how your content is displayed on the page, making sure it appears polished and professional. In this article, we will demonstrate how to set page setup options in Excel in C# using Spire.XLS for .NET.
- Set Page Margins in Excel in C#
- Set Page Orientation in Excel in C#
- Set Paper Size in Excel in C#
- Set Print Area in Excel in C#
- Set Scaling Factor in Excel in C#
- Set Fit-to-Pages Options in Excel in C#
- Set Headers and Footers in Excel in C#
Install Spire.XLS for .NET
To begin with, you need to add the DLL files included in the Spire.XLS for .NET package as references in your .NET project. The DLL files can be either downloaded from this link or installed via NuGet.
PM> Install-Package Spire.XLS
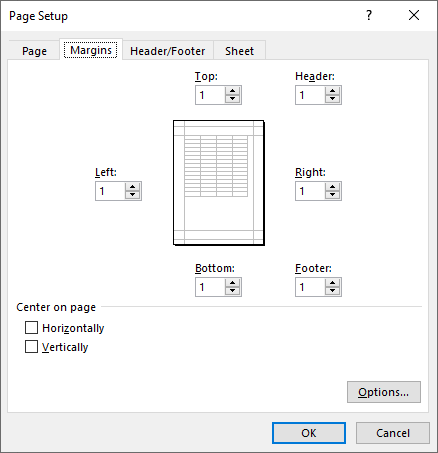
Set Page Margins in Excel in C#
The PageSetup class in Spire.XLS for .NET is used to configure page setup options for Excel worksheets. You can access the PageSetup object of a worksheet through the Worksheet.PageSetup property. Then, use properties like PageSetup.TopMargin, PageSetup.BottomMargin, PageSetup.LeftMargin, PageSetup.RightMargin, PageSetup.HeaderMarginInch, and PageSetup.FooterMarginInch to set the corresponding margins for the worksheet. The detailed steps are as follows.
- Create an object of the Workbook class.
- Load an Excel file using Workbook.LoadFromFile() method.
- Get a specific worksheet using Workbook.Worksheets[index] property.
- Access the PageSetup object of the worksheet using Worksheet.PageSetup property.
- Set the top, bottom, left, right, header, and footer margins using PageSetup.TopMargin, PageSetup.BottomMargin, PageSetup.LeftMargin, PageSetup.RightMargin, PageSetup.HeaderMarginInch, and PageSetup.FooterMarginInch properties.
- Save the modified workbook to a new file using Workbook.SaveToFile() method.
- C#
using Spire.Xls;

namespace SetPageMargins
{
    internal class Program
    {
        static void Main(string[] args)
        {
            // Create a Workbook object
            Workbook workbook = new Workbook();

            // Load an Excel file
            workbook.LoadFromFile("Sample.xlsx");

            // Get the first worksheet
            Worksheet sheet = workbook.Worksheets[0];

            // Get the PageSetup object of the worksheet
            PageSetup pageSetup = sheet.PageSetup;

            // Set top, bottom, left, and right page margins for the worksheet
            // The measure of the unit is Inch (1 inch = 2.54 cm)
            pageSetup.TopMargin = 1;
            pageSetup.BottomMargin = 1;
            pageSetup.LeftMargin = 1;
            pageSetup.RightMargin = 1;
            pageSetup.HeaderMarginInch = 1;
            pageSetup.FooterMarginInch = 1;

            // Save the modified workbook to a new file
            workbook.SaveToFile("SetPageMargins.xlsx", ExcelVersion.Version2016);
            workbook.Dispose();
        }
    }
}
Set Page Orientation in Excel in C#
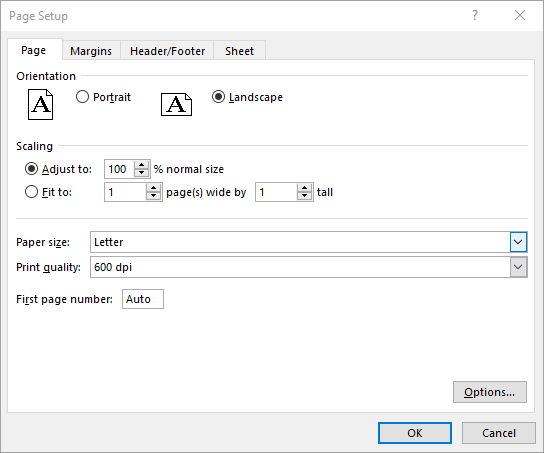
The PageSetup.Orientation property lets you determine how the page should be oriented when printed. You can choose between two options: portrait mode or landscape mode. The detailed steps are as follows.
- Create an object of the Workbook class.
- Load an Excel file using Workbook.LoadFromFile() method.
- Get a specific worksheet using Workbook.Worksheets[index] property.
- Access the PageSetup object of the worksheet using Worksheet.PageSetup property.
- Set the page orientation using PageSetup.Orientation property.
- Save the modified workbook to a new file using Workbook.SaveToFile() method.
- C#
using Spire.Xls;

namespace SetPageOrientation
{
    internal class Program
    {
        static void Main(string[] args)
        {
            //Page Orientation
            // Create a Workbook object
            Workbook workbook = new Workbook();

            // Load an Excel file
            workbook.LoadFromFile("Sample.xlsx");

            // Get the first worksheet
            Worksheet sheet = workbook.Worksheets[0];

            // Get the PageSetup object of the worksheet
            PageSetup pageSetup = sheet.PageSetup;

            // Set the page orientation for printing the worksheet to landscape mode
            pageSetup.Orientation = PageOrientationType.Landscape;

            // Save the modified workbook to a new file
            workbook.SaveToFile("SetPageOrientation.xlsx", ExcelVersion.Version2016);
            workbook.Dispose();
        }
    }
}
Set Paper Size in Excel in C#
The PageSetup.PaperSize property enables you to select from a variety of paper sizes for printing your worksheet. These options include A3, A4, A5, B4, B5, letter, legal, tabloid, and more. The detailed steps are as follows.
- Create an object of the Workbook class.
- Load an Excel file using Workbook.LoadFromFile() method.
- Get a specific worksheet using Workbook.Worksheets[index] property.
- Access the PageSetup object of the worksheet using Worksheet.PageSetup property.
- Set the paper size using PageSetup.PaperSize property.
- Save the modified workbook to a new file using Workbook.SaveToFile() method.
- C#
using Spire.Xls;

namespace SetPaperSize
{
    internal class Program
    {
        static void Main(string[] args)
        {
            // Create a Workbook object
            Workbook workbook = new Workbook();

            // Load an Excel file
            workbook.LoadFromFile("Sample.xlsx");

            // Get the first worksheet
            Worksheet sheet = workbook.Worksheets[0];

            // Get the PageSetup object of the worksheet
            PageSetup pageSetup = sheet.PageSetup;

            // Set the paper size to A4
            pageSetup.PaperSize = PaperSizeType.PaperA4;

            // Save the modified workbook to a new file
            workbook.SaveToFile("SetPaperSize.xlsx", ExcelVersion.Version2016);
            workbook.Dispose();
        }
    }
}
Set Print Area in Excel in C#
You can specify the exact area that you want to print using the PageSetup.PringArea property. The detailed steps are as follows.
- Create an object of the Workbook class.
- Load an Excel file using Workbook.LoadFromFile() method.
- Get a specific worksheet using Workbook.Worksheets[index] property.
- Access the PageSetup object of the worksheet using Worksheet.PageSetup property.
- Set the print area using PageSetup.PringArea property.
- Save the modified workbook to a new file using Workbook.SaveToFile() method.
- C#
using Spire.Xls;

namespace SetPrintArea
{
    internal class Program
    {
        static void Main(string[] args)
        {
            // Create a Workbook object
            Workbook workbook = new Workbook();

            // Load an Excel file
            workbook.LoadFromFile("Sample.xlsx");

            // Get the first worksheet
            Worksheet sheet = workbook.Worksheets[0];

            // Get the PageSetup object of the worksheet
            PageSetup pageSetup = sheet.PageSetup;

            // Set the print area of the worksheet to "A1:E5"
            pageSetup.PrintArea = "A1:E5";

            // Save the modified workbook to a new file
            workbook.SaveToFile("SetPrintArea.xlsx", ExcelVersion.Version2016);
            workbook.Dispose();
        }
    }
}

Set Scaling Factor in Excel in C#
If you want to scale the content of your worksheet to a specific percentage of its original size, use the PageSetup.Zoom property. The detailed steps are as follows.
- Create an object of the Workbook class.
- Load an Excel file using Workbook.LoadFromFile() method.
- Get a specific worksheet using Workbook.Worksheets[index] property.
- Access the PageSetup object of the worksheet using Worksheet.PageSetup property.
- Set the scaling factor using PageSetup.Zoom property.
- Save the modified workbook to a new file using Workbook.SaveToFile() method.
- C#
using Spire.Xls;

namespace SetScalingFactor
{
    internal class Program
    {
        static void Main(string[] args)
        {
            // Create a Workbook object
            Workbook workbook = new Workbook();

            // Load an Excel file
            workbook.LoadFromFile("Sample.xlsx");

            // Get the first worksheet
            Worksheet sheet = workbook.Worksheets[0];

            // Get the PageSetup object of the worksheet
            PageSetup pageSetup = sheet.PageSetup;

            // Set the scaling factor of the worksheet to 90%
            pageSetup.Zoom = 90;

            // Save the modified workbook to a new file
            workbook.SaveToFile("SetScalingFactor.xlsx", ExcelVersion.Version2016);
            workbook.Dispose();
        }
    }
}

Set Fit-to-Pages Options in Excel in C#
Spire.XLS also enables you to fit your worksheet content to a specific number of pages by using the PageSetup.FitToPagesTall and PageSetup.FitToPagesWide properties. The detailed steps are as follows.
- Create an object of the Workbook class.
- Load an Excel file using Workbook.LoadFromFile() method.
- Get a specific worksheet using Workbook.Worksheets[index] property.
- Access the PageSetup object of the worksheet using Worksheet.PageSetup property.
- Fit the content of the worksheet to one page using PageSetup.FitToPagesTall and PageSetup.FitToPagesWide properties.
- Save the modified workbook to a new file using Workbook.SaveToFile() method.
- C#
using Spire.Xls;

namespace SetFitToPages
{
    internal class Program
    {
        static void Main(string[] args)
        {
            // Create a Workbook object
            Workbook workbook = new Workbook();

            // Load an Excel file
            workbook.LoadFromFile("Sample.xlsx");

            // Get the first worksheet
            Worksheet sheet = workbook.Worksheets[0];

            // Get the PageSetup object of the worksheet
            PageSetup pageSetup = sheet.PageSetup;

            // Fit the content of the worksheet within one page vertically (i.e., all rows will fit on a single page)
            pageSetup.FitToPagesTall = 1;
            // Fit the content of the worksheet within one page horizontally (i.e., all columns will fit on a single page)
            pageSetup.FitToPagesWide = 1;

            // Save the modified workbook to a new file
            workbook.SaveToFile("FitToPages.xlsx", ExcelVersion.Version2016);
            workbook.Dispose();
        }
    }
}
Set Headers and Footers in Excel in C#
For setting headers and footers in Excel, please check this article: C#/VB.NET: Add Headers and Footers to Excel.
Apply for a Temporary License
If you'd like to remove the evaluation message from the generated documents, or to get rid of the function limitations, please request a 30-day trial license for yourself.
In some cases, checking the size, orientation, and rotation of PDF pages can be part of the quality control process. For example, before publishing or distributing a document, you might need to verify this information to ensure that all pages in the document are correctly presented. In this article, you will learn how to get PDF page size, orientation and rotation angle in C# using Spire.PDF for .NET.
Install Spire.PDF for .NET
To begin with, you need to add the DLL files included in the Spire.PDF for.NET package as references in your .NET project. The DLL files can be either downloaded from this link or installed via NuGet.
PM> Install-Package Spire.PDF
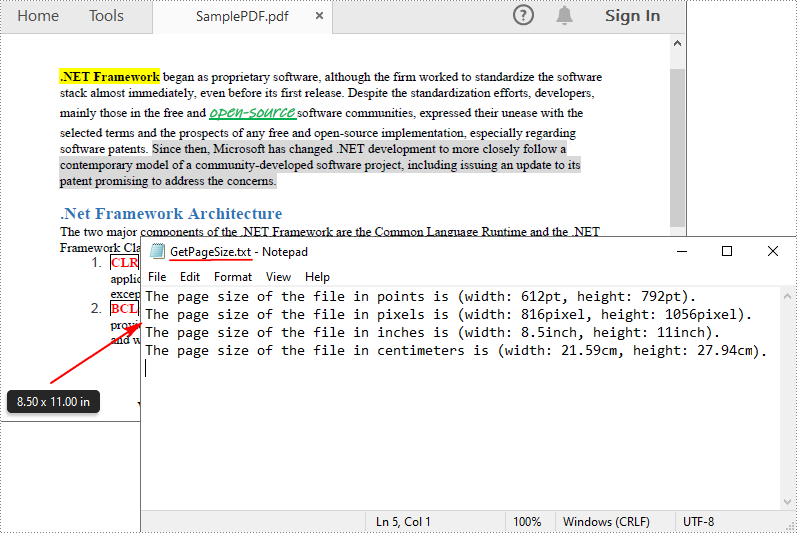
Get PDF Page Size in C#
Spire.PDF for .NET offers the PdfPageBase.Size.Width and PdfPageBase.Size.Height properties to get the width and height of a PDF page in points. If you want to convert the default unit of measure to other units, you can use the PdfUnitConvertor class. The following are the detailed steps.
- Create a PdfDocument instance.
- Load a PDF file using PdfDocument.LoadFromFile() method.
- Get a specified page using PdfDocument.Pages[] property.
- Get the width and height of the PDF page using PdfPageBase.Size.Width and PdfPageBase.Size.Height properties.
- Create a PdfUnitConvertor instance, and then convert the size units from points to other units of measure using PdfUnitConvertor.ConvertUnits() method.
- Add the page size information to a StringBuilder instance, and then save the result to a TXT file.
- C#
using System.Text;
using Spire.Pdf;
using Spire.Pdf.Graphics;

namespace GetPDFPageSize
{
    class Program
    {
        static void Main(string[] args)
        {
            //Create a PdfDocument object
            PdfDocument pdf = new PdfDocument();

            //Load a PDF file from disk
            pdf.LoadFromFile("SamplePDF.pdf");

            //Get the first page
            PdfPageBase page = pdf.Pages[0];

            //Get the width and height of the page in "point"
            float pointWidth = page.Size.Width;
            float pointHeight = page.Size.Height;

            //Create PdfUnitConvertor to convert the unit
            PdfUnitConvertor unitCvtr = new PdfUnitConvertor();

            //Convert size units from points to pixels
            float pixelWidth = unitCvtr.ConvertUnits(pointWidth, PdfGraphicsUnit.Point, PdfGraphicsUnit.Pixel);
            float pixelHeight = unitCvtr.ConvertUnits(pointHeight, PdfGraphicsUnit.Point, PdfGraphicsUnit.Pixel);

            //Convert size units from points to inches
            float inchWidth = unitCvtr.ConvertUnits(pointWidth, PdfGraphicsUnit.Point, PdfGraphicsUnit.Inch);
            float inchHeight = unitCvtr.ConvertUnits(pointHeight, PdfGraphicsUnit.Point, PdfGraphicsUnit.Inch);

            //Convert size units from points to centimeters
            float centimeterWidth = unitCvtr.ConvertUnits(pointWidth, PdfGraphicsUnit.Point, PdfGraphicsUnit.Centimeter);
            float centimeterHeight = unitCvtr.ConvertUnits(pointHeight, PdfGraphicsUnit.Point, PdfGraphicsUnit.Centimeter);

            //Create a StringBuilder instance
            StringBuilder content = new StringBuilder();

            //Add the page size information to the StringBuilder instance
            content.AppendLine("The page size of the file in points is (width: " + pointWidth + "pt, height: " + pointHeight + "pt).");
            content.AppendLine("The page size of the file in pixels is (width: " + pixelWidth + "pixel, height: " + pixelHeight + "pixel).");
            content.AppendLine("The page size of the file in inches is (width: " + inchWidth + "inch, height: " + inchHeight + "inch).");
            content.AppendLine("The page size of the file in centimeters is (width: " + centimeterWidth + "cm, height: " + centimeterHeight + "cm).");

            //Save to a txt file
            File.WriteAllText("GetPageSize.txt", content.ToString());
        }
    }
}
Detect PDF Page Orientation in C#
To detect the orientation of a PDF page, you can compare the width and height of the page. If the page width is greater than the height, then the page orientation is landscape, otherwise it is portrait. The following are the detailed steps.
- Create a PdfDocument instance.
- Load a PDF file using PdfDocument.LoadFromFile() method.
- Get a specified page using PdfDocument.Pages[] property.
- Get the width and height of the PDF page using PdfPageBase.Size.Width and PdfPageBase.Size.Height properties.
- Compare the values of page width and height to detect the page orientation.
- Output the result using Console.WriteLine() method.
- C#
using Spire.Pdf;

namespace GetPDFPageOrientation
{
    class Program
    {
        static void Main(string[] args)
        {
            //Create a PdfDocument object
            PdfDocument pdf = new PdfDocument();

            //Load a PDF file from disk
            pdf.LoadFromFile("SamplePDF.pdf");

            //Get the first page
            PdfPageBase page = pdf.Pages[0];

            //Get the width and height of the page
            float width = page.Size.Width;
            float height = page.Size.Height;

            //Compare the values of page width and height
            if (width > height)
            {
                Console.WriteLine("The page orientation is Landscape.");
            }

            else
            {
                Console.WriteLine("The page orientation is Portrait.");
            }
        }
    }
}

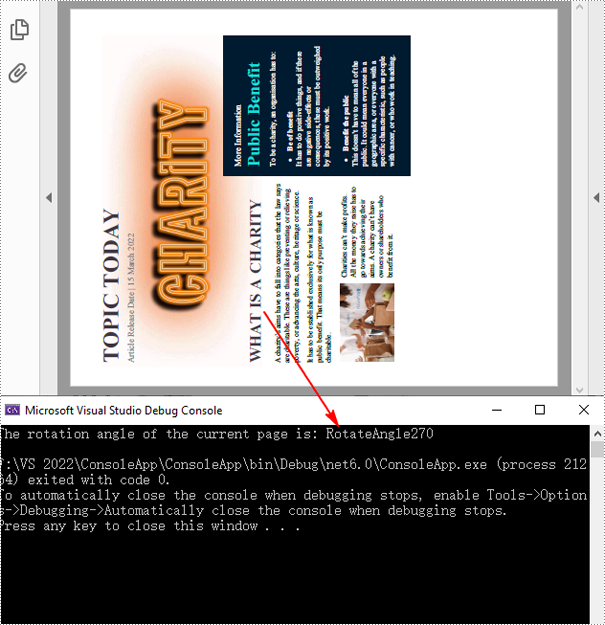
Detect PDF Page Rotation Angle in C#
The rotation angle of a PDF page can be obtained through the PdfPageBase.Rotation property. The following are the detailed steps.
- Create a PdfDocument instance.
- Load a PDF file using PdfDocument.LoadFromFile() method.
- Get a specified page using PdfDocument.Pages[] property.
- Get the rotation angle of the page using PdfPageBase.Rotation property, and then convert it to text string.
- Output the result using Console.WriteLine() method.
- C#
using Spire.Pdf;

namespace GetPDFPageRotationAngle
{
    class Program
    {
        static void Main(string[] args)
        {
            //Create a PdfDocument object
            PdfDocument pdf = new PdfDocument();

            //Load a PDF file from disk
            pdf.LoadFromFile("E:\\PythonPDF\\Sample.pdf");

            //Get the first page
            PdfPageBase page = pdf.Pages[0];

            //Get the rotation angle of the current page
            PdfPageRotateAngle rotationAngle = page.Rotation;
            string rotation = rotationAngle.ToString();

            //Output the page rotation angle information
            Console.WriteLine("The rotation angle of the current page is: " + rotation);
        }
    }
}
Apply for a Temporary License
If you'd like to remove the evaluation message from the generated documents, or to get rid of the function limitations, please request a 30-day trial license for yourself.
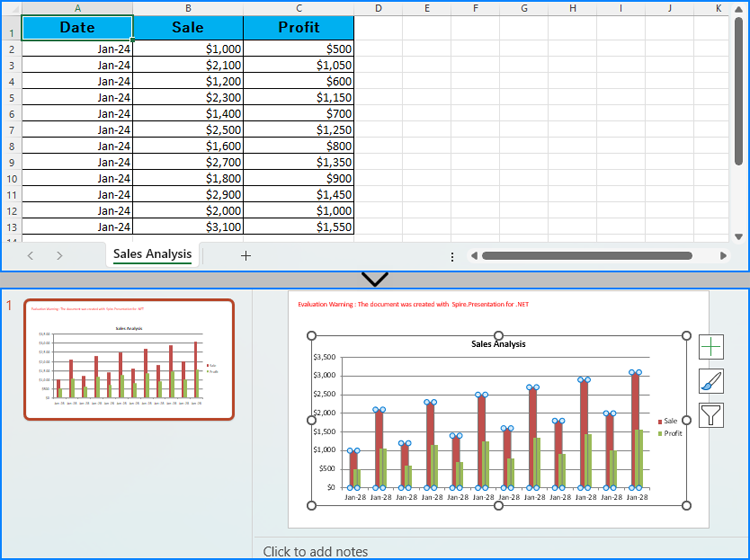
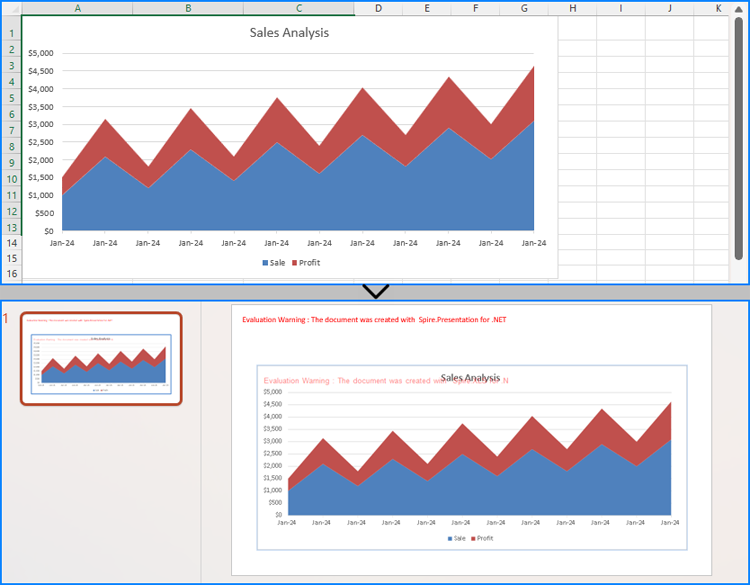
Creating charts in PowerPoint slides is a powerful way to enhance presentations by visually representing complex information, making it easier for audiences to grasp key insights. By reading Excel data directly to generate charts, you can streamline the data entry process and ensure data accuracy. Or, if you want to use charts from Excel files directly in PowerPoint presentations, you can directly insert them as pictures into PowerPoint slides, thus maximizing the original formatting and appearance. This article will show how to create charts in PowerPoint slides from Excel data using Spire.Office for .NET in .NET programs.
- Create Charts in PowerPoint Slides with Excel Data using C#
- Insert Excel Charts into PowerPoint Slides as Images using C#
Install Spire.Office for .NET
To begin with, you need to add the DLL files included in the Spire.Office for.NET package as references in your .NET project. The DLL files can be either downloaded from this link or installed via NuGet.
PM> Install-Package Spire.Office
Create Charts in PowerPoint Slides with Excel Data using C#
Developers can read data from Excel worksheets with Spire.XLS for .NET and then create charts in PowerPoint slides with Spire.Presentation for .NET using the read data as the charts' data source. The detailed steps for creating charts in PowerPoint presentations with Excel file data are as follows:
- Create an instance of Presentation class.
- Create an instance of Workbook class and load an Excel file using Workbook.LoadFromFile() method.
- Get the first slide in the presentation through Presentation.Slides[] property and create a chart in the first slide of the presentation using ISlide.Shapes.AppendChart() method.
- Clear the default dummy data using IChart.ChartData.Clear() method.
- Get the first worksheet in the workbook through Workbook.Worksheets[] property.
- Iterate through rows in the worksheet and then the columns in the worksheet:
- Get the cell values in the worksheet through Worksheet.AllocatedRange[].Value2 property and set them as the values of the chart’s data through IChart.ChartData[].Value property.
- Set the chart title using properties under IChart.ChartTitle property.
- Set the chart series labels and category labels through IChart.Series.SeriesLabel and IChart.Categories.CategoryLabels properties.
- Set the series values through IChart.Series[].Values property.
- Set the number format of the axis through IChart.PrimaryCategoryAxis.NumberFormat and IChart.PrimaryValueAxis.NumberFormat properties.
- Set the style of the chart through IChart.ChartStyle property.
- Save the presentation using Presentation.SaveToFile() method.
- C#
using Spire.Presentation;
using Spire.Presentation.Charts;
using Spire.Xls;
using System.Drawing;
using FileFormat = Spire.Presentation.FileFormat;
using IChart = Spire.Presentation.Charts.IChart;

namespace PresentationChartExcelData
{
    class Program
    {
        public static void Main(string[] args)
        {
            // Create an instance of Presentation class
            Presentation presentation = new Presentation();

            // Set the slide size
            presentation.SlideSize.Type = SlideSizeType.Screen16x9;

            // Create an instance of Workbook class and load an Excel file
            Workbook workbook = new Workbook();
            workbook.LoadFromFile("Sample.xlsx");

            // Get the first worksheet in the workbook
            Worksheet sheet = workbook.Worksheets[0];

            // Create a chart in the presentation
            RectangleF rect = new RectangleF(50, 100, presentation.SlideSize.Size.Width - 100, presentation.SlideSize.Size.Height - 150);
            ISlide slide = presentation.Slides[0];
            IChart chart = slide.Shapes.AppendChart(ChartType.ColumnClustered, rect);

            // Clear the default dummy data
            chart.ChartData.Clear(0, 0, 5, 5);

            // Iterate through the rows in the worksheet
            for (int i = 0; i < sheet.AllocatedRange.RowCount; i++)
            {
                // Iterate through the columns in the worksheet
                for (int j = 0; j < sheet.AllocatedRange.ColumnCount; j++)
                {
                    // Set the cell values in the worksheet as the values of the chart data
                    chart.ChartData[i, j].Value = sheet.AllocatedRange[i + 1, j + 1].Value2;
                    // Copy number formats
                    chart.ChartData[i, j].NumberFormat = sheet.AllocatedRange[i + 1, j + 1].NumberFormat;
                }
            }

            // Set the chart title
            chart.ChartTitle.TextProperties.Text = sheet.Name;
            chart.ChartTitle.TextProperties.IsCentered = true;
            chart.ChartTitle.Height = 25;
            chart.HasTitle = true;

            // Set the series labels and category labels
            chart.Series.SeriesLabel = chart.ChartData["B1", "C1"];
            chart.Categories.CategoryLabels = chart.ChartData["A2", "A" + sheet.AllocatedRange.RowCount];

            // Set the series values
            chart.Series[0].Values = chart.ChartData["B2", "B" + sheet.AllocatedRange.RowCount];
            chart.Series[1].Values = chart.ChartData["C2", "C" + sheet.AllocatedRange.RowCount];

            // Set the number format of the axis
            chart.PrimaryCategoryAxis.NumberFormat = sheet.AllocatedRange["A2"].NumberFormat;
            chart.PrimaryValueAxis.NumberFormat = sheet.AllocatedRange["B2"].NumberFormat;

            // Set the style of the chart
            chart.ChartStyle = ChartStyle.Style2;

            // Set the overlap and gap width
            chart.OverLap = 50;
            chart.GapWidth = 200;

            // Save the presentation
            presentation.SaveToFile("output/PresentationChartExcelData.pptx", FileFormat.Pptx2019);
            presentation.Dispose();
            workbook.Dispose();
        }
    }
}
Insert Excel Charts into PowerPoint Slides as Images using C#
To insert an existing chart from an Excel worksheet into a PowerPoint slide while maintaining its appearance and formatting precisely, the Workbook.SaveChartAsImage() method can be employed. This method allows the Excel chart to be saved as an image, which can then be added to the slide. The specific steps are as follows:
- Create an instance of Presentation class.
- Create an instance of Workbook class and load an Excel file using Workbook.LoadFromFile() method.
- Save a chart in a worksheet as an image using Workbook.SaveChartAsImage() method.
- Embed the image into the presentation using Presentation.Images.Append() method.
- Add the image to a slide using Presentation.Slides[].AppendEmbedImage() method.
- Save the presentation using Presentation.SaveToFile() method.
- C#
using Spire.Presentation;
using Spire.Presentation.Drawing;
using Spire.Xls;
using System.Drawing;
using FileFormat = Spire.Presentation.FileFormat;

namespace PresentationChartExcelChart
{
    class Program
    {
        public static void Main(string[] args)
        {
            // Create an instance of Presentation class
            Presentation presentation = new Presentation();

            // Set the slide size
            presentation.SlideSize.Type = SlideSizeType.Screen16x9;

            // Create an instance of Workbook class and load an Excel file
            Workbook workbook = new Workbook();
            workbook.LoadFromFile("Sample.xlsx");

            // Save the first chart in the first worksheet as an image
            Image image = workbook.SaveChartAsImage(workbook.Worksheets[0], 0);

            // Embed the image into the presentation
            IImageData imageData = presentation.Images.Append(image);

            // Add the image to the first slide
            RectangleF rect = new RectangleF(50, 120, presentation.SlideSize.Size.Width - 100, presentation.SlideSize.Size.Height - 170);
            presentation.Slides[0].Shapes.AppendEmbedImage(ShapeType.Rectangle, imageData, rect);

            // Save the presentation
            presentation.SaveToFile("output/PresentationChartExcelChart.pptx", FileFormat.Pptx2019);
            presentation.Dispose();
            workbook.Dispose();
        }
    }
}
Apply for a Temporary License
If you'd like to remove the evaluation message from the generated documents, or to get rid of the function limitations, please request a 30-day trial license for yourself.
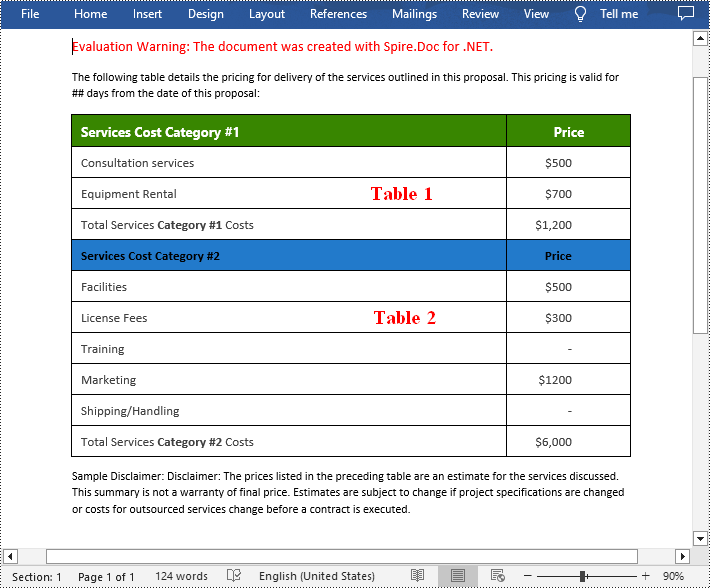
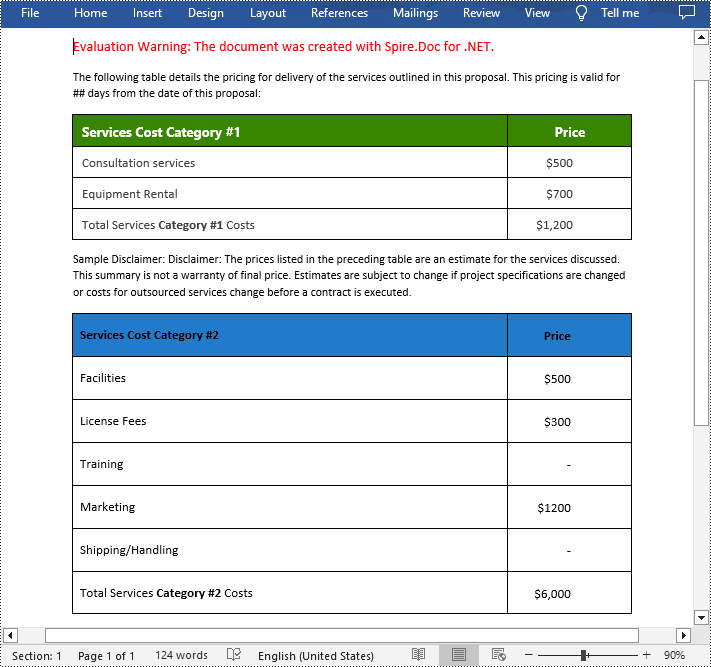
Tables in Word documents allow users to organize data in a clear and structured manner. However, as documents grow in complexity, the need to adjust table structures often arises. Whether you need to combine multiple tables for a comprehensive view or divide a large table for better readability, mastering the art of merging and splitting tables in Word can significantly improve the presentation of your data. In this article, you will learn how to merge or split tables in Word in C# using Spire.Doc for .NET.
Install Spire.Doc for .NET
To begin with, you need to add the DLL files included in the Spire.Doc for.NET package as references in your .NET project. The DLL files can be either downloaded from this link or installed via NuGet.
PM> Install-Package Spire.Doc
Merge Tables in Word in C#
With Spire.Doc for .NET, you can combine two or more tables into one by copying all rows from other tables to the target table and then deleting the other tables. The following are the detailed steps.
- Create a Document instance.
- Load a Word document using Document.LoadFromFile() method.
- Get a specified section using Document.Sections[] property.
- Get two tables in the section using section.Tables[] property.
- Iterate through all rows in the second table and copy them using Table.Rows[].Clone() method.
- Add the rows of the second table to the first table using Table.Rows.Add() method.
- Save the result document using Document.SaveToFile() method.
- C#
using Spire.Doc;

namespace CombineTables
{
    class Program
    {
        static void Main(string[] args)
        {
            //Create a Document instance
            Document doc = new Document();

            //Load a Word document
            doc.LoadFromFile("Cost.docx");

            //Get the first section
            Section section = doc.Sections[0];

            //Get the first and second table in the section
            Table table1 = section.Tables[0] as Table;
            Table table2 = section.Tables[1] as Table;

            //Add the rows of table2 to table1
            for (int i = 0; i < table2.Rows.Count; i++)
            {
                table1.Rows.Add(table2.Rows[i].Clone());
            }

            //Remove the table2
            section.Tables.Remove(table2);

            //Save the result document
            doc.SaveToFile("CombineTables.docx", FileFormat.Docx);
        }
    }
}
Split Tables in Word in C#
To split a table into two or more tables, you need to create a new table, then copy the specified rows from the original table to the new table, and then delete those rows from the original table. The following are the detailed steps.
- Create a Document instance.
- Load a Word document using Document.LoadFromFile() method.
- Get a specified section using Document.Sections[] property.
- Get a specified table in the section using section.Tables[] property.
- Specify the row index where the table will be split.
- Create a new instance of the Table class.
- Iterate through the specified rows in the original table and copy them using Table.Rows[].Clone() method.
- Add the specified rows to the new table using Table.Rows.Add() method.
- Iterate through the copied rows and remove each row from the original table using Table.Rows.RemoveAt() method.
- Add the new table to the section using Section.Tables.Add() method.
- Save the result document using Document.SaveToFile() method.
- C#
using Spire.Doc;

namespace SplitWordTable
{
    class Program
    {
        static void Main(string[] args)
        {
            //Create a Document instance
            Document doc = new Document();

            //Load a Word document
            doc.LoadFromFile("CombineTables.docx");

            //Get the first section
            Section section = doc.Sections[0];

            //Get the first table in the section
            Table table = section.Tables[0] as Table;

            //Specify to split the table from the fifth row
            int splitIndex = 4;

            //Create a new table
            Table newTable = new Table(section.Document);

            //Adds rows (from the 5th to the last row) to the new table
            for (int i = splitIndex; i < table.Rows.Count; i++)
            {
                newTable.Rows.Add(table.Rows[i].Clone());
            }

            //Delete rows from the original table
            for (int i = table.Rows.Count - 1; i >= splitIndex; i--)
            {
                table.Rows.RemoveAt(i);
            }

            //Add the new table to the section
            section.Tables.Add(newTable);

            //Save the result document
            doc.SaveToFile("SplitTable.docx", FileFormat.Docx);
        }
    }
}
Apply for a Temporary License
If you'd like to remove the evaluation message from the generated documents, or to get rid of the function limitations, please request a 30-day trial license for yourself.
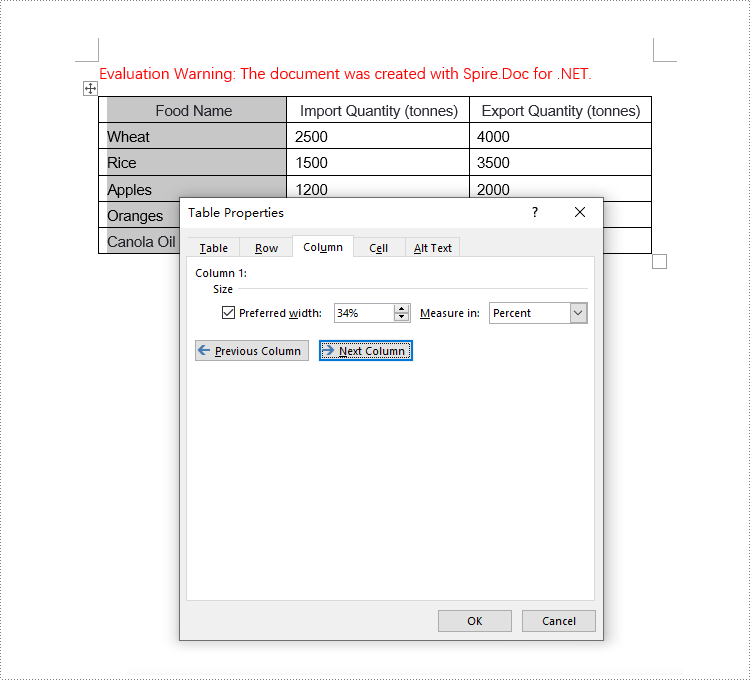
Setting the column width in Word tables is crucial for optimizing document readability and aesthetics. Appropriate column widths prevent long lines of text from hindering readability, particularly in text-dense tables. Word offers two approaches: percentages and fixed values. Setting column widths using percentage values allows tables to adapt to different screen sizes, keeping content neatly aligned and enhancing the reading experience. Using fixed values, on the other hand, precisely controls the structure of the table, ensuring consistency and professionalism, making it suitable for designs with strict data alignment requirements or complex layouts. This article will introduce how to set Word table column width based on percentage or fixed value settings using Spire.Doc for .NET in C# projects.
Install Spire.Doc for .NET
To begin with, you need to add the DLL files included in the Spire.Doc for .NET package as references in your .NET project. The DLL files can be either downloaded from this link or installed via NuGet.
PM> Install-Package Spire.Doc
Set Column Width Based on Percentage in C#
When setting column widths in a Word table using percentage values, you first need to set the table's preferred width type to percentage. This is done with Table.PreferredWidth = new PreferredWidth(WidthType.Percentage, (short)100). Then, iterate through each column and set the width to the same or different percentage values as required. Here are the detailed steps:
- Create a Document object.
- Load a document using the Document.LoadFromFile() method.
- Retrieve the first section of the document using Document.Sections[0].
- Get the first table within the section using Section.Tables[0].
- Use a for loop to iterate through all rows in the table.
- Set the column width for cells in different columns to percentage values using the TableRow.Cells[index].SetCellWidth(value, CellWidthType.Percentage) method.
- Save the changes to the Word document using the Document.SaveToFile() method.
- C#
using Spire.Doc;

namespace SpireDocDemo
{
    internal class Program
    {
        static void Main(string[] args)
        {
            // Create a new Document object
            Document doc = new Document();

            // Load the document named "example.docx"
            doc.LoadFromFile("Sample.docx");

            // Get the first Section of the document
            Section section = doc.Sections[0];

            // Cast the first Table in the Section to Table type
            Table table = (Table)section.Tables[0];

            // Create a PreferredWidth object, set the width type to Percentage, and set the width value to 100%
            PreferredWidth percentageWidth = new PreferredWidth(WidthType.Percentage, (short)100);

            // Set the preferred width of the Table to the PreferredWidth object created above
            table.PreferredWidth = percentageWidth;

            // Define a variable of type TableRow
            TableRow tableRow;

            // Iterate through all rows in the Table
            for (int i = 0; i < table.Rows.Count; i++)
            {
                // Get the current row
                tableRow = table.Rows[i];

                // Set the width of the first column cell to 34%, with the type as Percentage
                tableRow.Cells[0].SetCellWidth(34, CellWidthType.Percentage);

                // Set the width of the second column cell to 33%, with the type as Percentage
                tableRow.Cells[1].SetCellWidth(33, CellWidthType.Percentage);

                // Set the width of the third column cell to 33%, with the type as Percentage
                tableRow.Cells[2].SetCellWidth(33, CellWidthType.Percentage);
            }

            // Save the modified document, specifying the file format as Docx2016
            doc.SaveToFile("set_column_width_by_percentage.docx", FileFormat.Docx2016);

            // Close the document
            doc.Close();
        }
    }
}
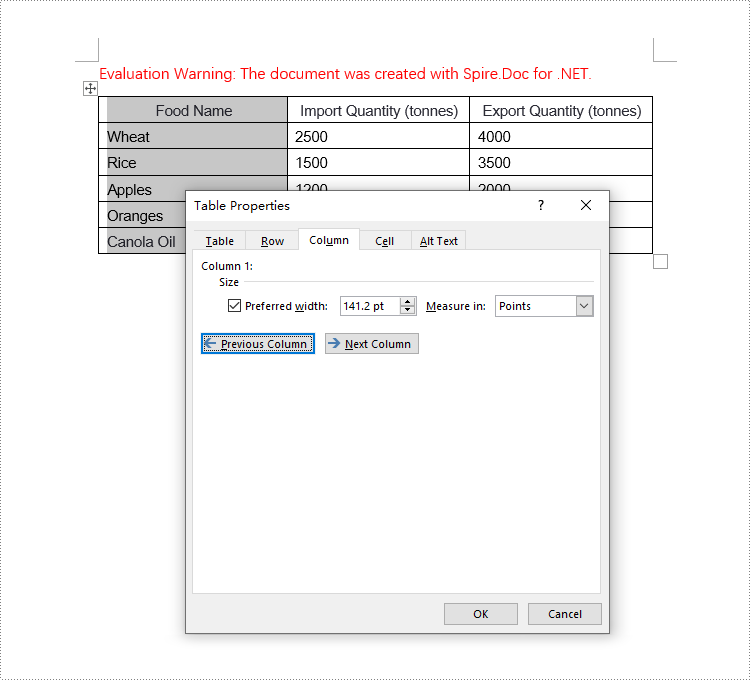
Set Column Width Based on Fixed Value in C#
When setting column widths in a Word table using fixed values, you first need to set the table's layout to fixed. This is done with Table.TableFormat.LayoutType = LayoutType.Fixed. Then, iterate through each column and set the width to the same or different fixed values as required. Here are the detailed steps:
- Create a Document object.
- Load a document using the Document.LoadFromFile() method.
- Retrieve the first section of the document using Document.Sections[0].
- Get the first table within the section using Section.Tables[0].
- Use a for loop to iterate through all rows in the table.
- Set the column width for cells in different columns to fixed values using the TableRow.Cells[index].SetCellWidth(value, CellWidthType.Point) method. Note that value should be replaced with the desired width in points.
- Save the changes to the Word document using the Document.SaveToFile() method.
- C#
using Spire.Doc;

namespace SpireDocDemo
{
    internal class Program
    {
        static void Main(string[] args)
        {
            // Create a new Document object
            Document doc = new Document();

            // Load the document
            doc.LoadFromFile("Sample.docx");

            // Get the first Section of the document
            Section section = doc.Sections[0];

            // Cast the first Table in the Section to Table type
            Table table = (Table)section.Tables[0];

            // Set the table layout type to Fixed
            table.TableFormat.LayoutType = LayoutType.Fixed;

            // Set the table resizing mode to not auto-resize
            table.TableFormat.IsAutoResized = false;

            // Get the left margin
            float leftMargin = section.PageSetup.Margins.Left;

            // Get the right margin
            float rightMargin = section.PageSetup.Margins.Right;

            // Calculate the page width minus the left and right margins
            double pageWidth = section.PageSetup.PageSize.Width - leftMargin - rightMargin;

            // Define a variable of type TableRow
            TableRow tableRow;

            // Loop through all rows in the Table
            for (int i = 0; i < table.Rows.Count; i++)
            {
                // Get the current row
                tableRow = table.Rows[i];

                // Set the width of the first column cell to 34% of the page width
                tableRow.Cells[0].SetCellWidth((float)(pageWidth * 0.34), CellWidthType.Point);

                // Set the width of the second column cell to 33% of the page width
                tableRow.Cells[1].SetCellWidth((float)(pageWidth * 0.33), CellWidthType.Point);

                // Set the width of the third column cell to 33% of the page width
                tableRow.Cells[2].SetCellWidth((float)(pageWidth * 0.33), CellWidthType.Point);
            }

            // Save the modified document, specifying the file format as Docx2016
            doc.SaveToFile("set_column_width_to_fixed_value.docx", FileFormat.Docx2016);

            // Close the document
            doc.Close();
        }
    }
}
Apply for a Temporary License
If you'd like to remove the evaluation message from the generated documents, or to get rid of the function limitations, please request a 30-day trial license for yourself.
C#: Extract Text from Images using the New Model of Spire.OCR for .NET
2024-07-18 01:09:12 Written by KoohjiSpire.OCR for .NET offers developers a new model to extract text from images. In this article, we will demonstrate how to extract text from images in C# using the new model of Spire.OCR for .NET.
The detailed steps are as follows.
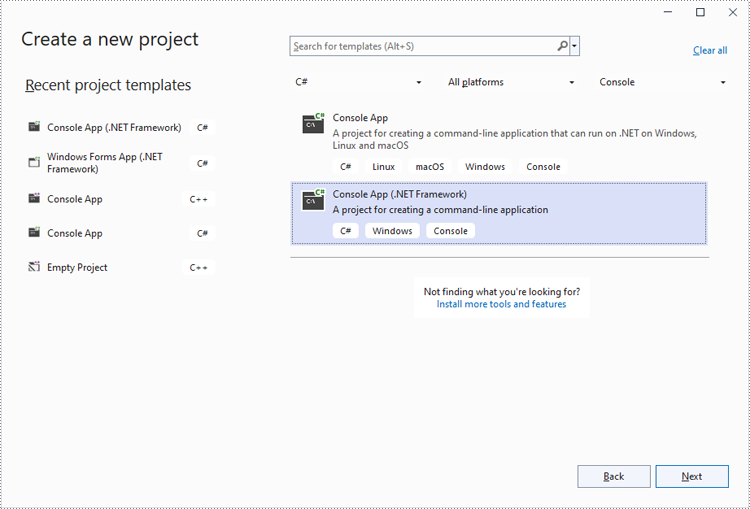
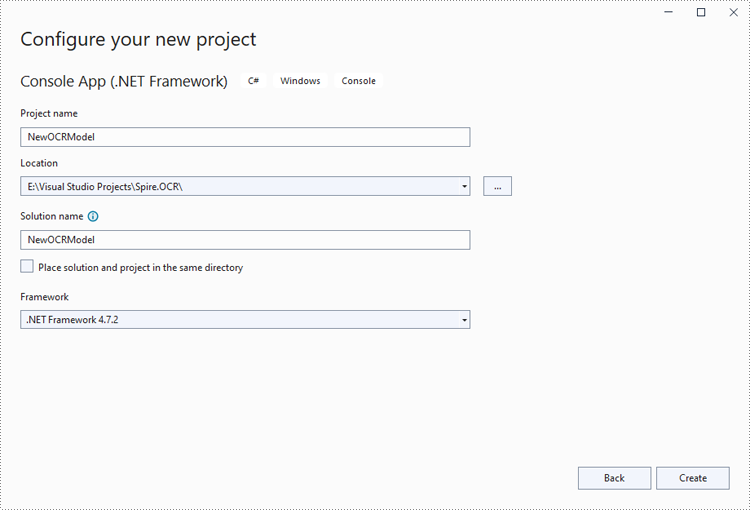
Step 1: Create a Console App (.NET Framework) in Visual Studio.
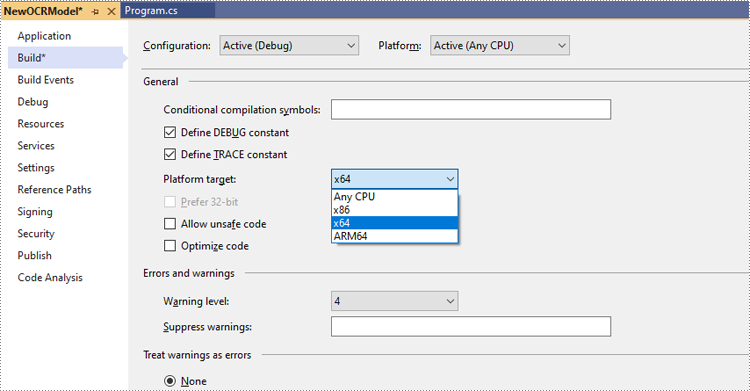
Step 2: Change the platform target of the application to x64.
In the application's Solution Explorer, right-click on the project's name and then select "Properties".
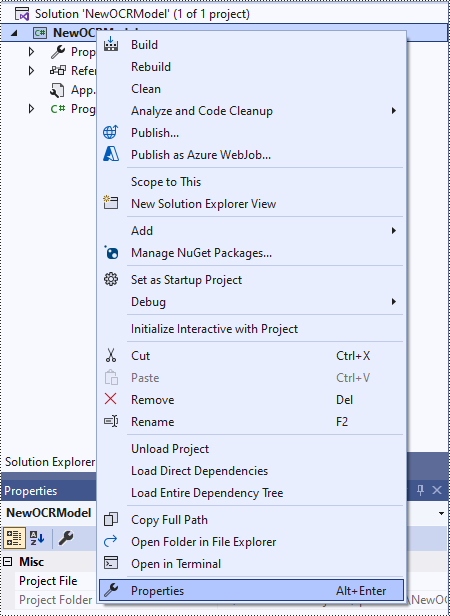
Change the platform target of the application to x64. This step must be performed since Spire.OCR only supports 64-bit platforms.
Step 3: Install Spire.OCR for .NET in your application.
Install Spire.OCR for .NET through NuGet by executing the following command in the NuGet Package Manager Console:
Install-Package Spire.OCR
Step 4: Download the new model of Spire.OCR for .NET.
Download the model that fits in with your operating system from one of the following links.
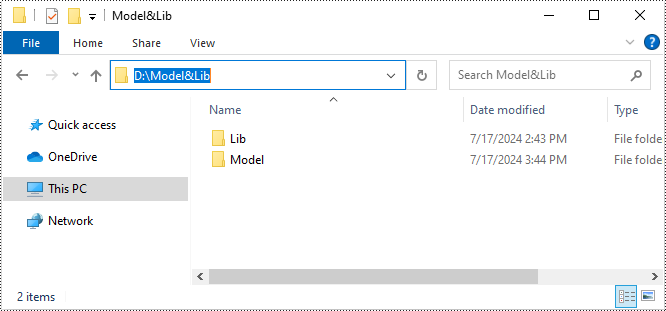
Then extract the package and save it to a specific directory on your computer. In this example, we saved the package to "D:\".
Step 5: Use the new model of Spire.OCR for .NET to extract text from images in C#.
The following code example shows how to extract text from an image using C# and the new model of Spire.OCR for .NET:
- C#
using Spire.OCR;
using System.IO;

namespace NewOCRModel
{
    internal class Program
    {
        static void Main(string[] args)
        {
            // Set license key
            // Spire.OCR.License.LicenseProvider.SetLicenseKey("your-license-key");

            // Create an instance of the OcrScanner class
            OcrScanner scanner = new OcrScanner();

            // Create an instance of the ConfigureOptions class to set up the scanner configuration
            ConfigureOptions configureOptions = new ConfigureOptions();

            // Set the path to the new model
            configureOptions.ModelPath = "D:\\win-x64";

            // Set the language for text recognition. The default is English.
            // Supported languages include English, Chinese, Chinesetraditional, French, German, Japanese, and Korean.
            configureOptions.Language = "English";

            // Apply the configuration options to the scanner
            scanner.ConfigureDependencies(configureOptions);

            // Extract text from an image
            scanner.Scan("test.png");

            //Save the extracted text to a text file
            string text = scanner.Text.ToString();
            File.WriteAllText("Output.txt", text);
        }
    }
}
Apply for a Temporary License
If you'd like to remove the evaluation message from the generated documents, or to get rid of the function limitations, please request a 30-day trial license for yourself.
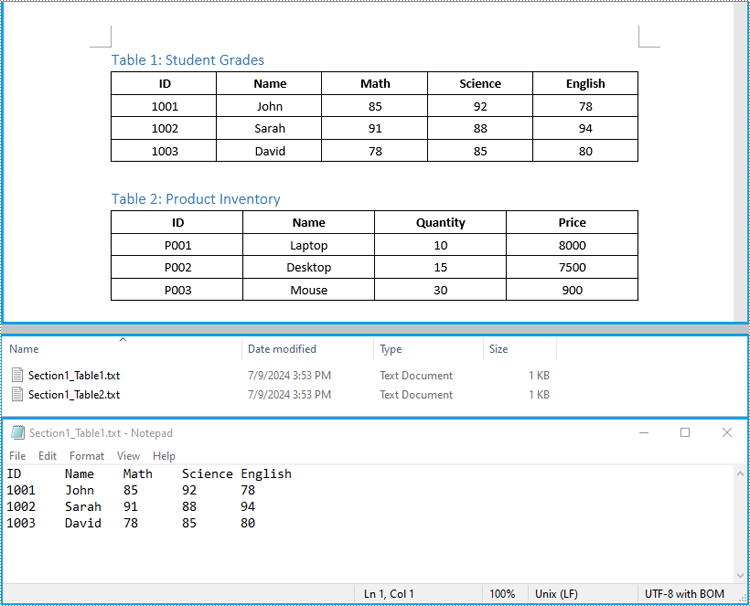
Tables in Word documents often contain valuable information, ranging from financial data and research results to survey results and statistical records. Extracting the data contained within these tables can unlock a wealth of opportunities, empowering you to leverage it for a variety of purposes, such as in-depth data analysis, trend identification, and seamless integration with other tools or databases. In this article, we will demonstrate how to extract tables from Word documents in C# using Spire.Doc for .NET.
Install Spire.Doc for .NET
To begin with, you need to add the DLL files included in the Spire.Doc for .NET package as references in your .NET project. The DLL files can be either downloaded from this link or installed via NuGet.
PM> Install-Package Spire.Doc
Extract Tables from Word in C#
In Spire.Doc for .NET, the Section.Tables property is used to access the tables contained within a section of a Word document. This property returns a collection of ITable objects, where each object represents a distinct table in the section. Once you have the ITable objects, you can iterate through their rows and cells, and then retrieve the textual content of each cell using cell.Paragraphs[index].Text property.
The detailed steps to extract tables from a Word document are as follows:
- Create an object of the Document class and load a Word document using Document.LoadFromFile() method.
- Iterate through the sections in the document and get the table collection of each section through Section.Tables property.
- Iterate through the tables in each section and create a string object for each table.
- Iterate through the rows in each table and the cells in each row, then get the text of each cell through TableCell.Paragraphs[index].Text property and add the cell text to the string.
- Save each string to a text file.
- C#
using Spire.Doc;
using Spire.Doc.Collections;
using Spire.Doc.Interface;
using System.IO;
using System.Text;

namespace ExtractWordTable
{
    internal class Program
    {
        static void Main(string[] args)
        {
            // Create an object of the Document class
            Document doc = new Document();
            // Load a Word document
            doc.LoadFromFile("Tables.docx");

            // Iterate through the sections in the document
            for (int sectionIndex = 0; sectionIndex < doc.Sections.Count; sectionIndex++)
            {
                // Get the current section
                Section section = doc.Sections[sectionIndex];

                // Get the table collection of the section
                TableCollection tables = section.Tables;

                // Iterate through the tables in the section
                for (int tableIndex = 0; tableIndex < tables.Count; tableIndex++)
                {
                    // Get the current table
                    ITable table = tables[tableIndex];

                    // Initialize a string to store the table data
                    string tableData = "";

                    // Iterate through the rows in the table
                    for (int rowIndex = 0; rowIndex < table.Rows.Count; rowIndex++)
                    {
                        // Get the current row
                        TableRow row = table.Rows[rowIndex];
                        // Iterate through the cells in the row
                        for (int cellIndex = 0; cellIndex < row.Cells.Count; cellIndex++)
                        {
                            // Get the current cell
                            TableCell cell = table.Rows[rowIndex].Cells[cellIndex];

                            // Get the text in the cell
                            string cellText = "";
                            for (int paraIndex = 0; paraIndex < cell.Paragraphs.Count; paraIndex++)
                            {
                                cellText += (cell.Paragraphs[paraIndex].Text.Trim() + " ");
                            }

                            // Add the text to the string
                            tableData += cellText.Trim();
                            if (cellIndex < table.Rows[rowIndex].Cells.Count - 1)
                            {
                                tableData += "\t";
                            }
                        }

                        // Add a new line
                        tableData += "\n";
                    }

                    // Save the table data to a text file
                    string filePath = Path.Combine("Tables", $"Section{sectionIndex + 1}_Table{tableIndex + 1}.txt");

                    File.WriteAllText(filePath, tableData, Encoding.UTF8);
                }
            }

            doc.Close();
        }
    }
}
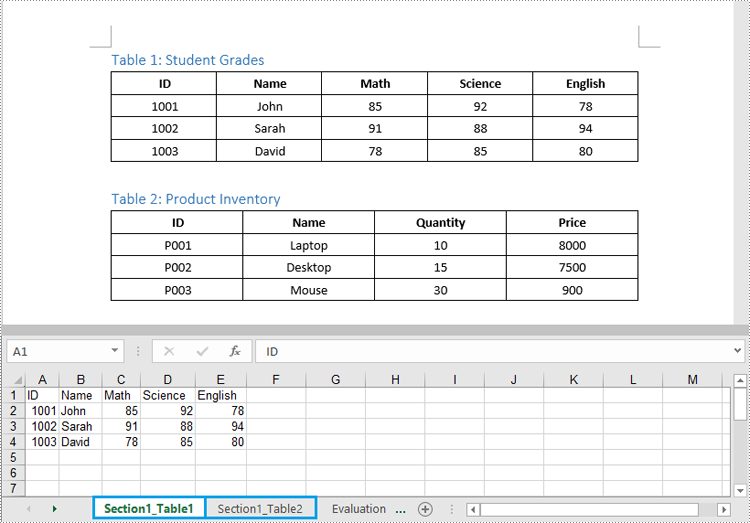
Extract Tables from Word to Excel in C#
In addition to saving the extracted table data to text files, you can also write the data directly into Excel worksheets by using the Spire.XLS for .NET library. However, before you can use Spire.XLS, you need to install it via NuGet:
Install-Package Spire.XLS
The detailed steps to extract tables from Word documents to Excel worksheets are as follows:
- Create an object of the Document class and load a Word document using the Document.LoadFromFile() method.
- Create an object of the Workbook class and clear the default worksheets using Workbook.Worksheets.Clear() method.
- Iterate through the sections in the document and get the table collection of each section through Section.Tables property.
- Iterate through the tables in the section and add a worksheet for each table to the workbook using Workbook.Worksheets.Add() method.
- Iterate through the rows in each table and the cells in each row, then get the text of each cell through TableCell.Paragraphs[index].Text property and write the text to the worksheet using Worksheet.SetCellValue() method.
- Save the workbook to an Excel file using Workbook.SaveToFile() method.
- C#
using Spire.Doc;
using Spire.Doc.Interface;
using Spire.Xls;

namespace ExtractWordTableToExcel
{
    internal class Program
    {
        static void Main(string[] args)
        {
            // Create an object of the Document class
            Document doc = new Document();
            // Load a Word document
            doc.LoadFromFile("Tables.docx");

            // Create an object of the Workbook class
            Workbook wb = new Workbook();
            // Remove the default worksheets
            wb.Worksheets.Clear();

            // Iterate through the sections in the document
            for (int sectionIndex = 0; sectionIndex < doc.Sections.Count; sectionIndex++)
            {
                // Get the current section
                Section section = doc.Sections[sectionIndex];
                // Iterate through the tables in the section
                for (int tableIndex = 0; tableIndex < section.Tables.Count; tableIndex++)
                {
                    // Get the current table
                    ITable table = section.Tables[tableIndex];
                    // Add a worksheet to the workbook
                    Worksheet ws = wb.Worksheets.Add($"Section{sectionIndex + 1}_Table{tableIndex + 1}");

                    // Iterate through the rows in the table
                    for (int rowIndex = 0; rowIndex < table.Rows.Count; rowIndex++)
                    {
                        // Get the current row
                        TableRow row = table.Rows[rowIndex];
                        // Iterate through the cells in the row
                        for (int cellIndex = 0; cellIndex < row.Cells.Count; cellIndex++)
                        {
                            // Get the current cell
                            TableCell cell = row.Cells[cellIndex];
                            // Get the text in the cell
                            string cellText = "";
                            for (int paraIndex = 0; paraIndex < cell.Paragraphs.Count; paraIndex++)
                            {
                                cellText += (cell.Paragraphs[paraIndex].Text.Trim() + " ");
                            }
                            // Write the cell text to the worksheet
                            ws.SetCellValue(rowIndex + 1, cellIndex + 1, cellText);
                        }
                        // Autofit the width of the columns in the worksheet
                        ws.Range.AutoFitColumns();
                    }
                }
            }

            // Save the workbook to an Excel file
            wb.SaveToFile("Tables/WordTableToExcel.xlsx", ExcelVersion.Version2016);
            doc.Close();
            wb.Dispose();
        }
    }
}
Apply for a Temporary License
If you'd like to remove the evaluation message from the generated documents, or to get rid of the function limitations, please request a 30-day trial license for yourself.
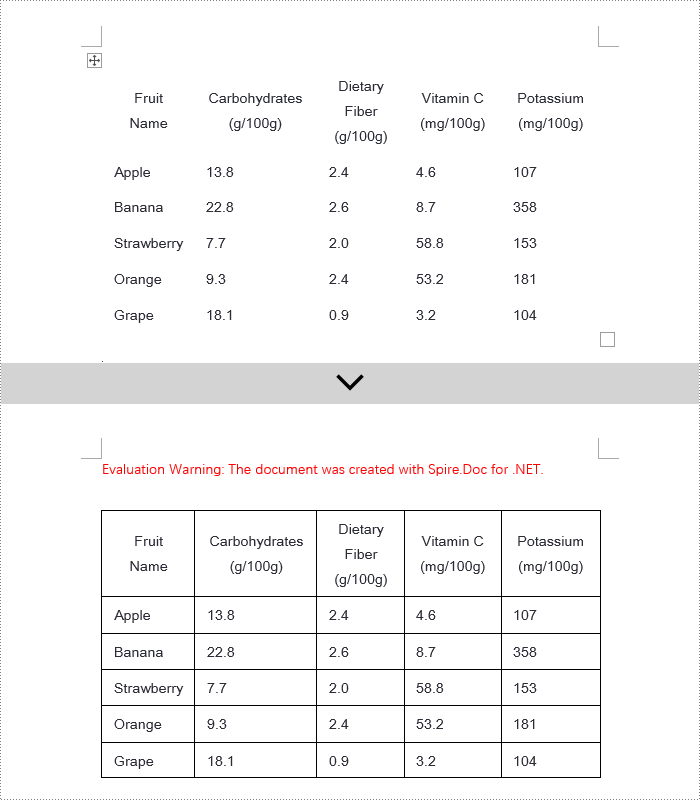
Adding, modifying, and removing Word table borders can enhance the readability, aesthetics, and organization of data. Adding borders makes the content of the table clearer, distinguishing between different cells, which helps readers quickly identify information. Modifying border styles (such as line thickness, color, or pattern) can emphasize key data, guide visual flow, or conform to specific document styles and design requirements. Removing borders, in some cases, reduces visual clutter, making the content more compact and minimalist, especially suitable for data presentation where strict divisions are not needed or when you wish to downplay structural visibility. This article will introduce how to add, modify, or remove Word table borders in C# projects using Spire.Doc for .NET.
Install Spire.Doc for .NET
To begin with, you need to add the DLL files included in the Spire.Doc for .NET package as references in your .NET project. The DLL files can be either downloaded from this link or installed via NuGet.
PM> Install-Package Spire.Doc
C# Add Word Table Borders
To set borders for all cells in an entire Word table, you need to iterate over each cell and set its visual border properties. Here are the detailed steps:
- Create a Document object.
- Use the Document.LoadFromFile() method to load a document.
- Retrieve the first section of the document using Document.Sections[0].
- Get the first table in that section by using Section.Tables[0].
- Use a for loop to iterate through all the cells in the table.
- Set TableCell.CellFormat.Borders.BorderType to BorderStyle.Single, which sets the cell border to a single line style.
- Set TableCell.CellFormat.Borders.LineWidth to 1.5, defining the border width to be 1.5 points.
- Set TableCell.CellFormat.Borders.Color to Color.Black, setting the border color to black.
- Save the changes to the Word document using the Document.SaveToFile() method.
- C#
using Spire.Doc;

namespace SpireDocDemo
{
    internal class Program
    {
        static void Main(string[] args)
        {
            // Create a new Document object
            Document doc = new Document();

            // Load the document from a file
            doc.LoadFromFile("TableExample1.docx");

            // Get the first section of the document
            Section section = doc.Sections[0];

            // Get the first table in that section
            Table table = (Table)section.Tables[0];

            // Declare TableRow and TableCell variables for use within loops
            TableRow tableRow;
            TableCell tableCell;

            // Iterate through all rows in the table
            for (int i = 0; i < table.Rows.Count; i++)
            {
                // Get the current row
                tableRow = table.Rows[i];

                // Iterate through all cells in the current row
                for (int j = 0; j < tableRow.Cells.Count; j++)
                {
                    // Get the current cell
                    tableCell = tableRow.Cells[j];

                    // Set the border style of the current cell to single line
                    tableCell.CellFormat.Borders.BorderType = Spire.Doc.Documents.BorderStyle.Single;
                }
            }

            // Save the modified document as a new file
            doc.SaveToFile("AddBorders.docx", FileFormat.Docx2016);

            // Close the document to release resources
            doc.Close();
        }
    }
}
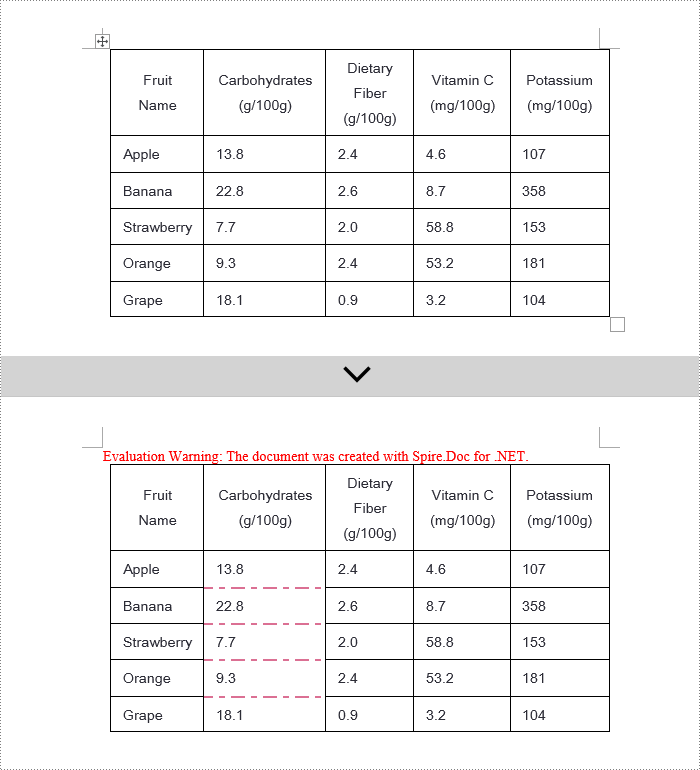
C# Modify Word Table Borders
Spire.Doc offers a range of border properties such as the border style TableCell.CellFormat.Borders.BorderType, border width TableCell.CellFormat.Borders.LineWidth, and border color TableCell.CellFormat.Borders.Color, among others. You can customize these properties to achieve the desired effects. Below are the detailed steps:
- Create a Document object.
- Load a document using the Document.LoadFromFile() method.
- Retrieve the first section of the document using Document.Sections[0].
- Get the first table in the section using Section.Tables[0].
- Use a for loop to iterate over the cells in the table whose border styles you wish to change.
- Change the bottom border color of the cell by setting TableCell.CellFormat.Borders.Bottom.Color to Color.PaleVioletRed.
- Change the bottom border style of the cell by setting TableCell.CellFormat.Borders.Bottom.BorderType to BorderStyle.DotDash.
- Change the bottom border width of the cell by setting TableCell.CellFormat.Borders.Bottom.LineWidth to 2 points.
- Save the changes to the document using the Document.SaveToFile() method.
- C#
using Spire.Doc;
using Spire.Doc.Documents;
using System.Drawing;

namespace SpireDocDemo
{
    internal class Program
    {
        static void Main(string[] args)
        {
            // Create a new Document object
            Document doc = new Document();

            // Load the document from a file
            doc.LoadFromFile("TableExample2.docx");

            // Get the first section of the document
            Section section = doc.Sections[0];

            // Get the first table in that section
            Table table = (Table)section.Tables[0];

            // Declare a TableRow to use within the loop
            TableRow tableRow;

            // Iterate through all rows of the table
            for (int i = 1; i < table.Rows.Count - 1; i++)
            {
                tableRow = table.Rows[i];

                // Set the border color of the current cell
                tableRow.Cells[1].CellFormat.Borders.Bottom.Color = Color.PaleVioletRed;

                // Set the border style of the current cell to DotDash
                tableRow.Cells[1].CellFormat.Borders.Bottom.BorderType = Spire.Doc.Documents.BorderStyle.DotDash;

                // Set the width of the border
                tableRow.Cells[1].CellFormat.Borders.Bottom.LineWidth = 2;
            }

            // Save the modified document as a new file
            doc.SaveToFile("ModifiedBorders.docx", FileFormat.Docx2016);

            // Close the document and release resources
            doc.Close();
        }
    }
}
C# Remove Word Table Borders
During the process of handling Word documents, not only can border styles be applied to entire tables, but customization can also be extended to individual cells. To completely remove all borders from a table, it is recommended to follow a two-step strategy: First, apply border removal settings to the table itself; second, visit each cell within the table individually to clear their border styles. Here are the detailed steps:
- Create a Document object.
- Load a document using the Document.LoadFromFile() method.
- Retrieve the first table in the section using Section.Tables[0].
- Use a for loop to iterate over all cells in the table.
- Set Table.TableFormat.Borders.BorderType = BorderStyle.None to remove borders from the table.
- Set TableCell.CellFormat.Borders.BorderType = BorderStyle.None to remove borders from each cell.
- Save the changes to the Word document using the Document.SaveToFile() method.
- C#
using Spire.Doc;
using Spire.Doc.Documents;
using System.Drawing;

namespace SpireDocDemo
{
    internal class Program
    {
        static void Main(string[] args)
        {
            // Create a new Document object
            Document doc = new Document();

            // Load the document from file
            doc.LoadFromFile("TableExample2.docx");

            // Get the first section of the document
            Section section = doc.Sections[0];

            // Get the first table in that section
            Table table = (Table)section.Tables[0];

            // Remove the borders set on the table
            table.TableFormat.Borders.BorderType = BorderStyle.None;

            // Declare a TableRow to use in the loop
            TableRow tableRow;

            // Iterate through all rows in the table
            for (int i = 0; i < table.Rows.Count; i++)
            {
                tableRow = table.Rows[i];
                for (int j = 0; j < tableRow.Cells.Count; j++)
                {
                    // Remove all borders set on the cell
                    tableRow.Cells[j].CellFormat.Borders.BorderType = BorderStyle.None;
                }
            }

            // Save the modified document as a new file
            doc.SaveToFile("RemoveBorders.docx", FileFormat.Docx2016);

            // Close the document to release resources
            doc.Close();
        }
    }
}

Apply for a Temporary License
If you'd like to remove the evaluation message from the generated documents, or to get rid of the function limitations, please request a 30-day trial license for yourself.
Displaying PowerPoint text box content in multiple columns significantly enhances the presentation of information and audience comprehension. It improves readability by shortening line lengths, making dense text more digestible; optimizes visual layout for an aesthetically pleasing and professional look; and utilizes space efficiently to ensure that information is abundant yet uncluttered. In this article, we will introduce how to add or remove columns in a PowerPoint text box using Spire.Presentation for .NET in C# projects.
Install Spire.Presentation for .NET
To begin with, you need to add the DLL files included in the Spire.Presentation for.NET package as references in your .NET project. The DLL files can be either downloaded from this link or installed via NuGet.
PM> Install-Package Spire.Presentation
Add Columns to a PowerPoint Text Box with C#
Spire.Presentation provides the Shape.TextFrame.ColumnCount property to set the number of columns for content and the Shape.TextFrame.ColumnSpacing property to set the spacing between columns. Below are the detailed steps:
- Create a Presentation object.
- Load a PowerPoint document using the Presentation.LoadFromFile() method.
- Retrieve the first slide using Presentation.Slides[0].
- Obtain the first text box object as IAutoShape.
- Use the Shape.TextFrame.ColumnCount property to set the number of columns for the text box content.
- Use the Shape.TextFrame.ColumnSpacing property to set the spacing between columns.
- Save the document to a specified path using the Presentation.SaveToFile() method.
- C#
using Spire.Presentation;

namespace Spire.PresentationDemo
{
    internal class Program
    {
        static void Main(string[] args)
        {
            // Create a Presentation object
            Presentation presentation = new Presentation();

            // Load the PPTX file
            presentation.LoadFromFile("Sample1.pptx");

            // Get the first slide
            ISlide slide = presentation.Slides[0];

            // Check if the first shape on the slide is of type IAutoShape
            if (slide.Shapes[0] is IAutoShape)
            {
                // Cast the first shape to an IAutoShape object
                IAutoShape shape = (IAutoShape)slide.Shapes[0];

                // Set the number of columns in the shape's text frame to 2
                shape.TextFrame.ColumnCount = 2;

                // Set the column spacing in the shape's text frame to 25 pt
                shape.TextFrame.ColumnSpacing = 25f;
            }

            // Save the modified presentation as a new PPTX file
            presentation.SaveToFile("SetColumns.pptx", Spire.Presentation.FileFormat.Pptx2016);

            // Dispose of the resources used by the Presentation object
            presentation.Dispose();
        }
    }
}
Remove Columns from a PowerPoint Text Box with C#
To remove the columns from the Powerpoint text box, simply set the Shape.TextFrame.ColumnCount property to 1. Below are the detailed steps:
- Create a Presentation object.
- Load a PowerPoint document using the Presentation.LoadFromFile() method.
- Retrieve a slide using the Presentation.Slides[index] property.
- Obtain the text box object as IAutoShape.
- Set Shape.TextFrame.ColumnCount = 1 to remove the columns.
- Save the document to a specified path using the Presentation.SaveToFile() method.
- C#
using Spire.Presentation;

namespace SpirePresentationDemo
{
    internal class Program
    {
        static void Main(string[] args)
        {
            // Create a Presentation object
            Presentation presentation = new Presentation();

            // Load the PPTX file
            presentation.LoadFromFile("Sample2.pptx");

            // Get the first slide
            ISlide slide = presentation.Slides[0];

            // Check if the first shape on the slide is of type IAutoShape
            if (slide.Shapes[0] is IAutoShape)
            {
                // Cast the first shape to an IAutoShape object
                IAutoShape shape = (IAutoShape)slide.Shapes[0];

                // Set the column count of the shape's text frame to 1
                shape.TextFrame.ColumnCount = 1;
            }

            // Save the modified presentation as a new PPTX file
            presentation.SaveToFile("RemoveColumns.pptx", Spire.Presentation.FileFormat.Pptx2016);

            // Dispose of the resources used by the Presentation object
            presentation.Dispose();
        }
    }
}

Apply for a Temporary License
If you'd like to remove the evaluation message from the generated documents, or to get rid of the function limitations, please request a 30-day trial license for yourself.
