
.NET (1273)
Children categories
C#: Insert, Retrieve, Reorder and Remove Slides in PowerPoint Sections
2024-11-15 01:03:47 Written by support iceblueSections in PowerPoint let you group related slides together, making it easy to segment a presentation by topics, chapters, or any other logical structure. When working with large, multi-section presentations, automating slide operations - such as insertion, retrieval, reordering, and removal - can significantly improve productivity. In this article, we will explain how to insert, retrieve, reorder, and remove slides in PPT sections in C# using Spire.Presentation for .NET.
- Insert Slides into a PowerPoint Section in C#
- Retrieve Slides from a PowerPoint Section in C#
- Reorder Slides in a PowerPoint Section in C#
- Remove Slides from a PowerPoint Section in C#
Install Spire.Presentation for .NET
To begin with, you need to add the DLL files included in the Spire.Presentation for.NET package as references in your .NET project. The DLL files can be either downloaded from this link or installed via NuGet.
PM> Install-Package Spire.Presentation
Insert Slides into a PowerPoint Section in C#
Inserting slides is often needed when you need to add new content to a section. With Spire.Presentation for .NET, you can insert a slide into a section using the Section.Insert() method. The detailed steps are as follows.
- Create an instance of the Presentation class.
- Load a PowerPoint presentation using the Presentation.LoadFromFile() method.
- Get a specific section through its index (0-based) using the Presentation.SectionList(index) property.
- Add a new slide to presentation, then insert it into the section using the Section.Insert() method.
- Remove the added slide from the presentation.
- Save the resulting presentation using the Presentation.SaveToFile() method.
- C#
using Spire.Presentation;
using System.Collections.Generic;

namespace InsertSlidesInSection
{
    internal class Program
    {
        static void Main(string[] args)
        {
            // Create an instance of the Presentation class
            using (Presentation presentation = new Presentation())
            {
                // Load a PowerPoint presentation
                presentation.LoadFromFile("Example.pptx");

                // Access the first section
                Section firstSection = presentation.SectionList[0];

                // Add a new slide to the presentation and insert it at the start of the section
            ISlide slide = presentation.Slides.Append();
            firstSection.Insert(0, slide);
            // Remove the added slide from the presentation
            presentation.Slides.Remove(slide);

                // Save the modified presentation
                presentation.SaveToFile("InsertSlidesInSection.pptx", FileFormat.Pptx2016);
            }
        }
    }
}

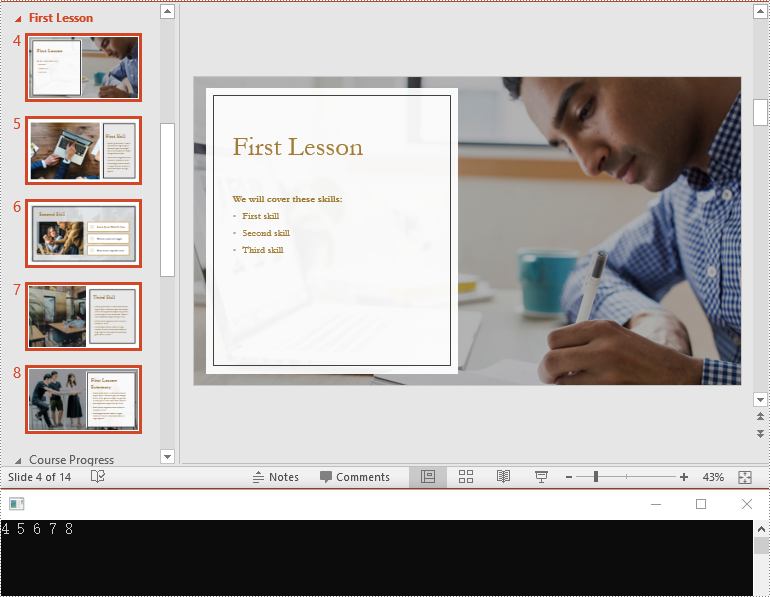
Retrieve Slides from a PowerPoint Section in C#
Extracting slides from a specific section allows you to focus on a subset of slides for targeted operations, like slide reordering or applying specific formatting. Using the Section.GetSlides() method in Spire.Presentation for .NET, you can easily retrieve all slides within a given section. The detailed steps are as follows.
- Create an instance of the Presentation class.
- Load a PowerPoint presentation using the Presentation.LoadFromFile() method.
- Get a specific section through its index (0-based) using the Presentation.SectionList(index) property.
- Retrieve the slides within the section using the Section.GetSlides() method.
- Iterate through the retrieved slides and get the slide number (1-based) of each slide.
- C#
using Spire.Presentation;
using System;

namespace RetrieveSlidesInSection
{
    internal class Program
    {
        static void Main(string[] args)
        {
            // Create an instance of the Presentation class
            using (Presentation presentation = new Presentation())
            {
                // Load a PowerPoint presentation
                presentation.LoadFromFile("Example.pptx");

                // Retrieve the slides in the 3rd section
                Section section = presentation.SectionList[2];
                ISlide[] slides = section.GetSlides();

                // Output the slide number for each slide in the section
                foreach (ISlide slide in slides)
                {
                    Console.Write(slide.SlideNumber + " ");
                }
                Console.ReadKey();
            }
        }
    }
}
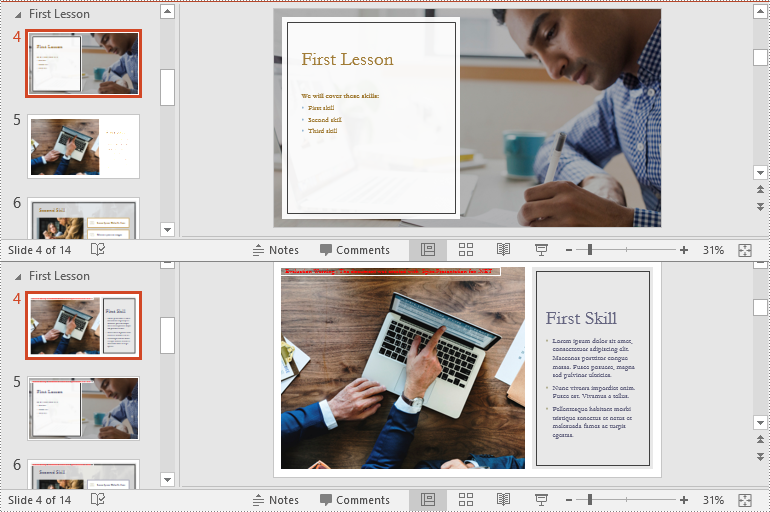
Reorder Slides in a PowerPoint Section in C#
Reordering slides is essential for ensuring that related content follows a logical sequence. Spire.Presentation for .NET offers the Section.Move() method for moving a slide in a section to another position. The detailed steps are as follows.
- Create an instance of the Presentation class.
- Load a PowerPoint presentation using the Presentation.LoadFromFile() method.
- Get a specific section through its index (0-based) using the Presentation.SectionList(index) property.
- Move a specific slide in the section to another position using the Section.Move() method.
- Save the resulting presentation using the Presentation.SaveToFile() method.
- C#
using Spire.Presentation;

namespace ReorderSlidesInSection
{
    internal class Program
    {
        static void Main(string[] args)
        {
            // Create an instance of the Presentation class
            using (Presentation presentation = new Presentation())
            {
		   // Load a PowerPoint presentation
                presentation.LoadFromFile("Example.pptx");

                // Access the 3rd section
                Section section = presentation.SectionList[2];

                // Retrieve the slides in the section
                ISlide[] slides = section.GetSlides();

                // Move the 1st slide in the section to the specified position
                section.Move(2, slides[0]);

                // Save the modified presentation
                presentation.SaveToFile("ReorderSlidesInSection.pptx", FileFormat.Pptx2016);
            }
        }
    }
}
Remove Slides from a PowerPoint Section in C#
Removing slides from a section helps streamline your presentation, especially when certain slides become outdated or irrelevant. With the Section.RemoveAt() or Section.RemoveRange() method in Spire.Presentation for .NET, you can easily delete an individual slide or a range of slides from a section. The detailed steps are as follows.
- Create an instance of the Presentation class.
- Load a PowerPoint presentation using the Presentation.LoadFromFile() method.
- Get a specific section through its index (0-based) using the Presentation.SectionList(index) property.
- Remove a specific slide or a range of slides from the presentation using the Section.RemoveAt() or Section.RemoveRange() method.
- Save the resulting presentation using the Presentation.SaveToFile() method.
- C#
using Spire.Presentation;

namespace RemoveSlidesInSection
{
    internal class Program
    {
        static void Main(string[] args)
        {
            // Create an instance of the Presentation class
            using (Presentation presentation = new Presentation())
            {
                // Load a PowerPoint presentation
                presentation.LoadFromFile("Course.pptx");

                // Access the 3rd section
                Section section = presentation.SectionList[2];

                // Remove the first slide from the section
                section.RemoveAt(0);

                // Or remove a range of slides from the section
                //section.RemoveRange(0, 2);

                // Save the modified presentation
                presentation.SaveToFile("RemoveSlidesInSection.pptx", FileFormat.Pptx2016);
            }
        }
    }
}
Apply for a Temporary License
If you'd like to remove the evaluation message from the generated documents, or to get rid of the function limitations, please request a 30-day trial license for yourself.
HTML is widely used to present content in web browsers, but preserving its exact layout when sharing or printing can be challenging. PDF, by contrast, is a universally accepted format that reliably maintains document layout across various devices and operating systems. Converting HTML to PDF is particularly useful in web development, especially when creating printable versions of web pages or generating reports from web data.
Spire.PDF for .NET now supports a streamlined method to convert HTML to PDF in C# using the ChromeHtmlConverter class. This tutorial provides step-by-step guidance on performing this conversion effectively.
- Convert HTML to PDF with ChromeHtmlConverter in C#
- Generate Output Logs During HTML to PDF Conversion in C#
Install Spire.PDF for .NET
To begin with, you need to add the DLL files included in the Spire.PDF for.NET package as references in your .NET project. The DLLs files can be either downloaded from this link or installed via NuGet.
PM> Install-Package Spire.PDF
Install Google Chrome
This method requires Google Chrome to perform the conversion. If Chrome is not already installed, you can download it from this link and install it.
Convert HTML to PDF using ChromeHtmlConverter in C#
You can utilize the ChromeHtmlConverter.ConvertToPdf() method to convert an HTML file to a PDF using the Chrome plugin. This method accepts 3 parameters, including the input HTML file path, output PDF file path, and ConvertOptions which allows customization of conversion settings like conversion timeout, PDF paper size and page margins. The detailed steps are as follows.
- Create an instance of the ChromeHtmlConverter class and provide the path to the Chrome plugin (chrome.exe) as a parameter in the class constructor.
- Create an instance of the ConvertOptions class.
- Customize the conversion settings, such as the conversion timeout, the paper size and page margins of the converted PDF through the properties of the ConvertOptions class.
- Convert an HTML file to PDF using the ChromeHtmlConverter.ConvertToPdf() method.
- C#
using Spire.Additions.Chrome;

namespace ConvertHtmlToPdfUsingChrome
{
    internal class Program
    {
        static void Main(string[] args)
        {
            //Specify the input URL and output PDF file path
            string inputUrl = @"https://www.e-iceblue.com/Tutorials/Spire.PDF/Spire.PDF-Program-Guide/C-/VB.NET-Convert-Image-to-PDF.html";
            string outputFile = @"HtmlToPDF.pdf";

            //Specify the path to the Chrome plugin
            string chromeLocation = @"C:\Program Files\Google\Chrome\Application\chrome.exe";

            //Create an instance of the ChromeHtmlConverter class
            ChromeHtmlConverter converter = new ChromeHtmlConverter(chromeLocation);

            // Create an instance of the ConvertOptions class
            ConvertOptions options = new ConvertOptions();
            //Set conversion timeout
            options.Timeout = 10 * 3000;
            //Set paper size and page margins of the converted PDF
            options.PageSettings = new PageSettings()
            {
                PaperWidth = 8.27,
                PaperHeight = 11.69,
                MarginTop = 0,
                MarginLeft = 0,
                MarginRight = 0,
                MarginBottom = 0

            };

            //Convert the URL to PDF
            converter.ConvertToPdf(inputUrl, outputFile, options);
        }
    }
}
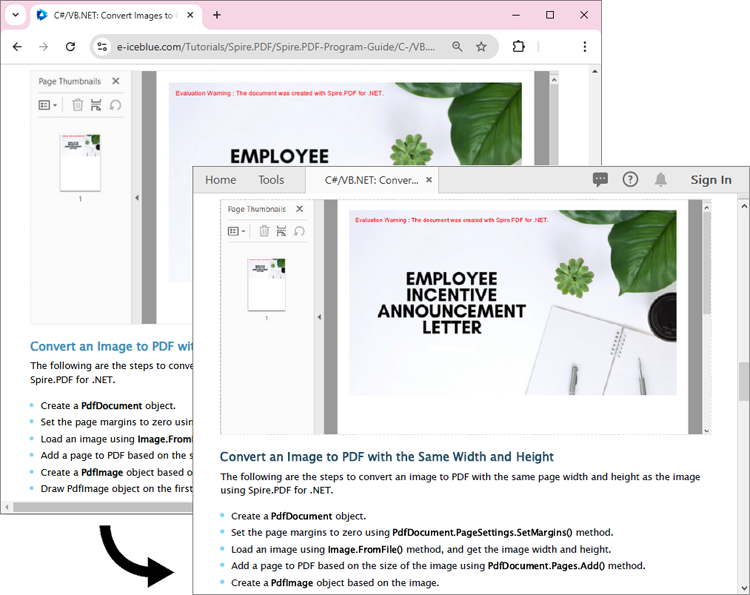
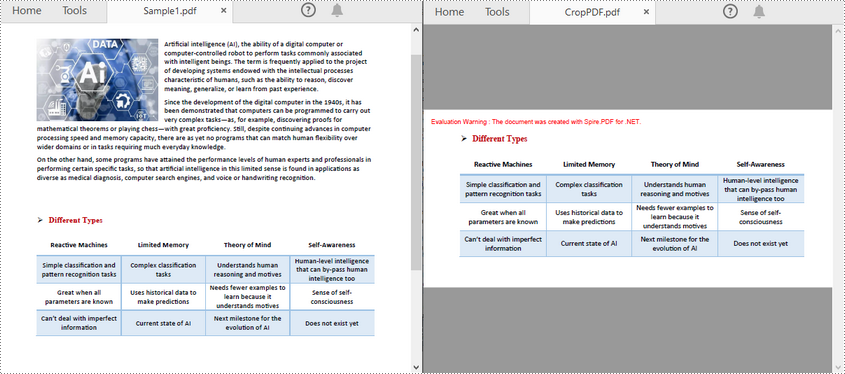
The converted PDF file maintains the same appearance as if the HTML file were printed to PDF directly through the Chrome browser:
Generate Output Logs During HTML to PDF Conversion in C#
Spire.PDF for .NET enables you to generate output logs during HTML to PDF conversion using the Logger class. The detailed steps are as follows.
- Create an instance of the ChromeHtmlConverter class and provide the path to the Chrome plugin (chrome.exe) as a parameter in the class constructor.
- Enable Logging by creating a Logger object and assigning it to the ChromeHtmlConverter.Logger property.
- Create an instance of the ConvertOptions class.
- Customize the conversion settings, such as the conversion timeout, the paper size and page margins of the converted PDF through the properties of the ConvertOptions class.
- Convert an HTML file to PDF using the ChromeHtmlConverter.ConvertToPdf() method.
- C#
using Spire.Additions.Chrome;

namespace ConvertHtmlToPdfUsingChrome
{
    internal class Program
    {
        static void Main(string[] args)
        {
            //Specify the input URL and output PDF file path
            string inputUrl = @"https://www.e-iceblue.com/Tutorials/Spire.PDF/Spire.PDF-Program-Guide/C-/VB.NET-Convert-Image-to-PDF.html";
            string outputFile = @"HtmlToPDF.pdf";

            // Specify the log file path
            string logFilePath = @"Logs.txt";

            //Specify the path to the Chrome plugin
            string chromeLocation = @"C:\Program Files\Google\Chrome\Application\chrome.exe";

            //Create an instance of the ChromeHtmlConverter class
            ChromeHtmlConverter converter = new ChromeHtmlConverter(chromeLocation);
            //Enable logging
            converter.Logger = new Logger(logFilePath);

            //Create an instance of the ConvertOptions class
            ConvertOptions options = new ConvertOptions();
            //Set conversion timeout
            options.Timeout = 10 * 3000;
            //Set paper size and page margins of the converted PDF
            options.PageSettings = new PageSettings()
            {
                PaperWidth = 8.27,
                PaperHeight = 11.69,
                MarginTop = 0,
                MarginLeft = 0,
                MarginRight = 0,
                MarginBottom = 0

            };

            //Convert the URL to PDF
            converter.ConvertToPdf(inputUrl, outputFile, options);
        }
    }
}
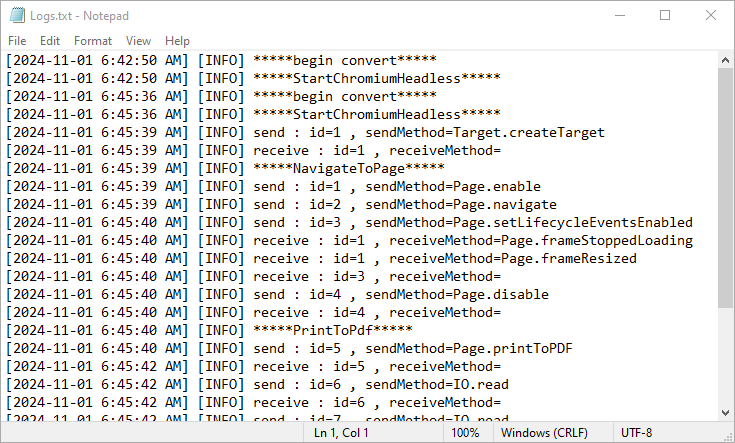
Here is the screenshot of the output log file:
Apply for a Temporary License
If you'd like to remove the evaluation message from the generated documents, or to get rid of the function limitations, please request a 30-day trial license for yourself.
Markdown, with its lightweight syntax, offers a streamlined approach to web content creation, collaboration, and document sharing, particularly in environments where tools like Git or Markdown-friendly editors are prevalent. By converting Word documents to Markdown files, users can enhance their productivity, facilitate easier version control, and ensure compatibility across different systems and platforms. In this article, we will explore the process of converting Word documents to Markdown files using Spire.Doc for .NET, providing simple C# code examples.
Install Spire.Doc for .NET
To begin with, you need to add the DLL files included in the Spire.Doc for.NET package as references in your .NET project. The DLL files can be either downloaded from this link or installed via NuGet.
PM> Install-Package Spire.Doc
Convert Word to Markdown with C#
Using Spire.Doc for .NET, we can convert a Word document to a Markdown file by loading the document using Document.LoadFromFile() method and then convert it to a Markdown file using Document.SaveToFile(filename: String, FileFormat.Markdown) method. The detailed steps are as follows:
- Create an instance of Document class.
- Load a Word document using Document.LoadFromFile() method.
- Convert the document to a Markdown file using Document.SaveToFile(filename: String, FileFormat.Markdown) method.
- Release resources.
- C#
using Spire.Doc;

namespace WordToMarkdown
{
    class Program
    {
        static void Main(string[] args)
        {
            // Create an instance of Document class
            Document doc = new Document();

            // Load a Word document
            doc.LoadFromFile("Sample.docx");

            // Convert the document to a Markdown file
            doc.SaveToFile("output/WordToMarkdown.md", FileFormat.Markdown);
            doc.Dispose();
        }
    }
}
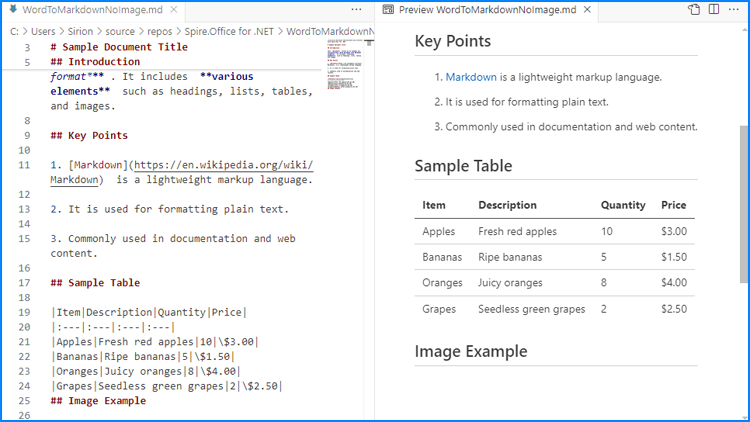
Convert Word to Markdown Without Images
When using Spire.Doc for .NET to convert Word documents to Markdown files, images are stored in Base64 encoding by default, which can increase the file size and affect compatibility. To address this, we can remove the images during conversion, thereby reducing the file size and enhancing compatibility.
The following steps outline how to convert Word documents to Markdown files without images:
- Create an instance of Document class.
- Load a Word document using Document.LoadFromFile() method.
- Iterate through the sections and then the paragraphs in the document.
- Iterate through the document objects in the paragraphs:
- Get a document object through Paragraph.ChildObjects[] property.
- Check if it’s an instance of DocPicture class. If it is, remove it using Paragraph.ChildObjects.Remove(DocumentObject) method.
- Convert the document to a Markdown file using Document.SaveToFile(filename: String, FileFormat.Markdown) method.
- Release resources.
- C#
using Spire.Doc;
using Spire.Doc.Documents;
using Spire.Doc.Fields;

namespace WordToMarkdownNoImage
{
    class Program
    {
        static void Main(string[] args)
        {
            // Create an instance of Document class
            Document doc = new Document();

            // Load a Word document
            doc.LoadFromFile("Sample.docx");

            // Iterate through the sections in the document
            foreach (Section section in doc.Sections)
            {
                // Iterate through the paragraphs in the sections
                foreach (Paragraph paragraph in section.Paragraphs)
                {
                    // Iterate through the document objects in the paragraphs
                    for (int i = 0; i < paragraph.ChildObjects.Count; i++)
                    {
                        // Get a document object
                        DocumentObject docObj = paragraph.ChildObjects[i];
                        // Check if it is an instance of DocPicture class
                        if (docObj is DocPicture)
                        {
                            // Remove the DocPicture instance
                            paragraph.ChildObjects.Remove(docObj);
                        }
                    }
                }
            }

            // Convert the document to a Markdown file
            doc.SaveToFile("output/WordToMarkdownNoImage.md", FileFormat.Markdown);
            doc.Dispose();
        }
    }
}
Apply for a Temporary License
If you'd like to remove the evaluation message from the generated documents, or to get rid of the function limitations, please request a 30-day trial license for yourself.
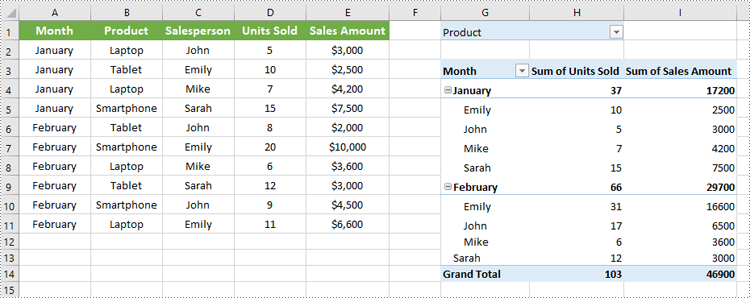
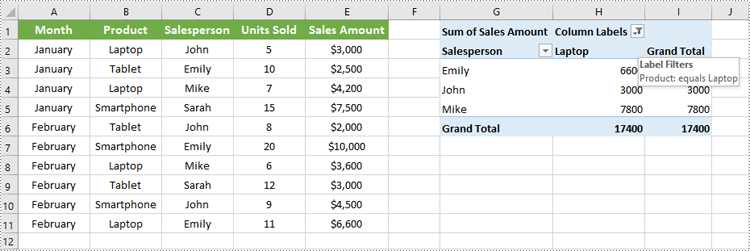
Filters in pivot tables enable users to narrow down the displayed data based on specific criteria. By adding filters, users can focus on subsets of data that are most relevant to their analysis, allowing for a more targeted and efficient data exploration. In this article, we will demonstrate how to add filters to pivot tables in Excel in C# using Spire.XLS for .NET.
- Add Report Filter to Pivot Table in Excel in C#
- Add Filter to a Row Field of Pivot Table in Excel in C#
- Add Filter to a Column Field of Pivot Table in Excel in C#
Install Spire.XLS for .NET
To begin with, you need to add the DLL files included in the Spire.XLS for.NET package as references in your .NET project. The DLL files can be either downloaded from this link or installed via NuGet.
PM> Install-Package Spire.XLS
Add Report Filter to Pivot Table in Excel in C#
Spire.XLS for .NET offers the XlsPivotTable.ReportFilters.Add() method to add report filters to a pivot table. The detailed steps are as follows.
- Create an object of the Workbook class.
- Load an Excel file using Workbook.LoadFromFile() method.
- Get a specific worksheet in the file using Workbook.Worksheets[index] property.
- Get a specific pivot table in the worksheet using Worksheet.PivotTables[index] property.
- Create a report filter using PovotReportFilter class.
- Add the report filter to the pivot table using XlsPivotTable.ReportFilters.Add() method.
- Save the resulting file using Workbook.SaveToFile() method.
- C#
using Spire.Xls;
using Spire.Xls.Core.Spreadsheet.PivotTables;

namespace AddReportFilter
{
    internal class Program
    {
        static void Main(string[] args)
        {
            // Create an object of the Workbook class
            Workbook workbook = new Workbook();
            // Load an Excel file
            workbook.LoadFromFile("Sample.xlsx");

            // Get the first worksheet
            Worksheet sheet = workbook.Worksheets[0];

            // Get the first pivot table
            XlsPivotTable pt = sheet.PivotTables[0] as XlsPivotTable;

            // Create a report filter
            PivotReportFilter reportFilter = new PivotReportFilter("Product", true);

            // Add the report filter to the pivot table
            pt.ReportFilters.Add(reportFilter);

            // Save the resulting file
            workbook.SaveToFile("AddReportFilter.xlsx", FileFormat.Version2016);
            workbook.Dispose();
        }
    }
}
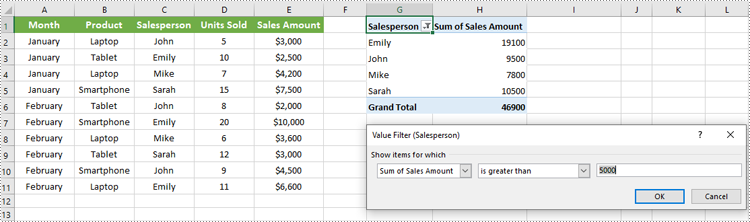
Add Filter to a Row Field of Pivot Table in Excel in C#
You can add a value filter or label filter to a specific row field in a pivot table using the XlsPivotTable.RowFields[index].AddValueFilter() or XlsPivotTable.RowFields[index].AddLabelFilter() method. The detailed steps are as follows.
- Create an object of the Workbook class.
- Load an Excel file using Workbook.LoadFromFile() method.
- Get a specific worksheet in the file using Workbook.Worksheets[index] property.
- Get a specific pivot table in the worksheet using Worksheet.PivotTables[index] property.
- Add a value filter or label filter to a specific row field in the pivot table using XlsPivotTable.RowFields[index].AddValueFilter() or XlsPivotTable.RowFields[index].AddLabelFilter() method.
- Calculate the data in the pivot table using XlsPivotTable.CalculateData() method.
- Save the resulting file using Workbook.SaveToFile() method.
- C#
using Spire.Xls;
using Spire.Xls.Core.Spreadsheet.PivotTables;

namespace AddRowFilter
{
    internal class Program
    {
        static void Main(string[] args)
        {
            // Create an object of the Workbook class
            Workbook workbook = new Workbook();
            // Load an Excel file
            workbook.LoadFromFile("Sample.xlsx");

            // Get the first worksheet
            Worksheet sheet = workbook.Worksheets[0];

            // Get the first pivot table
            XlsPivotTable pt = sheet.PivotTables[0] as XlsPivotTable;


            // Add a value filter to the first row field in the pivot table
            pt.RowFields[0].AddValueFilter(PivotValueFilterType.GreaterThan, pt.DataFields[0], 5000, null);
            // Or add a label filter to the first row field in the pivot table
            //pt.RowFields[0].AddLabelFilter(PivotLabelFilterType.Equal, "Mike", null);

            // Calculate the pivot table data
            pt.CalculateData();

            // Save the resulting file
            workbook.SaveToFile("AddRowFilter.xlsx", FileFormat.Version2016);
            workbook.Dispose();
        }
    }
}
Add Filter to a Column Field of Pivot Table in Excel in C#
To add a value filter or label filter to a specific column field in a pivot table, you can use the XlsPivotTable.ColumnFields[index].AddValueFilter() or XlsPivotTable.ColumnFields[index].AddLabelFilter() method. The detailed steps are as follows.
- Create an object of the Workbook class.
- Load an Excel file using Workbook.LoadFromFile() method.
- Get a specific worksheet in the file using Workbook.Worksheets[index] property.
- Get a specific pivot table in the worksheet using Worksheet.PivotTables[index] property.
- Add a value filter or label filter to a specific column field in the pivot table using XlsPivotTable.ColumnFields[index].AddValueFilter() or XlsPivotTable.ColumnFields[index].AddLabelFilter() method.
- Calculate the data in the pivot table using XlsPivotTable.CalculateData() method.
- Save the resulting file using Workbook.SaveToFile() method.
- C#
using Spire.Xls;
using Spire.Xls.Core.Spreadsheet.PivotTables;

namespace AddColumnFilter
{
    internal class Program
    {
        static void Main(string[] args)
        {
            // Create an object of the Workbook class
            Workbook workbook = new Workbook();
            // Load an Excel file
            workbook.LoadFromFile("Sample.xlsx");

            // Get the first worksheet
            Worksheet sheet = workbook.Worksheets[0];

            // Get the first pivot table
            XlsPivotTable pt = sheet.PivotTables[0] as XlsPivotTable;

            // Add a label filter to the first column field in the pivot table
            pt.ColumnFields[0].AddLabelFilter(PivotLabelFilterType.Equal, "Laptop", null);
            // Or add a value filter to the first column field in the pivot table
            // pt.ColumnFields[0].AddValueFilter(PivotValueFilterType.Between, pt.DataFields[0], 5000, 10000);


            // Calculate the pivot table data
            pt.CalculateData();

            // Save the resulting file
            workbook.SaveToFile("AddColumnFilter.xlsx", FileFormat.Version2016);
            workbook.Dispose();
        }
    }
}
Apply for a Temporary License
If you'd like to remove the evaluation message from the generated documents, or to get rid of the function limitations, please request a 30-day trial license for yourself.
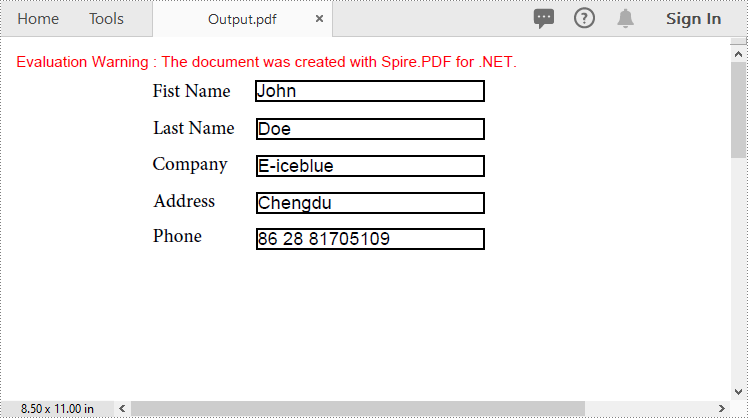
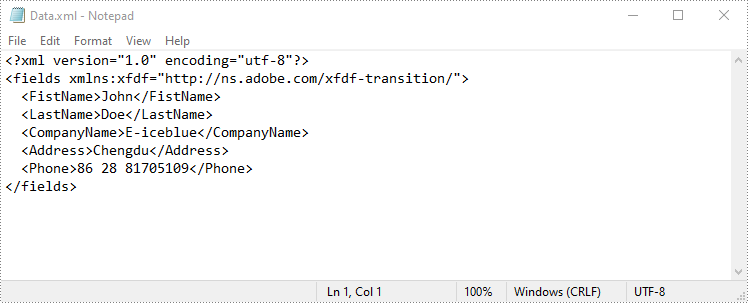
Importing and exporting PDF form data allows users to seamlessly exchange form information with external files in formats such as FDF (Forms Data Format), XFDF (XML Forms Data Format), or XML. The import function enables quick population of PDF forms using data from external sources, while the export function extracts data from PDF forms and saves it to external files. This capability simplifies data management, making it especially valuable for processing large volumes of form data or integrating with other systems. In this article, we will demonstrate how to import PDF form data from FDF, XFDF, or XML files, or export PDF form data to FDF, XFDF, or XML files in C# using Spire.PDF for .NET.
- Import PDF Form Data from FDF, XFDF or XML Files in C#
- Export PDF Form Data to FDF, XFDF or XML Files in C#
Install Spire.PDF for .NET
To begin with, you need to add the DLL files included in the Spire.PDF for.NET package as references in your .NET project. The DLLs files can be either downloaded from this link or installed via NuGet.
PM> Install-Package Spire.PDF
Import PDF Form Data from FDF, XFDF or XML Files in C#
Spire.PDF for .NET offers the PdfFormWidget.ImportData() method for importing PDF form data from FDF, XFDF, or XML files. The detailed steps are as follows.
- Create an object of the PdfDocument class.
- Load a PDF document using PdfDocument.LoadFromFile() method.
- Get the form of the PDF document using PdfDocument.Form property.
- Import form data from an FDF, XFDF or XML file using PdfFormWidget.ImportData() method.
- Save the resulting document using PdfDocument.SaveToFile() method.
- C#
using Spire.Pdf;
using Spire.Pdf.Widget;

namespace ImportPdfFormData
{
    internal class Program
    {
        static void Main(string[] args)
        {
            //Create an object of the PdfDocument class
            PdfDocument document = new PdfDocument();
            //Load a PDF document
            document.LoadFromFile("Forms.pdf");

            //Get the form of the PDF document
            PdfFormWidget loadedForm = document.Form as PdfFormWidget;

            //Import PDF form data from an XML file
            loadedForm.ImportData("Data.xml", DataFormat.Xml);

            //Import PDF form data from an FDF file
            //loadedForm.ImportData("Data.fdf", DataFormat.Fdf);

            //Import PDF form data from an XFDF file
            //loadedForm.ImportData("Data.xfdf", DataFormat.XFdf);

            //Save the resulting document
            document.SaveToFile("Output.pdf");
            //Close the PdfDocument object
            document.Close();
        }
    }
}
Export PDF Form Data to FDF, XFDF or XML Files in C#
Spire.PDF for .NET also enables you to export PDF form data to FDF, XFDF, or XML files by using the PdfFormWidget.ExportData() method. The detailed steps are as follows.
- Create an object of the PdfDocument class.
- Load a PDF document using PdfDocument.LoadFromFile() method.
- Get the form of the PDF document using PdfDocument.Form property.
- Export form data to an FDF, XFDF or XML file using PdfFormWidget.ExportData() method.
- C#
using Spire.Pdf;
using Spire.Pdf.Fields;
using Spire.Pdf.Widget;

namespace ExportPdfFormData
{
    internal class Program
    {
        static void Main(string[] args)
        {
            //Create an object of the PdfDocument class
            PdfDocument document = new PdfDocument();
            //Load a PDF document
            document.LoadFromFile("Forms.pdf");

            //Get the form of the PDF document
            PdfFormWidget loadedForm = document.Form as PdfFormWidget;

            //Export PDF form data to an XML file
            loadedForm.ExportData("Data.xml", DataFormat.Xml, "Form");

            //Export PDF form data to an FDF file
            //loadedForm.ExportData("Data.fdf", DataFormat.Fdf, "Form");

            //Export PDF form data to an XFDF file
            //loadedForm.ExportData("Data.xfdf", DataFormat.XFdf, "Form");

            //Close the PdfDocument object
            document.Close();
        }
    }
}
Apply for a Temporary License
If you'd like to remove the evaluation message from the generated documents, or to get rid of the function limitations, please request a 30-day trial license for yourself.
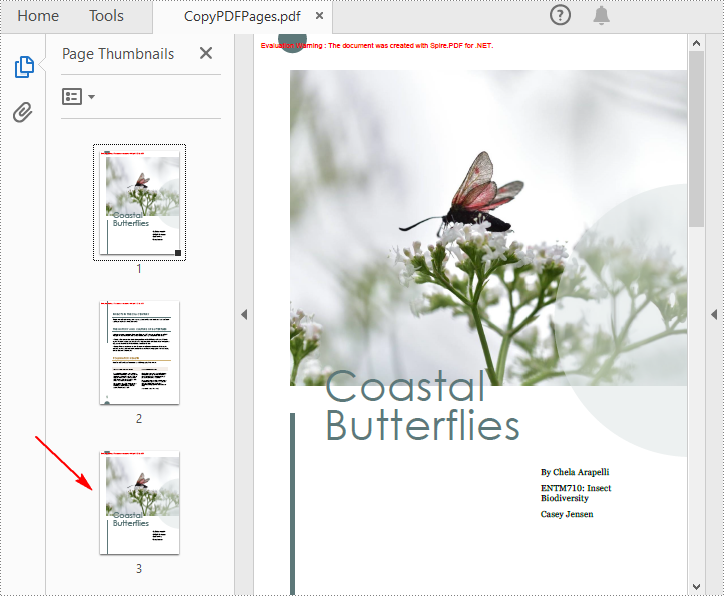
Copying PDF pages facilitates better organization of information. By copying pages that contain important sections and then compiling them into a new document, you can bring together relevant content from different sources to create a cohesive resource that is easy to navigate. In this article, you will learn how to copy pages in PDF in C# using Spire.PDF for .NET.
Install Spire.PDF for .NET
To begin with, you need to add the DLL files included in the Spire.PDF for.NET package as references in your .NET project. The DLL files can be either downloaded from this link or installed via NuGet.
PM> Install-Package Spire.PDF
Copy Pages within the Same PDF in C#
To duplicate PDF pages, you can first create template based on a specified page in PDF, and then draw the template on a newly added page through the PdfPageBase.Canvas.DrawTemplate() method. The following are the detailed steps.
- Create a PdfDocument instance.
- Load a PDF file using PdfDocument.LoadFromFile() method.
- Get a specified page using PdfDocument.Pages[] property.
- Get the size of the page using PdfPageBase.Size property.
- Create a template based on the page using PdfPageBase.CreateTemplate() method.
- Add a new page of the same size at the end using PdfDocument.Pages.Add(SizeF size, PdfMargins margins) method. Or you can insert a new page of the same size at a specified location using PdfDocument.Pages.Insert(int index, SizeF size, PdfMargins margins) method.
- Draw template on the newly added page using PdfPageBase.Canvas.DrawTemplate(PdfTemplate template, PointF location) method.
- Save the result file using PdfDocument.SaveToFile() method.
- C#
using Spire.Pdf;
using Spire.Pdf.Graphics;
using System.Drawing;

namespace DuplicatePage
{
    class Program
    {
        static void Main(string[] args)
        {
            //Create a PdfDocument instance
            PdfDocument pdf = new PdfDocument();

            //Load a PDF file
            pdf.LoadFromFile("Butterflies.pdf");

            //Get the first page
            PdfPageBase page = pdf.Pages[0];

            //Get the size of the page
            SizeF size = page.Size;

            //Create a template based on the page
            PdfTemplate template = page.CreateTemplate();

            //Add a new page the same size as the first page
            page = pdf.Pages.Add(size, new PdfMargins(0));
            //Insert a new page at the specified location
            //page = pdf.Pages.Insert(1, size, new PdfMargins(0));

            //Draw the template on the newly added page
            page.Canvas.DrawTemplate(template, new PointF(0, 0));

            //Save the PDF file
            pdf.SaveToFile("CopyPDFPages.pdf");
        }
    }
}
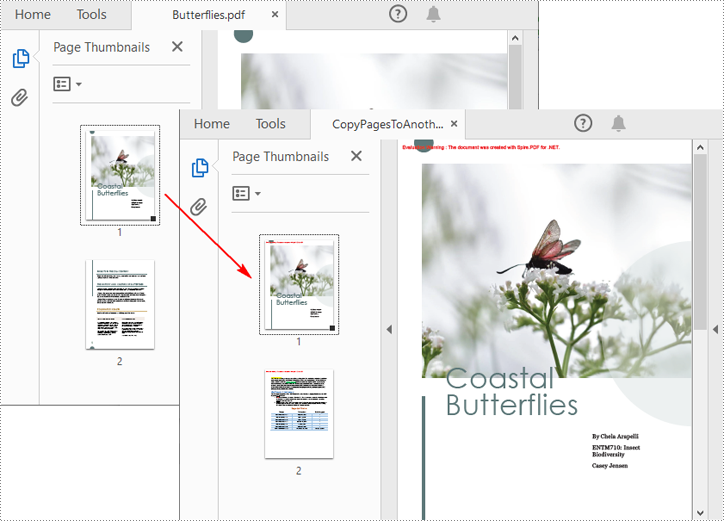
Copy Pages from One PDF to Another in C#
Spire.PDF for .NET also allows you to load two PDF files, create templates based on the pages in one PDF file, and then draw them onto the pages in another PDF file. The following are the detailed steps.
- Create a PdfDocument instance.
- Load two PDF files using PdfDocument.LoadFromFile() method.
- Get a specified page in the first PDF using PdfDocument.Pages[] property.
- Get the size of the page using PdfPageBase.Size property.
- Create a template based on the page using PdfPageBase.CreateTemplate() method.
- Insert a new page of the same size at a specified location in the second PDF using PdfDocument.Pages.Insert(int index, SizeF size, PdfMargins margins) method. Or you can add a new page of the same size at the end of the second PDF using PdfDocument.Pages.Add(SizeF size, PdfMargins margins) method.
- Draw template on the newly added page using PdfPageBase.Canvas.DrawTemplate(PdfTemplate template, PointF location) method.
- Save the result file using PdfDocument.SaveToFile() method.
- C#
using Spire.Pdf;
using Spire.Pdf.Graphics;
using System.Drawing;

namespace CopyPageToAnother
{
    class Program
    {
        static void Main(string[] args)
        {
            //Load the first PDF file
            PdfDocument pdf1 = new PdfDocument();
            pdf1.LoadFromFile("Butterflies.pdf");

            //Load the second PDF file
            PdfDocument pdf2 = new PdfDocument();
            pdf2.LoadFromFile("SamplePDF.pdf");

            //Get the first page in the first PDF file
            PdfPageBase page = pdf1.Pages[0];

            //Get the size of the page
            SizeF size = page.Size;

            //Create a template based on the page
            PdfTemplate template = page.CreateTemplate();

            //Insert a new page at a specified location in the second PDF file
            PdfPageBase newPage = pdf2.Pages.Insert(0, size, new PdfMargins(0));

            //Add a new page at the end of the second PDF file
            //PdfPageBase newPage = pdf2.Pages.Add(size, new PdfMargins(0));

            //Draw the template on the newly added page
            newPage.Canvas.DrawTemplate(template, new PointF(0, 0));

            //Save the result file
            pdf2.SaveToFile("CopyPagesToAnotherPDF.pdf");
        }
    }
}
Apply for a Temporary License
If you'd like to remove the evaluation message from the generated documents, or to get rid of the function limitations, please request a 30-day trial license for yourself.
The need to convert PDF documents into more flexible and editable formats, such as Markdown, has become a common task for developers and content creators. Converting PDFs to Markdown files facilitates easier editing and version control, and enhances content portability across different platforms and applications, making it particularly suitable for modern web publishing workflows. By utilizing Spire.PDF for .NET, developers can automate the conversion process, ensuring that the rich formatting and structure of the original PDFs are preserved in the resulting Markdown files.
This article will demonstrate how to use Spire.PDF for .NET to convert PDF documents to Markdown format with C# code.
Install Spire.PDF for .NET
To begin with, you need to add the DLL files included in the Spire.PDF for.NET package as references in your .NET project. The DLL files can be either downloaded from this link or installed via NuGet.
PM> Install-Package Spire.PDF
Convert PDF Documents to Markdown Files
With the Spire.PDF for .NET library, developers can easily load any PDF file using the PdfDocument.LoadFromFile(string filename) method and then save the document in the desired format by calling the PdfDocument.SaveToFile(string filename, FileFormat fileFormat) method. To convert a PDF to Markdown format, simply specify the FileFormat.Markdown enumeration as a parameter when invoking the method.
The detailed steps for converting PDF documents to Markdown files are as follows:
- Create an instance of PdfDocument class.
- Load a PDF document using PdfDocument.LoadFromFile(string filename) method.
- Convert the document to a Markdown file using PdfDocument.SaveToFile(string filename, FileFormat.Markdown) method.
- C#
using Spire.Pdf;

namespace PDFToMarkdown
{
    class Program
    {
        static void Main(string[] args)
        {
            // Create an instance of PdfDocument class
            PdfDocument pdf = new PdfDocument();

            // Load a PDF document
            pdf.LoadFromFile("Sample.pdf");

            // Convert the document to Markdown file
            pdf.SaveToFile("output/PDFToMarkdown.md", FileFormat.Markdown);

            // Release resources
            pdf.Close();
        }
    }
}
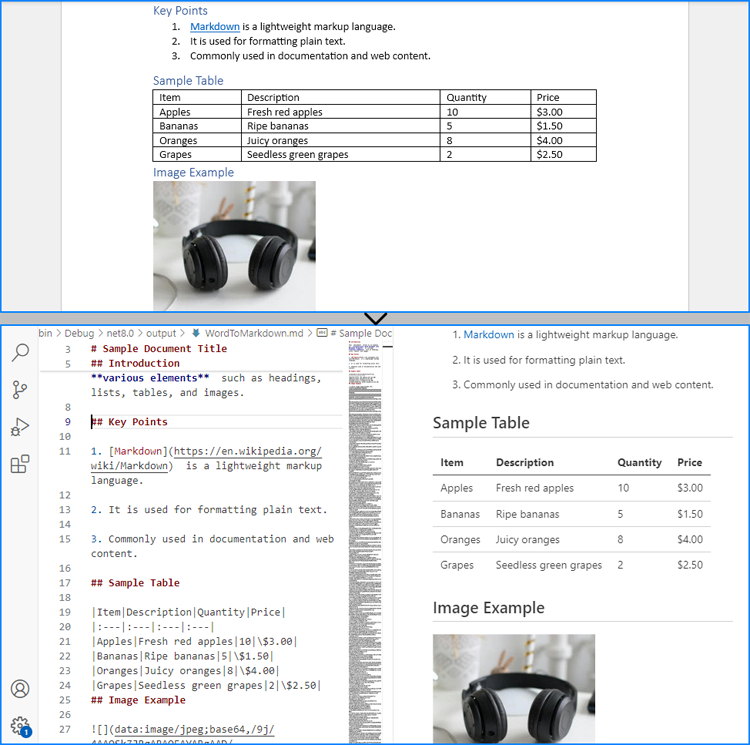
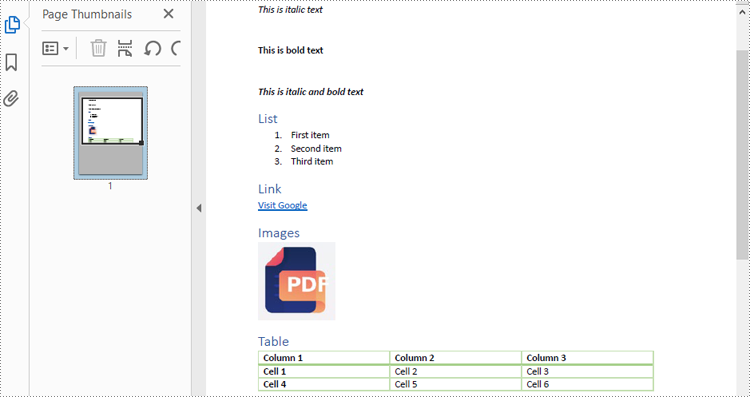
The PDF Document:
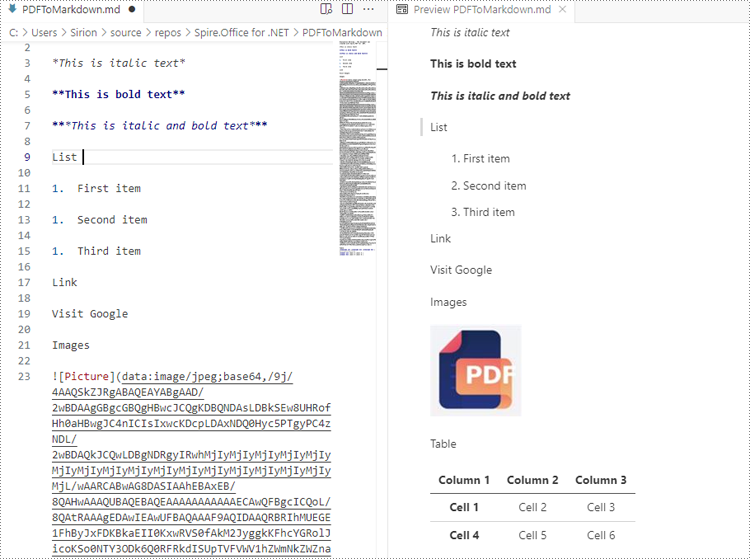
The Result Markdown File:
Convert PDF to Markdown by Streams
In addition to directly reading files for manipulation, Spire.PDF for .NET also supports loading a PDF document from a stream using PdfDocument.LoadFromStream() method and converting it to a Markdown file stream using PdfDocument.SaveToStream() method. Using streams reduces memory usage, supports large files, enables real-time data transfer, and simplifies data exchange with other systems.
The detailed steps for converting PDF documents to Markdown files by streams are as follows:
- Create a Stream object of PDF documents by downloading from the web or reading from a file.
- Load the PDF document from the stream using PdfDocument.LoadFromStream(Stream stream) method.
- Create another Stream object to store the converted Markdown file.
- Convert the PDF document to a Markdown file stream using PdfDocument.SaveToStream(Stream stream, FileFormat.Markdown) method.
- C#
using Spire.Pdf;
using System.IO;
using System.Net.Http;

namespace PDFToMarkdownByStream
{
    class Program
    {
        static async Task Main(string[] args)
        {
            // Create an instance of PdfDocument class
            PdfDocument pdf = new PdfDocument();

            // Download a PDF document from a url as bytes
            using (HttpClient client = new HttpClient())
            {
                byte[] pdfBytes = await client.GetByteArrayAsync("http://example.com/Sample.pdf");

                // Create a MemoryStream using the bytes
                using (MemoryStream inputStream = new MemoryStream(pdfBytes))
                {
                    // Load the PDF document from the stream
                    pdf.LoadFromStream(inputStream);

                    // Create another MemoryStream object to store the Markdown file
                    using (MemoryStream outputStream = new MemoryStream())
                    {
                        // Convert the PDF document to a Markdown file stream
                        pdf.SaveToStream(outputStream, FileFormat.Markdown);
                        outputStream.Position = 0; // Reset the position of the stream for subsequent reads

                        // Upload the result stream or write it to a file
                        await client.PostAsync("http://example.com/upload", new StreamContent(outputStream));
                        File.WriteAllBytes("output.md", outputStream.ToArray());
                    }
                }
            }

            // Release resources
            pdf.Close();
        }
    }
}
Apply for a Temporary License
If you'd like to remove the evaluation message from the generated documents, or to get rid of the function limitations, please request a 30-day trial license for yourself.
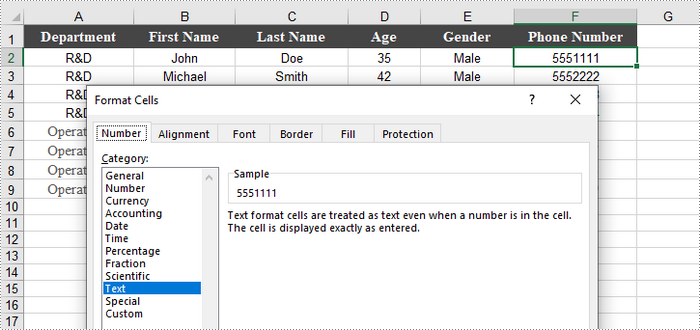
Transforming text to numbers and vice versa in Excel is essential for effective data management. By converting text to numbers, you enhance the accuracy of calculations and data processing, which is vital for activities such as financial reporting and statistical analysis. Conversely, changing numbers to text can improve formatting, making outputs clearer and more readable, ultimately presenting data in a more user-friendly way.
In this article, you will learn how to convert text to numbers and numbers to text in Excel using Spire.XLS for .NET.
Install Spire.XLS for .NET
To begin with, you need to add the DLL files included in the Spire.XLS for .NET package as references in your .NET project. The DLL files can be either downloaded from this link or installed via NuGet.
PM> Install-Package Spire.XLS
Convert Text to Numbers in C#
When you import data from an external source into Excel, you might notice a small green triangle in the upper-left corner of certain cells. This triangle serves as an error indicator, signaling that the number is formatted as text. When numbers are stored as text, it can lead to unexpected outcomes, such as formulas not calculating correctly and displaying as text instead of yielding results.
To convert text-formatted numbers back to numeric format, you can use the CellRange.ConvertToNumber() method. The CellRange object can refer to either a single cell or a range of cells.
Here are the steps to convert text to numbers in Excel:
- Create a Workbook object.
- Load an Excel file using Workbook.LoadFromFile() method.
- Access a specific worksheet with Workbook.Worksheets[index] property.
- Retrieve a cell or range of cells using Worksheet.Range property.
- Convert the text in the cell(s) to numbers using CellRange.ConvertToNumber() method.
- Save the document as a new Excel file.
- C#
using Spire.Xls;

namespace ConvertTextToNumbers
{
    class Program
    {
        static void Main(string[] args)
        {

            // Create a Workbook object
            Workbook workbook = new Workbook();

            // Load an Excel document
            workbook.LoadFromFile("C:\\Users\\Administrator\\Desktop\\Input.xlsx");

            // Get a specific worksheet
            Worksheet worksheet = workbook.Worksheets[0];

            // Get a cell range
            CellRange range = worksheet.Range["D2:G13"];

            // Convert text to number
            range.ConvertToNumber();

            // Save the workbook to a different Excel file
            workbook.SaveToFile("TextToNumbers.xlsx", ExcelVersion.Version2013);

            // Dispose resources
            workbook.Dispose();
        }
    }
}
Convert Numbers to Text in C#
When working with numerical data in Excel, you may find occasions where converting numbers to text is necessary. This is especially crucial for data that requires specific formatting, such as IDs or phone numbers, where leading zeros must be preserved.
To convert a number in a cell to text, you can set the CellRange.NumberFormat property to @. The CellRange object can represent either a single cell or a range of cells.
Here are the steps to convert numbers to text in Excel:
- Create a Workbook object.
- Load an Excel file using Workbook.LoadFromFile() method.
- Access a specific worksheet through Workbook.Worksheets[index] property.
- Retrieve a specific cell or range of cells using Worksheet.Range property.
- Convert the numbers in the cell(s) to text by setting CellRange.NumberFormat to @.
- Save the document as a new Excel file.
- C#
using Spire.Xls;

namespace ConvertNumbersToText
{
    class Program
    {
        static void Main(string[] args)
        {
            // Create a Workbook object
            Workbook workbook = new Workbook();

            // Load an Excel document
            workbook.LoadFromFile("C:\\Users\\Administrator\\Desktop\\Employee.xlsx");

            // Get a specific worksheet
            Worksheet worksheet = workbook.Worksheets[0];

            // Get a cell range
            CellRange cellRange = worksheet.Range["F2:F9"];

            // Convert numbers in the cell range to text
            cellRange.NumberFormat = "@";

            // Save the workbook to a different Excel file
            workbook.SaveToFile("NumbersToText.xlsx", ExcelVersion.Version2013);

            // Dispose resources
            workbook.Dispose();
        }
    }
}
Apply for a Temporary License
If you'd like to remove the evaluation message from the generated documents, or to get rid of the function limitations, please request a 30-day trial license for yourself.
PDF page cropping is particularly useful in scenarios where the original document has excessive margins or borders that are not necessary for the intended use. By cropping pages, you can preserve the designated area for specific use, making the document more efficient for sharing, printing, or digital presentations. In this article, you will learn how to crop pages in PDF in C# using Spire.PDF for .NET.
Install Spire.PDF for .NET
To begin with, you need to add the DLL files included in the Spire.PDF for.NET package as references in your .NET project. The DLL files can be either downloaded from this link or installed via NuGet.
PM> Install-Package Spire.PDF
Crop a PDF Page in C#
Spire.PDF for .NET allows you specify a rectangular area, and then use the PdfPageBase.CropBox property to crop page to the specified area. The following are the detailed steps.
- Create a PdfDocument instance.
- Load a PDF file using PdfDocument.LoadFromFile() method.
- Get a specified page using PdfDocument.Pages[] property.
- Crop the page to the specified area using PdfPageBase.CropBox property.
- Save the result file using PdfDocument.SaveToFile() method.
- C#
using System.Drawing;
using Spire.Pdf;

namespace CropPDFPage
{
    class Program
    {
        static void Main(string[] args)
        {
            //Create a PdfDocument object
            PdfDocument pdf = new PdfDocument();

            //Load a PDF file from disk
            pdf.LoadFromFile("Sample1.pdf");

            //Get the first page
            PdfPageBase page = pdf.Pages[0];

            //Crop the page by the specified area
            page.CropBox = new RectangleF(0, 300, 600, 260);

            //Save the result file
            pdf.SaveToFile("CropPDF.pdf");
            pdf.Close();
        }
    }
}
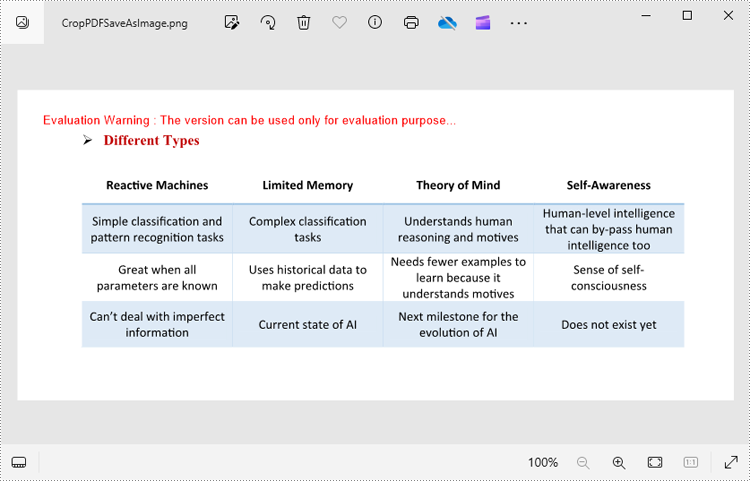
Crop a PDF Page and Export as an Image in C#
To accomplish this task, you can use the PdfDocument.SaveAsImage(int pageIndex, PdfImageType type) method to convert a cropped PDF page to an image. The following are the detailed steps.
- Create a PdfDocument instance.
- Load a PDF file using PdfDocument.LoadFromFile() method.
- Get a specified page using PdfDocument.Pages[] property.
- Crop the page to the specified area using PdfPageBase.CropBox property.
- Convert the copped page to an image using PdfDocument.SaveAsImage() method.
- Save the image as a PNG, JPG or BMP file using Image.Save(string filename, ImageFormat format) method.
- C#
using System.Drawing;
using System.Drawing.Imaging;
using Spire.Pdf;
using Spire.Pdf.Graphics;

namespace CropPDFPageToImage
{
    class Program
    {
        static void Main(string[] args)
        {
            //Create a PdfDocument object
            PdfDocument pdf = new PdfDocument();

            //Load a PDF file from disk
            pdf.LoadFromFile("Sample1.pdf");

            //Get the first page
            PdfPageBase page = pdf.Pages[0];

            //Crop the page by the specified area
            page.CropBox = new RectangleF(0, 300, 600, 260);

            //Convert the page to an image
            Image image = pdf.SaveAsImage(0, PdfImageType.Bitmap);

            //Save the image as a PNG file
            image.Save("CropPDFSaveAsImage.png", ImageFormat.Png);

            //Save the image as a JPG file
            //image.Save("ToJPG.jpg", ImageFormat.Jpeg);

            //Save the image as a BMP file
            //image.Save("ToBMP.bmp", ImageFormat.Bmp);
        }
    }
}
Apply for a Temporary License
If you'd like to remove the evaluation message from the generated documents, or to get rid of the function limitations, please request a 30-day trial license for yourself.
When printing Excel spreadsheets, particularly those containing complex datasets or detailed reports, configuring the page setup properly is crucial. Excel’s page setup options enable you to adjust key factors such as page margins, orientation, paper size, and scaling, ensuring your documents are tailored to fit various printing needs. By customizing these settings, you can control how your content is displayed on the page, making sure it appears polished and professional. In this article, we will demonstrate how to set page setup options in Excel in C# using Spire.XLS for .NET.
- Set Page Margins in Excel in C#
- Set Page Orientation in Excel in C#
- Set Paper Size in Excel in C#
- Set Print Area in Excel in C#
- Set Scaling Factor in Excel in C#
- Set Fit-to-Pages Options in Excel in C#
- Set Headers and Footers in Excel in C#
Install Spire.XLS for .NET
To begin with, you need to add the DLL files included in the Spire.XLS for .NET package as references in your .NET project. The DLL files can be either downloaded from this link or installed via NuGet.
PM> Install-Package Spire.XLS
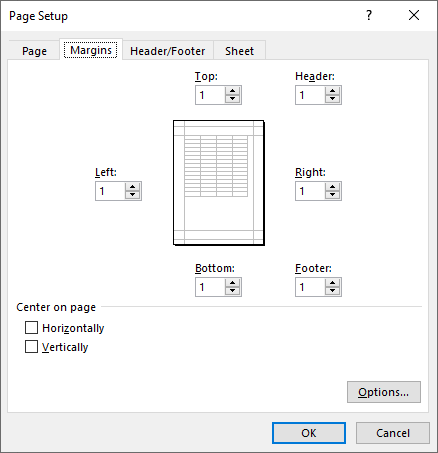
Set Page Margins in Excel in C#
The PageSetup class in Spire.XLS for .NET is used to configure page setup options for Excel worksheets. You can access the PageSetup object of a worksheet through the Worksheet.PageSetup property. Then, use properties like PageSetup.TopMargin, PageSetup.BottomMargin, PageSetup.LeftMargin, PageSetup.RightMargin, PageSetup.HeaderMarginInch, and PageSetup.FooterMarginInch to set the corresponding margins for the worksheet. The detailed steps are as follows.
- Create an object of the Workbook class.
- Load an Excel file using Workbook.LoadFromFile() method.
- Get a specific worksheet using Workbook.Worksheets[index] property.
- Access the PageSetup object of the worksheet using Worksheet.PageSetup property.
- Set the top, bottom, left, right, header, and footer margins using PageSetup.TopMargin, PageSetup.BottomMargin, PageSetup.LeftMargin, PageSetup.RightMargin, PageSetup.HeaderMarginInch, and PageSetup.FooterMarginInch properties.
- Save the modified workbook to a new file using Workbook.SaveToFile() method.
- C#
using Spire.Xls;

namespace SetPageMargins
{
    internal class Program
    {
        static void Main(string[] args)
        {
            // Create a Workbook object
            Workbook workbook = new Workbook();

            // Load an Excel file
            workbook.LoadFromFile("Sample.xlsx");

            // Get the first worksheet
            Worksheet sheet = workbook.Worksheets[0];

            // Get the PageSetup object of the worksheet
            PageSetup pageSetup = sheet.PageSetup;

            // Set top, bottom, left, and right page margins for the worksheet
            // The measure of the unit is Inch (1 inch = 2.54 cm)
            pageSetup.TopMargin = 1;
            pageSetup.BottomMargin = 1;
            pageSetup.LeftMargin = 1;
            pageSetup.RightMargin = 1;
            pageSetup.HeaderMarginInch = 1;
            pageSetup.FooterMarginInch = 1;

            // Save the modified workbook to a new file
            workbook.SaveToFile("SetPageMargins.xlsx", ExcelVersion.Version2016);
            workbook.Dispose();
        }
    }
}
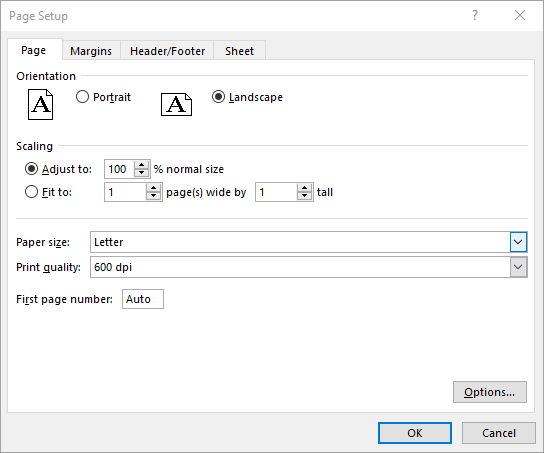
Set Page Orientation in Excel in C#
The PageSetup.Orientation property lets you determine how the page should be oriented when printed. You can choose between two options: portrait mode or landscape mode. The detailed steps are as follows.
- Create an object of the Workbook class.
- Load an Excel file using Workbook.LoadFromFile() method.
- Get a specific worksheet using Workbook.Worksheets[index] property.
- Access the PageSetup object of the worksheet using Worksheet.PageSetup property.
- Set the page orientation using PageSetup.Orientation property.
- Save the modified workbook to a new file using Workbook.SaveToFile() method.
- C#
using Spire.Xls;

namespace SetPageOrientation
{
    internal class Program
    {
        static void Main(string[] args)
        {
            //Page Orientation
            // Create a Workbook object
            Workbook workbook = new Workbook();

            // Load an Excel file
            workbook.LoadFromFile("Sample.xlsx");

            // Get the first worksheet
            Worksheet sheet = workbook.Worksheets[0];

            // Get the PageSetup object of the worksheet
            PageSetup pageSetup = sheet.PageSetup;

            // Set the page orientation for printing the worksheet to landscape mode
            pageSetup.Orientation = PageOrientationType.Landscape;

            // Save the modified workbook to a new file
            workbook.SaveToFile("SetPageOrientation.xlsx", ExcelVersion.Version2016);
            workbook.Dispose();
        }
    }
}
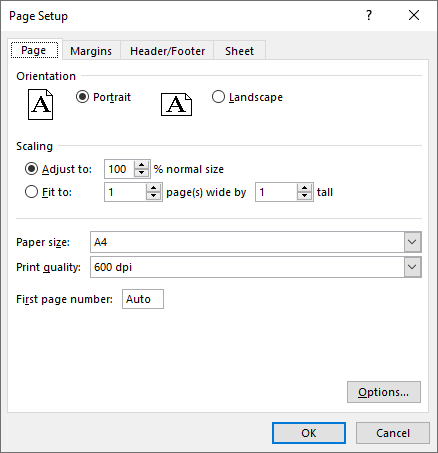
Set Paper Size in Excel in C#
The PageSetup.PaperSize property enables you to select from a variety of paper sizes for printing your worksheet. These options include A3, A4, A5, B4, B5, letter, legal, tabloid, and more. The detailed steps are as follows.
- Create an object of the Workbook class.
- Load an Excel file using Workbook.LoadFromFile() method.
- Get a specific worksheet using Workbook.Worksheets[index] property.
- Access the PageSetup object of the worksheet using Worksheet.PageSetup property.
- Set the paper size using PageSetup.PaperSize property.
- Save the modified workbook to a new file using Workbook.SaveToFile() method.
- C#
using Spire.Xls;

namespace SetPaperSize
{
    internal class Program
    {
        static void Main(string[] args)
        {
            // Create a Workbook object
            Workbook workbook = new Workbook();

            // Load an Excel file
            workbook.LoadFromFile("Sample.xlsx");

            // Get the first worksheet
            Worksheet sheet = workbook.Worksheets[0];

            // Get the PageSetup object of the worksheet
            PageSetup pageSetup = sheet.PageSetup;

            // Set the paper size to A4
            pageSetup.PaperSize = PaperSizeType.PaperA4;

            // Save the modified workbook to a new file
            workbook.SaveToFile("SetPaperSize.xlsx", ExcelVersion.Version2016);
            workbook.Dispose();
        }
    }
}
Set Print Area in Excel in C#
You can specify the exact area that you want to print using the PageSetup.PringArea property. The detailed steps are as follows.
- Create an object of the Workbook class.
- Load an Excel file using Workbook.LoadFromFile() method.
- Get a specific worksheet using Workbook.Worksheets[index] property.
- Access the PageSetup object of the worksheet using Worksheet.PageSetup property.
- Set the print area using PageSetup.PringArea property.
- Save the modified workbook to a new file using Workbook.SaveToFile() method.
- C#
using Spire.Xls;

namespace SetPrintArea
{
    internal class Program
    {
        static void Main(string[] args)
        {
            // Create a Workbook object
            Workbook workbook = new Workbook();

            // Load an Excel file
            workbook.LoadFromFile("Sample.xlsx");

            // Get the first worksheet
            Worksheet sheet = workbook.Worksheets[0];

            // Get the PageSetup object of the worksheet
            PageSetup pageSetup = sheet.PageSetup;

            // Set the print area of the worksheet to "A1:E5"
            pageSetup.PrintArea = "A1:E5";

            // Save the modified workbook to a new file
            workbook.SaveToFile("SetPrintArea.xlsx", ExcelVersion.Version2016);
            workbook.Dispose();
        }
    }
}

Set Scaling Factor in Excel in C#
If you want to scale the content of your worksheet to a specific percentage of its original size, use the PageSetup.Zoom property. The detailed steps are as follows.
- Create an object of the Workbook class.
- Load an Excel file using Workbook.LoadFromFile() method.
- Get a specific worksheet using Workbook.Worksheets[index] property.
- Access the PageSetup object of the worksheet using Worksheet.PageSetup property.
- Set the scaling factor using PageSetup.Zoom property.
- Save the modified workbook to a new file using Workbook.SaveToFile() method.
- C#
using Spire.Xls;

namespace SetScalingFactor
{
    internal class Program
    {
        static void Main(string[] args)
        {
            // Create a Workbook object
            Workbook workbook = new Workbook();

            // Load an Excel file
            workbook.LoadFromFile("Sample.xlsx");

            // Get the first worksheet
            Worksheet sheet = workbook.Worksheets[0];

            // Get the PageSetup object of the worksheet
            PageSetup pageSetup = sheet.PageSetup;

            // Set the scaling factor of the worksheet to 90%
            pageSetup.Zoom = 90;

            // Save the modified workbook to a new file
            workbook.SaveToFile("SetScalingFactor.xlsx", ExcelVersion.Version2016);
            workbook.Dispose();
        }
    }
}

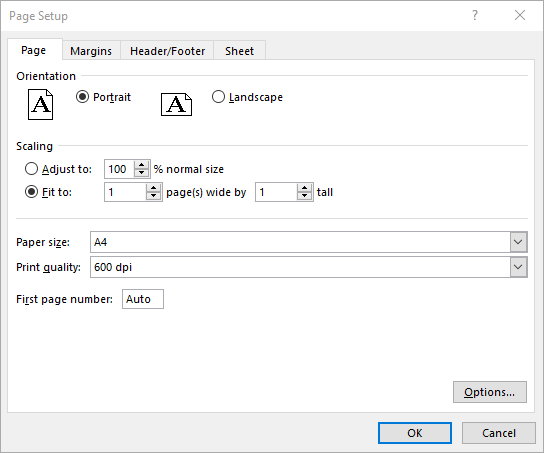
Set Fit-to-Pages Options in Excel in C#
Spire.XLS also enables you to fit your worksheet content to a specific number of pages by using the PageSetup.FitToPagesTall and PageSetup.FitToPagesWide properties. The detailed steps are as follows.
- Create an object of the Workbook class.
- Load an Excel file using Workbook.LoadFromFile() method.
- Get a specific worksheet using Workbook.Worksheets[index] property.
- Access the PageSetup object of the worksheet using Worksheet.PageSetup property.
- Fit the content of the worksheet to one page using PageSetup.FitToPagesTall and PageSetup.FitToPagesWide properties.
- Save the modified workbook to a new file using Workbook.SaveToFile() method.
- C#
using Spire.Xls;

namespace SetFitToPages
{
    internal class Program
    {
        static void Main(string[] args)
        {
            // Create a Workbook object
            Workbook workbook = new Workbook();

            // Load an Excel file
            workbook.LoadFromFile("Sample.xlsx");

            // Get the first worksheet
            Worksheet sheet = workbook.Worksheets[0];

            // Get the PageSetup object of the worksheet
            PageSetup pageSetup = sheet.PageSetup;

            // Fit the content of the worksheet within one page vertically (i.e., all rows will fit on a single page)
            pageSetup.FitToPagesTall = 1;
            // Fit the content of the worksheet within one page horizontally (i.e., all columns will fit on a single page)
            pageSetup.FitToPagesWide = 1;

            // Save the modified workbook to a new file
            workbook.SaveToFile("FitToPages.xlsx", ExcelVersion.Version2016);
            workbook.Dispose();
        }
    }
}
Set Headers and Footers in Excel in C#
For setting headers and footers in Excel, please check this article: C#/VB.NET: Add Headers and Footers to Excel.
Apply for a Temporary License
If you'd like to remove the evaluation message from the generated documents, or to get rid of the function limitations, please request a 30-day trial license for yourself.
