
.NET (1270)
Children categories
Sometimes, you may need to perform specific operations on multiple shapes in Excel, such as adding styles, resizing, or moving them around. Grouping shapes can help you accomplish this task more easily and efficiently. Once shapes are grouped, they are treated as a single entity and can be manipulated at the same time. In this article, you will learn how to programmatically group or ungroup shapes in Excel in C# and VB.NET using Spire.XLS for .NET.
Install Spire.XLS for .NET
To begin with, you need to add the DLL files included in the Spire.XLS for .NET package as references in your .NET project. The DLL files can be either downloaded from this link or installed via NuGet.
PM> Install-Package Spire.XLS
Group Shapes in Excel using C# and VB.NET
To group certain shapes in an Excel worksheet, you need to use the Worksheet.GroupShapeCollection property to return a GroupShapeCollection object, and then call the GroupShapeCollection.Group() method. The following are the detailed steps:
- Initialize an instance of Workbook class.
- Get the first worksheet by its index through Workbook.Worksheets[int] property.
- Add several shapes to specific rows and columns in the worksheet using Worksheet.PrstGeomShapes.AddPrstGeomShape(int, int, int, int, PrstGeomShapeType) method.
- Get the group shape collection of the worksheet through Worksheet.GroupShapeCollection property.
- Group the shapes using GroupShapeCollection.Group(IShape[]) method.
- Save the result document using Workbook.SaveToFile(string) method.
- C#
- VB.NET
using Spire.Xls;
using Spire.Xls.Core;
using Spire.Xls.Core.MergeSpreadsheet.Collections;
using System.Drawing;
namespace GroupShapes
{
class Program
{
static void Main(string[] args)
{
//Create a Workbook instance
Workbook workbook = new Workbook();
//Get the first worksheet
Worksheet worksheet = workbook.Worksheets[0];
//Add four shapes
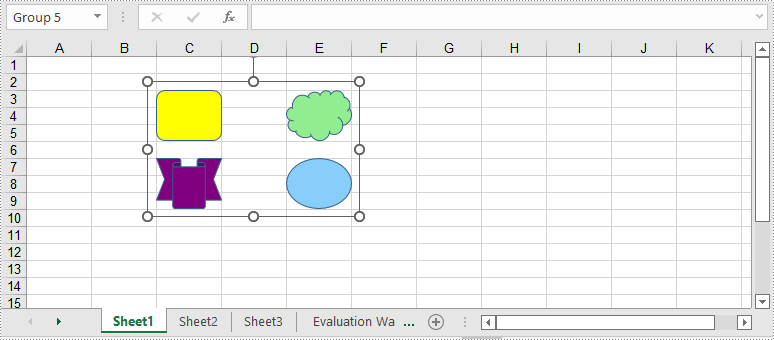
IPrstGeomShape shape1 = worksheet.PrstGeomShapes.AddPrstGeomShape(3, 3, 65, 50, PrstGeomShapeType.RoundRect);
shape1.Fill.FillType = ShapeFillType.SolidColor;
shape1.Fill.ForeColor = Color.Yellow;
shape1.Line.Weight = 0.1;
IPrstGeomShape shape2 = worksheet.PrstGeomShapes.AddPrstGeomShape(7, 3, 65, 50, PrstGeomShapeType.Ribbon);
shape2.Fill.FillType = ShapeFillType.SolidColor;
shape2.Fill.ForeColor = Color.Purple;
shape2.Line.Weight = 0.1;
IPrstGeomShape shape3 = worksheet.PrstGeomShapes.AddPrstGeomShape(3, 5, 65, 50, PrstGeomShapeType.Cloud);
shape3.Fill.FillType = ShapeFillType.SolidColor;
shape3.Fill.ForeColor = Color.LightGreen;
shape3.Line.Weight = 0.1;
IPrstGeomShape shape4 = worksheet.PrstGeomShapes.AddPrstGeomShape(7, 5, 65, 50, PrstGeomShapeType.Ellipse);
shape4.Fill.FillType = ShapeFillType.SolidColor;
shape4.Fill.ForeColor = Color.LightSkyBlue;
shape4.Line.Weight = 0.1;
//Group the shapes
GroupShapeCollection groupShapeCollection = worksheet.GroupShapeCollection;
groupShapeCollection.Group(new IShape[] { shape1, shape2, shape3, shape4});
//Save the result file
workbook.SaveToFile("GroupShapes.xlsx", ExcelVersion.Version2013);
}
}
}
Ungroup Shapes in Excel using C# and VB.NET
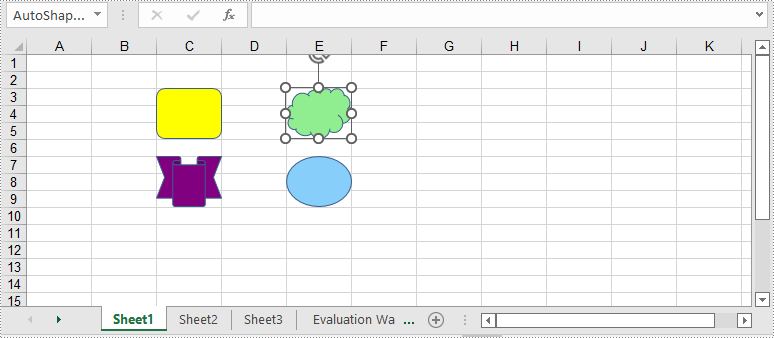
To ungroup the grouped shapes in an Excel worksheet, you can use the GroupShapeCollection. UnGroupAll() method. After the shapes are ungrouped, you can manipulate them individually. The following are the detailed steps:
- Initialize an instance of Workbook class.
- Load an Excel file using Workbook.LoadFromFile() method.
- Get a specific worksheet by its index through Workbook.Worksheets[int] property.
- Get the group shape collection of the worksheet through Worksheet.GroupShapeCollection property.
- Ungroup all the grouped shapes using GroupShapeCollection.UnGroupAll() method.
- Save the result document using Workbook.SaveToFile() method.
- C#
- VB.NET
using Spire.Xls;
using Spire.Xls.Core.MergeSpreadsheet.Collections;

namespace UngroupShapes
{
    class Program
    {
        static void Main(string[] args)
        {
            //Create a Workbook instance
            Workbook workbook = new Workbook();
            workbook.LoadFromFile("GroupShapes.xlsx");

            //Get the first worksheet
            Worksheet worksheet = workbook.Worksheets[0];

            //Ungroup the grouped shapes in the worksheet
            GroupShapeCollection groupShapeCollection = worksheet.GroupShapeCollection;
            groupShapeCollection.UnGroupAll();

            //Save the result file
            workbook.SaveToFile("UnGroupShapes.xlsx", ExcelVersion.Version2013);
        }
    }
}
Apply for a Temporary License
If you'd like to remove the evaluation message from the generated documents, or to get rid of the function limitations, please request a 30-day trial license for yourself.
C#/VB.NET: Convert Images (PNG, JPG, BMP, etc.) to PowerPoint
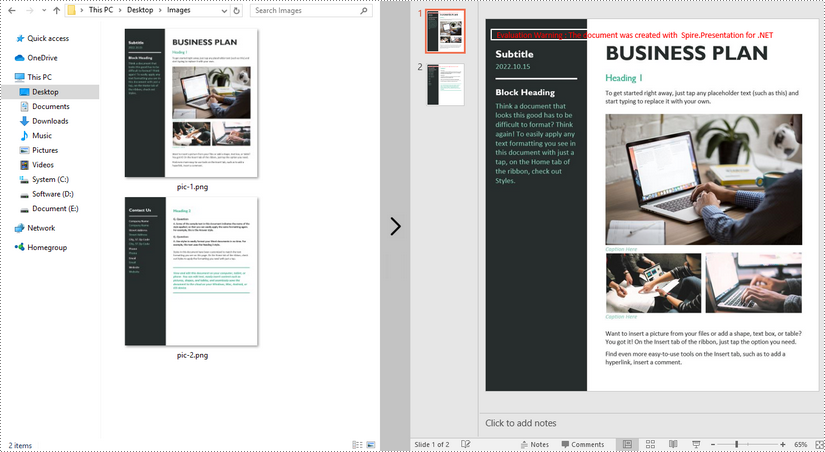
2022-11-14 01:40:53 Written by support iceblueThere are times when you need to create a PowerPoint document from a group of pre-created image files. As an example, you have been provided with some beautiful flyers by your company, and you need to combine them into a single PowerPoint document in order to display each picture in an orderly manner. In this article, you will learn how to convert image files (in any popular image format) to a PowerPoint document in C# and VB.NET using Spire.Presentation for .NET.
- Convert Image to Background in PowerPoint in C# and VB.NET
- Convert Image to Shape in PowerPoint in C# and VB.NET
- Convert Image to PowerPoint with Customized Slide Size in C# and VB.NET
Install Spire.Presentation for .NET
To begin with, you need to add the DLL files included in the Spire.Presentation for.NET package as references in your .NET project. The DLL files can be either downloaded from this link or installed via NuGet.
PM> Install-Package Spire.Presentation
Convert Image to Background in PowerPoint in C# and VB.NET
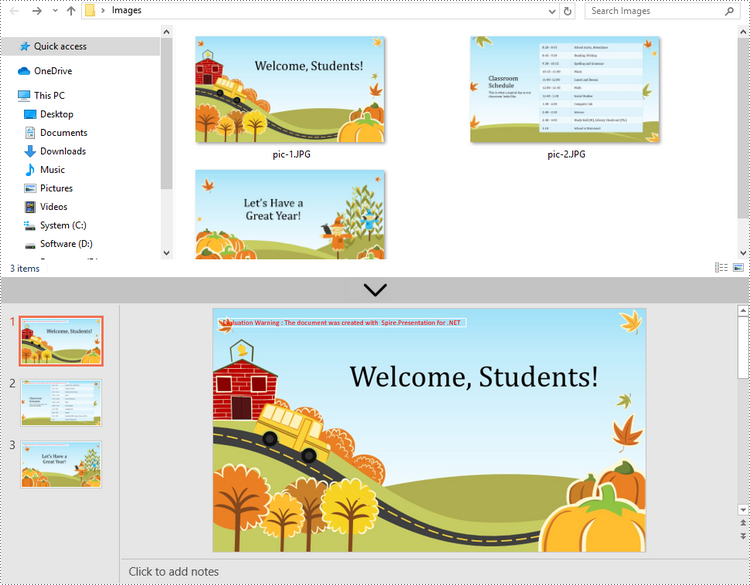
When images are converted as background of each slide in a PowerPoint document, they cannot be moved or scaled. The following are the steps to convert a set of images to a PowerPoint file as background images using Spire.Presentation for .NET.
- Create a Presentation object.
- Set the slide size type to Sreen16x9.
- Get the image paths from a folder and save in a string array.
- Traverse through the images.
- Get a specific image and append it to the image collection of the document using Presentation.Images.Append() method.
- Add a slide to the document using Presentation.Slides.Append() method.
- Set the image as the background of the slide through the properties under ISlide.SlideBackground object.
- Save the document to a PowerPoint file using Presentation.SaveToFile() method.
- C#
- VB.NET
using Spire.Presentation;
using Spire.Presentation.Drawing;
using System.Drawing;
using System.IO;

namespace ConvertImageToBackground
{
    class Program
    {
        static void Main(string[] args)
        {
            //Create a Presentation object
            Presentation presentation = new Presentation();

            //Set slide size type
            presentation.SlideSize.Type = SlideSizeType.Screen16x9;

            //Remove the default slide
            presentation.Slides.RemoveAt(0);

            //Get file paths in a string array
            string[] picFiles = Directory.GetFiles(@"C:\Users\Administrator\Desktop\Images");

            //Loop through the images
            for (int i = 0; i < picFiles.Length; i++)
            {
                //Add a slide
                ISlide slide = presentation.Slides.Append();

                //Get a specific image
                string imageFile = picFiles[i];
                Image image = Image.FromFile(imageFile);

                //Append it to the image collection
                IImageData imageData = presentation.Images.Append(image);

                //Set the image as the background image of the slide
                slide.SlideBackground.Type = BackgroundType.Custom;
                slide.SlideBackground.Fill.FillType = FillFormatType.Picture;
                slide.SlideBackground.Fill.PictureFill.FillType = PictureFillType.Stretch;
                slide.SlideBackground.Fill.PictureFill.Picture.EmbedImage = imageData;
            }

            //Save to file
            presentation.SaveToFile("ImagesToBackground.pptx", FileFormat.Pptx2013);
        }
    }
}
Convert Image to Shape in PowerPoint in C# and VB.NET
If you would like the images are moveable and resizable in the PowerPoint file, you can convert them as shapes. Below are the steps to convert images to shapes in a PowerPoint document using Spire.Presentation for .NET.
- Create a Presentation object.
- Set the slide size type to Sreen16x9.
- Get the image paths from a folder and save in a string array.
- Traverse through the images.
- Get a specific image and append it to the image collection of the document using Presentation.Images.Append() method.
- Add a slide to the document using Presentation.Slides.Append() method.
- Add a shape with the size equal to the slide using ISlide.Shapes.AppendShape() method.
- Fill the shape with the image through the properties under IAutoShape.Fill object.
- Save the document to a PowerPoint file using Presentation.SaveToFile() method.
- C#
- VB.NET
using Spire.Presentation;
using Spire.Presentation.Drawing;
using System.Drawing;
using System.IO;

namespace ConvertImageToShape
{
    class Program
    {
        static void Main(string[] args)
        {
            //Create a Presentation object
            Presentation presentation = new Presentation();

            //Set slide size type
            presentation.SlideSize.Type = SlideSizeType.Screen16x9;

            //Remove the default slide
            presentation.Slides.RemoveAt(0);

            //Get file paths in a string array
            string[] picFiles = Directory.GetFiles(@"C:\Users\Administrator\Desktop\Images");

            //Loop through the images
            for (int i = 0; i < picFiles.Length; i++)
            {
                //Add a slide
                ISlide slide = presentation.Slides.Append();

                //Get a specific image
                string imageFile = picFiles[i];
                Image image = Image.FromFile(imageFile);

                //Append it to the image collection
                IImageData imageData = presentation.Images.Append(image);

                //Add a shape with a size equal to the slide
                IAutoShape shape = slide.Shapes.AppendShape(ShapeType.Rectangle, new RectangleF(new PointF(0, 0), presentation.SlideSize.Size));

                //Fill the shape with image
                shape.Line.FillType = FillFormatType.None;
                shape.Fill.FillType = FillFormatType.Picture;
                shape.Fill.PictureFill.FillType = PictureFillType.Stretch;
                shape.Fill.PictureFill.Picture.EmbedImage = imageData;
            }

            //Save to file
            presentation.SaveToFile("ImageToShape.pptx", FileFormat.Pptx2013);
        }
    }
}
Convert Image to PowerPoint with Customized Slide Size in C# and VB.NET
If the aspect ratio of your images is not 16:9, or they are not in a standard slide size, you can create slides based on the actual size of the pictures. This will prevent the image from being over stretched or compressed. The following are the steps to convert images to a PowerPoint document with customized slide size using Spire.Presentation for .NET.
- Create a Presentation object.
- Create a PdfUnitConvertor object, which is used to convert pixel to point.
- Get the image paths from a folder and save in a string array.
- Traverse through the images.
- Get a specific image and append it to the image collection of the document using Presentation.Images.Append() method.
- Get the image width and height, and convert them to point.
- Set the slide size of the presentation based on the image size through Presentation.SlideSize.Size property.
- Add a slide to the document using Presentation.Slides.Append() method.
- Set the image as the background image of the slide through the properties under ISlide.SlideBackground object.
- Save the document to a PowerPoint file using Presentation.SaveToFile() method.
- C#
- VB.NET
using Spire.Pdf.Graphics;
using Spire.Presentation;
using Spire.Presentation.Drawing;
using System.Drawing;
using System.IO;

namespace CustomSlideSize
{
    class Program
    {
        static void Main(string[] args)
        {
            //Create a Presentation object
            Presentation presentation = new Presentation();

            //Remove the default slide
            presentation.Slides.RemoveAt(0);

            //Get file paths in a string array
            string[] picFiles = Directory.GetFiles(@"C:\Users\Administrator\Desktop\Images");

            //Create a PdfUnitConvertor object
            PdfUnitConvertor convertor = new PdfUnitConvertor();

            //Loop through the images
            for (int i = 0; i < picFiles.Length; i++)
            {
                //Get a specific image
                string imageFile = picFiles[i];
                Image image = Image.FromFile(imageFile);

                //Append it to the image collection
                IImageData imageData = presentation.Images.Append(image);

                //Get image height and width in pixel
                int height = imageData.Height;
                int width = imageData.Width;

                //Convert pixel to point
                float widthPoint = convertor.ConvertUnits(width, PdfGraphicsUnit.Pixel, PdfGraphicsUnit.Point);
                float heightPoint= convertor.ConvertUnits(height, PdfGraphicsUnit.Pixel, PdfGraphicsUnit.Point);

                //Set slide size
                presentation.SlideSize.Size = new SizeF(widthPoint, heightPoint);

                //Add a slide
                ISlide slide = presentation.Slides.Append();

                //Set the image as the background image of the slide
                slide.SlideBackground.Type = BackgroundType.Custom;
                slide.SlideBackground.Fill.FillType = FillFormatType.Picture;
                slide.SlideBackground.Fill.PictureFill.FillType = PictureFillType.Stretch;
                slide.SlideBackground.Fill.PictureFill.Picture.EmbedImage = imageData;
            }

            //Save to file
            presentation.SaveToFile("CustomizeSlideSize.pptx", FileFormat.Pptx2013);
        }
    }
}
Apply for a Temporary License
If you'd like to remove the evaluation message from the generated documents, or to get rid of the function limitations, please request a 30-day trial license for yourself.
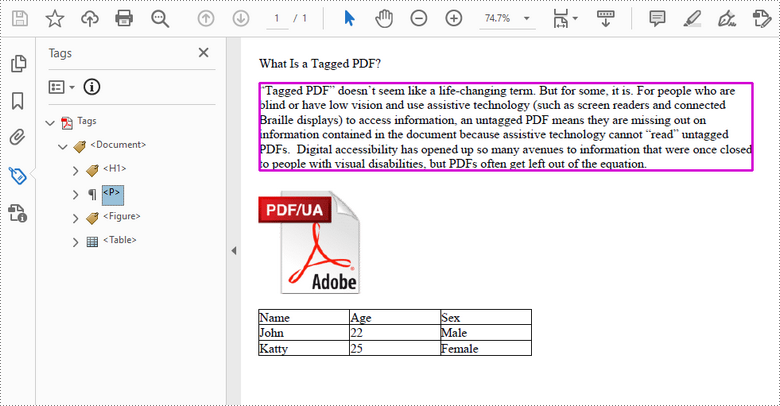
A tagged PDF (also known as PDF/UA) is a type of PDF that includes an underlying tag tree, similar to HTML, that defines the structure of the document. These tags can help screen readers to navigate throughout the document without any loss of information. This article introduces how to create a tagged PDF from scratch in C# and VB.NET using Spire.PDF for .NET.
Install Spire.PDF for .NET
To begin with, you need to add the DLL files included in the Spire.PDF for.NET package as references in your .NET project. The DLL files can be either downloaded from this link or installed via NuGet.
PM> Install-Package Spire.PDF
Create a Tagged PDF with Rich Elements
To add structure elements in a tagged PDF document, we must first create an object of PdfTaggedContent class. Then, add an element to the root using PdfTaggedContent.StructureTreeRoot.AppendChildElement() method. The following are the detailed steps to add a "heading" element to a tagged PDF using Spire.PDF for .NET.
- Create a PdfDocument object and add a page to it using PdfDocument.Pages.Add() method.
- Create an object of PdfTaggedContent class.
- Make the document compliance to PDF/UA identification using PdfTaggedContent.SetPdfUA1Identification() method.
- Add a "document" element to the root of the document using PdfTaggedContent.StructureTreeRoot.AppendChildElement() method.
- Add a "heading" element under the "document" element using PdfStructureElement.AppendChildElement() method.
- Add a start tag using PdfStructureElement.BeginMarkedContent() method, which indicates the beginning of the heading element.
- Draw heading text on the page using PdfPageBase.Canvas.DrawString() method.
- Add an end tag using PdfStructureElement.BeginMarkedContent() method, which implies the heading element ends here.
- Save the document to a PDF file using PdfDocument.SaveToFile() method.
The following code snippet provides an example on how to create various elements including document, heading, paragraph, figure and table in a tagged PDF document in C# and VB.NET.
- C#
- VB.NET
using Spire.Pdf;
using Spire.Pdf.Graphics;
using Spire.Pdf.Interchange.TaggedPdf;
using Spire.Pdf.Tables;
using System.Data;
using System.Drawing;

namespace CreatePDFUA
{
    class Program
    {
        static void Main(string[] args)
        {
            //Create a PdfDocument object
            PdfDocument doc = new PdfDocument();

            //Add a page
            PdfPageBase page = doc.Pages.Add(PdfPageSize.A4, new PdfMargins(20));

            //Set tab order
            page.SetTabOrder(TabOrder.Structure);

            //Create an object of PdfTaggedContent class
            PdfTaggedContent taggedContent = new PdfTaggedContent(doc);

            //Set language and title for the document
            taggedContent.SetLanguage("en-US");
            taggedContent.SetTitle("test");

            //Set PDF/UA1 identification
            taggedContent.SetPdfUA1Identification();

            //Create font and brush
            PdfTrueTypeFont font = new PdfTrueTypeFont(new Font("Times New Roman", 14), true);
            PdfSolidBrush brush = new PdfSolidBrush(Color.Black);

            //Add a "document" element
            PdfStructureElement document = taggedContent.StructureTreeRoot.AppendChildElement(PdfStandardStructTypes.Document);

            //Add a "heading" element
            PdfStructureElement heading1 = document.AppendChildElement(PdfStandardStructTypes.HeadingLevel1);
            heading1.BeginMarkedContent(page);
            string headingText = "What Is a Tagged PDF?";
            page.Canvas.DrawString(headingText, font, brush, new PointF(0, 0));
            heading1.EndMarkedContent(page);

            //Add a "paragraph" element
            PdfStructureElement paragraph = document.AppendChildElement(PdfStandardStructTypes.Paragraph);
            paragraph.BeginMarkedContent(page);
            string paragraphText = "“Tagged PDF” doesn’t seem like a life-changing term. But for some, it is. For people who are " +
                "blind or have low vision and use assistive technology (such as screen readers and connected Braille displays) to " +
                "access information, an untagged PDF means they are missing out on information contained in the document because assistive " +
                "technology cannot “read” untagged PDFs.  Digital accessibility has opened up so many avenues to information that were once " +
                "closed to people with visual disabilities, but PDFs often get left out of the equation.";
            RectangleF rect = new RectangleF(0, 30, page.Canvas.ClientSize.Width, page.Canvas.ClientSize.Height);
            page.Canvas.DrawString(paragraphText, font, brush, rect);
            paragraph.EndMarkedContent(page);

            //Add a "figure" element to
            PdfStructureElement figure = document.AppendChildElement(PdfStandardStructTypes.Figure);
            figure.BeginMarkedContent(page);
            PdfImage image = PdfImage.FromFile(@"C:\Users\Administrator\Desktop\pdfua.png");
            page.Canvas.DrawImage(image, new PointF(0, 150));
            figure.EndMarkedContent(page);

            //Add a "table" element
            PdfStructureElement table = document.AppendChildElement(PdfStandardStructTypes.Table);
            table.BeginMarkedContent(page);
            PdfTable pdfTable = new PdfTable();
            pdfTable.Style.DefaultStyle.Font = font;
            DataTable dataTable = new DataTable();
            dataTable.Columns.Add("Name");
            dataTable.Columns.Add("Age");
            dataTable.Columns.Add("Sex");
            dataTable.Rows.Add(new string[] { "John", "22", "Male" });
            dataTable.Rows.Add(new string[] { "Katty", "25", "Female" });
            pdfTable.DataSource = dataTable;
            pdfTable.Style.ShowHeader = true;
            pdfTable.Draw(page.Canvas, new PointF(0, 280), 300f);
            table.EndMarkedContent(page);

            //Save the document to file
            doc.SaveToFile("CreatePDFUA.pdf");
        }
    }
}
Apply for a Temporary License
If you'd like to remove the evaluation message from the generated documents, or to get rid of the function limitations, please request a 30-day trial license for yourself.
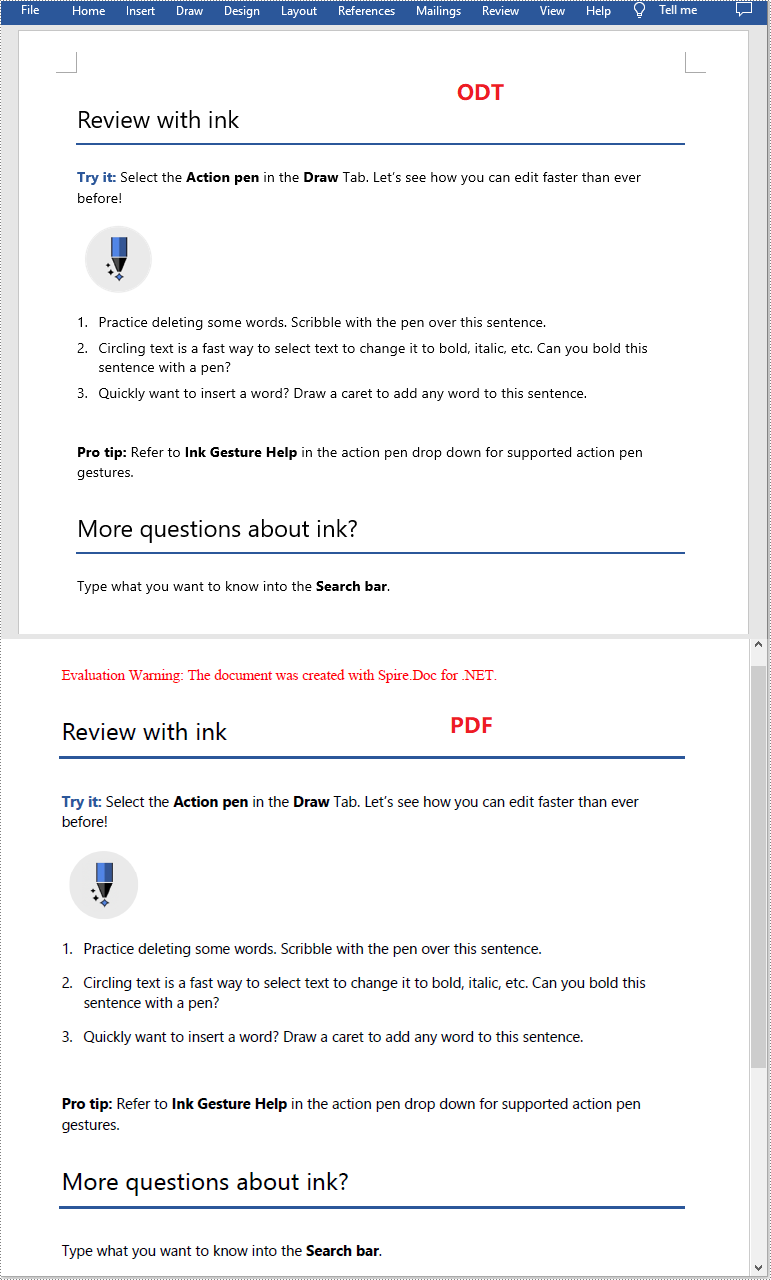
ODT files are OpenDocument Text files created with word processing programs such as free OpenOffice Writer. Like DOCX files, ODT files can contain content like text, images, objects and styles, but they may not be readable by some people who don't have the appropriate application installed. If you plan to share an ODT file, it's best to convert it to pdf so everyone can access it. In this article, we will explain how to convert ODT to PDF in C# and VB.NET using Spire.Doc for .NET.
Install Spire.Doc for .NET
To begin with, you need to add the DLL files included in the Spire.Doc for .NET package as references in your .NET project. The DLL files can be either downloaded from this link or installed via NuGet.
PM> Install-Package Spire.Doc
Convert ODT to PDF using C# and VB.NET
The following are the steps to convert an ODT file to PDF:
- Create an instance of Document class.
- Load an ODT file using Document.LoadFromFile() method.
- Convert the ODT file to PDF using Document.SaveToFile(string fileName, FileFormat fileFormat) method.
- C#
- VB.NET
using Spire.Doc;

namespace ConvertOdtToPdf
{
    internal class Program
    {
        static void Main(string[] args)
        {
            //Create a Document instance
            Document doc = new Document();
            //Load an ODT file
            doc.LoadFromFile("Sample.odt");

            //Save the ODT file to PDF
            doc.SaveToFile("OdtToPDF.pdf", FileFormat.PDF);
        }
    }
}
Apply for a Temporary License
If you'd like to remove the evaluation message from the generated documents, or to get rid of the function limitations, please request a 30-day trial license for yourself.
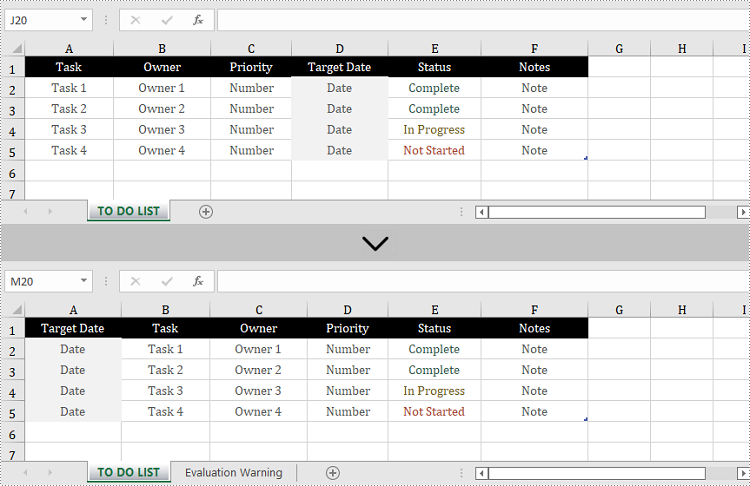
The proper adjustment of the columns' order in Excel can improve readability. For example, by setting the date data as the first column, we can quickly locate data based on a specific date. It is easy to move columns in MS Excel by using Shift and Drag. This article, however, focuses on how to rearrange columns in Excel in C# and VB.NET by using Spire.XLS for .NET.
Install Spire.XLS for .NET
To begin with, you need to add the DLL files included in the Spire.XLS for .NET package as references in your .NET project. The DLL files can be either downloaded from this link or installed via NuGet.
PM> Install-Package Spire.XLS
Reorder Excel Columns in C# and VB.NET
The following are the steps to rearrange columns in Excel using Spire.XLS for .NET.
- Create a Workbook object, and load a sample Excel file using Workbook.LoadFromFile() method.
- Get the target worksheet using Workbook.Worksheets[index] property.
- Specify the new column order in an int array.
- Create a temporary sheet and copy the data from the target sheet into it.
- Copy the columns from the temporary sheet to the target sheet and store them in the new order.
- Remove the temporary sheet.
- Save the workbook to another Excel file using Workbook.SaveToFile() method.
- C#
- VB.NET
using System.Linq;
using Spire.Xls;

namespace MoveColumn
{
    class Program
    {
        static void Main(string[] args)
        {
            //Create a Workbook object
            Workbook workbook = new Workbook();

            //Load an Excel file
            workbook.LoadFromFile(@"C:\Users\Administrator\Desktop\sample.xlsx");

            //Get the first worksheet
            Worksheet worksheet = workbook.Worksheets[0];

            //Set the new column order (the column index starts from 0)
            int[] newColumnOrder = new int[] { 3, 0, 1, 2, 4, 5 };

            //Add a temporary worksheet
            Worksheet newSheet = workbook.Worksheets.Add("temp");

            //Copy data from the first worksheet to the temporary sheet
            newSheet.CopyFrom(worksheet);

            //Loop through the newColumnOrder array
            for (int i = 0; i < newColumnOrder.Count(); i++)
            {
                //Copy the column from the temporary sheet to the first sheet
                newSheet.Columns[newColumnOrder[i]].Copy(worksheet.Columns[i], true, true);

                //Set the width of a certain column the first sheet to that of the temporary sheet
                worksheet.Columns[i].ColumnWidth = newSheet.Columns[newColumnOrder[i]].ColumnWidth;
            }

            //Remove temporary sheet
            workbook.Worksheets.Remove(newSheet);

            //Save the workbook to another Excel file
            workbook.SaveToFile("MoveColumn.xlsx", FileFormat.Version2016);
        }
    }
}
Apply for a Temporary License
If you'd like to remove the evaluation message from the generated documents, or to get rid of the function limitations, please request a 30-day trial license for yourself.
Excel spreadsheets are scalable grid-based files that are used to organize data and perform calculations. People all across the world use spreadsheets to create tables for personal and business usage. To write a large amount of data into an Excel spreadsheet, it is recommended to use the programming method, which saves time and is less error-prone. In this article, you will learn how to write data into Excel in C# and VB.NET using Spire.XLS for .NET.
- Write Text or Number Values to Specific Cells
- Write Arrays to a Worksheet
- Write a DataTable to a Worksheet
Install Spire.XLS for .NET
To begin with, you need to add the DLL files included in the Spire.XLS for .NET package as references in your .NET project. The DLL files can be either downloaded from this link or installed via NuGet.
PM> Install-Package Spire.XLS
Write Text or Number Values to Specific Cells
A certain cell in a worksheet can be accessed by Worksheet.Range[int row, int column] property. Then, you can add a text value or a number value to the cell through the XlsRange.Value or XlsRange.Value2 property. The following are the detailed steps.
- Create a Workbook object.
- Get the first worksheet through Workbook.Worksheets[] property.
- Get a specific cell through Workhseet.Range[] property.
- Add a text value or a number value to the cell through XlsRange.Value or XlsRange.Value2 property.
- Save the workbook to an Excel file using Workbook.SaveToFile() method.
- C#
- VB.NET
using Spire.Xls;
namespace WriteDataToCells
{
class Program
{
static void Main(string[] args)
{
//Create a Workbook object
Workbook workbook = new Workbook();
//Get the first worksheet
Worksheet worksheet = workbook.Worksheets[0];
//Write data to specific cells
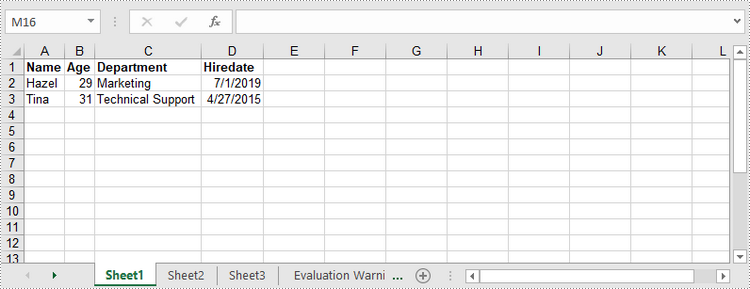
worksheet.Range[1, 1].Value = "Name";
worksheet.Range[1, 2].Value = "Age";
worksheet.Range[1, 3].Value = "Department";
worksheet.Range[1, 4].Value = "Hiredate";
worksheet.Range[1, 2].Value = "Hazel";
worksheet.Range[2, 2].Value2 = 29;
worksheet.Range[2, 3].Value = "Marketing";
worksheet.Range[2, 4].Value = "2019-07-01";
worksheet.Range[3, 1].Value = "Tina";
worksheet.Range[3, 2].Value2 = 31;
worksheet.Range[3, 3].Value = "Technical Support";
worksheet.Range[3, 4].Value = "2015-04-27";
//Auto fit column widths
worksheet.AllocatedRange.AutoFitColumns();
//Apply a style to the first row
CellStyle style = workbook.Styles.Add("newStyle");
style.Font.IsBold = true;
worksheet.Range[1, 1, 1, 4].Style = style;
//Save to an Excel file
workbook.SaveToFile("WriteToCells.xlsx", ExcelVersion.Version2016);
}
}
}
Write Arrays to a Worksheet
Spire.XLS for .NET provides the Worksheet.InsertArrary() method, allowing programmers to write one-dimensional arrays or two-dimensional arrays into the specified cell range of a worksheet. The steps to write arrays to a worksheet are as follows:
- Create a Workbook object.
- Get the first worksheet through Workbook.Worksheets[] property.
- Create a one-dimensional array and a two-dimensional array.
- Insert the arrays to worksheet using Worksheet.InsertArray() method.
- Save the workbook to an Excel file using Workbook.SaveToFile() method.
- C#
- VB.NET
using Spire.Xls;
namespace WriteArraysToWorksheet
{
class Program
{
static void Main(string[] args)
{
//Create a Workbook instance
Workbook workbook = new Workbook();
//Get the first worksheet
Worksheet worksheet = workbook.Worksheets[0];
//Create a one-dimensional array
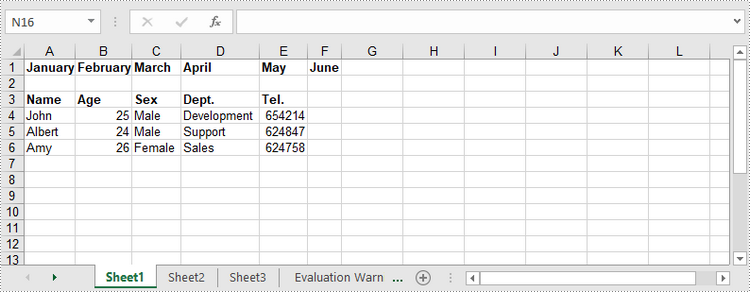
string[] oneDimensionalArray = new string[] { "January", "February", "March", "April", "May", "June" };
//Write the array to the first row of the worksheet
worksheet.InsertArray(oneDimensionalArray, 1, 1, false);
//Create a two-dimensional array
string[,] twoDimensionalArray = new string[,]{
{"Name", "Age", "Sex", "Dept.", "Tel."},
{"John", "25", "Male", "Development","654214"},
{"Albert", "24", "Male", "Support","624847"},
{"Amy", "26", "Female", "Sales","624758"}
};
//Write the array to the worksheet starting from the cell A3
worksheet.InsertArray(twoDimensionalArray, 3, 1);
//Auto fit column width in the located range
worksheet.AllocatedRange.AutoFitColumns();
//Apply a style to the first and the third row
CellStyle style = workbook.Styles.Add("newStyle");
style.Font.IsBold = true;
worksheet.Range[1, 1, 1, 6].Style = style;
worksheet.Range[3, 1, 3, 6].Style = style;
//Save to an Excel file
workbook.SaveToFile("InsertArrays.xlsx", ExcelVersion.Version2016);
}
}
}
Write a DataTable to a Worksheet
To import data from a DataTable to a worksheet, use the Worksheet.InsertDataTable() method. The following are the detailed steps.
- Create a Workbook object.
- Get the first worksheet through Workbook.Worksheets[] property.
- Create a DataTable with random data.
- Write the DataTable to the worksheet at the specified location using Worksheet.InsertDataTable() method.
- Save the workbook to an Excel file using Workbook.SaveToFile() method.
- C#
- VB.NET
using System;
using System.Data;
using Spire.Xls;
namespace WriteDataTableToWorksheet
{
class Program
{
static void Main(string[] args)
{
//Create a Workbook instance
Workbook workbook = new Workbook();
//Get the first worksheet
Worksheet worksheet = workbook.Worksheets[0];
//Create a DataTable object
DataTable dataTable = new DataTable();
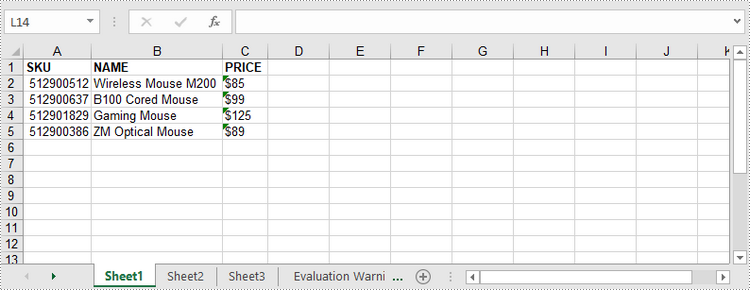
dataTable.Columns.Add("SKU", typeof(Int32));
dataTable.Columns.Add("NAME", typeof(String));
dataTable.Columns.Add("PRICE", typeof(String));
//Create rows and add data
DataRow dr = dataTable.NewRow();
dr[0] = 512900512;
dr[1] = "Wireless Mouse M200";
dr[2] = "$85";
dataTable.Rows.Add(dr);
dr = dataTable.NewRow();
dr[0] = 512900637;
dr[1] = "B100 Cored Mouse";
dr[2] = "$99";
dataTable.Rows.Add(dr);
dr = dataTable.NewRow();
dr[0] = 512901829;
dr[1] = "Gaming Mouse";
dr[2] = "$125";
dataTable.Rows.Add(dr);
dr = dataTable.NewRow();
dr[0] = 512900386;
dr[1] = "ZM Optical Mouse";
dr[2] = "$89";
dataTable.Rows.Add(dr);
//Write datatable to the worksheet
worksheet.InsertDataTable(dataTable, true, 1, 1, true);
//Auto fit column width in the located range
worksheet.AllocatedRange.AutoFitColumns();
//Apply a style to the first and the third row
CellStyle style = workbook.Styles.Add("newStyle");
style.Font.IsBold = true;
worksheet.Range[1, 1, 1, 3].Style = style;
//Save to an Excel file
workbook.SaveToFile("InsertDataTable.xlsx", ExcelVersion.Version2016);
}
}
}
Apply for a Temporary License
If you'd like to remove the evaluation message from the generated documents, or to get rid of the function limitations, please request a 30-day trial license for yourself.
An ODP file is an OpenDocument Presentation file consisting of slides containing images, text, media, and transition effects. Since ODP files can only be opened by specified programs such as OpenOffice Impress, LibreOffice Impress, and Microsoft PowerPoint, if you want your ODP files to be viewable on more devices, you can convert them to PDF. In this article, you will learn how to programmatically convert a ODP file to PDF using Spire.Presentation for .NET.
Install Spire.Presentation for .NET
To begin with, you need to add the DLL files included in the Spire.Presentation for.NET package as references in your .NET project. The DLL files can be either downloaded from this link or installed via NuGet.
PM> Install-Package Spire.Presentation
Convert OpenDocument Presentation to PDF
The detailed steps are as follows:
- Create a Presentation instance.
- Load an ODP file using Presentation.LoadFromFile() method.
- Save the ODP file to PDF using Presentation.SaveToFile(String, FileFormat) method.
- C#
- VB.NET
using Spire.Presentation;

namespace ODPtoPDF
{
    class Program
    {
        static void Main(string[] args)
        {
            //Create a Presentation instance
            Presentation presentation = new Presentation();

            //Load an ODP file
            presentation.LoadFromFile("Sample.odp", FileFormat.ODP);

            //Convert the ODP file to PDF
            presentation.SaveToFile("OdptoPDF.pdf", FileFormat.PDF);

        }
    }
}
Apply for a Temporary License
If you'd like to remove the evaluation message from the generated documents, or to get rid of the function limitations, please request a 30-day trial license for yourself.
Compared with Word document format, pictures are more convenient to share and preview across platforms, because they do not require MS Word to be installed on machines. Moreover, converting Word to images can preserve the original appearance of the document, which is useful when further modifications are not desired. In this article, you will learn how to convert Word documents to images in C# and VB.NET using Spire.Doc for .NET.
- Convert Word to JPG in C#, VB.NET
- Convert Word to SVG in C#, VB.NET
- Convert Word to PNG with Customized Resolution in C#, VB.NET
Install Spire.Doc for .NET
To begin with, you need to add the DLL files included in the Spire.Doc for.NET package as references in your .NET project. The DLL files can be either downloaded from this link or installed via NuGet.
PM> Install-Package Spire.Doc
Convert Word to JPG in C#, VB.NET
Spire.Doc for .NET offers the Document.SaveToImages() method to convert a whole Word document into individual Bitmap or Metafile images. Then, a Bitmap or Metafile image can be saved as a BMP, EMF, JPEG, PNG, GIF, or WMF format file. The following are the steps to convert a Word document to JPG images using this library.
- Create a Document object.
- Load a Word document using Document.LoadFromFile() method.
- Convert the document to Bitmap images using Document.SaveToImages() method.
- Loop through the image collection to get the specific one and save it as a JPG file.
- C#
- VB.NET
using Spire.Doc;
using Spire.Doc.Documents;
using System;
using System.Drawing;
using System.Drawing.Imaging;
namespace ConvertWordToJPG
{
class Program
{
static void Main(string[] args)
{
//Create a Document object
Document doc = new Document();
//Load a Word document
doc.LoadFromFile("C:\\Users\\Administrator\\Desktop\\Template.docx");
//Convert the whole document into individual images
Image[] images = doc.SaveToImages(ImageType.Bitmap);
//Loop through the image collection
for (int i = 0; i < images.Length; i++)
{
//Save the image to a JPEG format file
string outputfile = String.Format("Image-{0}.jpg", i);
images[i].Save("C:\\Users\\Administrator\\Desktop\\Images\\" + outputfile, ImageFormat.Jpeg);
}
}
}
}
Convert Word to SVG in C#, VB.NET
Using Spire.Doc for .NET, you can save a Word document as a queue of byte arrays. Each byte array can then be written as a SVG file. The detailed steps to convert Word to SVG are as follows.
- Create a Document object.
- Load a Word file using Document.LoadFromFile() method.
- Save the document as a queue of byte arrays using Document.SaveToSVG() method.
- Loop through the items in the queue to get a specific byte array.
- Write the byte array to a SVG file.
- C#
- VB.NET
using Spire.Doc;
using System;
using System.Collections.Generic;
using System.IO;
namespace CovnertWordToSVG
{
class Program
{
static void Main(string[] args)
{
//Create a Document object
Document doc = new Document();
//Load a Word document
doc.LoadFromFile("C:\\Users\\Administrator\\Desktop\\Template.docx");
//Save the document as a queue of byte arrays
Queue<byte[]> svgBytes = doc.SaveToSVG();
//Loop through the items in the queue
for (int i = 0; i < svgBytes.Count; i++)
{
//Convert the queue to an array
byte[][] bytes = svgBytes.ToArray();
//Specify the output file name
string outputfile = String.Format("Image-{0}.svg", i);
//Write the byte[] in a SVG format file
FileStream fs = new FileStream("C:\\Users\\Administrator\\Desktop\\Images\\" + outputfile, FileMode.Create);
fs.Write(bytes[i], 0, bytes[i].Length);
fs.Close();
}
}
}
}
Convert Word to PNG with Customized Resolution in C#, VB.NET
An image with higher resolution is generally more clear. You can customize the image resolution while converting Word to PNG by following the following steps.
- Create a Document object.
- Load a Word file using Document.LoadFromFile() method.
- Convert the document to Bitmap images using Document.SaveToImages() method.
- Loop through the image collection to get the specific one.
- Call the custom method ResetResolution() to reset the image resolution.
- Save the image as a PNG file.
- C#
- VB.NET
using Spire.Doc;
using System;
using System.Drawing;
using System.Drawing.Imaging;
using Spire.Doc.Documents;
namespace ConvertWordToPng
{
class Program
{
static void Main(string[] args)
{
//Create a Document object
Document doc = new Document();
//Load a Word document
doc.LoadFromFile("C:\\Users\\Administrator\\Desktop\\Template.docx");
//Convert the whole document into individual images
Image[] images = doc.SaveToImages(ImageType.Metafile);
//Loop through the image collection
for (int i = 0; i < images.Length; i++)
{
//Reset the resolution of a specific image
Image newimage = ResetResolution(images[i] as Metafile, 150);
//Save the image to a PNG format file
string outputfile = String.Format("Image-{0}.png", i);
newimage.Save("C:\\Users\\Administrator\\Desktop\\Images\\" + outputfile, ImageFormat.Png);
}
}
//Set the image resolution by the ResetResolution() method
public static Image ResetResolution(Metafile mf, float resolution)
{
int width = (int)(mf.Width * resolution / mf.HorizontalResolution);
int height = (int)(mf.Height * resolution / mf.VerticalResolution);
Bitmap bmp = new Bitmap(width, height);
bmp.SetResolution(resolution, resolution);
using (Graphics g = Graphics.FromImage(bmp))
{
g.DrawImage(mf, Point.Empty);
}
return bmp;
}
}
}
Apply for a Temporary License
If you'd like to remove the evaluation message from the generated documents, or to get rid of the function limitations, please request a 30-day trial license for yourself.
The emphasis mark is used in Word documents to emphasize words and make them more noticeable. It is usually a dot or a circle placed above or under the emphasized words. However, manually selecting words and applying emphasis marks on them takes a lot of work. Fortunately, Spire.Doc for .NET provides a much easier way to apply emphasis marks by codes. This article will show you how to apply emphasis marks to text in Word documents using Spire.Doc for .NET.
Install Spire.Doc for .NET
To begin with, you need to add the DLL files included in the Spire.Doc for.NET package as references in your .NET project. The DLL files can be either downloaded from this link or installed via NuGet.
PM> Install-Package Spire.Doc
Apply Emphasis Mark to Specified Text
The detailed steps are as follows:
- Create a Document instance.
- Load the Word document from disk using Document.LoadFromFile() method.
- Find the text you need to emphasize using Document.FindAllString() method.
- Apply emphasis mark to the found text through CharacterFormat.EmphasisMark property.
- Save the document to another Word file using Document.SaveToFile() method.
- C#
- VB.NET
using System;
using Spire.Doc;
using Spire.Doc.Documents;

namespace applyemphasismark
{
    class Program
    {
        static void Main(string[] args)
        {
            //Create a Document instance
            Document document = new Document();

            //Load the Word document from disk
            document.LoadFromFile(@"D:\testp\test.docx");

            //Find text you want to emphasize
            TextSelection[] textSelections = document.FindAllString("Spire.Doc for .NET", false, true);

            //Apply emphasis mark to the found text
            foreach (TextSelection selection in textSelections)
            {
                selection.GetAsOneRange().CharacterFormat.EmphasisMark = Emphasis.Dot;
            }

            //Save the document to another Word file
            string output = "ApllyEmphasisMark.docx";
            document.SaveToFile(output, FileFormat.Docx);
        }
    }
}
Apply for a Temporary License
If you'd like to remove the evaluation message from the generated documents, or to get rid of the function limitations, please request a 30-day trial license for yourself.
PowerPoint is a presentation document that is typically used for product introductions, performance reports, teaching, and other purposes. Since the design of PowerPoint is a visual behavior and needs constant fine-tuning, it is not recommended to create PowerPoint from scratch programmatically. But if you do have the requirement to create PowerPoint documents in C# or VB.NET, you can try this solution provided by Spire.Presentation for .NET.
Install Spire.Presentation for .NET
To begin with, you need to add the DLL files included in the Spire.Presentation for.NET package as references in your .NET project. The DLL files can be either downloaded from this link or installed via NuGet.
PM> Install-Package Spire.Presentation
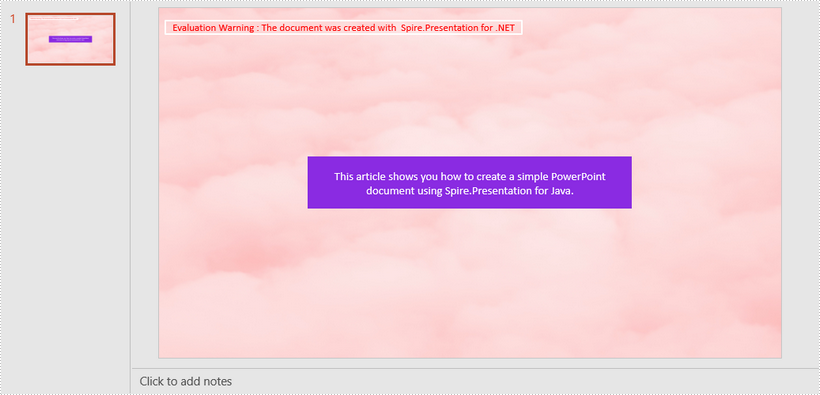
Create a Simple PowerPoint Document
Spire.Presentation for .NET offers the Presentation class and the ISlide interface to represent a PowerPoint document and a slide respectively. It is quite straightforward and simple for developers to use the properties and methods under them to create or manipulate PowerPoint files. The following are the steps to generate a simple PowerPoint document using it.
- Create a Presentation object, and set the slide size type to screen 16x9 through the Presentation.SlideSize.Type property.
- Get the first slide through the Presentation.Slides[] property.
- Set the background image of the slide using ISlide.SlideBackground property.
- Add a rectangle to the slide using ISlide.Shapes.AppendShape() method, positioning the shape at the center of the slide using IAutoShape.SetShapeAlignment() method.
- Set the fill color, line style, font color, and text of the shape through other properties under the IAutoShape object.
- Save the presentation to a .pptx file using Presentation.SaveToFile() method.
- C#
- VB.NET
using System.Drawing;
using Spire.Presentation;
using Spire.Presentation.Drawing;

namespace CreatePowerPoint
{
    class Program
    {
        static void Main(string[] args)
        {
            //Create a Presentation object
            Presentation presentation = new Presentation();

            //Set the slide size type to screen 16x9
            presentation.SlideSize.Type = SlideSizeType.Screen16x9;

            //Get the first slide
            ISlide slide = presentation.Slides[0];

            //Set the background image
            string imgPath = @"C:\Users\Administrator\Desktop\bgImage.jpg";
            IImageData imageData = presentation.Images.Append(Image.FromFile(imgPath));
            slide.SlideBackground.Type = Spire.Presentation.Drawing.BackgroundType.Custom;
            slide.SlideBackground.Fill.FillType = Spire.Presentation.Drawing.FillFormatType.Picture;
            slide.SlideBackground.Fill.PictureFill.FillType = PictureFillType.Stretch;
            slide.SlideBackground.Fill.PictureFill.Picture.EmbedImage = imageData;

            //Insert a rectangle shape
            Rectangle rect = new Rectangle(100, 100, 500, 80);
            IAutoShape shape = slide.Shapes.AppendShape(ShapeType.Rectangle, rect);

            //Position the shape at the center of the slide
            shape.SetShapeAlignment(ShapeAlignment.AlignCenter);
            shape.SetShapeAlignment(ShapeAlignment.DistributeVertically);

            //Set the fill color, line style and font color of the shape
            shape.Fill.FillType = FillFormatType.Solid;
            shape.Fill.SolidColor.Color = Color.BlueViolet;
            shape.ShapeStyle.LineStyleIndex = 0;//no line
            shape.ShapeStyle.FontColor.Color = Color.White;

            //Set the text of the shape
            shape.TextFrame.Text = "This article shows you how to create a simple PowerPoint document using Spire.Presentation for Java.";

            //Save to file
            presentation.SaveToFile("CreatePowerPoint.pptx", FileFormat.Pptx2013);
        }
    }
}
Apply for a Temporary License
If you'd like to remove the evaluation message from the generated documents, or to get rid of the function limitations, please request a 30-day trial license for yourself.
