C#/VB.NET: Group or Ungroup Shapes in Excel
Sometimes, you may need to perform specific operations on multiple shapes in Excel, such as adding styles, resizing, or moving them around. Grouping shapes can help you accomplish this task more easily and efficiently. Once shapes are grouped, they are treated as a single entity and can be manipulated at the same time. In this article, you will learn how to programmatically group or ungroup shapes in Excel in C# and VB.NET using Spire.XLS for .NET.
Install Spire.XLS for .NET
To begin with, you need to add the DLL files included in the Spire.XLS for .NET package as references in your .NET project. The DLL files can be either downloaded from this link or installed via NuGet.
PM> Install-Package Spire.XLS
Group Shapes in Excel using C# and VB.NET
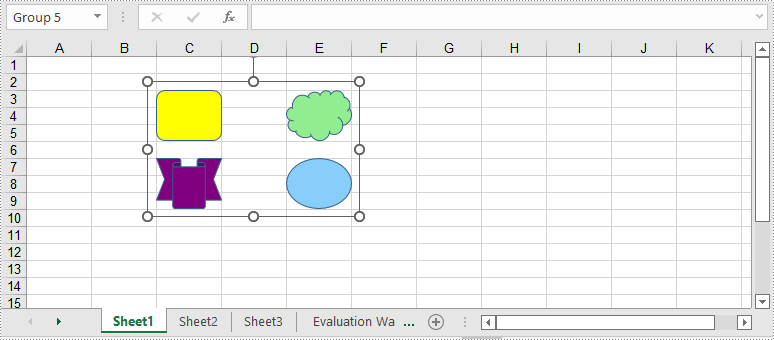
To group certain shapes in an Excel worksheet, you need to use the Worksheet.GroupShapeCollection property to return a GroupShapeCollection object, and then call the GroupShapeCollection.Group() method. The following are the detailed steps:
- Initialize an instance of Workbook class.
- Get the first worksheet by its index through Workbook.Worksheets[int] property.
- Add several shapes to specific rows and columns in the worksheet using Worksheet.PrstGeomShapes.AddPrstGeomShape(int, int, int, int, PrstGeomShapeType) method.
- Get the group shape collection of the worksheet through Worksheet.GroupShapeCollection property.
- Group the shapes using GroupShapeCollection.Group(IShape[]) method.
- Save the result document using Workbook.SaveToFile(string) method.
- C#
- VB.NET
using Spire.Xls;
using Spire.Xls.Core;
using Spire.Xls.Core.MergeSpreadsheet.Collections;
using System.Drawing;

namespace GroupShapes
{
    class Program
    {
        static void Main(string[] args)
        {
            //Create a Workbook instance
            Workbook workbook = new Workbook();
            //Get the first worksheet
            Worksheet worksheet = workbook.Worksheets[0];

            //Add four shapes
            IPrstGeomShape shape1 = worksheet.PrstGeomShapes.AddPrstGeomShape(3, 3, 65, 50, PrstGeomShapeType.RoundRect);
            shape1.Fill.FillType = ShapeFillType.SolidColor;
            shape1.Fill.ForeColor = Color.Yellow;
            shape1.Line.Weight = 0.1;
            IPrstGeomShape shape2 = worksheet.PrstGeomShapes.AddPrstGeomShape(7, 3, 65, 50, PrstGeomShapeType.Ribbon);
            shape2.Fill.FillType = ShapeFillType.SolidColor;
            shape2.Fill.ForeColor = Color.Purple;
            shape2.Line.Weight = 0.1;
            IPrstGeomShape shape3 = worksheet.PrstGeomShapes.AddPrstGeomShape(3, 5, 65, 50, PrstGeomShapeType.Cloud);
            shape3.Fill.FillType = ShapeFillType.SolidColor;
            shape3.Fill.ForeColor = Color.LightGreen;
            shape3.Line.Weight = 0.1;
            IPrstGeomShape shape4 = worksheet.PrstGeomShapes.AddPrstGeomShape(7, 5, 65, 50, PrstGeomShapeType.Ellipse);
            shape4.Fill.FillType = ShapeFillType.SolidColor;
            shape4.Fill.ForeColor = Color.LightSkyBlue;
            shape4.Line.Weight = 0.1;

            //Group the shapes
            GroupShapeCollection groupShapeCollection = worksheet.GroupShapeCollection;
            groupShapeCollection.Group(new IShape[] { shape1, shape2, shape3, shape4});


            //Save the result file
            workbook.SaveToFile("GroupShapes.xlsx", ExcelVersion.Version2013);
        }
    }
}
Ungroup Shapes in Excel using C# and VB.NET
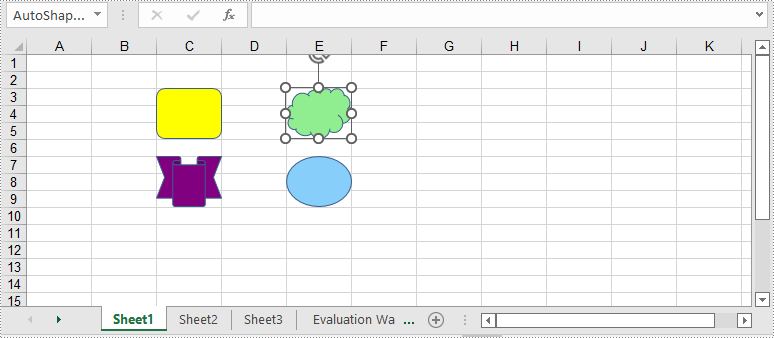
To ungroup the grouped shapes in an Excel worksheet, you can use the GroupShapeCollection. UnGroupAll() method. After the shapes are ungrouped, you can manipulate them individually. The following are the detailed steps:
- Initialize an instance of Workbook class.
- Load an Excel file using Workbook.LoadFromFile() method.
- Get a specific worksheet by its index through Workbook.Worksheets[int] property.
- Get the group shape collection of the worksheet through Worksheet.GroupShapeCollection property.
- Ungroup all the grouped shapes using GroupShapeCollection.UnGroupAll() method.
- Save the result document using Workbook.SaveToFile() method.
- C#
- VB.NET
using Spire.Xls;
using Spire.Xls.Core.MergeSpreadsheet.Collections;

namespace UngroupShapes
{
    class Program
    {
        static void Main(string[] args)
        {
            //Create a Workbook instance
            Workbook workbook = new Workbook();
            workbook.LoadFromFile("GroupShapes.xlsx");

            //Get the first worksheet
            Worksheet worksheet = workbook.Worksheets[0];

            //Ungroup the grouped shapes in the worksheet
            GroupShapeCollection groupShapeCollection = worksheet.GroupShapeCollection;
            groupShapeCollection.UnGroupAll();

            //Save the result file
            workbook.SaveToFile("UnGroupShapes.xlsx", ExcelVersion.Version2013);
        }
    }
}
Apply for a Temporary License
If you'd like to remove the evaluation message from the generated documents, or to get rid of the function limitations, please request a 30-day trial license for yourself.
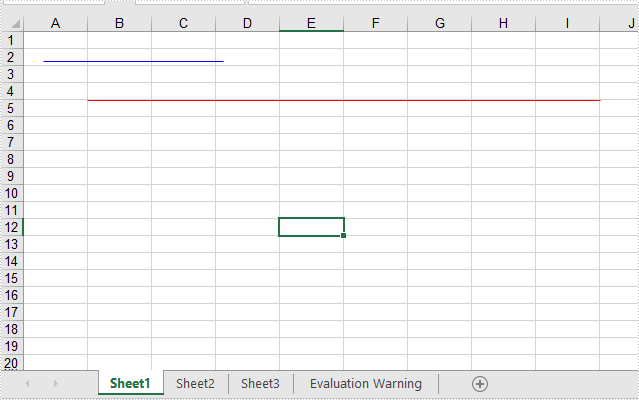
C#/VB.NET Add lines to Excel worksheets through two points
This article will show you how to add lines to Excel worksheets through two points. We could set the point’s location via relative location and Absolute location in pixels.
using Spire.Xls;
using Spire.Xls.Core.Spreadsheet.Shapes;
using System.Drawing;

namespace Word
{
    class Program
    {
        static void Main(string[] args)

        {
            //Initiate a Workbook object and get the first worksheet
            Workbook workbook = new Workbook();
            Worksheet worksheet = workbook.Worksheets[0];
            //Add a line with relative location
            XlsLineShape line = worksheet.TypedLines.AddLine() as XlsLineShape;

            //set the column index of the starting point
            line.LeftColumn = 2;
            line.LeftColumnOffset = 2;
            line.TopRow = 5;
            line.TopRowOffset = 10;

            //set the column index of the end point
            line.RightColumn = 10;
            line.RightColumnOffset = 10;
            line.BottomRow =5;
            line.BottomRowOffset = 10;

            //Set the color
            line.Color = Color.Red;


            //Add a line with Absolute location in pixels
            XlsLineShape line1 = worksheet.TypedLines.AddLine() as XlsLineShape;
            //Set the start point and end point
            line1.StartPoint = new Point(20, 30);
            line1.EndPoint = new Point(200, 30);

            //Set the color
            line1.Color = Color.Blue;

            workbook.SaveToFile("Addlines.xlsx", ExcelVersion.Version2013);
            workbook.Dispose();
        }
    }
 }
Imports Spire.Xls
Imports Spire.Xls.Core.Spreadsheet.Shapes
Imports System.Drawing

Namespace Word

    Class Program

        Private Shared Sub Main(ByVal args() As String)
            'Initiate a Workbook object and get the first worksheet
            Dim workbook As Workbook = New Workbook
            Dim worksheet As Worksheet = workbook.Worksheets(0)
            'Add a line with relative location
            Dim line As XlsLineShape = CType(worksheet.TypedLines.AddLine,XlsLineShape)
            'set the column index of the starting point
            line.LeftColumn = 2
            line.LeftColumnOffset = 2
            line.TopRow = 5
            line.TopRowOffset = 10
            'set the column index of the end point
            line.RightColumn = 10
            line.RightColumnOffset = 10
            line.BottomRow = 5
            line.BottomRowOffset = 10
            'Set the color
            line.Color = Color.Red
            'Add a line with Absolute location in pixels
            Dim line1 As XlsLineShape = CType(worksheet.TypedLines.AddLine,XlsLineShape)
            'Set the start point and end point
            line1.StartPoint = New Point(20, 30)
            line1.EndPoint = New Point(200, 30)
            'Set the color
            line1.Color = Color.Blue
            workbook.SaveToFile("Addlines.xlsx", ExcelVersion.Version2013)
            workbook.Dispose
        End Sub
    End Class
End Namespace
Effective screenshot:
Add arrow line to Excel worksheet in C#
With Spire.XLS for .NET, developers can easily use C# to add shapes to Excel worksheet. From version 9.8.11, Spire.XLS supports to add arrow lines to Excel worksheet. The following sample will show you how to insert arrow line, double Arrow, Elbow Arrow, Elbow Double-Arrow, Curved Arrow and Curved Double-Arrow to Excel worksheet in C#.
using Spire.Xls;
using System.Drawing;

namespace Add_Lines_to_Excel
{
    class Program
    {
        static void Main(string[] args)
        {
            //Initiate a Workbook object and get the first worksheet
            Workbook workbook = new Workbook();
            Worksheet sheet = workbook.Worksheets[0];

            //Add a Double Arrow and fill the line with solid color
            var line = sheet.TypedLines.AddLine();
            line.Top = 10;
            line.Left = 20;
            line.Width = 100;
            line.Height = 0;
            line.Color = Color.Blue;
            line.BeginArrowHeadStyle = ShapeArrowStyleType.LineArrow;
            line.EndArrowHeadStyle = ShapeArrowStyleType.LineArrow;

            //Add an Arrow and fill the line with solid color
            var line_1 = sheet.TypedLines.AddLine();
            line_1.Top = 50;
            line_1.Left = 30;
            line_1.Width = 100;
            line_1.Height = 100;
            line_1.Color = Color.Red;
            line_1.BeginArrowHeadStyle = ShapeArrowStyleType.LineNoArrow;
            line_1.EndArrowHeadStyle = ShapeArrowStyleType.LineArrow;

            //Add an Elbow Arrow Connector
            Spire.Xls.Core.Spreadsheet.Shapes.XlsLineShape line3 = sheet.TypedLines.AddLine() as Spire.Xls.Core.Spreadsheet.Shapes.XlsLineShape;
            line3.LineShapeType = LineShapeType.ElbowLine;
            line3.Width = 30;
            line3.Height = 50;
            line3.EndArrowHeadStyle = ShapeArrowStyleType.LineArrow;
            line3.Top = 100;
            line3.Left = 50;

            //Add an Elbow Double-Arrow Connector
            Spire.Xls.Core.Spreadsheet.Shapes.XlsLineShape line2 = sheet.TypedLines.AddLine() as Spire.Xls.Core.Spreadsheet.Shapes.XlsLineShape;
            line2.LineShapeType = LineShapeType.ElbowLine;
            line2.Width = 50;
            line2.Height = 50;
            line2.EndArrowHeadStyle = ShapeArrowStyleType.LineArrow;
            line2.BeginArrowHeadStyle = ShapeArrowStyleType.LineArrow;
            line2.Left = 120;
            line2.Top = 100;

            //Add a Curved Arrow Connector
            line3 = sheet.TypedLines.AddLine() as Spire.Xls.Core.Spreadsheet.Shapes.XlsLineShape;
            line3.LineShapeType = LineShapeType.CurveLine;
            line3.Width = 30;
            line3.Height = 50;
            line3.EndArrowHeadStyle = ShapeArrowStyleType.LineArrowOpen;
            line3.Top = 100;
            line3.Left = 200;

            //Add a Curved Double-Arrow Connector
            line2 = sheet.TypedLines.AddLine() as Spire.Xls.Core.Spreadsheet.Shapes.XlsLineShape;
            line2.LineShapeType = LineShapeType.CurveLine;
            line2.Width = 30;
            line2.Height = 50;
            line2.EndArrowHeadStyle = ShapeArrowStyleType.LineArrowOpen;
            line2.BeginArrowHeadStyle = ShapeArrowStyleType.LineArrowOpen;
            line2.Left = 250;
            line2.Top = 100;

            //Save the file
            workbook.SaveToFile("AddLines.xlsx", ExcelVersion.Version2013);

        }
    }
}
![]()
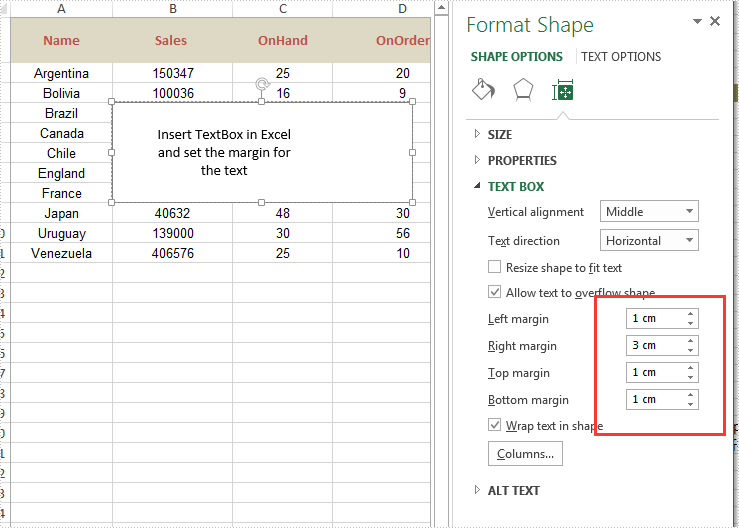
Set the internal margin of excel textbox in C#
With Spire.XLS, developers can add text or image to the textbox to Excel worksheet easily. From version 9.3.10, Spire.XLS supports to set the inner margin of contents on Excel text box. With this feature, we can adjust the position of the text contents on the textbox to make it beautiful. This article is going to introduce how to set the inner margins of the textbox in Excel worksheet in C#.
using Spire.Xls;
using Spire.Xls.Core.Spreadsheet.Shapes;
namespace SetInternalMargin
{
    class Program
    {
        static void Main(string[] args)
        {
            {

                //load the sample document
                Workbook workbook = new Workbook();
                workbook.LoadFromFile("Sample.xlsx", ExcelVersion.Version2010);

                //get the first worksheet
                Worksheet sheet = workbook.Worksheets[0];

                //add a textbox to the sheet and set its position and size
                XlsTextBoxShape textbox = sheet.TextBoxes.AddTextBox(4, 2, 100, 300) as XlsTextBoxShape;

                //set the text on the textbox
                textbox.Text = "Insert TextBox in Excel and set the margin for the text";
                textbox.HAlignment = CommentHAlignType.Center;
                textbox.VAlignment = CommentVAlignType.Center;

                //set the inner margins of the contents
                textbox.InnerLeftMargin = 1;
                textbox.InnerRightMargin = 3;
                textbox.InnerTopMargin = 1;
                textbox.InnerBottomMargin = 1;

                //save the document to file
                workbook.SaveToFile("Result.xlsx", ExcelVersion.Version2010);

            }

        }
    }
}
Effective screenshot after setting the margins of the contents:
Hide or Unhide Shape in Excel in C#
Spire.XLS supports to hide or unhide certain shapes in Excel worksheet through IShape.Visible property. This article demonstrates the detail steps to hide or unhide a shape using Spire.XLS and C#.
Below is the screenshot of the example Excel file:
Detail steps:
Step 1: Instantiate a Workbook object and load the Excel file.
Workbook workbook = new Workbook();
workbook.LoadFromFile("Input.xlsx");
Step 2: Get the first worksheet.
Worksheet sheet = workbook.Worksheets[0];
Step 3: Hide the second shape in the worksheet.
//Hide the second shape in the worksheet
sheet.PrstGeomShapes[1].Visible = false;

//Show the second shape in the worksheet
//sheet.PrstGeomShapes[1].Visible = true;
Step 4: Save the file.
workbook.SaveToFile("HideShape.xlsx", ExcelVersion.Version2013);
Output:
Full code:
using Spire.Xls;
namespace HideShape
{
    class Program
    {
        static void Main(string[] args)
        {
            //Instantiate a Workbook object
            Workbook workbook = new Workbook();
            //Load the Excel file
            workbook.LoadFromFile("Input.xlsx");

            //Get the first worksheet
            Worksheet sheet = workbook.Worksheets[0];

            //Hide the second shape in the worksheet
            sheet.PrstGeomShapes[1].Visible = false;

            //Show the second shape in the worksheet
            sheet.PrstGeomShapes[1].Visible = true;

            //Save the file
            workbook.SaveToFile("HideShape.xlsx", ExcelVersion.Version2013);
        }
    }
}
C#/VB.NET: Extract Text and Images from Excel Shapes
Shapes in Excel serve as visual elements that can decorate or optimize worksheets, including objects such as text boxes and images. By inserting shapes, users are able to present data in a more intuitive manner and emphasize vital information, ultimately improving the readability of the spreadsheets. When it becomes necessary to deal with the contents within the shapes independently, you can programmatically extract them from shapes for further processing. In this article, we will show you how to extract text and images from excel shapes by using Spire.XLS for .NET.
Install Spire.XLS for .NET
To begin with, you need to add the DLL files included in the Spire.XLS for.NET package as references in your .NET project. The DLLs files can be either downloaded from this link or installed via NuGet.
PM> Install-Package Spire.XLS
Extract Text from Excel Shapes
Spire.XLS for .NET allows users to extract text from shape object by using IPrstGeomShape.Text property and write it to a new .txt file. The following are detailed steps.
- Create a Workbook object.
- Load an Excel file using Workbook.LoadFromFile() method.
- Get the first worksheet by Workbook.Worksheets[] property.
- Get the second shape by Worksheet.PrstGeomShapes[] property.
- Extract text content from the second shape and save it to the string variable.
- Create a StringBuilder object and append the extracted text to it.
- Write the text to a .txt file using File.WriteAllText() method.
- C#
- VB.NET
using System.IO;
using System.Text;
using Spire.Xls;
using Spire.Xls.Core;

namespace Extracttext
{
    class Program
    {
        static void Main(string[] args)
        {
            //Create a Workbook object
            Workbook workbook = new Workbook();

            //Load the Excel file
            workbook.LoadFromFile("sample.xlsx");

            //Get the first worksheet
            Worksheet sheet = workbook.Worksheets[0];

            //Get the second shape and extract text from it
            IPrstGeomShape shape1 = sheet.PrstGeomShapes[1];
            string s = shape1.Text;

            //Append the extracted text to StringBuilder object
            StringBuilder sb = new StringBuilder();
            sb.AppendLine(s);

            //Write the text to a .txt file
            File.WriteAllText("ShapeText.txt", sb.ToString());
            workbook.Dispose();
        }
    }
}

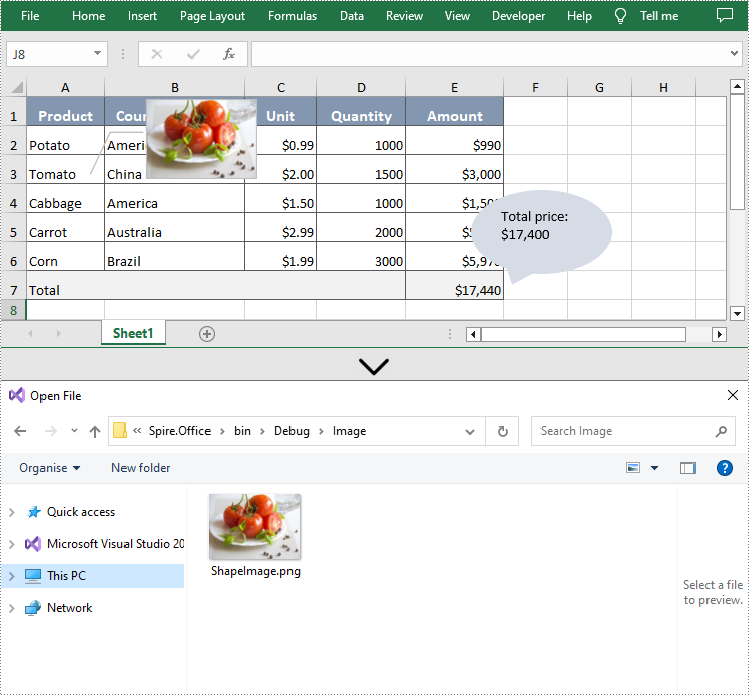
Extract Images from Excel Shapes
Additionally, Spire.XLS for .NET also supports extracting the image by using IPrstGeomShape.Fill.Picture property and save it to a local folder. The related steps are as follows.
- Create a Workbook object.
- Load an Excel file using Workbook.LoadFromFile() method.
- Get the first worksheet by Workbook.Worksheets[] property.
- Get the first shape by Worksheet.PrstGeomShapes[] property.
- Extract the image from the first shape by its Fill and Picture property.
- Save the extracted image to a folder by using Image.Save() method.
- C#
- VB.NET
using System.Drawing;
using System.Drawing.Imaging;
using Spire.Xls;
using Spire.Xls.Core;

namespace Extractimage
{
    class Program
    {
        static void Main(string[] args)
        {
            //Create a Workbook object
            Workbook workbook = new Workbook();

            //Load the Excel file
            workbook.LoadFromFile("sample.xlsx");

            //Get the first worksheet
            Worksheet sheet = workbook.Worksheets[0];

            //Get the first shape and extract the image from it
            IPrstGeomShape shape2 = sheet.PrstGeomShapes[0];
            Image image = shape2.Fill.Picture;

            //Save the extracted image to a folder
            image.Save(@"Image\ShapeImage.png", ImageFormat.Png);
            workbook.Dispose();
        }
    }
}
Apply for a Temporary License
If you'd like to remove the evaluation message from the generated documents, or to get rid of the function limitations, please request a 30-day trial license for yourself.
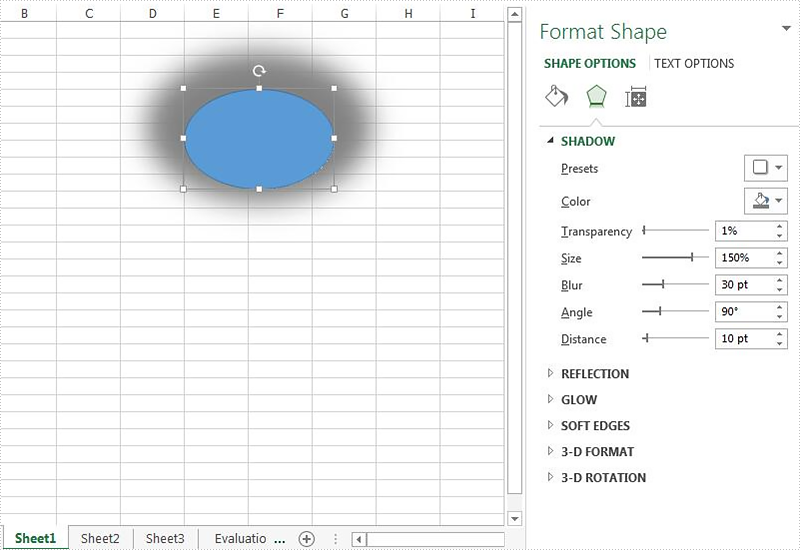
Set the shadow style for the shape on Excel worksheet in C#
With the help of Spire.XLS, we can easily add shapes to the Excel worksheet. This article will demonstrate how to format the shadow of shape on Excel in C#. We can use Spire.XLS to set the color, size, blur, angle, transparency and distance of the shadow for the shape on Excel worksheet.
Set the shadow style when we add new shape to the Excel worksheet:
using Spire.Xls;
using Spire.Xls.Core;
using System.Drawing;
namespace SetShadowStyle
{
    class Program
    {
        static void Main(string[] args)
        {
            //instantiate a Workbook object and get the first worksheet
            Workbook workbook = new Workbook();
            Worksheet sheet = workbook.Worksheets[0];

            //add an ellipse shape
            IPrstGeomShape ellipse = sheet.PrstGeomShapes.AddPrstGeomShape(5, 5, 150, 100, PrstGeomShapeType.Ellipse);

            //set the shadow style for the ellipse
            ellipse.Shadow.Angle = 90;
            ellipse.Shadow.Distance = 10;
            ellipse.Shadow.Size = 150;
            ellipse.Shadow.Color = Color.Gray;
            ellipse.Shadow.Blur = 30;
            ellipse.Shadow.Transparency = 1;
            ellipse.Shadow.HasCustomStyle = true;

            //save the document to file
            workbook.SaveToFile("Shapeshadow.xlsx", FileFormat.Version2010);
        }
    }
}
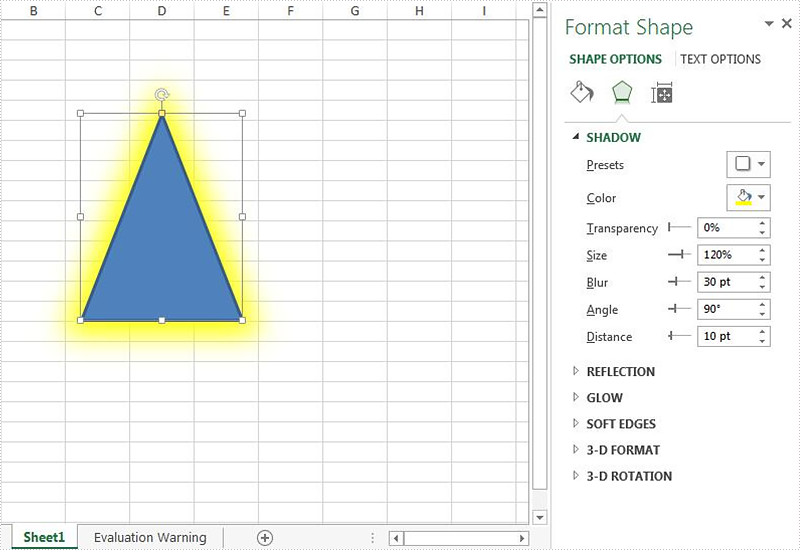
Effective screenshot after setting the shadow style for the shape on the Excel worksheet:
Set the shadow style when we loaded an Excel document with shape:
using Spire.Xls;
using Spire.Xls.Core;
using System.Drawing;
namespace SetShadowStyle
{
    class Program
    {
        static void Main(string[] args)
        {
            //create an instance of workbook and load the document from file
            Workbook workbook = new Workbook();
            workbook.LoadFromFile("Sample.xlsx");

            //get the first worksheet from the sample document
            Worksheet sheet = workbook.Worksheets[0];

            //get the first shape from the worksheet
            IPrstGeomShape shape = sheet.PrstGeomShapes[0];

            //set the shadow style for the shape
            shape.Shadow.Angle = 90;
            shape.Shadow.Distance = 10;
            shape.Shadow.Size = 120;
            shape.Shadow.Color = Color.Yellow;
            shape.Shadow.Blur = 30;
            shape.Shadow.HasCustomStyle = true;

            //save the document to file
            workbook.SaveToFile("ShadowStyle.xlsx", FileFormat.Version2010);

        }
    }
}
Effective screenshot after setting the shadow style for the shape on the Excel worksheet:
C#: Add, Format, or Remove Shapes in Excel Documents
Shapes are powerful tools for improving the aesthetics and functionality of your Excel documents. Whether you're looking to add visual elements to charts, highlight important data, or create engaging presentations, mastering shape manipulation is essential. In this article, we will explore how to add, format, and remove shapes in Excel in C# using Spire.XLS for .NET, providing you with practical tips and techniques to elevate your spreadsheet.
Install Spire.XLS for .NET
To begin with, you need to add the DLL files included in the Spire.XLS for .NET package as references in your .NET project. The DLL files can be either downloaded from this link or installed via NuGet.
PM> Install-Package Spire.XLS
Add Shapes in Excel in C#
Spire.XLS for .NET provides the Worksheet.PrstGeomShapes.AddPrstGeomShape(int row, int column, int width, int height, PrstGeomShapeType shapeType) method for adding shapes to a worksheet. The first four parameters define the shape's position and dimensions, while the fifth parameter specifies the shape type. The PrstGeomShapeType enumeration includes 188 different shape types preset in Excel.
To add a specific type of shape to a worksheet in C#, follow these steps:
- Create a Workbook object.
- Get a specific worksheet using the Workbook.Worksheets[index] property.
- Add a shape to the worksheet using the Worksheet.PrstGeomShapes.AddPrstGeomShape() method, specifying the location, size and type of the shape.
- Save the workbook to an Excel file.
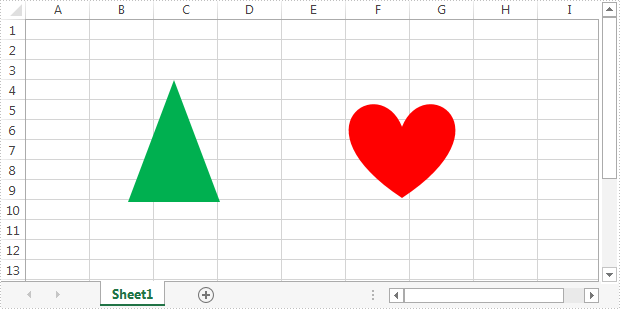
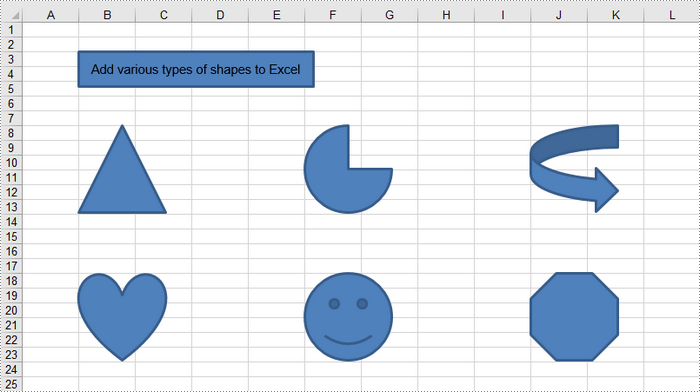
The following code demonstrates how to generate an Excel file and add various geometric shapes, including a rectangle, a triangle, a heart, a pie, and a smiley face, using the Spire.XLS for .NET library.
- C#
using Spire.Xls;
using Spire.Xls.Core;

namespace AddShapesInExcel
{
    class Program
    {
        static void Main(string[] args)
        {
            // Create a Workbook object
            Workbook workbook = new Workbook();

            // Get the first worksheet
            Worksheet sheet = workbook.Worksheets[0];

            // Add a rectangle
            IPrstGeomShape rectangle = sheet.PrstGeomShapes.AddPrstGeomShape(3, 2, 270, 40, PrstGeomShapeType.Rect);

            // Set text for the shape
            rectangle.Text = "Add various types of shapes to Excel";
            rectangle.TextVerticalAlignment = ExcelVerticalAlignment.MiddleCentered;

            // Add a triangle, a pie, a curved right arrow, a heart, a smile face, and an octagon to the worksheet
            sheet.PrstGeomShapes.AddPrstGeomShape(8, 2, 100, 100, PrstGeomShapeType.Triangle);
            sheet.PrstGeomShapes.AddPrstGeomShape(8, 6, 100, 100, PrstGeomShapeType.Pie);
            sheet.PrstGeomShapes.AddPrstGeomShape(8, 10, 100, 100, PrstGeomShapeType.CurvedRightArrow);

            sheet.PrstGeomShapes.AddPrstGeomShape(18, 2, 100, 100, PrstGeomShapeType.Heart);
            sheet.PrstGeomShapes.AddPrstGeomShape(18, 6, 100, 100, PrstGeomShapeType.SmileyFace);
            sheet.PrstGeomShapes.AddPrstGeomShape(18, 10, 100, 100, PrstGeomShapeType.Octagon);

            // Save the workbook to an Excel file
            workbook.SaveToFile("AddShapes.xlsx", ExcelVersion.Version2016);

            // Dispose resources
            workbook.Dispose();
        }
    }
}
Format Shapes in Excel in C#
Formatting shapes enhances the visual appeal of your worksheets and improves information conveyance. Spire.XLS for Java provides interfaces such as IShapeLineFormat, IShapeFill, and IShadow, enabling users to customize the line style, line color, fill, and shadow effect of a shape.
The steps to format a shape in Excel are as follows:
- Create a Workbook object.
- Get a specific worksheet using the Workbook.Worksheets[index] property.
- Add a shape to the worksheet using the Worksheet.PrstGeomShapes.AddPrstGeomShape() method, specifying the location, size and type of the shape.
- Get the IShapeLineFormat object through the IShape.Line property.
- Set the line style, color, width and visibility using the properties under the IShapeLineFormat object.
- Get the IShapeFill object through the IShape.Fill property.
- Set the fill type, and fill color (or image, pattern, texture) using the properties under the IShapeFill object.
- Save the workbook to an Excel file.
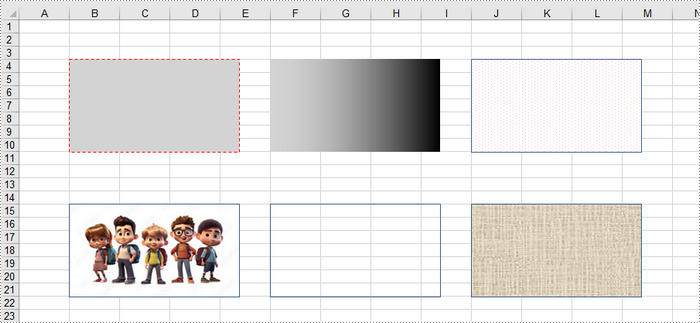
The following code demonstrates various methods for customizing shapes in Excel, including line styles, fill types (solid, gradient, pattern, texture), and the use of images.
- C#
using Spire.Xls;
using Spire.Xls.Core;
using System.Drawing;

namespace FormatShapesInExcel
{
    class Program
    {
        static void Main(string[] args)
        {
            // Create a Workbook object
            Workbook workbook = new Workbook();

            // Get the first worksheet
            Worksheet sheet = workbook.Worksheets[0];

            // Add the first rectangle to the worksheet
            IPrstGeomShape rectangle_one = sheet.PrstGeomShapes.AddPrstGeomShape(4, 2, 220, 120, PrstGeomShapeType.Rect);

            // Set the line style, width, and color
            rectangle_one.Line.DashStyle = ShapeDashLineStyleType.Dashed;
            rectangle_one.Line.Weight = 1.0;
            rectangle_one.Line.ForeColor = Color.Red;

            // Set the fill type and fore color
            rectangle_one.Fill.FillType = ShapeFillType.SolidColor;
            rectangle_one.Fill.ForeColor = Color.LightGray;

            // Add the second rectangle and format the shape
            IPrstGeomShape rectangle_two = sheet.PrstGeomShapes.AddPrstGeomShape(4, 6, 220, 120, PrstGeomShapeType.Rect);
            rectangle_two.Line.Visible = false;
            rectangle_two.Fill.FillType = ShapeFillType.Gradient;
            rectangle_two.Fill.ForeColor = Color.LightGray;
            rectangle_two.Fill.GradientStyle = GradientStyleType.Vertical;

            // Add the third rectangle and format the shape
            IPrstGeomShape rectangle_three = sheet.PrstGeomShapes.AddPrstGeomShape(4, 10, 220, 120, PrstGeomShapeType.Rect);
            rectangle_three.Line.Weight = 1.0;
            rectangle_three.Fill.FillType = ShapeFillType.Pattern;
            rectangle_three.Fill.Pattern = GradientPatternType.Pat80Percent;
            rectangle_three.Fill.ForeColor = Color.White;
            rectangle_three.Fill.BackColor = Color.Pink;

            // Add the fourth rectangle and format the shape
            IPrstGeomShape rectangle_four = sheet.PrstGeomShapes.AddPrstGeomShape(15, 2, 220, 120, PrstGeomShapeType.Rect);
            rectangle_four.Line.Weight = 1.0;
            rectangle_four.Fill.CustomPicture("C:\\Users\\Administrator\\Desktop\\cartoon.jpeg");

            // Add the fifth rectangle and format the shape
            IPrstGeomShape rectangle_five = sheet.PrstGeomShapes.AddPrstGeomShape(15, 6, 220, 120, PrstGeomShapeType.Rect);
            rectangle_five.Line.Weight = 1.0;
            rectangle_five.Fill.FillType  = ShapeFillType.NoFill;

            // Add the sixth rectangle and format the shape
            IPrstGeomShape rectangle_six = sheet.PrstGeomShapes.AddPrstGeomShape(15, 10, 220, 120, PrstGeomShapeType.Rect);
            rectangle_six.Line.Weight = 1.0;
            rectangle_six.Fill.FillType = ShapeFillType.Texture;
            rectangle_six.Fill.Texture = GradientTextureType.Canvas;

            // Save the workbook to an Excel file
            workbook.SaveToFile("FormatShapes.xlsx", ExcelVersion.Version2016);

            // Dispose resources
            workbook.Dispose();
        }
    }
}
Remove Shapes from Excel in C#
The Worksheet.PrstGeomShapes property returns a collection of shapes within a worksheet. To remove a specific shape from the collection, use the PrstGeomShapeCollection[index].Remove() method, where the index specifies the shape's position. To delete all shapes, you can iterate through the collection and remove each shape individually.
The steps to remove a shape in an Excel worksheet are as follows:
- Create a Workbook object.
- Load an Excel file using the Workbook.LoadFromFile() method.
- Get a specific worksheet through the Workbook.Worksheets[index] property.
- Get the shape collection through the Worksheet.PrstGeomShapes property.
- Remove a specific shape using the PrstGeomShapeCollection[index].Remove() method.
- Save the workbook to a different Excel file.
The following code demonstrates how to load an existing Excel file, remove specific shapes or all shapes from a worksheet.
- C#
using Spire.Xls;
using Spire.Xls.Core.Spreadsheet.Collections;

namespace RemoveShapesFromExcel
{
    class Program
    {
        static void Main(string[] args)
        {
            // Create a Workbook object
            Workbook workbook = new Workbook();

            // Load an Excel file
            workbook.LoadFromFile("C:\\Users\\Administrator\\Desktop\\Shapes.xlsx");

            // Get a specific worksheet
            Worksheet sheet = workbook.Worksheets[0];

            // Get the shape collection from the worksheet
            PrstGeomShapeCollection shapes = sheet.PrstGeomShapes;

            // Remove a specific shape
            shapes[1].Remove();

            /*
            // Remove all shapes
            for (int i = shapes.Count - 1; i >= 0; i--)
            {
                shapes[i].Remove();
            }
            */

            // Save the workbook to an Excel file
            workbook.SaveToFile("RemoveShape.xlsx", ExcelVersion.Version2013);

            // Dispose resources
            workbook.Dispose();
        }
    }
}
Apply for a Temporary License
If you'd like to remove the evaluation message from the generated documents, or to get rid of the function limitations, please request a 30-day trial license for yourself.
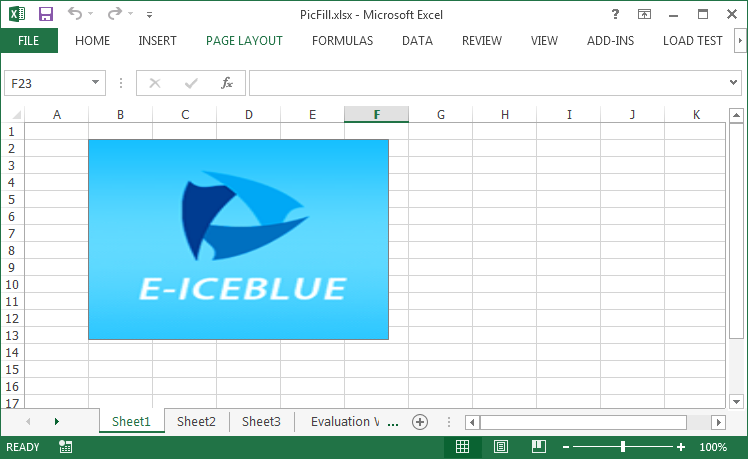
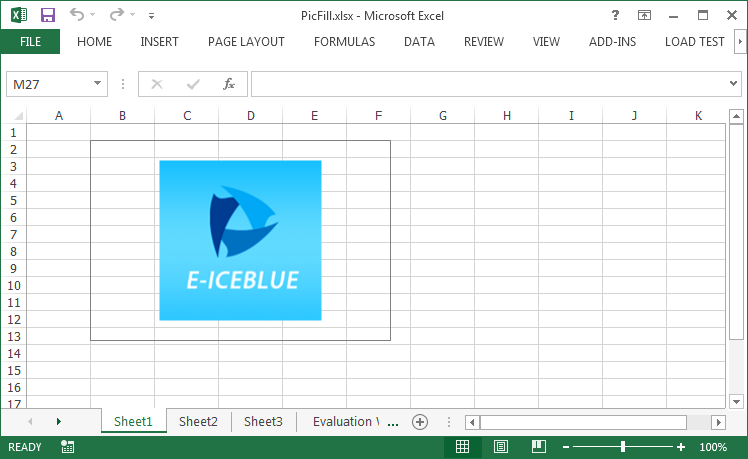
Adding Picture to Excel Textbox in C#, VB.NET
Textbox in Excel is a special kind of graphic object, which allows users to add some text in it. Moreover, textbox can be filled with solid color, gradient, pattern or a picture so that it looks more attractive. This article presents how to add a picture fill to Excel textbox and adjust the position of the picture as well.
Code Snippets:
Step 1: Create a new instance of Workbook class and get the first worksheet.
Workbook workbook = new Workbook();
Worksheet sheet = workbook.Worksheets[0];
Step 2: Add a textbox shape into the worksheet.
ITextBoxShape shape = sheet.TextBoxes.AddTextBox(2, 2, 200, 300);
Step 3: Fill the textbox with a 160x160 pixels picture.
shape.Fill.CustomPicture(@"C:\Users\Administrator\Desktop\logo.png");
shape.Fill.FillType = ShapeFillType.Picture;
Step 4: Save the file.
workbook.SaveToFile("PicFill.xlsx", ExcelVersion.Version2013);
When we add a picture fill to a textbox using above code, the picture will stretch to fill the shape, like below screenshot.
If you want to prevent the image from stretching, you can adjust the size of the textbox or change the position of the picture, for example, place the image at the central position of the textbox. Following code snippet demonstrates how to center align the picture fill.
//If the height of textbox is larger than the height of original picture, set the picture into vertical center
if (textbox.Height > textbox.Fill.Picture.Height)
{
    int difH = textbox.Height - textbox.Fill.Picture.Height;
    (textbox.Fill as XlsShapeFill).PicStretch.Top = difH * 100 / (textbox.Height * 2);
    (textbox.Fill as XlsShapeFill).PicStretch.Bottom = difH * 100 / (textbox.Height * 2);
}
//If the width of textbox is larger than the width of original picture, set the picture into horizontal center
if (textbox.Width > textbox.Fill.Picture.Width)
{
    int difW = textbox.Width - textbox.Fill.Picture.Width;
    (textbox.Fill as XlsShapeFill).PicStretch.Left = difW * 100 / (textbox.Width * 2);
    (textbox.Fill as XlsShapeFill).PicStretch.Right = difW * 100 / (textbox.Width * 2);
}
Full Code:
using Spire.Xls;
using Spire.Xls.Core;
using Spire.Xls.Core.Spreadsheet.Shapes;
namespace AddingPicture
{
    class Program
    {

        static void Main(string[] args)
        {
            //load Excel file
            Workbook workbook = new Workbook();
            Worksheet sheet = workbook.Worksheets[0];
            ITextBoxShape textbox = sheet.TextBoxes.AddTextBox(2, 2, 200, 300);

            textbox.Fill.CustomPicture(@"C:\Users\Administrator\Desktop\logo.png");
            textbox.Fill.FillType = ShapeFillType.Picture;

            //If the height of textbox is larger than the height of original picture, set the picture into vertical center
            if (textbox.Height > textbox.Fill.Picture.Height)
            {
                int difH = textbox.Height - textbox.Fill.Picture.Height;
                (textbox.Fill as XlsShapeFill).PicStretch.Top = difH * 100 / (textbox.Height * 2);
                (textbox.Fill as XlsShapeFill).PicStretch.Bottom = difH * 100 / (textbox.Height * 2);
            }
            //If the width of textbox is larger than the width of original picture, set the picture into horizontal center
            if (textbox.Width > textbox.Fill.Picture.Width)
            {
                int difW = textbox.Width - textbox.Fill.Picture.Width;
                (textbox.Fill as XlsShapeFill).PicStretch.Left = difW * 100 / (textbox.Width * 2);
                (textbox.Fill as XlsShapeFill).PicStretch.Right = difW * 100 / (textbox.Width * 2);
            }

            workbook.SaveToFile("PicFill.xlsx", ExcelVersion.Version2013);
        }
    }
}
Imports Spire.Xls
Imports Spire.Xls.Core
Imports Spire.Xls.Core.Spreadsheet.Shapes
Namespace AddingPicture
	Class Program

		Private Shared Sub Main(args As String())
			'load Excel file
			Dim workbook As New Workbook()
			Dim sheet As Worksheet = workbook.Worksheets(0)
			Dim textbox As ITextBoxShape = sheet.TextBoxes.AddTextBox(2, 2, 200, 300)

			textbox.Fill.CustomPicture("C:\Users\Administrator\Desktop\logo.png")
			textbox.Fill.FillType = ShapeFillType.Picture

			'If the height of textbox is larger than the height of original picture, set the picture into vertical center
			If textbox.Height > textbox.Fill.Picture.Height Then
				Dim difH As Integer = textbox.Height - textbox.Fill.Picture.Height
				TryCast(textbox.Fill, XlsShapeFill).PicStretch.Top = difH * 100 / (textbox.Height * 2)
				TryCast(textbox.Fill, XlsShapeFill).PicStretch.Bottom = difH * 100 / (textbox.Height * 2)
			End If
			'If the width of textbox is larger than the width of original picture, set the picture into horizontal center
			If textbox.Width > textbox.Fill.Picture.Width Then
				Dim difW As Integer = textbox.Width - textbox.Fill.Picture.Width
				TryCast(textbox.Fill, XlsShapeFill).PicStretch.Left = difW * 100 / (textbox.Width * 2)
				TryCast(textbox.Fill, XlsShapeFill).PicStretch.Right = difW * 100 / (textbox.Width * 2)
			End If

			workbook.SaveToFile("PicFill.xlsx", ExcelVersion.Version2013)
		End Sub
	End Class
End Namespace
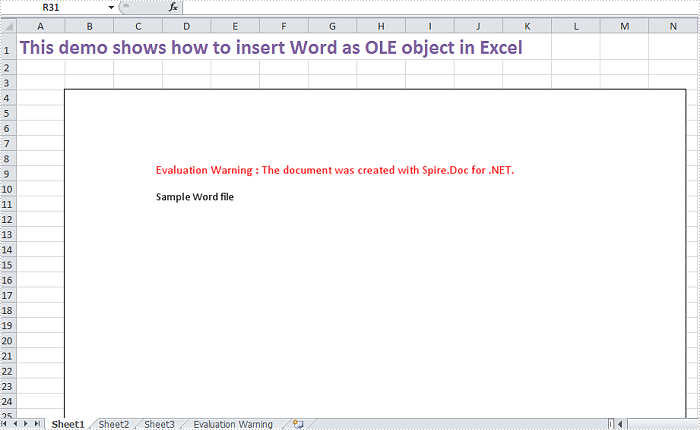
How to Insert OLE Object in Excel in C#, VB.NET
OLE object is used to make content created in one program available in another program, for instance, we can insert Word as OLE object in Excel sheet.
As a robust component, Spire.XLS supports to insert Word and PowerPoint slide as linked object or embedded object into Excel. In this article, we make an example to explain how to insert Word as OLE object into Excel using Spire.XLS and Spire.Doc. Before coding, you need to download Spire.Office and reference related the Dlls in your VS project.
Code Snippet:
Step 1: Define a GetDocImage(string doxcFile) method to get olePicture. Actually, the olePicture is an image of data information in original Word document. The image generated from the specified page will be shown in Excel sheet after inserting OLE object into it.
private static Image GetDocImage(string docxFile)
{
    Document document = new Document();
    document.LoadFromFile(docxFile);
    return document.SaveToImages(0, Spire.Doc.Documents.ImageType.Bitmap);

}
Step 2: Insert OLE object in Excel. After getting the worksheet from Excel file, we call GetDocImage(string doxcFile) method which is defined in the first step to get image source and then use the ws.OleObjects.Add(string FileName, Image image, OleLinkType linkType) method to insert the new OLE object to worksheet.
static void Main(string[] args)
{
    //load Excel file
    Workbook workbook = new Workbook();
    workbook.LoadFromFile("d:\\sample.xlsx");
    Worksheet ws = workbook.Worksheets[0];
    //insert OLE object
    string docx = "d:\\sample.docx";
    Image image = GetDocImage(docx);
    IOleObject oleObject = ws.OleObjects.Add(docx,image,OleLinkType.Embed);
    oleObject.Location=ws.Range["B4"];
    oleObject.ObjectType = OleObjectType.WordDocument;
    //save the file
    workbook.SaveToFile("result.xlsx",ExcelVersion.Version2010);
    System.Diagnostics.Process.Start("result.xlsx");
}
Result:
Full Code:
using Spire.Doc;
using Spire.Xls;
using Spire.Xls.Core;
using System.Drawing;
namespace InsertOLEObject
{
    class Program
    {
        private static Image GetDocImage(string docxFile)
        {
            Document document = new Document();
            document.LoadFromFile(docxFile);
            return document.SaveToImages(0, Spire.Doc.Documents.ImageType.Bitmap);

        }
        static void Main(string[] args)
        {
            //load Excel file
            Workbook workbook = new Workbook();
            workbook.LoadFromFile("d:\\sample.xlsx");
            Worksheet ws = workbook.Worksheets[0];
            //insert OLE object
            string docx = "d:\\sample.docx";
            Image image = GetDocImage(docx);
            IOleObject oleObject = ws.OleObjects.Add(docx, image, OleLinkType.Embed);
            oleObject.Location = ws.Range["B4"];
            oleObject.ObjectType = OleObjectType.WordDocument;
            //save the file
            workbook.SaveToFile("result.xlsx", ExcelVersion.Version2010);
            System.Diagnostics.Process.Start("result.xlsx");
        }
    }
}
Imports Spire.Doc
Imports Spire.Xls
Imports Spire.Xls.Core
Imports System.Drawing
Namespace InsertOLEObject
	Class Program
		Private Shared Function GetDocImage(docxFile As String) As Image
			Dim document As New Document()
			document.LoadFromFile(docxFile)
			Return document.SaveToImages(0, Spire.Doc.Documents.ImageType.Bitmap)

		End Function
		Private Shared Sub Main(args As String())
			'load Excel file
			Dim workbook As New Workbook()
			workbook.LoadFromFile("d:\sample.xlsx")
			Dim ws As Worksheet = workbook.Worksheets(0)
			'insert OLE object
			Dim docx As String = "d:\sample.docx"
			Dim image As Image = GetDocImage(docx)
			Dim oleObject As IOleObject = ws.OleObjects.Add(docx, image, OleLinkType.Embed)
			oleObject.Location = ws.Range("B4")
			oleObject.ObjectType = OleObjectType.WordDocument
			'save the file
			workbook.SaveToFile("result.xlsx", ExcelVersion.Version2010)
			System.Diagnostics.Process.Start("result.xlsx")
		End Sub
	End Class
End Namespace