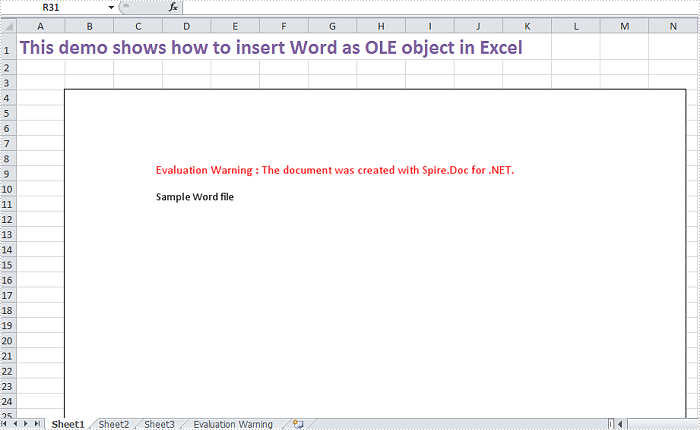
How to Insert OLE Object in Excel in C#, VB.NET
OLE object is used to make content created in one program available in another program, for instance, we can insert Word as OLE object in Excel sheet.
As a robust component, Spire.XLS supports to insert Word and PowerPoint slide as linked object or embedded object into Excel. In this article, we make an example to explain how to insert Word as OLE object into Excel using Spire.XLS and Spire.Doc. Before coding, you need to download Spire.Office and reference related the Dlls in your VS project.
Code Snippet:
Step 1: Define a GetDocImage(string doxcFile) method to get olePicture. Actually, the olePicture is an image of data information in original Word document. The image generated from the specified page will be shown in Excel sheet after inserting OLE object into it.
private static Image GetDocImage(string docxFile)
{
    Document document = new Document();
    document.LoadFromFile(docxFile);
    return document.SaveToImages(0, Spire.Doc.Documents.ImageType.Bitmap);

}
Step 2: Insert OLE object in Excel. After getting the worksheet from Excel file, we call GetDocImage(string doxcFile) method which is defined in the first step to get image source and then use the ws.OleObjects.Add(string FileName, Image image, OleLinkType linkType) method to insert the new OLE object to worksheet.
static void Main(string[] args)
{
    //load Excel file
    Workbook workbook = new Workbook();
    workbook.LoadFromFile("d:\\sample.xlsx");
    Worksheet ws = workbook.Worksheets[0];
    //insert OLE object
    string docx = "d:\\sample.docx";
    Image image = GetDocImage(docx);
    IOleObject oleObject = ws.OleObjects.Add(docx,image,OleLinkType.Embed);
    oleObject.Location=ws.Range["B4"];
    oleObject.ObjectType = OleObjectType.WordDocument;
    //save the file
    workbook.SaveToFile("result.xlsx",ExcelVersion.Version2010);
    System.Diagnostics.Process.Start("result.xlsx");
}
Result:
Full Code:
using Spire.Doc;
using Spire.Xls;
using Spire.Xls.Core;
using System.Drawing;
namespace InsertOLEObject
{
    class Program
    {
        private static Image GetDocImage(string docxFile)
        {
            Document document = new Document();
            document.LoadFromFile(docxFile);
            return document.SaveToImages(0, Spire.Doc.Documents.ImageType.Bitmap);

        }
        static void Main(string[] args)
        {
            //load Excel file
            Workbook workbook = new Workbook();
            workbook.LoadFromFile("d:\\sample.xlsx");
            Worksheet ws = workbook.Worksheets[0];
            //insert OLE object
            string docx = "d:\\sample.docx";
            Image image = GetDocImage(docx);
            IOleObject oleObject = ws.OleObjects.Add(docx, image, OleLinkType.Embed);
            oleObject.Location = ws.Range["B4"];
            oleObject.ObjectType = OleObjectType.WordDocument;
            //save the file
            workbook.SaveToFile("result.xlsx", ExcelVersion.Version2010);
            System.Diagnostics.Process.Start("result.xlsx");
        }
    }
}
Imports Spire.Doc
Imports Spire.Xls
Imports Spire.Xls.Core
Imports System.Drawing
Namespace InsertOLEObject
	Class Program
		Private Shared Function GetDocImage(docxFile As String) As Image
			Dim document As New Document()
			document.LoadFromFile(docxFile)
			Return document.SaveToImages(0, Spire.Doc.Documents.ImageType.Bitmap)

		End Function
		Private Shared Sub Main(args As String())
			'load Excel file
			Dim workbook As New Workbook()
			workbook.LoadFromFile("d:\sample.xlsx")
			Dim ws As Worksheet = workbook.Worksheets(0)
			'insert OLE object
			Dim docx As String = "d:\sample.docx"
			Dim image As Image = GetDocImage(docx)
			Dim oleObject As IOleObject = ws.OleObjects.Add(docx, image, OleLinkType.Embed)
			oleObject.Location = ws.Range("B4")
			oleObject.ObjectType = OleObjectType.WordDocument
			'save the file
			workbook.SaveToFile("result.xlsx", ExcelVersion.Version2010)
			System.Diagnostics.Process.Start("result.xlsx")
		End Sub
	End Class
End Namespace
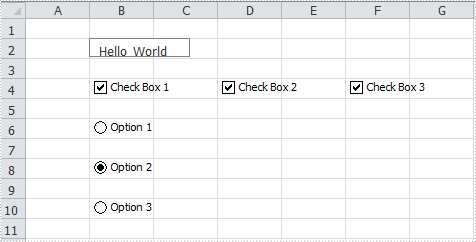
How to Insert Controls to Worksheet in C#, VB.NET
MS Excel contains a set of Windows Forms controls that can be used to Worksheet to host item. Spire.XLS also provides programmers similar features to add controls on Worksheet at runtime without installing any other control program. In this article, I'll introduce you how to insert TextBox, CheckBox and RadioButton into Worksheet via Spire.XLS in C#, VB.NET.
Detailed Steps:
Step 1: Download Spire.XLS and reference dll file to your VS project.
Step 2: Use Spire.Xls.Core as namespace, which contains all the interfaces like ITextBoxShap, ICheckBox, IRadioButton and etc.
Step 3: Initialize a new instance of Workbook and create a Worksheet in it.
Workbook wb = new Workbook();
Worksheet ws = wb.Worksheets[0];
Step 4: Insert a TextBox at specified location and input the display text.
ITextBoxShape textbox = ws.TextBoxes.AddTextBox(2, 2, 15, 100);
textbox.Text = "Hello World";
Step 5: Insert three CheckBox into Worksheet at different locations. Set the CheckState and display text.
ICheckBox cb = ws.CheckBoxes.AddCheckBox(4, 2, 15, 100);
cb.CheckState = CheckState.Checked;
cb.Text = "Check Box 1";

cb = ws.CheckBoxes.AddCheckBox(4, 4, 15, 100);
cb.CheckState = CheckState.Checked;
cb.Text = "Check Box 2";

cb = ws.CheckBoxes.AddCheckBox(4, 6, 15, 100);
cb.CheckState = CheckState.Checked;
cb.Text = "Check Box 3";
Step 6: Insert three RadioButton and set the related properties.
IRadioButton rb = ws.RadioButtons.Add(6, 2, 15, 100);
rb.Text = "Option 1";

rb = ws.RadioButtons.Add(8, 2, 15, 100);
rb.CheckState = CheckState.Checked;
rb.Text = "Option 2";

rb = ws.RadioButtons.Add(10, 2, 15, 100);
rb.Text = "Option 3";
Step 7: Save the file.
ws.DefaultRowHeight = 15;
wb.SaveToFile("Result.xlsx", ExcelVersion.Version2010);
Output:
Full Code:
using Spire.Xls;
using Spire.Xls.Core;
namespace InsertControl
{
    class Program
    {
        static void Main(string[] args)
        {
            Workbook wb = new Workbook();
            Worksheet ws = wb.Worksheets[0];

            ITextBoxShape textbox = ws.TextBoxes.AddTextBox(2, 2, 15, 100);
            textbox.Text = "Hello World";

            ICheckBox cb = ws.CheckBoxes.AddCheckBox(4, 2, 15, 100);
            cb.CheckState = CheckState.Checked;
            cb.Text = "Check Box 1";

            cb = ws.CheckBoxes.AddCheckBox(4, 4, 15, 100);
            cb.CheckState = CheckState.Checked;
            cb.Text = "Check Box 2";

            cb = ws.CheckBoxes.AddCheckBox(4, 6, 15, 100);
            cb.CheckState = CheckState.Checked;
            cb.Text = "Check Box 3";

            IRadioButton rb = ws.RadioButtons.Add(6, 2, 15, 100);
            rb.Text = "Option 1";

            rb = ws.RadioButtons.Add(8, 2, 15, 100);
            rb.CheckState = CheckState.Checked;
            rb.Text = "Option 2";

            rb = ws.RadioButtons.Add(10, 2, 15, 100);
            rb.Text = "Option 3";

            ws.DefaultRowHeight = 15;
            wb.SaveToFile("Result.xlsx", ExcelVersion.Version2010);
        }
    }
}
Imports Spire.Xls
Imports Spire.Xls.Core
Namespace InsertControl
	Class Program
		Private Shared Sub Main(args As String())
			Dim wb As New Workbook()
			Dim ws As Worksheet = wb.Worksheets(0)

			Dim textbox As ITextBoxShape = ws.TextBoxes.AddTextBox(2, 2, 15, 100)
			textbox.Text = "Hello World"

			Dim cb As ICheckBox = ws.CheckBoxes.AddCheckBox(4, 2, 15, 100)
			cb.CheckState = CheckState.Checked
			cb.Text = "Check Box 1"

			cb = ws.CheckBoxes.AddCheckBox(4, 4, 15, 100)
			cb.CheckState = CheckState.Checked
			cb.Text = "Check Box 2"

			cb = ws.CheckBoxes.AddCheckBox(4, 6, 15, 100)
			cb.CheckState = CheckState.Checked
			cb.Text = "Check Box 3"

			Dim rb As IRadioButton = ws.RadioButtons.Add(6, 2, 15, 100)
			rb.Text = "Option 1"

			rb = ws.RadioButtons.Add(8, 2, 15, 100)
			rb.CheckState = CheckState.Checked
			rb.Text = "Option 2"

			rb = ws.RadioButtons.Add(10, 2, 15, 100)
			rb.Text = "Option 3"

			ws.DefaultRowHeight = 15
			wb.SaveToFile("Result.xlsx", ExcelVersion.Version2010)
		End Sub
	End Class
End Namespace
How to set the font and background for TextBox in Excel Chart
Textbox is been widely used in Excel workbooks to give abstract and introduce information for a part of the excel documents. Spire.XLS supports to insert textbox in Excel worksheet and edit the setting of the textbox. We have already shown you how to remove the borderline of textbox in Excel chart. This tutorial will demonstrate how to set the font and background for TextBox in Excel in C#.
Firstly, make sure that Spire.XLS for .NET has been installed on your machine. And then, adds Spire.XLS.dll as reference in the downloaded Bin folder thought the below path: "..\Spire.XLS\Bin\NET4.0\ Spire.XLS.dll".
Now it comes to the details of how to set the text font and background color for textbox in Excel in C# and view the textbox before editing:
Step 1: Create a new instance of workbook and load an Excel file with textbox from file.
Workbook workbook = new Workbook();
workbook.LoadFromFile("sample.xlsx");
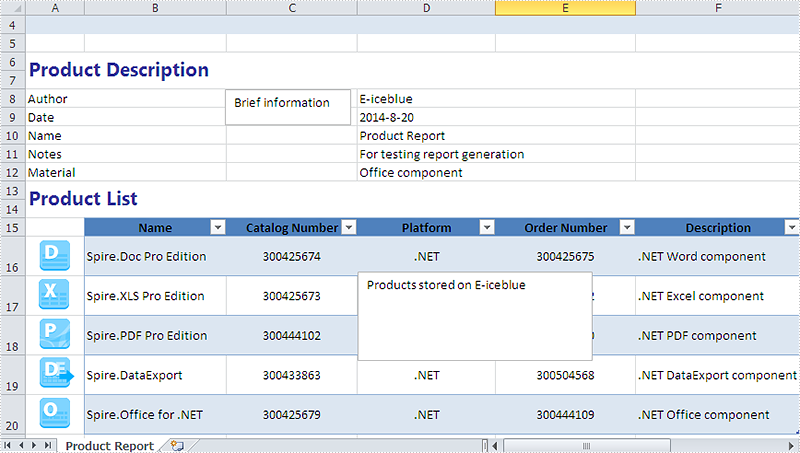
Step 2: Get the worksheet named in "Product Report" which contains textbox.
Worksheet sheet = workbook.Worksheets["Product Report"];
Step 3: Get the second textbox which will be edited.
XlsTextBoxShape shape = sheet.TextBoxes[1] as XlsTextBoxShape;
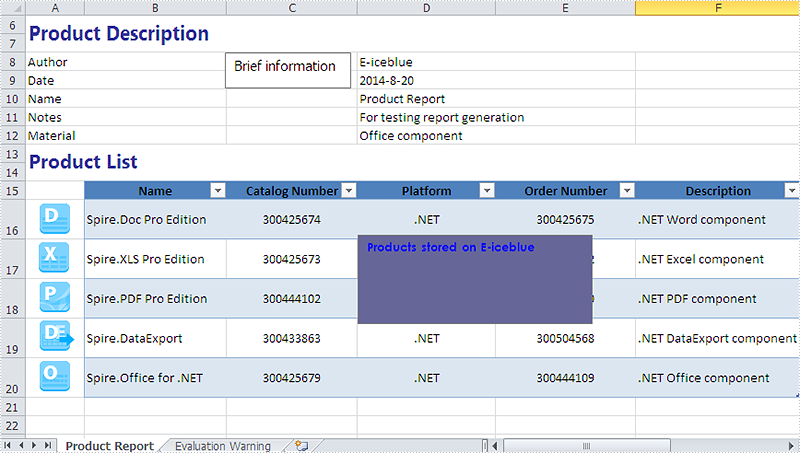
Step 4: Set the font and background color for the second textbox.
//Set the font
ExcelFont font = workbook.CreateFont();
font.FontName = "Century Gothic";
font.Size = 10;
font.IsBold = true;
font.Color = Color.Blue;
(new RichText(shape.RichText)).SetFont(0, shape.Text.Length - 1, font);
//set background color
shape.Fill.FillType = ShapeFillType.SolidColor;
shape.Fill.ForeKnownColor = ExcelColors.BlueGray;
Step 5: Save the document to file and launch it.
string output = "result.xlsx";
workbook.SaveToFile(output,ExcelVersion.Version2010);
System.Diagnostics.Process.Start(output);
Effective screenshot after set the font and background color for textbox in Excel chart:
Full codes:
using Spire.Xls;
using Spire.Xls.Core.Spreadsheet.Shapes;
using System.Drawing;
namespace setFontandBackgroundforTextbox
{
    class Program
    {
        static void Main(string[] args)
        {
            Workbook workbook = new Workbook();
            workbook.LoadFromFile("sample.xlsx");
            Worksheet sheet = workbook.Worksheets["Product Report"];
            XlsTextBoxShape shape = sheet.TextBoxes[1] as XlsTextBoxShape;

            //set font
            ExcelFont font = workbook.CreateFont();
            //font.IsStrikethrough = true;
            font.FontName = "Century Gothic";
            font.Size = 10;
            font.IsBold = true;
            font.Color = Color.Blue;
            (new RichText(shape.RichText)).SetFont(0, shape.Text.Length - 1, font);
            //set background color
            shape.Fill.FillType = ShapeFillType.SolidColor;
            shape.Fill.ForeKnownColor = ExcelColors.BlueGray;

            string output = "result.xlsx";
            workbook.SaveToFile(output,ExcelVersion.Version2010);
            System.Diagnostics.Process.Start(output);

        }
    }
Remove borderline of textbox in Excel chart in C#, VB.NET
There is an article in the tutorials which demonstrates how to insert textbox with contents in Excel. Sometime back, a user of Spire.XLS wanted to know if it is possible to remove the borderline of the textbox that has been inserted in Excel chart. Yes, of course. This article focuses on delivering a solution to this issue.
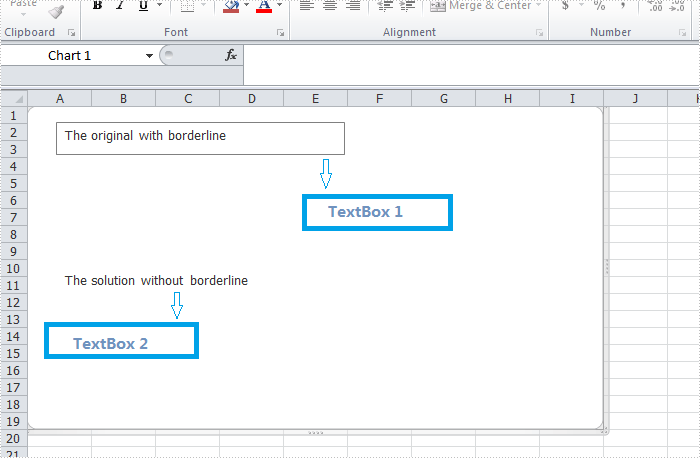
In the following section, we're going to create two textboxes in the same chart, one textbox is built with borderline, the other one without. Then we can learn how to remove borderline using Spire.XLS by comparison.
Code snippet for remove borderline of textbox:
Step 1: Create a new instance of workbook.
Workbook workbook = new Workbook();
workbook.Version=ExcelVersion.Version2010;
Step 2: Create a new worksheet named "Remove Borderline" and add a chart to the worksheet.
Worksheet sheet = workbook.Worksheets[0];
sheet.Name = "Remove Borderline";
Chart chart = sheet.Charts.Add();
Step 3: Create textbox1 in the chart and input text information.
chart.TextBoxes.AddTextBox(50, 50, 100, 500).ShapeType = ExcelShapeType.TextBox;
chart.TextBoxes[0].Text = "The original with borderline";
Step 4: Create textbox2 in the chart, input text information and remove borderline.
XlsTextBoxShape textbox = chart.TextBoxes.AddTextBox(500, 50, 100, 500) as XlsTextBoxShape;
textbox.Text = "The solution without borderline";
textbox.Line.Weight = 0;
Step 5: Save and launch the file.
workbook.SaveToFile("Sample.xlsx", ExcelVersion.Version2010);
Process.Start("Sample.xlsx");
Result:
Full code:
using Spire.Xls;
using Spire.Xls.Core.Spreadsheet.Shapes;
using System.Diagnostics;
namespace RemoveBorderlineofTextbox
{
    class Program
    {

        static void Main(string[] args)
        {
            Workbook workbook = new Workbook();
            workbook.Version = ExcelVersion.Version2010;
            Worksheet sheet = workbook.Worksheets[0];
            sheet.Name = "Remove Borderline";
            Chart chart = sheet.Charts.Add();
            //original
            chart.TextBoxes.AddTextBox(50, 50, 100, 500).ShapeType = ExcelShapeType.TextBox;
            chart.TextBoxes[0].Text = "The original with borderline";
            //solution
            XlsTextBoxShape textbox = chart.TextBoxes.AddTextBox(500, 50, 100, 500) as XlsTextBoxShape;
            textbox.Text = "The solution without borderline";
            //set 0 then invisible
            textbox.Line.Weight = 0;
            workbook.SaveToFile("Sample.xlsx", ExcelVersion.Version2010);
            Process.Start("Sample.xlsx");

        }
    }
}
Imports Spire.Xls
Imports Spire.Xls.Core.Spreadsheet.Shapes
Imports System.Diagnostics
Namespace RemoveBorderlineofTextbox
	Class Program

		Private Shared Sub Main(args As String())
			Dim workbook As New Workbook()
			workbook.Version = ExcelVersion.Version2010
			Dim sheet As Worksheet = workbook.Worksheets(0)
			sheet.Name = "Remove Borderline"
			Dim chart As Chart = sheet.Charts.Add()
			'original
			chart.TextBoxes.AddTextBox(50, 50, 100, 500).ShapeType = ExcelShapeType.TextBox
			chart.TextBoxes(0).Text = "The original with borderline"
			'solution
			Dim textbox As XlsTextBoxShape = TryCast(chart.TextBoxes.AddTextBox(500, 50, 100, 500), XlsTextBoxShape)
			textbox.Text = "The solution without borderline"
			'set 0 then invisible
			textbox.Line.Weight = 0
			workbook.SaveToFile("Sample.xlsx", ExcelVersion.Version2010)
			Process.Start("Sample.xlsx")

		End Sub
	End Class
End Namespace
C#: Add, Extract, or Remove a Textbox in Excel
Textboxes in Excel are versatile tools that allow users to add annotations, labels, or any additional information to their spreadsheets. Whether you want to highlight important data, provide explanations, or create visually appealing reports, managing textboxes is essential.
In this article, you will learn how to add a textbox, extract content from an existing textbox, and remove a textbox in Excel using C# and Spire.XLS for .NET.
Install Spire.XLS for .NET
To begin with, you need to add the DLL files included in the Spire.XLS for .NET package as references in your .NET project. The DLL files can be either downloaded from this link or installed via NuGet.
PM> Install-Package Spire.XLS
Add a Textbox to Excel in C#
A textbox can be added to a worksheet using the Worksheet.TextBoxes.AddTextBox() method. This method returns an ITextBoxShape object, which contains properties such as Text, HAlignment, and Fill, for configuring the text and formatting of the textbox.
The steps to add a textbox with customized text and formatting to Excel are as follows:
- Create a Workbook object.
- Load an Excel file from the specified file path.
- Get a specific worksheet from the workbook.
- Add a textbox to the worksheet at the specified location using Worksheet.TextBoxes.AddTextBox() method.
- Set the text of the textbox using ITextBoxShape.Text property.
- Customize the appearance of the textbox using other properties of the ITextBoxShape object.
- Save the workbook to a different Excel file.
- C#
using Spire.Xls;
using Spire.Xls.Core;
using System.Drawing;
namespace AddTextbox
{
class Program
{
static void Main(string[] args)
{
// Create a Workbook object
Workbook workbook = new Workbook();
// Load an Excel document
workbook.LoadFromFile("C:\\Users\\Administrator\\Desktop\\Input.xlsx");
// Get a specific sheet
Worksheet sheet = workbook.Worksheets[0];
// Add a textbox to the specified location
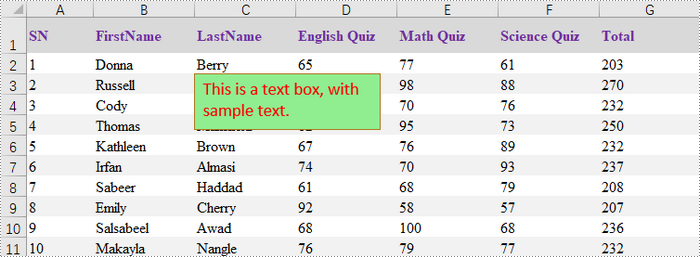
ITextBoxShape textBoxShape = sheet.TextBoxes.AddTextBox(3, 3, 60, 200);
// Set text of the textbox
textBoxShape.Text = "This is a text box, with sample text.";
// Create a font
ExcelFont font = workbook.CreateFont();
font.FontName = "Calibri";
font.Size = 14;
font.Color = Color.Red;
// Apply font to the text
textBoxShape.RichText.SetFont(0, textBoxShape.Text.Length - 1, font);
// Set horizontal alignment
textBoxShape.HAlignment = CommentHAlignType.Left;
// Set the fill color of the shape
textBoxShape.Fill.FillType = ShapeFillType.SolidColor;
textBoxShape.Fill.ForeColor = Color.LightGreen;
// Save the Excel file
workbook.SaveToFile("output/AddTextBox.xlsx", ExcelVersion.Version2010);
// Dispose resources
workbook.Dispose();
}
}
}
Extract Text from a Textbox in Excel in C#
A specific textbox can be accessed using the Worksheet.TextBoxes[index] property. Once retrieved, the textbox's text can be accessed through the ITextBox.Text property.
The steps to extract text from a textbox in Excel are as follows:
- Create a Workbook object.
- Load an Excel file from the specified file path.
- Get a specific worksheet from the workbook.
- Get the text of a specific textbox using Worksheet.TextBoxes[index] property.
- Get the text of the textbox using ITextBox.Text property.
- C#
using Spire.Xls;
using Spire.Xls.Core;
namespace ExtractTextFromTextbox
{
class Program
{
static void Main(string[] args)
{
// Create a Workbook object
Workbook workbook = new Workbook();
// Load an Excel file
workbook.LoadFromFile("C:\\Users\\Administrator\\Desktop\\TextBox.xlsx");
// Get a specific worksheet
Worksheet sheet = workbook.Worksheets[0];
// Get a specific textbox
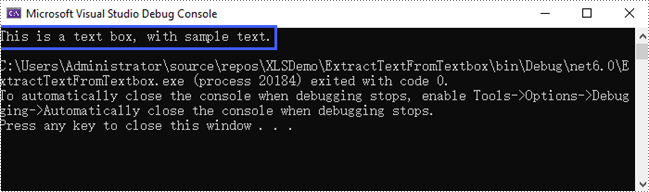
ITextBox textBox = sheet.TextBoxes[0];
// Get text from the textbox
String text = textBox.Text;
// Print out result
Console.WriteLine(text);
}
}
}
Remove a Textbox from Excel in C#
To remove a specific textbox from a worksheet, use the Worksheet.TextBoxes[index].Remove() method. To clear all textboxes, retrieve the count with the Worksheet.TextBoxes.Count property and iterate through the collection, removing each textbox individually.
The steps to remove a textbox from Excel are as follows:
- Create a Workbook object.
- Load an Excel file from the specified file path.
- Get a specific worksheet from the workbook.
- Remove a specific textbox using Worksheet.TextBoxes[index].Remove() method.
- Save the workbook to a different Excel file.
- C#
using Spire.Xls;

namespace RemoveTextbox
{
    class Program
    {
        static void Main(string[] args)
        {
            // Create a Workbook object
            Workbook workbook = new Workbook();

            // Load an Excel file
            workbook.LoadFromFile("C:\\Users\\Administrator\\Desktop\\TextBox.xlsx");

            // Get a specific worksheet
            Worksheet sheet = workbook.Worksheets[0];

            // Remove a specific textbox
            sheet.TextBoxes[0].Remove();

            // Save the updated document to a different Excel file
            workbook.SaveToFile("output/RemoveTextbox.xlsx", ExcelVersion.Version2016);

            // Dispose resources
            workbook.Dispose();
        }
    }
}
Apply for a Temporary License
If you'd like to remove the evaluation message from the generated documents, or to get rid of the function limitations, please request a 30-day trial license for yourself.