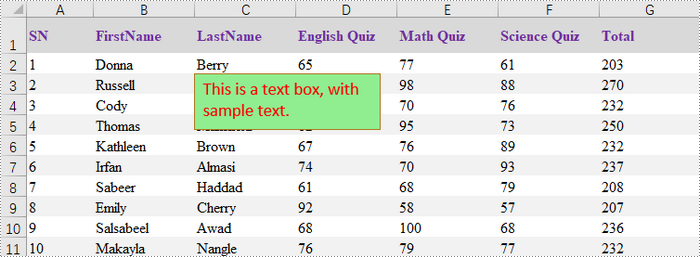
Textboxes in Excel are versatile tools that allow users to add annotations, labels, or any additional information to their spreadsheets. Whether you want to highlight important data, provide explanations, or create visually appealing reports, managing textboxes is essential.
In this article, you will learn how to add a textbox, extract content from an existing textbox, and remove a textbox in Excel using C# and Spire.XLS for .NET.
Install Spire.XLS for .NET
To begin with, you need to add the DLL files included in the Spire.XLS for .NET package as references in your .NET project. The DLL files can be either downloaded from this link or installed via NuGet.
PM> Install-Package Spire.XLS
Add a Textbox to Excel in C#
A textbox can be added to a worksheet using the Worksheet.TextBoxes.AddTextBox() method. This method returns an ITextBoxShape object, which contains properties such as Text, HAlignment, and Fill, for configuring the text and formatting of the textbox.
The steps to add a textbox with customized text and formatting to Excel are as follows:
- Create a Workbook object.
- Load an Excel file from the specified file path.
- Get a specific worksheet from the workbook.
- Add a textbox to the worksheet at the specified location using Worksheet.TextBoxes.AddTextBox() method.
- Set the text of the textbox using ITextBoxShape.Text property.
- Customize the appearance of the textbox using other properties of the ITextBoxShape object.
- Save the workbook to a different Excel file.
- C#
using Spire.Xls;
using Spire.Xls.Core;
using System.Drawing;

namespace AddTextbox
{
    class Program
    {
        static void Main(string[] args)
        {
            // Create a Workbook object
            Workbook workbook = new Workbook();

            // Load an Excel document
            workbook.LoadFromFile("C:\\Users\\Administrator\\Desktop\\Input.xlsx");

            // Get a specific sheet
            Worksheet sheet = workbook.Worksheets[0];

            // Add a textbox to the specified location
            ITextBoxShape textBoxShape = sheet.TextBoxes.AddTextBox(3, 3, 60, 200);

            // Set text of the textbox
            textBoxShape.Text = "This is a text box, with sample text.";

            // Create a font
            ExcelFont font = workbook.CreateFont();
            font.FontName = "Calibri";
            font.Size = 14;
            font.Color = Color.Red;

            // Apply font to the text
            textBoxShape.RichText.SetFont(0, textBoxShape.Text.Length - 1, font);

            // Set horizontal alignment
            textBoxShape.HAlignment = CommentHAlignType.Left;

            // Set the fill color of the shape
            textBoxShape.Fill.FillType = ShapeFillType.SolidColor;
            textBoxShape.Fill.ForeColor = Color.LightGreen;

            // Save the Excel file
            workbook.SaveToFile("output/AddTextBox.xlsx", ExcelVersion.Version2010);

            // Dispose resources
            workbook.Dispose();
        }
    }
}

Extract Text from a Textbox in Excel in C#
A specific textbox can be accessed using the Worksheet.TextBoxes[index] property. Once retrieved, the textbox's text can be accessed through the ITextBox.Text property.
The steps to extract text from a textbox in Excel are as follows:
- Create a Workbook object.
- Load an Excel file from the specified file path.
- Get a specific worksheet from the workbook.
- Get the text of a specific textbox using Worksheet.TextBoxes[index] property.
- Get the text of the textbox using ITextBox.Text property.
- C#
using Spire.Xls;
using Spire.Xls.Core;

namespace ExtractTextFromTextbox
{
    class Program
    {
        static void Main(string[] args)
        {
            // Create a Workbook object
            Workbook workbook = new Workbook();

            // Load an Excel file
            workbook.LoadFromFile("C:\\Users\\Administrator\\Desktop\\TextBox.xlsx");

            // Get a specific worksheet
            Worksheet sheet = workbook.Worksheets[0];

            // Get a specific textbox
            ITextBox textBox = sheet.TextBoxes[0];

            // Get text from the textbox
            String text = textBox.Text;

            // Print out result
            Console.WriteLine(text);
        }
    }
}

Remove a Textbox from Excel in C#
To remove a specific textbox from a worksheet, use the Worksheet.TextBoxes[index].Remove() method. To clear all textboxes, retrieve the count with the Worksheet.TextBoxes.Count property and iterate through the collection, removing each textbox individually.
The steps to remove a textbox from Excel are as follows:
- Create a Workbook object.
- Load an Excel file from the specified file path.
- Get a specific worksheet from the workbook.
- Remove a specific textbox using Worksheet.TextBoxes[index].Remove() method.
- Save the workbook to a different Excel file.
- C#
using Spire.Xls;

namespace RemoveTextbox
{
    class Program
    {
        static void Main(string[] args)
        {
            // Create a Workbook object
            Workbook workbook = new Workbook();

            // Load an Excel file
            workbook.LoadFromFile("C:\\Users\\Administrator\\Desktop\\TextBox.xlsx");

            // Get a specific worksheet
            Worksheet sheet = workbook.Worksheets[0];

            // Remove a specific textbox
            sheet.TextBoxes[0].Remove();

            // Save the updated document to a different Excel file
            workbook.SaveToFile("output/RemoveTextbox.xlsx", ExcelVersion.Version2016);

            // Dispose resources
            workbook.Dispose();
        }
    }
}
Apply for a Temporary License
If you'd like to remove the evaluation message from the generated documents, or to get rid of the function limitations, please request a 30-day trial license for yourself.


