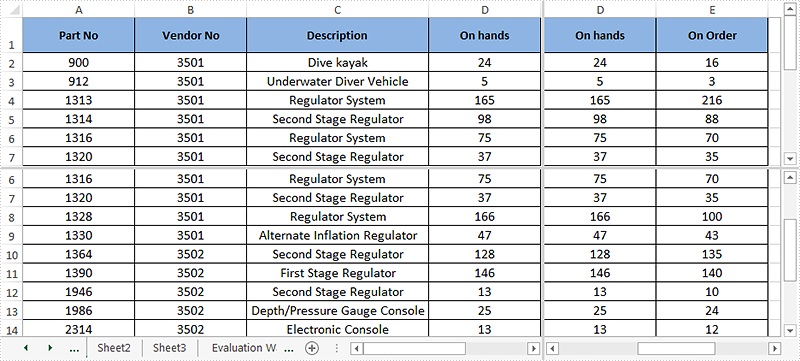
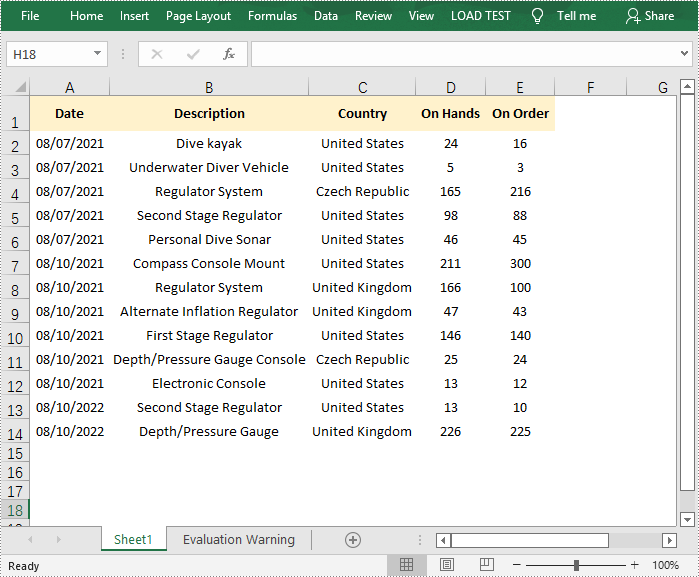
C#/VB.NET: Rearrange Columns in Excel
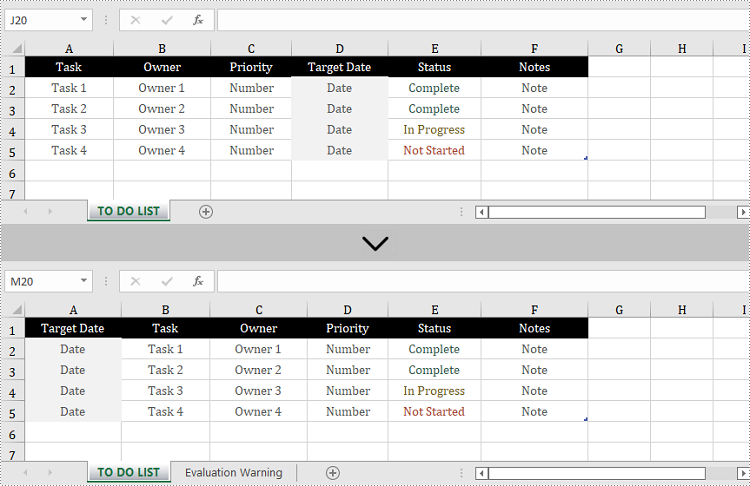
The proper adjustment of the columns' order in Excel can improve readability. For example, by setting the date data as the first column, we can quickly locate data based on a specific date. It is easy to move columns in MS Excel by using Shift and Drag. This article, however, focuses on how to rearrange columns in Excel in C# and VB.NET by using Spire.XLS for .NET.
Install Spire.XLS for .NET
To begin with, you need to add the DLL files included in the Spire.XLS for .NET package as references in your .NET project. The DLL files can be either downloaded from this link or installed via NuGet.
PM> Install-Package Spire.XLS
Reorder Excel Columns in C# and VB.NET
The following are the steps to rearrange columns in Excel using Spire.XLS for .NET.
- Create a Workbook object, and load a sample Excel file using Workbook.LoadFromFile() method.
- Get the target worksheet using Workbook.Worksheets[index] property.
- Specify the new column order in an int array.
- Create a temporary sheet and copy the data from the target sheet into it.
- Copy the columns from the temporary sheet to the target sheet and store them in the new order.
- Remove the temporary sheet.
- Save the workbook to another Excel file using Workbook.SaveToFile() method.
- C#
- VB.NET
using System.Linq;
using Spire.Xls;

namespace MoveColumn
{
    class Program
    {
        static void Main(string[] args)
        {
            //Create a Workbook object
            Workbook workbook = new Workbook();

            //Load an Excel file
            workbook.LoadFromFile(@"C:\Users\Administrator\Desktop\sample.xlsx");

            //Get the first worksheet
            Worksheet worksheet = workbook.Worksheets[0];

            //Set the new column order (the column index starts from 0)
            int[] newColumnOrder = new int[] { 3, 0, 1, 2, 4, 5 };

            //Add a temporary worksheet
            Worksheet newSheet = workbook.Worksheets.Add("temp");

            //Copy data from the first worksheet to the temporary sheet
            newSheet.CopyFrom(worksheet);

            //Loop through the newColumnOrder array
            for (int i = 0; i < newColumnOrder.Count(); i++)
            {
                //Copy the column from the temporary sheet to the first sheet
                newSheet.Columns[newColumnOrder[i]].Copy(worksheet.Columns[i], true, true);

                //Set the width of a certain column the first sheet to that of the temporary sheet
                worksheet.Columns[i].ColumnWidth = newSheet.Columns[newColumnOrder[i]].ColumnWidth;
            }

            //Remove temporary sheet
            workbook.Worksheets.Remove(newSheet);

            //Save the workbook to another Excel file
            workbook.SaveToFile("MoveColumn.xlsx", FileFormat.Version2016);
        }
    }
}
Apply for a Temporary License
If you'd like to remove the evaluation message from the generated documents, or to get rid of the function limitations, please request a 30-day trial license for yourself.
C#/VB.NET: Copy Cell Ranges Between Different Workbooks
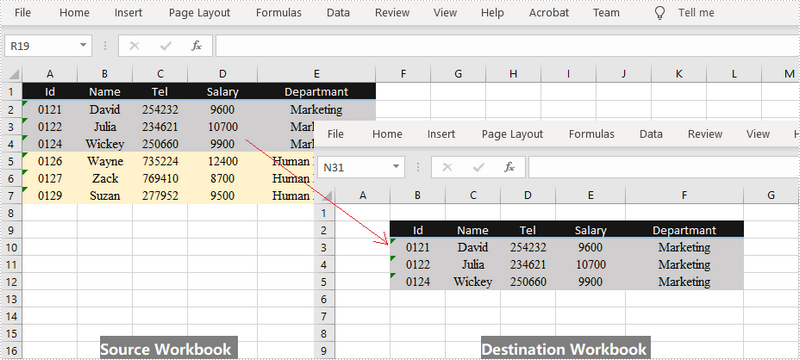
When you're dealing Excel documents, it is a common task that you may need to copy data from a main workbook and paste into a separate workbook. You can copy either a selected cell range or an entire worksheet between different workbooks. This article demonstrates how to copy a selected cell range from one workbook to another by using Spire.XLS for .NET.
Install Spire.XLS for .NET
To begin with, you need to add the DLL files included in the Spire.XLS for.NET package as references in your .NET project. The DLLs files can be either downloaded from this link or installed via NuGet.
- Package Manager
PM> Install-Package Spire.XLS
Copy a Cell Range Between Different Workbooks
Spire.XLS offers the Worksheet.Copy() method to copy data from a source range to a destination range. The destination range can be a cell range inside the same workbook or from a different workbook. The following are the steps to copy a cell range from a workbook to another.
- Create a Workbook object to load the source Excel document.
- Get the source worksheet and the source cell range using Workbook.Worksheets property and Worksheet.Range property respectively.
- Create another Workbook object to load the destination Excel document.
- Get the destination worksheet and cell range.
- Copy the data from the source range to the destination range using Worksheet.Copy(CellRange source, CellRange destRange).
- Copy the column widths from the source range to the destination range, so that the data can display properly in the destination workbook.
- Save the destination workbook to an Excel file using Workbook.SaveToFile() method.
- C#
- VB.NET
using Spire.Xls;

namespace CopyCellRange
{
    class Program
    {
        static void Main(string[] args)
        {
            //Create a Workbook object
            Workbook sourceBook = new Workbook();

            //Load the source workbook
            sourceBook.LoadFromFile(@"C:\Users\Administrator\Desktop\source.xlsx");

            //Get the source worksheet
            Worksheet sourceSheet = sourceBook.Worksheets[0];

            //Get the source cell range
            CellRange sourceRange = sourceSheet.Range["A1:E4"];

            //Create another Workbook objecy
            Workbook destBook = new Workbook();

            //Load the destination workbook
            destBook.LoadFromFile(@"C:\Users\Administrator\Desktop\destination.xlsx");

            //Get the destination worksheet
            Worksheet destSheet = destBook.Worksheets[0];

            //Get the destination cell range
            CellRange destRange = destSheet.Range["B2:F5"];

            //Copy data from the source range to the destination range
            sourceSheet.Copy(sourceRange, destRange);

            //Loop through the columns in the source range
            for (int i = 0; i < sourceRange.Columns.Length; i++)
            {
                //Copy the column widths also from the source range to destination range
                destRange.Columns[i].ColumnWidth = sourceRange.Columns[i].ColumnWidth;
            }

            //Save the destination workbook to an Excel file
            destBook.SaveToFile("CopyRange.xlsx");
        }
    }
}
Imports Spire.Xls

Namespace CopyCellRange
    Class Program
        Shared  Sub Main(ByVal args() As String)
            'Create a Workbook object
            Dim sourceBook As Workbook =  New Workbook()

            'Load the source workbook
            sourceBook.LoadFromFile("C:\Users\Administrator\Desktop\source.xlsx")

            'Get the source worksheet
            Dim sourceSheet As Worksheet =  sourceBook.Worksheets(0)

            'Get the source cell range
            Dim sourceRange As CellRange =  sourceSheet.Range("A1:E4")

            'Create another Workbook objecy
            Dim destBook As Workbook =  New Workbook()

            'Load the destination workbook
            destBook.LoadFromFile("C:\Users\Administrator\Desktop\destination.xlsx")

            'Get the destination worksheet
            Dim destSheet As Worksheet =  destBook.Worksheets(0)

            'Get the destination cell range
            Dim destRange As CellRange =  destSheet.Range("B2:F5")

            'Copy data from the source range to the destination range
            sourceSheet.Copy(sourceRange, destRange)

            'Loop through the columns in the source range
            Dim i As Integer
            For  i = 0 To  sourceRange.Columns.Length- 1  Step  i + 1
                'Copy the column widths also from the source range to destination range
                destRange.Columns(i).ColumnWidth = sourceRange.Columns(i).ColumnWidth
            Next

            'Save the destination workbook to an Excel file
            destBook.SaveToFile("CopyRange.xlsx")
        End Sub
    End Class
End Namespace
Apply for a Temporary License
If you'd like to remove the evaluation message from the generated documents, or to get rid of the function limitations, please request a 30-day trial license for yourself.
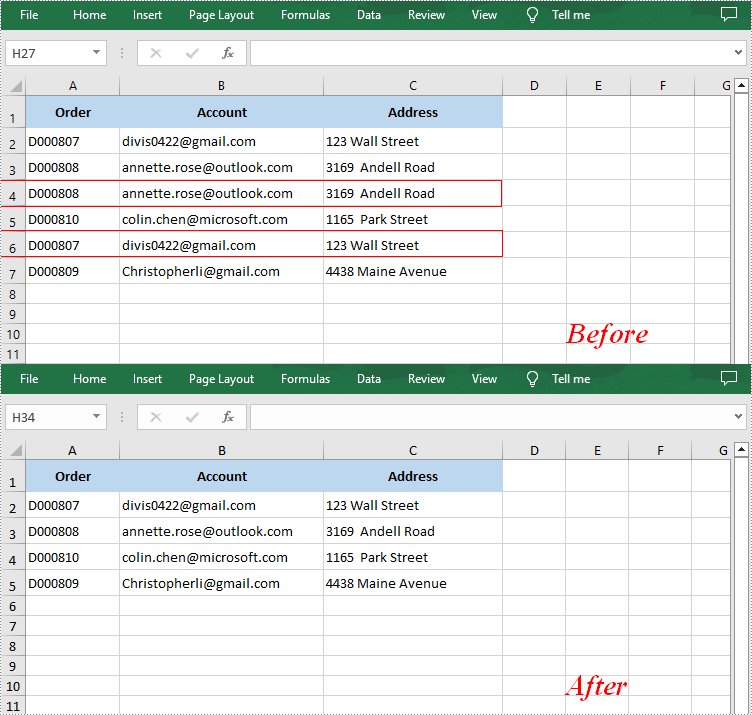
C#/VB.NET: Remove Duplicate Rows in Excel
When merging datasets from different sources or copying data from other worksheets, duplicate rows may appear if the data are not properly matched. These duplicate rows may distort data analysis and calculations, leading to incorrect results. Therefore, removing duplicate rows is a frequently needed task, and this article demonstrates how to accomplish this task programmatically using Spire.XLS for .NET.
Install Spire.XLS for .NET
To begin with, you need to add the DLL files included in the Spire.XLS for .NET package as references in your .NET project. The DLL files can be either downloaded from this link or installed via NuGet.
PM> Install-Package Spire.XLS
Remove Duplicate Rows in Excel in C# and VB.NET
Removing duplicate rows manually is a very repetitive and time-consuming task. With Spire.XLS for .NET, you can identify and remove all duplicate rows at once. The following are the detailed steps.
- Create a Workbook instance.
- Load a sample Excel document using Workbook.LoadFromFile() method.
- Get a specified worksheet by its index using Workbook.Worksheets[sheetIndex] property.
- Specify the cell range where duplicate records need to be deleted using Worksheet.Range property.
- Get the rows that contain duplicate content in the specified cell range.
- Loop through all duplicated rows and delete them using Worksheet.DeleteRow() method.
- Save the result document using Workbook.SaveToFile() method.
- C#
- VB.NET
using Spire.Xls;
using System.Linq;

namespace RemoveDuplicateRows
{
    class Program
    {
        static void Main(string[] args)
        {
            //Create a Workbook instance
            Workbook workbook = new Workbook();

            //Load a sample Excel document
            workbook.LoadFromFile("Test.xlsx");

            //Get the first worksheet
            Worksheet sheet = workbook.Worksheets[0];

            //Specify the cell range where duplicate records need to be deleted
            var range = sheet.Range["A1:A" + sheet.LastRow];

            //Get the duplicate row numbers
            var duplicatedRows = range.Rows
                   .GroupBy(x => x.Columns[0].DisplayedText)
                   .Where(x => x.Count() > 1)
                   .SelectMany(x => x.Skip(1))
                   .Select(x => x.Columns[0].Row)
                   .ToList();

            //Remove the duplicate rows
            for (int i = 0; i < duplicatedRows.Count; i++)
            {
                sheet.DeleteRow(duplicatedRows[i] - i);
            }

            //Save the result document
            workbook.SaveToFile("RemoveDuplicateRows.xlsx");
        }
    }
}
Apply for a Temporary License
If you'd like to remove the evaluation message from the generated documents, or to get rid of the function limitations, please request a 30-day trial license for yourself.
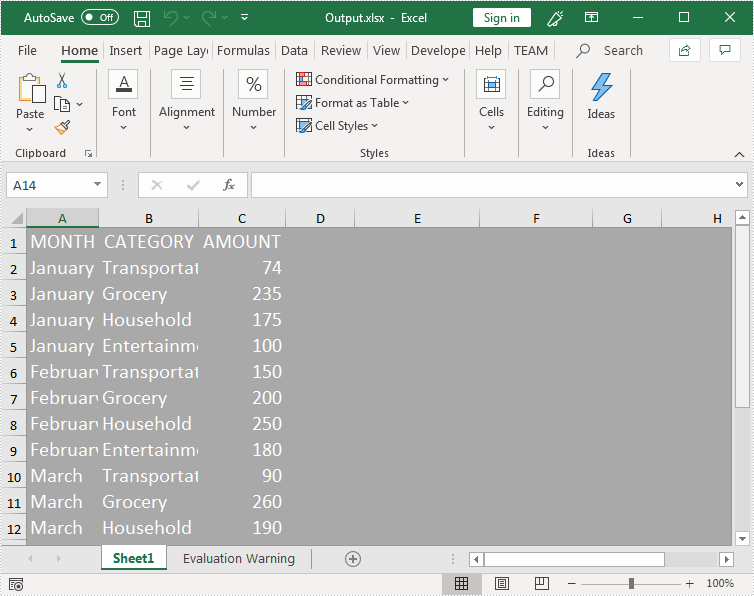
Apply a Style to an Entire Excel Worksheet in C#
Starting from version 9.9.5, Spire.XLS supports applying style to an entire excel worksheet. This article will show you how to apply a style to an entire excel worksheet using Spire.XLS.
Detail steps:
Step 1: Instantiate a Workbook object and load the excel file.
Workbook workbook = new Workbook();
workbook.LoadFromFile("Input.xlsx");
Step 2: Get the first worksheet.
Worksheet sheet = workbook.Worksheets[0];
Step 3: Create a cell style, specify the cell background color, font color and font size.
CellStyle style = workbook.Styles.Add("newStyle");
style.Color = Color.DarkGray;
style.Font.Color = Color.White;
style.Font.Size = 15;
Step 4: Apply the style to the first worksheet.
sheet.ApplyStyle(style);
Step 5: Save the resultant file.
workbook.SaveToFile("Output.xlsx", ExcelVersion.Version2013);
Output:
Full code:
using System.Drawing;
using Spire.Xls;

namespace StyleEntireWorksheet
{
    class Program
    {
        static void Main(string[] args)
        {
            //Create a Workbook instance and load the excel file
            Workbook workbook = new Workbook();
            workbook.LoadFromFile("Input.xlsx");

            //Get the first worksheet
            Worksheet sheet = workbook.Worksheets[0];

            //Create a cell style
            CellStyle style = workbook.Styles.Add("newStyle");
            style.Color = Color.DarkGray;
            style.Font.Color = Color.White;
            style.Font.Size = 15;

            //Apply the style to the first worksheet
            sheet.ApplyStyle(style);

            //Save the resultant file
            workbook.SaveToFile("Output.xlsx", ExcelVersion.Version2013);
        }
    }
}
Get a list of the worksheet names in an Excel workbook
When we deal with a workbook with a large number of worksheets, we may need to get the names of those worksheets and then it is easy for us to find the information we want. This article will demonstrate how to use Spire.XLS to get a list of the worksheets in the workbook in two parts.
Get a list of all the worksheet names in a workbook.
using Spire.Xls;
using Spire.Xls.Collections;
using System;
namespace WorksheetName
{
    class Program
    {

        static void Main(string[] args)
        {
            const string DEMOFILE = @"Sample.xlsx";

            var results = GetAllWorksheets(DEMOFILE);

            foreach (Worksheet item in results)
            {
                Console.WriteLine(item.Name);
            }
            Console.ReadLine();
        }
        public static WorksheetsCollection GetAllWorksheets(string fileName)
        {
            //Initialize a new Workboook object
            Workbook workbook = new Workbook();

            //Load the document
            workbook.LoadFromFile(fileName);

            //Get all worksheets
            WorksheetsCollection worksheets = workbook.Worksheets;

            return worksheets;
        }
    }
}
=
Get a list of the hidden worksheet names in a workbook
static void Main(string[] args)
 {
     const string DEMOPATH = @"Sample.xlsx";
     List sheets = GetHiddenSheets(DEMOPATH);
     foreach (var sheet in sheets)
     {
         Console.WriteLine(sheet.Name);
     }
     Console.ReadLine();
 }
 public static List GetHiddenSheets(string fileName)
 {
     List returnVal = new List();

     //Initialize a new Workboook object
     Workbook workbook = new Workbook();

     //Load the document
     workbook.LoadFromFile(fileName);

     //Judge whether a worksheet is hidden
     foreach (Worksheet sheet in workbook.Worksheets)
     {
         if (sheet.Visibility == WorksheetVisibility.Hidden)
         {
             returnVal.Add(sheet);
         }
     }
     return returnVal;
 }
How to Split Excel Worksheet into Multiple Panes in C#
Excel enables us to split an excel worksheet into two or four independent panes. After splitting up the window into panes, we can use the horizontal and vertical scroll bars to view and compare data in different parts of the same worksheet. This article demonstrates how to vertical and horizontal split an excel worksheet into four panes programmatically using Spire.XLS.
Detail steps:
Step 1: Instantiate a Workbook instance and load the excel document.
Workbook workbook = new Workbook();
workbook.LoadFromFile("Sample.xlsx");
Step 2: Get the first worksheet.
Worksheet sheet = workbook.Worksheets[0];
Step 3: Split the worksheet horizontally and vertically.
sheet.FirstVisibleColumn = 3;

sheet.FirstVisibleRow = 5;

sheet.VerticalSplit = 110;

sheet.HorizontalSplit = 100;
sheet.ActivePane = 1;
Step 4: Save the excel document.
workbook.SaveToFile("Output.xlsx", ExcelVersion.Version2013);
Screenshot after splitting:
Full codes:
using Spire.Xls;

namespace Split_Panes
{
    class Program
    {
        static void Main(string[] args)
        {
            //Load the excel document
            Workbook workbook = new Workbook();
            workbook.LoadFromFile("Sample.xlsx");

            //Get the first worksheet
            Worksheet sheet = workbook.Worksheets[0];

            //Vertical and horizontal split the worksheet into four panes

            sheet.FirstVisibleColumn = 3;

            sheet.FirstVisibleRow = 5;

            sheet.VerticalSplit = 110;

            sheet.HorizontalSplit = 100;

            sheet.ActivePane = 1;

            //Save the excel document
            workbook.SaveToFile("Output.xlsx", ExcelVersion.Version2013);

            workbook.Dispose();
        }
    }
}
How to remove page breaks in a worksheet
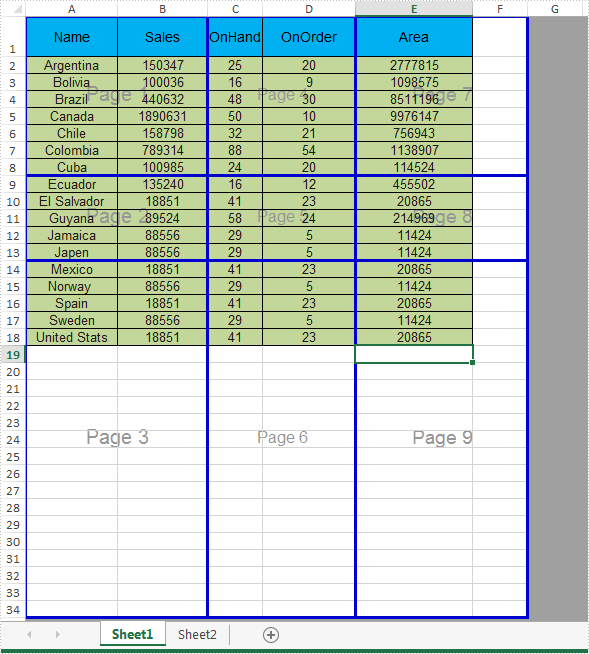
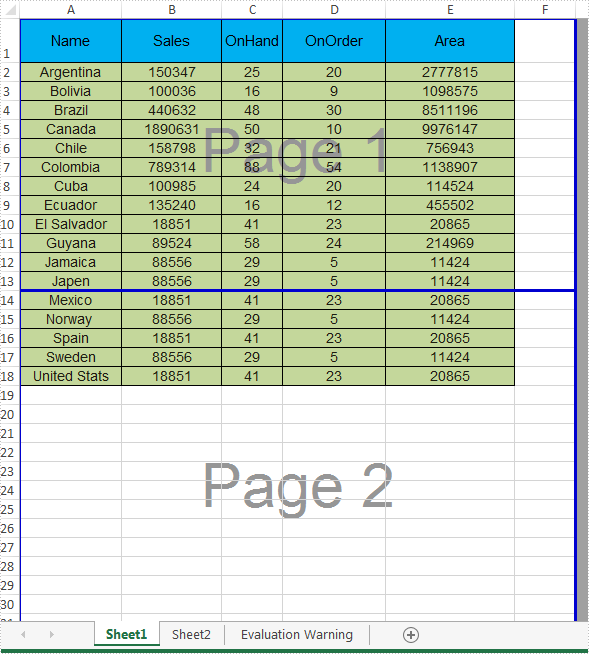
We have already demonstrated how to add page breaks in Excel worksheet in C# with the help of Spire.XLS. Spire.XLS supports to remove all the horizontal and vertical page breaks and it also supports to remove the special page breaks. Here comes to the steps of how to remove the page breaks from an Excel worksheet.
Firstly, view the same Excel document with horizontal page breaks and vertical page breaks:
Step 1: Initialize an instance of Workbook and load the document from file.
Workbook workbook = new Workbook();
workbook.LoadFromFile("Sample.xlsx");
Step 2: Get the first worksheet from the workbook.
Worksheet sheet = workbook.Worksheets[0];
Step 3: Clear all the vertical page breaks by call the VPageBreaks.Clear() method.
sheet.VPageBreaks.Clear();
Step 4: Remove the specified horizontal Page Break by call the HPageBreaks.RemoveAt() method.
sheet.HPageBreaks.RemoveAt(0);
Step 5: Set the ViewMode as Preview to see how the page breaks work.
sheet.ViewMode = ViewMode.Preview;
Step 6: Save the document to file.
workbook.SaveToFile("RemovePageBreak.xlsx", FileFormat.Version2010);
Effective screenshot of removing the page breaks in a worksheet:
Full codes:
using Spire.Xls;
namespace RemovePageBreak
{
    class Program
    {

        static void Main(string[] args)
        {
            Workbook workbook = new Workbook();
            workbook.LoadFromFile("Sample.xlsx");

            Worksheet sheet = workbook.Worksheets[0];

            //sheet.HPageBreaks.Clear();
            sheet.VPageBreaks.Clear();

            sheet.HPageBreaks.RemoveAt(0);


            sheet.ViewMode = ViewMode.Preview;

            workbook.SaveToFile("RemovePageBreak.xlsx", FileFormat.Version2010);
        }
    }
}
C#: Remove Worksheets from a Workbook
Simplifying your Excel workbooks by removing redundant or unused worksheets can be a beneficial organizational practice. This process allows you to eliminate clutter and improve file structure by focusing only on the most relevant data. Removing unneeded worksheets frees up storage space, streamlines navigation, and keeps your workbooks clean and efficient.
In this article, you will learn how to remove worksheets from an Excel workbook in C# by using the Spire.XLS for .NET library.
- Remove a Worksheet by Its Index from a Workbook
- Remove a Worksheet by Its Name from a Workbook
- Remove All Worksheets from a Workbook at Once
Install Spire.XLS for .NET
To begin with, you need to add the DLL files included in the Spire.XLS for .NET package as references in your .NET project. The DLL files can be either downloaded from this link or installed via NuGet.
PM> Install-Package Spire.XLS
Remove a Worksheet by Its Index from a Workbook in C#
Spire.XLS for .NET provides the WorksheetsCollection.RemoveAt(int index) method, which allows you to remove a specific worksheet by its index from a workbook. Here are the detailed steps:
- Create a Workbook object.
- Load an Excel file from a given path.
- Get the worksheets collection from the document using Workbook.Worksheets property.
- Remove a worksheet by its index using WorksheetsCollection.RemoveAt(int index) method.
- Save the workbook to a different Excel document.
- C#
using Spire.Xls;
using Spire.Xls.Collections;

namespace RemoveWorksheetByIndex
{
    class Program
    {
        static void Main(string[] args)
        {
            // Create a Workbook object
            Workbook wb = new Workbook();

            // Load an Excel file
            wb.LoadFromFile(@"C:\Users\Administrator\Desktop\Input.xlsx");

            // Get the worksheets collection from the document
            WorksheetsCollection worksheets = wb.Worksheets;

            // Remove a specific worksheet by its index
            worksheets.RemoveAt(0);

            // Save the workbook to a different Excel file
            wb.SaveToFile("RemoveByIndex.xlsx", ExcelVersion.Version2016);

            // Dispose resources
            wb.Dispose();
        }
    }
}
Remove a Worksheet by Its Name from a Workbook in C#
If you already know the name of the worksheet that you want to remove, you can do so by using the WorksheetsCollection.Remove(string sheetName) method. The detailed steps are as follows:
- Create a Workbook object.
- Load an Excel file from a given path.
- Get the worksheets collection from the document using Workbook.Worksheets property.
- Remove a worksheet by its name using WorksheetsCollection.Remove(string sheetName) method.
- Save the workbook to a different Excel document.
- C#
using Spire.Xls;
using Spire.Xls.Collections;

namespace RemoveWorksheetByName
{
    class Program
    {
        static void Main(string[] args)
        {
            // Create a Workbook object
            Workbook wb = new Workbook();

            // Load an Excel file
            wb.LoadFromFile(@"C:\Users\Administrator\Desktop\Input.xlsx");

            // Get the worksheets collection from the document
            WorksheetsCollection worksheets = wb.Worksheets;

            // Remove a specific worksheet by its name
            worksheets.Remove("sheet2")

            // Save the workbook to a different Excel file
            wb.SaveToFile("RemoveByName.xlsx", ExcelVersion.Version2016);

            // Dispose resources
            wb.Dispose();
        }
    }
}
Remove All Worksheets from a Workbook at Once in C#
To remove all worksheets at once, you can use the WorksheetsCollection.Clear() method. Here are the detailed steps:
- Create a Workbook object.
- Load an Excel file from a given path.
- Get the worksheets collection from the document using Workbook.Worksheets property.
- Remove all worksheet at once using WorksheetsCollection.Clear() method.
- Save the workbook to a different Excel document.
- C#
using Spire.Xls;
using Spire.Xls.Collections;

namespace RemoveAllWorksheets
{
    class Program
    {
        static void Main(string[] args)
        {
            // Create a Workbook object
            Workbook wb = new Workbook();

            // Load an Excel file
            wb.LoadFromFile(@"C:\Users\Administrator\Desktop\Input.xlsx");

            // Get the worksheets collection from the document
            WorksheetsCollection worksheets = wb.Worksheets;

            // Remove all worksheets
            worksheets.Clear();

            // Save the workbook to a different Excel file
            wb.SaveToFile("RemoveAllWorksheets.xlsx", ExcelVersion.Version2016);

            // Dispose resources
            wb.Dispose();
        }
    }
}
Apply for a Temporary License
If you'd like to remove the evaluation message from the generated documents, or to get rid of the function limitations, please request a 30-day trial license for yourself.
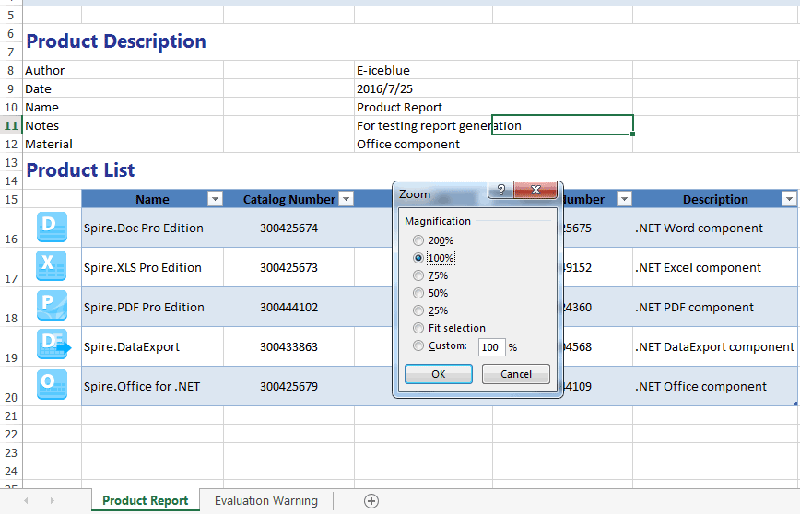
How to set the Zoom Factor on Excel worksheet in C#
Sometimes, we may need to change the zoom factor when displaying the data on the excel worksheet to fulfil our requirements. In this article, we will demonstrate how to set the zoom factor on Excel work sheet in C# with the help of Spire.XLS.
Firstly, please view the screenshot of how Microsoft Excel to set the zoom factor after click View--Zoom on the top toolbox:

Spire.XLS enables developers to set the value of worksheet’s zoom property to the specific zoom factor via sheet.Zoom. Here comes to the steps of how to control the zoom factor by Spire.XLS.
Step 1: Create a new Excel workbook and load from file.
Workbook wb = new Workbook();
wb.LoadFromFile("Sample.xlsx");
Step 2: Get the first worksheet from the Excel workbook.
Worksheet sheet = wb.Worksheets[0];
Step 3: Set the value of worksheet's zoom property to the specific zoom factor.
sheet.Zoom = 100;
Step 4: Save the document to file.
wb.SaveToFile("result.xlsx", ExcelVersion.Version2010);
Effective screenshot after setting the zoom factor:
Full codes:
using Spire.Xls;
namespace Zoom
{
    class Program
    {

        static void Main(string[] args)
        {

            Workbook wb = new Workbook();
            wb.LoadFromFile("Sample.xlsx");

            Worksheet sheet = wb.Worksheets[0];
            sheet.Zoom = 100;

            wb.SaveToFile("result.xlsx", ExcelVersion.Version2010);
        }
    }
}
C#/VB.NET: Hide or Show Gridlines in Excel
Gridlines are the faint lines used to distinguish cells in an Excel worksheet. With gridlines, users can easily distinguish the boundaries of each cell and read data in an organized manner. But in certain cases, those gridlines can be quite distracting. In this article, you will learn how to programmatically show or hide/remove gridlines in an Excel worksheet using Spire.XLS for .NET.
Install Spire.XLS for .NET
To begin with, you need to add the DLL files included in the Spire.XLS for .NET package as references in your .NET project. The DLL files can be either downloaded from this link or installed via NuGet.
PM> Install-Package Spire.XLS
Hide or Show Gridlines in Excel
The detailed steps are as follows.
- Create a Workbook object.
- Load a sample Excel document using Workbook.LoadFromFile() method.
- Get a specified worksheet using Workbook.Worksheets[] property.
- Hide or show gridlines in the specified worksheet using Worksheet.GridLinesVisible property.
- Save the result file using Workbook.SaveToFile() method.
- C#
- VB.NET
using Spire.Xls;

namespace RemoveGridlines
{
    class Program
    {

        static void Main(string[] args)
        {
            //Create a Workbook object
            Workbook workbook = new Workbook();

            //Load a sample Excel document
            workbook.LoadFromFile(@"E:\Files\Test.xlsx");

            //Get the first worksheet
            Worksheet worksheet = workbook.Worksheets[0];

            //Hide gridlines in the specified worksheet
            worksheet.GridLinesVisible = false;

            //Show gridlines in the specified worksheet
            //worksheet.GridLinesVisible = true;

            //Save the document
            workbook.SaveToFile("Gridlines.xlsx", ExcelVersion.Version2010);
        }
    }
}
Apply for a Temporary License
If you'd like to remove the evaluation message from the generated documents, or to get rid of the function limitations, please request a 30-day trial license for yourself.