.NET (1270)
Children categories
It is not uncommon at work that we may receive two versions of a Word document and face the need to find the differences between them. Document comparison is particularly important and popular in the fields of laws, regulations and education. In this article, you will learn how to compare two Word documents in C# and VB.NET by using Spire.Doc for .NET.
- Compare Two Documents and Save Result in a Third Word Document
- Compare Two Documents and Return Insertions and Deletions in Lists
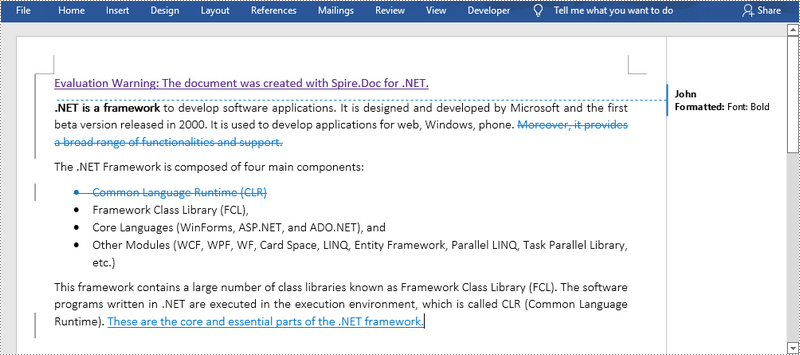
Below is a screenshot of the two Word documents that’ll be compared.

Install Spire.Doc for .NET
To begin with, you need to add the DLL files included in the Spire.Doc for .NET package as references in your .NET project. The DLL files can be either downloaded from this link or installed via NuGet.
PM> Install-Package Spire.Doc
Compare Two Documents and Save Result in a Third Word Document
Saving the comparison result in a separate Word document allows us to see all the changes made to the original document, including insertions, deletions as well as modifications on formatting. The following are the steps to compare two documents and save the result in a third Word document using Spire.Doc for .NET.
- Load two Word documents separately while initialing the Document objects.
- Compare these two documents using Document.Compare() method.
- Save the result in a third Word document using ;Document.SaveToFile() method.
- C#
- VB.NET
using Spire.Doc;

namespace CompareDocuments
{
    class Program
    {
        static void Main(string[] args)
        {
            //Load one Word document
            Document doc1 = new Document("C:\\Users\\Administrator\\Desktop\\original.docx");

            //Load the other Word document
            Document doc2 = new Document("C:\\Users\\Administrator\\Desktop\\revised.docx");

            //Compare two documents
            doc1.Compare(doc2, "John");

            //Save the differences in a third document
            doc1.SaveToFile("Differences.docx", FileFormat.Docx2013);
            doc1.Dispose();
        }
    }
}
Compare Two Documents and Return Insertions and Deletions in Lists
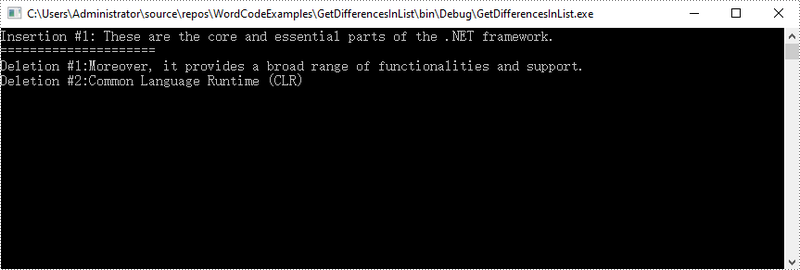
Developers may only want to obtain the insertions and deletions instead of the whole differences. The following are the steps to get insertions and deletions in two separate lists.
- Load two Word documents separately while initialing the Document objects.
- Compare two documents using Document.Compare() method.
- Get the revisions using the constructor function of the DifferRevisions ;class.
- Get a list of insertions through DifferRevisions.InsertRevisions property.
- Get a list of deletions through DifferRevisions.DeleteRevisions property.
- Loop through the elements in the two lists to get the specific insertion and deletion.
- C#
- VB.NET
using Spire.Doc;
using Spire.Doc.Fields;
using System;

namespace GetDifferencesInList
{
    class Program
    {
        static void Main(string[] args)
        {
            //Load one Word document
            Document doc1 = new Document("C:\\Users\\Administrator\\Desktop\\original.docx");

            //Load the other Word document
            Document doc2 = new Document("C:\\Users\\Administrator\\Desktop\\revised.docx");

            //Compare the two Word documents
            doc1.Compare(doc2, "Author");

            //Get the revisions
            DifferRevisions differRevisions = new DifferRevisions(doc1);

            //Return the insertion revisions in a list
            var insetRevisionsList = differRevisions.InsertRevisions;

            //Return the deletion revisions in a list
            var deletRevisionsList = differRevisions.DeleteRevisions;

            //Create two int variables
            int m = 0;
            int n = 0;

            //Loop through the insertion revision list
            for (int i = 0; i < insetRevisionsList.Count; i++)
            {
                if (insetRevisionsList[i] is TextRange)
                {
                    m += 1;
                    //Get the specific revision and get its content
                    TextRange textRange = insetRevisionsList[i] as TextRange;
                    Console.WriteLine("Insertion #" + m + ":" + textRange.Text);
                }
            }
            Console.WriteLine("=====================");

            //Loop through the deletion revision list
            for (int i = 0; i < deletRevisionsList.Count; i++)
            {
                if (deletRevisionsList[i] is TextRange)
                {
                    n += 1;
                    //Get the specific revision and get its content
                    TextRange textRange = deletRevisionsList[i] as TextRange;
                    Console.WriteLine("Deletion #" + n + ":" + textRange.Text);
                }
            }
            Console.ReadKey();
        }
    }
}
Apply for a Temporary License
If you'd like to remove the evaluation message from the generated documents, or to get rid of the function limitations, please request a 30-day trial license for yourself.
PDF is a versatile file format, but it is difficult to edit. If you want to modify and calculate PDF data, converting PDF to Excel would be an ideal solution. In this article, you will learn how to convert PDF to Excel in C# and VB.NET using Spire.PDF for .NET.
Install Spire.PDF for .NET
To begin with, you need to add the DLL files included in the Spire.PDF for.NET package as references in your .NET project. The DLL files can be either downloaded from this link or installed via NuGet.
PM> Install-Package Spire.PDF
Convert PDF to Excel in C# and VB.NET
The following are the steps to convert a PDF document to Excel:
- Initialize an instance of PdfDocument class.
- Load the PDF document using PdfDocument.LoadFromFile(filePath) method.
- Save the document to Excel using PdfDocument.SaveToFile(filePath, FileFormat.XLSX) method.
- C#
- VB.NET
using Spire.Pdf;
using Spire.Pdf.Conversion;

namespace ConvertPdfToExcel
{
    class Program
    {
        static void Main(string[] args)
        {
            //Initialize an instance of PdfDocument class
            PdfDocument pdf = new PdfDocument();
            //Load the PDF document
            pdf.LoadFromFile("Sample.pdf");

            //Save the PDF document to XLSX
            pdf.SaveToFile("PdfToExcel.xlsx", FileFormat.XLSX);
        }
    }
}
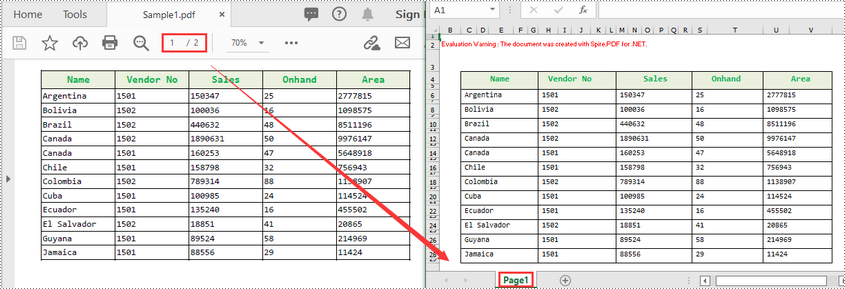
Convert a Multi-Page PDF to One Excel Worksheet in C# and VB.NET
The following are the steps to covert a multi-page PDF to one Excel worksheet:
- Initialize an instance of PdfDocument class.
- Load the PDF document using PdfDocument.LoadFromFile(filePath) method.
- Initialize an instance of XlsxLineLayoutOptions class, in the class constructor, setting the first parameter - convertToMultipleSheet as false.
- Set PDF to XLSX convert options using PdfDocument.ConvertOptions.SetPdfToXlsxOptions(XlsxLineLayoutOptions) method.
- Save the document to Excel using PdfDocument.SaveToFile(filePath, FileFormat.XLSX) method.
- C#
- VB.NET
using Spire.Pdf;
using Spire.Pdf.Conversion;

namespace ConvertPdfToExcel
{
    class Program
    {
        static void Main(string[] args)
        {
            //Initialize an instance of PdfDocument class
            PdfDocument pdf = new PdfDocument();
            //Load the PDF document
            pdf.LoadFromFile("Sample1.pdf");

            //Initialize an instance of XlsxLineLayoutOptions class, in the class constructor, setting the first parameter - convertToMultipleSheet as false.
            //The four parameters represent: convertToMultipleSheet, showRotatedText, splitCell, wrapText
            XlsxLineLayoutOptions options = new XlsxLineLayoutOptions(false, true, true, true);
            //Set PDF to XLSX convert options
            pdf.ConvertOptions.SetPdfToXlsxOptions(options);

            //Save the PDF document to XLSX
            pdf.SaveToFile("PdfToOneExcelSheet.xlsx", FileFormat.XLSX);
        }
    }
}
Apply for a Temporary License
If you'd like to remove the evaluation message from the generated documents, or to get rid of the function limitations, please request a 30-day trial license for yourself.
SVG is a file format for vector graphics, used to create images that can be scaled without loss of quality. However, PDF is more suitable for sharing and printing due to its support for high-quality printing, encryption, digital signatures, and other features. Converting SVG to PDF ensures good image display on different devices and environments, and better protects intellectual property. In this tutorial, we will show you how to convert SVG to PDF and how to add a SVG image to PDF in C# and VB.NET using Spire.PDF for .NET.
Install Spire.PDF for .NET
To begin with, you need to add the DLL files included in the Spire.PDF for .NET package as references in your .NET project. The DLLs files can be either downloaded from this link or installed via NuGet.
PM> Install-Package Spire.PDF
Convert SVG to PDF in C# and VB.NET
Spire.PDF for .NET provides the PdfDocument.SaveToFile(String, FileFormat) method, which allows users to save an SVG file as a PDF. The detailed steps are as follows.
- Create a PdfDocument object.
- Load a sample SVG file using PdfDocument.LoadFromFile() method.
- Convert the SVG file to PDF using PdfDocument.SaveToFile(String, FileFormat) method.
- C#
- VB.NET
using Spire.Pdf;

namespace SVGtoPDF
{
    class Program
    {
        static void Main(string[] args)
        {
            //Create a PdfDocument object
            PdfDocument doc = new PdfDocument();

            //Load a sample SVG file
            doc.LoadFromSvg("Sample.svg");

            //Save result document
            doc.SaveToFile("Result.pdf", FileFormat.PDF);
            doc.Dispose();
        }
    }
}
Add SVG image to PDF in C# and VB.NET
In addition to converting SVG to PDF directly, it also supports adding SVG image files to the specified locations in PDF. Please check the steps as below:
- Create a PdfDocument object and load an SVG file using PdfDocument. LoadFromSvg() method.
- Create a template based on the content of the SVG file using PdfDocument. Pages[].CreateTemplate() method.
- Get the width and height of the template on the page.
- Create another PdfDocument object and load a PDF file using PdfDocument.LoadFromFile() method.
- Draw the template with a custom size at a specified location using PdfDocument.Pages[].Canvas.DrawTemplate() method.
- Save to PDF file using PdfDocument.SaveToFile(String, FileFormat) method.
- C#
- VB.NET
using Spire.Pdf;
using Spire.Pdf.Graphics;
using System.Drawing;

namespace AddSVGImagetoPDF
{
    class Program
    {
        static void Main(string[] args)
        {
            //Create a PdfDocument object
            PdfDocument doc1 = new PdfDocument();

            //Load an SVG file
            doc1.LoadFromSvg("C:\\Users\\Administrator\\Desktop\\sample.svg");

            //Create a template based on the content of the SVG file
            PdfTemplate template = doc1.Pages[0].CreateTemplate();

            //Get the width and height of the template
            float width = template.Width;
            float height = template.Height;

            //Create another PdfDocument object
            PdfDocument doc2 = new PdfDocument();

            //Load a PDF file
            doc2.LoadFromFile("C:\\Users\\Administrator\\Desktop\\sample.pdf");

            //Draw the template with a custom size at a specified location
            doc2.Pages[0].Canvas.DrawTemplate(template, new PointF(0, 0), new SizeF(width * 0.8f, height * 0.8f));

            //Save to PDF file
            doc2.SaveToFile("AddSvgToPdf.pdf", FileFormat.PDF);
            doc2.Dispose();
        }
    }
}
Apply for a Temporary License
If you'd like to remove the evaluation message from the generated documents, or to get rid of the function limitations, please request a 30-day trial license for yourself.
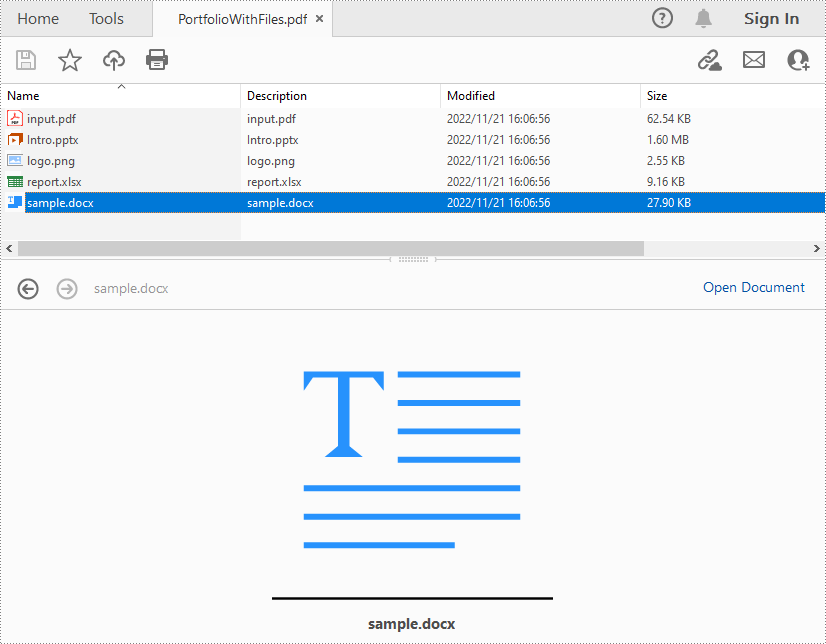
A PDF portfolio is a collection of files that can contain text documents, spreadsheets, emails, images, PowerPoint presentations and drawings. Although a PDF portfolio assembles different types of files into a single unit, each of the files in it retains their original formatting, resolutions and sizes. In this article, you will learn how to programmatically create a PDF portfolio using Spire.PDF for .NET.
Install Spire.PDF for .NET
To begin with, you need to add the DLL files included in the Spire.PDF for.NET package as references in your .NET project. The DLLs files can be either downloaded from this link or installed via NuGet.
PM> Install-Package Spire.PDF
Create a PDF Portfolio and Add Files to It
As a PDF portfolio is a collection of files, Spire.PDF for .NET allows you to create it easily using PdfDocument.Collection property. Then you can add files to the PDF portfolio using PdfCollection.AddFile() method. The detailed steps are as follows:
- Specify the files that need to be added to the PDF portfolio.
- Create PdfDocument instance.
- Create a PDF portfolio and add files to it using PdfDocument.Collection.AddFile() method.
- Save the result file using PdfDocument.SaveToFile() method.
- C#
- VB.NET
using System;
using Spire.Pdf;

namespace CreatePDFPortfolio
{
    class Program
    {
        static void Main(string[] args)
        {
            // Specify the files
            String[] files = new String[] { "input.pdf", "sample.docx", "report.xlsx", "Intro.pptx", "logo.png" };

            //Create a PdfDocument instance
            using (PdfDocument pdf = new PdfDocument())
            {
                //Create a PDF portfolio and add files to it
                for (int i = 0; i < files.Length; i++)
                {
                    pdf.Collection.AddFile(files[i]);

                }
                //Save the result file
                pdf.SaveToFile("PortfolioWithFiles.pdf", FileFormat.PDF);
                pdf.Dispose();
            }
        }
    }
}
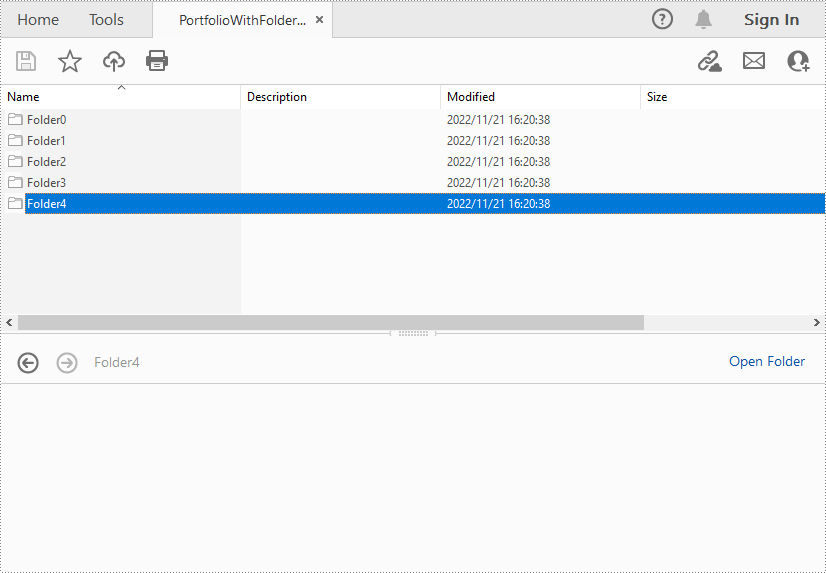
Create a PDF Portfolio and Add Folders to It
After creating a PDF portfolio, Spire.PDF for .NET also allows you to create folders within the PDF portfolio to further manage the files. The detailed steps are as follows:
- Specify the files that need to be added to the PDF portfolio.
- Create PdfDocument instance.
- Create a PDF Portfolio using PdfDocument.Collection property.
- Add folders to the PDF portfolio using PdfCollection.Folders.CreateSubfolder() method, and then add files to the folders using PdfFolder.AddFile() method.
- Save the result file using PdfDocument.SaveToFile() method.
- C#
- VB.NET
using System;
using Spire.Pdf;
using Spire.Pdf.Collections;

namespace CreatePDFPortfolio
{
    class Program
    {
        static void Main(string[] args)
        {
            // Specify the files
            String[] files = new String[] { "input.pdf", "sample.docx", "report.xlsx", "Intro.pptx", "logo.png" };

            //Create a PdfDocument instance
            using (PdfDocument pdf = new PdfDocument())
            {
                //Create a PDF portfolio and add folders to it
                for (int i = 0; i < files.Length; i++)
                {
                    PdfFolder folder = pdf.Collection.Folders.CreateSubfolder("Folder" + i);

                    //Add files to the folders
                    folder.AddFile(files[i]);
                }

                //Save the result file
                pdf.SaveToFile("PortfolioWithFolders.pdf", FileFormat.PDF);
                pdf.Dispose();
            }
        }
    }
}
Apply for a Temporary License
If you'd like to remove the evaluation message from the generated documents, or to get rid of the function limitations, please request a 30-day trial license for yourself.
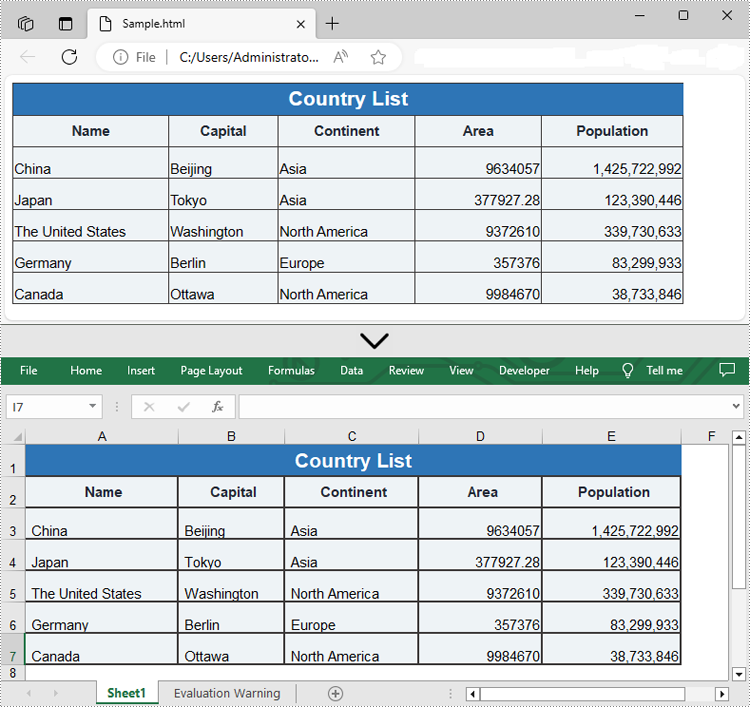
HTML (HyperText Markup Language) is primarily used for structuring content on web pages. While it excels at presenting information visually on the web, it lacks the robust analytical capabilities and data manipulation features found in spreadsheet software like Excel. By converting HTML data to Excel, users can leverage Excel's advanced functionalities like formulas, charts, tables, and macros to organize and analyze data efficiently. In this article, we will explain how to convert HTML to Excel in C# using Spire.XLS for .NET.
Install Spire.XLS for .NET
To begin with, you need to add the DLL files included in the Spire.XLS for .NET package as references in your .NET project. The DLL files can be either downloaded from this link or installed via NuGet.
PM> Install-Package Spire.XLS
Convert HTML to Excel in C#
Spire.XLS for .NET offers the Workbook.LoadFromHtml() method to load an HTML file. After loading the HTML file, you can easily save it in Excel format using the Workbook.SaveToFile() method. The detailed steps are as follows.
- Create an object of the Workbook class.
- Load an HTML file using the Workbook.LoadFromHtml() method.
- Save the HTML file in Excel format using the Workbook.SaveToFile() method.
- C#
using Spire.Xls;

namespace ConvertHtmlToExcel
{
    internal class Program
    {
        static void Main(string[] args)
        {
            // Specify the input HTML file path
            string filePath = @"C:\Users\Administrator\Desktop\Sample.html";

            // Create an object of the workbook class
            Workbook workbook = new Workbook();

            // Load the HTML file
            workbook.LoadFromHtml(filePath);

            // Save the HTML file in Excel XLSX format
            string result = @"C:\Users\Administrator\Desktop\ToExcel.xlsx";
            workbook.SaveToFile(result, ExcelVersion.Version2013);

            workbook.Dispose();
        }
    }
}
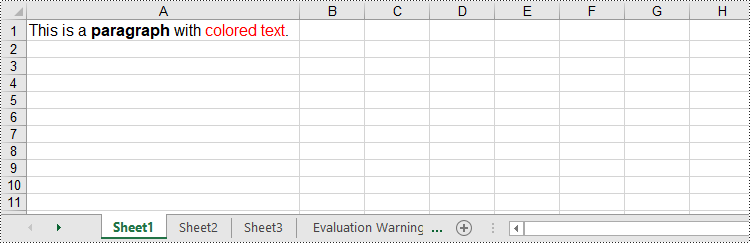
Insert HTML String to Excel in C#
In addition to converting HTML files to Excel, Spire.XLS for .NET also allows you to insert HTML strings into Excel cells by using the CellRange.HtmlString property. The detailed steps are as follows.
- Create an object of the Workbook class.
- Get a specific worksheet by its index (0-based) using the Workbook.Worksheets[index] property.
- Get the cell that you want to add an HTML string to using the Worksheet.Range[] property.
- Add an HTML sting to the cell using the CellRange.HtmlString property.
- Save the resulting workbook to a new file using the Workbook.SaveToFile() method.
- C#
using Spire.Xls;

namespace InsertHtmlStringInExcel
{
    internal class Program
    {
        static void Main(string[] args)
        {
            // Create an object of the workbook class
            Workbook workbook = new Workbook();
            // Get the first sheet
            Worksheet sheet = workbook.Worksheets[0];

            // Specify the HTML string
            string htmlCode = "<p><font size='12'>This is a <b>paragraph</b> with <span style='color: red;'>colored text</span>.</font></p>";

            // Get the cell that you want to add the HTML string to
            CellRange range = sheet.Range["A1"];
            // Add the HTML string to the cell
            range.HtmlString = htmlCode;

            // Auto-adjust the width of the first column based on its content
            sheet.AutoFitColumn(1);

            // Save the resulting workbook to a new file
            string result = @"C:\Users\Administrator\Desktop\InsertHtmlStringIntoCell.xlsx";
            workbook.SaveToFile(result, ExcelVersion.Version2013);

            workbook.Dispose();
        }
    }
}
Apply for a Temporary License
If you'd like to remove the evaluation message from the generated documents, or to get rid of the function limitations, please request a 30-day trial license for yourself.
Booklets are usually used when we print huge PDF files. It saves paper and make the pages tidy. Starts from Spire.PDF V5.12.3, Spire.PDF supports to print the PDF pages to booklet directly. This article demonstrates how to print PDF pages to booklet in C#.
using Spire.Pdf;
using Spire.Pdf.Actions;
using Spire.Pdf.General;
using Spire.Pdf.Print;

namespace PDFPrintBookLet
{
    class Program
    {
        static void Main(string[] args)
        {
            //Load the sample document
            PdfDocument doc = new PdfDocument();
            doc.LoadFromFile("Sample.pdf");

            //Set booklet layout when print the pdf files
            PdfBookletSubsetMode bookletSubset = PdfBookletSubsetMode.BothSides;
            PdfBookletBindingMode bookletBinding = PdfBookletBindingMode.Left;
            doc.PrintSettings.SelectBookletLayout(bookletSubset, bookletBinding);

            //Print PDF to virtual printer
            doc.PrintSettings.PrinterName = "Microsoft XPS Document Writer";
            doc.PrintSettings.PrintToFile("XpsBooklet.xps");
            doc.Print();
        }
    }
}
Screenshot after printing to XPS:

The replace feature in Microsoft PowerPoint allows you to search for a specific text and change its occurrences to a new text at once. This is extremely useful when you need to fix the same error in multiple places within a large PowerPoint document. In this article, you will learn how to programmatically replace text in PowerPoint documents in C# and VB.NET using Spire.Presentation for .NET.
- Replace the First Occurrence of a Specific Text in PowerPoint
- Replace All Occurrences of a Specific Text in PowerPoint
- Replace Text Using a Regular Expression in PowerPoint
Install Spire.Presentation for .NET
To begin with, you need to add the DLL files included in the Spire.Presentation for.NET package as references in your .NET project. The DLL files can be either downloaded from this link or installed via NuGet.
PM> Install-Package Spire.Presentation
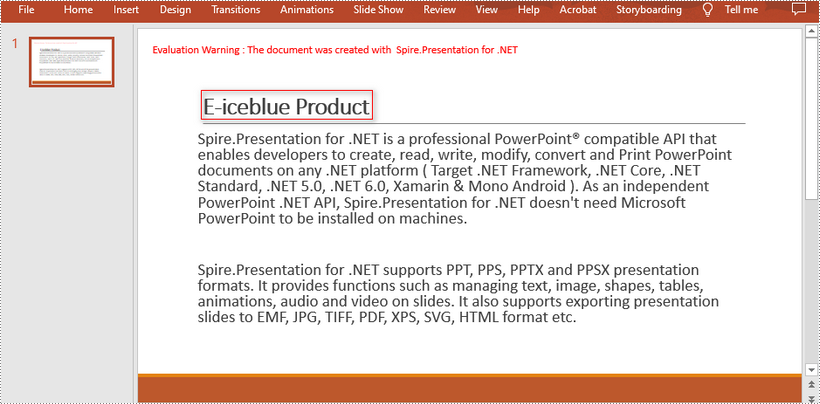
Replace the First Occurrence of a Specific Text in PowerPoint in C# and VB.NET
To replace the first occurrence of a specific text in a PowerPoint document, you can loop through all slides in the document, then call the ISlide.ReplaceFirstText() method. The detailed steps are as follows:
- Initialize an instance of the Presentation class.
- Load a PowerPoint document using Presentation.LoadFromFile() method.
- Loop through all slides in the PowerPoint document.
- Replace the first occurrence of a specific text with a new text using ISlide.ReplaceFirstText() method.
- Save the result document using Presentation.SaveToFile() method.
- C#
- VB.NET
using Spire.Presentation;
namespace ReplaceFirstTextOccurrenceInPPT
{
class Program
{
static void Main(string[] args)
{
//Create a Presentation instance
Presentation ppt = new Presentation();
//Load a PowerPoint document
ppt.LoadFromFile("Sample.pptx");
//Loop through all slides in the document
foreach (ISlide slide in ppt.Slides)
{
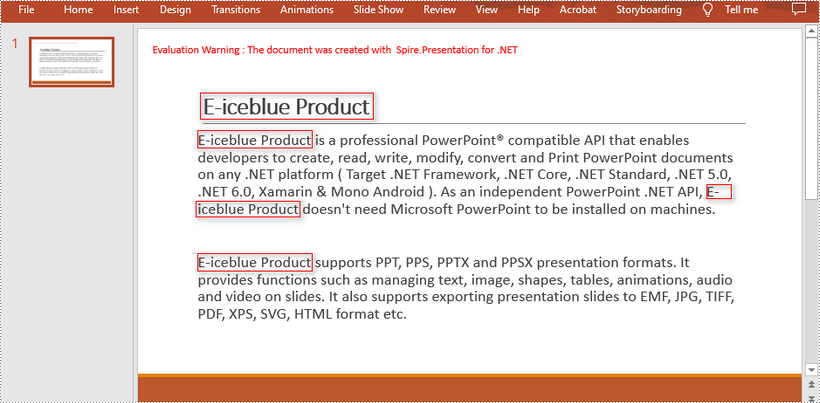
//Replace the first occurrence of "Spire.Presentation for .NET" with "E-iceblue Product"
slide.ReplaceFirstText("Spire.Presentation for .NET", "E-iceblue Product", false);
break;
}
//Save the result document
ppt.SaveToFile("ReplaceFirstTextOccurrence.pptx", FileFormat.Pptx2013);
}
}
}
Replace All Occurrences of a Specific Text in PowerPoint in C# and VB.NET
To replace all occurrences of a specific text in a PowerPoint document, you can loop through all slides in the document, and then use the ISlide.ReplaceAllText() method. The detailed steps are as follows:
- Initialize an instance of the Presentation class.
- Load a PowerPoint document using Presentation.LoadFromFile() method.
- Loop through all slides in the PowerPoint document.
- Replace all occurrences of a specific text with a new text using ISlide.ReplaceAllText() method.
- Save the result document using Presentation.SaveToFile() method.
- C#
- VB.NET
*using Spire.Presentation;

namespace ReplaceAllTextOccurrencesInPPT
{
    class Program
    {
        static void Main(string[] args)
        {
            //Create a Presentation instance
            Presentation ppt = new Presentation();
            //Load a PowerPoint document
            ppt.LoadFromFile("Sample.pptx");

            //Loop through all slides in the document
            foreach (ISlide slide in ppt.Slides)
            {
                //Replace all occurrences of "Spire.Presentation for .NET" with "E-iceblue Product"
                slide.ReplaceAllText("Spire.Presentation for .NET", "E-iceblue Product", false);
            }

            //Save the result document
            ppt.SaveToFile("ReplaceAllTextOccurrences.pptx", FileFormat.Pptx2013);

        }
    }
}
Replace Text Using a Regular Expression in PowerPoint using C# and VB.NET
Spire.Presentation for .NET provides the IShape.ReplaceTextWithRegex() method that enables you to replace text matching a regular expression pattern. The detailed steps are as follows:
- Initialize an instance of the Presentation class.
- Load a PowerPoint document using Presentation.LoadFromFile() method.
- Loop through all slides in the PowerPoint document.
- Loop through all shapes on each slide.
- Replace text matching a regular expression pattern using IShape.ReplaceTextWithRegex() method.
- Save the result document using Presentation.SaveToFile() method.
- C#
- VB.NET
using Spire.Presentation;
using System.Text.RegularExpressions;
namespace ReplaceTextUsingRegexInPPT
{
class Program
{
static void Main(string[] args)
{
//Create a Presentation instance
Presentation ppt = new Presentation();
//Load a PowerPoint document
ppt.LoadFromFile("Sample1.pptx");
//Loop through all slides in the document
foreach (ISlide slide in ppt.Slides)
{
//Loop through all shapes on each slide
foreach (IShape shape in slide.Shapes)
{
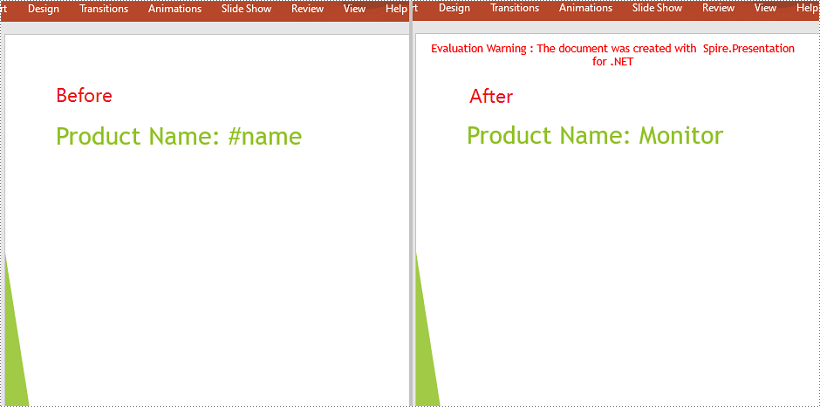
//Replace text starting with # on the slide to "Monitor"
shape.ReplaceTextWithRegex(new Regex(@"\#\w+\b"), "Monitor");
}
}
//Save the result document
ppt.SaveToFile("ReplaceTextUsingRegex.pptx", FileFormat.Pptx2013);
}
}
}
Apply for a Temporary License
If you'd like to remove the evaluation message from the generated documents, or to get rid of the function limitations, please request a 30-day trial license for yourself.
When creating a PowerPoint presentation, you may want to ensure that some important content in your presentation grabs the audience’s attention. A great way to make the content more prominent and noticeable is to highlight it with a bright color. This article will demonstrate how to highlight text in a PowerPoint presentation in C# and VB.NET using Spire.Presentation for .NET.
Install Spire.Presentation for .NET
To begin with, you need to add the DLL files included in the Spire.Presentation for.NET package as references in your .NET project. The DLL files can be either downloaded from this link or installed via NuGet.
PM> Install-Package Spire.Presentation
Highlight Text in PowerPoint in C# and VB.NET
The following are the steps to highlight specific text in a PowerPoint document:
- Initialize an instance of Presentation class.
- Load a PowerPoint presentation using Presentation.LoadFromFile() method.
- Loop through the slides in the presentation and the shapes on each slide.
- Check if the current shape is of IAutoShape type.
- If the result is true, typecast it to IAutoShape.
- Initialize an instance of TextHighLightingOptions class, and set the text highlighting options such as whole words only and case sensitive through TextHighLightingOptions.WholeWordsOnly and TextHighLightingOptions.CaseSensitive properties.
- Highlight a specific text in the shape using IAutoShape.TextFrame.HighLightText() method.
- Save the result file using Presentation.SaveToFile() method.
- C#
- VB.NET
using Spire.Presentation;
using System.Drawing;
namespace HighlightTextInPPT
{
class Program
{
static void Main(string[] args)
{
//Create an instance of Presentation class
Presentation presentation = new Presentation();
//Load a PowerPoint file
presentation.LoadFromFile(@"Sample1.pptx");
//Loop through all slides
for (int i = 0; i < presentation.Slides.Count; i++)
{
//Get the current slide
ISlide slide = presentation.Slides[i];
//Loop through the shapes on the slide
for (int j = 0; j < slide.Shapes.Count; j++)
{
//Check if the current shape is of IAutoShape type
if (slide.Shapes[j] is IAutoShape)
{
//Typecast the shape to IAutoShape
IAutoShape shape = slide.Shapes[j] as IAutoShape;
//Create an instance of TextHighLightingOptions class
TextHighLightingOptions options = new TextHighLightingOptions();
//Set text highlighting options
options.CaseSensitive = true;
options.WholeWordsOnly = true;
//Highlight specific text within the shape with color
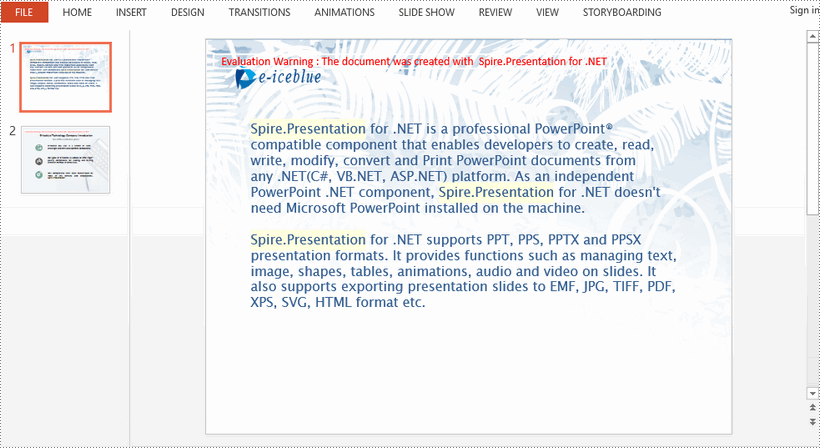
shape.TextFrame.HighLightText("Spire.Presentation", Color.LightYellow, options);
}
}
}
//Save the result file
presentation.SaveToFile("HighlightText.pptx", FileFormat.Pptx2013);
}
}
}
Apply for a Temporary License
If you'd like to remove the evaluation message from the generated documents, or to get rid of the function limitations, please request a 30-day trial license for yourself.
How to Mannually Add Spire.PDF as Dependency in a .NET Standard Library Project
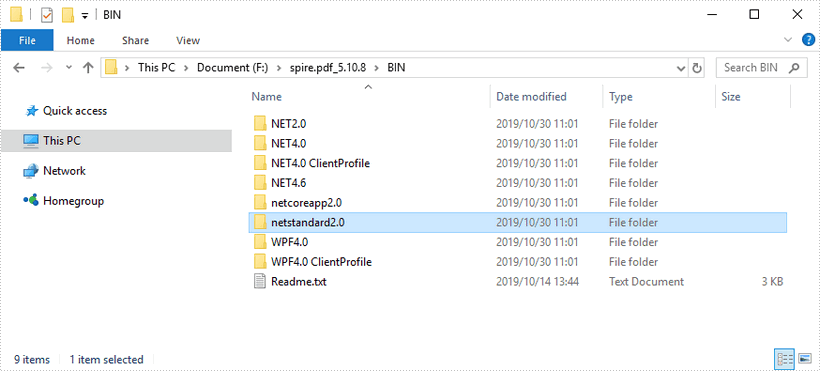
2019-10-30 03:43:03 Written by support iceblueStep 1: Download the latest version of Spire.PDF Pack from the link below, unzip it, and you'll get the DLL files for .NET Standarad from the "netstandard2.0" folder. If you already have this folder in your disk, go straight to step two.
Step 2: Create a .NET Standard library project in your Visual Studio.
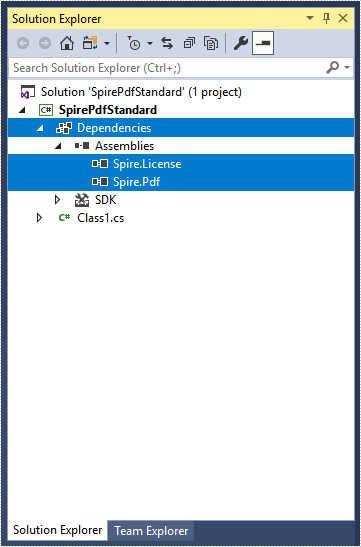
Step 3: Add all DLL files under the "netstandard2.0" folder as dependencies in your project.
Right-click "Dependencies" – select "Add Reference" – click "Browse" – selcet all DLLs under "netstandard2.0" folder – click "Add".
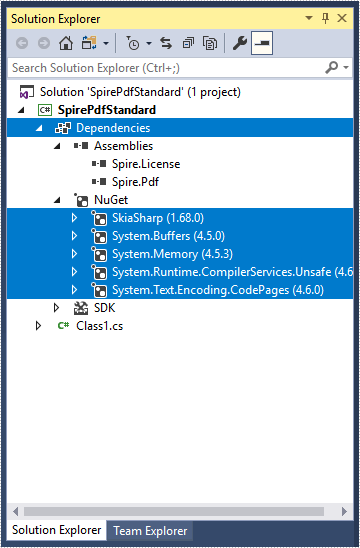
Step 4: Install the other five packages in your project via the NuGet Package Manager. They are SkiaSharp, System.Buffers, System.Memory, System.Text.Encoding.CodePages and System.Runtime.CompilerServices.Unsafe.
Right-click "Dependencies" – select "Manage NuGet Packages" – click "Browse" –type the package name – select the package from the search results – click "Install".
Step 5: Now that you've added all the dependences successfully, you can start to write your own .NET Standard library that is capable of creating and processing PDF documents.
using Spire.Pdf;
using Spire.Pdf.Graphics;
using System.Drawing;

namespace SpirePdfStandard
{
    public class Class1
    {
        public void CreatePdf()
        {
            //Create a PdfDocument object
            PdfDocument doc = new PdfDocument();

            //Add a page
            PdfPageBase page = doc.Pages.Add();

            //Draw text on the page at the specified position
            page.Canvas.DrawString("Hello World",
                                    new PdfFont(PdfFontFamily.Helvetica, 13f),
                                    new PdfSolidBrush(Color.Black),
                                    new PointF(50, 50));

            //Save the document
            doc.SaveToFile("Output.pdf");
        }

    }
}
Spire.Presentation supports setting alignment for table in a PowerPoint document. This article demonstrates how to align a table to the bottom of a PowerPoint slide using Spire.Presentation.
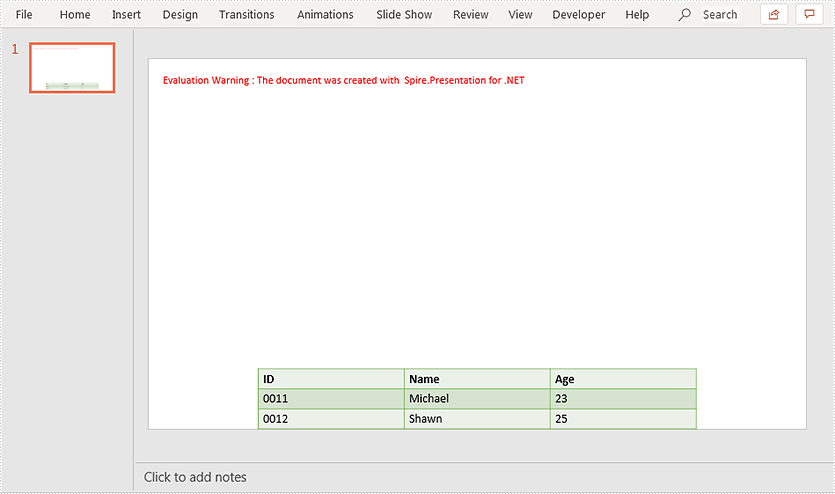
Below screenshot shows the original table before setting alignment:
using Spire.Presentation;

namespace AlignTable
{
    class Program
    {
        static void Main(string[] args)
        {
            //Load PowerPoint document
            Presentation ppt = new Presentation();
            ppt.LoadFromFile("Table.pptx");
            ITable table = null;
            //Loop through the shapes in the first slide
            foreach (IShape shape in ppt.Slides[0].Shapes)
            {
                //Find the table and align it to the bottom of the slide
                if (shape is ITable)
                {
                    table = (ITable)shape;
                    table.SetShapeAlignment(Spire.Presentation.ShapeAlignment.AlignBottom);
                }
            }

            //Save the resultant document
            ppt.SaveToFile("Result.pptx", FileFormat.Pptx2013);
        }
    }
}
Output: