C#/VB.NET: Merge and Split Table Cells in PowerPoint
Merging and splitting table cells in PowerPoint are two common functions, mainly used to adjust the layout and structure of the table. Merging cells involves combining adjacent cells into a larger one. It allows users to create title cells that span multiple columns or rows. On the other hand, splitting cells means dividing a cell into several smaller ones, which is useful for creating detailed layouts or accommodating diverse content. In this article, we will show you how to merge and split table cells in PowerPoint programmatically by using Spire.Presentation for .NET.
Install Spire.Presentation for .NET
To begin with, you need to add the DLL files included in the Spire.Presentation for.NET package as references in your .NET project. The DLLs files can be either downloaded from this link or installed via NuGet.
PM> Install-Package Spire.Presentation
Merge Table Cells in PowerPoint
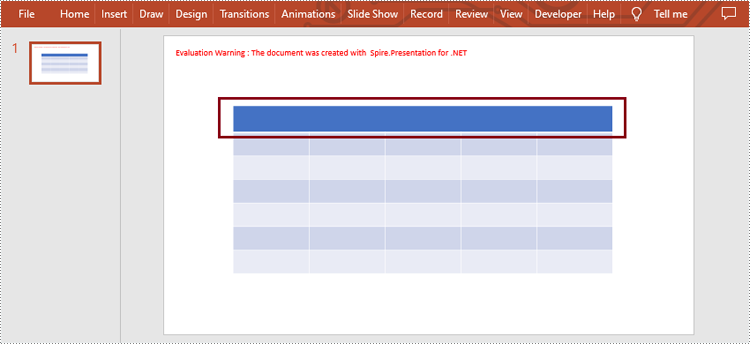
Spire.Presentation for .NET provides users with ITable[int columnIndex, int rowIndex] property and ITable.MergeCells(Cell startCell, Cell endCell, boolean allowSplitting) method to get and merge the specific cells. The detailed steps are as follows.
- Create an object of Presentation class.
- Load a sample file using Presentation.LoadFromFile() method.
- Get the table from the first slide by looping through all shapes.
- Get the specific cells by ITable[int columnIndex, int rowIndex] property and merge them by using ITable.MergeCells(Cell startCell, Cell endCell, boolean allowSplitting) method.
- Save the result file using Presentation.SaveToFile() method.
- C#
- VB.NET
using Spire.Presentation;

namespace MergeCells
{
    class Program
    {
        static void Main(string[] args)
        {
            //Create an object of Presentation class
            Presentation presentation = new Presentation();

            //Load a PowerPoint presentation
            presentation.LoadFromFile("sample.pptx");

            //Get the table from the first slide by looping through all shapes
            ITable table = null;
            foreach (IShape shape in presentation.Slides[0].Shapes)
            {
                if (shape is ITable)
                {
                    table = (ITable)shape;

                    //Merge the cells from [0,0] to [4,0]
                    table.MergeCells(table[0, 0], table[4, 0], false);
                }
            }

            //Save the result document
            presentation.SaveToFile("MergeCells.pptx", FileFormat.Pptx2010);
            presentation.Dispose();
        }
    }
}
Split Table Cells in PowerPoint
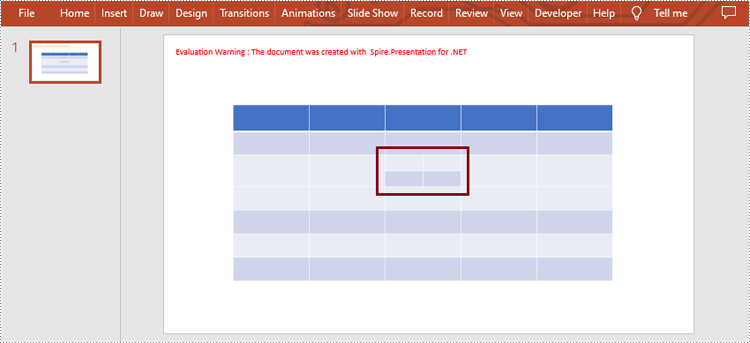
Spire.Presentation for .NET also supports users to get the specific cell and split it into smaller ones by using ITable[int columnIndex, int rowIndex] property and Cell.Split(int RowCount, int ColunmCount) method. The detailed steps are as follows.
- Create an object of Presentation class.
- Load a sample file using Presentation.LoadFromFile() method.
- Get the table from the first slide by looping through all shapes.
- Get the specific cell by ITable[int columnIndex, int rowIndex] property and split it into 2 rows and 2 columns by using Cell.Split(int RowCount, int ColumnCount) method.
- Save the result file using Presentation.SaveToFile() method.
- C#
- VB.NET
using Spire.Presentation;

namespace SplitCells
{
    class Program
    {
        static void Main(string[] args)
        {
            //Create an object of Presentation class
            Presentation presentation = new Presentation();

            //Load a PowerPoint presentation
            presentation.LoadFromFile("sample.pptx");

            //Get the table from the first slide by looping through all shapes
            ITable table = null;
            foreach (IShape shape in presentation.Slides[0].Shapes)
            {
                if (shape is ITable)
                {
                    table = (ITable)shape;

                    //Split cell [2, 2] into 2 rows and 2 columns
                    table[2, 2].Split(2, 2);
                }
            }

            //Save the result document
            presentation.SaveToFile("SplitCells.pptx", FileFormat.Pptx2013);
            presentation.Dispose();
                }
            }
        }
Apply for a Temporary License
If you'd like to remove the evaluation message from the generated documents, or to get rid of the function limitations, please request a 30-day trial license for yourself.
C#/VB.NET: Distribute Table Rows and Columns in PowerPoint
When creating a new table in PowerPoint, the rows and columns are evenly distributed by default. As you insert data into the table cells, the row heights and column widths will be automatically adjusted to fit with the contents. To make the table nicely organized, you may want to re-distribute the rows and columns. This article demonstrates how to accomplish this task in C# and VB.NET using Spire.Presentation for .NET.
Install Spire.Presentation for .NET
To begin with, you need to add the DLL files included in the Spire.Presentation for.NET package as references in your .NET project. The DLL files can be either downloaded from this link or installed via NuGet.
PM> Install-Package Spire.Presentation
Distribute Table Rows and Columns
The following are the steps to distribute table rows and columns evenly in PowerPoint.
- Create a Presentation object, and load the sample PowerPoint document using Presentation.LoadFromFile() method.
- Get the first slide through Presentation.Slides[0] property.
- Loop through the shapes in the first slide, and determine if a certain shape is a table. If yes, convert the shape to an ITable object.
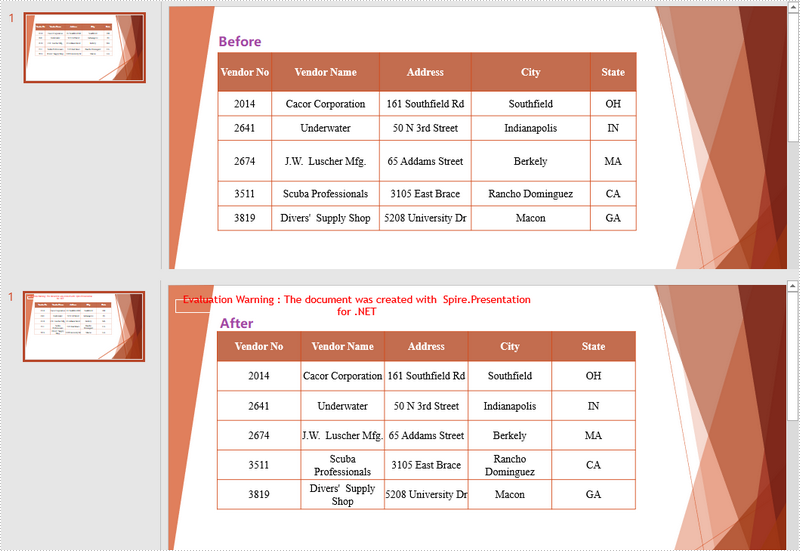
- Distribute the table rows and columns using ITable.DistributeRows() method and ITable.DistributeColumns() method, respectively.
- Save the changes to another file using Presentation.SaveToFile() method.
- C#
- VB.NET
using Spire.Presentation;

namespace DistributeRowsAndColumns
{
    class Program
    {
        static void Main(string[] args)
        {
            //Create a Presentation instance
            Presentation presentation = new Presentation();

            //Load the PowerPoint document
            presentation.LoadFromFile(@"C:\Users\Administrator\Desktop\Table.pptx");

            //Get the first slide
            ISlide slide = presentation.Slides[0];

            //Loop through the shapes
            for (int i = 0; i < slide.Shapes.Count; i++)
            {
                //Determine if a shape is table
                if (slide.Shapes[i] is ITable)
                {
                    //Get the table in the slide
                    ITable table = (ITable)slide.Shapes[i];

                    //Distribute table rows
                    table.DistributeRows(0, table.TableRows.Count-1);

                    //Distribute table columns
                    table.DistributeColumns(0, table.ColumnsList.Count-1);

                }
            }

            //Save the result to file
            presentation.SaveToFile("DistributeRowsAndColumns.pptx", FileFormat.Pptx2013);
        }
    }
}
Imports Spire.Presentation

Namespace DistributeRowsAndColumns
    Class Program
        Shared  Sub Main(ByVal args() As String)
            'Create a Presentation instance
            Dim presentation As Presentation =  New Presentation()

            'Load the PowerPoint document
            presentation.LoadFromFile("C:\Users\Administrator\Desktop\Table.pptx")

            'Get the first slide
            Dim slide As ISlide =  presentation.Slides(0)

            'Loop through the shapes
            Dim i As Integer
            For  i = 0 To  slide.Shapes.Count- 1  Step  i + 1
                'Determine if a shape is table
                If TypeOf slide.Shapes(i) Is ITable Then
                    'Get the table in the slide
                    Dim table As ITable = CType(slide.Shapes(i), ITable)

                    'Distribute table rows
                    table.DistributeRows(0, table.TableRows.Count-1)

                    'Distribute table columns
                    table.DistributeColumns(0, table.ColumnsList.Count-1)

                End If
            Next

            'Save the result to file
            presentation.SaveToFile("DistributeRowsAndColumns.pptx", FileFormat.Pptx2013)
        End Sub
    End Class
End Namespace
Apply for a Temporary License
If you'd like to remove the evaluation message from the generated documents, or to get rid of the function limitations, please request a 30-day trial license for yourself.
Align Table in PowerPoint in C#
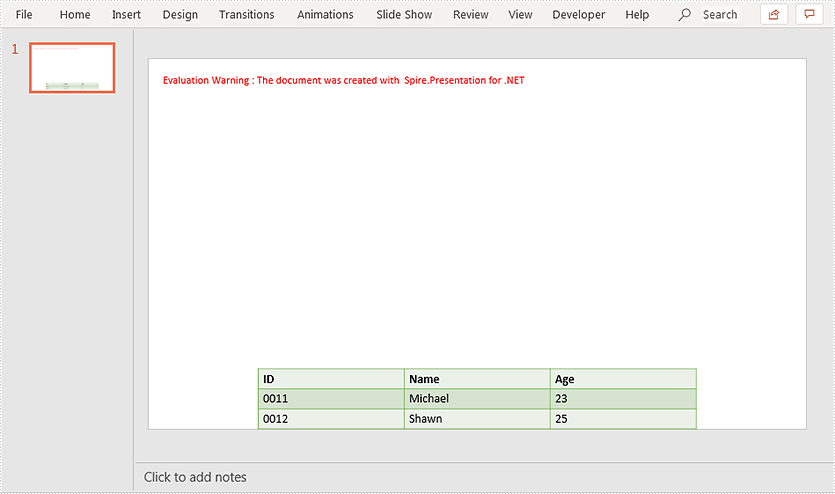
Spire.Presentation supports setting alignment for table in a PowerPoint document. This article demonstrates how to align a table to the bottom of a PowerPoint slide using Spire.Presentation.
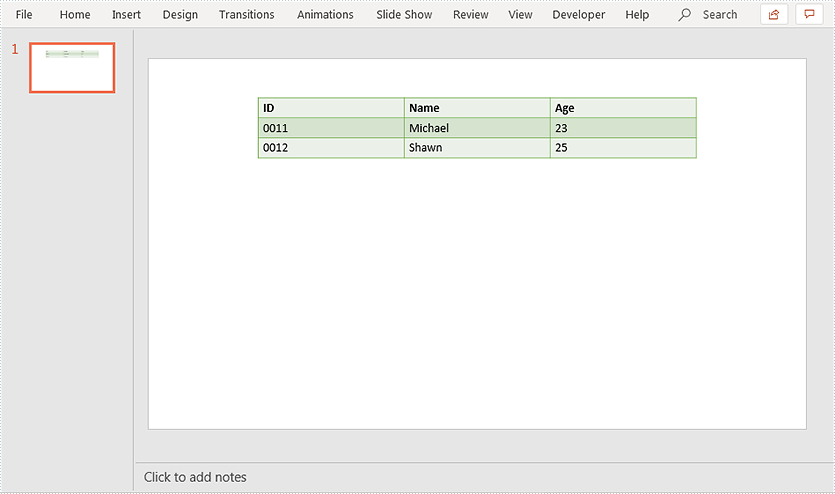
Below screenshot shows the original table before setting alignment:
using Spire.Presentation;

namespace AlignTable
{
    class Program
    {
        static void Main(string[] args)
        {
            //Load PowerPoint document
            Presentation ppt = new Presentation();
            ppt.LoadFromFile("Table.pptx");
            ITable table = null;
            //Loop through the shapes in the first slide
            foreach (IShape shape in ppt.Slides[0].Shapes)
            {
                //Find the table and align it to the bottom of the slide
                if (shape is ITable)
                {
                    table = (ITable)shape;
                    table.SetShapeAlignment(Spire.Presentation.ShapeAlignment.AlignBottom);
                }
            }

            //Save the resultant document
            ppt.SaveToFile("Result.pptx", FileFormat.Pptx2013);
        }
    }
}
Output:
Split Table Cells in PowerPoint in C#
This article is going to demonstrate how to split a specific table cell in PowerPoint using Spire.Presentation.
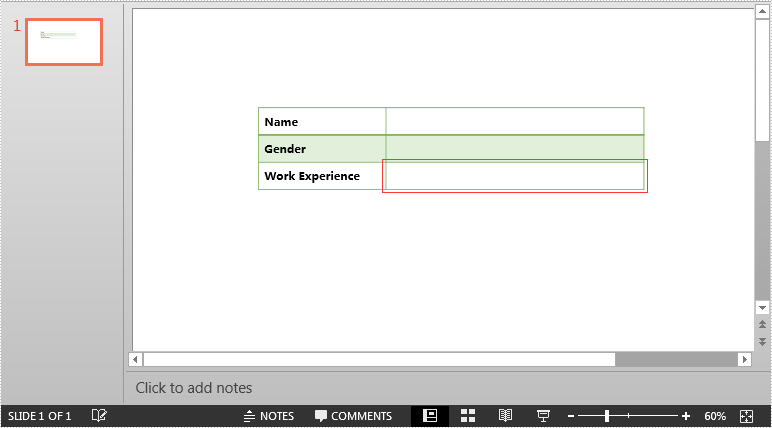
The original table:
Detail steps:
Step 1: Instantiate a Presentation object and load the PowerPoint file.
Presentation ppt = new Presentation();
ppt.LoadFromFile("Input.pptx");
Step 2: Get the first slide.
ISlide slide = ppt.Slides[0];
Step 3: Get the table on the slide.
ITable table = slide.Shapes[0] as ITable;
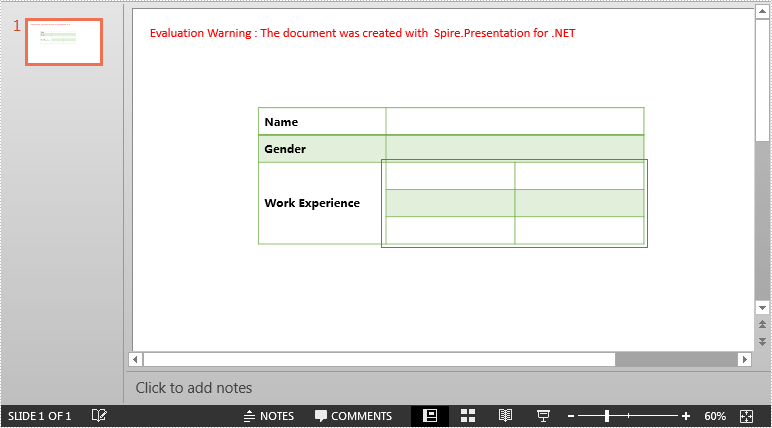
Step 4: Split the cell [1, 2] into 3 rows and 2 columns.
table[1, 2].Split(3, 2);
Step 5: Save the file.
ppt.SaveToFile("Split.pptx", FileFormat.Pptx2013);
Screenshot after splitting:
Full code:
using Spire.Presentation;

namespace Split_Table_Cells_in_PPT
{
    class Program
    {
        static void Main(string[] args)
        {
            //Instantiate a Presentation object
            Presentation ppt = new Presentation();
            //Load the PowerPoint file
            ppt.LoadFromFile("Input.pptx");

            //Get the first slide
            ISlide slide = ppt.Slides[0];

            //Get the table
            ITable table = slide.Shapes[0] as ITable;

            //Split cell [1, 2] into 3 rows and 2 columns
            table[1, 2].Split(3, 2);

            //Save the file
            ppt.SaveToFile("Split.pptx", FileFormat.Pptx2013);
        }
    }
}
Vertically align the text in table cell on Presentation slides
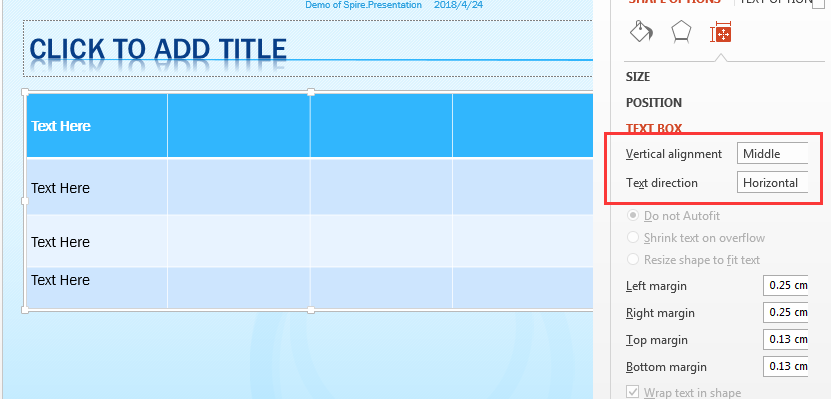
Spire.Presentation supports to align text vertically in a table cell on the presentation slides. In this article, we will show you how to use C# to align the text in table cell and set the text direction. Firstly, view the screenshot on Microsoft PowerPoint of the vertical alignment and the text direction:
Detail steps:
Step 1: Create a new PowerPoint document and load the sample document from file.
Presentation ppt = new Presentation();
ppt.LoadFromFile("Sample1.pptx",FileFormat.Pptx2010);
Step 2: Get the table shape from the first presentation slide.
ITable table = null;
foreach (IShape shape in ppt.Slides[0].Shapes)
{
    if (shape is ITable)
    {
        table = (ITable)shape;
Step 3: Aligning the text vertically and set the text direction.
table[i, 0].TextAnchorType = TextAnchorType.Center;
table[i, 0].VerticalTextType = VerticalTextType.Vertical270;

table[i, 1].TextAnchorType = TextAnchorType.Center;
table[i, 1].VerticalTextType = VerticalTextType.Horizontal;

table[i, 2].TextAnchorType = TextAnchorType.Center;
table[i, 2].VerticalTextType = VerticalTextType.Vertical;
Step 4: Save the document to file.
ppt.SaveToFile("Result.pptx", FileFormat.Pptx2010);
Effective screenshot after set the vertical alignment and the text direction:

Full codes of vertical align the text and set the text direction.:
using Spire.Presentation;

namespace AlignText
{

    class Program
    {
        static void Main(string[] args)
        {

            Presentation ppt = new Presentation();

            ppt.LoadFromFile("Sample1.pptx", FileFormat.Pptx2010);

            ITable table = null;
            foreach (IShape shape in ppt.Slides[0].Shapes)
            {
                if (shape is ITable)
                {
                    table = (ITable)shape;

                    for (int i = 0; i < table.ColumnsList.Count; i++)
                    {
                        table[i, 0].TextAnchorType = TextAnchorType.Center;
                        table[i, 0].VerticalTextType = VerticalTextType.Vertical270;


                        table[i, 1].TextAnchorType = TextAnchorType.Center;
                        table[i, 1].VerticalTextType = VerticalTextType.Horizontal;

                        table[i, 2].TextAnchorType = TextAnchorType.Center;
                        table[i, 2].VerticalTextType = VerticalTextType.Vertical;

                    }
                }
            }

            ppt.SaveToFile("Result.pptx", FileFormat.Pptx2010);

        }
    }
}
Set the border type and color for the table on Presentation slides
With the help of Spire.Presentation, we can easily set the border type and color of a whole table on the presentation slides. This article will focus on demonstrating how to set the border for the table in C#.
Firstly, view the 12 border types for the table on PowerPoint file:
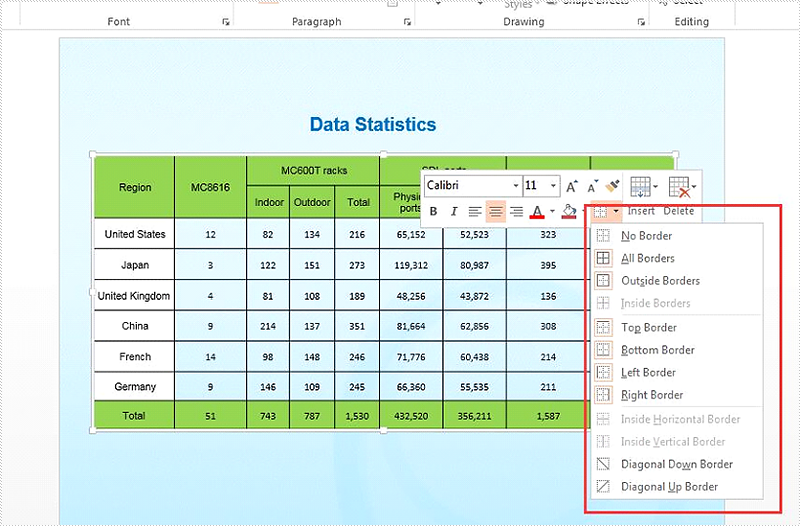
How to set the border type and color for an existing table on presentation slide:
//create a presentation document and load the file from disk
Presentation presentation = new Presentation();
presentation.LoadFromFile("Sample.pptx");

//get the table from the first slide of the sample document
ISlide slide = presentation.Slides[0];
ITable table = slide.Shapes[1] as ITable;

//set the border type as Inside and the border color as blue
table.SetTableBorder(TableBorderType.Inside, 1, Color.Blue);

//save the document to file
presentation.SaveToFile("Insideborder.pptx", FileFormat.Pptx2010);
Effective screenshot after set the border type for an existing table on presentation slide:
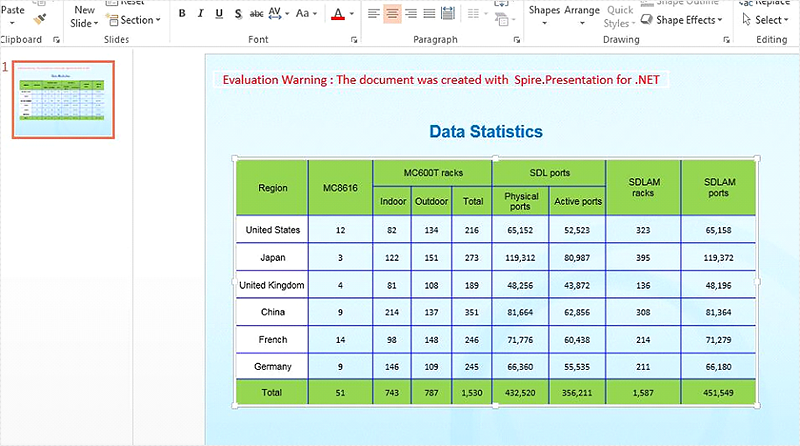
How to set the border type and color for newly added tables on presentation slide:
using Spire.Presentation;
using System;

namespace Set_border_type_and_color
{

    class Program
    {
        static void Main(string[] args)
        {

            //create a presentation document
            Presentation presentation = new Presentation();

            //set the table width and height for each table cell
            double[] tableWidth = new double[] { 100, 100, 100, 100, 100 };
            double[] tableHeight = new double[] { 20, 20 };

            //traverse all the border type of the table
            foreach (TableBorderType item in Enum.GetValues(typeof(TableBorderType)))

            //add a table to the presentation slide with the setting width and height
            {
                ITable itable = presentation.Slides.Append().Shapes.AppendTable(100, 100, tableWidth, tableHeight);

                //add some text to the table cell
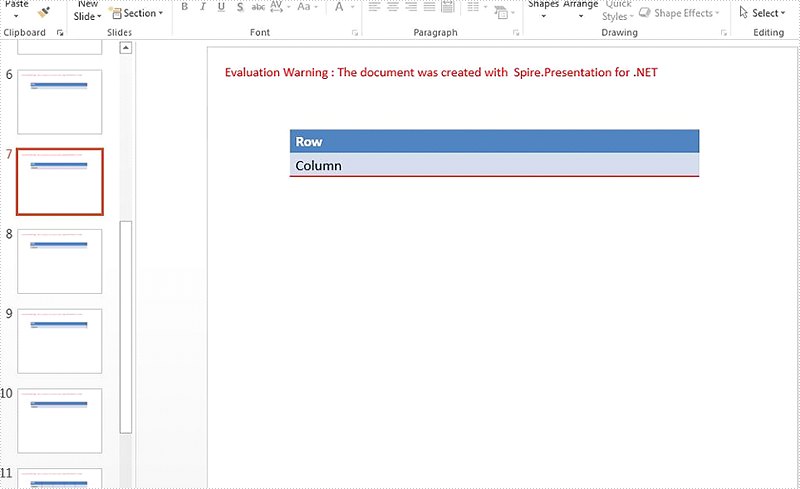
                itable.TableRows[0][0].TextFrame.Text = "Row";
                itable.TableRows[1][0].TextFrame.Text = "Column";

                //set the border type, border width and the border color for the table
                itable.SetTableBorder(item, 1.5, Color.Red);

            }

            //save the document to file
            presentation.SaveToFile("Addtablewithborder.pptx", FileFormat.Pptx2010);

        }
    }
}
Set Table Row Height and Column Width in PowerPoint
This article demonstrates how to set the row height and column width of an existing table in PowerPoint document using Spire.Presentation in C# and VB.NET.
The following screenshot shows the table before setting row height and column width.

Detail steps:
Step 1: Instantiate a Presentation object and load the PowerPoint document.
Presentation ppt = new Presentation();
ppt.LoadFromFile("Input.pptx");
Step 2: Get the first slide.
ISlide slide = ppt.Slides[0];
Step 3: Get the first table on the slide.
ITable table = ppt.Slides[0].Shapes[0] as ITable;
Step 4: Set table row height and column width.
table.TableRows[1].Height = 50;
table.ColumnsList[1].Width = 100;
Step 5: Save the document.
ppt.SaveToFile("Output.pptx", FileFormat.Pptx2013);
Screenshot:

Full code:
using Spire.Presentation;

namespace Set_table_column_width_and_row_height
{
    class Program
    {
        static void Main(string[] args)
        {
            Presentation ppt = new Presentation();
            ppt.LoadFromFile("Input.pptx");

            ISlide slide = ppt.Slides[0];

            ITable table = ppt.Slides[0].Shapes[0] as ITable;

            table.TableRows[1].Height = 50;
            table.ColumnsList[1].Width = 100;

            ppt.SaveToFile("Output.pptx", FileFormat.Pptx2013);
        }
    }
}
Imports Spire.Presentation

Namespace Set_table_column_width_and_row_height
	Class Program
		Private Shared Sub Main(args As String())
			Dim ppt As New Presentation()
			ppt.LoadFromFile("Input.pptx")

			Dim slide As ISlide = ppt.Slides(0)

			Dim table As ITable = TryCast(ppt.Slides(0).Shapes(0), ITable)

			table.TableRows(1).Height = 50
			table.ColumnsList(1).Width = 100

			ppt.SaveToFile("Output.pptx", FileFormat.Pptx2013)
		End Sub
	End Class
End Namespace
How to set horizontal alignment for the text in table on presentation slides
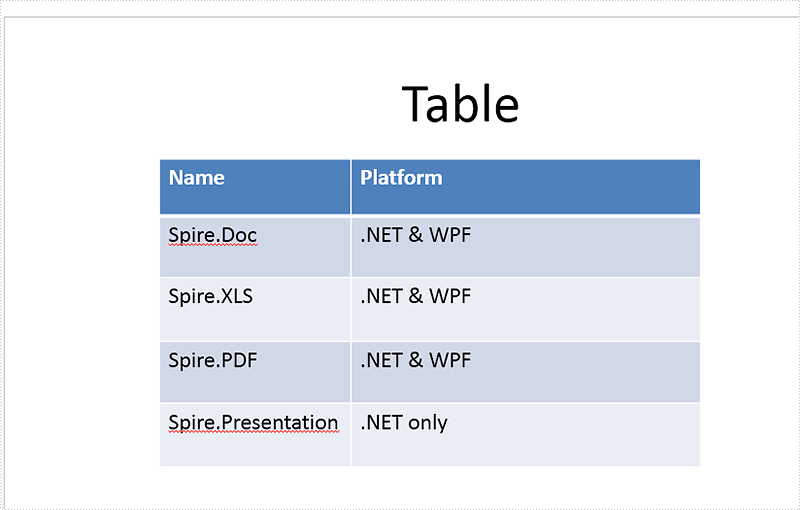
With the help of Spire.Presentation, developers can set the horizontal alignment for the text on presentation slides easily. This article will focus on show you how to set the horizontal alignment for the text on the table of the presentation slides in C#. There are five options for the text alignment on the Spire.Presentation: Left, Right, Center, Justify and None.
At first, please check a document with default alignment (Left) prepared. Then, different alignment styles will be applied for the different rows on the table.
Step 1: Create a presentation document and load the sample document from file.
Presentation presentation = new Presentation();
presentation.LoadFromFile("Sample.pptx",FileFormat.Pptx2010);
Step 2: Get the table from the sample document.
ITable table = null;

foreach (IShape shape in presentation.Slides[0].Shapes)
{
    if (shape is ITable)
    {
        table = (ITable)shape;
Step 3: Align text horizontally.
for (int i = 0; i < table.ColumnsList.Count; i++)
{

    table[i, 0].TextFrame.Paragraphs[0].Alignment = TextAlignmentType.Right;
    table[i, 1].TextFrame.Paragraphs[0].Alignment = TextAlignmentType.Center;
    table[i, 2].TextFrame.Paragraphs[0].Alignment = TextAlignmentType.Left;
    table[i, 3].TextFrame.Paragraphs[0].Alignment = TextAlignmentType.None;
    table[i, 4].TextFrame.Paragraphs[0].Alignment = TextAlignmentType.Justify;

}
Step 4: Save the document to file.
presentation.SaveToFile("tableresult.pptx", FileFormat.Pptx2010);
Effective screenshot after apply the horizontal alignment for the text on table:
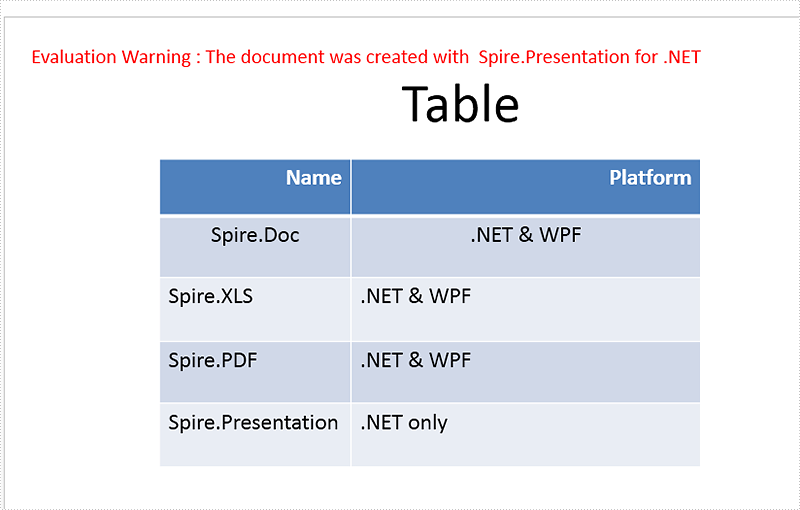
Full codes of how to set horizontal alignment for the text on the presentation slide's table:
using Spire.Presentation;

namespace set_horizontal_alignment
{

    class Program
    {
        static void Main(string[] args)
        {

            Presentation presentation = new Presentation();
            presentation.LoadFromFile("Sample.pptx", FileFormat.Pptx2010);

            ITable table = null;

            foreach (IShape shape in presentation.Slides[0].Shapes)
            {
                if (shape is ITable)
                {
                    table = (ITable)shape;

                    for (int i = 0; i < table.ColumnsList.Count; i++)
                    {

                        table[i, 0].TextFrame.Paragraphs[0].Alignment = TextAlignmentType.Right;
                        table[i, 1].TextFrame.Paragraphs[0].Alignment = TextAlignmentType.Center;
                        table[i, 2].TextFrame.Paragraphs[0].Alignment = TextAlignmentType.Left;
                        table[i, 3].TextFrame.Paragraphs[0].Alignment = TextAlignmentType.None;
                        table[i, 4].TextFrame.Paragraphs[0].Alignment = TextAlignmentType.Justify;


                    }
                }
            }
            presentation.SaveToFile("tableresult.pptx", FileFormat.Pptx2010);
        }

    }
}
How to Set and Remove Table Border in PowerPoint
Borders can make the associative perception of a table stronger, but sometimes, especially in PowerPoint, you may want to remove them in order to achieve a better visual effect. In this part, we're going to introduce how to set and remove border of an existing table in PowerPoint by using Spire.Presentation for .NET.
Before start, please download and install Spire.Presentation correctly, after that add the Spire.Presentation.dll file as the reference of your project.
Detail steps overview:
Set table border:
Step 1: Create a new presentation instance and load the sample document from file.
Presentation presentation = new Presentation();
presentation.LoadFromFile("testTable.pptx");
Step 2: Find the table by looping through all the slides, and then set borders for it. Users can set different border styles according to their requirements.
foreach (ISlide slide in presentation.Slides)
{
    foreach (IShape shape in slide.Shapes)
    {
        if (shape is ITable)
        {
            foreach (TableRow row in (shape as ITable).TableRows)
            {
                foreach (Cell cell in row)
                {
                    cell.BorderTop.FillType = FillFormatType.Solid;
                    cell.BorderBottom.FillType = FillFormatType.Solid;
                    cell.BorderLeft.FillType = FillFormatType.Solid;
                    cell.BorderRight.FillType = FillFormatType.Solid;
                }
            }
        }
    }
}
Step 3: Save the file as Border.pptx.
presentation.SaveToFile("Border.pptx", FileFormat.Pptx2010);
Remove table border:
Remove table border is very simple, refer to the following codes:
cell.BorderTop.FillType = FillFormatType.None;
cell.BorderBottom.FillType = FillFormatType.None;
cell.BorderLeft.FillType = FillFormatType.None;
cell.BorderRight.FillType = FillFormatType.None;
Effective screenshots:
Before:

After:

Full codes:
using Spire.Presentation;
using Spire.Presentation.Drawing;

namespace Set_and_Remove_Table_Border_in_PPT
{
    class Program
    {
        static void Main(string[] args)
        {
            Presentation presentation = new Presentation();
            presentation.LoadFromFile("testTable.pptx");
            foreach (ISlide slide in presentation.Slides)
            {
                foreach (IShape shape in slide.Shapes)
                {
                    if (shape is ITable)
                    {
                        foreach (TableRow row in (shape as ITable).TableRows)
                        {
                            foreach (Cell cell in row)
                            {
                                //Add top border and set its FillType as Solid.
                                cell.BorderTop.FillType = FillFormatType.Solid;
                                //Remove top border
                                //cell.BorderTop.FillType = FillFormatType.None;

                                cell.BorderBottom.FillType = FillFormatType.Solid;
                                //cell.BorderBottom.FillType = FillFormatType.None;

                                cell.BorderLeft.FillType = FillFormatType.Solid;
                                //cell.BorderLeft.FillType = FillFormatType.None;

                                cell.BorderRight.FillType = FillFormatType.Solid;
                                //cell.BorderRight.FillType = FillFormatType.None;
                            }
                        }
                    }
                }
            }
            presentation.SaveToFile("Border.pptx", FileFormat.Pptx2010);
        }
    }
}
How to add an image in Table Cell via Spire.Presentation
Adding an image in table cell can make your PPT files more different. Spire.Presentation allows developers add images to table cells. Here we introduce an example to add an image to a table cell in PPT.
Step 1: Create a new PPT document instance.
Presentation presentation = new Presentation();
Step 2: Call AppendTable() method to create a table and set the table style.
ISlide slide = presentation.Slides[0];
Double[] widths = new double[] { 100, 100};
Double[] heights = new double[] { 100, 100};
ITable table = presentation.Slides[0].Shapes.AppendTable(100, 80, widths, heights);
table.StylePreset = TableStylePreset.LightStyle1Accent2;
Step 3: Use table[0, 0].FillFormat.PictureFill.Picture.EmbedImage to embed the image to the cell. The FillType can be changed.
IImageData imgData = presentation.Images.Append(Image.FromFile("1.jpg"));
table[0, 0].FillFormat.FillType = FillFormatType.Picture;
table[0, 0].FillFormat.PictureFill.Picture.EmbedImage = imgData;
table[0, 0].FillFormat.PictureFill.FillType = PictureFillType.Stretch;
Step 4: Save and review.
presentation.SaveToFile("table.pptx", FileFormat.Pptx2010);
System.Diagnostics.Process.Start("table.pptx");
Here is the screenshot:
