C#: Set Page Setup Options in Excel
When printing Excel spreadsheets, particularly those containing complex datasets or detailed reports, configuring the page setup properly is crucial. Excel’s page setup options enable you to adjust key factors such as page margins, orientation, paper size, and scaling, ensuring your documents are tailored to fit various printing needs. By customizing these settings, you can control how your content is displayed on the page, making sure it appears polished and professional. In this article, we will demonstrate how to set page setup options in Excel in C# using Spire.XLS for .NET.
- Set Page Margins in Excel in C#
- Set Page Orientation in Excel in C#
- Set Paper Size in Excel in C#
- Set Print Area in Excel in C#
- Set Scaling Factor in Excel in C#
- Set Fit-to-Pages Options in Excel in C#
- Set Headers and Footers in Excel in C#
Install Spire.XLS for .NET
To begin with, you need to add the DLL files included in the Spire.XLS for .NET package as references in your .NET project. The DLL files can be either downloaded from this link or installed via NuGet.
PM> Install-Package Spire.XLS
Set Page Margins in Excel in C#
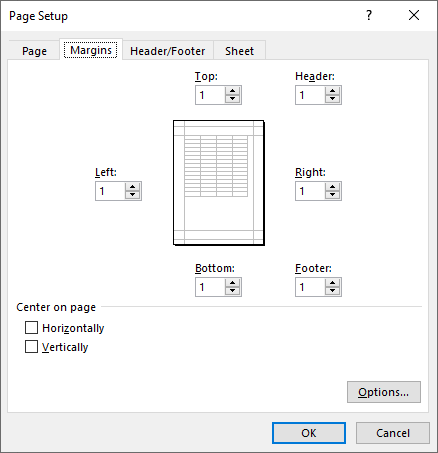
The PageSetup class in Spire.XLS for .NET is used to configure page setup options for Excel worksheets. You can access the PageSetup object of a worksheet through the Worksheet.PageSetup property. Then, use properties like PageSetup.TopMargin, PageSetup.BottomMargin, PageSetup.LeftMargin, PageSetup.RightMargin, PageSetup.HeaderMarginInch, and PageSetup.FooterMarginInch to set the corresponding margins for the worksheet. The detailed steps are as follows.
- Create an object of the Workbook class.
- Load an Excel file using Workbook.LoadFromFile() method.
- Get a specific worksheet using Workbook.Worksheets[index] property.
- Access the PageSetup object of the worksheet using Worksheet.PageSetup property.
- Set the top, bottom, left, right, header, and footer margins using PageSetup.TopMargin, PageSetup.BottomMargin, PageSetup.LeftMargin, PageSetup.RightMargin, PageSetup.HeaderMarginInch, and PageSetup.FooterMarginInch properties.
- Save the modified workbook to a new file using Workbook.SaveToFile() method.
- C#
using Spire.Xls;

namespace SetPageMargins
{
    internal class Program
    {
        static void Main(string[] args)
        {
            // Create a Workbook object
            Workbook workbook = new Workbook();

            // Load an Excel file
            workbook.LoadFromFile("Sample.xlsx");

            // Get the first worksheet
            Worksheet sheet = workbook.Worksheets[0];

            // Get the PageSetup object of the worksheet
            PageSetup pageSetup = sheet.PageSetup;

            // Set top, bottom, left, and right page margins for the worksheet
            // The measure of the unit is Inch (1 inch = 2.54 cm)
            pageSetup.TopMargin = 1;
            pageSetup.BottomMargin = 1;
            pageSetup.LeftMargin = 1;
            pageSetup.RightMargin = 1;
            pageSetup.HeaderMarginInch = 1;
            pageSetup.FooterMarginInch = 1;

            // Save the modified workbook to a new file
            workbook.SaveToFile("SetPageMargins.xlsx", ExcelVersion.Version2016);
            workbook.Dispose();
        }
    }
}
Set Page Orientation in Excel in C#
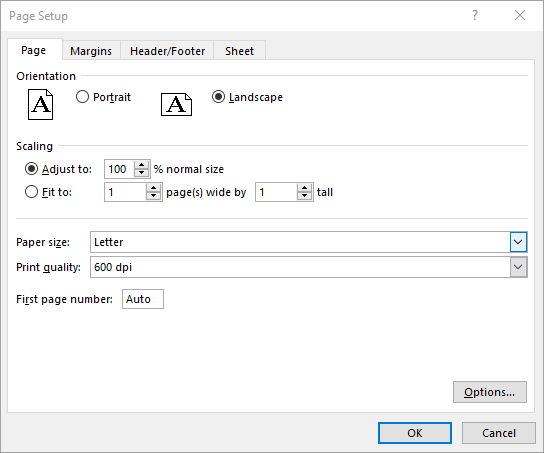
The PageSetup.Orientation property lets you determine how the page should be oriented when printed. You can choose between two options: portrait mode or landscape mode. The detailed steps are as follows.
- Create an object of the Workbook class.
- Load an Excel file using Workbook.LoadFromFile() method.
- Get a specific worksheet using Workbook.Worksheets[index] property.
- Access the PageSetup object of the worksheet using Worksheet.PageSetup property.
- Set the page orientation using PageSetup.Orientation property.
- Save the modified workbook to a new file using Workbook.SaveToFile() method.
- C#
using Spire.Xls;

namespace SetPageOrientation
{
    internal class Program
    {
        static void Main(string[] args)
        {
            //Page Orientation
            // Create a Workbook object
            Workbook workbook = new Workbook();

            // Load an Excel file
            workbook.LoadFromFile("Sample.xlsx");

            // Get the first worksheet
            Worksheet sheet = workbook.Worksheets[0];

            // Get the PageSetup object of the worksheet
            PageSetup pageSetup = sheet.PageSetup;

            // Set the page orientation for printing the worksheet to landscape mode
            pageSetup.Orientation = PageOrientationType.Landscape;

            // Save the modified workbook to a new file
            workbook.SaveToFile("SetPageOrientation.xlsx", ExcelVersion.Version2016);
            workbook.Dispose();
        }
    }
}
Set Paper Size in Excel in C#
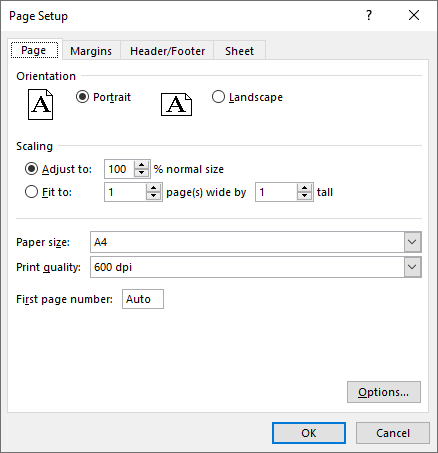
The PageSetup.PaperSize property enables you to select from a variety of paper sizes for printing your worksheet. These options include A3, A4, A5, B4, B5, letter, legal, tabloid, and more. The detailed steps are as follows.
- Create an object of the Workbook class.
- Load an Excel file using Workbook.LoadFromFile() method.
- Get a specific worksheet using Workbook.Worksheets[index] property.
- Access the PageSetup object of the worksheet using Worksheet.PageSetup property.
- Set the paper size using PageSetup.PaperSize property.
- Save the modified workbook to a new file using Workbook.SaveToFile() method.
- C#
using Spire.Xls;

namespace SetPaperSize
{
    internal class Program
    {
        static void Main(string[] args)
        {
            // Create a Workbook object
            Workbook workbook = new Workbook();

            // Load an Excel file
            workbook.LoadFromFile("Sample.xlsx");

            // Get the first worksheet
            Worksheet sheet = workbook.Worksheets[0];

            // Get the PageSetup object of the worksheet
            PageSetup pageSetup = sheet.PageSetup;

            // Set the paper size to A4
            pageSetup.PaperSize = PaperSizeType.PaperA4;

            // Save the modified workbook to a new file
            workbook.SaveToFile("SetPaperSize.xlsx", ExcelVersion.Version2016);
            workbook.Dispose();
        }
    }
}
Set Print Area in Excel in C#
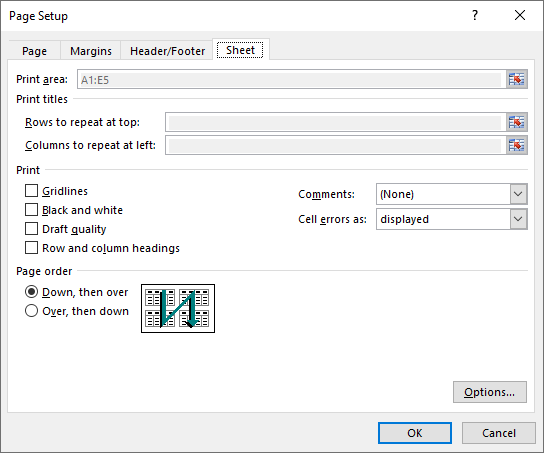
You can specify the exact area that you want to print using the PageSetup.PringArea property. The detailed steps are as follows.
- Create an object of the Workbook class.
- Load an Excel file using Workbook.LoadFromFile() method.
- Get a specific worksheet using Workbook.Worksheets[index] property.
- Access the PageSetup object of the worksheet using Worksheet.PageSetup property.
- Set the print area using PageSetup.PringArea property.
- Save the modified workbook to a new file using Workbook.SaveToFile() method.
- C#
using Spire.Xls;

namespace SetPrintArea
{
    internal class Program
    {
        static void Main(string[] args)
        {
            // Create a Workbook object
            Workbook workbook = new Workbook();

            // Load an Excel file
            workbook.LoadFromFile("Sample.xlsx");

            // Get the first worksheet
            Worksheet sheet = workbook.Worksheets[0];

            // Get the PageSetup object of the worksheet
            PageSetup pageSetup = sheet.PageSetup;

            // Set the print area of the worksheet to "A1:E5"
            pageSetup.PrintArea = "A1:E5";

            // Save the modified workbook to a new file
            workbook.SaveToFile("SetPrintArea.xlsx", ExcelVersion.Version2016);
            workbook.Dispose();
        }
    }
}
Set Scaling Factor in Excel in C#
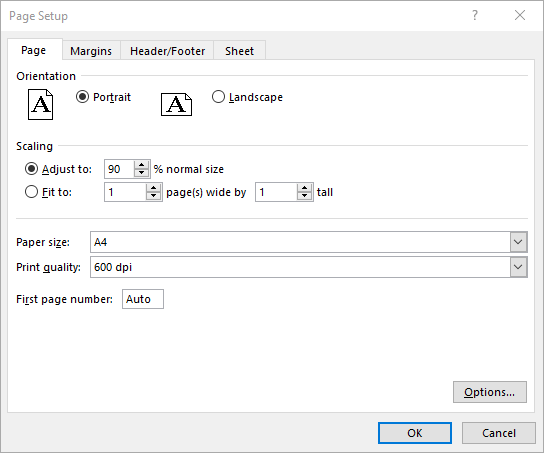
If you want to scale the content of your worksheet to a specific percentage of its original size, use the PageSetup.Zoom property. The detailed steps are as follows.
- Create an object of the Workbook class.
- Load an Excel file using Workbook.LoadFromFile() method.
- Get a specific worksheet using Workbook.Worksheets[index] property.
- Access the PageSetup object of the worksheet using Worksheet.PageSetup property.
- Set the scaling factor using PageSetup.Zoom property.
- Save the modified workbook to a new file using Workbook.SaveToFile() method.
- C#
using Spire.Xls;

namespace SetScalingFactor
{
    internal class Program
    {
        static void Main(string[] args)
        {
            // Create a Workbook object
            Workbook workbook = new Workbook();

            // Load an Excel file
            workbook.LoadFromFile("Sample.xlsx");

            // Get the first worksheet
            Worksheet sheet = workbook.Worksheets[0];

            // Get the PageSetup object of the worksheet
            PageSetup pageSetup = sheet.PageSetup;

            // Set the scaling factor of the worksheet to 90%
            pageSetup.Zoom = 90;

            // Save the modified workbook to a new file
            workbook.SaveToFile("SetScalingFactor.xlsx", ExcelVersion.Version2016);
            workbook.Dispose();
        }
    }
}
Set Fit-to-Pages Options in Excel in C#
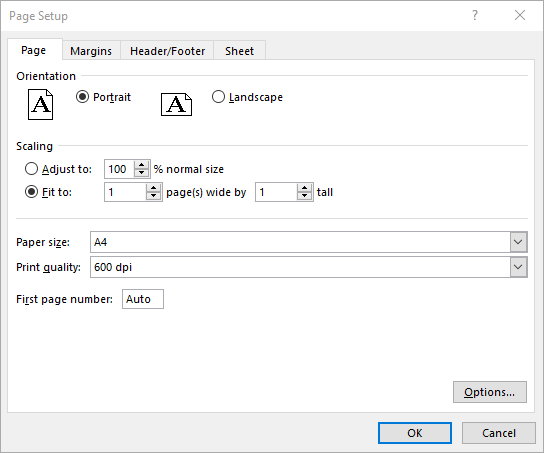
Spire.XLS also enables you to fit your worksheet content to a specific number of pages by using the PageSetup.FitToPagesTall and PageSetup.FitToPagesWide properties. The detailed steps are as follows.
- Create an object of the Workbook class.
- Load an Excel file using Workbook.LoadFromFile() method.
- Get a specific worksheet using Workbook.Worksheets[index] property.
- Access the PageSetup object of the worksheet using Worksheet.PageSetup property.
- Fit the content of the worksheet to one page using PageSetup.FitToPagesTall and PageSetup.FitToPagesWide properties.
- Save the modified workbook to a new file using Workbook.SaveToFile() method.
- C#
using Spire.Xls;

namespace SetFitToPages
{
    internal class Program
    {
        static void Main(string[] args)
        {
            // Create a Workbook object
            Workbook workbook = new Workbook();

            // Load an Excel file
            workbook.LoadFromFile("Sample.xlsx");

            // Get the first worksheet
            Worksheet sheet = workbook.Worksheets[0];

            // Get the PageSetup object of the worksheet
            PageSetup pageSetup = sheet.PageSetup;

            // Fit the content of the worksheet within one page vertically (i.e., all rows will fit on a single page)
            pageSetup.FitToPagesTall = 1;
            // Fit the content of the worksheet within one page horizontally (i.e., all columns will fit on a single page)
            pageSetup.FitToPagesWide = 1;

            // Save the modified workbook to a new file
            workbook.SaveToFile("FitToPages.xlsx", ExcelVersion.Version2016);
            workbook.Dispose();
        }
    }
}
Set Headers and Footers in Excel in C#
For setting headers and footers in Excel, please check this article: C#/VB.NET: Add Headers and Footers to Excel.
Apply for a Temporary License
If you'd like to remove the evaluation message from the generated documents, or to get rid of the function limitations, please request a 30-day trial license for yourself.
C#/VB.NET: Split Excel Sheets into Separate Files
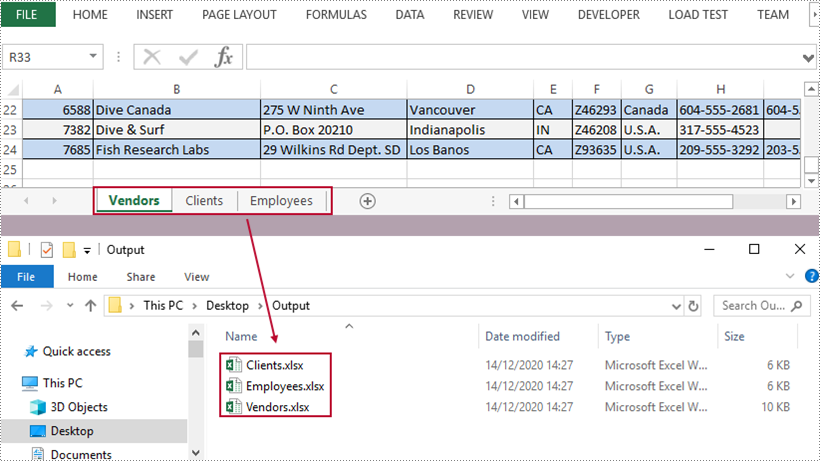
A workbook containing multiple worksheets helps to centrally manage relevant information, but sometimes we have to split the worksheets into separate Excel files so that individual worksheets can be distributed without disclosing other information. In this article, you will learn how to split Excel worksheets into separate workbooks in C# and VB.NET using Spire.XLS for .NET.
Install Spire.XLS for .NET
To begin with, you need to add the DLL files included in the Spire.XLS for .NET package as references in your .NET project. The DLL files can be either downloaded from this link or installed via NuGet.
PM> Install-Package Spire.XLS
Split Excel Sheets into Separate Files
The following are the main steps to split Excel sheets into separate workbooks using Spire.XLS for .NET.
- Create a Workbook object
- Load a sample Excel file using Workbook.LoadFromFile() method.
- Declare a new Workbook variable, which is used to create new Excel workbooks.
- Loop through the worksheets in the source document.
- Initialize the Workbook object, and add the copy of a specific worksheet of source document into it.
- Save the workbook to an Excel file using Workbook.SaveToFile() method.
- C#
- VB.NET
using Spire.Xls;
using System;

namespace SplitWorksheets
{
    class Program
    {
        static void Main(string[] args)
        {
            //Create a Workbook object
            Workbook wb = new Workbook();

            //Load an Excel document
            wb.LoadFromFile("C:\\Users\\Administrator\\Desktop\\data.xlsx");

            //Declare a new Workbook variable
            Workbook newWb;

            //Declare a String variable
            String sheetName;

            //Specify the folder path which is used to store the generated Excel files
            String folderPath = "C:\\Users\\Administrator\\Desktop\\Output\\";

            //Loop through the worksheets in the source file
            for (int i = 0; i < wb.Worksheets.Count; i++)
            {

                //Initialize the Workbook object
                newWb = new Workbook();

                //Remove the default sheets
                newWb.Worksheets.Clear();

                //Add the specific worksheet of the source document to the new workbook
                newWb.Worksheets.AddCopy(wb.Worksheets[i]);

                //Get the worksheet name
                sheetName = wb.Worksheets[i].Name;

                //Save the new workbook to the specified folder
                newWb.SaveToFile(folderPath + sheetName + ".xlsx", ExcelVersion.Version2013);
            }
        }
    }
}
Apply for a Temporary License
If you'd like to remove the evaluation message from the generated documents, or to get rid of the function limitations, please request a 30-day trial license for yourself.
C#/VB.NET: Accept or Reject Tracked Changes in Excel
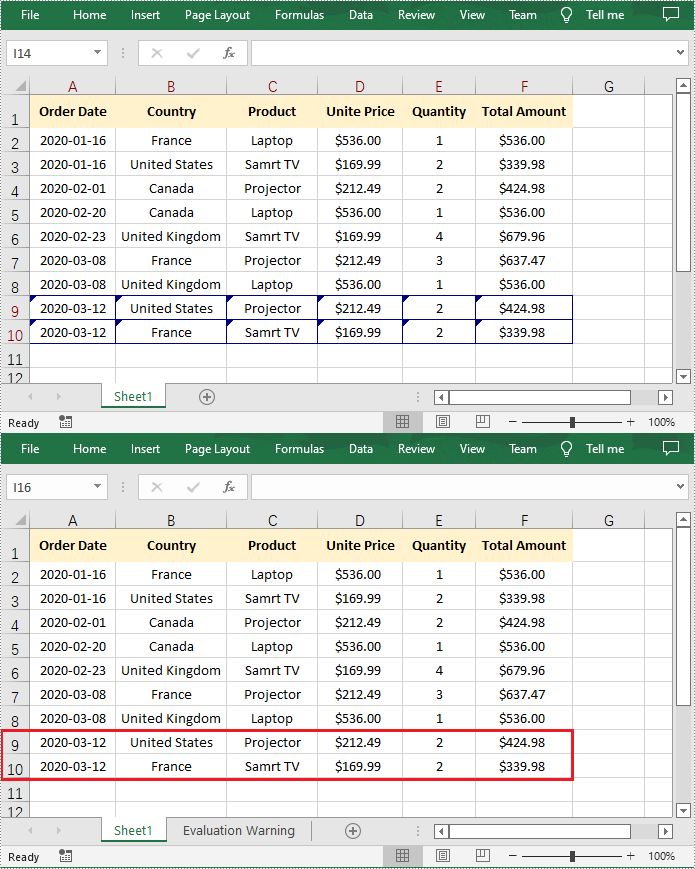
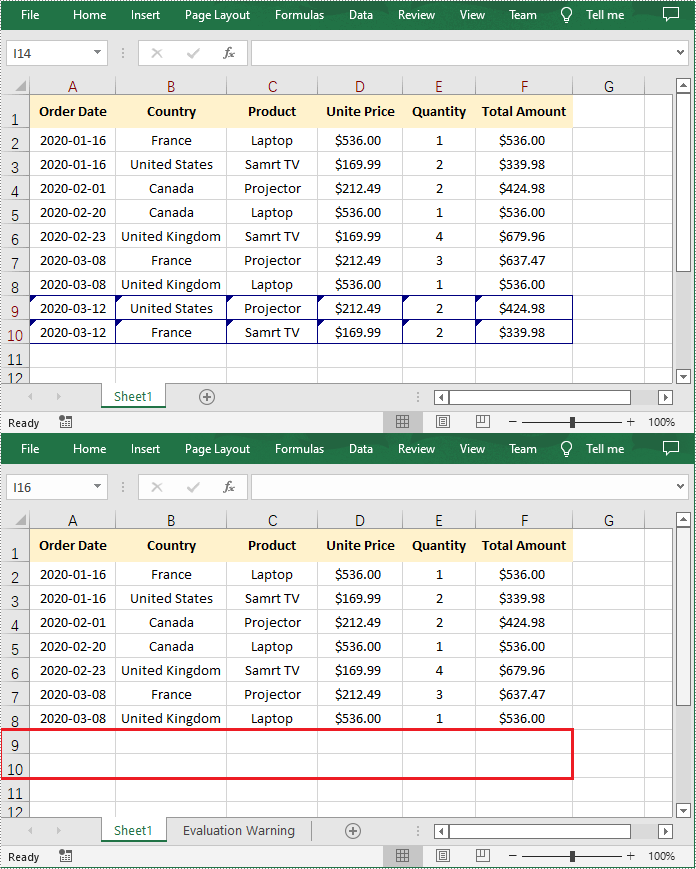
When sending an Excel document to others for review, it is recommended to turn on the Track Changes to ensure that all changes made to the worksheet or workbook are recorded. For the altered cells in Excel, each one will be highlighted with a blue triangle in the upper left corner of the cell. You can then view the changes and decide whether to accept or reject them. This article will demonstrate how to programmatically accept or reject all tracked changes in an Excel workbook using Spire.XLS for .NET.
Install Spire.XLS for .NET
To begin with, you need to add the DLL files included in the Spire.XLS for .NET package as references in your .NET project. The DLL files can be either downloaded from this link or installed via NuGet.
PM> Install-Package Spire.XLS
Accept All Tracked Changes in a Workbook
To accept tracked changes in a workbook, you'll first need to determine whether the workbook has tracked changes using Workbook.HasTrackedChanges property. If yes, you can then accept all changes at once using Workbook.AcceptAllTrackedChanges() method. The following are the steps to accept all tracked changes in an Excel workbook.
- Create a Workbook object.
- Load a sample Excel document using Workbook.LoadFromFile() method.
- Determine if the workbook has tracked changes using Workbook.HasTrackedChanges property.
- Accept all tracked changes in the workbook using Workbook.AcceptAllTrackedChanges() method.
- Save the result document using Workbook.SaveToFile() method.
- C#
- VB.NET
using Spire.Xls;

namespace AcceptTrackedChanges
{
    class Program
    {
        static void Main(string[] args)
        {
            //Create a Workbook object
            Workbook workbook = new Workbook();

            //Load a sample Excel document
            workbook.LoadFromFile("Sample.xlsx");

            //Determine if the workbook has tracked changes
            if (workbook.HasTrackedChanges)
            {

                //Accept all tracked changes in the workbook
                workbook.AcceptAllTrackedChanges();
            }

            //Save the result document
            workbook.SaveToFile("AcceptChanges.xlsx", FileFormat.Version2013);
        }
    }
}
Reject All Tracked Changes in a Workbook
If the tracked changes have been proven to exist in a workbook, Spire.XLS for .NET also provides the Workbook.RejectAllTrackedChanges() method to reject all tracked changes at once. The detailed steps are as follows.
- Create a Workbook object.
- Load a sample Excel document using Workbook.LoadFromFile() method.
- Determine if the workbook has tracked changes using Workbook.HasTrackedChanges property.
- Reject all tracked changes in the workbook using Workbook.RejectAllTrackedChanges() method.
- Save the result document using Workbook.SaveToFile() method.
- C#
- VB.NET
using Spire.Xls;

namespace AcceptTrackedChanges
{
    class Program
    {
        static void Main(string[] args)
        {
            //Create a Workbook object
            Workbook workbook = new Workbook();

            //Load a sample Excel document
            workbook.LoadFromFile("Sample.xlsx");

            //Determine if the workbook has tracked changes
            if (workbook.HasTrackedChanges)
            {

                //Reject all tracked changes in the workbook
                workbook.RejectAllTrackedChanges();
            }

            //Save the result document
            workbook.SaveToFile("RejectChanges.xlsx", FileFormat.Version2013);
        }
    }
}
Apply for a Temporary License
If you'd like to remove the evaluation message from the generated documents, or to get rid of the function limitations, please request a 30-day trial license for yourself.
C#/VB.NET hide and unhide window for Excel Workbook
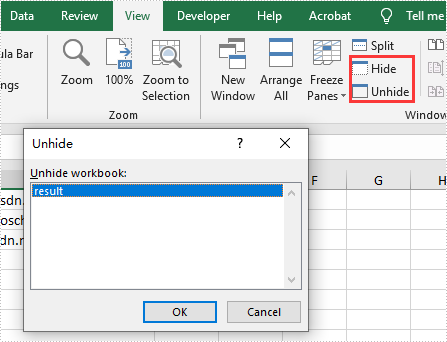
We have demonstrated how to use Spire.XLS for .NET to hide/show Excel worksheets. From Spire.XLS v 10.9.0, it starts to support hide the current window of Excel workbook by setting the property of workbook.IsHideWindow.
using Spire.Xls;

namespace HideWindow
{
    class Program
    {
        static void Main(string[] args)
        {
            //Load Sample Document
            Workbook workbook = new Workbook();
            workbook.LoadFromFile("Sample.xlsx");

            //Hide Excel Window
            workbook.IsHideWindow = true;

             //Save the document to file
            workbook.SaveToFile("result.xlsx", ExcelVersion.Version2013);
        }
    }

}
Imports Spire.Xls

Namespace HideWindow

    Class Program

        Private Shared Sub Main(ByVal args() As String)
            'Load Sample Document
            Dim workbook As Workbook = New Workbook
            workbook.LoadFromFile("Sample.xlsx")
            'Hide Excel Window
            workbook.IsHideWindow = true
            'Save the document to file
            workbook.SaveToFile("result.xlsx", ExcelVersion.Version2013)
        End Sub
    End Class
End Namespace
Determine if an Excel File Contains VBA Macros in C#, VB.NET
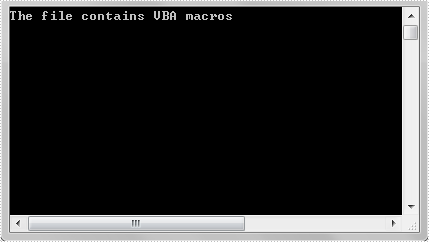
At some point, programmers may need to determine if an Excel file contains VBA macros. This article is going to show you how to programmatically determine if an Excel file contains VBA macros in C# and VB.NET using Spire.XLS.
Detail steps:
Step 1: Instantiate a Workbook object and load the Excel file.
Workbook workbook = new Workbook();
workbook.LoadFromFile("Macro.xlsm");
Step 2: Determine if the Excel file contains VBA macros.
bool hasMacros = false;
hasMacros = workbook.HasMacros;
if (hasMacros)
{
    Console.WriteLine("The file contains VBA macros");
}

else
{
    Console.WriteLine("The file doesn't contain VBA macros");
}
Screenshot:
Full code:
using System;
using Spire.Xls;

namespace Determine_if_Excel_file_contains_macros
{
    class Program
    {
        static void Main(string[] args)
        {
            //Instantiate a Workbook object
            Workbook workbook = new Workbook();
            //Load the Excel file
            workbook.LoadFromFile("Macro.xlsm");

            bool hasMacros = false;

            //Determine if the Excel file contains VBA macros
            hasMacros = workbook.HasMacros;

            if (hasMacros)
            {
                Console.WriteLine("The file contains VBA macros");
            }

            else
            {
                Console.WriteLine("The file doesn't contain VBA macros");
            }

            Console.ReadKey();
        }
    }
}
Imports System
Imports Spire.Xls

Namespace Determine_if_Excel_file_contains_macros
    Class Program
        Private Shared Sub Main(ByVal args As String())
            Dim workbook As Workbook = New Workbook()
            workbook.LoadFromFile("Macro.xlsm")
            Dim hasMacros As Boolean = False
            hasMacros = workbook.HasMacros

            If hasMacros Then
                Console.WriteLine("The file contains VBA macros")
            Else
                Console.WriteLine("The file doesn't contain VBA macros")
            End If

            Console.ReadKey()
        End Sub
    End Class
End Namespace
C#: Read or Remove Document Properties from Excel
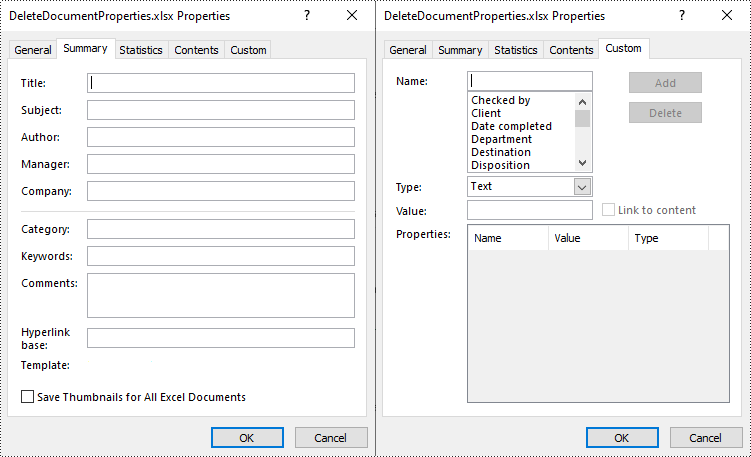
Excel document properties, also known as metadata, are essential for understanding the content and context of an Excel file. They provide valuable information about the document's content, authorship, and creation/revision history, which can facilitate the efficient organization and retrieval of files. In addition to adding document properties to Excel, this article will show you how to read or remove document properties from Excel in C# using Spire.XLS for .NET.
- Read Standard and Custom Document Properties from Excel in C#
- Remove Standard and Custom Document Properties from Excel in C#
Install Spire.XLS for .NET
To begin with, you need to add the DLL files included in the Spire.XLS for .NET package as references in your .NET project. The DLL files can be either downloaded from this link or installed via NuGet.
PM> Install-Package Spire.XLS
Read Standard and Custom Document Properties from Excel in C#
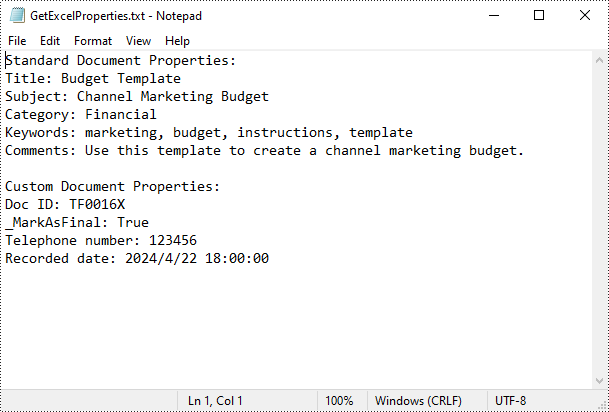
Excel properties are divided into two main categories:
- Standard Properties: These are predefined properties that are built into Excel files. They typically include basic details about the file such as title, subject, author, keywords, etc.
- Custom Properties: These are user-defined attributes that can be added to Excel to track additional information about the file based on your specific needs.
Spire.XLS for .NET allows to read both the standard and custom document properties of an Excel file. The following are the detailed steps:
- Create a Workbook instance.
- Load an Excel file using Workbook.LoadFromFile() method.
- Create a StringBuilder instance.
- Get a collection of all standard document properties using Workbook.DocumentProperties property.
- Get specific standard document properties using the properties of the BuiltInDocumentProperties class and append them to the StringBuilder instance.
- Get a collection of all custom document properties using Workbook.CustomDocumentProperties property.
- Iterate through the collection.
- Get the name and value of each custom document property using IDocumentProperty.Name and IDocumentProperty.Value properties and append them to the StringBuilder instance.
- Write the content of the StringBuilder instance into a txt file.
- C#
using Spire.Xls;
using Spire.Xls.Collections;
using Spire.Xls.Core;
using System.IO;
using System.Text;

namespace GetExcelProperties
{
    class Program
    {

        static void Main(string[] args)
        {
            {
                //Create a Workbook instance
                Workbook workbook = new Workbook();

                //Load a sample Excel file
                workbook.LoadFromFile("Budget Template.xlsx");

                //Create a StringBuilder instance
                StringBuilder sb = new StringBuilder();

                //Get a collection of all standard document properties
                BuiltInDocumentProperties standardProperties = workbook.DocumentProperties;

                //Get specific standard properties and append them to the StringBuilder instance
                sb.AppendLine("Standard Document Properties:");
                sb.AppendLine("Title: " + standardProperties.Title);
                sb.AppendLine("Subject: " + standardProperties.Subject);
                sb.AppendLine("Category: " + standardProperties.Category);
                sb.AppendLine("Keywords: " + standardProperties.Keywords);
                sb.AppendLine("Comments: " + standardProperties.Comments);
                sb.AppendLine();

                //Get a collection of all custom document properties
                ICustomDocumentProperties customProperties = workbook.CustomDocumentProperties;

                sb.AppendLine("Custom Document Properties:");
                //Iterate through the collection
                for (int i = 0; i < customProperties.Count; i++)
                {
                    //Get the name and value of each custom document property and append them to the StringBuilder instance
                    string name = customProperties[i].Name;
                    string value = customProperties[i].Value.ToString();
                    sb.AppendLine(name + ": " + value);
                }

                //Write the content of the StringBuilder instance into a text file
                File.WriteAllText("GetExcelProperties.txt", sb.ToString());
            }
        }
    }
}
Remove Standard and Custom Document Properties from Excel in C#
You can easily delete standard document properties from an Excel file by setting their values as empty. For custom document properties, you can use the ICustomDocumentProperties.Remove() method to delete them. The following are the detailed steps:
- Create a Workbook instance.
- Load a sample Excel file using Workbook.LoadFromFile() method.
- Get a collection of all standard document properties using Workbook.DocumentProperties property.
- Set the values of specific standard document properties as empty through the corresponding properties of the BuiltInDocumentProperties class.
- Get a collection of all custom document properties using Workbook.CustomDocumentProperties property.
- Iterate through the collection.
- Delete each custom property from the collection by its name using ICustomDocumentProperties.Remove(string strName) method.
- Save the result file using Workbook.SaveToFile() method.
- C#
using Spire.Xls;
using Spire.Xls.Collections;
using Spire.Xls.Core;

namespace DeleteExcelProperties
{
    class Program
    {

        static void Main(string[] args)
        {
            {
                //Create a Workbook instance
                Workbook workbook = new Workbook();

                //Load a sample Excel file
                workbook.LoadFromFile("Budget Template.xlsx");

                //Get a collection of all standard document properties
                BuiltInDocumentProperties standardProperties = workbook.DocumentProperties;

                //Set the value of each standard document property as empty
                standardProperties.Title = "";
                standardProperties.Subject = "";
                standardProperties.Category = "";
                standardProperties.Keywords = "";
                standardProperties.Comments = "";

                //Get a collection of all custom document properties
                ICustomDocumentProperties customProperties = workbook.CustomDocumentProperties;

                //Iterate through the collection
                for (int i = customProperties.Count -1; i >=0; i--)
                {
                    //Delete each custom document property from the collection by its name
                    customProperties.Remove(customProperties[i].Name);

                }

                //Save the result file
                workbook.SaveToFile("DeleteDocumentProperties.xlsx", ExcelVersion.Version2016);
            }
        }
    }
}
Apply for a Temporary License
If you'd like to remove the evaluation message from the generated documents, or to get rid of the function limitations, please request a 30-day trial license for yourself.
C#/VB.NET: Split an Excel Worksheet into Multiple Files
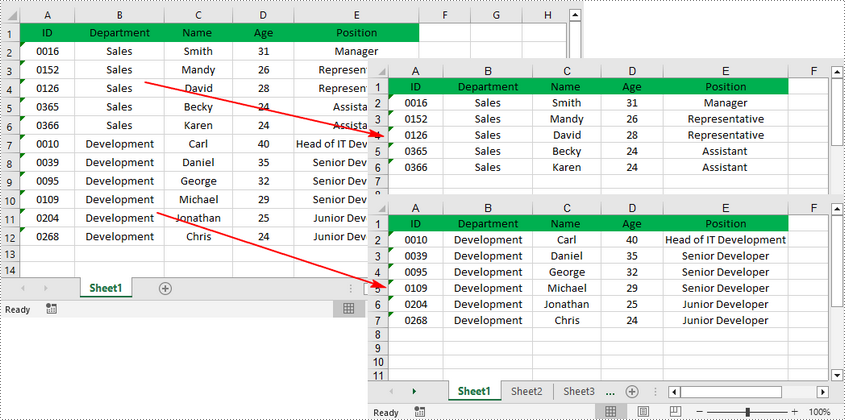
When dealing with an Excel worksheet containing a large amount of data, splitting it into several separate Excel files based on specific criteria can be beneficial. By dividing the worksheet into smaller, more manageable files, you can improve your work efficiency and make data analysis easier. This article will demonstrate how to programmatically split an Excel worksheet into multiple Excel files using Spire.XLS for .NET.
Install Spire.XLS for .NET
To begin with, you need to add the DLL files included in the Spire.XLS for .NET package as references in your .NET project. The DLL files can be either downloaded from this link or installed via NuGet.
PM> Install-Package Spire.XLS
Split an Excel Sheet into Multiple Files in C# and VB.NET
The Worksheet.Copy(CellRange sourceRange, CellRange destRange) method provided by Spire.XLS for .NET allows you to split a worksheet by copying a specified cell range from the original Excel file to a new Excel file. The following are the detailed steps.
- Create a Workbook instance.
- Load a sample Excel file using Workbook.LoadFromFile() method.
- Get a specific worksheet using Workbook.Worksheets[] property.
- Get the header row and the specified cell ranges using Worksheet.Range property.
- Create a new workbook and get its first worksheet.
- Copy the header row and specified cell range to the first worksheet of the new workbook using Worksheet.Copy(CellRange sourceRange, CellRange destRange) method.
- Copy the column width from the original workbook to the new workbook, and then save the new workbook to an Excel file using Workbook.SaveToFile() method.
- Create another new workbook, and then repeat the above steps to copy the header row and specified cell range into the new workbook.
- Save the new workbook to another Excel file.
- C#
- VB.NET
using Spire.Xls;

namespace splitworksheet
{
    class Program
    {
        static void Main(string[] args)
        {
            //Create a Workbook instance
            Workbook originalBook= new Workbook();

            //Load the original Excel document from file
            originalBook.LoadFromFile("Info.xlsx");

            //Get the first worksheet
            Worksheet sheet = originalBook.Worksheets[0];

            //Get the header row
            CellRange headerRow = sheet.Range[1, 1, 1,5];

            //Get two cell ranges
            CellRange range1 = sheet.Range[2, 1, 6, sheet.LastColumn];
            CellRange range2 = sheet.Range[7, 1, sheet.LastRow, sheet.LastColumn];

            //Create a new workbook
            Workbook newBook1 = new Workbook();

            //Get the first worksheet of new workbook
            Worksheet newSheet1 = newBook1.Worksheets[0];

            //Copy the header row and range 1 to the first worksheet of the new workbook
            sheet.Copy(headerRow, newSheet1.Range[1, 1]);
            sheet.Copy(range1, newSheet1.Range[2, 1]);

            //Copy the column width from the original workbook to the new workbook
            for (int i = 0; (i < sheet.LastColumn); i++)
            {
                newBook1.Worksheets[0].SetColumnWidth(i + 1, sheet.GetColumnWidth(i + 1));
            }

            //Save the new workbook to an Excel file
            newBook1.SaveToFile("Sales Depart.xlsx", ExcelVersion.Version2016);

            //Create another new workbook
            Workbook newBook2 = new Workbook();

            //Get the first worksheet of new workbook
            Worksheet newSheet2 = newBook2.Worksheets[0];

            //Copy the header row and range 2 to the first worksheet of the new workbook
            sheet.Copy(headerRow, newSheet2.Range[1, 1]);
            sheet.Copy(range2, newSheet2.Range[2, 1]);

            //Copy the column width from the original workbook to the new workbook
            for (int i = 0; (i < sheet.LastColumn); i++)
            {
                newBook2.Worksheets[0].SetColumnWidth(i + 1, sheet.GetColumnWidth(i + 1));
            }

            //Save the new workbook to another Excel file
            newBook2.SaveToFile("Development Depart.xlsx", ExcelVersion.Version2016);

        }
    }
}
Apply for a Temporary License
If you'd like to remove the evaluation message from the generated documents, or to get rid of the function limitations, please request a 30-day trial license for yourself.
How to set Excel page margins before printing a worksheet in C#
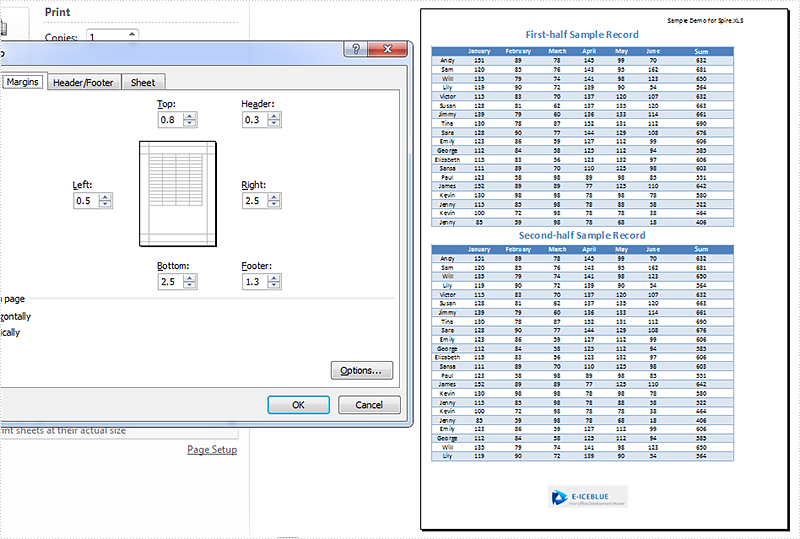
Page margins in Excel are the blank spaces between the worksheet data and the edges of the printed page. It is where we could add headers, footers and page numbers, etc. Before printing a worksheet, it's necessary to specify custom margins for a better layout. In Excel, we could set top margin, bottom margin, left margin, right margin, header margin, and footer margin, which are all supported by Spire.XLS library. This article is going to introduce the method to set Excel page margins in C# using Spire.XLS.
Note: Before start, please download the latest version of Spire.Doc and add the .dll in the bin folder as the reference of Visual Studio.
Step 1: Initial a new workbook and load the sample document.
            Workbook workbook = new Workbook();
            workbook.LoadFromFile("Sample.xlsx");
            Worksheet sheet = workbook.Worksheets[0];
Step 2: Set margins for top, bottom, left and right of the worksheet page. Here the unit of measure is Inch (1 inch=2.54 cm).
            sheet.PageSetup.TopMargin = 0.3;
            sheet.PageSetup.BottomMargin = 1;
            sheet.PageSetup.LeftMargin = 0.2;
            sheet.PageSetup.RightMargin = 1;
Step 3: Set the header margin and footer margin.
            sheet.PageSetup.HeaderMarginInch = 0.1;
            sheet.PageSetup.FooterMarginInch = 0.5;
Step 4: Save the document and launch to see effect.
            workbook.SaveToFile("S3.xlsx", ExcelVersion.Version2010);
            System.Diagnostics.Process.Start("S3.xlsx");
Effect:
Full codes:
using System;
using System.Collections.Generic;
using System.Linq;
using System.Text;
using Spire.Xls;

namespace How_to_set_Excel_margin_to_print
{
    class Program
    {
        static void Main(string[] args)
        {
            Workbook workbook = new Workbook();
            workbook.LoadFromFile("Sample.xlsx");
            Worksheet sheet = workbook.Worksheets[0];

            sheet.PageSetup.TopMargin = 0.3;
            sheet.PageSetup.BottomMargin = 1;
            sheet.PageSetup.LeftMargin = 0.2;
            sheet.PageSetup.RightMargin = 1;

            sheet.PageSetup.HeaderMarginInch = 0.1;
            sheet.PageSetup.FooterMarginInch = 0.5;

            workbook.SaveToFile("S3.xlsx", ExcelVersion.Version2010);
            System.Diagnostics.Process.Start("S3.xlsx");

        }
    }
}
Insert HTML-Formatted RichText into Excel Cell in C#
Some time back, one of registered members on our Forum had a requirement to display the value of HTML code in Excel cell. This article is aimed to provide a fine way to manage this issue using Spire.Doc and Spire.XLS.
Main Method:
At present, we have to use Document.LoadHTML() method which is available in Spire.Doc.Document class to load HTML string to a Word document, this way, HTML formatted text will be save in specific paragraphs. Then, get the paragraph with rich text style and return a RichTextString object, save RichText to a specified CellRange. Besides, the paragraph text style must be applied to this CellRange.
Detailed Steps:
Step 1: Create a new Workbook and Word document.
Workbook workbook = new Workbook();
Document doc = new Document();
Step 2: Save the HTML code to StringReader and load the HTML string to Word document.
StringReader sr = new StringReader("<span style=\"border-width:thin;border-color:#FFFFFF;\"><font color=#000000 size=8><b>U = Unchanged rate</b></font></span>");
doc.LoadHTML(sr, XHTMLValidationType.None);
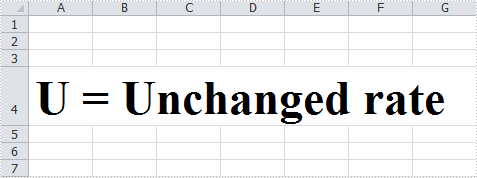
Step 3: Get the formatted text from Word document and save to cell 'A4' in the first worksheet.
foreach (Section section in doc.Sections)
{
    foreach (Paragraph paragraph in section.Paragraphs)
    {
        if (paragraph.Items.Count > 0)
        {
           workbook.Worksheets[0].Range["A4"].RichText.Text += paragraph.Text;
        }
     }
}
Step 4: Apply text style including font color and font size to cell 'A4'.
int index = 0;

foreach (var item in paragraph.Items)
{
    if (item is Spire.Doc.Fields.TextRange)
    {
        for (int i = index; i < (item as Spire.Doc.Fields.TextRange).Text.Length + index; i++)
        {
            ExcelFont excelFont = workbook.CreateFont();
            excelFont.FontName = (item as Spire.Doc.Fields.TextRange).CharacterFormat.FontName;
            excelFont.Size = (item as Spire.Doc.Fields.TextRange).CharacterFormat.FontSize;
            excelFont.IsBold = (item as Spire.Doc.Fields.TextRange).CharacterFormat.Bold;
            excelFont.IsItalic = (item as Spire.Doc.Fields.TextRange).CharacterFormat.Italic;
            excelFont.Underline = (FontUnderlineType)(item as Spire.Doc.Fields.TextRange).CharacterFormat.UnderlineStyle; excelFont.Color = (item as Spire.Doc.Fields.TextRange).CharacterFormat.TextColor;
            workbook.Worksheets[0].Range["A4"].RichText.SetFont(i, i, excelFont);
        }
    }
    index += (item as Spire.Doc.Fields.TextRange).Text.Length;

}
Step 5: Change the width and height of the row to achieve the best fit.
workbook.Worksheets[0].Range["A4"].AutoFitRows();
Step 6: Save changes to the workbook in a new file.
workbook.SaveToFile("result.xlsx", ExcelVersion.Version2010);
HTML-Formatted Text in Excel would be shown as:
Full Code:
Workbook workbook = new Workbook();
Document doc = new Document();

StringReader sr = new StringReader("<span style=\"border-width:thin;border-color:#FFFFFF;\"><font color=#000000 size=8><b>U = Unchanged rate</b></font></span>");
doc.LoadHTML(sr, XHTMLValidationType.None);

int index = 0;

foreach (Section section in doc.Sections)
{
    foreach (Paragraph paragraph in section.Paragraphs)
    {
        if (paragraph.Items.Count > 0)
        {
            workbook.Worksheets[0].Range["A4"].RichText.Text += paragraph.Text;
            foreach (var item in paragraph.Items)
            {
                if (item is Spire.Doc.Fields.TextRange)
                {
for (int i = index; i < (item as Spire.Doc.Fields.TextRange).Text.Length + index; i++)
{
    ExcelFont excelFont = workbook.CreateFont();
    excelFont.FontName = (item as Spire.Doc.Fields.TextRange).CharacterFormat.FontName;
    excelFont.Size = (item as Spire.Doc.Fields.TextRange).CharacterFormat.FontSize;
    excelFont.IsBold = (item as Spire.Doc.Fields.TextRange).CharacterFormat.Bold;
    excelFont.IsItalic = (item as Spire.Doc.Fields.TextRange).CharacterFormat.Italic;
    excelFont.Underline = (FontUnderlineType)(item as Spire.Doc.Fields.TextRange).CharacterFormat.UnderlineStyle;
    excelFont.Color = (item as Spire.Doc.Fields.TextRange).CharacterFormat.TextColor;
    workbook.Worksheets[0].Range["A4"].RichText.SetFont(i, i, excelFont);
}
                }
                index += (item as Spire.Doc.Fields.TextRange).Text.Length;
            }
        }
    }
}
workbook.Worksheets[0].Range["A4"].AutoFitRows();
workbook.SaveToFile("result.xlsx", ExcelVersion.Version2010);
Set Excel View Mode in C#, VB.NET
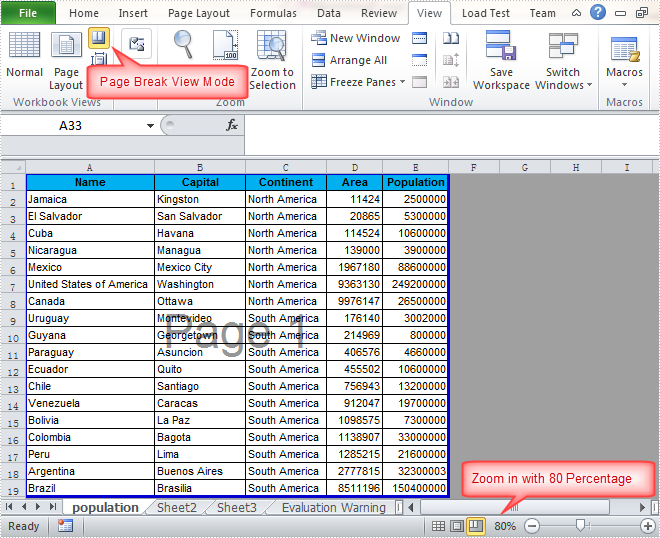
Users can change the Excel view mode according to reading habit. By default, there are several view modes we can choose, including Normal View, Page Layout View, Page Break Preview, Full Screen View and Custom Views. Besides, Microsoft Excel also enables us to zoom in/out the document to a specified level. In this article, I'll make a brief introduction about how to set Excel view mode using Spire.XLS in C# and VB.NET.
In this sample, the Excel view mode will be set as Page Break Preview with zoom in 80 percent. Download the Spire.XLS for .NET, add the Spire.Xls.dll as a reference into assemblies, then we can use the following code snippet to achieve this end goal.
Detailed Steps
Step 1: Create a new instance of Workbook and load the sample file.
Workbook workbook = new Workbook();
workbook.LoadFromFile("Sample.xlsx", ExcelVersion.Version2010);
Step 2: Get the first the worksheet from the Excel workbook.
Worksheet sheet = workbook.Worksheets[0];
Step 3: Set view mode as Page Break Preview and Zoom in the sheet with 80 percent.
sheet.ViewMode = ViewMode.Preview;
sheet.ZoomScalePageBreakView = 80;
Step 4: Save the changes to workbook in a new file.
workbook.SaveToFile("Result.xlsx", ExcelVersion.Version2010);
Output:
Full Code:
using Spire.Xls;
namespace SetExcelViewMode
{
    class Program
    {

        static void Main(string[] args)
        {
            Workbook workbook = new Workbook();
            workbook.LoadFromFile("Sample.xlsx", ExcelVersion.Version2010);
            Worksheet sheet = workbook.Worksheets[0];
            ////Page Layout
            //sheet.ViewMode = ViewMode.Layout;
            //sheet.ZoomScalePageLayoutView = 80;
            ////Normal View(Default)
            //sheet.ViewMode = ViewMode.Normal;
            //sheet.ZoomScaleNormal = 80;
            //Preview
            sheet.ViewMode = ViewMode.Preview;
            sheet.ZoomScalePageBreakView = 80;

            workbook.SaveToFile("Result.xlsx", ExcelVersion.Version2010);

        }

    }
}
Imports Spire.Xls
Namespace SetExcelViewMode
	Class Program

		Private Shared Sub Main(args As String())
			Dim workbook As New Workbook()
			workbook.LoadFromFile("Sample.xlsx", ExcelVersion.Version2010)
			Dim sheet As Worksheet = workbook.Worksheets(0)
			'''/Page Layout
			'sheet.ViewMode = ViewMode.Layout;
			'sheet.ZoomScalePageLayoutView = 80;
			'''/Normal View(Default)
			'sheet.ViewMode = ViewMode.Normal;
			'sheet.ZoomScaleNormal = 80;
			'Preview
			sheet.ViewMode = ViewMode.Preview
			sheet.ZoomScalePageBreakView = 80

			workbook.SaveToFile("Result.xlsx", ExcelVersion.Version2010)

		End Sub

	End Class
End Namespace