

Python (318)
Converting a document from Word to TIFF can be useful when you need to share the content as an image file, such as for electronic forms, presentations, or publishing. The TIFF format preserves the visual layout and appearance of the document. Conversely, converting a TIFF image to a Word document can be helpful when you want to present information in the Word format.
This article demonstrates how to convert Word to TIFF and TIFF to Word (non-editable) using Python and the Spire.Doc for Python library.
Install the Required Libraries
This situation relies on the combination of Spire.Doc for Python and Pillow (PIL). Spire.Doc is used to read, create and convert Word documents, while the PIL library is used for handling TIFF files and accessing their frames.
The libraries can be easily installed on your device through the following pip commands.
pip install Spire.Doc
pip install pillow
Convert Word to TIFF in Python
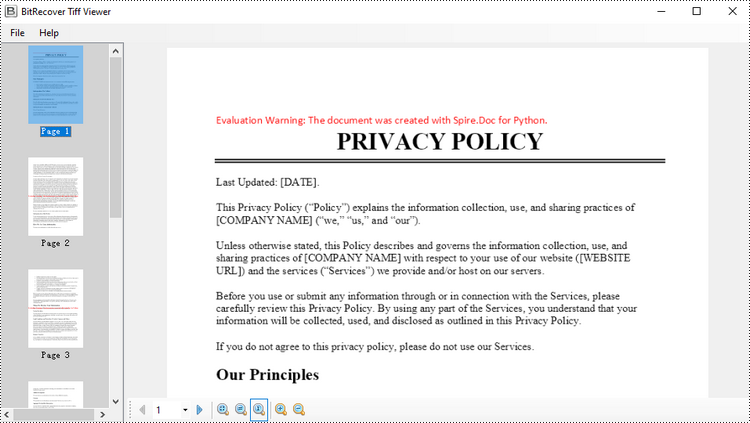
To convert a Word document into a TIFF image, the initial step is to use the Spire.Doc library to load the Word document and transform the individual pages into image data streams. Then, you can leverage the functionality provided by the PIL to merge these separate image streams into a unified TIFF image.
The following are the steps to convert Word to TIFF using Python.
- Create a Document object.
- Load a Word document from a specified file path.
- Iterate through the pages in the document.
- Convert each page into an image stream using Document.SaveImageToSteams() method.
- Convert the image stream into a PIL image.
- Combine these PIL images into a single TIFF image.
- Python
from spire.doc import *
from spire.doc.common import *

from PIL import Image
from io import BytesIO

# Create a Document object
doc = Document()

# Load a Word document
doc.LoadFromFile("C:\\Users\\Administrator\\Desktop\\Input.docx")

# Create an empty list to store PIL Images
images = []

# Iterate through pages in the document
for i in range(doc.GetPageCount()):

    # Convert a specific page to image stream
    with doc.SaveImageToStreams(i, ImageType.Bitmap) as imageData:

        # Open a specific image stream as a PIL image
        img = Image.open(BytesIO(imageData.ToArray()))

        # Append the PIL image to list
        images.append(img)

# Save the PIL Images as a multi-page TIFF file
images[0].save("Output/ToTIFF.tiff", save_all=True, append_images=images[1:])

# Dispose resources
doc.Dispose()
Convert TIFF to Word in Python
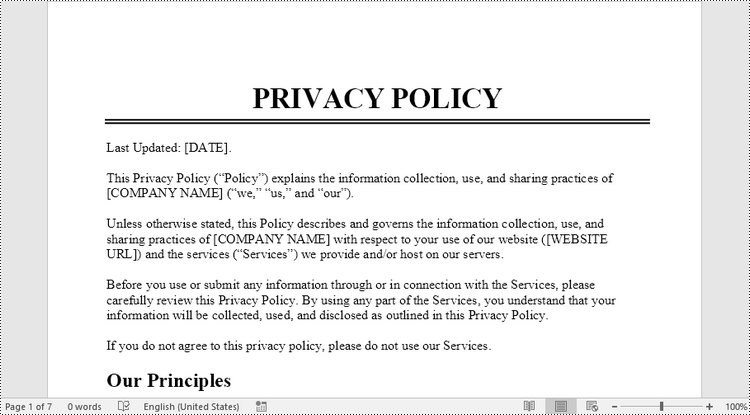
By utilizing PIL library, you can load a TIFF file and break it down into separate PNG images for each frame. You can then utilize the Spire.Doc library to incorporate these separate PNG files as distinct pages within a Microsoft Word document.
To convert a TIFF image to a Word document using Python, follow these steps.
- Create a Document object.
- Add a section to it and set the page margins to zero.
- Load a TIFF image.
- Iterate though the frames in the TIFF image.
- Get a specific frame, and save it as a PNG file.
- Add a paragraph to the section.
- Append the image file to the paragraph.
- Set the page size to be the same as the image size.
- Save the document to a Word file.
- Python
from spire.doc import *
from spire.doc.common import *

from PIL import Image
import io

# Create a Document object
doc = Document()

# Add a section
section = doc.AddSection()

# Set margins to 0
section.PageSetup.Margins.All = 0.0

# Load a TIFF image
tiff_image = Image.open("C:\\Users\\Administrator\\Desktop\\TIFF.tiff")

# Iterate through the frames in it
for i in range(tiff_image.n_frames):

    # Go to the current frame
    tiff_image.seek(i)

    # Extract the image of the current frame
    frame_image = tiff_image.copy()

    # Save the image to a PNG file
    frame_image.save(f"temp/output_frame_{i}.png")

    # Add a paragraph
    paragraph = section.AddParagraph()

    # Append image to the paragraph
    image = paragraph.AppendPicture(f"temp/output_frame_{i}.png")

    # Get image width and height
    width = image.Width
    height  = image.Height

    # Set the page size to be the same as the image size
    section.PageSetup.PageSize = SizeF(width, height)

# Save the document to a Word file
doc.SaveToFile("Output/ToWord.docx",FileFormat.Docx2019)

# Dispose resources
doc.Dispose()
Get a Free License
To fully experience the capabilities of Spire.Doc for Python without any evaluation limitations, you can request a free 30-day trial license.
Python: Export and Import Data Between Excel Files and Databases
2024-06-28 01:05:53 Written by KoohjiThe ability to export data from Excel files to databases, and vice versa, has become a crucial functionality in data management. Exporting data from an Excel file to a database offers scalability and enhanced security, enabling efficient handling of large datasets and facilitating collaboration with concurrency control. Conversely, importing data from databases into Excel provides the familiar spreadsheet interface for data analysis, visualization, and presentation, making complex information accessible to users. With the powerful Python language, developers can easily automate the transfer of data between databases and spreadsheets.
This article demonstrates how to use Spire.XLS for Python to export data from a database to Excel files and import data from Excel files to a database with simple Python code, taking the SQLite database as the example.
- Export Data from a Database to an Excel File with Python
- Export Data from an Excel Worksheet to a Database with Python
Install Spire.XLS for Python
This scenario requires Spire.XLS for Python and plum-dispatch v1.7.4. They can be easily installed in your Windows through the following pip command.
pip install Spire.XLS
If you are unsure how to install, please refer to: How to Install Spire.XLS for Python on Windows
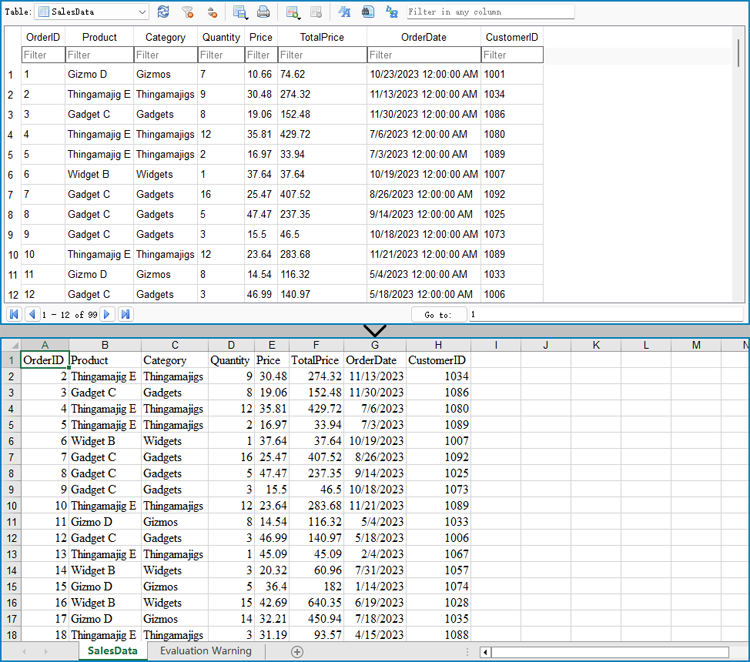
Export Data from a Database to an Excel File with Python
Spire.XLS for Python offers a range of classes, methods, and properties to create, read, and edit Excel workbooks. Developers can use the sqlite3 module from the Python standard library to read data from databases and utilize Spire.XLS for Python to create Excel files and write data into them, thereby enabling the export of database data to Excel worksheets.
The detailed steps are as follows:
- Connect to a database.
- Create an instance of Workbook class and clear the default worksheets.
- Iterate through the tables in the database to get all the column names and the data in the columns.
- Create a worksheet for each table using Workbook.Worksheets.Add() method, write the column names to the header row of the worksheet, and then write data to other rows through Worksheet.Range[].Value property.
- Format the worksheet.
- Save the workbook using Workbook.SaveToFile() method.
- Python
from spire.xls import *
from spire.xls.common import *
import sqlite3

# Connect to database
conn = sqlite3.connect("Sales Data.db")
cursor = conn.cursor()

# Get all the table names in the database
cursor.execute("SELECT name FROM sqlite_master WHERE type='table';")
tableNames = [name[0] for name in cursor.fetchall()]

# Create an Excel file
workbook = Workbook()
workbook.Worksheets.Clear()

# Iterate through each table in the database
for tableName in tableNames:
    # Get the column names of the table
    cursor.execute(f"PRAGMA table_info('{tableName}')")
    columnsInfo = cursor.fetchall()
    columnNames = [columnInfo[1] for columnInfo in columnsInfo]

    # Get the data of the table
    cursor.execute(f"SELECT * FROM {tableName}")
    rows = cursor.fetchall()

    # Create a worksheet
    sheet = workbook.Worksheets.Add(tableName)

    # Write the header to the worksheet
    for i in range(len(columnNames)):
        sheet.Range[1, i + 1].Value = columnNames[i]

    # Write the data to the worksheet
    for j in range(1, len(rows)):
        column = rows[j]
        for k in range(len(column)):
            sheet.Range[j + 1, k + 1].Value = column[k]

    # Format the worksheet
    sheet.AllocatedRange.Style.Font.FontName = "Times New Roman"
    sheet.AllocatedRange.Style.Font.Size = 12.0
    sheet.AllocatedRange.AutoFitRows()
    sheet.AllocatedRange.AutoFitColumns()

# Save the Excel file
workbook.SaveToFile("output/DataBaseToExcel.xlsx", FileFormat.Version2016)
workbook.Dispose()
conn.close()
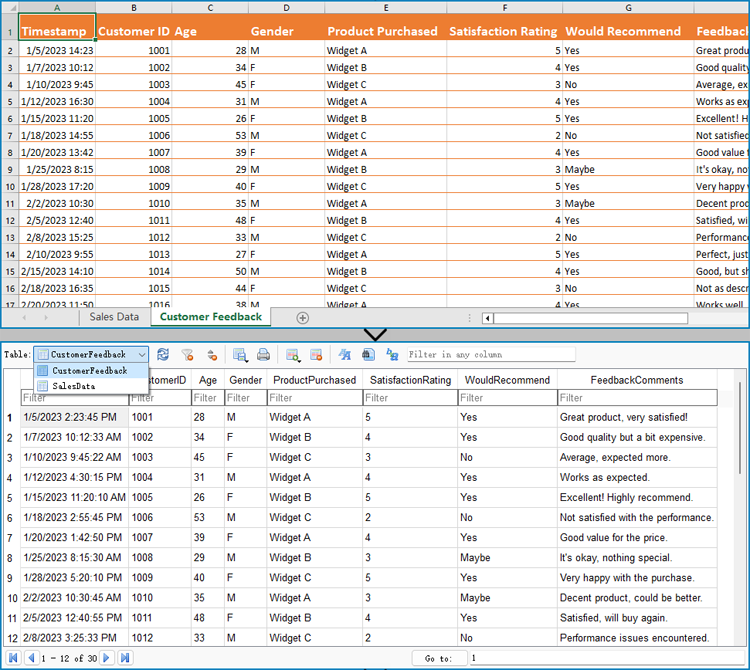
Export Data from an Excel Worksheet to a Database with Python
Spire.XLS for Python can also assist developers in reading various types of data from Excel files, and then developers can use sqlite3 to write the data to a database. Below are the detailed steps:
- Create an instance of Workbook class.
- Load an Excel workbook using Workbook.LoadFromFile() method.
- Connect to a database.
- Iterate through the worksheets in the workbook.
- Get a worksheet using Workbook.Worksheets.get_Item() method and get the name of the worksheet using Worksheet.Name property.
- Get the data in the header row through Worksheet.Range[].Value property.
- Create a table in the database with the worksheet name as the table name and create columns in the table with the header row data as the column names.
- Get the values from the worksheet cells through Worksheet.Range[].Value property and write them to the corresponding position in the database table.
- Commit the changes and close the connection.
- Python
from spire.xls import *
from spire.xls.common import *
import sqlite3

# Create an instance of Workbook
workbook = Workbook()

# Load an Excel file
workbook.LoadFromFile("Sample.xlsx")

# Connect to database
conn = sqlite3.connect("output/Report.db")
cursor = conn.cursor()

for s in range(workbook.Worksheets.Count):
    # Get a worksheet
    sheet = workbook.Worksheets.get_Item(s)

    # Get the sheet name
    sheetName = sheet.Name
    sheetName = sheetName.replace(" ", "")

    # Get the data in the header row
    header = []
    for i in range(sheet.AllocatedRange.ColumnCount):
        headerValue = sheet.Range[1, i + 1].Value
        headerValue = headerValue.replace(" ", "")
        header.append(headerValue)

    # Create a database table
    createTableSql = f"CREATE TABLE IF NOT EXISTS {sheetName} ({', '.join([f'{header[i]} TEXT' for i in range(len(header))])})"
    cursor.execute(createTableSql)

    # Insert data into the database table
    for row in range(1, sheet.AllocatedRange.RowCount):
        data = []
        for col in range(sheet.AllocatedRange.ColumnCount):
            # Get the cell value
            value = sheet.Range[row + 1, col + 1].Value
            data.append(value)
        # Insert the cell values into the database table
        insertSql = f"INSERT INTO {sheetName} ({', '.join(header)}) VALUES ({', '.join(['?' for _ in data])})"
        cursor.execute(insertSql, data)

# Commit the changes and close the connection
conn.commit()
conn.close()

workbook.Dispose()
Apply for a Temporary License
If you'd like to remove the evaluation message from the generated documents, or to get rid of the function limitations, please request a 30-day trial license for yourself.
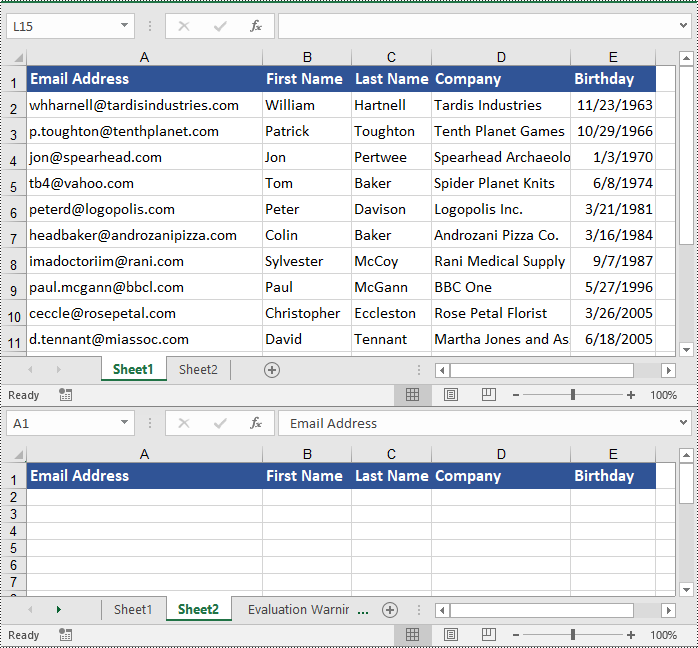
Working with large Excel workbooks can sometimes become unwieldy, especially when you need to share or distribute parts of the data independently. In these cases, it can be helpful to split your Excel file into multiple smaller files. This not only makes the individual files more manageable, but also allows you to better organize and share your data. In this article, we will demonstrate how to split an Excel file in Python using Spire.XLS for Python.
Install Spire.XLS for Python
This scenario requires Spire.XLS for Python and plum-dispatch v1.7.4. They can be easily installed in your Windows through the following pip command.
pip install Spire.XLS
If you are unsure how to install, please refer to this tutorial: How to Install Spire.XLS for Python on Windows
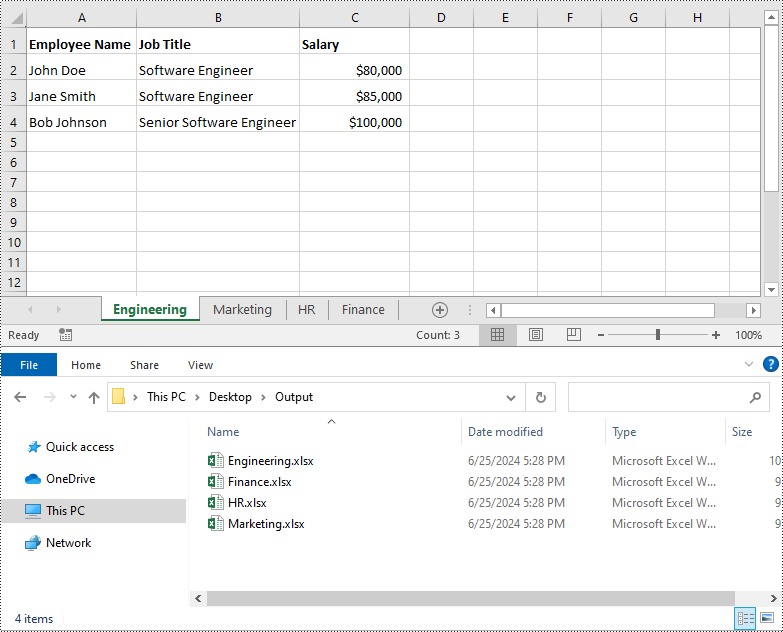
Split Excel by Worksheets in Python
If your Excel file contains multiple worksheets, you can easily split each sheet into an Excel file by using the Workbook.Worksheets.AddCopy() method provided by Spire.XLS for Python. The detailed steps are as follows.
- Create an object of the Workbook class.
- Load an Excel file using Workbook.LoadFromFile() method.
- Iterate through the worksheets in the Excel file.
- For each worksheet, create a new Workbook object for it.
- Remove the default worksheets in the new workbook using Workbook.Worksheets.Clear() method.
- Copy the worksheet to the new workbook using Workbook.Worksheets.AddCopy() method.
- Save the new workbook to an Excel file using Workbook.SaveToFile() method.
- Python
from spire.xls import *
from spire.xls.common import *

# Create an object of the Workbook class
workbook = Workbook()
# Load an Excel file
workbook.LoadFromFile("Sample.xlsx")

# Specify the folder path for the generated Excel files
folderPath = "C:\\Users\\Administrator\\Desktop\\Output\\"

# Iterate through all worksheets in the Excel file
for worksheet in workbook.Worksheets:
    # For each worksheet, create a new Workbook object
    newWorkbook = Workbook()
    # Remove the worksheets from the new workbook
    newWorkbook.Worksheets.Clear()

    # Copy the worksheet from the Excel file to the new workbook
    newWorkbook.Worksheets.AddCopy(worksheet)

    # Save the new workbook to the specified folder
    newWorkbook.SaveToFile(folderPath + worksheet.Name + ".xlsx", FileFormat.Version2016)

workbook.Dispose()
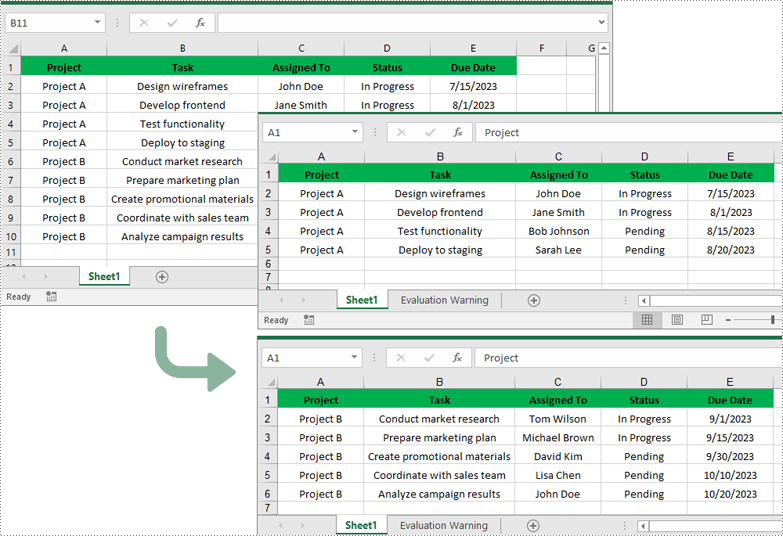
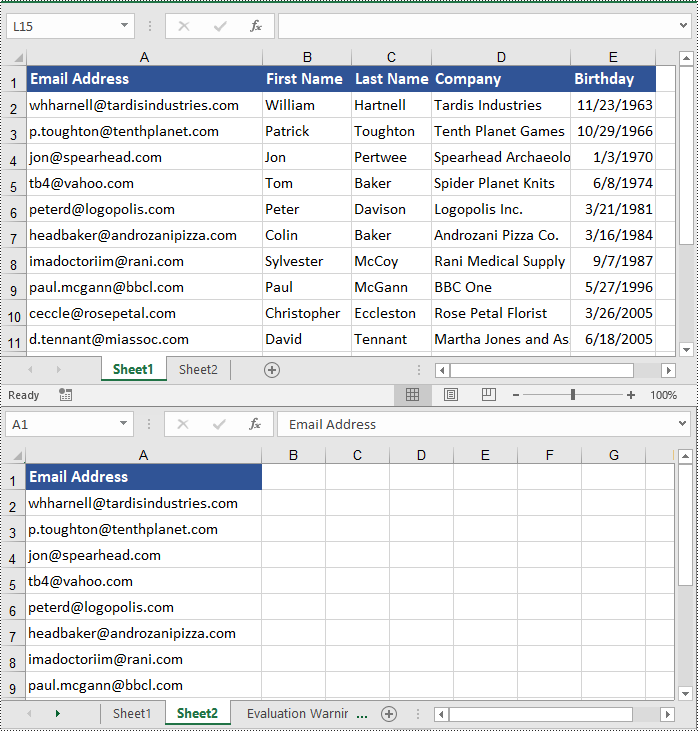
Split Excel by Rows in Python
If you have a large worksheet where a specific number of rows represent a unique record or entry, you can extract these individual rows or records into separate Excel files for focused data analysis using the Worksheet.CopyRow() method. The detailed steps are as follows.
- Create an object of the Workbook class.
- Load an Excel file using Workbook.LoadFromFile() method.
- Get the original worksheet where you want to copy rows from using Workbook.Worksheets[index] property.
- Create a new Workbook object and remove the default worksheets from the new workbook using Workbook.Worksheets.Clear() method.
- Add a new Worksheet to the new workbook using Workbook.Worksheets.Add() method.
- Copy specific rows from the original worksheet to the new worksheet using Worksheet.CopyRow() method.
- Copy Column widths from the original worksheet to the new worksheet.
- Save the new workbook to an Excel file using Workbook.SaveToFile() method.
- Python
from spire.xls import *
from spire.xls.common import *

# Create a Workbook object and load an Excel file
workbook = Workbook()
workbook.LoadFromFile("Sample.xlsx")
# Get the original (the 1st) worksheet
worksheet = workbook.Worksheets[0]
# Get the header row
header = worksheet.Rows[0]

# Specify the folder path for the generated Excel files
folderPath = "C:\\Users\\Administrator\\Desktop\\Output\\"

# Create a new Workbook object
newWorkbook1 = Workbook()
# Remove the default worksheets
newWorkbook1.Worksheets.Clear()
# Add a new worksheet
newWorksheet1 = newWorkbook1.Worksheets.Add("Sheet1")
# Copy rows 1-5 from the original worksheet to the new worksheet
for i in range(1, 6):
    worksheet.CopyRow(worksheet.Rows[i - 1], newWorksheet1, newWorksheet1.LastDataRow + 1, CopyRangeOptions.All)
# Copy column widths from the original worksheet to the new worksheet
for i in range(worksheet.Columns.Count):
    newWorksheet1.SetColumnWidth(i + 1, worksheet.GetColumnWidth(i + 1))
# Save the new workbook to the specified folder
newWorkbook1.SaveToFile(folderPath + "Rows1-5.xlsx", FileFormat.Version2016)
newWorkbook1.Dispose()

# Create a new Workbook object
newWorkbook2 = Workbook()
# Remove the default worksheets
newWorkbook2.Worksheets.Clear()
# Add a new worksheet
newWorksheet2 = newWorkbook2.Worksheets.Add("Sheet1")
# Copy header row from the original worksheet to the new worksheet
worksheet.CopyRow(worksheet.Rows[0], newWorksheet2, newWorksheet2.LastDataRow + 1, CopyRangeOptions.All)
# Copy rows 6-10 from the original worksheet to the new worksheet
for i in range(6, 11):
    worksheet.CopyRow(worksheet.Rows[i - 1], newWorksheet2, newWorksheet2.LastDataRow + 1, CopyRangeOptions.All)
# Copy column widths from the original worksheet to the new worksheet
for i in range(worksheet.Columns.Count):
    newWorksheet2.SetColumnWidth(i + 1, worksheet.GetColumnWidth(i + 1))
# Save the new workbook to the specified folder
newWorkbook2.SaveToFile(folderPath + "Rows6-10.xlsx", FileFormat.Version2016)
newWorkbook2.Dispose()
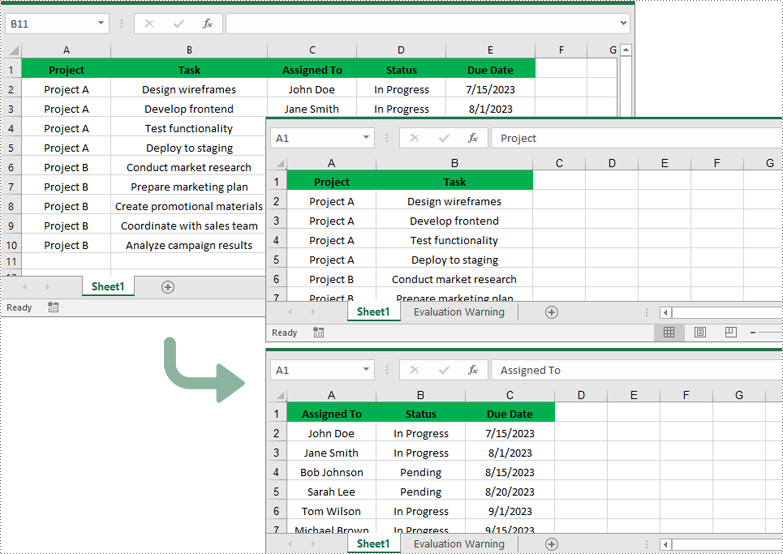
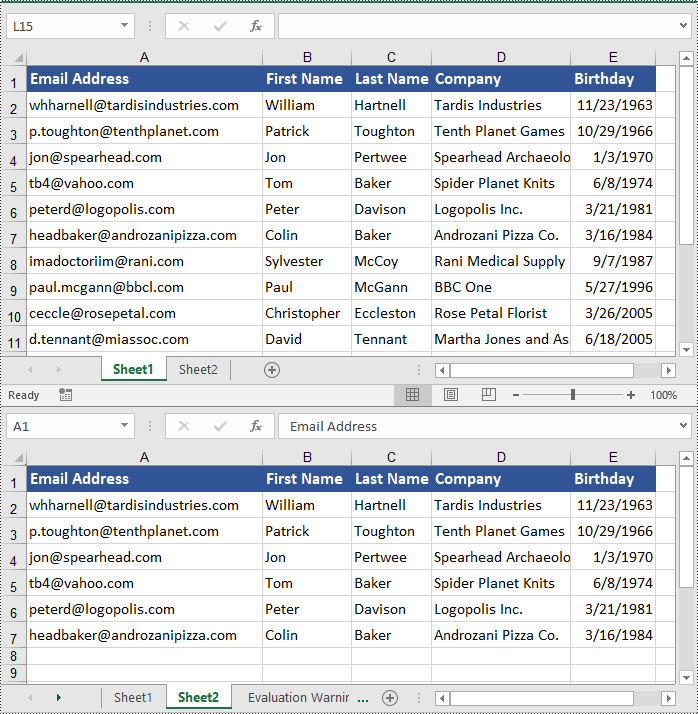
Split Excel by Columns in Python
In addition to splitting by rows, you can also split an Excel file by columns using the Worksheet.CopyColumn() method. The detailed steps are as follows.
- Create an object of the Workbook class.
- Load an Excel file using Workbook.LoadFromFile() method.
- Get the original worksheet where you want to copy columns from using Workbook.Worksheets[index] property.
- Create a new Workbook object and remove the default worksheets from the new workbook using Workbook.Worksheets.Clear() method.
- Add a new Worksheet to the new workbook using Workbook.Worksheets.Add() method.
- Copy specific columns from the original worksheet to the new worksheet using Worksheet.CopyColumn() method.
- Copy row heights from the original worksheet to the new worksheet.
- Save the new workbook to an Excel file using Workbook.SaveToFile() method.
- Python
from spire.xls import *
from spire.xls.common import *

# Create a Workbook object and load an Excel file
workbook = Workbook()
workbook.LoadFromFile("Sample.xlsx")
# Get the original (the 1st) worksheet
worksheet = workbook.Worksheets[0]

# Specify the folder path for the generated Excel files
folderPath = "C:\\Users\\Administrator\\Desktop\\Output\\"

# Create a new Workbook object
newWorkbook1 = Workbook()
# Remove the default worksheets
newWorkbook1.Worksheets.Clear()
# Add a new worksheet
newWorksheet1 = newWorkbook1.Worksheets.Add("Sheet1")
# Copy columns 1-2 from the original worksheet to the new worksheet
for i in range(1, 3):
    worksheet.CopyColumn(worksheet.Columns[i-1], newWorksheet1, newWorksheet1.LastDataColumn + 1, CopyRangeOptions.All)
# Copy row heights from the original worksheet to the new worksheet
for i in range(worksheet.Rows.Count):
    newWorksheet1.SetRowHeight(i + 1, worksheet.GetRowHeight(i + 1))
# Save the new workbook to the specified folder
newWorkbook1.SaveToFile(folderPath + "Columns1-2.xlsx", FileFormat.Version2016)
newWorkbook1.Dispose()

# Create a new Workbook object
newWorkbook2 = Workbook()
# Remove the default worksheets
newWorkbook2.Worksheets.Clear()
# Add a new worksheet
newWorksheet2 = newWorkbook2.Worksheets.Add("Sheet1")
# Copy columns 3-5 from the original worksheet to the new worksheet
for i in range(3, 6):
    worksheet.CopyColumn(worksheet.Columns[i-1], newWorksheet2, newWorksheet2.LastDataColumn + 1, CopyRangeOptions.All)

# Copy row heights from the original worksheet to the new worksheet
for i in range(worksheet.Rows.Count):
    newWorksheet2.SetRowHeight(i + 1, worksheet.GetRowHeight(i + 1))
# Save the new workbook to the specified folder
newWorkbook2.SaveToFile(folderPath + "Columns3-5.xlsx", FileFormat.Version2016)
newWorkbook2.Dispose()
Apply for a Temporary License
If you'd like to remove the evaluation message from the generated documents, or to get rid of the function limitations, please request a 30-day trial license for yourself.
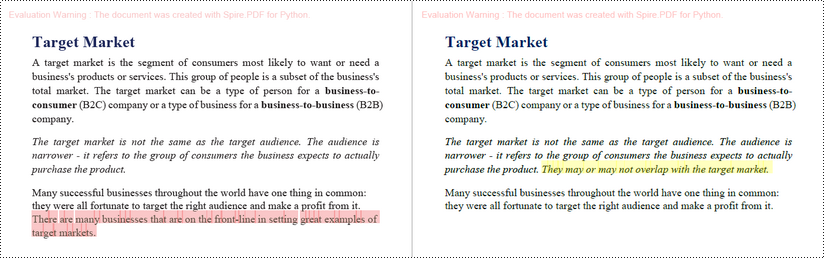
Comparing PDF documents is a common task when collaborating on projects or tracking changes. This allows users to quickly review and understand what has been modified, added, or removed between revisions. Effective PDF comparison streamlines the review process and ensures all stakeholders are aligned on the latest document content.
In this article, you will learn how to compare two PDF documents using Python and the Spire.PDF for Python library.
Install Spire.PDF for Python
This scenario requires Spire.PDF for Python and plum-dispatch v1.7.4. They can be easily installed in your Windows through the following pip command.
pip install Spire.PDF
If you are unsure how to install, please refer to this tutorial: How to Install Spire.PDF for Python on Windows
Compare Two PDF Documents in Python
Spire.PDF for Python provides the PdfComparer.Compare() method allowing developers to compare two PDF documents and save the comparison result to another PDF document. Here are the detailed steps.
- Load the first PDF document while initializing the PdfDocument object.
- Load the second PDF document while initializing another PdfDocument object.
- Initialize an instance of PdfComparer class, passing the two PdfDocument objects are the parameter.
- Call Compare() method of the PdfComparer object to compare the two PDF documents and save the result to a different PDF document.
- Python
from spire.pdf.common import *
from spire.pdf import *

# Load the first document
doc_one = PdfDocument("C:\\Users\\Administrator\\Desktop\\PDF_ONE.pdf")

# Load the section document
doc_two = PdfDocument("C:\\Users\\Administrator\\Desktop\\PDF_TWO.pdf")

# Create a PdfComparer object
comparer = PdfComparer(doc_two, doc_one)

# Compare two documents and save the comparison result in a pdf document
comparer.Compare("output/CompareResult.pdf")

# Dispose resources
doc_one.Dispose()
doc_two.Dispose()
Compare Selected Pages in PDF Documents in Python
Instead of comparing two entire documents, you can specify the pages to compare using the PdfComparer.PdfCompareOptions.SetPageRanges() method. The following are the detailed steps.
- Load the first PDF document while initializing the PdfDocument object.
- Load the second PDF document while initializing another PdfDocument object.
- Initialize an instance of PdfComparer class, passing the two PdfDocument objects are the parameter.
- Specify the page range to compare using PdfComparer.PdfCompareOptions.SetPageRanges() method
- Call PdfComparer.Compare() method to compare the selected pages and save the result to a different PDF document.
- Python
from spire.pdf.common import *
from spire.pdf import *

# Load the first document
doc_one = PdfDocument("C:\\Users\\Administrator\\Desktop\\PDF_ONE.pdf")

# Load the section document
doc_two = PdfDocument("C:\\Users\\Administrator\\Desktop\\PDF_TWO.pdf")

# Create a PdfComparer object
comparer = PdfComparer(doc_two, doc_one)

# Set page range for comparison
comparer.PdfCompareOptions.SetPageRanges(1, 3, 1, 3)

# Compare the selected pages and save the comparison result in a pdf document
comparer.Compare("output/CompareResult.pdf")

# Dispose resources
doc_one.Dispose()
doc_two.Dispose()
Apply for a Temporary License
If you'd like to remove the evaluation message from the generated documents, or to get rid of the function limitations, please request a 30-day trial license for yourself.
When working with large amounts of information, the ability to quickly sort data can be very beneficial at times. By arranging data in ascending, descending, or customized order, users can easily spot trends, analyze relationships, and extract valuable insights. In this article, you will learn how to sort columns or rows in Excel in Python using Spire.XLS for Python.
- Sort By Columns in Excel in Python
- Sort By Custom List in Excel in Python
- Sort By Rows in Excel in Python
Install Spire.XLS for Python
This scenario requires Spire.XLS for Python and plum-dispatch v1.7.4. They can be easily installed in your Windows through the following pip command.
pip install Spire.XLS
If you are unsure how to install, please refer to this tutorial: How to Install Spire.XLS for Python on Windows
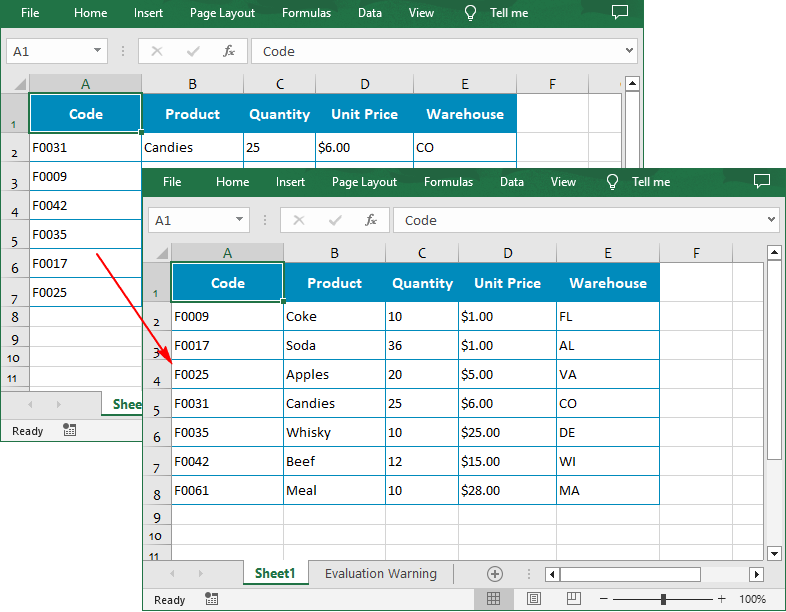
Sort By Columns in Excel in Python
The Workbook.DataSorter.SortColumns.Add(key: int, sortComparsionType: SortComparsionType, orderBy: OrderBy) method provided by Spire.XLS for Python allows users to sort data based on different criteria. For example, you can sort cell values, cell colors or font colors in ascending, descending, or other order.
The following are the steps to sort the values in a specified column:
- Create a Workbook instance.
- Load an Excel file using Workbook.LoadFromFile() method.
- Get a specified worksheet using Workbook.Worksheets[] property.
- Specify the sorting mode using Workbook.DataSorter.SortColumns.Add() method.
- Sort data in a specified cell range using Workbook.DataSorter.Sort() method.
- Save the result file using Workbook.SaveToFile() method.
- Python
from spire.xls.common import *
from spire.xls import *

# Create a Workbook instance
workbook = Workbook()

# Load an Excel file
workbook.LoadFromFile("Budget.xlsx")

# Get the first worksheet
worksheet = workbook.Worksheets[0]

# Sort values in the specified column in ascending order
workbook.DataSorter.SortColumns.Add(0, SortComparsionType.Values, OrderBy.Ascending)

# Sort in the specified cell range
workbook.DataSorter.Sort(worksheet["A1:E7"])

# Save the result file
workbook.SaveToFile("SortByColumns.xlsx", ExcelVersion.Version2016)
workbook.Dispose()
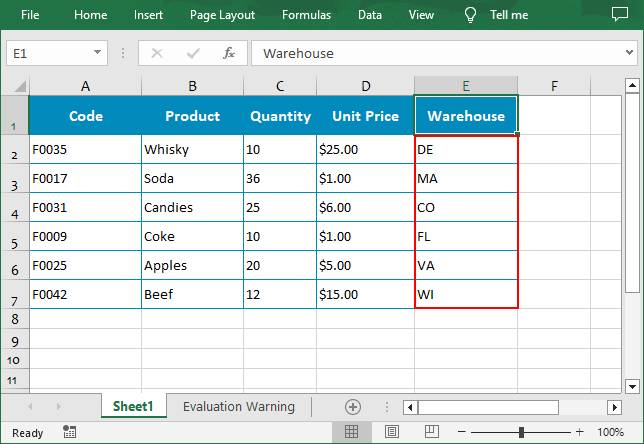
Sort By Custom List in Excel in Python
You can also create a custom list and then sort data based on it using the Workbook.DataSorter.SortColumns.Add(key: int, customSortOrder: List[str]) method.
The following are the steps to sort data using a custom list:
- Create a Workbook instance.
- Load an Excel file using Workbook.LoadFromFile() method.
- Get a specified worksheet using Workbook.Worksheets[] property.
- Create a custom sort list, and then sort a specified column using it though Workbook.DataSorter.SortColumns.Add() method.
- Sort data in a specified cell range using Workbook.DataSorter.Sort() method.
- Save the result file using Workbook.SaveToFile() method.
- Python
from spire.xls.common import *
from spire.xls import *

# Create a Workbook instance
workbook = Workbook()

# Load an Excel file
workbook.LoadFromFile("Budget.xlsx")

# Get the first worksheet
worksheet = workbook.Worksheets[0]

# Create a custom sort list
customList = ["DE","MA", "CO", "FL", "VA", "WI"]

# Sort a specified column using the custom list
workbook.DataSorter.SortColumns.Add(4, customList )

# Sort in the specified cell range
workbook.DataSorter.Sort(worksheet["A1:E7"])

# Save the result file
workbook.SaveToFile("CustomSortList.xlsx", ExcelVersion.Version2016)
workbook.Dispose()
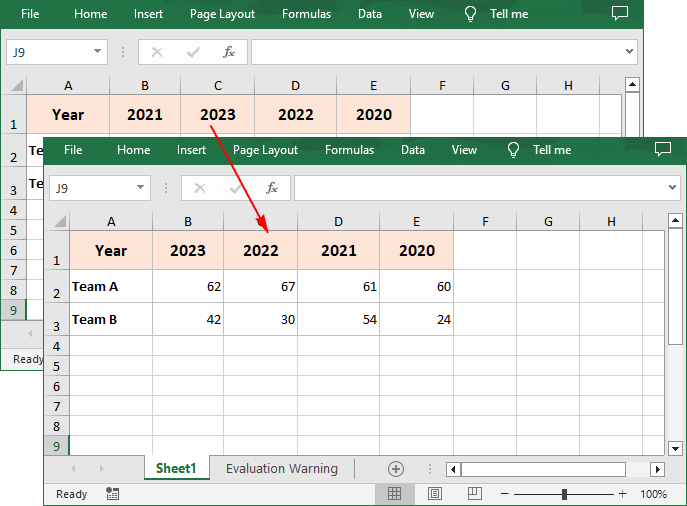
Sort By Rows in Excel in Python
To sort a specified row in Excel, you need to set the sort orientation to LeftToRight, specify the sort mode and sort row data accordingly.
The following are the steps to sort the values in a specified row:
- Create a Workbook instance.
- Load an Excel file using Workbook.LoadFromFile() method.
- Get a specified worksheet using Workbook.Worksheets[] property.
- Set whether to include titles when sorting using Workbook.DataSorter.IsIncludeTitle property.
- Set the sort orientation using Workbook.DataSorter.Orientation property.
- Specify the sorting mode, and then sort data in the first row using Workbook.DataSorter.Sort(Worksheet.Rows[0]) method.
- Save the result file using Workbook.SaveToFile() method.
- Python
from spire.xls.common import *
from spire.xls import *

# Create a Workbook instance
workbook = Workbook()

# Load an Excel file
workbook.LoadFromFile("Year.xlsx")

# Get the first worksheet
sheet = workbook.Worksheets[0]

# Set whether to include titles when sorting
workbook.DataSorter.IsIncludeTitle = True

# Set the sort orientation
workbook.DataSorter.Orientation = SortOrientationType.LeftToRight

# Specify the sorting mode
workbook.DataSorter.SortColumns.Add(0,SortComparsionType.Values,OrderBy.Descending)

# Sort data in the first row
workbook.DataSorter.Sort(sheet.Rows[0])

# Save the result file
workbook.SaveToFile("SortByRows.xlsx", ExcelVersion.Version2016)
workbook.Dispose()
Apply for a Temporary License
If you'd like to remove the evaluation message from the generated documents, or to get rid of the function limitations, please request a 30-day trial license for yourself.
Setting the number format for cells in Excel worksheets is crucial for data management and presentation, which enhances readability, ensures consistency, and facilitates accurate data analysis. Proper number formatting allows users to distinguish between different types of numerical data, such as currency, percentages, dates, and scientific notations, making complex datasets more comprehensible at a glance. In this article, we will explore how to automate the process of setting the number format for cells in Excel worksheets with Spire.XLS for Python in Python programs.
Install Spire.XLS for Python
This scenario requires Spire.XLS for Python and plum-dispatch v1.7.4. They can be easily installed in your Windows through the following pip command.
pip install Spire.XLS
If you are unsure how to install, please refer to: How to Install Spire.XLS for Python on Windows
Set the Number Format for Cells in Excel Worksheets
In an Excel workbook, the number format of a cell is determined by its format code. Developers can utilize various symbols in format code to define how numerical data, date and time, currency, etc. are displayed. Below are some commonly used symbols in number format codes:
- #: Represents a digit placeholder that displays only non-zero digits.
- 0: Represents a digit placeholder and always occupies at least one position.
- ; (semicolon): Separates formats for positive numbers, negative numbers, and zero.
- / (slash): In date formats, separates year, month, and day.
- $: Currency symbol, used for representing monetary values, adaptable to system regional settings.
- () (parentheses): Formats negative numbers by enclosing them in parentheses.
- [ ] (square brackets): Utilized in conditional formatting, such as color settings [Red] or conditions like [<=100]"Low";[>100]"High".
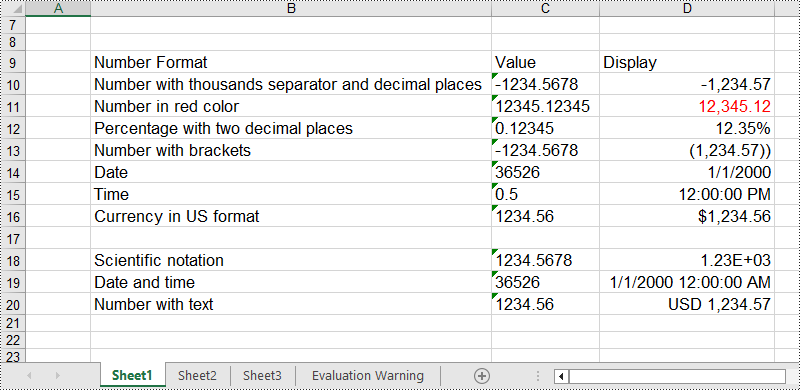
Spire.XLS for Python provides the CellRange.NumberValue property to set the number value of a cell and the CellRange.NumberFormat property to set the number format with format code. Below are the steps for setting the number format for cells in Excel worksheets with Python:
- Create an instance of Workbook class to create an Excel workbook.
- Get the first default worksheet using Workbook.Worksheets.get_Item() method.
- Add text to header row through Worksheet.Range[].Text property.
- Add number value to cells through Worksheet.Range[].NumberValue property and set the number format for the cells with format code through Worksheet.Range[].NumberFormat property.
- Save the Excel workbook using Workbook.SaveToFile() method.
- Python
from spire.xls import *
from spire.xls.common import *

# Create an instance of Workbook
workbook = Workbook()

# Get the first worksheet
sheet = workbook.Worksheets.get_Item(0)

# Set the header row
sheet.Range["B9"].Text = "Number Format"
sheet.Range["C9"].Text = "Value"
sheet.Range["D9"].Text = "Display"

# Number with thousands separator and decimal places
sheet.Range["B10"].Text = "Number with thousands separator and decimal places"
sheet.Range["C10"].Text = "-1234.5678"
sheet.Range["D10"].NumberValue = -1234.5678
sheet.Range["D10"].NumberFormat = "#,##0.00"

# Number in red color
sheet.Range["B11"].Text = "Number in red color"
sheet.Range["C11"].Text = "12345.12345"
sheet.Range["D11"].NumberValue = 12345.12345
sheet.Range["D11"].NumberFormat = "[Red]#,##0.00"

# Percentage with two decimal places
sheet.Range["B12"].Text = "Percentage with two decimal places"
sheet.Range["C12"].Text = "0.12345"
sheet.Range["D12"].NumberValue = 0.12345
sheet.Range["D12"].NumberFormat = "0.00%"

# Number with brackets
sheet.Range["B13"].Text = "Number with brackets"
sheet.Range["C13"].Text = "-1234.5678"
sheet.Range["D13"].NumberValue = -1234.5678
sheet.Range["D13"].NumberFormat = "(#,##0.00;(#,##0.00))"

# Date
sheet.Range["B14"].Text = "Date"
sheet.Range["C14"].Text = "36526"
sheet.Range["D14"].NumberValue = 36526
sheet.Range["D14"].NumberFormat = "m/d/yyyy"

# Time
sheet.Range["B15"].Text = "Time"
sheet.Range["C15"].Text = "0.5"
sheet.Range["D15"].NumberValue = 0.5
sheet.Range["D15"].NumberFormat = "h:mm:ss AM/PM"

# Currency in US format
sheet.Range["B16"].Text = "Currency in US format"
sheet.Range["C16"].Text = "1234.56"
sheet.Range["D16"].NumberValue = 1234.56
sheet.Range["D16"].NumberFormat = "$#,##0.00"

# Scientific notation
sheet.Range["B18"].Text = "Scientific notation"
sheet.Range["C18"].Text = "1234.5678"
sheet.Range["D18"].NumberValue = 1234.5678
sheet.Range["D18"].NumberFormat = "0.00E+00"

# Date and time
sheet.Range["B19"].Text = "Date and time"
sheet.Range["C19"].Text = "36526"
sheet.Range["D19"].NumberValue = 36526
sheet.Range["D19"].NumberFormat = "m/d/yyyy h:mm:ss AM/PM"

# Number with text
sheet.Range["B20"].Text = "Number with text"
sheet.Range["C20"].Text = "1234.56"
sheet.Range["D20"].NumberValue = 1234.5678
sheet.Range["D20"].NumberFormat = "\"USD \"#,##0.00"

# Set the font size and autofit rows and columns
sheet.AllocatedRange.Style.Font.Size = 13
sheet.AllocatedRange.AutoFitRows()
sheet.AllocatedRange.AutoFitColumns()

# Save the file
workbook.SaveToFile("output/SetNumberFormatExcel.xlsx", FileFormat.Version2016)
workbook.Dispose()
Apply for a Temporary License
If you'd like to remove the evaluation message from the generated documents, or to get rid of the function limitations, please request a 30-day trial license for yourself.
Copying data in Excel is a fundamental feature that allows you to quickly and efficiently reproduce data. It can be especially valuable when building spreadsheets with similar structures, or needing to propagate the same information across multiple areas of your workbook. By mastering the art of copying in Excel, you can boost your productivity and reduce the risk of manual data entry errors. In this article, we will explain how to copy rows, columns and cells in Excel in Python using Spire.XLS for Python.
Install Spire.XLS for Python
This scenario requires Spire.XLS for Python and plum-dispatch v1.7.4. They can be easily installed in your Windows through the following pip command.
pip install Spire.XLS
If you are unsure how to install, please refer to this tutorial: How to Install Spire.XLS for Python on Windows
Copy Rows in Excel in Python
You can use the Worksheet.CopyRow(sourceRow, destSheet, destRowIndex, copyOptions) method provided by Spire.XLS for Python to easily copy a row in the same or between different worksheets in Excel. The detailed steps are as follows.
- Create an object of the Workbook class.
- Load an Excel file using the Workbook.LoadFromFile() method.
- Get the source worksheet and the destination worksheet using the Workbook.Worksheets[index] property.
- Get the desired row that you want to copy using the Worksheet.Rows[index] property.
- Copy the row and its format from the source worksheet to the destination worksheet using the Worksheet.CopyRow(sourceRow, destSheet, destRowIndex, copyOptions) method.
- Copy the column widths of cells in the source row to the corresponding cells in the destination row.
- Save the workbook to a file using the Workbook.SaveToFile() method.
- Python
from spire.xls import *
from spire.xls.common import *

# Create a Workbook object
workbook = Workbook()
# Load an Excel file
workbook.LoadFromFile("ContactList.xlsx")

# Get the source worksheet
sheet1 = workbook.Worksheets[0]
# Get the destination worksheet
sheet2 = workbook.Worksheets[1]

# Get the desired row that you want to copy
row = sheet1.Rows[0]

# Copy the row from the source worksheet to the first row of the destination worksheet
sheet1.CopyRow(row, sheet2, 1, CopyRangeOptions.All)

columns = sheet1.Columns.Length
# Copy the column widths of the cells in the source row to the corresponding cells in the destination row
for i in range(columns):
    column_width = row.Columns[i].ColumnWidth
    sheet2.Rows[0].Columns[i].ColumnWidth = column_width

# Save the workbook to a file
workbook.SaveToFile("CopyRow.xlsx", ExcelVersion.Version2016)
workbook.Dispose()
Copy Columns in Excel in Python
To copy a column in an Excel worksheet, you can use the Worksheet.CopyColumn(sourceColumn, destSheet, destColIndex, copyOptions) method. The detailed steps are as follows.
- Create an object of the Workbook class.
- Load an Excel file using the Workbook.LoadFromFile() method.
- Get the source worksheet and the destination worksheet using the Workbook.Worksheets[index] property.
- Get the desired column that you want to copy using the Worksheet.Columns[index] property.
- Copy the column and its format from the source worksheet to the destination worksheet using the Worksheet.CopyColumn(sourceColumn, destSheet, destColIndex, copyOptions) method.
- Copy the row heights of cells in the source column to the corresponding cells in the destination column.
- Save the workbook to a file using the Workbook.SaveToFile() method.
- Python
from spire.xls import *
from spire.xls.common import *

# Create a Workbook object
workbook = Workbook()
# Load an Excel file
workbook.LoadFromFile("ContactList.xlsx")

# Get the source worksheet
sheet1 = workbook.Worksheets[0]
# Get the destination worksheet
sheet2 = workbook.Worksheets[1]

# Get the desired column that you want to copy
column = sheet1.Columns[0]

# Copy the column from the source worksheet to the first column of the destination worksheet
sheet1.CopyColumn(column, sheet2, 1, CopyRangeOptions.All)

rows = column.Rows.Length
# Copy the row heights of cells in the source column to the corresponding cells in the destination column
for i in range(rows):
    row_height = column.Rows[i].RowHeight
    sheet2.Columns[0].Rows[i].RowHeight = row_height

# Save the workbook to a file
workbook.SaveToFile("CopyColumn.xlsx", ExcelVersion.Version2016)
workbook.Dispose()
Copy Cells in Excel in Python
In addition to copying entire rows and columns, you are also able to copy an individual cell or a range of cells using the CellRange.Copy(destRange, copyOptions) method. The detailed steps are as follows.
- Create an object of the Workbook class.
- Load an Excel file using the Workbook.LoadFromFile() method.
- Get the source worksheet and the destination worksheet using the Workbook.Worksheets[index] property.
- Get the source cell range and the destination cell range using the Worksheet.Range[] property.
- Copy the source cell range and its format from the source worksheet to the destination cell range in the destination worksheet using the CellRange.Copy(destRange, copyOptions) method.
- Copy the row heights and column widths of the source cell range to the destination cell range.
- Save the workbook to a file using the Workbook.SaveToFile() method.
- Python
from spire.xls import *
from spire.xls.common import *

# Create a Workbook object
workbook = Workbook()
# Load an Excel file
workbook.LoadFromFile("ContactList.xlsx")

# Get the source worksheet
sheet1 = workbook.Worksheets[0]
# Get the destination worksheet
sheet2 = workbook.Worksheets[1]

# Get the source cell range
range1 = sheet1.Range["A1:E7"]
# Get the destination cell range
range2 = sheet2.Range["A1:E7"]

# Copy the source cell range from the source worksheet to the destination cell range in the destination worksheet
range1.Copy(range2, CopyRangeOptions.All)

# Copy the row heights and column widths of the source cell range to the destination cell range
for i, row in enumerate(range1.Rows):
    for j, column in enumerate(row.Columns):
        range2.Rows[i].Columns[j].ColumnWidth = column.ColumnWidth
        range2.Rows[i].RowHeight = row.RowHeight

# Save the workbook to a file
workbook.SaveToFile("CopyCells.xlsx", ExcelVersion.Version2016)
workbook.Dispose()
Apply for a Temporary License
If you'd like to remove the evaluation message from the generated documents, or to get rid of the function limitations, please request a 30-day trial license for yourself.
Tables are a powerful formatting tool in Word, allowing you to organize and present data effectively. However, the default table borders may not always align with your document's style and purpose. By selectively changing or removing the borders, you can achieve a variety of visual effects to suit your requirements. In this article, we will explore how to change and remove borders for tables in Word documents in Python using Spire.Doc for Python.
Install Spire.Doc for Python
This scenario requires Spire.Doc for Python. It can be easily installed in your Windows through the following pip command.
pip install Spire.Doc
If you are unsure how to install, please refer to this tutorial: How to Install Spire.Doc for Python on Windows
Change Borders for a Table in Word in Python
Spire.Doc for Python empowers you to retrieve the borders collection of a table by using the Table.TableFormat.Borders property. Once retrieved, you can access individual borders (like top border, bottom border, left border, right border, horizontal border, and vertical border) from the collection and then modify them by adjusting their line style, width, and color. The detailed steps are as follows.
- Create an object of the Document class.
- Load a Word document using Document.LoadFromFile() method.
- Get a specific section using Document.Sections[index] property.
- Get a specific table using Section.Tables[index] property.
- Get the borders collection of the table using Table.TableFormat.Borders property.
- Get an individual border, such as the top border from the borders collection using Borders.Top property, and then change its line style, width and color.
- Refer to the above step to get other individual borders from the borders collection, and then change their line style, width and color.
- Save the resulting document using Document.SaveToFile() method.
- Python
from spire.doc import *
from spire.doc.common import *

# Create an object of the Document class
document = Document()
# Load a Word document
document.LoadFromFile("Table.docx")

# Add a section to the document
section = document.Sections[0]

# Get the first table in the section
table = section.Tables[0] if isinstance(section.Tables[0], Table) else None

# Get the collection of the borders
borders = table.TableFormat.Borders

# Get the top border and change border style, line width, and color
topBorder = borders.Top
topBorder.BorderType = BorderStyle.Single
topBorder.LineWidth = 1.0
topBorder.Color = Color.get_YellowGreen()

# Get the left border and change border style, line width, and color
leftBorder = borders.Left
leftBorder.BorderType = BorderStyle.Single
leftBorder.LineWidth = 1.0
leftBorder.Color = Color.get_YellowGreen()

# Get the right border and change border style, line width, and color
rightBorder = borders.Right
rightBorder.BorderType = BorderStyle.Single
rightBorder.LineWidth = 1.0
rightBorder.Color = Color.get_YellowGreen()

# Get the bottom border and change border style, line width, and color
bottomBorder = borders.Bottom
bottomBorder.BorderType = BorderStyle.Single
bottomBorder.LineWidth = 1.0
bottomBorder.Color = Color.get_YellowGreen()

# Get the horizontal border and change border style, line width, and color
horizontalBorder = borders.Horizontal
horizontalBorder.BorderType = BorderStyle.Dot
horizontalBorder.LineWidth = 1.0
horizontalBorder.Color = Color.get_Orange()

# Get the vertical border and change border style, line width, and color
verticalBorder = borders.Vertical
verticalBorder.BorderType = BorderStyle.Dot
verticalBorder.LineWidth = 1.0
verticalBorder.Color = Color.get_CornflowerBlue()

# Save the resulting document
document.SaveToFile("ChangeBorders.docx", FileFormat.Docx2013)
document.Close()
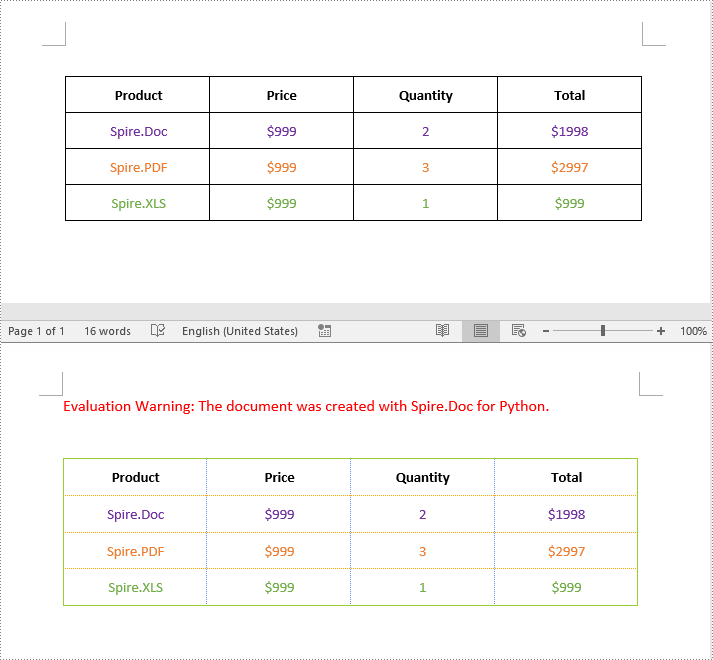
Remove Borders from a Table in Word in Python
To remove borders from a table, you need to set the BorderType property of the borders to BorderStyle.none. The detailed steps are as follows.
- Create an object of the Document class.
- Load a Word document using Document.LoadFromFile() method.
- Get a specific section using Document.Sections[index] property.
- Get a specific table using Section.Tables[index] property.
- Get the borders collection of the table using Table.TableFormat.Borders property.
- Get an individual border, such as the top border from the borders collection using Borders.Top property. Then set the BorderType property of the top border to BorderStyle.none.
- Refer to the above step to get other individual borders from the borders collection and then set the BorderType property of the borders to BorderStyle.none.
- Save the resulting document using Document.SaveToFile() method.
- Python
from spire.doc import *
from spire.doc.common import *

# Initialize an instance of the Document class
document = Document()
document.LoadFromFile("ChangeBorders.docx")

# Add a section to the document
section = document.Sections[0]

# Get the first table in the section
table = section.Tables[0] if isinstance(section.Tables[0], Table) else None

# Get the borders collection of the table
borders = table.TableFormat.Borders

# Remove top border
topBorder = borders.Top
topBorder.BorderType = BorderStyle.none

# Remove left border
leftBorder = borders.Left
leftBorder.BorderType = BorderStyle.none

# Remove right border
rightBorder = borders.Right
rightBorder.BorderType = BorderStyle.none

# Remove bottom border
bottomBorder = borders.Bottom
bottomBorder.BorderType = BorderStyle.none

# remove inside horizontal border
horizontalBorder = borders.Horizontal
horizontalBorder.BorderType = BorderStyle.none

# Remove inside vertical border
verticalBorder = borders.Vertical
verticalBorder.BorderType = BorderStyle.none

# Save the resulting document
document.SaveToFile("RemoveBorders.docx", FileFormat.Docx2013)
document.Close()
Apply for a Temporary License
If you'd like to remove the evaluation message from the generated documents, or to get rid of the function limitations, please request a 30-day trial license for yourself.
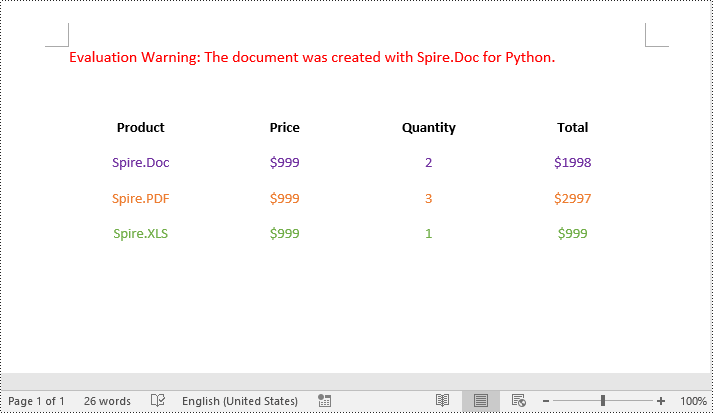
PowerPoint presentations often serve as repositories of essential data and information shared during meetings, lectures, and conferences. They frequently include tables for data presentation and basic analysis. However, to further analyze the data or integrate it into reports and spreadsheets, it becomes necessary to extract these tables and save them in other formats. By leveraging Python, users can efficiently extract tables from PowerPoint presentations, transforming static slides into dynamic data sets ready for processing.
This article aims to demonstrate how to extract tables from PowerPoint presentations and write them to text and Excel worksheets using Spire.Presentation for Python, thereby enhancing the utilization of data in presentations and streamlining the data extraction process.
- Extract Table Data from PowerPoint Presentations to Text Files
- Extract Table Data from PowerPoint Presentations to Excel Worksheets
Install Spire.Presentation for Python
This scenario requires Spire.Presentation for Python and plum-dispatch v1.7.4. They can be easily installed in your Windows through the following pip command.
pip install Spire.Presentation
If you are unsure how to install, please refer to: How to Install Spire.Presentation for Python on Windows
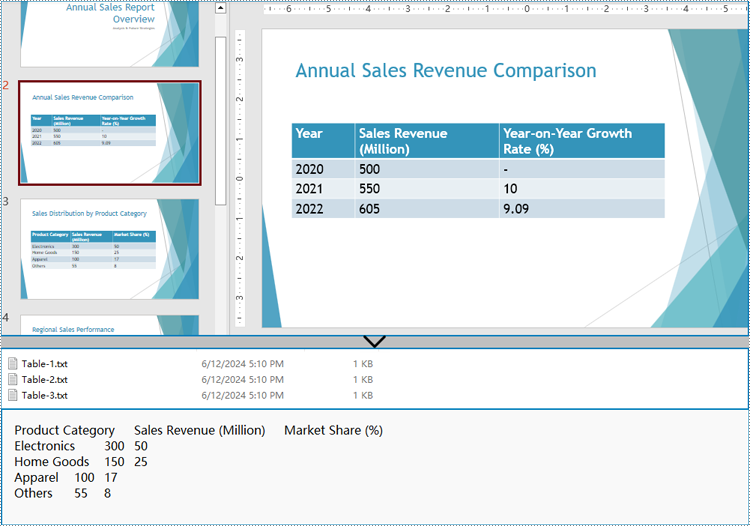
Extract Table Data from PowerPoint Presentations to Text Files
Spire.Presentation for Python provides the ITable class which represents a table in a presentation slide. By iterating through the shapes in each slide to check if it’s an instance of ITable class, developers can retrieve all the tables in the presentation file and get the data in the tables.
The detailed steps for extracting tables from PowerPoint presentations and writing them to text files are as follows:
- Create an instance of Presentation class and load a PowerPoint file using Presentation.LoadFromFile() method.
- Iterate through all the slides in the file and then all the shapes in the slides.
- Check if a shape is an instance of ITable class. If it is, iterate through the rows and then the cells in each row. Get the cell values using TableRow[].TextFrame.Text property and append them to strings.
- Write the table data to text files.
- Python
from spire.presentation import *
from spire.presentation.common import *

# Create an instance of Presentation
presentation = Presentation()

# Load a PowerPoint file
presentation.LoadFromFile("Sample.pptx")

tables = []
# Iterate through all the slides
for slide in presentation.Slides:
    # Iterate through all the shapes
    for shape in slide.Shapes:
        # Check whether the shape is a table
        if isinstance(shape, ITable):
            tableData = ""
            # Iterate through all the rows
            for row in shape.TableRows:
                rowData = ""
                # Iterate through all the cells in the row
                for i in range(0, row.Count):
                    # Get the cell value
                    cellValue = row[i].TextFrame.Text
                    rowData += (cellValue + "\t" if i < row.Count - 1 else cellValue)
                tableData += (rowData + "\n")
            tables.append(tableData)

# Write the tables to text files
for idx, table in enumerate(tables, start=1):
    fileName = f"output/Tables/Table-{idx}.txt"
    with open(fileName, "w") as f:
        f.write(table)
presentation.Dispose()
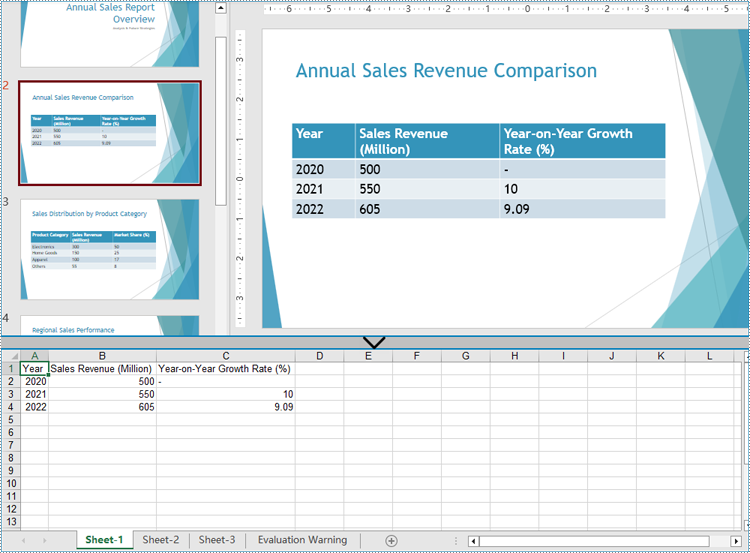
Extract Table Data from PowerPoint Presentations to Excel Worksheets
After extracting table data from presentations using Spire.Presentation for Python, developers can further utilize Spire.XLS for Python to write this data into Excel worksheets, facilitating further analysis, referencing, and format conversion.
Install Spire.XLS for Python via PyPI:
pip install Spire.XLS
The detailed steps for extracting tables from PowerPoint presentations and writing them to Excel worksheets are as follows:
- Create an instance of Presentation class and load a PowerPoint file using Presentation.LoadFromFile() method.
- Create an instance of Workbook class and clear the default worksheets.
- Iterate through the slides in the presentation and then the shapes in the slides to check if the shapes are instances of ITable class. Append all the ITable instances to a list.
- Iterate through the tables in the list and add a worksheet to the workbook for each table using Workbook.Worksheets.Add() method.
- Iterate through the rows of each table and then the cells in the rows to get the cell values through TableRow.TextFrame.Text property. Write the values to the corresponding cells in the worksheet through Worksheet.Range[].Value property.
- Save the workbook using Workbook.SaveToFile() method.
- Python
from spire.presentation import *
from spire.presentation.common import *
from spire.xls import *
from spire.xls.common import *

# Create an instance of Presentation
presentation = Presentation()

# Load a PowerPoint file
presentation.LoadFromFile("Sample.pptx")

# Create an Excel file and clear the default worksheets
workbook = Workbook()
workbook.Worksheets.Clear()

tables = []
# Iterate through all the slides
for slide in presentation.Slides:
    # Iterate through all the shapes
    for shape in slide.Shapes:
        # Check whether the shape is a table
        if isinstance(shape, ITable):
            tables.append(shape)

# Iterate through all the tables
for t in range(len(tables)):
    table = tables[t]
    sheet = workbook.Worksheets.Add(f"Sheet-{t+1}")
    for i in range(0, table.TableRows.Count):
        row = table.TableRows[i]
        for j in range(0, row.Count):
            sheet.Range[i + 1, j + 1].Value = row[j].TextFrame.Text
    # Autofit rows and columns
    sheet.AllocatedRange.AutoFitColumns()
    sheet.AllocatedRange.AutoFitRows()

# Save the Excel file
workbook.SaveToFile("output/PresentationTables.xlsx", FileFormat.Version2016)

presentation.Dispose()
workbook.Dispose()
Apply for a Temporary License
If you'd like to remove the evaluation message from the generated documents, or to get rid of the function limitations, please request a 30-day trial license for yourself.
Python: Count Words, Pages, Characters, Paragraphs and Lines in Word
2024-06-17 01:10:38 Written by KoohjiVarious written documents, such as academic papers, reports, and legal materials, often have specific formatting guidelines that encompass word count, page count, and other essential metrics. Accurately measuring these elements is crucial as it ensures that your document adheres to the required standards and meets the expected quality benchmarks. In this article, we will explain how to count words, pages, characters, paragraphs, and lines in a Word document in Python using Spire.Doc for Python.
- Count Words, Pages, Characters, Paragraphs, and Lines in a Word Document in Python
- Count Words and Characters in a Specific Paragraph of a Word Document in Python
Install Spire.Doc for Python
This scenario requires Spire.Doc for Python. It can be easily installed in your Windows through the following pip commands.
pip install Spire.Doc
If you are unsure how to install, please refer to: How to Install Spire.Doc for Python on Windows
Count Words, Pages, Characters, Paragraphs, and Lines in a Word Document in Python
Spire.Doc for Python offers the BuiltinDocumentProperties class that empowers you to retrieve crucial information from your Word document. By utilizing this class, you can access a wealth of details, including the built-in document properties, as well as the number of words, pages, characters, paragraphs, and lines contained within the document.
The steps below explain how to get the number of words, pages, characters, paragraphs, and lines in a Word document in Python using Spire.Doc for Python:
- Create an object of the Document class.
- Load a Word document using the Document.LoadFromFile() method.
- Get the BuiltinDocumentProperties object using the Document.BuiltinDocumentProperties property.
- Get the number of words, characters, paragraphs, lines, and pages in the document using the WordCount, CharCount, ParagraphCount, LinesCount, PageCount properties of the BuiltinDocumentProperties class, and append the result to a list.
- Write the content of the list into a text file.
- Python
from spire.doc import *
from spire.doc.common import *

# Create an object of the Document class
doc = Document()
# Load a Word document
doc = Document("Input.docx")

# Create a list
sb = []

# Get the built-in properties of the document
properties = doc.BuiltinDocumentProperties

# Get the number of words, characters, paragraphs, lines, and pages and append the result to the list
sb.append("The number of words: " + str(properties.WordCount))
sb.append("The number of characters: " + str(properties.CharCount))
sb.append("The number of paragraphs: " + str(properties.ParagraphCount))
sb.append("The number of lines: " + str(properties.LinesCount))
sb.append("The number of pages: " + str(properties.PageCount))

# Save the data in the list to a text file
with open("result.txt", "w") as file:
file.write("\n".join(sb))

doc.Close()

Count Words and Characters in a Specific Paragraph of a Word Document in Python
In addition to retrieving the overall word count, page count, and other metrics for an entire Word document, you are also able to get the word count and character count for a specific paragraph by using the Paragraph.WordCount and Paragraph.CharCount properties.
The steps below explain how to get the number of words and characters of a paragraph in a Word document in Python using Spire.Doc for Python:
- Create an object of the Document class.
- Load a Word document using the Document.LoadFromFile() method.
- Get a specific paragraph using the Document.Sections[sectionIndex].Paragraphs[paragraphIndex] property.
- Get the number of words and characters in the paragraph using the Paragraph.WordCount and Paragraph.CharCount properties, and append the result to a list.
- Write the content of the list into a text file.
- Python
from spire.doc import *
from spire.doc.common import *

# Create an object of the Document class
doc = Document()
# Load a Word document
doc = Document("Input.docx")

# Get a specific paragraph
paragraph = doc.Sections[0].Paragraphs[0]

# Create a list
sb = []

# Get the number of words and characters in the paragraph and append the result to the list
sb.append("The number of words: " + str(paragraph.WordCount))
sb.append("The number of characters: " + str(paragraph.CharCount))

# Save the data in the list to a text file
with open("result.txt", "w") as file:
file.write("\n".join(sb))

doc.Close()

Apply for a Temporary License
If you'd like to remove the evaluation message from the generated documents, or to get rid of the function limitations, please request a 30-day trial license for yourself.
