Python: Convert Text to Multiple Columns in Excel
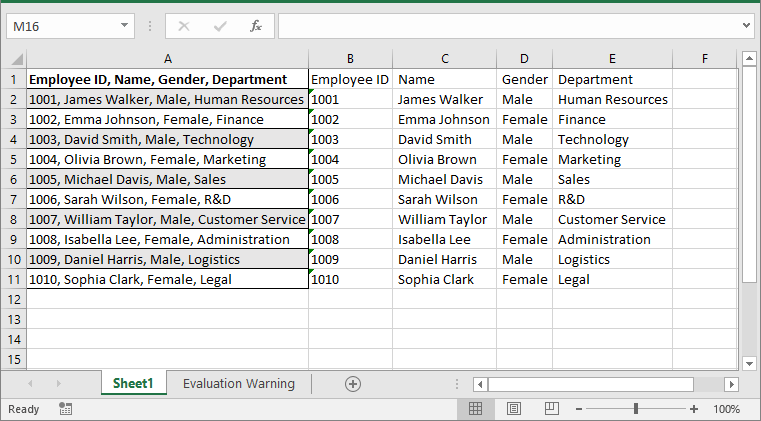
When importing data from external sources or pasting large volumes of information into Excel, it's common for the data to be placed in a single column. This can make the data difficult to work with, especially when you need to separate it for in-depth analysis. By converting the text into multiple columns, you can create a clearer structure that allows for easier sorting, filtering, and analysis. In this article, we will introduce how to convert text to multiple columns in Excel in Python using Spire.XLS for Python.
Install Spire.XLS for Python
This scenario requires Spire.XLS for Python and plum-dispatch v1.7.4. They can be easily installed in your Windows through the following pip command.
pip install Spire.XLS
If you are unsure how to install, please refer to this tutorial: How to Install Spire.XLS for Python on Windows
Convert Text to Multiple Columns in Excel in Python
Spire.XLS for Python does not offer a direct method for converting text in a cell into multiple columns. However, you can accomplish this by first retrieving the cell content using the CellRange.Text property. Next, use the str.split() method to split the text based on a specified delimiter, such as a comma, space, or semicolon. Finally, write the split data into individual columns. The detailed steps are as follows:
- Create an object of the Workbook class.
- Load an Excel workbook using the Workbook.LoadFromFile() method.
- Access a specific worksheet using the Workbook.Worksheets[index] property.
- Loop through each row in the sheet.
- Get the content of the first cell in the current row using the CellRange.Text property. Next, split the content based on a specified delimiter using the str.split() method, and finally, write the split data into separate columns.
- Automatically adjust column widths in the worksheet using the Worksheet.AllocatedRange.AutoFitColumns() method.
- Save the modified workbook to a new file using the Workbook.SaveToFile() method.
- Python
from spire.xls import *
from spire.xls.common import *

# Specify the input and output Excel File paths
inputFile = "Template.xlsx"
outputFile = "ConvertTextToColumns.xlsx"

# Create an object of the Workbook class
workbook = Workbook()
# Load the Excel file
workbook.LoadFromFile(inputFile)

# Get the first worksheet in the file
sheet = workbook.Worksheets[0]

# Loop through each row in the worksheet
for i in range(sheet.LastRow):
    # Get the text of the first cell in the current row
    text = sheet.Range[i + 1, 1].Text
    # Split the text by comma
    splitText = text.split(',')
    # Write the split data into individual columns
    for j in range(len(splitText)):
        sheet.Range[i + 1, j + 2].Text = splitText[j]

# Automatically adjust column widths in the worksheet
sheet.AllocatedRange.AutoFitColumns()

# Save the modified Excel file
workbook.SaveToFile(outputFile, ExcelVersion.Version2013)
workbook.Dispose()
Apply for a Temporary License
If you'd like to remove the evaluation message from the generated documents, or to get rid of the function limitations, please request a 30-day trial license for yourself.
Python: Find and Highlight Data in Excel Worksheets
Efficiently emphasizing critical data within Excel workbooks is essential for swift analysis. This process not only draws immediate attention to the most relevant information but also aids in identifying trends, anomalies, and key metrics. By using Python to handle Excel workbooks, users can automate the search and highlight functions, enhancing productivity and ensuring precision. This article explores how to leverage Python for finding and highlighting data in Excel worksheets using Spire.XLS for Python library.
Install Spire.XLS for Python
This scenario requires Spire.XLS for Python and plum-dispatch v1.7.4. They can be easily installed in your Windows through the following pip commands.
pip install Spire.XLS
If you are unsure how to install, please refer to: How to Install Spire.XLS for Python on Windows
Find and Highlight Data in Excel Worksheets
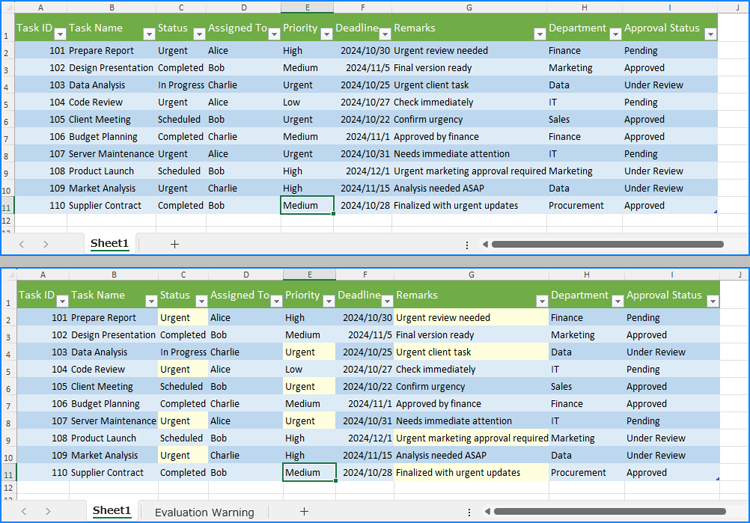
Using Spire.XLS for Python, we can find all cells containing a specific string and return them as a list by using the Worksheet.FindAllString(stringValue: str, formula: bool, formulaValue: bool) method. After that, we can iterate through the found cells and apply a highlight color by setting it via the CellRange.Style.Color property.
The detailed steps for finding and highlighting data in an Excel worksheet are as follows:
- Create an instance of Workbook class and load an Excel workbook using Workbook.LoadFromFile() method.
- Get a worksheet using Workbook.Worksheets.get_Item() method.
- Find all the cells containing the string to be highlighted using Worksheet.FindAllString() method.
- Iterate through the results to highlight the cells by setting a fill color through CellRange.Style.Color property.
- Save the workbook using Workbook.SaveToFile() method.
- Python
Python
from spire.xls import *

# Create an instance of Workbook
workbook = Workbook()

# Load an Excel file
workbook.LoadFromFile("Sample.xlsx")

# Get the first worksheet
sheet = workbook.Worksheets.get_Item(0)

# Find the data to be highlighted
cellRanges = sheet.FindAllString("Urgent", False, True)

# Iterate through the found ranges
for cellRange in cellRanges:
    # Highlight the data
    cellRange.Style.Color = Color.get_LightYellow()

# Save the workbook
workbook.SaveToFile("output/FindHighlightDataExcel.xlsx")
workbook.Dispose()
Find and Highlight Data in a Specific Cell Range
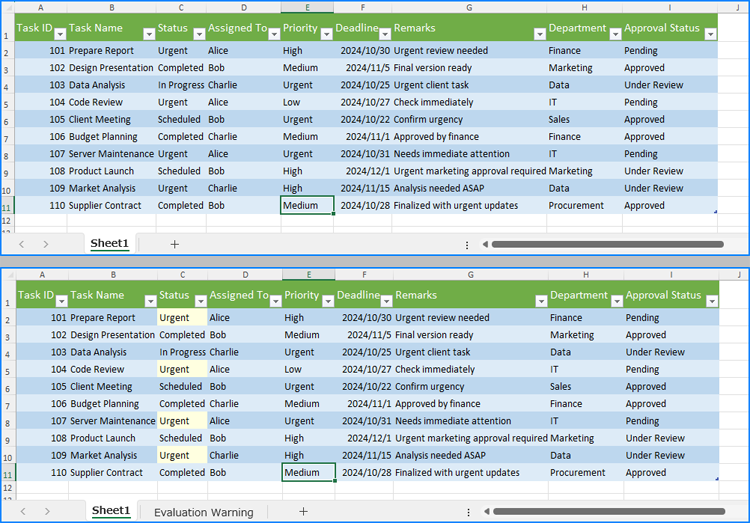
In addition to searching for data across the entire worksheet, we can use the CellRange.FindAllString(stringValue: str, formula: bool, formulaValue: bool) method to find and highlight data within a specified cell range. The detailed steps are as follows:
- Workbook.LoadFromFile() method.
- Get a worksheet using Workbook.Worksheets.get_Item() method.
- Get a cell range through Worksheet.Range[] property.
- Find all the cells containing the string to be highlighted using CellRange.FindAllString() method.
- Iterate through the results to highlight the cells by setting a fill color through CellRange.Style.Color property.
- Save the workbook using Workbook.SaveToFile() method.
- Python
from spire.xls import *

# Create an instance of Workbook
workbook = Workbook()

# Load an Excel file
workbook.LoadFromFile("Sample.xlsx")

# Get the first worksheet
sheet = workbook.Worksheets.get_Item(0)

# Get the cell range
findRange = sheet.Range["C1:C11"]

# Find the data to be highlighted
cellRanges = findRange.FindAllString("Urgent", False, True)

# Iterate the found ranges
for cellRange in cellRanges:
    # Highlight the data
    cellRange.Style.Color = Color.get_LightYellow()

# Save the workbook
workbook.SaveToFile("output/FindHighlightRange.xlsx")
workbook.Dispose()
Apply for a Temporary License
If you'd like to remove the evaluation message from the generated documents, or to get rid of the function limitations, please request a 30-day trial license for yourself.
Python: Convert Text to Numbers and Numbers to Text in Excel
Converting text to numbers and vice versa in Excel is crucial for efficient data management. When you convert text to numbers, you enable accurate calculations and data processing, which is essential for tasks like financial reporting and statistical analysis. On the other hand, converting numbers to text can be beneficial for formatting outputs, creating clear and readable labels, and presenting data in a more user-friendly manner.
In this article, you will learn how to convert text to numbers and numbers to text in Excel using Spire.XLS for Python.
Install Spire.XLS for Python
This scenario requires Spire.XLS for Python and plum-dispatch v1.7.4. They can be easily installed in your Windows through the following pip command.
pip install Spire.XLS
If you are unsure how to install, please refer to this tutorial: How to Install Spire.XLS for Python on Windows
Convert Text to Numbers in Excel
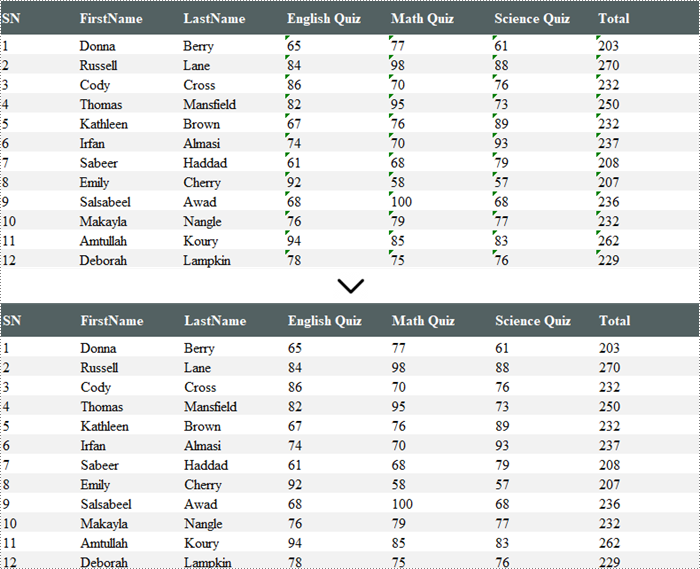
If you import data from another source into Excel, a small green triangle may appear in the upper-left corner of the cell. This error indicator indicates that the number is stored as text. Numbers that are stored as text can cause unexpected results, like an uncalculated formula showing instead of a result.
To convert numbers stored as text to numbers, you can simply use the CellRange.ConvertToNumber() method. The CellRange object can represent a single cell or a range of cells.
The steps to convert text to numbers in Excel are as follows:
- Create a Workbook object.
- Load an Excel file using Workbook.LoadFromFile() method.
- Get a specific worksheet using Workbook.Worksheets[index] property.
- Get a cell or a range of cells using Worksheet.Range property.
- Convert the text in the cell(s) into numbers using CellRange.ConvertToNumber() method.
- Save the document to a different Excel file.
- Python
from spire.xls import *
from spire.xls.common import *

# Create a Workbook object
workbook = Workbook()

# Load an Excel document
workbook.LoadFromFile("C:\\Users\\Administrator\\Desktop\\Input.xlsx")

# Get a specific worksheet
worksheet = workbook.Worksheets[0]

# Get a cell range
range = worksheet.Range["D2:G13"]

# Convert text to number
range.ConvertToNumber()

# Save the workbook to a different Excel file
workbook.SaveToFile("output/TextToNumbers.xlsx", ExcelVersion.Version2013)

# Dispose resources
workbook.Dispose()
Convert Numbers to Text in Excel
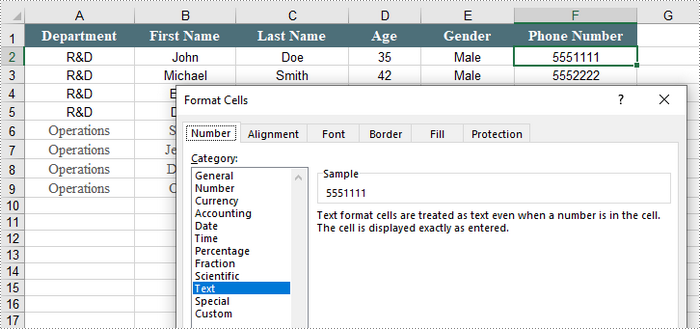
When working with numerical data in Excel, you might encounter situations where you need to convert numbers to text. This is particularly important when dealing with data that requires specific formatting, such as IDs or phone numbers that must retain leading zeros.
To convert the number in a cell into text, you can set the CellRange.NumberFormat to @. The CellRange object represents a single cell or a range of cells.
The detailed steps to convert numbers to text in Excel are as follows:
- Create a Workbook object.
- Load an Excel file using Workbook.LoadFromFile() method.
- Get a specific worksheet using Workbook.Worksheets[index] property.
- Get a specific cell or a range of cells using Worksheet.Range property.
- Convert the numbers in the cell(s) into text by setting CellRange.NumberFormat to @.
- Save the document to a different Excel file.
- Python
from spire.xls import *
from spire.xls.common import *

# Create a Workbook object
workbook = Workbook()

# Load an Excel document
workbook.LoadFromFile("C:\\Users\\Administrator\\Desktop\\Employee.xlsx")

# Get a specific worksheet
worksheet = workbook.Worksheets[0]

# Get a cell range
cellRange = worksheet.Range["F2:F9"]

# Convert numbers in the cell range to text
cellRange.NumberFormat = "@"

# Save the workbook to a different Excel file
workbook.SaveToFile("output/NumbersToText.xlsx", ExcelVersion.Version2013)

# Dispose resources
workbook.Dispose()
Apply for a Temporary License
If you'd like to remove the evaluation message from the generated documents, or to get rid of the function limitations, please request a 30-day trial license for yourself.
Python: Sort Data in Excel
When working with large amounts of information, the ability to quickly sort data can be very beneficial at times. By arranging data in ascending, descending, or customized order, users can easily spot trends, analyze relationships, and extract valuable insights. In this article, you will learn how to sort columns or rows in Excel in Python using Spire.XLS for Python.
- Sort By Columns in Excel in Python
- Sort By Custom List in Excel in Python
- Sort By Rows in Excel in Python
Install Spire.XLS for Python
This scenario requires Spire.XLS for Python and plum-dispatch v1.7.4. They can be easily installed in your Windows through the following pip command.
pip install Spire.XLS
If you are unsure how to install, please refer to this tutorial: How to Install Spire.XLS for Python on Windows
Sort By Columns in Excel in Python
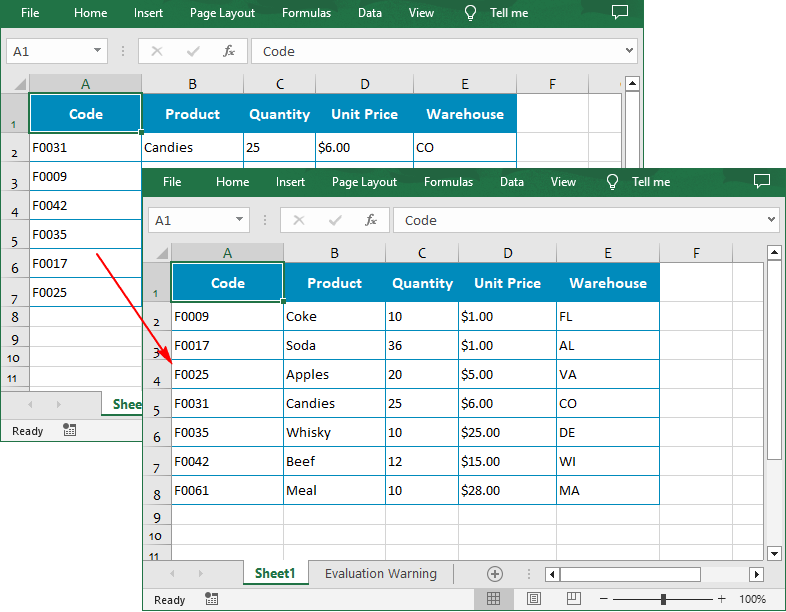
The Workbook.DataSorter.SortColumns.Add(key: int, sortComparsionType: SortComparsionType, orderBy: OrderBy) method provided by Spire.XLS for Python allows users to sort data based on different criteria. For example, you can sort cell values, cell colors or font colors in ascending, descending, or other order.
The following are the steps to sort the values in a specified column:
- Create a Workbook instance.
- Load an Excel file using Workbook.LoadFromFile() method.
- Get a specified worksheet using Workbook.Worksheets[] property.
- Specify the sorting mode using Workbook.DataSorter.SortColumns.Add() method.
- Sort data in a specified cell range using Workbook.DataSorter.Sort() method.
- Save the result file using Workbook.SaveToFile() method.
- Python
from spire.xls.common import *
from spire.xls import *

# Create a Workbook instance
workbook = Workbook()

# Load an Excel file
workbook.LoadFromFile("Budget.xlsx")

# Get the first worksheet
worksheet = workbook.Worksheets[0]

# Sort values in the specified column in ascending order
workbook.DataSorter.SortColumns.Add(0, SortComparsionType.Values, OrderBy.Ascending)

# Sort in the specified cell range
workbook.DataSorter.Sort(worksheet["A1:E7"])

# Save the result file
workbook.SaveToFile("SortByColumns.xlsx", ExcelVersion.Version2016)
workbook.Dispose()
Sort By Custom List in Excel in Python
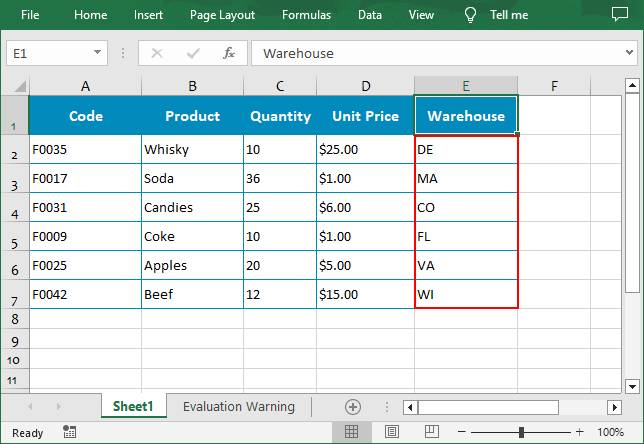
You can also create a custom list and then sort data based on it using the Workbook.DataSorter.SortColumns.Add(key: int, customSortOrder: List[str]) method.
The following are the steps to sort data using a custom list:
- Create a Workbook instance.
- Load an Excel file using Workbook.LoadFromFile() method.
- Get a specified worksheet using Workbook.Worksheets[] property.
- Create a custom sort list, and then sort a specified column using it though Workbook.DataSorter.SortColumns.Add() method.
- Sort data in a specified cell range using Workbook.DataSorter.Sort() method.
- Save the result file using Workbook.SaveToFile() method.
- Python
from spire.xls.common import *
from spire.xls import *

# Create a Workbook instance
workbook = Workbook()

# Load an Excel file
workbook.LoadFromFile("Budget.xlsx")

# Get the first worksheet
worksheet = workbook.Worksheets[0]

# Create a custom sort list
customList = ["DE","MA", "CO", "FL", "VA", "WI"]

# Sort a specified column using the custom list
workbook.DataSorter.SortColumns.Add(4, customList )

# Sort in the specified cell range
workbook.DataSorter.Sort(worksheet["A1:E7"])

# Save the result file
workbook.SaveToFile("CustomSortList.xlsx", ExcelVersion.Version2016)
workbook.Dispose()
Sort By Rows in Excel in Python
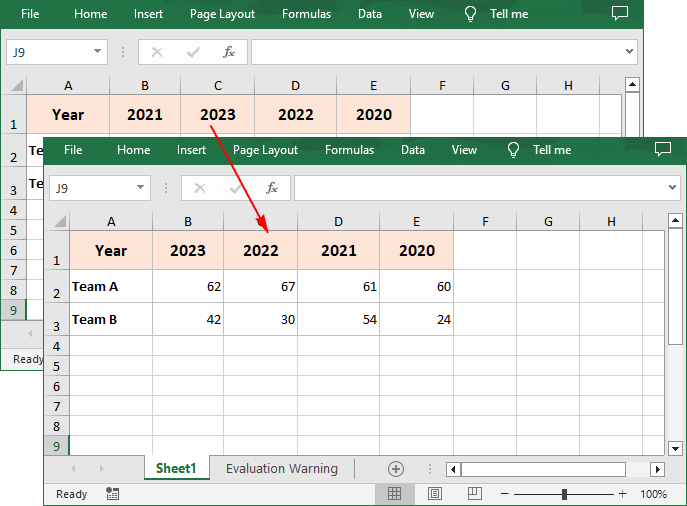
To sort a specified row in Excel, you need to set the sort orientation to LeftToRight, specify the sort mode and sort row data accordingly.
The following are the steps to sort the values in a specified row:
- Create a Workbook instance.
- Load an Excel file using Workbook.LoadFromFile() method.
- Get a specified worksheet using Workbook.Worksheets[] property.
- Set whether to include titles when sorting using Workbook.DataSorter.IsIncludeTitle property.
- Set the sort orientation using Workbook.DataSorter.Orientation property.
- Specify the sorting mode, and then sort data in the first row using Workbook.DataSorter.Sort(Worksheet.Rows[0]) method.
- Save the result file using Workbook.SaveToFile() method.
- Python
from spire.xls.common import *
from spire.xls import *

# Create a Workbook instance
workbook = Workbook()

# Load an Excel file
workbook.LoadFromFile("Year.xlsx")

# Get the first worksheet
sheet = workbook.Worksheets[0]

# Set whether to include titles when sorting
workbook.DataSorter.IsIncludeTitle = True

# Set the sort orientation
workbook.DataSorter.Orientation = SortOrientationType.LeftToRight

# Specify the sorting mode
workbook.DataSorter.SortColumns.Add(0,SortComparsionType.Values,OrderBy.Descending)

# Sort data in the first row
workbook.DataSorter.Sort(sheet.Rows[0])

# Save the result file
workbook.SaveToFile("SortByRows.xlsx", ExcelVersion.Version2016)
workbook.Dispose()
Apply for a Temporary License
If you'd like to remove the evaluation message from the generated documents, or to get rid of the function limitations, please request a 30-day trial license for yourself.
Python: Set Text Alignment and Orientation in Excel
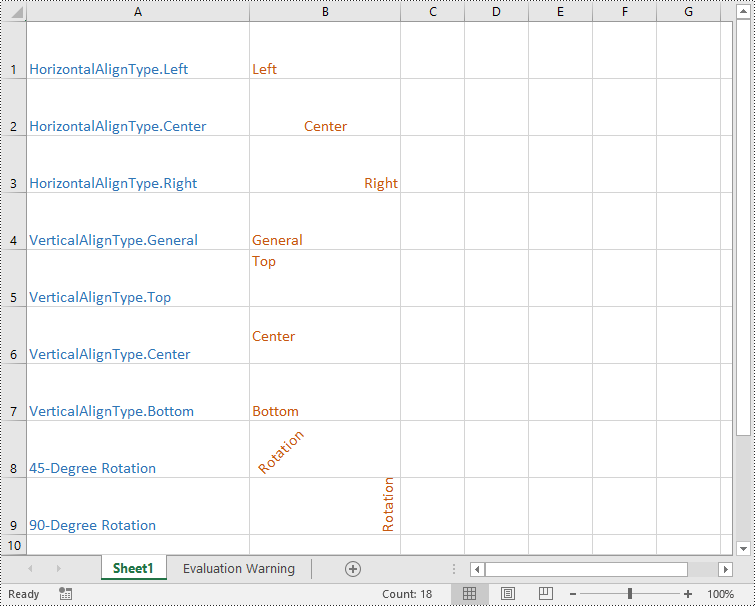
In Microsoft Excel, text alignment and text orientation are crucial formatting options for optimizing the presentation of text within cells. Text alignment determines the horizontal or vertical positioning of text within a cell, while text orientation controls the tilt angle or display direction of the text. By flexibly utilizing these formatting options, you can customize the appearance of text within cells to create professional and visually appealing spreadsheets. In this article, we will demonstrate how to set text alignment and orientation in Excel in Python using Spire.XLS for Python.
Install Spire.XLS for Python
This scenario requires Spire.XLS for Python and plum-dispatch v1.7.4. They can be easily installed in your Windows through the following pip command.
pip install Spire.XLS
If you are unsure how to install, please refer to this tutorial: How to Install Spire.XLS for Python on Windows
Set Text Alignment and Orientation in Excel in Python
Spire.XLS for Python provides the CellRange.Style.HorizontalAlignment and CellRange.Style.VerticalAlignment properties that enable you to customize the horizontal and vertical alignment of text in a single cell or range of cells. Additionally, it allows you to change the orientation of text by applying rotation to cells using the CellRange.Style.Rotation property. The detailed steps are as follows:
- Create an object of the Workbook class.
- Load an Excel file using the Workbook.LoadFromFile() method.
- Get a specific worksheet using the Workbook.Worksheets[index] property.
- Set the horizontal alignment for text in specific cells to Left, Center, Right, or General using the CellRange.Style.HorizontalAlignment property.
- Set the vertical alignment for text in specific cells to Top, Center, or Bottom using the CellRange.Style.VerticalAlignment property.
- Change the orientation for text in specific cells using the CellRange.Style.Rotation property.
- Save the result file using the Workbook.SaveToFile() method.
- Python
from spire.xls import *
from spire.xls.common import *

# Create an object of the Workbook class
workbook = Workbook()

# Load an Excel file
workbook.LoadFromFile("Example.xlsx")

# Get the first worksheet
sheet = workbook.Worksheets[0]

# Set the horizontal alignment for text in a specific cell to Left
sheet.Range["B1"].Style.HorizontalAlignment = HorizontalAlignType.Left
# Set the horizontal alignment for text in a specific cell to Center
sheet.Range["B2"].Style.HorizontalAlignment = HorizontalAlignType.Center
# Set the horizontal alignment for text in a specific cell to Right
sheet.Range["B3"].Style.HorizontalAlignment = HorizontalAlignType.Right
# Set the horizontal alignment for text in a specific cell to General
sheet.Range["B4"].Style.HorizontalAlignment = HorizontalAlignType.General

# Set the vertical alignment for text in a specific cell to Top
sheet.Range["B5"].Style.VerticalAlignment = VerticalAlignType.Top
# Set the vertical alignment for text in a specific cell to Center
sheet.Range["B6"].Style.VerticalAlignment = VerticalAlignType.Center
# Set the vertical alignment for text in a specific cell to Bottom
sheet.Range["B7"].Style.VerticalAlignment = VerticalAlignType.Bottom

# Change the text orientation in specific cells by applying rotation
sheet.Range["B8"].Style.Rotation = 45
sheet.Range["B9"].Style.Rotation = 90

# Save the result file
workbook.SaveToFile("TextAlignmentAndOrientation.xlsx", ExcelVersion.Version2016)
workbook.Dispose()
Apply for a Temporary License
If you'd like to remove the evaluation message from the generated documents, or to get rid of the function limitations, please request a 30-day trial license for yourself.
Python: Add Tables to Excel Documents or Delete Tables from Excel Documents
Tables in Excel are powerful tools for organizing, storing, analyzing, and visualizing data. They are widely used in various industries and fields, including finance, business, science, education, and more. The table functionality in Excel makes data processing easier and provides users with flexibility and efficiency to make decisions and solve problems. This article will explain how to use Spire.XLS for Python to add or delete tables in Excel documents using Python.
Install Spire.XLS for Python
This scenario requires Spire.XLS for Python and plum-dispatch v1.7.4. They can be easily installed in your Windows through the following pip commands.
pip install Spire.XLS
If you are unsure how to install, please refer to this tutorial: How to Install Spire.XLS for Python on Windows
Add Tables to an Excel Document in Python
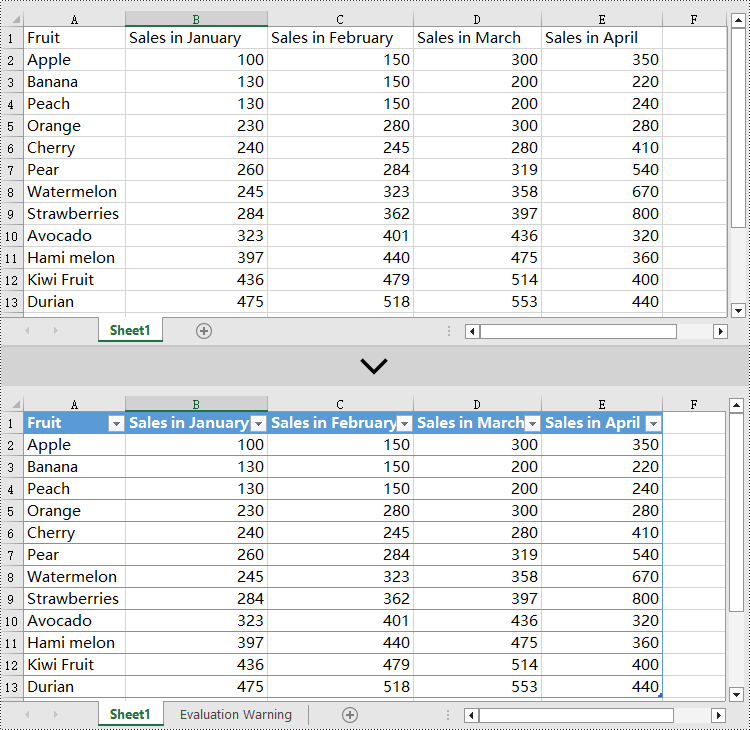
Spire.XLS for Python creates table objects for the specified data source using the Worksheet.ListObjects.Create(tableName, range) method. The following are the detailed steps:
- Create an object of the Workbook class.
- Use the Workbook.LoadFromFile() method to load an Excel document.
- Use the Workbook.Worksheets[] property to retrieve the desired worksheet.
- Create a table object using the Worksheet.ListObjects.Create() method.
- Set the table style using the Worksheet.ListObjects[].BuiltInTableStyle property.
- Use the Workbook.SaveToFile() method to save the resulting file.
- Python
from spire.xls import *
from spire.xls.common import *

# Create a Workbook object
workbook = Workbook()

# Load an .xlsx document
workbook.LoadFromFile("Data/sample1.xlsx")

# Get the first worksheet
sheet = workbook.Worksheets[0]

# Create a table named "table" in the worksheet, with range [1,1,13,5]
sheet.ListObjects.Create("table", sheet.Range[1,1,13,5])

# Set the built-in table style of the first table to TableStyleLight9
sheet.ListObjects[0].BuiltInTableStyle = TableBuiltInStyles.TableStyleLight9

# Save the workbook to a file
workbook.SaveToFile("AddTable.xlsx", ExcelVersion.Version2016)

# Release resources and clean up the workbook object
workbook.Dispose()
Delete Tables from an Excel Document in Python
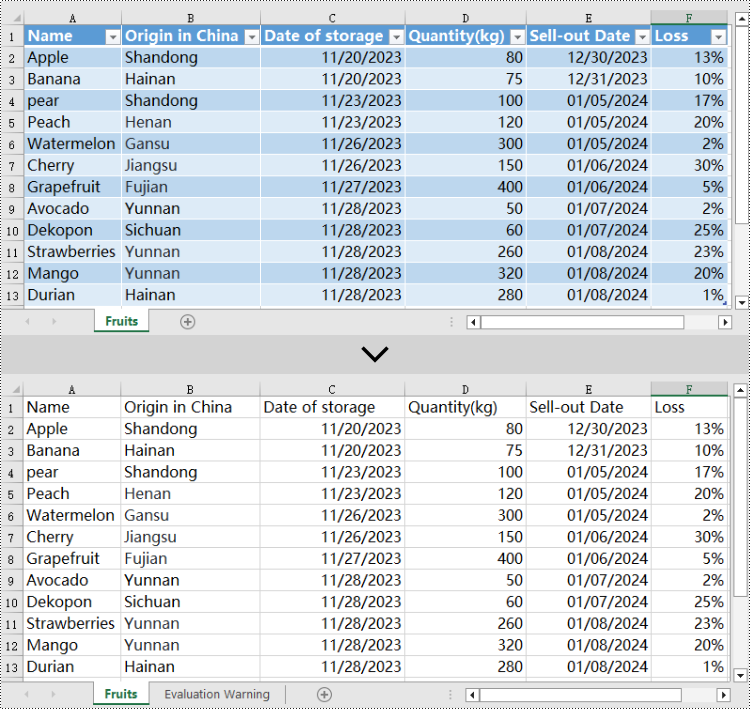
Excel table objects are located in the Worksheet.ListObjects collection. To delete a table object, you need to iterate through the collection, find the table object based on its name, and remove it from the collection. Here are the detailed steps:
- Create an object of the Workbook class.
- Use the Workbook.LoadFromFile() method to load an Excel document.
- Use the Workbook.Worksheets[] property to retrieve the desired worksheet.
- Iterate through the Worksheet.ListObjects collection in the worksheet to obtain the name of each ListObject object for finding the table object to delete.
- Use the Worksheet.ListObjects.RemoveAt() method to remove the table object.
- Use the Workbook.SaveToFile() method to save the resulting file.
- Python
from spire.xls import *
from spire.xls.common import *

# Create a Workbook object
workbook = Workbook()

# Load an .xlsx document
workbook.LoadFromFile("Data/Sample2.xlsx")

# Get the first worksheet
sheet = workbook.Worksheets[0]

# Iterate through all the tables in the worksheet
for i in range(len(sheet.ListObjects)):

    # Check if the table's name is "FruitTable"
if sheet.ListObjects[i].Name == "FruitTable":

        # If a matching table is found, remove it
        sheet.ListObjects.RemoveAt(i)

# Save the workbook to a file
workbook.SaveToFile("DeleteTable.xlsx", ExcelVersion.Version2016)

# Release resources and clean up the workbook object
workbook.Dispose()
Apply for a Temporary License
If you'd like to remove the evaluation message from the generated documents, or to get rid of the function limitations, please request a 30-day trial license for yourself.
Python: Group or Ungroup Rows and Columns in Excel
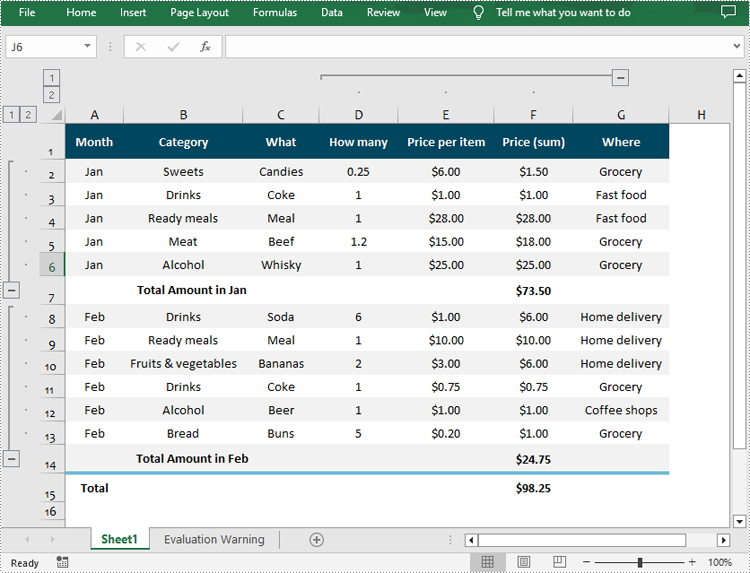
Grouping rows and columns in Excel provides a more organized and structured view of data, making it easier to analyze and understand complex datasets. After grouping related rows or columns, you can collapse or expand them as needed to focus on specific subsets of information while hiding details. In this article, you will learn how to group or ungroup rows and columns , as well as how to collapse or expand groups in Excel in Python using Spire.XLS for Python.
- Group Rows and Columns in Excel in Python
- Ungroup Rows and Columns in Excel in Python
- Expand or Collapse Groups in Excel in Python
Install Spire.XLS for Python
This scenario requires Spire.XLS for Python and plum-dispatch v1.7.4. They can be easily installed in your Windows through the following pip command.
pip install Spire.XLS
If you are unsure how to install, please refer to this tutorial: How to Install Spire.XLS for Python on Windows
Group Rows and Columns in Excel in Python
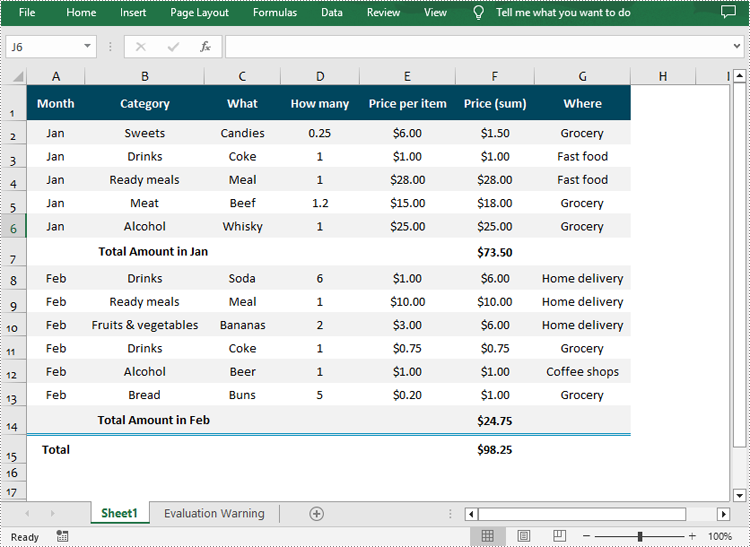
Spire.XLS for Python provides the Worksheet.GroupByRows() and Worksheet.GroupByColumns() methods to group specific rows and columns in an Excel worksheet. The following are the detailed steps:
- Create a Workbook object.
- Load a sample Excel file using Workbook.LoadFromFile() method.
- Get the specified worksheet using Workbook.Worksheets[] property.
- Group rows using Worksheet.GroupByRows() method.
- Group columns using Worksheet.GroupByColumns() method.
- Save the result file using Workbook.SaveToFile() method.
- Python
from spire.xls import *
from spire.xls.common import *

inputFile = "Data.xlsx"
outputFile = "GroupRowsAndColumns.xlsx"

# Create a Workbook object
workbook = Workbook()

# Load a sample Excel file
workbook.LoadFromFile(inputFile)

# Get the first worksheet
sheet = workbook.Worksheets[0]

# Group rows
sheet.GroupByRows(2, 6, False)
sheet.GroupByRows(8, 13, False)

# Group columns
sheet.GroupByColumns(4, 6, False)

# Save the result file
workbook.SaveToFile(outputFile, ExcelVersion.Version2016)
workbook.Dispose()
Ungroup Rows and Columns in Excel in Python
Ungrouping rows and columns in Excel refer to the process of reversing the grouping operation and restoring the individual rows or columns to their original state.
To ungroup rows and columns in an Excel worksheet, you can use the Worksheet.UngroupByRows() and Worksheet.UngroupByColumns() methods. The following are the detailed steps:
- Create a Workbook object.
- Load a sample Excel file using Workbook.LoadFromFile() method.
- Get the specified worksheet using Workbook.Worksheets[] property.
- Ungroup rows using Worksheet.UngroupByRows() method.
- Ungroup columns using Worksheet.UngroupByColumns() method.
- Save the result file using Workbook.SaveToFile() method.
- Python
from spire.xls import *
from spire.xls.common import *

inputFile = "GroupRowsAndColumns.xlsx"
outputFile = "UnGroupRowsAndColumns.xlsx"

# Create a Workbook object
workbook = Workbook()

# Load a sample Excel file
workbook.LoadFromFile(inputFile)

# Get the first worksheet
sheet = workbook.Worksheets[0]

# UnGroup rows
sheet.UngroupByRows(2, 6)
sheet.UngroupByRows(8, 13)

# UnGroup columns
sheet.UngroupByColumns(4, 6)

# Save the result file
workbook.SaveToFile(outputFile, ExcelVersion.Version2016)
workbook.Dispose()
Expand or Collapse Groups in Excel in Python
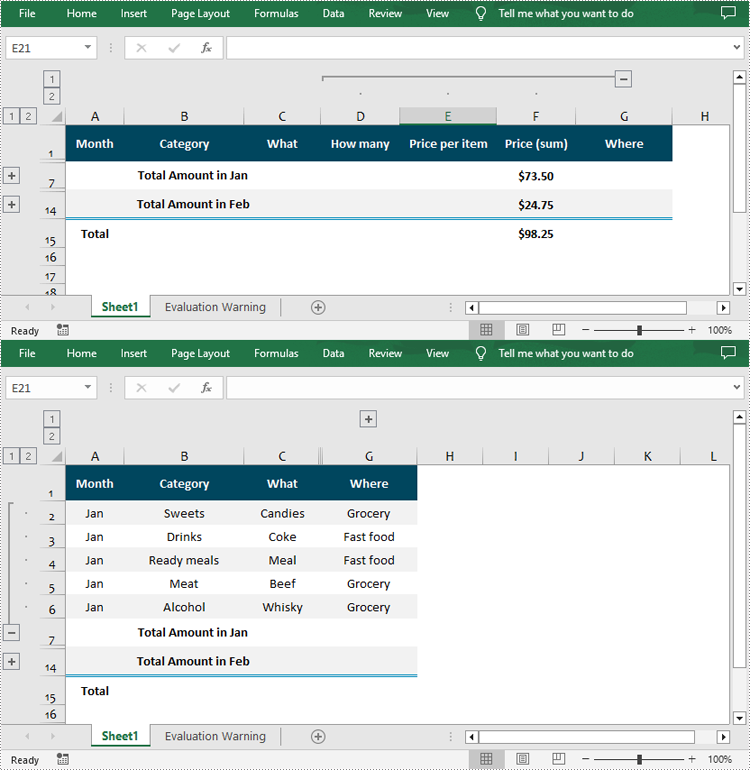
Expanding or collapsing groups in Excel refers to the action of showing or hiding the detailed information within a grouped section. With Spire.XLS for Python, you can expand or collapse groups through the Worksheet.Range[].ExpandGroup() or Worksheet.Range[].CollapseGroup() methods. The following are the detailed steps:
- Create a Workbook object.
- Load a sample Excel file using Workbook.LoadFromFile() method.
- Get the specified worksheet using Workbook.Worksheets[] property.
- Expand a specific group using the Worksheet.Range[].ExpandGroup() method.
- Collapse a specific group using the Worksheet.Range[].CollapseGroup() method.
- Save the result file using Workbook.SaveToFile() method.
- Python
from spire.xls import *
from spire.xls.common import *

inputFile = "Grouped.xlsx"
outputFile = "ExpandOrCollapseGroups.xlsx"

# Create a Workbook object
workbook = Workbook()

# Load a sample Excel file
workbook.LoadFromFile(inputFile)

# Get the first worksheet
sheet = workbook.Worksheets[0]

# Expand a group
sheet.Range["A2:G6"].ExpandGroup(GroupByType.ByRows)

# Collapse a group
sheet.Range["D1:F15"].CollapseGroup(GroupByType.ByColumns)

# Save the result file
workbook.SaveToFile(outputFile, ExcelVersion.Version2016)
workbook.Dispose()
Apply for a Temporary License
If you'd like to remove the evaluation message from the generated documents, or to get rid of the function limitations, please request a 30-day trial license for yourself.
Python: Find and Replace Data in Excel
The Find and Replace feature in Excel allows you to quickly find specific values and perform targeted replacements based on specific requirements. With it, all occurrences of a specific value can be updated at once, which can significantly improve productivity when working with large data sets. In this article, you will learn how to programmatically find and replace data in Excel in Python using Spire.XLS for Python.
- Find and Replace Data in a Worksheet in Excel
- Find and Replace Data in a Specific Cell Range in Excel
Install Spire.XLS for Python
This scenario requires Spire.XLS for Python and plum-dispatch v1.7.4. They can be easily installed in your Windows through the following pip command.
pip install Spire.XLS
If you are unsure how to install, please refer to this tutorial: How to Install Spire.XLS for Python on Windows
Find and Replace Data in an Excel Worksheet in Python
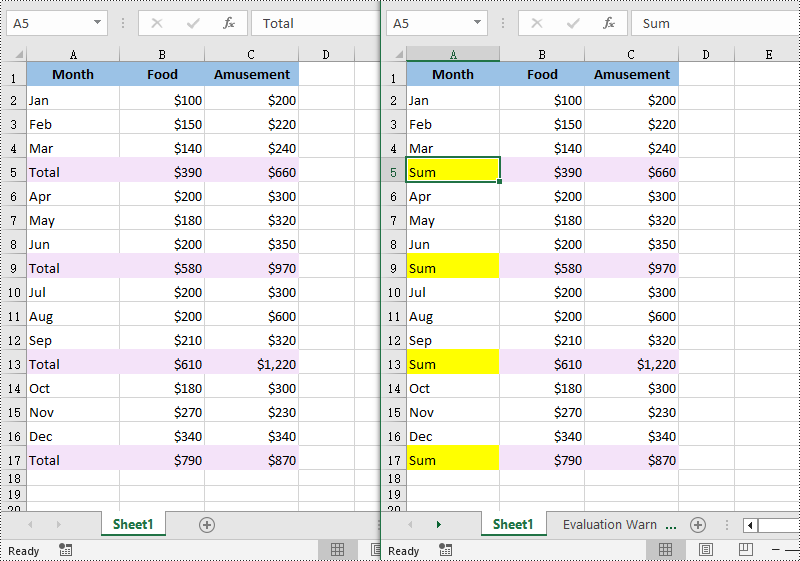
Spire.XLS for Python offers the Worksheet.FindAllString() method to find the cells containing specific data values in an Excel worksheet. Once the cells are found, you can use the CellRange.Text property to update their values with new values. The detailed steps are as follows:
- Create a Workbook object.
- Load an Excel file using Workbook.LoadFromFile() method.
- Get a specific worksheet using Workbook.Worksheets[] property.
- Find the cells containing a specific value in the worksheet using Worksheet.FindAllString() method.
- Iterate through the found cells.
- Replace the value of each found cell with another value using CellRange.Text property.
- Set a background color to highlight the cell using CellRange.Style.Color property.
- Save the result file using Workbook.SaveToFile() method.
- Python
from spire.common import *
from spire.xls.common import *

# Create a Workbook object
workbook = Workbook()

# Load an Excel document from disk
workbook.LoadFromFile("input.xlsx")

# Get the first worksheet
worksheet = workbook.Worksheets[0]

# Find the cells with the specific string value “Total” in the worksheet
ranges = worksheet.FindAllString("Total", False, False)

# Iterate through the found cells
for range in ranges:

    # Replace the value of the cell with another value
    range.Text = "Sum"

    # Set a background color for the cell
    range.Style.Color = Color.get_Yellow()

# Save the result file
workbook.SaveToFile("FindAndReplaceData.xlsx", ExcelVersion.Version2016)
workbook.Dispose()
Find and Replace Data in a Specific Cell Range in Excel in Python
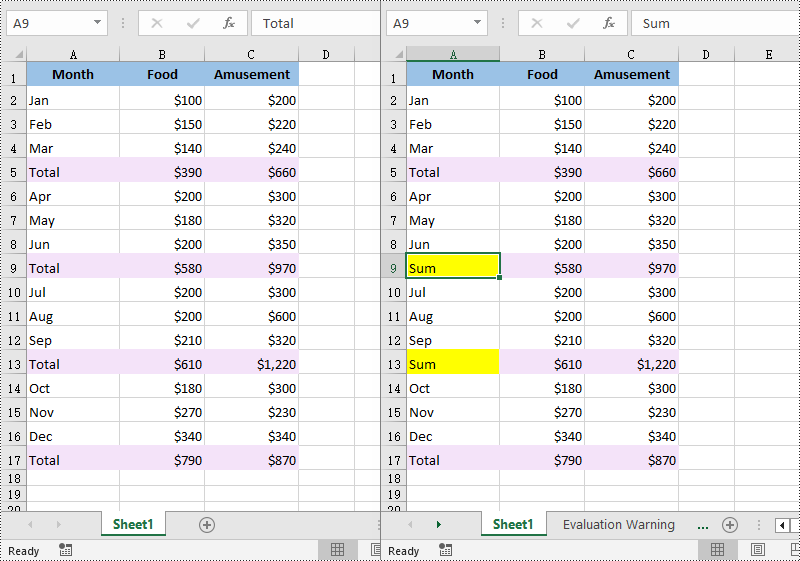
Spire.XLS for Python also allows you to find the cells containing a specific value in a cell range through the CellRange.FindAllString() method. Then you can update the value of each found cell with another value using the CellRange.Text property. The detailed steps are as follows:
- Create a Workbook object.
- Load an Excel file using Workbook.LoadFromFile() method.
- Get a specific worksheet using Workbook.Worksheets[] property.
- Get a specific cell range of the worksheet using Worksheet.Range[] property.
- Find the cells with a specific value in the cell range using CellRange.FindAllString() method.
- Iterate through the found cells.
- Replace the value of each found cell with another value using CellRange.Text property.
- Set a background color to highlight the cell using CellRange.Style.Color property.
- Save the result file using Workbook.SaveToFile() method.
- Python
from spire.xls import *
from spire.xls.common import *

# Create a Workbook object
workbook = Workbook()

# Load an Excel document from disk
workbook.LoadFromFile("input.xlsx")

# Get the first worksheet
sheet = workbook.Worksheets[0]

# Get a specific cell range
range = sheet.Range["A6:C13"]

# Find the cells with the specific value "Total" in the cell range
cells = range.FindAllString("Total", False, False)

# Iterate through the found cells
for cell in cells:

    # Replace the value of the cell with another value
    cell.Text = "Sum"

    # Set a background color for the cell
    cell.Style.Color = Color.get_Yellow()

# Save the result file
workbook.SaveToFile("ReplaceDataInCellRange.xlsx", ExcelVersion.Version2016)
workbook.Dispose()
Apply for a Temporary License
If you'd like to remove the evaluation message from the generated documents, or to get rid of the function limitations, please request a 30-day trial license for yourself.
Python: Add or Remove Data Validation in Excel Cells
Data validation in Excel is a powerful feature that allows you to control the type and range of data that can be entered into a cell or a range of cells. The main goal of data validation is to prevent errors and inconsistencies in data, which can lead to inaccurate analysis, reporting, and decision-making. Data validation helps ensure data accuracy by setting specific criteria for data entry. In this article, you will learn how to add or remove data validation in Excel in Python using Spire.XLS for Python.
Install Spire.XLS for Python
This scenario requires Spire.XLS for Python and plum-dispatch v1.7.4. They can be easily installed in your Windows through the following pip command.
pip install Spire.XLS
If you are unsure how to install, please refer to this tutorial: How to Install Spire.XLS for Python on Windows
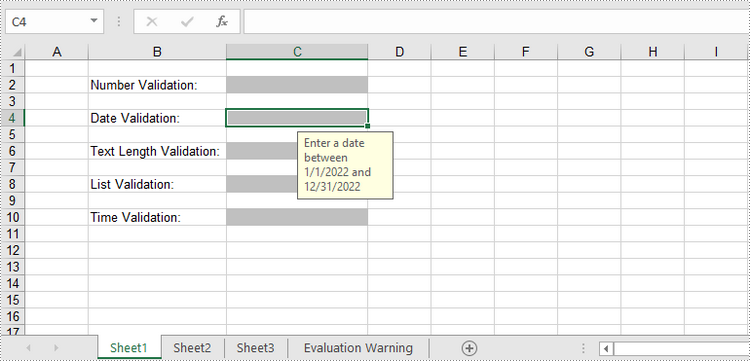
Add Various Types of Data Validation to Excel in Python
Spire.XLS for Python provides the DataValidation class to handle data validation in a specific cell or range. Through the properties under the DataValidation object, you can specify validation type, formula, compare operator, etc. The following are the steps to add data validation to an Excel cell using Spire.XLS for Python.
- Create a Workbook object.
- Get a specific worksheet through Workbook.Worksheets[index] property.
- Get a specific cell through Worksheet.Range property.
- Set the data validation type, formula, compare operator and other related attributes through the properties under CellRarange.DataValidation object.
- Save the workbook to another Excel file using Workbook.SaveToFile() method.
- Python
from spire.xls import *
from spire.xls.common import *

# Create a Workbook object
workbook = Workbook()

# Get the first worksheet
sheet = workbook.Worksheets[0]

# Insert text in cells
sheet.Range["B2"].Text = "Number Validation:"
sheet.Range["B4"].Text = "Date Validation:"
sheet.Range["B6"].Text = "Text Length Validation:"
sheet.Range["B8"].Text = "List Validation:"
sheet.Range["B10"].Text = "Time Validation:"

# Add number validation to C2
rangeNumber = sheet.Range["C2"]
rangeNumber.DataValidation.AllowType = CellDataType.Integer
rangeNumber.DataValidation.CompareOperator = ValidationComparisonOperator.Between
rangeNumber.DataValidation.Formula1 = "1"
rangeNumber.DataValidation.Formula2 = "10"
rangeNumber.DataValidation.InputMessage = "Enter a number between 1 and 10"
rangeNumber.Style.KnownColor = ExcelColors.Gray25Percent

# Add date validation to C4
rangeDate = sheet.Range["C4"]
rangeDate.DataValidation.AllowType = CellDataType.Date
rangeDate.DataValidation.CompareOperator = ValidationComparisonOperator.Between
rangeDate.DataValidation.Formula1 = "01/01/2022"
rangeDate.DataValidation.Formula2 = "31/12/2022"
rangeDate.DataValidation.InputMessage = "Enter a date between 01/01/2022 and 31/12/2022"
rangeDate.Style.KnownColor = ExcelColors.Gray25Percent

# Add text length validation to C6
rangeTextLength = sheet.Range["C6"]
rangeTextLength.DataValidation.AllowType = CellDataType.TextLength
rangeTextLength.DataValidation.CompareOperator = ValidationComparisonOperator.LessOrEqual
rangeTextLength.DataValidation.Formula1 = "5"
rangeTextLength.DataValidation.InputMessage = "Enter text lesser than 5 characters"
rangeTextLength.Style.KnownColor = ExcelColors.Gray25Percent

# Apply list validation to C8
rangeList = sheet.Range["C8"]
rangeList.DataValidation.Values = ["United States", "Canada", "United Kingdom", "Germany"]
rangeList.DataValidation.IsSuppressDropDownArrow = False
rangeList.DataValidation.InputMessage = "Choose an item from the list"
rangeList.Style.KnownColor = ExcelColors.Gray25Percent

# Apply time validation to C10
rangeTime = sheet.Range["C10"]
rangeTime.DataValidation.AllowType = CellDataType.Time
rangeTime.DataValidation.CompareOperator = ValidationComparisonOperator.Between
rangeTime.DataValidation.Formula1 = "9:00"
rangeTime.DataValidation.Formula2 = "12:00"
rangeTime.DataValidation.InputMessage = "Enter a time between 9:00 and 12:00"
rangeTime.Style.KnownColor = ExcelColors.Gray25Percent

# Auto fit width of column 2
sheet.AutoFitColumn(2)

# Set the width of column 3
sheet.Columns[2].ColumnWidth = 20

# Save to file
workbook.SaveToFile("output/DataValidation.xlsx", ExcelVersion.Version2016)
Remove Data Validation from Excel in Python
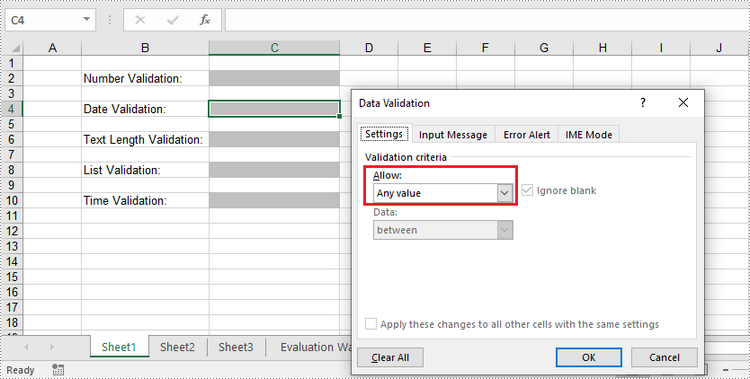
To remove the data validation from an Excel worksheet, use the Worksheet.DVTable.Remove(list rectangles) method. The parameter list specifies the cells to remove validation. The following are the detailed steps.
- Create a Workbook object.
- Load the Excel file containing data validation using Workbook.LoadFromFile() method.
- Get the specified worksheet though Workbook.Worksheets[index] property.
- Create a list of rectangles, which is used to specify the cells where the validation will be removed.
- Remove the data validation from the selected cells using Worksheet.DVTable.Remove() method.
- Save the workbook to another Excel file using Workbook.SaveToFile() method.
- Python
from spire.xls import *
from spire.xls.common import *

# Create a Workbook object
workbook = Workbook()

# Load a sample Excel file
workbook.LoadFromFile("C:\\Users\\Administrator\\Desktop\\DataValidation.xlsx")

# Get the first worksheet
worksheet = workbook.Worksheets[0]

# Create a list of rectangles to specify the cells or cell ranges where the data validation will be removed
rects= []
rects.append(Rectangle.FromLTRB(0,0,2,9))

# Remove the data validation from the selected cells
worksheet.DVTable.Remove(rects)

# Save the workbook to an Excel file
workbook.SaveToFile("output/RemoveDataValidation.xlsx")
Apply for a Temporary License
If you'd like to remove the evaluation message from the generated documents, or to get rid of the function limitations, please request a 30-day trial license for yourself.
Python: Apply Superscript and Subscript in Excel
Superscript and subscript are formatting styles used in typography and writing to position characters or numbers above or below the normal line of text. Superscript is a smaller-sized text or symbol that is raised above the baseline. It is commonly used for mathematical exponents, footnotes, and ordinal indicators. Subscript, on the other hand, is a smaller-sized text or symbol that is positioned below the baseline. It is often used for chemical formulas, mathematical expressions and some linguistic notations. These formatting styles can help users distinguish specific elements within text and convey information more effectively. In this article, we will show you how to apply superscript and subscript in Excel by using Spire.XLS for Python.
Install Spire.XLS for Python
This scenario requires Spire.XLS for Python and plum-dispatch v1.7.4. They can be easily installed in your Windows through the following pip command.
pip install Spire.XLS
If you are unsure how to install, please refer to this tutorial: How to Install Spire.XLS for Python on Windows
Apply Superscript and Subscript in Excel
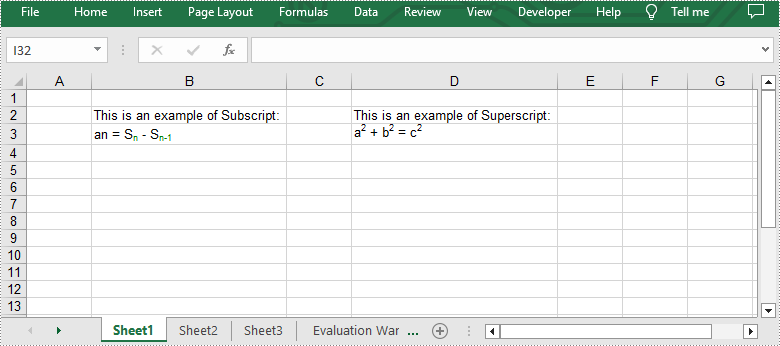
To apply the superscript or subscript style to specific characters in excel, you need to create a custom font first and set the superscript or subscript property of it. And then assign the font to the specific characters within the cell using CellRange.RichText.SetFont() method provided by Spire.XLS for Python. The detailed steps are as follows:
- Create an object of Workbook class.
- Get the first worksheet of it using Workbook.Worksheets[int index] property.
- Get the specific cells using Worksheet.Range[string name] property and add desired text to them.
- Get a cell by using Worksheet.Range[string name] property and add rich text to it by CellRange.RichText.Text property.
- Create a custom font using Workbook.CreateFont() method.
- Enable the subscript property of the font by setting ExcelFont.IsSubscript property to true.
- Assign the font to specific characters of the added rich text in the cell by calling CellRange.RichText.SetFont() method.
- Likewise, get another cell using Worksheet.Range[string name] property and add rich text to it by CellRange.RichText.Text property.
- Create a custom font using Workbook.CreateFont() method.
- Enable the superscript property of the font by setting ExcelFont.IsSuperscript property to true.
- Assign the font to specific characters of the added rich text in the cell by calling CellRange.RichText.SetFont() method.
- Automatically adjust column widths to fit text length using Worksheet.AllocatedRange.AutoFitColumns() method.
- Save the result file using Workbook.SaveToFile() method.
- Python
from spire.common import *
from spire.xls.common import *

outputFile = "ApplySubscriptAndSuperscript.xlsx"

#Create an object of Workbook class
workbook = Workbook()

#Get the first worksheet
sheet = workbook.Worksheets[0]

#Add text to the specific cells
sheet.Range["B2"].Text = "This is an example of Subscript:"
sheet.Range["D2"].Text = "This is an example of Superscript:"

#Add rich text to a specific cell
range = sheet.Range["B3"]
range.RichText.Text = "an = Sn - Sn-1"

#Create a custom font
font = workbook.CreateFont()

#Enable the subscript property of the font by setting the IsSubscript property to "true"
font.IsSubscript = True

#Set the font color
font.Color = Color.get_Green()

#Assign the font to specific characters of the added rich text
range.RichText.SetFont(6, 6, font)
range.RichText.SetFont(11, 13, font)

#Add rich text to another cell
range = sheet.Range["D3"]
range.RichText.Text = "a2 + b2 = c2"

#Create a custom font
font = workbook.CreateFont()

#Enable the superscript property of the font by setting the IsSuperscript property to "true"
font.IsSuperscript = True

#Assign the font to specific characters of the added rich text
range.RichText.SetFont(1, 1, font)
range.RichText.SetFont(6, 6, font)
range.RichText.SetFont(11, 11, font)

#Autofit the column widths
sheet.AllocatedRange.AutoFitColumns()

#Save the result file
workbook.SaveToFile(outputFile, ExcelVersion.Version2013)
workbook.Dispose()
Apply for a Temporary License
If you'd like to remove the evaluation message from the generated documents, or to get rid of the function limitations, please request a 30-day trial license for yourself.