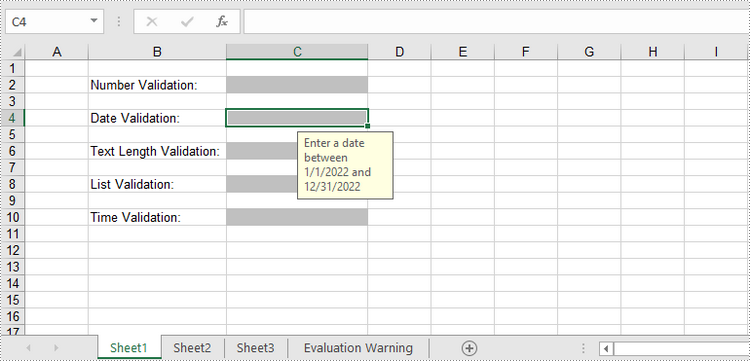
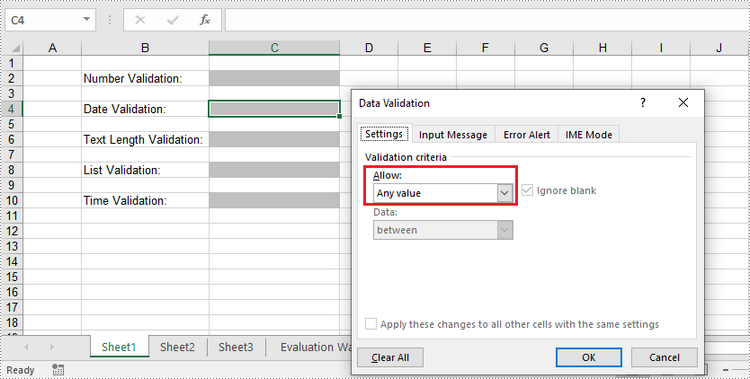
Data validation in Excel is a powerful feature that allows you to control the type and range of data that can be entered into a cell or a range of cells. The main goal of data validation is to prevent errors and inconsistencies in data, which can lead to inaccurate analysis, reporting, and decision-making. Data validation helps ensure data accuracy by setting specific criteria for data entry. In this article, you will learn how to add or remove data validation in Excel in Python using Spire.XLS for Python.
Install Spire.XLS for Python
This scenario requires Spire.XLS for Python and plum-dispatch v1.7.4. They can be easily installed in your Windows through the following pip command.
pip install Spire.XLS
If you are unsure how to install, please refer to this tutorial: How to Install Spire.XLS for Python on Windows
Add Various Types of Data Validation to Excel in Python
Spire.XLS for Python provides the DataValidation class to handle data validation in a specific cell or range. Through the properties under the DataValidation object, you can specify validation type, formula, compare operator, etc. The following are the steps to add data validation to an Excel cell using Spire.XLS for Python.
- Create a Workbook object.
- Get a specific worksheet through Workbook.Worksheets[index] property.
- Get a specific cell through Worksheet.Range property.
- Set the data validation type, formula, compare operator and other related attributes through the properties under CellRarange.DataValidation object.
- Save the workbook to another Excel file using Workbook.SaveToFile() method.
- Python
from spire.xls import *
from spire.xls.common import *

# Create a Workbook object
workbook = Workbook()

# Get the first worksheet
sheet = workbook.Worksheets[0]

# Insert text in cells
sheet.Range["B2"].Text = "Number Validation:"
sheet.Range["B4"].Text = "Date Validation:"
sheet.Range["B6"].Text = "Text Length Validation:"
sheet.Range["B8"].Text = "List Validation:"
sheet.Range["B10"].Text = "Time Validation:"

# Add number validation to C2
rangeNumber = sheet.Range["C2"]
rangeNumber.DataValidation.AllowType = CellDataType.Integer
rangeNumber.DataValidation.CompareOperator = ValidationComparisonOperator.Between
rangeNumber.DataValidation.Formula1 = "1"
rangeNumber.DataValidation.Formula2 = "10"
rangeNumber.DataValidation.InputMessage = "Enter a number between 1 and 10"
rangeNumber.Style.KnownColor = ExcelColors.Gray25Percent

# Add date validation to C4
rangeDate = sheet.Range["C4"]
rangeDate.DataValidation.AllowType = CellDataType.Date
rangeDate.DataValidation.CompareOperator = ValidationComparisonOperator.Between
rangeDate.DataValidation.Formula1 = "01/01/2022"
rangeDate.DataValidation.Formula2 = "31/12/2022"
rangeDate.DataValidation.InputMessage = "Enter a date between 01/01/2022 and 31/12/2022"
rangeDate.Style.KnownColor = ExcelColors.Gray25Percent

# Add text length validation to C6
rangeTextLength = sheet.Range["C6"]
rangeTextLength.DataValidation.AllowType = CellDataType.TextLength
rangeTextLength.DataValidation.CompareOperator = ValidationComparisonOperator.LessOrEqual
rangeTextLength.DataValidation.Formula1 = "5"
rangeTextLength.DataValidation.InputMessage = "Enter text lesser than 5 characters"
rangeTextLength.Style.KnownColor = ExcelColors.Gray25Percent

# Apply list validation to C8
rangeList = sheet.Range["C8"]
rangeList.DataValidation.Values = ["United States", "Canada", "United Kingdom", "Germany"]
rangeList.DataValidation.IsSuppressDropDownArrow = False
rangeList.DataValidation.InputMessage = "Choose an item from the list"
rangeList.Style.KnownColor = ExcelColors.Gray25Percent

# Apply time validation to C10
rangeTime = sheet.Range["C10"]
rangeTime.DataValidation.AllowType = CellDataType.Time
rangeTime.DataValidation.CompareOperator = ValidationComparisonOperator.Between
rangeTime.DataValidation.Formula1 = "9:00"
rangeTime.DataValidation.Formula2 = "12:00"
rangeTime.DataValidation.InputMessage = "Enter a time between 9:00 and 12:00"
rangeTime.Style.KnownColor = ExcelColors.Gray25Percent

# Auto fit width of column 2
sheet.AutoFitColumn(2)

# Set the width of column 3
sheet.Columns[2].ColumnWidth = 20

# Save to file
workbook.SaveToFile("output/DataValidation.xlsx", ExcelVersion.Version2016)

Remove Data Validation from Excel in Python
To remove the data validation from an Excel worksheet, use the Worksheet.DVTable.Remove(list rectangles) method. The parameter list specifies the cells to remove validation. The following are the detailed steps.
- Create a Workbook object.
- Load the Excel file containing data validation using Workbook.LoadFromFile() method.
- Get the specified worksheet though Workbook.Worksheets[index] property.
- Create a list of rectangles, which is used to specify the cells where the validation will be removed.
- Remove the data validation from the selected cells using Worksheet.DVTable.Remove() method.
- Save the workbook to another Excel file using Workbook.SaveToFile() method.
- Python
from spire.xls import *
from spire.xls.common import *

# Create a Workbook object
workbook = Workbook()

# Load a sample Excel file
workbook.LoadFromFile("C:\\Users\\Administrator\\Desktop\\DataValidation.xlsx")

# Get the first worksheet
worksheet = workbook.Worksheets[0]

# Create a list of rectangles to specify the cells or cell ranges where the data validation will be removed
rects= []
rects.append(Rectangle.FromLTRB(0,0,2,9))

# Remove the data validation from the selected cells
worksheet.DVTable.Remove(rects)

# Save the workbook to an Excel file
workbook.SaveToFile("output/RemoveDataValidation.xlsx")

Apply for a Temporary License
If you'd like to remove the evaluation message from the generated documents, or to get rid of the function limitations, please request a 30-day trial license for yourself.


