
Document Operation (8)
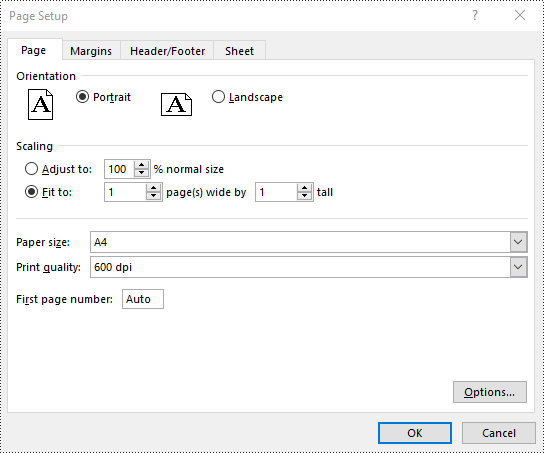
Page setup in Excel refers to the various settings that control how an Excel worksheet will be printed or displayed in a print preview. These settings determine the appearance and layout of the printed document, ensuring that it meets the desired formatting and readability standards. Page setup options include page margins, orientation, paper size, print area, headers, footers, scaling, and other print-related settings. In this article, we will explain how to set page setup options in Excel in Python using Spire.XLS for Python.
- Set Page Margins in Excel in Python
- Set Page Orientation in Excel in Python
- Set Paper Size in Excel in Python
- Set Print Area in Excel in Python
- Set Scaling Factor in Excel in Python
- Set FitToPages Options in Excel in Python
- Set Headers and Footers in Excel in Python
Install Spire.XLS for Python
This scenario requires Spire.XLS for Python and plum-dispatch v1.7.4. They can be easily installed in your Windows through the following pip command.
pip install Spire.XLS
If you are unsure how to install, please refer to this tutorial: How to Install Spire.XLS for Python on Windows
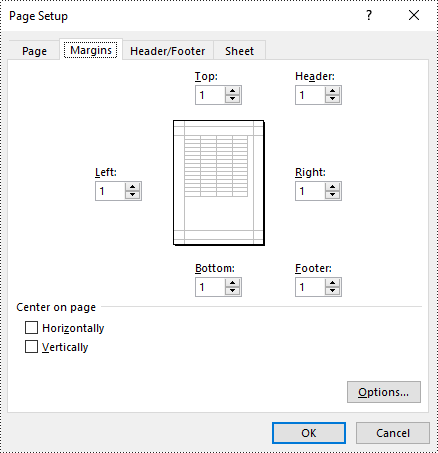
Set Page Margins in Excel in Python
In Spire.XLS for Python, the PageSetup class is used to configure page setup options for Excel worksheets. You can access the PageSetup object of a worksheet through the Worksheet.PageSetup property. Then, you can use properties like PageSetup.TopMargin, PageSetup.BottomMargin, PageSetup.LeftMargin, PageSetup.RightMargin, PageSetup.HeaderMarginInch, and PageSetup.FooterMarginInch to set the respective margins for the worksheet. The detailed steps are as follows:
- Create an object of the Workbook class.
- Load an Excel file using Workbook.LoadFromFile() method.
- Get a specific worksheet using Workbook.Worksheets[index] property.
- Access the PageSetup object of the worksheet using Worksheet.PageSetup property.
- Set the top, bottom, left, right, header, and footer margins using PageSetup.TopMargin, PageSetup.BottomMargin, PageSetup.LeftMargin, PageSetup.RightMargin, PageSetup.HeaderMarginInch, and PageSetup.FooterMarginInch properties.
- Save the modified workbook to a new file using Workbook.SaveToFile() method.
- Python
from spire.xls import *
from spire.xls.common import *

# Create a Workbook object
workbook = Workbook()
# Load an Excel file
workbook.LoadFromFile("Sample.xlsx")

# Get the first worksheet
sheet = workbook.Worksheets[0]

# Get the PageSetup object of the worksheet
pageSetup = sheet.PageSetup

# Set top, bottom, left, and right page margins for the worksheet
# The measure of the unit is Inch (1 inch = 2.54 cm)
pageSetup.TopMargin = 1
pageSetup.BottomMargin = 1
pageSetup.LeftMargin = 1
pageSetup.RightMargin = 1
pageSetup.HeaderMarginInch= 1
pageSetup.FooterMarginInch= 1

# Save the modified workbook to a new file
workbook.SaveToFile("SetPageMargins.xlsx", ExcelVersion.Version2016)
workbook.Dispose()
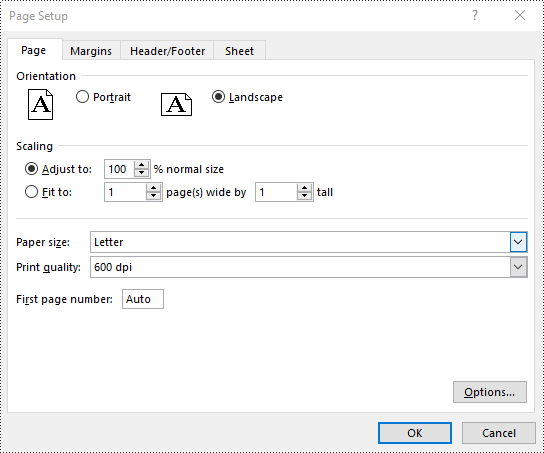
Set Page Orientation in Excel in Python
To set the page orientation for an Excel worksheet, you can use the PageSetup.Orientation property. The detailed steps are as follows.
- Create an object of the Workbook class.
- Load an Excel file using Workbook.LoadFromFile() method.
- Get a specific worksheet using Workbook.Worksheets[index] property.
- Access the PageSetup object of the worksheet using Worksheet.PageSetup property.
- Set the page orientation using PageSetup.Orientation property.
- Save the modified workbook to a new file using Workbook.SaveToFile() method.
- Python
from spire.xls import *
from spire.xls.common import *

# Create a Workbook object
workbook = Workbook()
# Load an Excel file
workbook.LoadFromFile("Sample.xlsx")

# Get the first worksheet
sheet = workbook.Worksheets[0]

# Get the PageSetup object of the worksheet
pageSetup = sheet.PageSetup

# Set the page orientation for printing the worksheet to landscape mode
pageSetup.Orientation = PageOrientationType.Landscape

# Save the modified workbook to a new file
workbook.SaveToFile("SetPageOrientation.xlsx", ExcelVersion.Version2016)
workbook.Dispose()
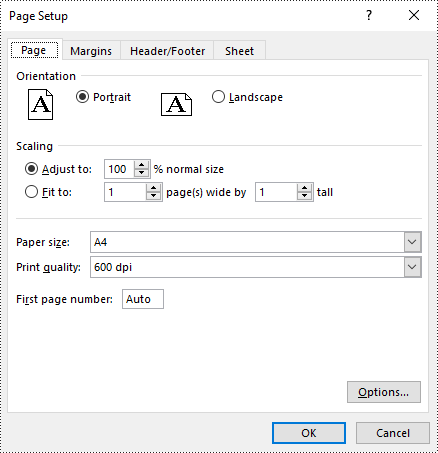
Set Paper Size in Excel in Python
You can set a wide range of paper sizes, such as A3, A4, A5, B4, B5, Letter, Legal, and Tabloid for printing an Excel worksheet using the PageSetup.PaperSize property. The detailed steps are as follows:
- Create an object of the Workbook class.
- Load an Excel file using Workbook.LoadFromFile() method.
- Get a specific worksheet using Workbook.Worksheets[index] property.
- Access the PageSetup object of the worksheet using Worksheet.PageSetup property.
- Set the paper size using PageSetup.PaperSize property.
- Save the modified workbook to a new file using Workbook.SaveToFile() method.
- Python
from spire.xls import *
from spire.xls.common import *

# Create a Workbook object
workbook = Workbook()
# Load an Excel file
workbook.LoadFromFile("Sample.xlsx")

# Get the first worksheet
sheet = workbook.Worksheets[0]

# Get the PageSetup object of the worksheet
pageSetup = sheet.PageSetup

# Set the paper size to A4
pageSetup.PaperSize = PaperSizeType.PaperA4

# Save the modified workbook to a new file
workbook.SaveToFile("SetPaperSize.xlsx", ExcelVersion.Version2016)
workbook.Dispose()
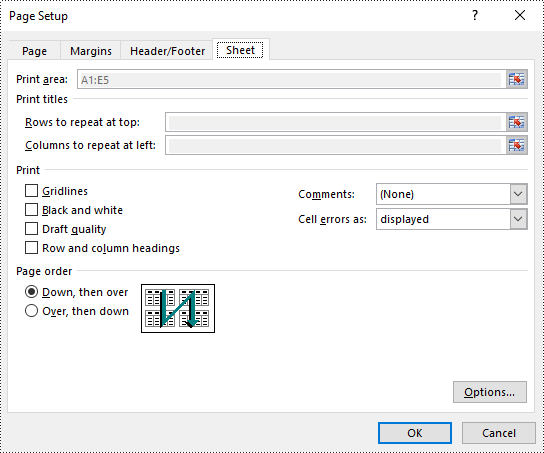
Set Print Area in Excel in Python
The print area of an Excel worksheet can be customized using the PageSetup.PringArea property. The detailed steps are as follows.
- Create an object of the Workbook class.
- Load an Excel file using Workbook.LoadFromFile() method.
- Get a specific worksheet using Workbook.Worksheets[index] property.
- Access the PageSetup object of the worksheet using Worksheet.PageSetup property.
- Set the print area using PageSetup.PringArea property.
- Save the modified workbook to a new file using Workbook.SaveToFile() method.
- Python
from spire.xls import *
from spire.xls.common import *

# Create a Workbook object
workbook = Workbook()
# Load an Excel file
workbook.LoadFromFile("Sample.xlsx")

# Get the first worksheet
sheet = workbook.Worksheets[0]

# Get the PageSetup object of the worksheet
pageSetup = sheet.PageSetup

# Set the print area of the worksheet to "A1:E5"
pageSetup.PrintArea = "A1:E5"

# Save the modified workbook to a new file
workbook.SaveToFile("SetPrintArea.xlsx", ExcelVersion.Version2016)
workbook.Dispose()
Set Scaling Factor in Excel in Python
You can scale the content of a worksheet to a specific percentage of its original size with the PageSetup.Zoom property. The detailed steps are as follows.
- Create an object of the Workbook class.
- Load an Excel file using Workbook.LoadFromFile() method.
- Get a specific worksheet using Workbook.Worksheets[index] property.
- Access the PageSetup object of the worksheet using Worksheet.PageSetup property.
- Set the scaling factor using PageSetup.Zoom property.
- Save the modified workbook to a new file using Workbook.SaveToFile() method.
- Python
from spire.xls import *
from spire.xls.common import *

# Create a Workbook object
workbook = Workbook()
# Load an Excel file
workbook.LoadFromFile("Sample.xlsx")

# Get the first worksheet
sheet = workbook.Worksheets[0]

# Get the PageSetup object of the worksheet
pageSetup = sheet.PageSetup

# Set the scaling factor of the worksheet to 90%
pageSetup.Zoom = 90

# Save the modified workbook to a new file
workbook.SaveToFile("SetScalingFactor.xlsx", ExcelVersion.Version2016)
workbook.Dispose()

Set FitToPages Options in Excel in Python
In addition to scaling the content of a worksheet to a specific percentage of its original size, you can also fit the content of a worksheet to a specific number of pages using PageSetup.FitToPagesTall and PageSetup.FitToPagesWide properties. The detailed steps are as follows.
- Create an object of the Workbook class.
- Load an Excel file using Workbook.LoadFromFile() method.
- Get a specific worksheet using Workbook.Worksheets[index] property.
- Access the PageSetup object of the worksheet using Worksheet.PageSetup property.
- Fit the content of the worksheet to one page using PageSetup.FitToPagesTall and PageSetup.FitToPagesWide properties.
- Save the modified workbook to a new file using Workbook.SaveToFile() method.
- Python
from spire.xls import *
from spire.xls.common import *

# Create a Workbook object
workbook = Workbook()
# Load an Excel file
workbook.LoadFromFile("Sample.xlsx")

# Get the first worksheet
sheet = workbook.Worksheets[0]

# Get the PageSetup object of the worksheet
pageSetup = sheet.PageSetup

# Fit the content of the worksheet within one page vertically (i.e., all rows will fit on a single page)
pageSetup.FitToPagesTall = 1
# Fit the content of the worksheet within one page horizontally (i.e., all columns will fit on a single page)
pageSetup.FitToPagesWide = 1

# Save the modified workbook to a new file
workbook.SaveToFile("FitToPages.xlsx", ExcelVersion.Version2016)
workbook.Dispose()
Set Headers and Footers in Excel in Python
For setting headers and footers in Excel, please check this article: Python: Add Headers and Footers to Excel.
Apply for a Temporary License
If you'd like to remove the evaluation message from the generated documents, or to get rid of the function limitations, please request a 30-day trial license for yourself.
Working with large Excel workbooks can sometimes become unwieldy, especially when you need to share or distribute parts of the data independently. In these cases, it can be helpful to split your Excel file into multiple smaller files. This not only makes the individual files more manageable, but also allows you to better organize and share your data. In this article, we will demonstrate how to split an Excel file in Python using Spire.XLS for Python.
Install Spire.XLS for Python
This scenario requires Spire.XLS for Python and plum-dispatch v1.7.4. They can be easily installed in your Windows through the following pip command.
pip install Spire.XLS
If you are unsure how to install, please refer to this tutorial: How to Install Spire.XLS for Python on Windows
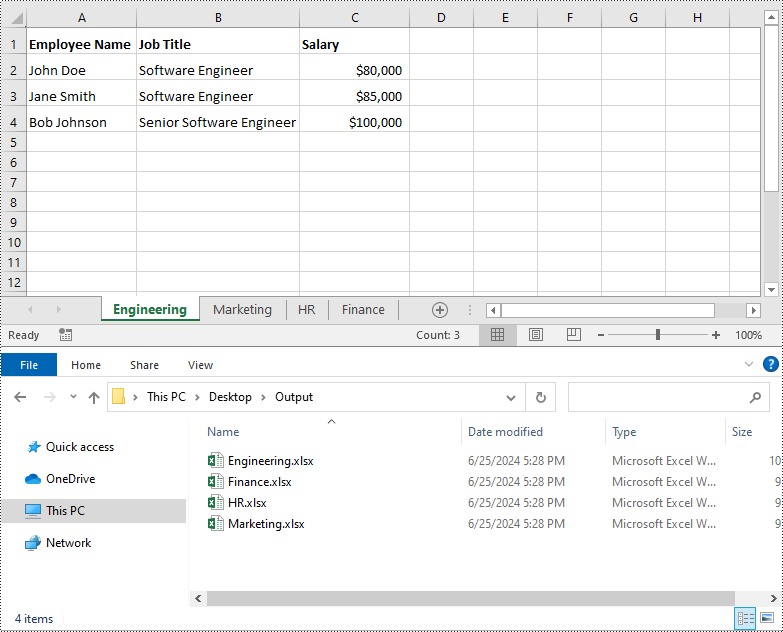
Split Excel by Worksheets in Python
If your Excel file contains multiple worksheets, you can easily split each sheet into an Excel file by using the Workbook.Worksheets.AddCopy() method provided by Spire.XLS for Python. The detailed steps are as follows.
- Create an object of the Workbook class.
- Load an Excel file using Workbook.LoadFromFile() method.
- Iterate through the worksheets in the Excel file.
- For each worksheet, create a new Workbook object for it.
- Remove the default worksheets in the new workbook using Workbook.Worksheets.Clear() method.
- Copy the worksheet to the new workbook using Workbook.Worksheets.AddCopy() method.
- Save the new workbook to an Excel file using Workbook.SaveToFile() method.
- Python
from spire.xls import *
from spire.xls.common import *

# Create an object of the Workbook class
workbook = Workbook()
# Load an Excel file
workbook.LoadFromFile("Sample.xlsx")

# Specify the folder path for the generated Excel files
folderPath = "C:\\Users\\Administrator\\Desktop\\Output\\"

# Iterate through all worksheets in the Excel file
for worksheet in workbook.Worksheets:
    # For each worksheet, create a new Workbook object
    newWorkbook = Workbook()
    # Remove the worksheets from the new workbook
    newWorkbook.Worksheets.Clear()

    # Copy the worksheet from the Excel file to the new workbook
    newWorkbook.Worksheets.AddCopy(worksheet)

    # Save the new workbook to the specified folder
    newWorkbook.SaveToFile(folderPath + worksheet.Name + ".xlsx", FileFormat.Version2016)

workbook.Dispose()
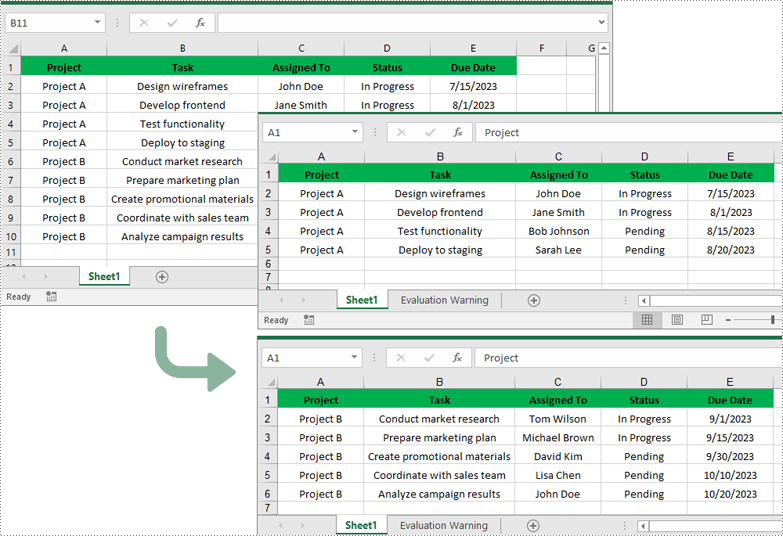
Split Excel by Rows in Python
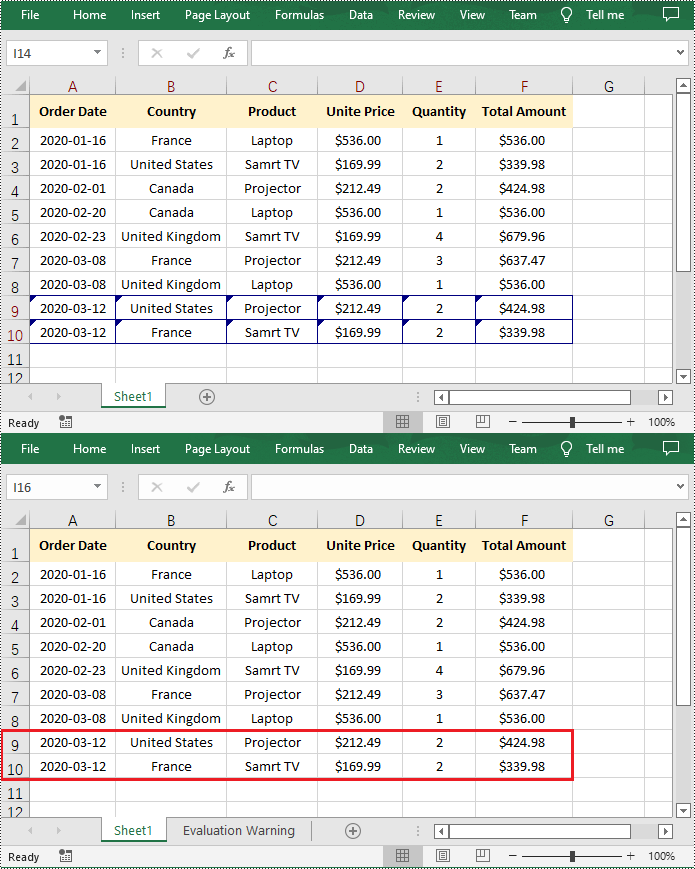
If you have a large worksheet where a specific number of rows represent a unique record or entry, you can extract these individual rows or records into separate Excel files for focused data analysis using the Worksheet.CopyRow() method. The detailed steps are as follows.
- Create an object of the Workbook class.
- Load an Excel file using Workbook.LoadFromFile() method.
- Get the original worksheet where you want to copy rows from using Workbook.Worksheets[index] property.
- Create a new Workbook object and remove the default worksheets from the new workbook using Workbook.Worksheets.Clear() method.
- Add a new Worksheet to the new workbook using Workbook.Worksheets.Add() method.
- Copy specific rows from the original worksheet to the new worksheet using Worksheet.CopyRow() method.
- Copy Column widths from the original worksheet to the new worksheet.
- Save the new workbook to an Excel file using Workbook.SaveToFile() method.
- Python
from spire.xls import *
from spire.xls.common import *

# Create a Workbook object and load an Excel file
workbook = Workbook()
workbook.LoadFromFile("Sample.xlsx")
# Get the original (the 1st) worksheet
worksheet = workbook.Worksheets[0]
# Get the header row
header = worksheet.Rows[0]

# Specify the folder path for the generated Excel files
folderPath = "C:\\Users\\Administrator\\Desktop\\Output\\"

# Create a new Workbook object
newWorkbook1 = Workbook()
# Remove the default worksheets
newWorkbook1.Worksheets.Clear()
# Add a new worksheet
newWorksheet1 = newWorkbook1.Worksheets.Add("Sheet1")
# Copy rows 1-5 from the original worksheet to the new worksheet
for i in range(1, 6):
    worksheet.CopyRow(worksheet.Rows[i - 1], newWorksheet1, newWorksheet1.LastDataRow + 1, CopyRangeOptions.All)
# Copy column widths from the original worksheet to the new worksheet
for i in range(worksheet.Columns.Count):
    newWorksheet1.SetColumnWidth(i + 1, worksheet.GetColumnWidth(i + 1))
# Save the new workbook to the specified folder
newWorkbook1.SaveToFile(folderPath + "Rows1-5.xlsx", FileFormat.Version2016)
newWorkbook1.Dispose()

# Create a new Workbook object
newWorkbook2 = Workbook()
# Remove the default worksheets
newWorkbook2.Worksheets.Clear()
# Add a new worksheet
newWorksheet2 = newWorkbook2.Worksheets.Add("Sheet1")
# Copy header row from the original worksheet to the new worksheet
worksheet.CopyRow(worksheet.Rows[0], newWorksheet2, newWorksheet2.LastDataRow + 1, CopyRangeOptions.All)
# Copy rows 6-10 from the original worksheet to the new worksheet
for i in range(6, 11):
    worksheet.CopyRow(worksheet.Rows[i - 1], newWorksheet2, newWorksheet2.LastDataRow + 1, CopyRangeOptions.All)
# Copy column widths from the original worksheet to the new worksheet
for i in range(worksheet.Columns.Count):
    newWorksheet2.SetColumnWidth(i + 1, worksheet.GetColumnWidth(i + 1))
# Save the new workbook to the specified folder
newWorkbook2.SaveToFile(folderPath + "Rows6-10.xlsx", FileFormat.Version2016)
newWorkbook2.Dispose()
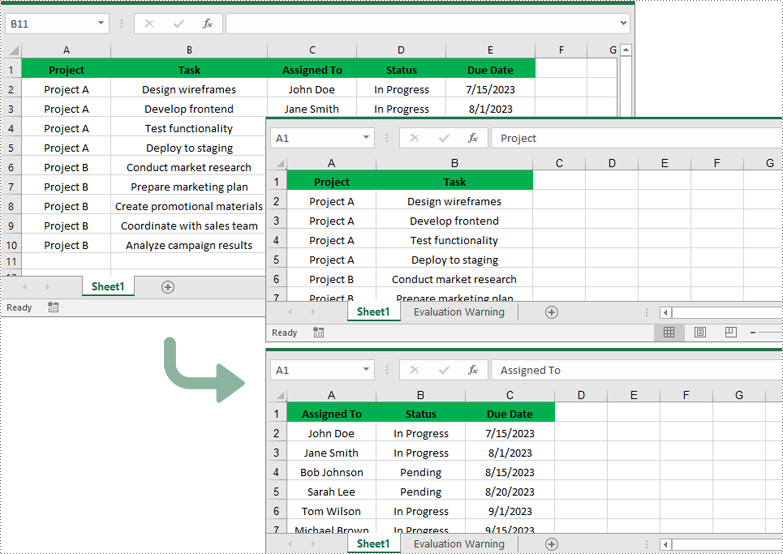
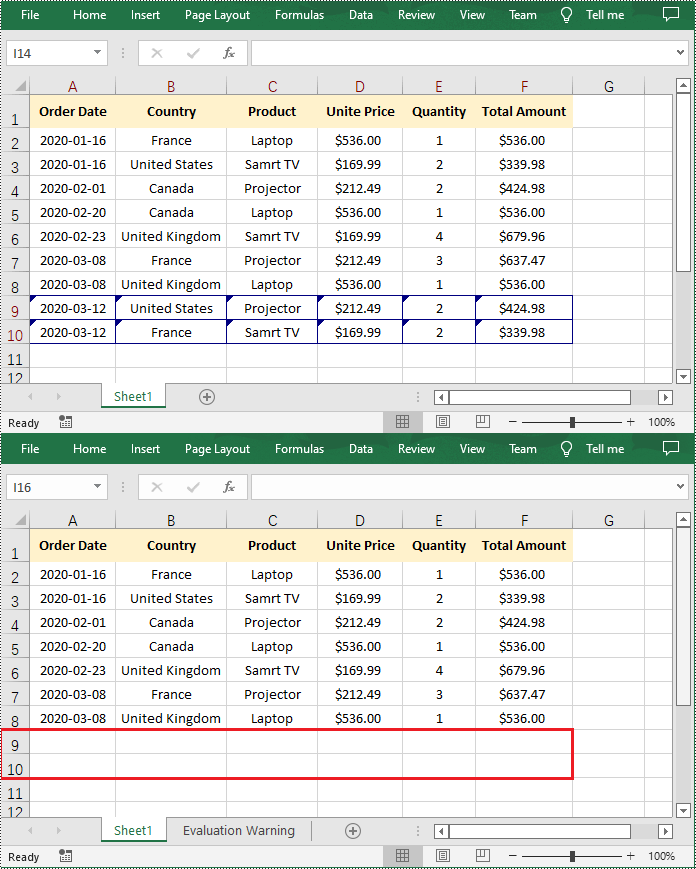
Split Excel by Columns in Python
In addition to splitting by rows, you can also split an Excel file by columns using the Worksheet.CopyColumn() method. The detailed steps are as follows.
- Create an object of the Workbook class.
- Load an Excel file using Workbook.LoadFromFile() method.
- Get the original worksheet where you want to copy columns from using Workbook.Worksheets[index] property.
- Create a new Workbook object and remove the default worksheets from the new workbook using Workbook.Worksheets.Clear() method.
- Add a new Worksheet to the new workbook using Workbook.Worksheets.Add() method.
- Copy specific columns from the original worksheet to the new worksheet using Worksheet.CopyColumn() method.
- Copy row heights from the original worksheet to the new worksheet.
- Save the new workbook to an Excel file using Workbook.SaveToFile() method.
- Python
from spire.xls import *
from spire.xls.common import *

# Create a Workbook object and load an Excel file
workbook = Workbook()
workbook.LoadFromFile("Sample.xlsx")
# Get the original (the 1st) worksheet
worksheet = workbook.Worksheets[0]

# Specify the folder path for the generated Excel files
folderPath = "C:\\Users\\Administrator\\Desktop\\Output\\"

# Create a new Workbook object
newWorkbook1 = Workbook()
# Remove the default worksheets
newWorkbook1.Worksheets.Clear()
# Add a new worksheet
newWorksheet1 = newWorkbook1.Worksheets.Add("Sheet1")
# Copy columns 1-2 from the original worksheet to the new worksheet
for i in range(1, 3):
    worksheet.CopyColumn(worksheet.Columns[i-1], newWorksheet1, newWorksheet1.LastDataColumn + 1, CopyRangeOptions.All)
# Copy row heights from the original worksheet to the new worksheet
for i in range(worksheet.Rows.Count):
    newWorksheet1.SetRowHeight(i + 1, worksheet.GetRowHeight(i + 1))
# Save the new workbook to the specified folder
newWorkbook1.SaveToFile(folderPath + "Columns1-2.xlsx", FileFormat.Version2016)
newWorkbook1.Dispose()

# Create a new Workbook object
newWorkbook2 = Workbook()
# Remove the default worksheets
newWorkbook2.Worksheets.Clear()
# Add a new worksheet
newWorksheet2 = newWorkbook2.Worksheets.Add("Sheet1")
# Copy columns 3-5 from the original worksheet to the new worksheet
for i in range(3, 6):
    worksheet.CopyColumn(worksheet.Columns[i-1], newWorksheet2, newWorksheet2.LastDataColumn + 1, CopyRangeOptions.All)

# Copy row heights from the original worksheet to the new worksheet
for i in range(worksheet.Rows.Count):
    newWorksheet2.SetRowHeight(i + 1, worksheet.GetRowHeight(i + 1))
# Save the new workbook to the specified folder
newWorkbook2.SaveToFile(folderPath + "Columns3-5.xlsx", FileFormat.Version2016)
newWorkbook2.Dispose()
Apply for a Temporary License
If you'd like to remove the evaluation message from the generated documents, or to get rid of the function limitations, please request a 30-day trial license for yourself.
Document properties provide additional information about an Excel file, such as author, title, subject, and other metadata associated with the file. Retrieving these properties from Excel can help users gain insight into the file content and history, enabling better organization and management of files. At times, users may also need to remove document properties to protect the privacy and confidentiality of the information contained in the file. In this article, you will learn how to read or remove document properties in Excel in Python using Spire.XLS for Python.
- Read Standard and Custom Document Properties in Excel
- Remove Standard and Custom Document Properties in Excel
Install Spire.XLS for Python
This scenario requires Spire.XLS for Python and plum-dispatch v1.7.4. They can be easily installed in your Windows through the following pip command.
pip install Spire.XLS
If you are unsure how to install, please refer to this tutorial: How to Install Spire.XLS for Python on Windows
Read Standard and Custom Document Properties in Excel in Python
Excel properties are divided into two main categories:
- Standard Properties: These are predefined properties that are built into Excel files. They typically include basic details about the file such as title, subject, author, keywords, etc.
- Custom Properties: These are user-defined attributes that can be added to Excel to track additional information about the file based on your specific needs.
Spire.XLS for Python allows to read both the standard and custom document properties of an Excel file. The following are the detailed steps:
- Create a Workbook instance.
- Load an Excel file using Workbook.LoadFromFile() method.
- Create a StringBuilder instance.
- Get a collection of all standard document properties using Workbook.DocumentProperties property.
- Get specific standard document properties using the properties of the BuiltInDocumentProperties class and append them to the StringBuilder instance.
- Get a collection of all custom document properties using Workbook.CustomDocumentProperties property.
- Iterate through the collection.
- Get the name, type, and value of each custom document property using ICustomDocumentProperties[].Name, ICustomDocumentProperties[].PropertyType and ICustomDocumentProperties[].Value properties.
- Determine the specific property type, and then convert the property value to the value of the corresponding data type.
- Append the property name and converted property value to the StringBuilder instance using StringBuilde.append() method.
- Write the content of the StringBuilder instance into a txt file.
- Python
from spire.xls import *
from spire.xls.common import *
def AppendAllText(fname: str, text: List[str]):
fp = open(fname, "w")
for s in text:
fp.write(s + "\n")
fp.close()
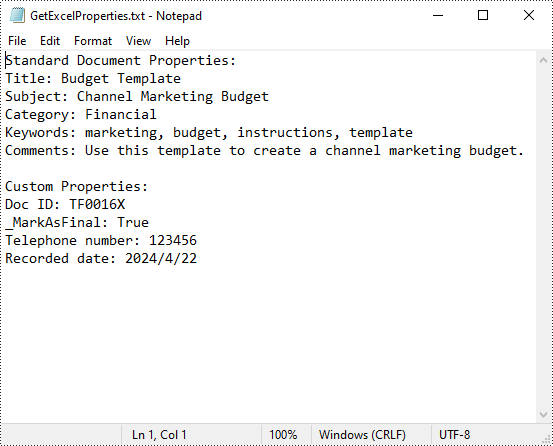
inputFile = "Budget Template.xlsx"
outputFile = "GetExcelProperties.txt"
# Create a Workbook instance
workbook = Workbook()
# Load an Excel document from disk
workbook.LoadFromFile(inputFile)
# Create a StringBuilder instance
builder = []
# Get a collection of all standard document properties
standardProperties = workbook.DocumentProperties
# Get specific standard properties and append them to the StringBuilder instance
builder.append("Standard Document Properties:")
builder.append("Title: " + standardProperties.Title)
builder.append("Subject: " + standardProperties.Subject)
builder.append("Category: " + standardProperties.Category)
builder.append("Keywords: " + standardProperties.Keywords)
builder.append("Comments: " + standardProperties.Comments)
builder.append("")
# Get a collection of all custom document properties
customProperties = workbook.CustomDocumentProperties
builder.append("Custom Properties:")
# Iterate through the collection
for i in range(len(customProperties)):
# Get the name, type, and value of each custom document property
name = customProperties[i].Name
type = customProperties[i].PropertyType
obj = customProperties[i].Value
# Determine the specific property type, and then convert the property value to the value of the corresponding data type
value = None
if type == PropertyType.Double:
value = Double(obj).Value
elif type == PropertyType.DateTime:
value = DateTime(obj).ToShortDateString()
elif type == PropertyType.Bool:
value = Boolean(obj).Value
elif type == PropertyType.Int:
value = Int32(obj).Value
elif type == PropertyType.Int32:
value = Int32(obj).Value
else:
value = String(obj).Value
# Append the property name and converted property value to the StringBuilder instance
builder.append(name + ": " + str(value))
# Write the content of the StringBuilder instance into a text file
AppendAllText(outputFile, builder)
workbook.Dispose()
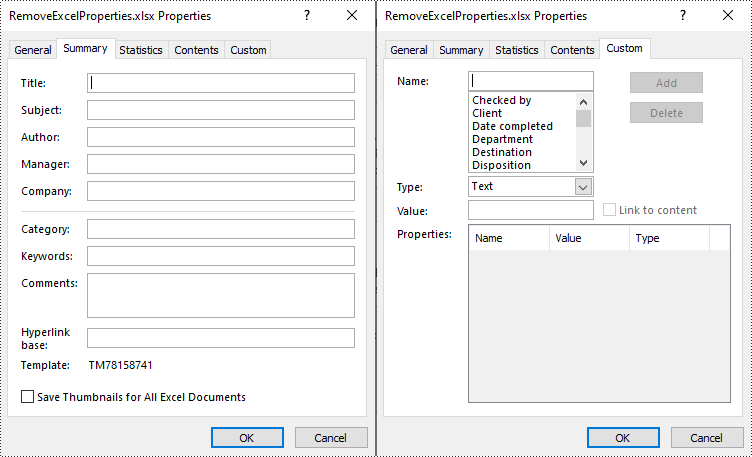
Remove Standard and Custom Document Properties in Excel in Python
You can easily delete standard document properties from an Excel file by setting their values as empty. For custom document properties, you can use the ICustomDocumentProperties.Remove() method to delete them. The following are the detailed steps:
- Create a Workbook instance.
- Load a sample Excel file using Workbook.LoadFromFile() method.
- Get a collection of all standard document properties using Workbook.DocumentProperties property.
- Set the values of specific standard document properties as empty through the corresponding properties of the BuiltInDocumentProperties class.
- Get a collection of all custom document properties using Workbook.CustomDocumentProperties property.
- Iterate through the collection.
- Delete each custom property from the collection by its name using ICustomDocumentProperties.Remove() method.
- Save the result file using Workbook.SaveToFile() method.
- Python
from spire.xls import *
from spire.xls.common import *

inputFile = "Budget Template.xlsx"
outputFile = "RemoveExcelProperties.xlsx"

# Create a Workbook instance
workbook = Workbook()

# Load an Excel document from disk
workbook.LoadFromFile(inputFile)

# Get a collection of all standard document properties
standardProperties = workbook.DocumentProperties

# Set the value of each standard document property as empty
standardProperties.Title = ""
standardProperties.Subject = ""
standardProperties.Category = ""
standardProperties.Keywords = ""
standardProperties.Comments = ""

# Get a collection of all custom document properties
customProperties = workbook.CustomDocumentProperties

# Iterate through the collection
for i in range(len(customProperties) - 1, -1, -1):
    # Delete each custom document property from the collection by its name
    customProperties.Remove(customProperties[i].Name)

# Save the result file
workbook.SaveToFile(outputFile, ExcelVersion.Version2016)
workbook.Dispose()
Apply for a Temporary License
If you'd like to remove the evaluation message from the generated documents, or to get rid of the function limitations, please request a 30-day trial license for yourself.
The AutoFilter feature in Excel is a powerful tool that allows you to quickly filter worksheet data based on specific criteria, making it easier to find and analyze relevant information. When applying AutoFilter to a range of cells, you can display only those rows that meet certain conditions, while hiding the rest of the data. In this article, you will learn how to add or remove AutoFilter in Excel with Python using Spire.XLS for Python.
- Add AutoFilter to Excel Cells in Python
- Apply Date AutoFilter in Excel in Python
- Apply Custom AutoFilter in Excel in Python
- Remove AutoFilter in Excel in Python
Install Spire.XLS for Python
This scenario requires Spire.XLS for Python and plum-dispatch v1.7.4. They can be easily installed in your Windows through the following pip command.
pip install Spire.XLS
If you are unsure how to install, please refer to this tutorial: How to Install Spire.XLS for Python on Windows
Add AutoFilter to Excel Cells in Python
Spire.XLS for Python allows you to apply AutoFilter on a specific cell range through the Worksheet.AutoFilters.Range property. The following are the detailed steps:
- Create a Workbook instance.
- Load a sample Excel file using Workbook.LoadFromFile() method.
- Get a specified worksheet using Workbook.Worksheets[sheetIndex] property.
- Add an AutoFilter to a specified cell range using Worksheet.AutoFilters.Range property.
- Save the result file using Workbook.SaveToFile() method.
- Python
from spire.xls import *
from spire.xls.common import *

inputFile = "Data.xlsx"
outputFile = "ExcelAutoFilter.xlsx"

# Create a Workbook instance
workbook = Workbook()

# Load an Excel file
workbook.LoadFromFile(inputFile)

# Get the first worksheet
sheet = workbook.Worksheets[0]

# Create an AutoFilter in the sheet and specify the range to be filtered
sheet.AutoFilters.Range = sheet.Range["A1:C1"]

# Save the result file
workbook.SaveToFile(outputFile, ExcelVersion.Version2016)
workbook.Dispose()
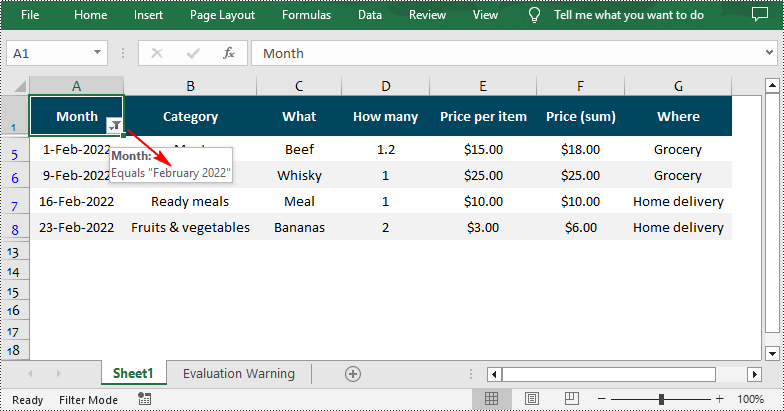
Apply Date AutoFilter in Excel in Python
If you need to explore information related to specific dates or time, you can apply a date filter to the selected range using the Workbook.AutoFilters.AddDateFilter(column: IAutoFilter, dateTimeGroupingType: DateTimeGroupingType, year: int, Month: int, day: int, hour: int, minute: int, second: int) method. The following are detailed steps.
- Create a Workbook instance.
- Load a sample Excel file using Workbook.LoadFromFile() method.
- Get a specified worksheet using Workbook.Worksheets[sheetIndex] property.
- Add an AutoFilter to a specified range using Workbook.AutoFilters.Range property.
- Get the column to be filtered.
- Call the Workbook.AutoFilters.AddDateFilter() method to add a date filter to the column to filter data related to a specified year/month/date, etc.
- Apply the filter using Workbook.AutoFilters.Filter() method.
- Save the result file using Workbook.SaveToFile() method.
- Python
from spire.xls import *
from spire.xls.common import *

inputFile = "Data.xlsx"
outputFile = "DateAutoFilter.xlsx"

# Create a Workbook instance
workbook = Workbook()

#Load an Excel file
workbook.LoadFromFile(inputFile)

#Get the first worksheet
sheet = workbook.Worksheets[0]

# Create an auto filter in the sheet and specify the range to be filtered
sheet.AutoFilters.Range = sheet.Range["A1:A12"]

# Get the column to be filtered
filtercolumn = sheet.AutoFilters[0]

# Add a date filter to filter data related to February 2022
sheet.AutoFilters.AddDateFilter(filtercolumn, DateTimeGroupingType.Month, 2022, 2, 0, 0, 0, 0)

# Apply the filter
sheet.AutoFilters.Filter()

# Save the result file
workbook.SaveToFile(outputFile, ExcelVersion.Version2016)
workbook.Dispose()
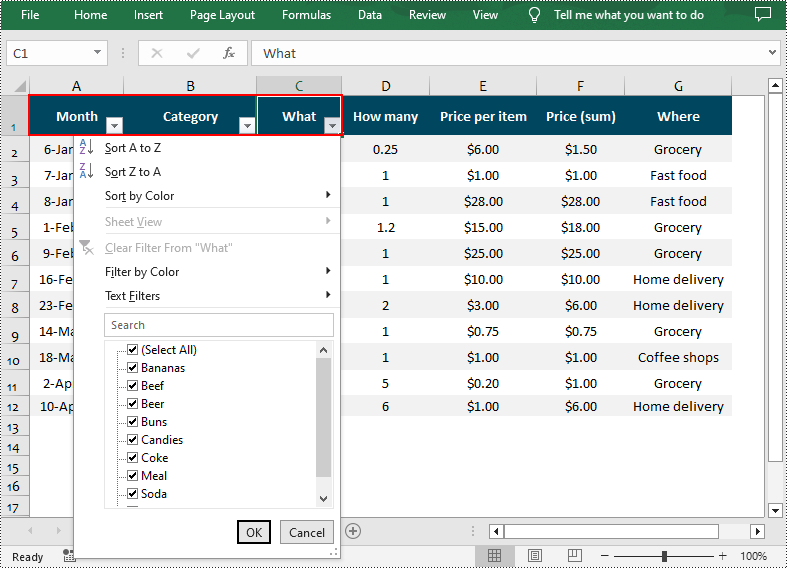
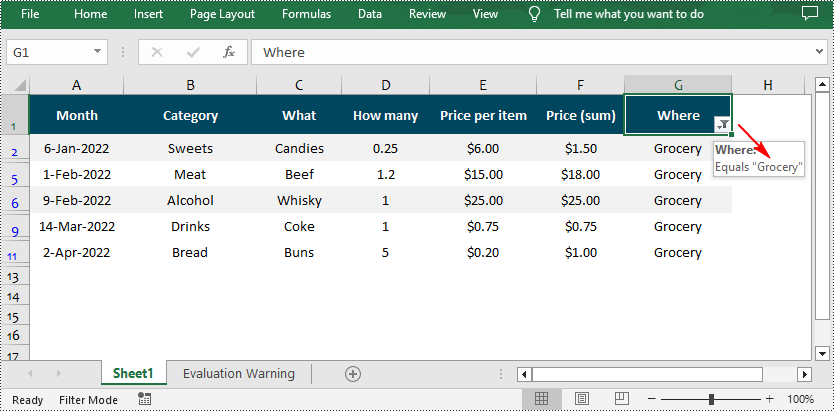
Apply Custom AutoFilter in Excel in Python
The Workbook.AutoFilters.CustomFilter(column: FilterColumn, operatorType: FilterOperatorType, criteria: Object) method allows you to create custom filters based on certain criteria. For example, you can filter data that contains specific text. The following are detailed steps.
- Create a Workbook instance.
- Load a sample Excel file using Workbook.LoadFromFile() method.
- Get a specified worksheet using Workbook.Worksheets[sheetIndex] property.
- Add an AutoFilter to a specified range using Workbook.AutoFilters.Range property.
- Get the column to be filtered.
- Add a custom filter to the column to filter data containing the specified string using Workbook.AutoFilters.CustomFilter() method.
- Apply the filter using Workbook.AutoFilters.Filter() method.
- Save the result file using Workbook.SaveToFile() method.
- Python
from spire.xls import *
from spire.xls.common import *

inputFile = "Data.xlsx"
outputFile = "CustomAutoFilter.xlsx"

# Create a Workbook instance
workbook = Workbook()

#Load an Excel file
workbook.LoadFromFile(inputFile)

#Get the first worksheet
sheet = workbook.Worksheets[0]

# Create an auto filter in the sheet and specify the range to be filtered
sheet.AutoFilters.Range = sheet.Range["G1:G12"]

# Get the column to be filtered
filtercolumn = sheet.AutoFilters[0]

# Add a custom filter to filter data containing the string "Grocery"
strCrt = String("Grocery")
sheet.AutoFilters.CustomFilter(filtercolumn, FilterOperatorType.Equal, strCrt)

# Apply the filter
sheet.AutoFilters.Filter()

# Save the result file
workbook.SaveToFile(outputFile, ExcelVersion.Version2016)
workbook.Dispose()
Remove AutoFilter in Excel in Python
In addition to adding AutoFilters in Excel files, Spire.XLS for Python also support removing or deleting the AutoFilters from Excel through the Worksheet.AutoFilters.Clear() method. The following are detailed steps.
- Create a Workbook instance.
- Load a sample Excel file using Workbook.LoadFromFile() method.
- Get a specified worksheet using Workbook.Worksheets[sheetIndex] property.
- Remove AutoFilter from the worksheet using Worksheet.AutoFilters.Clear() method.
- Save the result file using Workbook.SaveToFile() method.
- Python
from spire.xls import *
from spire.xls.common import *

inputFile = "CustomAutoFilter.xlsx"
outputFile = "RemoveAutoFilter.xlsx"

# Create a Workbook instance
workbook = Workbook()

# Load an Excel file
workbook.LoadFromFile(inputFile)

# Get the first worksheet
sheet = workbook.Worksheets[0]

# Delete AutoFilter from the sheet
sheet.AutoFilters.Clear()

# Save the result file
workbook.SaveToFile(outputFile, ExcelVersion.Version2016)
workbook.Dispose()
Apply for a Temporary License
If you'd like to remove the evaluation message from the generated documents, or to get rid of the function limitations, please request a 30-day trial license for yourself.
Accepting and rejecting tracked changes in Excel are essential features that empower users to effectively manage and control modifications made by multiple contributors. Accepting changes allows users to include modifications in the spreadsheet, facilitating collaboration and ensuring that the final version reflects collective input. Conversely, rejecting changes enables users to maintain the original content and avoid incorporating incorrect or unnecessary modifications. These functions provide users with the ability to maintain data integrity, ensure document accuracy, and streamline the collaborative process in Excel. In this article, we will demonstrate how to accept and reject tracked changes in Excel in Python using Spire.XLS for Python.
Install Spire.XLS for Python
This scenario requires Spire.XLS for Python and plum-dispatch v1.7.4. They can be easily installed in your Windows through the following pip command.
pip install Spire.XLS
If you are unsure how to install, please refer to this tutorial: How to Install Spire.XLS for Python on Windows
Accept Tracked Changes in Excel in Python
Spire.XLS for Python provides the Workbook.HasTrackedChanges property to determine whether an Excel workbook has tracked changes or not. If the property returns True, you can use the Workbook.AcceptAllTrackedChanges() method to accept these changes at once.
The following steps explain how to accept all tracked changes in an Excel workbook using Spire.XLS for Python:
- Create a Workbook object.
- Load a sample Excel workbook using Workbook.LoadFromFile() method.
- Check if the workbook has tracked changes using Workbook.HasTrackedChanges property.
- Accept all tracked changes in the workbook using Workbook.AcceptAllTrackedChanges() method.
- Save the result workbook using Workbook.SaveToFile() method.
- Python
from spire.xls.common import *
from spire.xls import *

# Specify the input and output file paths
inputFile = "Sample.xlsx"
outputFile = "AcceptChanges.xlsx"

# Create a Workbook object
workbook = Workbook()
# Load an Excel file
workbook.LoadFromFile(inputFile)

# Check if the file has tracked changes
if workbook.HasTrackedChanges:
    # Accept all tracked changes in the file
    workbook.AcceptAllTrackedChanges()

# Save the result file
workbook.SaveToFile(outputFile, FileFormat.Version2013)
workbook.Dispose()
Reject Tracked Changes in Excel in Python
If the changes made to a workbook compromise the integrity of the data, such as introducing errors, inconsistencies, or inaccuracies, you can reject these changes by using the Workbook.RejectAllTrackedChanges() method.
The following steps explain how to reject all tracked changes in an Excel workbook using Spire.XLS for Python:
- Create a Workbook object.
- Load a sample Excel workbook using Workbook.LoadFromFile() method.
- Check if the workbook has tracked changes using Workbook.HasTrackedChanges property.
- Reject all tracked changes in the workbook using Workbook.RejectAllTrackedChanges() method.
- Save the result workbook using Workbook.SaveToFile() method.
- Python
from spire.xls.common import *
from spire.xls import *

# Specify the input and output file paths
inputFile = "Sample.xlsx"
outputFile = "RejectChanges.xlsx"

# Create a Workbook object
workbook = Workbook()
# Load an Excel file
workbook.LoadFromFile(inputFile)

# Check if the file has tracked changes
if workbook.HasTrackedChanges:
    # Reject all tracked changes in the file
    workbook.RejectAllTrackedChanges()

# Save the result file
workbook.SaveToFile(outputFile, FileFormat.Version2013)
workbook.Dispose()
Apply for a Temporary License
If you'd like to remove the evaluation message from the generated documents, or to get rid of the function limitations, please request a 30-day trial license for yourself.
In Excel, document properties refer to the metadata or information associated with an Excel file. These properties provide details about the workbook itself, such as author, title, subject, keywords, and other descriptive information. Document properties are useful for organizing and categorizing Excel files, making it easier to search, sort, and manage a collection of workbooks. In this article, you will learn how to add document properties in Excel in Python using Spire.XLS for Python.
- Add Built-in Document Properties in Excel in Python
- Add Custom Document Properties in Excel in Python
Install Spire.XLS for Python
This scenario requires Spire.XLS for Python and plum-dispatch v1.7.4. They can be easily installed in your Windows through the following pip command.
pip install Spire.XLS
If you are unsure how to install, please refer to this tutorial: How to Install Spire.XLS for Python on Windows
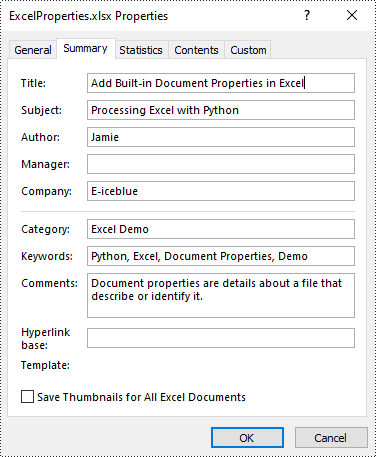
Add Built-in Document Properties in Excel in Python
Built-in document properties are basic information about a document such as title, subject, author, category, etc. The names of these properties are predefined that cannot be edited, but Spire.XLS for Python allows you to set specific values for these properties. The following are the detailed steps.
- Create a Workbook object.
- Load an Excel document using Workbook.LoadFromFile() method.
- Get the built-in document properties of the document using Workbook.DocumentProperties property.
- Set specific document properties such as title, author, keywords and comments using the properties of BuiltInDocumentProperties class.
- Save the result document using Workbook.SaveToFile() method.
- Python
from spire.xls import *
from spire.xls.common import *

inputFile = "sample.xlsx"
outputFile = "ExcelProperties.xlsx"

# Create a Workbook object
workbook = Workbook()

# Load a sample Excel document
workbook.LoadFromFile(inputFile)

# Set built-in document properties for the Excel workbook
workbook.DocumentProperties.Author = "Jamie"
workbook.DocumentProperties.Title = "Add Built-in Document Properties in Excel"
workbook.DocumentProperties.Subject = "Processing Excel with Python"
workbook.DocumentProperties.Keywords = "Python, Excel, Document Properties, Demo"
workbook.DocumentProperties.Category = "Excel Demo"
workbook.DocumentProperties.Company = "E-iceblue"
workbook.DocumentProperties.Comments = "Document properties are details about a file that describe or identify it."

# Save the result document
workbook.SaveToFile(outputFile, FileFormat.Version2016)
workbook.Dispose()
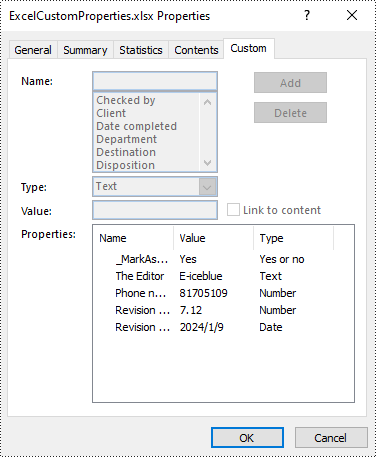
Add Custom Document Properties in Excel in Python
Custom document properties are additional properties that you can define for an Excel document. With Spire.XLS for Python, you can add custom properties with specified names and values through the ICustomDocumentProperties.Add() method. The following are the detailed steps.
- Create a Workbook object.
- Load an Excel document using Workbook.LoadFromFile() method.
- Get the custom document properties of the document using Workbook.CustomDocumentProperties property.
- Add custom document properties with different data types to the document using ICustomDocumentProperties.Add() method.
- Save the result document using Workbook.SaveToFile() method.
- Python
from spire.xls import *
from spire.xls.common import *

inputFile = "sample.xlsx"
outputFile = "ExcelCustomProperties.xlsx"

# Create a Workbook object
workbook = Workbook()

# Load a sample Excel document
workbook.LoadFromFile(inputFile)

# Add a custom property to make the document as final
workbook.CustomDocumentProperties.Add("_MarkAsFinal", True)

# Add other custom properties to the document
workbook.CustomDocumentProperties.Add("The Editor", "E-iceblue")
workbook.CustomDocumentProperties.Add("Phone number", 81705109)
workbook.CustomDocumentProperties.Add("Revision number", 7.12)
workbook.CustomDocumentProperties.Add("Revision date", DateTime.get_Now())

# Save the result document
workbook.SaveToFile(outputFile, FileFormat.Version2016)
workbook.Dispose()
Apply for a Temporary License
If you'd like to remove the evaluation message from the generated documents, or to get rid of the function limitations, please request a 30-day trial license for yourself.
When dealing with multiple Excel files that contain similar data structures, merging them enables comprehensive data analysis and reporting. By combining data from various sources, you can gain a holistic view and uncover insights that may not be apparent when examining each file individually. In this article, you will learn how to merge Excel files into one in Python using Spire.XLS for Python library.
- Merge Multiple Excel Workbooks into One in Python
- Merge Multiple Excel Worksheets into One in Python
Install Spire.XLS for Python
This scenario requires Spire.XLS for Python and plum-dispatch v1.7.4. They can be easily installed in your Windows through the following pip command.
pip install Spire.XLS
If you are unsure how to install, please refer to this tutorial: How to Install Spire.XLS for Python on Windows
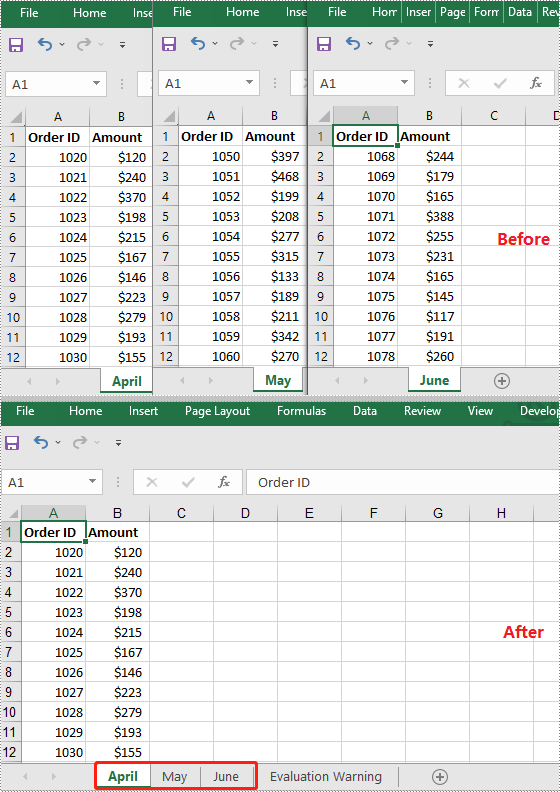
Merge Multiple Excel Workbooks into One in Python
Spire.XLS for Python enables you to merge multiple workbooks into one by copying the worksheets from the workbooks to be merged into a new workbook using Workbook.Worksheets.AddCopy() method. The detailed steps are as follows.
- Put the file paths of the workbooks to be merged into a list.
- Initialize a Workbook object to create a new workbook and clear its default worksheets.
- Initialize a temporary Workbook object.
- Loop through the file paths in the list.
- Load the workbook specified by the file path into the temporary Workbook object using Workbook.LoadFromFile() method.
- Loop through the worksheets in the temporary workbook, then copy each worksheet from the temporary workbook to the newly created workbook using Workbook.Worksheets.AddCopy() method.
- Save the resulting workbook using Workbook.SaveToFile() method.
- Python
from spire.xls import *
from spire.xls.common import *

# Put the file paths of the workbooks to be merged into a list
files = []
files.append("Input1.xlsx" )
files.append("Input2.xlsx")
files.append("Input3.xlsx")

# Create a new workbook
newbook = Workbook()
newbook.Version = ExcelVersion.Version2013
# Clear the default worksheets
newbook.Worksheets.Clear()

# Create a temporary workbook
tempbook = Workbook()
# Loop through the file paths in the list
for file in files:
    # Load the workbook specified by the file path into the temporary workbook object
    tempbook.LoadFromFile(file)
    # Loop through the worksheets in the temporary workbook
    for sheet in tempbook.Worksheets:
        # Copy the worksheet from the temporary workbook to the new workbook
        newbook.Worksheets.AddCopy(sheet, WorksheetCopyType.CopyAll)

# Save the new workbook to a .xlsx file
newbook.SaveToFile("MergeWorkbooks.xlsx", ExcelVersion.Version2016)

newbook.Dispose()
tempbook.Dispose()
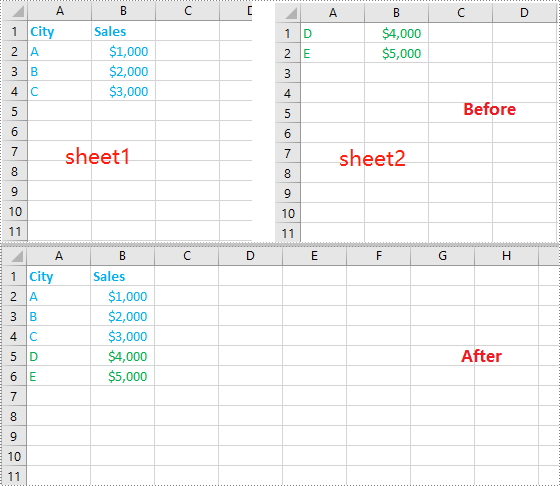
Merge Multiple Excel Worksheets into One in Python
To merge multiple Excel worksheets, you can copy the data ranges used in these worksheets to a single worksheet using CellRange.Copy(destRange) method. The detailed steps are as follows.
- Initialize a Workbook object and load an Excel workbook using Workbook.LoadFromFile() method.
- Get the two worksheets that need to be merged using Workbook.Worksheets[sheetIndex] property. Note the sheet index is zero-based.
- Get the used range of the second worksheet using Worksheet.AllocatedRange property.
- Specify the destination range in the first worksheet using Worksheet.Range[rowIndex, columnIndex] property. Note the row and column indexes are 1-based.
- Copy the used range of the second worksheet to the destination range in the first worksheet using CellRange.Copy(destRange) method.
- Remove the second worksheet from the workbook.
- Save the resulting workbook using Workbook.SaveToFile() method.
- Python
from spire.xls import *
from spire.xls.common import *

# Create a Workbook object
workbook = Workbook()
# Load an Excel workbook
workbook.LoadFromFile("File2.xlsx")

# Get the first worksheet
sheet1 = workbook.Worksheets[0]
# Get the second worksheet
sheet2 = workbook.Worksheets[1]

# Get the used range in the second worksheet
sourceRange = sheet2.AllocatedRange
# Specify the destination range in the first worksheet
destRange = sheet1.Range[sheet1.LastRow + 1, 1]

# Copy the used range from the second worksheet to the destination range in the first worksheet
sourceRange.Copy(destRange)

# Remove the second worksheet
sheet2.Remove()

# Save the resulting workbook to a .xlsx file
workbook.SaveToFile("MergeWorksheets.xlsx", ExcelVersion.Version2013)
workbook.Dispose()
Apply for a Temporary License
If you'd like to remove the evaluation message from the generated documents, or to get rid of the function limitations, please request a 30-day trial license for yourself.
The Excel spreadsheet is extensively utilized for organizing, analyzing, and presenting data in a tabular format. The capacity to programmatically interact with Excel files holds great value as it facilitates automation and integration of Excel functionality within software applications. Specifically, knowing how to create new Excel documents, retrieve information from existing ones, and update or modify them as needed through code would be very helpful. This article will demonstrate how to create, read, or update Excel documents in Python using Spire.XLS for Python.
- Create an Excel Document in Python
- Read Data from a Worksheet in Python
- Update an Excel Document in Python
Install Spire.XLS for Python
This scenario requires Spire.XLS for Python and plum-dispatch v1.7.4. They can be easily installed in your Windows through the following pip command.
pip install Spire.XLS
If you are unsure how to install, please refer to this tutorial: How to Install Spire.XLS for Python on Windows
Create an Excel Document in Python
Spire.XLS for Python offers a variety of classes and interfaces that you can use to create and edit Excel documents. Here is a list of important classes, properties and methods involved in this article.
| Member | Description |
| Workbook class | Represents an Excel workbook model. |
| Workbook.Worksheets.Add() method | Adds a worksheet to workbook. |
| Workbook.SaveToFile() method | Saves the workbook to an Excel document. |
| Worksheet class | Represents a worksheet in a workbook. |
| Worksheet.Range property | Gets a specific cell or cell range from worksheet. |
| Worksheet.Range.Text property | Gets or sets the text value of a cell. |
| Worksheet.Rows property | Gets a collection of rows in worksheet. |
| CellRange class | Represents a cell or cell range in worksheet. |
The following are the steps to create an Excel document from scratch using Spire.XLS for Python.
- Create a Workbook object.
- Add a worksheet using Workbook.Worksheets.Add() method.
- Write data to specific cells through Worksheet.Range.Text property.
- Save the workbook to an Excel document using Workbook.SaveToFile() method.
- Python
from spire.xls import *
from spire.xls.common import *
# Create a Workbook object
wb = Workbook()
# Remove default worksheets
wb.Worksheets.Clear()
# Add a worksheet and name it "Employee"
sheet = wb.Worksheets.Add("Employee")
# Merge the cells between A1 and G1
sheet.Range["A1:G1"].Merge()
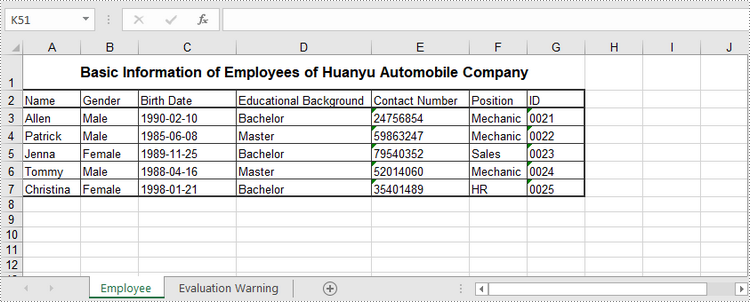
# Write data to A1 and apply formatting to it
sheet.Range["A1"].Text = "Basic Information of Employees of Huanyu Automobile Company"
sheet.Range["A1"].HorizontalAlignment = HorizontalAlignType.Center
sheet.Range["A1"].VerticalAlignment = VerticalAlignType.Center
sheet.Range["A1"].Style.Font.IsBold = True
sheet.Range["A1"].Style.Font.Size = 13
# Set row height of the first row
sheet.Rows[0].RowHeight = 30
# Write data to specific cells
sheet.Range["A2"].Text = "Name"
sheet.Range["B2"].Text = "Gender"
sheet.Range["C2"].Text = "Birth Date"
sheet.Range["D2"].Text = "Educational Background"
sheet.Range["E2"].Text = "Contact Number"
sheet.Range["F2"].Text = "Position"
sheet.Range["G2"].Text = "ID"
sheet.Range["A3"].Text = "Allen"
sheet.Range["B3"].Text = "Male"
sheet.Range["C3"].Text = "1990-02-10"
sheet.Range["D3"].Text = "Bachelor"
sheet.Range["E3"].Text = "24756854"
sheet.Range["F3"].Text = "Mechanic"
sheet.Range["G3"].Text = "0021"
sheet.Range["A4"].Text = "Patrick"
sheet.Range["B4"].Text = "Male"
sheet.Range["C4"].Text = "1985-06-08"
sheet.Range["D4"].Text = "Master"
sheet.Range["E4"].Text = "59863247"
sheet.Range["F4"].Text = "Mechanic"
sheet.Range["G4"].Text = "0022"
sheet.Range["A5"].Text = "Jenna"
sheet.Range["B5"].Text = "Female"
sheet.Range["C5"].Text = "1989-11-25"
sheet.Range["D5"].Text = "Bachelor"
sheet.Range["E5"].Text = "79540352"
sheet.Range["F5"].Text = "Sales"
sheet.Range["G5"].Text = "0023"
sheet.Range["A6"].Text = "Tommy"
sheet.Range["B6"].Text = "Male"
sheet.Range["C6"].Text = "1988-04-16"
sheet.Range["D6"].Text = "Master"
sheet.Range["E6"].Text = "52014060"
sheet.Range["F6"].Text = "Mechanic"
sheet.Range["G6"].Text = "0024"
sheet.Range["A7"].Text = "Christina"
sheet.Range["B7"].Text = "Female"
sheet.Range["C7"].Text = "1998-01-21"
sheet.Range["D7"].Text = "Bachelor"
sheet.Range["E7"].Text = "35401489"
sheet.Range["F7"].Text = "HR"
sheet.Range["G7"].Text = "0025"
# Set row height of a range
sheet.Range["A2:G7"].RowHeight = 15
# Set column width
sheet.SetColumnWidth(3, 15)
sheet.SetColumnWidth(4, 21)
sheet.SetColumnWidth(5, 15)
# Set border style of a range
sheet.Range["A2:G7"].BorderAround(LineStyleType.Medium)
sheet.Range["A2:G7"].BorderInside(LineStyleType.Thin)
sheet.Range["A2:G2"].BorderAround(LineStyleType.Medium)
sheet.Range["A2:G7"].Borders.KnownColor = ExcelColors.Black
# Save to a .xlsx file
wb.SaveToFile("output/NewSpreadsheet.xlsx", FileFormat.Version2016)
Read Data from a Worksheet in Python
The Worksheet.Range.Value property returns number value or text value of a cell as a string. To get data of a whole worksheet or a cell range, loop through the cells within it. The following are the steps to get data of a worksheet using Spire.XLS for Python.
- Create a Workbook object.
- Load an Excel document using Workbook.LoadFromFile() method.
- Get a specific worksheet through Workbook.Worksheets[index] property.
- Get the cell range contain data though Worksheet.AllocatedRange property.
- Iterate through the rows and columns to get cells within the range, and return the value of each cell through CellRange.Value property.
- Python
from spire.xls import *
from spire.xls.common import *

# Create a Workbook object
wb = Workbook()

# Load an existing Excel file
wb.LoadFromFile("C:\\Users\\Administrator\\Desktop\\NewSpreadsheet.xlsx");

# Get the first worksheet
sheet = wb.Worksheets[0]

# Get the cell range containing data
locatedRange = sheet.AllocatedRange

# Iterate through the rows
for i in range(len(sheet.Rows)):

    # Iterate through the columns
    for j in range(len(locatedRange.Rows[i].Columns)):

        # Get data of a specific cell
        print(locatedRange[i + 1, j + 1].Value + "  ", end='')

    print("")

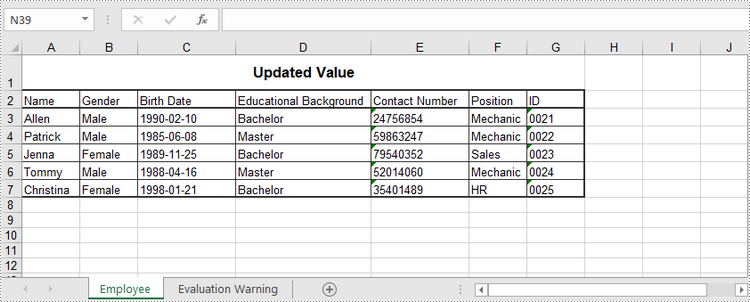
Update an Excel Document in Python
To change the value of a certain cell, just re-assign a value to it through Worksheet.Range.Value property. The following are the detailed steps.
- Create a Workbook object.
- Load an Excel document using Workbook.LoadFromFile() method.
- Get a specific worksheet through Workbook.Worksheets[index] property.
- Change the value of a particular cell though Worksheet.Range.Value property.
- Save the workbook to an Excel file using Workbook.SaveToFile() method.
- Python
from spire.xls import *
from spire.xls.common import *

# Create a Workbook object
wb = Workbook();

# Load an existing Excel file
wb.LoadFromFile("C:\\Users\\Administrator\\Desktop\\NewSpreadsheet.xlsx")

# Get the first worksheet
sheet = wb.Worksheets[0]

# Change the value of a specific cell
sheet.Range["A1"].Value = "Updated Value"

# Save to file
wb.SaveToFile("output/Updated.xlsx", ExcelVersion.Version2016)
Apply for a Temporary License
If you'd like to remove the evaluation message from the generated documents, or to get rid of the function limitations, please request a 30-day trial license for yourself.
