
Excel’s AutoFilter feature is a powerful tool that allows you to quickly filter worksheet data based on specific criteria. When applying auto filter to a range of cells, you can display only those rows that meet certain conditions and hide the rest of the data.
However, while filters simplify workflows, knowing how to remove auto filters in Excel is equally critical to maintaining accurate, accessible, and error-free datasets. In this article, you will learn how to add or remove AutoFilters in Excel in Python using Spire.XLS for Python library.
- Installation Guide for Spire.XLS for Python
- How to Use Excel Auto Filters in Python
- How to Remove Auto Filters in Excel
- Conclusion
Installation Guide for Spire.XLS for Python
Spire.XLS for Python is a robust library that enables developers to automate AutoFilter operations in Excel, including adding or removing auto filters.
To install the Python library, open your terminal or command prompt and run the following:
pip install Spire.XLSThe pip tool will search for the latest version of the Spire.XLS library on the Python Package Index (PyPI) and then download and install it along with any necessary dependencies.
How to Use Excel Auto Filters in Python
Add AutoFilter in Excel in Python
Excel AutoFilter can be applied to entire columns or specified cell ranges. The following are the core properties used:
- Worksheet.AutoFilters property: Gets a collection of auto filters in the worksheet, and return an AutoFiltersCollection object.
- AutoFiltersCollection.Range property: Specify the cell range to be filtered.
Code Example:
- Python
from spire.xls import *
from spire.xls.common import *
inputFile = "Data.xlsx"
outputFile = "ExcelAutoFilter.xlsx"
# Create a Workbook instance
workbook = Workbook()
# Load an Excel file
workbook.LoadFromFile(inputFile)
# Get the first worksheet
sheet = workbook.Worksheets[0]
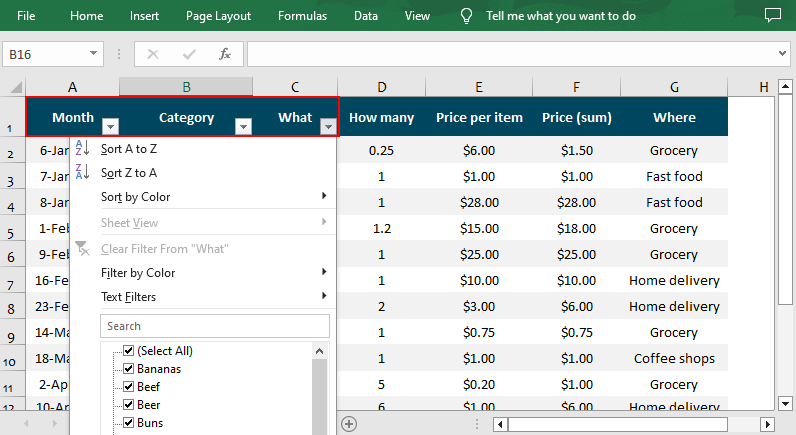
# Create an AutoFilter in the sheet and specify the range to be filtered
sheet.AutoFilters.Range = sheet.Range["A1:C1"]
# Save the result file
workbook.SaveToFile(outputFile, ExcelVersion.Version2016)
workbook.Dispose()Result: Dropdown arrows appear in the header row for filtering.
Different Excel Filter Types in Spire.XLS
The AutoFiltersCollection class of the Spire.XLS for Python library offers various methods for you to filter data in Excel in different ways. Check below for the details:
| Filters | Details |
| Filter text data | Use the AddFilter() to filter cells that contain specified text content. |
| Filter dates | Use the AddDateFilter() method to filter dates associated with the specified year/month/date, etc. |
| Filter blank / non-blank cells |
|
| Filter by color |
|
| Custom filter | Use the CustomFilter() method to filter by the custom criteria. |
Apply Custom Auto Filter in Excel in Python
After adding one of the above filters, you can use the AutoFiltersCollection.Filter() method to apply the filter within the given range. The following is a code example of applying a custom AutoFilter to filter data that is not equal to the specified text string.
- Python
from spire.xls import *
from spire.xls.common import *
inputFile = "Data.xlsx"
outputFile = "CustomFilter.xlsx"
# Create a Workbook instance
workbook = Workbook()
#Load an Excel file
workbook.LoadFromFile(inputFile)
#Get the first worksheet
sheet = workbook.Worksheets[0]
# Create an auto filter in the sheet and specify the range to be filtered
sheet.AutoFilters.Range = sheet.Range["B1:B12"]
# Get the column to be filtered
filtercolumn = sheet.AutoFilters[0]
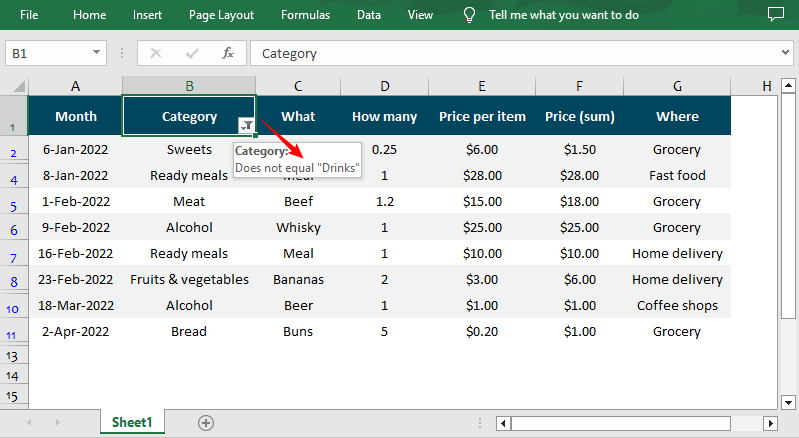
# Add a custom filter to filter data that does not contain the string "Drinks"
strCrt = String("Drinks")
sheet.AutoFilters.CustomFilter(filtercolumn , FilterOperatorType.NotEqual, strCrt)
# Apply the filter
sheet.AutoFilters.Filter()
# Save the result file
workbook.SaveToFile(outputFile, ExcelVersion.Version2016)
workbook.Dispose()Result: Only cells that are not equal to the string “Drinks” are visible.
How to Remove Auto Filters in Excel in Python
AutoFilters are great for focusing on specific data, but leaving them active can lead to critical issues. Removing auto filters ensures:
- Full data disclosure: All rows/columns are visible.
- Consistent formatting: Eliminates dropdown arrows for a cleaner look.
- Avoid confusion: Prevents recipients from misinterpreting filtered data as the complete dataset.
Spire.XLS for Python provides the AutoFiltersCollection.Clear() method to remove or delete all AutoFilters from an Excel worksheet. Here’s the complete code example:
- Python
from spire.xls import *
from spire.xls.common import *
inputFile = "CustomFilter.xlsx"
outputFile = "RemoveAutoFilter.xlsx"
# Create a Workbook instance
workbook = Workbook()
# Load an Excel file
workbook.LoadFromFile(inputFile)
# Get the first worksheet
sheet = workbook.Worksheets[0]
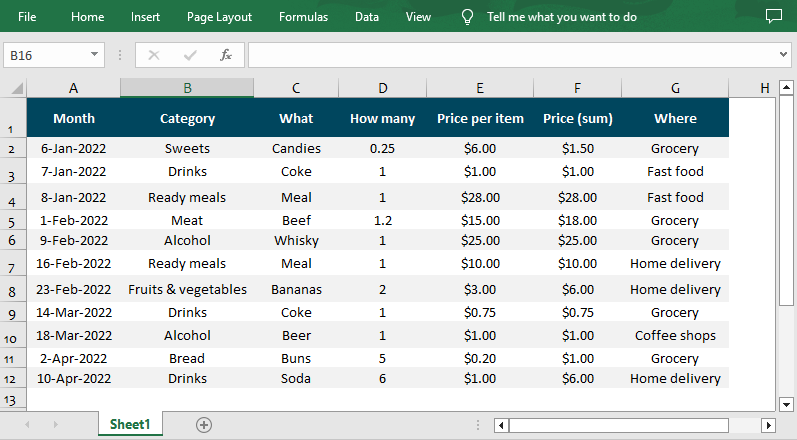
# Delete AutoFilter from the sheet
sheet.AutoFilters.Clear()
# Save the result file
workbook.SaveToFile(outputFile, ExcelVersion.Version2016)
workbook.Dispose()Result: All rows are visible, and AutoFilter dropdowns are removed.
Conclusion
With Spire.XLS for Python, adding or removing auto filters in Excel becomes a seamless, automated process. This guide covered installation, basic and custom filters, and code examples to help you streamline data tasks. For more advanced features, explore the Python Excel library’s full documentation.
Get a Free License
To fully experience the capabilities of Spire.XLS for Python without any evaluation limitations, you can request a free 30-day trial license.