
.NET (1273)
Children categories
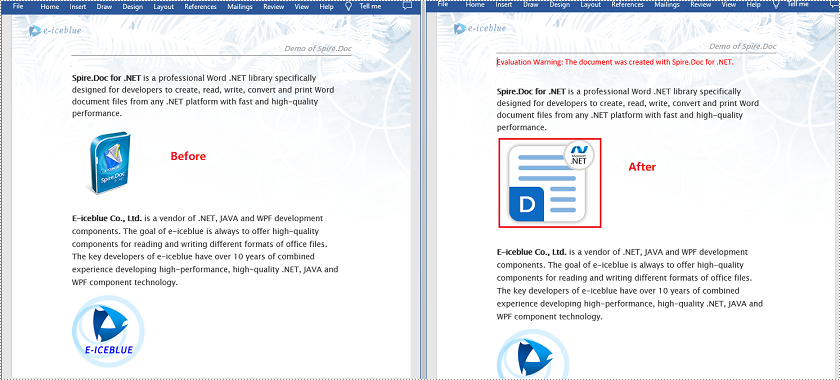
Sometimes you may encounter a situation where you need to replace images in a Word document. For example, if you are creating a resume from a template, you may need to replace the profile picture in the template with your own photo. In this article, we will show you how to replace images in a Word document in C# and VB.NET using Spire.Doc for .NET.
Install Spire.Doc for .NET
To begin with, you need to add the DLL files included in the Spire.Doc for.NET package as references in your .NET project. The DLL files can be either downloaded from this link or installed via NuGet.
PM> Install-Package Spire.Doc
Replace Image with New Image in Word in C# and VB.NET
To replace an image in a Word document with another image, you need to loop through the elements of the document, find the images and add them to a list, then get the image that you want to replace from the list and call the DocPicture.LoadImage() method to replace it with another image.
The following are the detailed steps:
- Initialize an instance of the Document class.
- Load a Word document using Document.LoadFromFile() method.
- Initialize an instance of the List class.
- Iterate through all sections in the document.
- Iterate through all paragraphs in each section.
- Iterate through all child objects in each paragraph.
- Find the images and add them to the list.
- Get a specific image from the list and replace it with another image using DocPicture.LoadImage() method.
- Save the result document using Document.SaveToFile() method.
- C#
- VB.NET
using Spire.Doc;
using Spire.Doc.Documents;
using Spire.Doc.Fields;
using System.Collections.Generic;
using System.Drawing;

namespace ReplaceImageWithImage
{
    internal class Program
    {
        static void Main(string[] args)
        {
            //Initialize an instance of the Document class
            Document doc = new Document();
            //Load a Word document
            doc.LoadFromFile("Sample.docx");

            //Initialize an instance of the List class
            List pictures = new List();

            //Iterate through all sections in the document
            foreach (Section sec in doc.Sections)
            {
                //Iterate through all paragraphs in each section
                foreach (Paragraph para in sec.Paragraphs)
                {
                    //Iterate through all child objects in each paragraph
                    foreach (DocumentObject docObj in para.ChildObjects)
                    {
                        //Find the images and add them to the list
                        if (docObj.DocumentObjectType == DocumentObjectType.Picture)
                        {
                            pictures.Add(docObj);
                        }
                    }
                }
            }

            //Replace the first picture in the list with another image
            DocPicture picture = pictures[0] as DocPicture;
            picture.LoadImage(Image.FromFile(@"doc.png"));

            //Save the result document
            doc.SaveToFile("ReplaceWithNewImage.docx", FileFormat.Docx2013);

        }
    }
}
Replace Image with Text in Word in C# and VB.NET
Spire.Doc doesn’t provide a direct method to replace image with text, but you can achieve this task by inserting the text at the image location and then removing the image from the document.
The following steps demonstrate how to replace all images in a Word document with text:
- Initialize an instance of the Document class.
- Load a Word document using Document.LoadFromFile() method.
- Iterate through all sections in the document.
- Iterate through all paragraphs in each section.
- Initialize an instance of the List class.
- Iterate through all child objects in each paragraph.
- Find the images and add them to the list.
- Iterate through the images in the list.
- Get the index of the image in the paragraph using Paragraph.ChildObjects.Indexof() method.
- Initialize an instance of TextRange class and set text for the text range through TextRange.Text property.
- Insert the text range at the image location using Paragraph.ChildObjects.Insert() method.
- Remove the image from the paragraph using Paragraph.ChildObjects.Remove() method.
- Save the result document using Document.SaveToFile() method.
- C#
- VB.NET
using Spire.Doc;
using Spire.Doc.Documents;
using Spire.Doc.Fields;
using System.Collections.Generic;

namespace ReplaceImageWithText
{
    internal class Program
    {
        static void Main(string[] args)
        {
            //Initialize an instance of the Document class
            Document doc = new Document();
            //Load a Word document
            doc.LoadFromFile("Sample.docx");

            int j = 1;
            //Iterate through all sections in the document
            foreach (Section sec in doc.Sections)
            {
                //Iterate through all paragraphs in each section
                foreach (Paragraph para in sec.Paragraphs)
                {
                    //Initialize an instance of the List class
                    List pictures = new List();
                    //Find the images and add them to the list
                    foreach (DocumentObject docObj in para.ChildObjects)
                    {
                        if (docObj.DocumentObjectType == DocumentObjectType.Picture)
                        {
                            pictures.Add(docObj);
                        }
                    }

                    //Iterate through all images in the list and replace them with text "Here is image {image index}"
                    foreach (DocumentObject pic in pictures)
                    {
                        int index = para.ChildObjects.IndexOf(pic);
                        TextRange range = new TextRange(doc);
                        range.Text = string.Format("Here is image-{0}", j);
                        para.ChildObjects.Insert(index, range);
                        para.ChildObjects.Remove(pic);
                        j++;
                    }
                }
            }

            //Save the result document
            doc.SaveToFile("ReplaceWithText.docx", FileFormat.Docx);
        }
    }
}

Apply for a Temporary License
If you'd like to remove the evaluation message from the generated documents, or to get rid of the function limitations, please request a 30-day trial license for yourself.
PDF files can't be edited easily and for this reason, it is the most popular file format in business field. Printing PDF files becomes a widely asked requirement as a result. This tutorial focus on introducing how to print PDF files via a .NET PDF API. With the help of Spire.PDF for .NET, developers can finish the print function in a few lines codes to print the PDF files with the default printer or any other network connected printer. You can also print all the PDF pages or only print the selected pages you want.
ATTENTION THAT, if you are using the Spire.PDF Version 3.9.360 or above, please refer to tutorial here.
Step 1: Create a new PDF document and load a PDF from file.
PdfDocument doc = new PdfDocument();
doc.LoadFromFile("sample.pdf");
If you want to print all the pages in PDF file with the default printer, please go to Step 2. If you want to set the printer and only print some pages in the PDF file, please go to Step 3 directly.
Step 2: Print the PDF file with the default printer to print all the pages
doc.PrintDocument.Print();
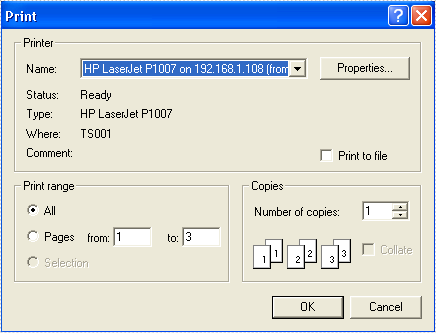
Step 3: Set the Printer and select the pages you want to print in the PDF file.
PrintDialog dialogPrint = new PrintDialog();
dialogPrint.AllowPrintToFile = true;
dialogPrint.AllowSomePages = true;
dialogPrint.PrinterSettings.MinimumPage = 1;
dialogPrint.PrinterSettings.MaximumPage = doc.Pages.Count;
dialogPrint.PrinterSettings.FromPage = 1;
dialogPrint.PrinterSettings.ToPage = doc.Pages.Count;

if (dialogPrint.ShowDialog() == DialogResult.OK)
   {
     //Set the pagenumber which you choose as the start page to print
     doc.PrintFromPage = dialogPrint.PrinterSettings.FromPage;
     //Set the pagenumber which you choose as the final page to print
     doc.PrintToPage = dialogPrint.PrinterSettings.ToPage;
     //Set the name of the printer which is to print the PDF
     doc.PrinterName = dialogPrint.PrinterSettings.PrinterName;

     PrintDocument printDoc = doc.PrintDocument;
     printDoc.Print();
  }
By using the Step 2 method to print all the pages with the default printer, it will start to print the PDF files automatically when you process it. If you select the printer and the pages you choose to print, then you will get a printer dialog as below:
The full codes of how to print PDF file in C#:
using System;
using System.Collections.Generic;
using System.Linq;
using System.Text;
using Spire.Pdf;
using System.Windows.Forms;
using Spire.Pdf.Annotations;
using Spire.Pdf.Widget;
using System.Drawing.Printing;


namespace PrintPDF
{
    class Program
    {
        static void Main(string[] args)
        {
            PdfDocument doc = new PdfDocument();
            doc.LoadFromFile("sample.pdf");

            //Use the default printer to print all the pages
            //doc.PrintDocument.Print();

            //Set the printer and select the pages you want to print

            PrintDialog dialogPrint = new PrintDialog();
            dialogPrint.AllowPrintToFile = true;
            dialogPrint.AllowSomePages = true;
            dialogPrint.PrinterSettings.MinimumPage = 1;
            dialogPrint.PrinterSettings.MaximumPage = doc.Pages.Count;
            dialogPrint.PrinterSettings.FromPage = 1;
            dialogPrint.PrinterSettings.ToPage = doc.Pages.Count;

            if (dialogPrint.ShowDialog() == DialogResult.OK)
            {
                doc.PrintFromPage = dialogPrint.PrinterSettings.FromPage;
                doc.PrintToPage = dialogPrint.PrinterSettings.ToPage;
                doc.PrinterName = dialogPrint.PrinterSettings.PrinterName;

                PrintDocument printDoc = doc.PrintDocument;
                printDoc.Print();
            }

        }
    }
}
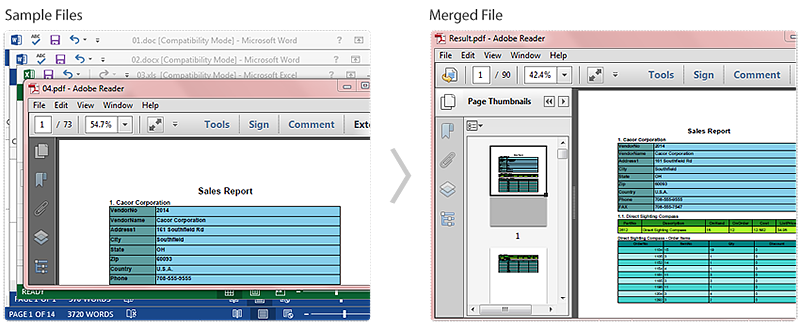
Maybe you have met this case in your work: You receive a lot of files that are in different file types, some are Word, some are PowerPoint slides, or some are Excel, etc, and you need to combine these files to one PDF for easy sharing. In this article, I’ll introduce you how to convert each file type into an Adobe PDF and then simultaneously merge them into a single PDF document using Spire.Office.
In this sample, I get four types of file (.doc, .docx, .xls, .pdf) prepared at first. Within the Spire.Office, it provides SaveToStream() method which allows us to save Word and Excel documents into stream, then these streams can be converted to PDF documents by calling the method of PdfDocument(Stream stream). At last, we could merge these PDF files to one file with the method PdfDocument.AppendPage(). More details would be as follows:
Code Snippet for Merge Multiple File Types to One PDF
Step 1: Create four new PDF documents.
PdfDocument[] documents = new PdfDocument[4];
Step 2: Load the .doc file, save it into stream and generate new PDF document from the stream.
using (MemoryStream ms1 = new MemoryStream())
{
      Document doc = new Document("01.doc", Spire.Doc.FileFormat.Doc);
      doc.SaveToStream(ms1, Spire.Doc.FileFormat.PDF);
      documents[0] = new PdfDocument(ms1);
}
Step 3: Repeat Step 2 to generate two PDF documents from .docx file and .xls file.
using (MemoryStream ms2 = new MemoryStream())
{
      Document docx = new Document("02.docx", Spire.Doc.FileFormat.Docx2010);
      docx.SaveToStream(ms2, Spire.Doc.FileFormat.PDF);
      documents[1] = new PdfDocument(ms2);
}
using (MemoryStream ms3 = new MemoryStream())
{
      Workbook workbook = new Workbook();
      workbook.LoadFromFile("03.xls", ExcelVersion.Version97to2003);
      workbook.SaveToStream(ms3, Spire.Xls.FileFormat.PDF);
      documents[2] = new PdfDocument(ms3);
}
Step 4: Load .pdf file and save it to documents[3].
documents[3] = new PdfDocument("04.pdf");
Step 5: Append the documents[0],[1],[2] to documents[3] and save as a new PDF document.
for (int i = 2; i > -1; i--)
{
      documents[3].AppendPage(documents[i]);
}
documents[3].SaveToFile("Result.pdf");
Screenshot of the Effect:
Full Code:
using Spire.Doc;
using Spire.Xls;
using Spire.Pdf;

namespace MergeMultiTypestoOnePDF
{
    class Program
    {
        static void Main(string[] args)
        {
            PdfDocument[] documents = new PdfDocument[4];
            using (MemoryStream ms1 = new MemoryStream())
            {
                Document doc = new Document("01.doc", Spire.Doc.FileFormat.Doc);
                doc.SaveToStream(ms1, Spire.Doc.FileFormat.PDF);
                documents[0] = new PdfDocument(ms1);
            }
            using (MemoryStream ms2 = new MemoryStream())
            {
                Document docx = new Document("02.docx", Spire.Doc.FileFormat.Docx2010);
                docx.SaveToStream(ms2, Spire.Doc.FileFormat.PDF);
                documents[1] = new PdfDocument(ms2);
            }
            using (MemoryStream ms3 = new MemoryStream())
            {
                Workbook workbook = new Workbook();
                workbook.LoadFromFile("03.xls", ExcelVersion.Version97to2003);
                workbook.SaveToStream(ms3, Spire.Xls.FileFormat.PDF);
                documents[2] = new PdfDocument(ms3);
            }
            documents[3] = new PdfDocument("04.pdf");

            for (int i = 2; i > -1; i--)
            {
                documents[3].AppendPage(documents[i]);
            }

            documents[3].SaveToFile("Result.pdf");

        }
    }
}
Imports Spire.Doc
Imports Spire.Xls
Imports Spire.Pdf

Namespace MergeMultiTypestoOnePDF
	Class Program
		Private Shared Sub Main(args As String())
			Dim documents As PdfDocument() = New PdfDocument(3) {}
			Using ms1 As New MemoryStream()
				Dim doc As New Document("01.doc", Spire.Doc.FileFormat.Doc)
				doc.SaveToStream(ms1, Spire.Doc.FileFormat.PDF)
				documents(0) = New PdfDocument(ms1)
			End Using
			Using ms2 As New MemoryStream()
				Dim docx As New Document("02.docx", Spire.Doc.FileFormat.Docx2010)
				docx.SaveToStream(ms2, Spire.Doc.FileFormat.PDF)
				documents(1) = New PdfDocument(ms2)
			End Using
			Using ms3 As New MemoryStream()
				Dim workbook As New Workbook()
				workbook.LoadFromFile("03.xls", ExcelVersion.Version97to2003)
				workbook.SaveToStream(ms3, Spire.Xls.FileFormat.PDF)
				documents(2) = New PdfDocument(ms3)
			End Using
			documents(3) = New PdfDocument("04.pdf")

			For i As Integer = 2 To -1 + 1 Step -1
				documents(3).AppendPage(documents(i))
			Next

			documents(3).SaveToFile("Result.pdf")

		End Sub
	End Class
End Namespace
How to set Number Format and remove tick marks on Chart in C#
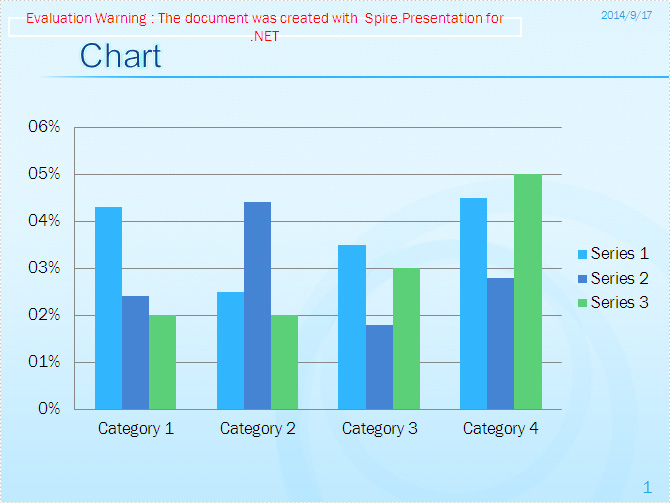
2014-09-17 09:18:15 Written by support iceblueMicrosoft PowerPoint automatically shows the number Format in Arabic number for data cell on chart and it will show tick marks on the value axis and category axis. In order to make the chart more clearly and tidy, we may need to set percentage number format for the data and remove the tick marks. With the help of Spire.Presentation, we can achieve these requirements easily.
Make sure Spire.Presentation for .NET (Version 2.1.7 or above) has been installed correctly and then add Spire.Presentation.dll as reference in the downloaded Bin folder though the below path: "..\Spire.Presentation\Bin\NET4.0\ Spire. Presentation.dll".
Check the custom chart on presentation slides at first:

Step 1: Create a presentation document and load the file from disk.
Presentation ppt = new Presentation();
ppt.LoadFromFile("sample.pptx");
Step 2: Get the chart that need to be adjust the number format and remove the tick marks.
IChart chart = ppt.Slides[0].Shapes[3] as IChart;
Step 3: Set percentage number format for the axis value of chart.
chart.PrimaryValueAxis.NumberFormat = "0#\\%";
Step 4: Remove the tick marks for value axis and category axis.
chart.PrimaryValueAxis.MajorTickMark = TickMarkType.TickMarkNone;
chart.PrimaryValueAxis.MinorTickMark = TickMarkType.TickMarkNone;
chart.PrimaryCategoryAxis.MajorTickMark = TickMarkType.TickMarkNone;
chart.PrimaryCategoryAxis.MinorTickMark = TickMarkType.TickMarkNone;
Step 5: Save and Launch to view the resulted PPTX file.
ppt.SaveToFile("Result.pptx", FileFormat.Pptx2007);
System.Diagnostics.Process.Start("Result.pptx");
Effective screenshot:
Full codes:
namespace SetNumberFormatforChartData
{
    class Program
    {
        static void Main(string[] args)
        {
            Presentation ppt = new Presentation();
            ppt.LoadFromFile("sample.pptx");
            IChart chart = ppt.Slides[0].Shapes[3] as IChart;
            chart.PrimaryValueAxis.NumberFormat = "0#\\%";

            chart.PrimaryValueAxis.MajorTickMark = TickMarkType.TickMarkNone;
            chart.PrimaryValueAxis.MinorTickMark = TickMarkType.TickMarkNone;

            chart.PrimaryCategoryAxis.MajorTickMark = TickMarkType.TickMarkNone;
            chart.PrimaryCategoryAxis.MinorTickMark = TickMarkType.TickMarkNone;

            ppt.SaveToFile("Result.pptx", FileFormat.Pptx2007);
            System.Diagnostics.Process.Start("Result.pptx");

        }
    }
}
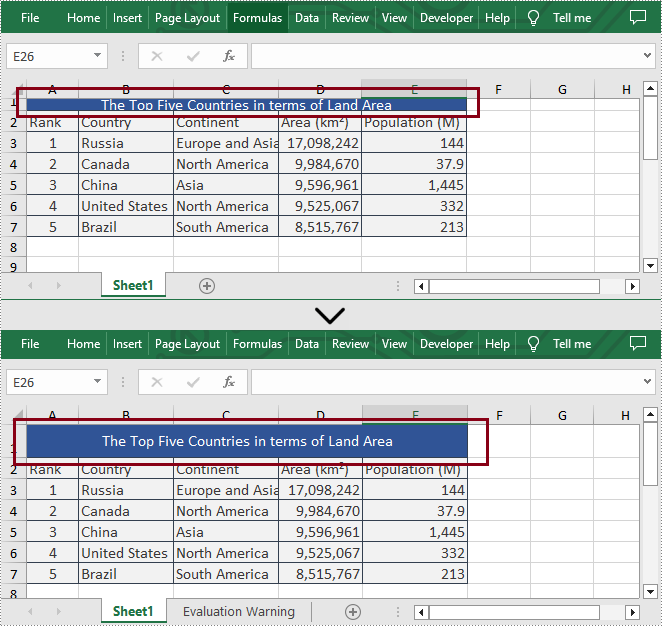
When creating a spreadsheet, you can adjust the layout and appearance of it by setting the row height and column width. Microsoft Excel provides users with various methods to modify column width and row height, such as dragging the boundaries of columns or rows to the desired size, or entering specific values in the column width box or row height box. However, it is crucial for developers to understand how to achieve this functionality through programming. In this article, we will show you how to set row height and column width in Excel by using Spire.XLS for .NET.
Install Spire.XLS for .NET
To begin with, you need to add the DLL files included in the Spire.XLS for.NET package as references in your .NET project. The DLLs files can be either downloaded from this link or installed via NuGet.
PM> Install-Package Spire.XLS
Set the Row Height in Excel
Spire.XLS for .NET supports users to set the row height programmatically by calling Worksheet.SetRowHeight() method. The following are detailed steps.
- Create an object of Workbook class.
- Load a sample file using Workbook.LoadFromFile() method.
- Get the first sheet from this file by using Workbook.Worksheets[] property.
- Set the height of the first row by calling Worksheet.SetRowHeight() method.
- Save the result file using Workbook.SaveToFile() method.
- C#
- VB.NET
using Spire.Xls;
namespace SetExcelRow
{
    class Program
    {

        static void Main(string[] args)
        {
            //Create an object of  Workbook class
            Workbook workbook = new Workbook();

            //Load a sample file from disk
            workbook.LoadFromFile(@"sample.xlsx");

            //Get the first worksheet from the sample file
            Worksheet sheet = workbook.Worksheets[0];

            //Set the row height of the first row
            sheet.SetRowHeight(1, 25);

            //Save the result file
            workbook.SaveToFile("SetRow.xlsx", ExcelVersion.Version2013);
            workbook.Dispose();
        }
    }
}
Set the Column Width in Excel
What's more, Spire.XLS for .NET also enable users to set the column width in Excel programmatically by calling Worksheet.SetColumnWidth() method. The following are detailed steps.
- Create an object of Workbook class.
- Load a sample file using Workbook.LoadFromFile() method.
- Get the first sheet from this file by using Workbook.Worksheets[] property.
- Set the width of the fourth column by calling Worksheet.SetColumnWidth() method.
- Save the result file using Workbook.SaveToFile() method.
- C#
- VB.NET
using Spire.Xls;
namespace SetExcelColumn
{
    class Program
    {

        static void Main(string[] args)
        {
            //Create an object of  Workbook class
            Workbook workbook = new Workbook();

            //Load a sample file from disk
            workbook.LoadFromFile(@"sample.xlsx");

            //Get the first worksheet from the sample file
            Worksheet sheet = workbook.Worksheets[0];

            //Set the column width of the fourth column
            sheet.SetColumnWidth(4, 15);

            //Save the result file
            workbook.SaveToFile("SetColumn.xlsx", ExcelVersion.Version2013);
            workbook.Dispose();
        }
    }
}

Apply for a Temporary License
If you'd like to remove the evaluation message from the generated documents, or to get rid of the function limitations, please request a 30-day trial license for yourself.
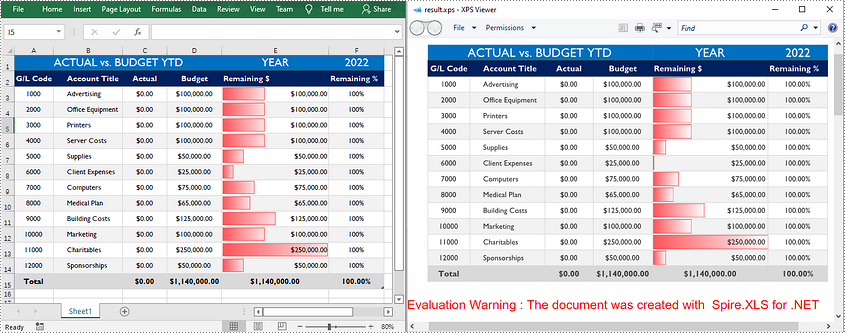
XPS (XML Paper Specification) is a specification for a page description language and a fixed-document format developed by Microsoft. It defines the layout of a document and the visual appearance of each page. Sometimes you may need to convert an Excel document to XPS for distribution, archiving or printing purposes, and this article will demonstrate how to accomplish this task programmatically using Spire.XLS for .NET.
Install Spire.XLS for .NET
To begin with, you need to add the DLL files included in the Spire.XLS for .NET package as references in your .NET project. The DLL files can be either downloaded from this link or installed via NuGet.
PM> Install-Package Spire.XLS
Convert Excel to XPS
Spire.XLS for .NET allows you to convert Excel (.xls/ .xlsx) to XPS with only three lines of code. The detailed steps are as follows.
- Create a Workbook object.
- Load a sample Excel document using Workbook.LoadFromFile() method.
- Convert the Excel document to XPS using Workbook.SaveToFile(String, FileFormat) method.
- C#
- VB.NET
using Spire.Xls;

namespace ExceltoXPS
{
    class Program
    {
        static void Main(string[] args)
        {

            //Create a Workbook object.
            Workbook workbook = new Workbook();

            //Load a sample Excel document
            workbook.LoadFromFile(@"E:\Files\\sample0.xlsx", ExcelVersion.Version2010);

            //Convert the document to XPS
            workbook.SaveToFile("result.xps", FileFormat.XPS);
        }
    }
}
Apply for a Temporary License
If you'd like to remove the evaluation message from the generated documents, or to get rid of the function limitations, please request a 30-day trial license for yourself.
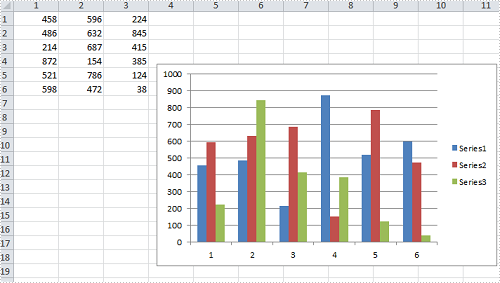
Sometimes, we create a spreadsheet that contains a wonderful chart, we may still want to adjust the size and position of the chart in order to make the chart mostly matches the Excel page. In this article, I'll introduce you how to resize a chart to a suitable scale and how to move a chart to a desired position in C#, VB.NET via Spire.XLS.
Within the class of Spire.Xls.Chart, we can set the parameters of XlsShape.LeftColum and XlsShape.TopRow to move a chart to any location on a worksheet, while the size of the chart can be changed by setting the parameters of XlsShape.Width and XlsShape.Height. More details would be as follows:
Test File:
Code Snippet for Resize and Move Chart
Step 1: Create a new instance of workbook and load the test file.
Workbook workbook = new Workbook();
workbook.LoadFromFile("sample.xlsx", ExcelVersion.Version2010);
Step 2: Get the chart from the first worksheet.
Worksheet sheet = workbook.Worksheets[0];
Chart chart = sheet.Charts[0];
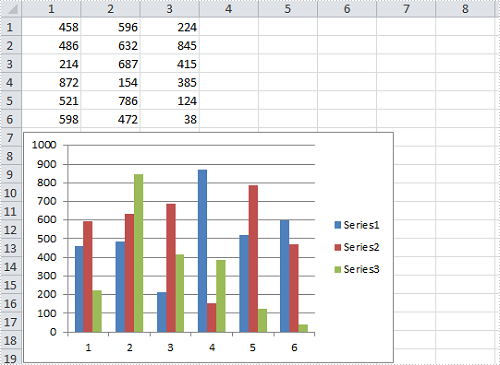
Step 3: Set position of the chart.
chart.LeftColumn = 1;
chart.TopRow = 7;
Step 4: Resize the chart.
chart.Width = 400;
chart.Height = 250;
Step 5: Save the changes to a new file.
workbook.SaveToFile("result.xlsx", ExcelVersion.Version2010);
Result:
Full Code:
using Spire.Xls;
namespace ResizeandMoveExcel
{
    class Program
    {

        static void Main(string[] args)
        {

            Workbook workbook = new Workbook();
            workbook.LoadFromFile("sample.xlsx", ExcelVersion.Version2010);

            Worksheet sheet = workbook.Worksheets[0];
            Chart chart = sheet.Charts[0];

            chart.LeftColumn = 1;
            chart.TopRow = 7;

            chart.Width = 400;
            chart.Height = 250;

            workbook.SaveToFile("result.xlsx", ExcelVersion.Version2010);
        }
    }
}
Imports Spire.Xls
Namespace ResizeandMoveExcel
	Class Program

		Private Shared Sub Main(args As String())

			Dim workbook As New Workbook()
			workbook.LoadFromFile("sample.xlsx", ExcelVersion.Version2010)

			Dim sheet As Worksheet = workbook.Worksheets(0)
			Dim chart As Chart = sheet.Charts(0)

			chart.LeftColumn = 1
			chart.TopRow = 7

			chart.Width = 400
			chart.Height = 250

			workbook.SaveToFile("result.xlsx", ExcelVersion.Version2010)
		End Sub
	End Class
End Namespace
How to set the font and background for TextBox in Excel Chart
2014-09-10 01:44:39 Written by support iceblueTextbox is been widely used in Excel workbooks to give abstract and introduce information for a part of the excel documents. Spire.XLS supports to insert textbox in Excel worksheet and edit the setting of the textbox. We have already shown you how to remove the borderline of textbox in Excel chart. This tutorial will demonstrate how to set the font and background for TextBox in Excel in C#.
Firstly, make sure that Spire.XLS for .NET has been installed on your machine. And then, adds Spire.XLS.dll as reference in the downloaded Bin folder thought the below path: "..\Spire.XLS\Bin\NET4.0\ Spire.XLS.dll".
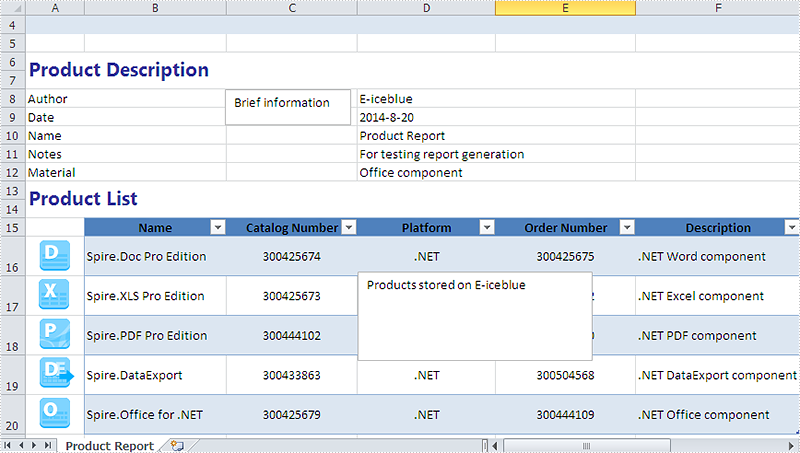
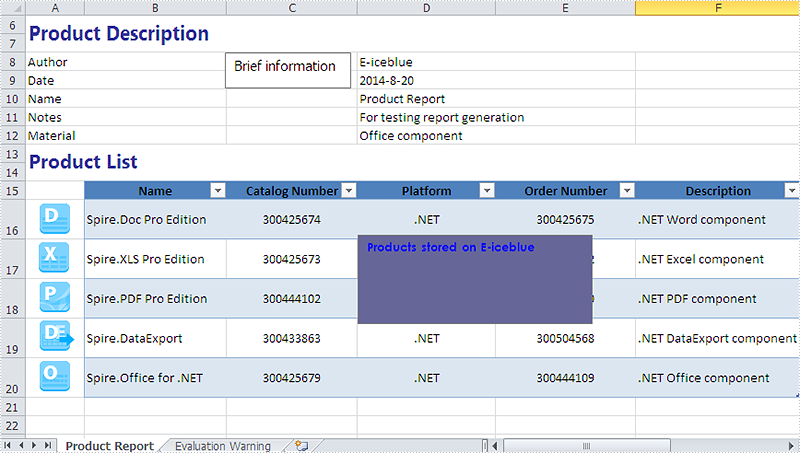
Now it comes to the details of how to set the text font and background color for textbox in Excel in C# and view the textbox before editing:
Step 1: Create a new instance of workbook and load an Excel file with textbox from file.
Workbook workbook = new Workbook();
workbook.LoadFromFile("sample.xlsx");
Step 2: Get the worksheet named in "Product Report" which contains textbox.
Worksheet sheet = workbook.Worksheets["Product Report"];
Step 3: Get the second textbox which will be edited.
XlsTextBoxShape shape = sheet.TextBoxes[1] as XlsTextBoxShape;
Step 4: Set the font and background color for the second textbox.
//Set the font
ExcelFont font = workbook.CreateFont();
font.FontName = "Century Gothic";
font.Size = 10;
font.IsBold = true;
font.Color = Color.Blue;
(new RichText(shape.RichText)).SetFont(0, shape.Text.Length - 1, font);
//set background color
shape.Fill.FillType = ShapeFillType.SolidColor;
shape.Fill.ForeKnownColor = ExcelColors.BlueGray;
Step 5: Save the document to file and launch it.
string output = "result.xlsx";
workbook.SaveToFile(output,ExcelVersion.Version2010);
System.Diagnostics.Process.Start(output);
Effective screenshot after set the font and background color for textbox in Excel chart:
Full codes:
using Spire.Xls;
using Spire.Xls.Core.Spreadsheet.Shapes;
using System.Drawing;
namespace setFontandBackgroundforTextbox
{
    class Program
    {
        static void Main(string[] args)
        {
            Workbook workbook = new Workbook();
            workbook.LoadFromFile("sample.xlsx");
            Worksheet sheet = workbook.Worksheets["Product Report"];
            XlsTextBoxShape shape = sheet.TextBoxes[1] as XlsTextBoxShape;

            //set font
            ExcelFont font = workbook.CreateFont();
            //font.IsStrikethrough = true;
            font.FontName = "Century Gothic";
            font.Size = 10;
            font.IsBold = true;
            font.Color = Color.Blue;
            (new RichText(shape.RichText)).SetFont(0, shape.Text.Length - 1, font);
            //set background color
            shape.Fill.FillType = ShapeFillType.SolidColor;
            shape.Fill.ForeKnownColor = ExcelColors.BlueGray;

            string output = "result.xlsx";
            workbook.SaveToFile(output,ExcelVersion.Version2010);
            System.Diagnostics.Process.Start(output);

        }
    }
Format Data Labels of Series Chart in Presentation in C#, VB.NET
2014-09-04 08:33:56 Written by support iceblueBy default, Microsoft PowerPoint automatically hides the data labels when we create a series chart on presentation slide. In order to make your readers have an intuitive understanding of your chart, you can choose to set formatting of label to display series name, category name, value, percentage and adjust its displayed position. In this article, I would like to show you how to format data labels in PowerPoint presentation via Spire.Presentation.
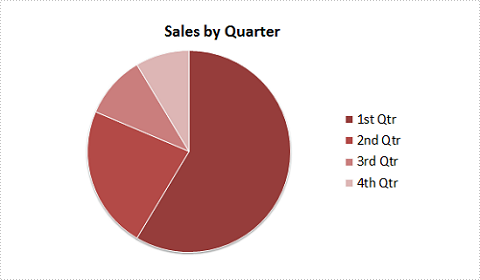
In the class of Spire.Presentation.Charts.ChartDataLabel, it contains properties like LabelValueVisible, PercentageVisible, SeriesNameVisible, CategoryNameVisible, Position and etc , which will enable us to easily manage the data labels formatting as you desired. Look at the pie chart below, it is not that informative if it doesn’t display data labels.
Now, let's format pie chart to display percentages in data labels with following code snippet:
Step 1: Create a new instance of Presentation class and load test the file that contains the pie chart.
Presentation ppt = new Presentation();
ppt.LoadFromFile("Test.pptx");
Step 2: Get the chart from presentation slide.
IChart chart = ppt.Slides[0].Shapes[0] as IChart;
Step 3: Get chart's series.
ChartSeriesFormatCollection sers = chart.Series;
Step 4: Set the position of legend on chart.
chart.ChartLegend.Position = ChartLegendPositionType.TopRight;
Step 5: Initialize four instance of series label and set parameters of each label.
ChartDataLabel cd1 = sers[0].DataLabels.Add();
cd1.PercentageVisible = true;
cd1.Position = ChartDataLabelPosition.Center;

ChartDataLabel cd2 = sers[0].DataLabels.Add();
cd2.PercentageVisible = true;
cd2.Position = ChartDataLabelPosition.Center;

ChartDataLabel cd3 = sers[0].DataLabels.Add();
cd3.PercentageVisible = true;
cd3.Position = ChartDataLabelPosition.Center;

ChartDataLabel cd4 = sers[0].DataLabels.Add();
cd4.PercentageVisible = true;
cd4.Position = ChartDataLabelPosition.Center;
Step 6: Save the changes to a new .pptx file.
ppt.SaveToFile("Result.pptx", FileFormat.Pptx2007);
Result:

Full Code:
using Spire.Presentation;
using Spire.Presentation.Charts;
using Spire.Presentation.Collections;

namespace FormatData
{

    class Program
    {
        static void Main(string[] args)
        {

            Presentation ppt = new Presentation();
            ppt.LoadFromFile("Test.pptx");

            IChart chart = ppt.Slides[0].Shapes[0] as IChart;
            ChartSeriesFormatCollection sers = chart.Series;
            chart.ChartLegend.Position = ChartLegendPositionType.TopRight;

            ChartDataLabel cd1 = sers[0].DataLabels.Add();
            cd1.PercentageVisible = true;
            cd1.Position = ChartDataLabelPosition.Center;
            ChartDataLabel cd2 = sers[0].DataLabels.Add();
            cd2.PercentageVisible = true;
            cd2.Position = ChartDataLabelPosition.Center;
            ChartDataLabel cd3 = sers[0].DataLabels.Add();
            cd3.PercentageVisible = true;
            cd3.Position = ChartDataLabelPosition.Center;
            ChartDataLabel cd4 = sers[0].DataLabels.Add();
            cd4.PercentageVisible = true;
            cd4.Position = ChartDataLabelPosition.Center;

            ppt.SaveToFile("Result.pptx", FileFormat.Pptx2007);

        }
    }
}
Imports Spire.Presentation
Imports Spire.Presentation.Charts
Imports Spire.Presentation.Collections

Namespace FormatData

	Class Program
		Private Shared Sub Main(args As String())

			Dim ppt As New Presentation()
			ppt.LoadFromFile("Test.pptx")

			Dim chart As IChart = TryCast(ppt.Slides(0).Shapes(0), IChart)
			Dim sers As ChartSeriesFormatCollection = chart.Series
			chart.ChartLegend.Position = ChartLegendPositionType.TopRight

			Dim cd1 As ChartDataLabel = sers(0).DataLabels.Add()
			cd1.PercentageVisible = True
			cd1.Position = ChartDataLabelPosition.Center
			Dim cd2 As ChartDataLabel = sers(0).DataLabels.Add()
			cd2.PercentageVisible = True
			cd2.Position = ChartDataLabelPosition.Center
			Dim cd3 As ChartDataLabel = sers(0).DataLabels.Add()
			cd3.PercentageVisible = True
			cd3.Position = ChartDataLabelPosition.Center
			Dim cd4 As ChartDataLabel = sers(0).DataLabels.Add()
			cd4.PercentageVisible = True
			cd4.Position = ChartDataLabelPosition.Center

			ppt.SaveToFile("Result.pptx", FileFormat.Pptx2007)

		End Sub
	End Class
End Namespace
Merge Selected Pages from Multiple PDF Files into One in C#/VB.NET
2014-09-02 09:25:30 Written by support iceblueUsing Spire.PDF, you can not only merge multiple PDF files into a single file, but also select specific pages from the source files and combine them in one PDF document. The following code snippets demonstrate the same.
Step 1: Get the PDF file paths and store in a string array.
string[] files = { "Sample1.pdf", "Sample2.pdf", "Sample3.pdf" };
Step 2: Load each PDF document to an object of PdfDocument and store all these objects in PdfDocument array.
         PdfDocument[] docs = new PdfDocument[files.Length];

        for (int i = 0; i < files.Length; i++)
        {
            docs[i] = new PdfDocument(files[i]);
        }
Step 3: Create an instance of PdfDocument class.
PdfDocument doc = new PdfDocument();
Step 4: Call InsertPage(PdfDocument doc, int pageIndex) method and InertPageRange(PdfDocument doc, int startIndex, int endIndex) method to insert selected pages to the new PDF document.
       doc.InsertPage(docs[0], 0);
       doc.InsertPage(docs[1], 1);
       doc.InsertPageRange(docs[2], 2, 5);
Step 5: Save and launch the file.
       doc.SaveToFile("Result.pdf");
       Process.Start("Result.pdf");
Screen Shot of Effect:
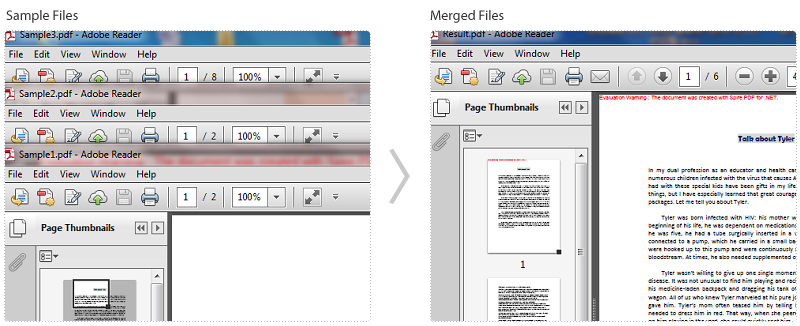
The six pages in the result file are extracted from three sample PDF files.
Full Code:
using Spire.Pdf;
using System.Diagnostics;

namespace MergeSelectedPages
{
    class Program
    {
        static void Main(string[] args)
        {
            string[] files = { "Sample1.pdf", "Sample2.pdf", "Sample3.pdf" };
            PdfDocument[] docs = new PdfDocument[files.Length];

            //open pdf documents
            for (int i = 0; i < files.Length; i++)
            {
                docs[i] = new PdfDocument(files[i]);
            }

            //create a new pdf document and insert selected pages
            PdfDocument doc = new PdfDocument();
            doc.InsertPage(docs[0], 0);
            doc.InsertPage(docs[1], 1);
            doc.InsertPageRange(docs[2], 2, 5);


            doc.SaveToFile("Result.pdf");
            Process.Start("Result.pdf");
        }
    }
}
Imports Spire.Pdf
Imports System.Diagnostics

Namespace MergeSelectedPages
	Class Program
		Private Shared Sub Main(args As String())
			Dim files As String() = {"Sample1.pdf", "Sample2.pdf", "Sample3.pdf"}
Dim docs As PdfDocument() = New PdfDocument(files.Length - 1) {}

'open pdf documents
For i As Integer = 0 To files.Length - 1
	docs(i) = New PdfDocument(files(i))
Next

'create a new pdf document and insert selected pages
Dim doc As New PdfDocument()
doc.InsertPage(docs(0), 0)
doc.InsertPage(docs(1), 1)
doc.InsertPageRange(docs(2), 2, 5)

doc.SaveToFile("Result.pdf")
Process.Start("Result.pdf")
		End Sub
	End Class
End Namespace
