
.NET (1273)
Children categories
How to convert PowerPoint document to EMF image in C#
2015-04-14 02:24:39 Written by support iceblueSpire.Presentation has powerful functions to export PowerPoint documents into different image file formats. In the previous articles, we have already shown you how to convert PowerPoint documents into TIFF, PNG and JPG. This article will demonstrate how to convert PowerPoint documents into EMF image. With Spire.Presentation for .NET, we can save presentation slides as an EMF image with the same size with the original slide's size and we can also set a specific size for the resulted EMF image.
Convert Presentation slides to EMF with the default size:
Step 1: Create a presentation document.
Presentation presentation = new Presentation();
Step 2: Load the PPTX file from disk.
presentation.LoadFromFile("Sample.pptx", FileFormat.Pptx2010);
Step 3: Save the presentation slide to EMF image by the method of SaveAsEMF().
presentation.Slides[2].SaveAsEMF("Result.emf");
Effective screenshot:

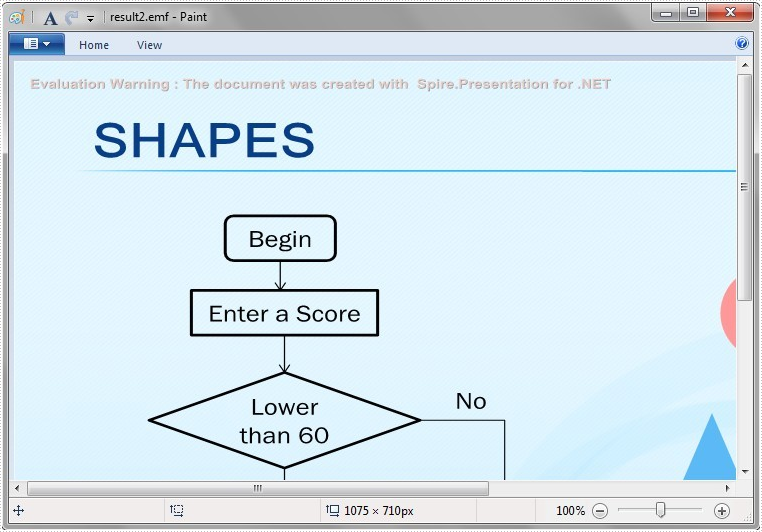
Convert Presentation slides to EMF with a specific size of 1075*710:
Step 1: Create a presentation document.
Presentation presentation = new Presentation();
Step 2: Load the PPTX file from disk.
presentation.LoadFromFile("sample.pptx");
Step 3: Save the presentation slide to EMF image with a specific size of 1075*710 by the method of SaveAsEMF(string filePath, int width, int height).
presentation.Slides[2].SaveAsEMF("Result2.emf", 1075, 710);
Effective screenshot:
Full codes:
using Spire.Presentation;
namespace PPStoEMF
{
    class Program
    {
        static void Main(string[] args)
        {
            Presentation presentation = new Presentation();
            presentation.LoadFromFile("Sample.pptx", FileFormat.Pptx2010);

            //presentation.Slides[2].SaveAsEMF("Result.emf");
            presentation.Slides[2].SaveAsEMF("Result2.emf", 1075, 710);
        }
    }
}
Set text alignment when append HTML string code to .doc in C#
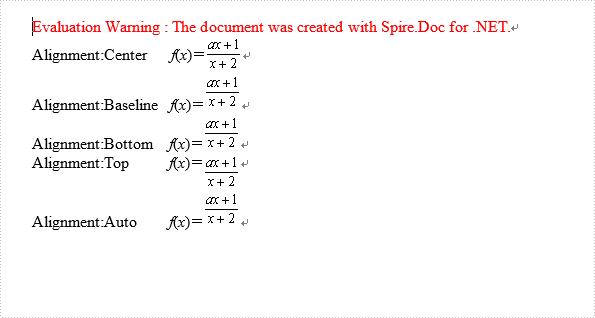
2015-04-10 02:05:28 Written by support iceblueWe can set Asian typography for paragraph for .doc files, there are four text alignments: Top, Center, Baseline, Bottom and Auto. In this article let's see how to set alignment when append HTML string code to .doc in C#.
Download Spire.Doc 5.3.83 or upper version, then add reference to your project.
Here are the steps:
Step 1: Create a HTML file contain the following code.
<html>
<body>
<i>f</i>(<i>x</i>)=<img align="middle" src="data:image/png;base64,iVBORw0KGgoAAAANSUhEUgAAACcAAAAlCAYAAADBa/A+AAAAAXNSR0IArs4c6QAAAARnQU1BAACxjwv8YQUAAAAJcEhZcwAADsMAAA7DAcdvqGQAAADvSURBVFhH7ZNbCsUwCES7/03nIkSwRh1rL00+PCCJVaeTPq5xMG2uSpuLuC7fwlZzZOxYc0TZnDwZ76WYzjVRjQnn57oQmdC5x9ses6IHUO7xd3NW8xNzVPPCwrtOLBXdbAlHgpJMX9SzVGQz7fUw55Eo87ZnqVAzh8x5z8jrHpl6pBNPb6bNVWlzVW7m5N+zKyT9Wqu0OYn3fVl8am754IHBz5+cpGxOP3qda9CNLNAMVESmmG3mMjw1lzrwXF0iEap5gUj1zNUlI0Jk+4i05lxNWCR1ysIh0Ixb1SJQCNQJ1pERgRU30uaqHGxujB+eJddCfZBWMwAAAABJRU5ErkJggg==" />
Step 2: Create a new document and add new section.
Document doc2 = new Document();
doc2.AddSection();
Step 3: Create new paragraph p and set its property of TextAlignment as "Center".
p.AppendText("Alignment:Center      ");
p.AppendHTML(File.ReadAllText(@"test.html"));
p.Format.TextAlignment = TextAlignment.Center;
Step 4: Set other options to make a contrast, Auto is Baseline by default.
Paragraph p1 = doc2.Sections[0].AddParagraph();
p1.AppendText("Alignment:Baseline   ");
p1.AppendHTML(File.ReadAllText(@"test.html"));
p1.Format.TextAlignment = TextAlignment.Baseline;

Paragraph p2 = doc2.Sections[0].AddParagraph();
p2.AppendText("Alignment:Bottom    ");
p2.AppendHTML(File.ReadAllText(@"test.html"));
p2.Format.TextAlignment = TextAlignment.Bottom;

Paragraph p3 = doc2.Sections[0].AddParagraph();
p3.AppendText("Alignment:Top          ");
p3.AppendHTML(File.ReadAllText(@"test.html"));
p3.Format.TextAlignment = TextAlignment.Top;

Paragraph p4 = doc2.Sections[0].AddParagraph();
p4.AppendText("Alignment:Auto        ");
p4.AppendHTML(File.ReadAllText(@"test.html"));
p4.Format.TextAlignment = TextAlignment.Auto;
Step 5: Save and review.
doc2.SaveToFile(@"test.doc", FileFormat.Doc);
System.Diagnostics.Process.Start("test.doc");
The screen shot:
Full Code Here:
using Spire.Doc;
using Spire.Doc.Documents;
using System.IO;
namespace SetTextAlignment
{
 class Program
    {

      static void Main(string[] args)
        {
            Document doc2 = new Document();
            doc2.AddSection();
            Paragraph p = doc2.Sections[0].AddParagraph();
            p.AppendText("Alignment:Center      ");
            p.AppendHTML(File.ReadAllText(@"test.html"));
            p.Format.TextAlignment = TextAlignment.Center;

            Paragraph p1 = doc2.Sections[0].AddParagraph();
            p1.AppendText("Alignment:Baseline   ");
            p1.AppendHTML(File.ReadAllText(@"test.html"));
            p1.Format.TextAlignment = TextAlignment.Baseline;

            Paragraph p2 = doc2.Sections[0].AddParagraph();
            p2.AppendText("Alignment:Bottom    ");
            p2.AppendHTML(File.ReadAllText(@"test.html"));
            p2.Format.TextAlignment = TextAlignment.Bottom;

            Paragraph p3 = doc2.Sections[0].AddParagraph();
            p3.AppendText("Alignment:Top          ");
            p3.AppendHTML(File.ReadAllText(@"test.html"));
            p3.Format.TextAlignment = TextAlignment.Top;

            Paragraph p4 = doc2.Sections[0].AddParagraph();
            p4.AppendText("Alignment:Auto        ");
            p4.AppendHTML(File.ReadAllText(@"test.html"));
            p4.Format.TextAlignment = TextAlignment.Auto;

            doc2.SaveToFile(@"test.doc", FileFormat.Doc);
            System.Diagnostics.Process.Start("test.doc");

        }
    }
}
How to Convert Selected Range of Cells to PDF in C#, VB.NET
2015-04-10 01:56:50 Written by support iceblueUsing Spire.XLS, programmers are able to save the whole worksheet as PDF by calling the method SaveToPdf(). However, you may only want to save or export a part of worksheet as PDF. Since Spire.XLS doesn't provide a method to directly convert a range of cells to PDF, we can copy the selected ranges to a new worksheet and then save it as PDF file. This method seems complex, but it is still efficient with Spire.XLS.
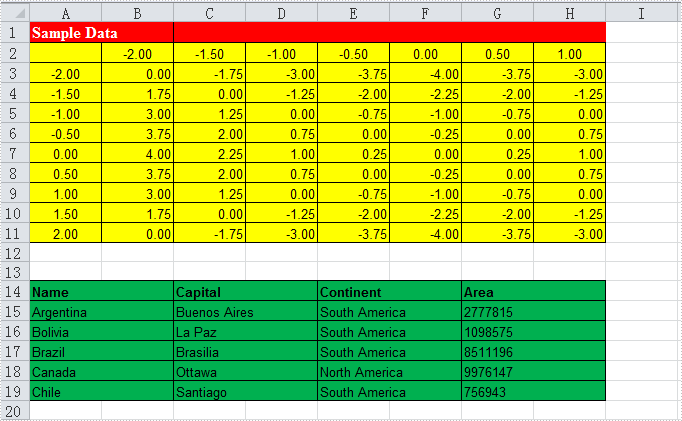
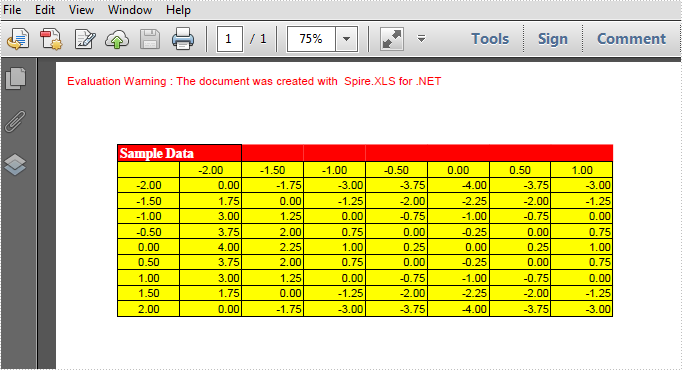
Look at the test file below, we only want the cells from A1 to H11 converted as PDF. We will firstly create a new blank worksheet, copy the selected range to the new sheet using CellRange.Copy() method, then convert the new sheet as PDF.
Code Snippet:
Step 1: Create a new workbook and load the test file.
Workbook workbook = new Workbook();
workbook.LoadFromFile("test.xlsx", ExcelVersion.Version2010);
Step 2: Add a new worksheet to workbook.
workbook.Worksheets.Add("newsheet");
Step 3: Copy the selected range from where it stores to the new worksheet.
workbook.Worksheets[0].Range["A1:H11"].Copy(workbook.Worksheets[1].Range["A1:H11"]);
Step 4: Convert the new worksheet to PDF.
workbook.Worksheets[1].SaveToPdf("result.pdf", Spire.Xls.FileFormat.PDF);
Result:
Full Code:
using Spire.Xls;
namespace Convert
{
    class Program
    {
          static void Main(string[] args)
{
    Workbook workbook = new Workbook();
    workbook.LoadFromFile("test.xlsx", ExcelVersion.Version2010);
    // add a new sheet to workbook
    workbook.Worksheets.Add("newsheet");
    //Copy your area to new sheet.
    workbook.Worksheets[0].Range["A1:H11"].Copy(workbook.Worksheets[1].Range["A1:H11"]);
    //convert new sheet to pdf
    workbook.Worksheets[1].SaveToPdf("result.pdf", Spire.Xls.FileFormat.PDF);

}

        }
    }
Imports Spire.Xls
Namespace Convert
	Class Program
		Private Shared Sub Main(args As String())
			Dim workbook As New Workbook()
			workbook.LoadFromFile("test.xlsx", ExcelVersion.Version2010)
			' add a new sheet to workbook
			workbook.Worksheets.Add("newsheet")
			'Copy your area to new sheet.
			workbook.Worksheets(0).Range("A1:H11").Copy(workbook.Worksheets(1).Range("A1:H11"))
			'convert new sheet to pdf
			workbook.Worksheets(1).SaveToPdf("result.pdf", Spire.Xls.FileFormat.PDF)

		End Sub

	End Class
End Namespace
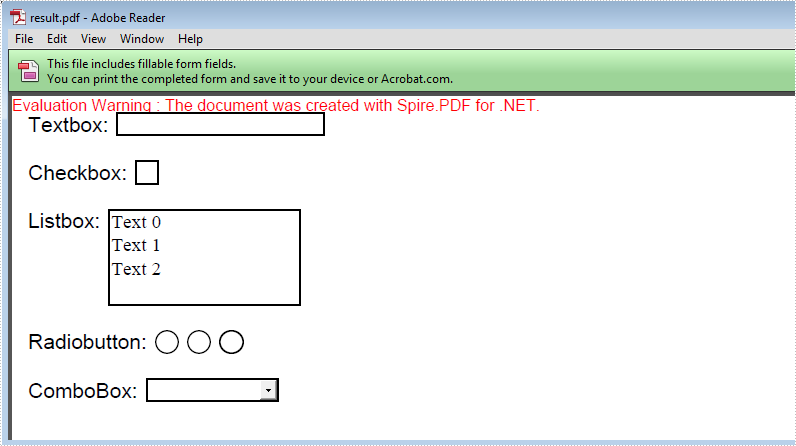
PDF form is often used to display, catch and edit data. People can fill blanks with data and submit data to server. Spire.PDF now enables users to add fields and create form in existing PDF document.
Here are the steps:
Step 1: Create PDF document, and load a blank PDF file, then get the first page.
PdfDocument pdf = new PdfDocument("Blank.pdf");
pdf.AllowCreateForm = (pdf.Form == null) ? true : false;
PdfPageBase page = pdf.Pages[0];
Step 2: Set font and font color. Preset coordinate.
PdfFont font = new PdfFont(PdfFontFamily.Helvetica, 13f);
PdfBrush brush = PdfBrushes.Black;
float x = 10;
float y = 10;
float tempX = 0;
float tempY = 0;
Step 3: Draw textbox.
string text = "Textbox: ";
page.Canvas.DrawString(text, font, brush, x, y);
tempX = font.MeasureString(text).Width + 15;
tempY = font.MeasureString(text).Height + 15;
PdfTextBoxField textbox = new PdfTextBoxField(page, "TextBox");
textbox.Bounds = new RectangleF(tempX, y, tempX * 2, 15);
textbox.BorderWidth = 0.75f;
textbox.BorderStyle = PdfBorderStyle.Solid;
pdf.Form.Fields.Add(textbox);
Step 4: Draw checkbox.
text = "Checkbox: ";
y += tempY;
page.Canvas.DrawString(text, font, brush, x, y);
tempX = font.MeasureString(text).Width + 15;
tempY = font.MeasureString(text).Height + 15;
PdfCheckBoxField checkbox = new PdfCheckBoxField(page, "CheckBox");
checkbox.Bounds = new RectangleF(tempX, y, 15, 15);
checkbox.BorderWidth = 0.75f;
checkbox.Style = PdfCheckBoxStyle.Cross;
pdf.Form.Fields.Add(checkbox);
Step 5: Draw Listbox and add content.
//ListBox
text = "Listbox: ";
y += tempY;
page.Canvas.DrawString(text, font, brush, x, y);
tempX = font.MeasureString(text).Width + 15;
tempY = font.MeasureString(text).Height + 15;
PdfListBoxField listbox = new PdfListBoxField(page, "ListBox");
listbox.Bounds = new RectangleF(tempX, y, tempX * 2, tempY * 2);
listbox.BorderWidth = 0.75f;
for (int i = 0; i < 3; i++)
{
     string tempText = string.Format("Text {0}", i);
     string tempValue = string.Format("Value {0}", i);
     listbox.Items.Add(new PdfListFieldItem(tempText, tempValue));
}
pdf.Form.Fields.Add(listbox);
Step 6: Draw RadioButton.
//RadioButton
text = "Radiobutton: ";
y += tempY * 2 + 15;
page.Canvas.DrawString(text, font, brush, x, y);
tempX = font.MeasureString(text).Width + 15;
tempY = font.MeasureString(text).Height + 15;
PdfRadioButtonListField radiobutton = new PdfRadioButtonListField(page, "RadioButton");
for (int i = 0; i < 3; i++)
{
     PdfRadioButtonListItem item = new PdfRadioButtonListItem(string.Format("rb{0}", i));
     item.BorderWidth = 0.75f;
     item.Bounds = new RectangleF(tempX + i * 20, y, 15, 15);
     radiobutton.Items.Add(item);
}
pdf.Form.Fields.Add(radiobutton);
Step 7: Draw combobox and add content.
//ComboBox
text = "ComboBox: ";
y += tempY;
page.Canvas.DrawString(text, font, brush, x, y);
tempX = font.MeasureString(text).Width + 15;
tempY = font.MeasureString(text).Height + 15;
PdfComboBoxField combobox = new PdfComboBoxField(page, "ComboBox");
combobox.Bounds = new RectangleF(tempX, y, tempX, 15);
combobox.BorderWidth = 0.75f;
for (int i = 0; i < 3; i++)
{
    string tempText = string.Format("Text {0}", i);
    string tempValue = string.Format("Value {0}", i);
    combobox.Items.Add(new PdfListFieldItem(tempText, tempValue));
}
pdf.Form.Fields.Add(combobox);
Step 8: Save and review
loDoc.SaveToFile("result.pdf");
System.Diagnostics.Process.Start("result.pdf");
Result screenshot:
Full Code:
using Spire.Pdf;
using Spire.Pdf.Fields;
using Spire.Pdf.Graphics;
using System.Drawing;


namespace AddFormFieldToExistingPDF
{
    class Program
    {
        static void Main(string []args)
        {
            PdfDocument pdf = new PdfDocument("Blank.pdf");
            pdf.AllowCreateForm = (pdf.Form == null) ? true : false;
            PdfPageBase page = pdf.Pages[0];


            PdfFont font = new PdfFont(PdfFontFamily.Helvetica, 13f);
            PdfBrush brush = PdfBrushes.Black;
            float x = 10;
            float y = 10;
            float tempX = 0;
            float tempY = 0;

            //TextBox
            string text = "Textbox: ";
            page.Canvas.DrawString(text, font, brush, x, y);
            tempX = font.MeasureString(text).Width + 15;
            tempY = font.MeasureString(text).Height + 15;
            PdfTextBoxField textbox = new PdfTextBoxField(page, "TextBox");
            textbox.Bounds = new RectangleF(tempX, y, tempX * 2, 15);
            textbox.BorderWidth = 0.75f;
            textbox.BorderStyle = PdfBorderStyle.Solid;
            pdf.Form.Fields.Add(textbox);

            //CheckBox
            text = "Checkbox: ";
            y += tempY;
            page.Canvas.DrawString(text, font, brush, x, y);
            tempX = font.MeasureString(text).Width + 15;
            tempY = font.MeasureString(text).Height + 15;
            PdfCheckBoxField checkbox = new PdfCheckBoxField(page, "CheckBox");
            checkbox.Bounds = new RectangleF(tempX, y, 15, 15);
            checkbox.BorderWidth = 0.75f;
            checkbox.Style = PdfCheckBoxStyle.Cross;
            pdf.Form.Fields.Add(checkbox);

            //ListBox
            text = "Listbox: ";
            y += tempY;
            page.Canvas.DrawString(text, font, brush, x, y);
            tempX = font.MeasureString(text).Width + 15;
            tempY = font.MeasureString(text).Height + 15;
            PdfListBoxField listbox = new PdfListBoxField(page, "ListBox");
            listbox.Bounds = new RectangleF(tempX, y, tempX * 2, tempY * 2);
            listbox.BorderWidth = 0.75f;
            for (int i = 0; i < 3; i++)
            {
                string tempText = string.Format("Text {0}", i);
                string tempValue = string.Format("Value {0}", i);
                listbox.Items.Add(new PdfListFieldItem(tempText, tempValue));
            }
            pdf.Form.Fields.Add(listbox);

            //RadioButton
            text = "Radiobutton: ";
            y += tempY * 2 + 15;
            page.Canvas.DrawString(text, font, brush, x, y);
            tempX = font.MeasureString(text).Width + 15;
            tempY = font.MeasureString(text).Height + 15;
            PdfRadioButtonListField radiobutton = new PdfRadioButtonListField(page, "RadioButton");
            for (int i = 0; i < 3; i++)
            {
                PdfRadioButtonListItem item = new PdfRadioButtonListItem(string.Format("rb{0}", i));
                item.BorderWidth = 0.75f;
                item.Bounds = new RectangleF(tempX + i * 20, y, 15, 15);
                radiobutton.Items.Add(item);
            }
            pdf.Form.Fields.Add(radiobutton);

            //ComboBox
            text = "ComboBox: ";
            y += tempY;
            page.Canvas.DrawString(text, font, brush, x, y);
            tempX = font.MeasureString(text).Width + 15;
            tempY = font.MeasureString(text).Height + 15;
            PdfComboBoxField combobox = new PdfComboBoxField(page, "ComboBox");
            combobox.Bounds = new RectangleF(tempX, y, tempX, 15);
            combobox.BorderWidth = 0.75f;
            for (int i = 0; i < 3; i++)
            {
                string tempText = string.Format("Text {0}", i);
                string tempValue = string.Format("Value {0}", i);
                combobox.Items.Add(new PdfListFieldItem(tempText, tempValue));
            }
            pdf.Form.Fields.Add(combobox);

            pdf.SaveToFile("Result.pdf");
            System.Diagnostics.Process.Start("Result.pdf");
        }
    }
}
How to Protect Chart on PowerPoint Slide in C#, VB.NET
2015-04-03 03:04:42 Written by support iceblueWhen we create a PowerPoint slide that contains charts on it, we may not want others to change the chart data, especially when we create a presentation of financial report, it is very important for legal reasons that no changes get made when the slides are presented. In this article, I'll introduce how to protect chart on PowerPoint slide via Spire.Presentation in C# and VB.NET.
Test File:

Code Snippet:
Step 1: Create a new instance of Presentation class. Load the sample file to PPT document by calling LoadFromFile() method.
Presentation ppt = new Presentation();
ppt.LoadFromFile("sample.pptx",FileFormat.Pptx2010);
Step 2: Get the second shape from slide and convert it as IChart. The first shape in the sample file is a textbox.
IChart chart = ppt.Slides[0].Shapes[1] as IChart;
Step 3: Set the Boolean value of IChart.IsDataProtect as true.
chart.IsDataProtect = true;
Step 4: Save the file.
ppt.SaveToFile("result.pptx", FileFormat.Pptx2010);
Output:
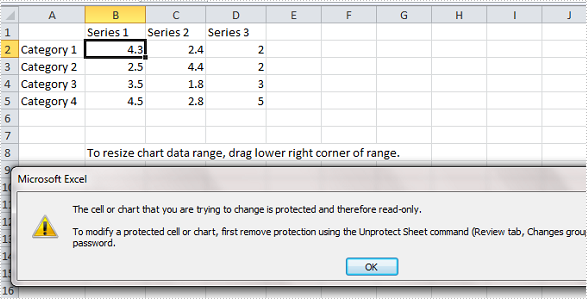
Run this program and open the result file, you’ll get following warning message if you try to modify the chart data in Excel.
Full Code:
using Spire.Presentation;
using Spire.Presentation.Charts;

namespace ProtectChart
{

    class Program
    {
        static void Main(string[] args)
        {

            Presentation ppt = new Presentation();
            ppt.LoadFromFile("sample.pptx", FileFormat.Pptx2010);

            IChart chart = ppt.Slides[0].Shapes[1] as IChart;
            chart.IsDataProtect = true;
            ppt.SaveToFile("result.pptx", FileFormat.Pptx2010);


        }
    }
}
Imports Spire.Presentation
Imports Spire.Presentation.Charts

Namespace ProtectChart

	Class Program
		Private Shared Sub Main(args As String())

			Dim ppt As New Presentation()
			ppt.LoadFromFile("sample.pptx", FileFormat.Pptx2010)

			Dim chart As IChart = TryCast(ppt.Slides(0).Shapes(1), IChart)
			chart.IsDataProtect = True
			ppt.SaveToFile("result.pptx", FileFormat.Pptx2010)


		End Sub
	End Class
End Namespace
How to use uninstalled font when converting Doc to PDF via Spire.Doc
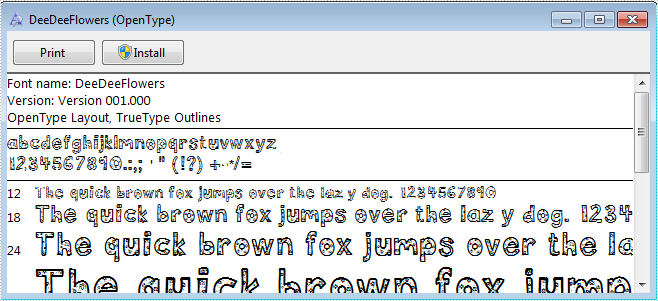
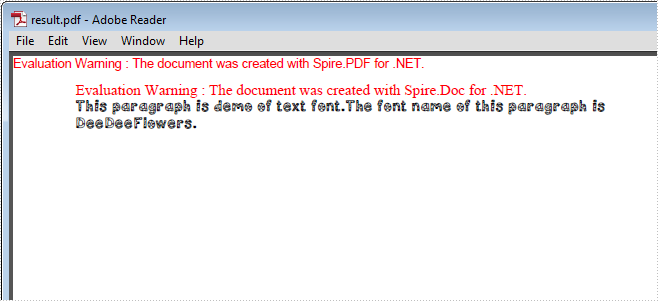
2015-03-25 03:21:26 Written by support iceblueNow Spire.Doc support using uninstalled font when converting Doc to PDF to diversity text content. In this article, we'll talk about how to realize this function:
Step 1: Download a font uninstalled in system.
Step 2: Create a new blank Word document.
Document document = new Document();
Step 3: Add a section and create a new paragraph.
Section section = document.AddSection();
Paragraph paragraph = section.Paragraphs.Count > 0 ? section.Paragraphs[0] : section.AddParagraph();
Step 4: Append text for a txtRange.
TextRange txtRange = paragraph.AppendText(text);
Step 5: Create an example for class ToPdfParameterList named to pdf, and create a new PrivateFontPathlist for property PrivateFontPaths, instantiate one PrivateFontPath with name and path of downloaded font.
ToPdfParameterList toPdf = new ToPdfParameterList()
{
    PrivateFontPaths = new List()
        {
          new PrivateFontPath("DeeDeeFlowers",@"D:\DeeDeeFlowers.ttf")
        }
};
Step 6: Set the new font for the txtaRange.
txtRange.CharacterFormat.FontName = "DeeDeeFlowers";
Step 7: Convert the Doc to PDF.
document.SaveToFile("result.pdf", toPdf);
Step 8: Review converted PDF files.
System.Diagnostics.Process.Start("result.pdf");
Result screenshot:
Full Code Below:
Document document = new Document();

//Add the first secition
Section section = document.AddSection();
//Create a new paragraph and get the first paragraph
Paragraph paragraph
    = section.Paragraphs.Count > 0 ? section.Paragraphs[0] : section.AddParagraph();

//Append Text
String text
    = "This paragraph is demo of text font and color. "
    + "The font name of this paragraph is Tahoma. "
    + "The font size of this paragraph is 20. "
    + "The under line style of this paragraph is DotDot. "
    + "The color of this paragraph is Blue. ";
 TextRange txtRange = paragraph.AppendText(text);

//Import the font
 ToPdfParameterList toPdf = new ToPdfParameterList()
 {
     PrivateFontPaths = new List<PrivateFontPath>()
         {
          new PrivateFontPath("DeeDeeFlowers",@"D:\DeeDeeFlowers.ttf")
         }
};
//Make use of the font.
txtRange.CharacterFormat.FontName = "DeeDeeFlowers";

document.SaveToFile("result.pdf", toPdf);

System.Diagnostics.Process.Start("result.pdf");
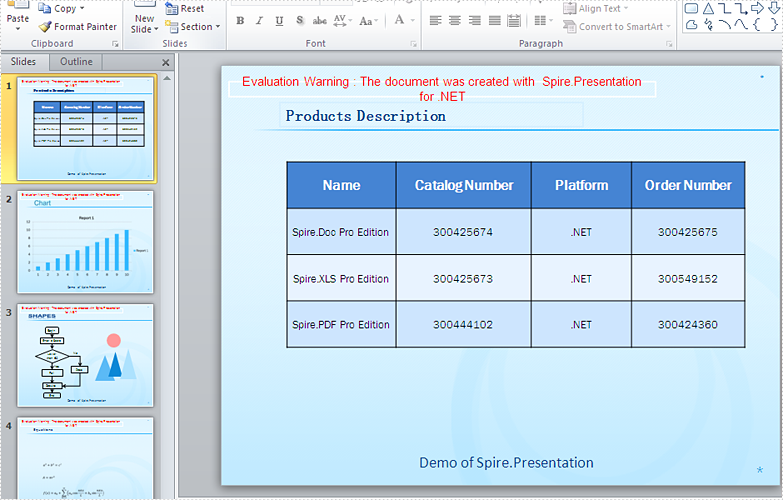
To use different versions of PowerPoint document easier, Spire.Presentation enables to convert PowerPoint Presentation 97 – 2003 to PowerPoint Presentation 2007, 2010. Spire.Presentation supports to convert PPT to PPTX, from version 2.2.17, now it starts to load .pps format document and save to .ppsx format document in C#. This article will show you how to convert PPS to PPTX in C#.
Step 1: Create a presentation document.
Presentation presentation = new Presentation();
Step 2: Load the PPS file from disk.
presentation.LoadFromFile("sample.pps");
Step 3: Save the PPS document to PPTX file format.
presentation.SaveToFile("ToPPTX.pptx", FileFormat.Pptx2010);
Step 4: Launch and view the resulted PPTX file.
System.Diagnostics.Process.Start("ToPPTX.pptx");
Full codes:
using Spire.Presentation;
namespace PPStoPPTX
{
    class Program
    {
        static void Main(string[] args)
        {
            Presentation presentation = new Presentation();

            //load the PPS file from disk
            presentation.LoadFromFile("sample.pps");

            //save the PPS document to PPTX file format
            presentation.SaveToFile("ToPPTX.pptx", FileFormat.Pptx2010);
            System.Diagnostics.Process.Start("ToPPTX.pptx");
        }
    }
}
Imports Spire.Presentation
Namespace PPStoPPTX
	Class Program
		Private Shared Sub Main(args As String())
			Dim presentation As New Presentation()

			'load the PPS file from disk
			presentation.LoadFromFile("sample.pps")

			'save the PPS document to PPTX file format
			presentation.SaveToFile("ToPPTX.pptx", FileFormat.Pptx2010)
			System.Diagnostics.Process.Start("ToPPTX.pptx")
		End Sub
	End Class
End Namespace
The result PPTX document:
Set the outline and effects for shapes in PowerPoint files via Spire.Presentation
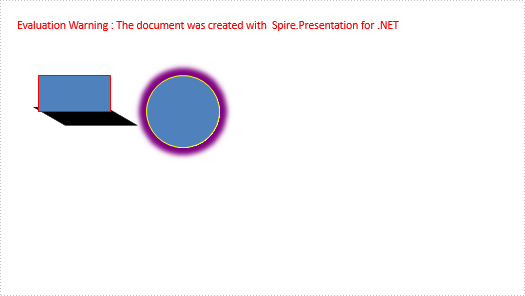
2015-03-19 08:05:12 Written by support iceblueOutline and effects for shapes can make the presentation of your PowerPoint files more attractive. This article talks about how to set the outline and effects for shapes via Spire.Presentation.
Step 1: Create a PowerPoint document.
Presentation ppt = new Presentation();
Step 2: Get the first slide
ISlide slide = ppt.Slides[0];
Step 3: Draw Rectangle shape on slide[0] with methord AppendShape();
IAutoShape shape = slide.Shapes.AppendShape(ShapeType.Rectangle, new RectangleF(50, 100, 100, 50));
Step 4: Set outline color as red.
//Outline color
shape.ShapeStyle.LineColor.Color = Color.Red;
Step 5: Add shadow effect and set parameters for it.
//Effect
PresetShadow shadow = new PresetShadow();
shadow.Preset = PresetShadowValue.FrontRightPerspective;
shadow.Distance = 10.0;
shadow.Direction = 225.0f;
shape.EffectDag.PresetShadowEffect = shadow;
Step 6: Change a Ellipse to add yellow outline with a glow effect:
Change step 4 and 5 as Code:
shape = slide.Shapes.AppendShape(ShapeType.Ellipse, new RectangleF(200, 100, 100, 100));
//Outline color
shape.ShapeStyle.LineColor.Color = Color.Yellow;
//Effect
GlowEffect glow = new GlowEffect();
glow.ColorFormat.Color = Color.Purple;
glow.Radius = 20.0;
shape.EffectDag.GlowEffect = glow;
Step 7: Save and review.
ppt.SaveToFile("Result.pptx", FileFormat.Pptx2010);
System.Diagnostics.Process.Start("Sample.PPTx");
Here is the screen shot:
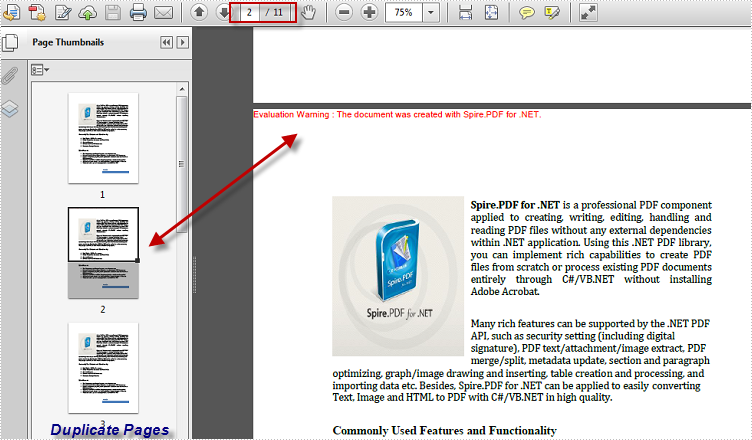
In some circumstance where we need to create a copy of the existing pages in our PDF document instead of copying the entire file, in particular, if we have to create hundreds copies of a certain page, it can be tedious to copy the page one after another. This article demonstrates a solution for how to duplicate a page in a PDF document and create multiple copies at a time using Spire.PDF.
In this example, I prepare a sample PDF file that only contains one page and eventually I’ll create ten copies of this page in the same document. Main method would be as follows:
Code Snippet:
Step 1: Create a new PDF document and load the sample file.
PdfDocument pdf = new PdfDocument("Sample.pdf");
Step 2: Get the first page from PDF, get the size of the page. Create a new instance of Pdf Template object based on the content and appearance of the first page.
PdfPageBase page = pdf.Pages[0];
SizeF size = page.Size;
PdfTemplate template = page.CreateTemplate();
Step 3: Create a new PDF page with the method Pages.Add() based on the size of the first page, draw the template on the new page at the specified location. Use a for loops to get more copies of this page.
for (int i = 0; i < 10; i++)
{
    page = pdf.Pages.Add(size, new PdfMargins(0));
    page.Canvas.DrawTemplate(template, new PointF(0, 0));
}
Step 4: Save the file.
pdf.SaveToFile("Result.pdf");
Output:
Ten copies of the first page have been created in the sample PDF document.
Full Code:
using Spire.Pdf;
using Spire.Pdf.Graphics;
using System.Drawing;

namespace DuplicatePage
{
    class Program
    {
        static void Main(string[] args)
        {
            PdfDocument pdf = new PdfDocument("Sample.pdf");

            PdfPageBase page = pdf.Pages[0];
            SizeF size = page.Size;
            PdfTemplate template = page.CreateTemplate();

            for (int i = 0; i < 10; i++)
            {
                page = pdf.Pages.Add(size, new PdfMargins(0));
                page.Canvas.DrawTemplate(template, new PointF(0, 0));
            }
            pdf.SaveToFile("Result.pdf");
        }
    }
}
Imports Spire.Pdf
Imports Spire.Pdf.Graphics
Imports System.Drawing

Namespace DuplicatePage
	Class Program
		Private Shared Sub Main(args As String())
			Dim pdf As New PdfDocument("Sample.pdf")

			Dim page As PdfPageBase = pdf.Pages(0)
			Dim size As SizeF = page.Size
			Dim template As PdfTemplate = page.CreateTemplate()

			For i As Integer = 0 To 9
				page = pdf.Pages.Add(size, New PdfMargins(0))
				page.Canvas.DrawTemplate(template, New PointF(0, 0))
			Next
			pdf.SaveToFile("Result.pdf")
		End Sub
	End Class
End Namespace
How to Apply Conditional Formatting to a Data Range in C#
2015-03-13 07:22:54 Written by support iceblueConditional formatting in Microsoft Excel has a number of presets that enables users to apply predefined formatting such as colors, icons and data bars, to a range of cells based on the value of the cell or the value of a formula. Conditional formatting usually reveals the data trends or highlights the data that meets one or more formulas.
In this article, I made an example to explain how these conditional formatting types can be achieved programmatically using Spire.XLS in C#. First of all, let's see the worksheet that contains a group of data in selected range as below, we’d like see which cells’ value is bigger than 800. In order to quickly figure out similar things like this, we can create a conditional formatting rule by formula: “If the value is bigger than 800, color the cell with Red” to highlight the qualified cells.
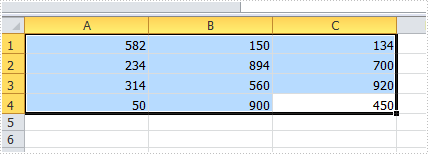
Code Snippet for Creating Conditional Formatting Rules:
Step 1: Create a worksheet and insert data to cell range from A1 to C4.
Workbook workbook = new Workbook();
Worksheet sheet = workbook.Worksheets[0];

sheet.Range["A1"].NumberValue = 582;
sheet.Range["A2"].NumberValue = 234;
sheet.Range["A3"].NumberValue = 314;
sheet.Range["A4"].NumberValue = 50;
sheet.Range["B1"].NumberValue = 150;
sheet.Range["B2"].NumberValue = 894;
sheet.Range["B3"].NumberValue = 560;
sheet.Range["B4"].NumberValue = 900;
sheet.Range["C1"].NumberValue = 134;
sheet.Range["C2"].NumberValue = 700;
sheet.Range["C3"].NumberValue = 920;
sheet.Range["C4"].NumberValue = 450;
sheet.AllocatedRange.RowHeight = 15;
sheet.AllocatedRange.ColumnWidth = 17;
Step 2: Create one conditional formatting rule to highlight cells that are greater than 800, and another rule that enables to highlight cells lesser than 300. In our program, the rule is represented by formula. As is shown in the code below, we firstly initialize a new instance of ConditionalFormatWrapper class and apply the format1 to selected cell range. Then define the format1 by setting the related properties. The FirstFormula and Operater property allow us to find out which cells are greater than 800; the Color property enables to color the cells we find. Repeat this method to create format2 to get the cells under 300 highlighted.
ConditionalFormatWrapper format1 = sheet.AllocatedRange.ConditionalFormats.AddCondition();
format1.FormatType = ConditionalFormatType.CellValue;
format1.FirstFormula = "800";
format1.Operator = ComparisonOperatorType.Greater;
format1.FontColor = Color.Red;
format1.BackColor = Color.LightSalmon;

ConditionalFormatWrapper format2 = sheet.AllocatedRange.ConditionalFormats.AddCondition();
format2.FormatType = ConditionalFormatType.CellValue;
format2.FirstFormula = "300";
format2.Operator = ComparisonOperatorType.Less;
format2.FontColor = Color.Green;
format2.BackColor = Color.LightBlue;
Step 3: Save and launch the file
workbook.SaveToFile("sample.xlsx", ExcelVersion.Version2010);
System.Diagnostics.Process.Start("sample.xlsx");
Result:
The cells with value bigger than 800 and smaller than 300, have been highlighted with defined text color and background color.
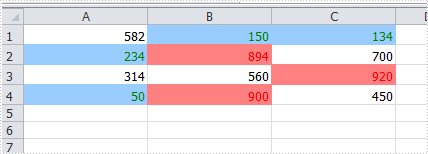
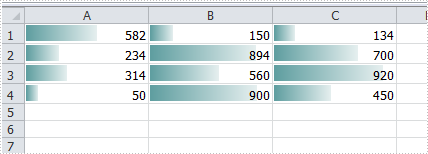
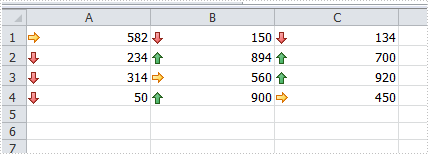
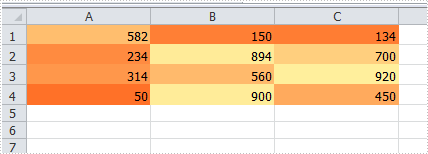
Apply the Other Three Conditional Formatting Types:
Spire.XLS also supports applying some other conditional formatting types which were predefined in MS Excel. Use the following code snippets to get more formatting effects.
Apply Data Bars:
ConditionalFormatWrapper format = sheet.AllocatedRange.ConditionalFormats.AddCondition();
format.FormatType = ConditionalFormatType.DataBar;
format.DataBar.BarColor = Color.CadetBlue;
Apply Icon Sets:
ConditionalFormatWrapper format = sheet.AllocatedRange.ConditionalFormats.AddCondition();
format.FormatType = ConditionalFormatType.IconSet;
Apply Color Scales:
ConditionalFormatWrapper format = sheet.AllocatedRange.ConditionalFormats.AddCondition();
format.FormatType = ConditionalFormatType.ColorScale;
Full Code:
using Spire.Xls;
using System.Drawing;
namespace  ApplyConditionalFormatting
{
    class Program
    {
        static void Main(string[] args)
        {
            {

                Workbook workbook = new Workbook();
                Worksheet sheet = workbook.Worksheets[0];
                sheet.Range["A1"].NumberValue = 582;
                sheet.Range["A2"].NumberValue = 234;
                sheet.Range["A3"].NumberValue = 314;
                sheet.Range["A4"].NumberValue = 50;
                sheet.Range["B1"].NumberValue = 150;
                sheet.Range["B2"].NumberValue = 894;
                sheet.Range["B3"].NumberValue = 560;
                sheet.Range["B4"].NumberValue = 900;
                sheet.Range["C1"].NumberValue = 134;
                sheet.Range["C2"].NumberValue = 700;
                sheet.Range["C3"].NumberValue = 920;
                sheet.Range["C4"].NumberValue = 450;
                sheet.AllocatedRange.RowHeight = 15;
                sheet.AllocatedRange.ColumnWidth = 17;

                //create conditional formatting rule
                ConditionalFormatWrapper format1 = sheet.AllocatedRange.ConditionalFormats.AddCondition();
                format1.FormatType = ConditionalFormatType.CellValue;
                format1.FirstFormula = "800";
                format1.Operator = ComparisonOperatorType.Greater;
                format1.FontColor = Color.Red;
                format1.BackColor = Color.LightSalmon;

                ConditionalFormatWrapper format2 = sheet.AllocatedRange.ConditionalFormats.AddCondition();
                format2.FormatType = ConditionalFormatType.CellValue;
                format2.FirstFormula = "300";
                format2.Operator = ComparisonOperatorType.Less;
                format2.FontColor = Color.Green;
                format2.BackColor = Color.LightBlue;

                ////add data bars
                //ConditionalFormatWrapper format = sheet.AllocatedRange.ConditionalFormats.AddCondition();
                //format.FormatType = ConditionalFormatType.DataBar;
                //format.DataBar.BarColor = Color.CadetBlue;

                ////add icon sets
                //ConditionalFormatWrapper format = sheet.AllocatedRange.ConditionalFormats.AddCondition();
                //format.FormatType = ConditionalFormatType.IconSet;

                ////add color scales
                //ConditionalFormatWrapper format = sheet.AllocatedRange.ConditionalFormats.AddCondition();
                //format.FormatType = ConditionalFormatType.ColorScale;

                workbook.SaveToFile("sample.xlsx", ExcelVersion.Version2010);
                System.Diagnostics.Process.Start("sample.xlsx");

            }

        }
    }
}
