
.NET (1273)
Children categories
How to Mark a Presentation as Final using Spire.Presentation in C#, VB.NET
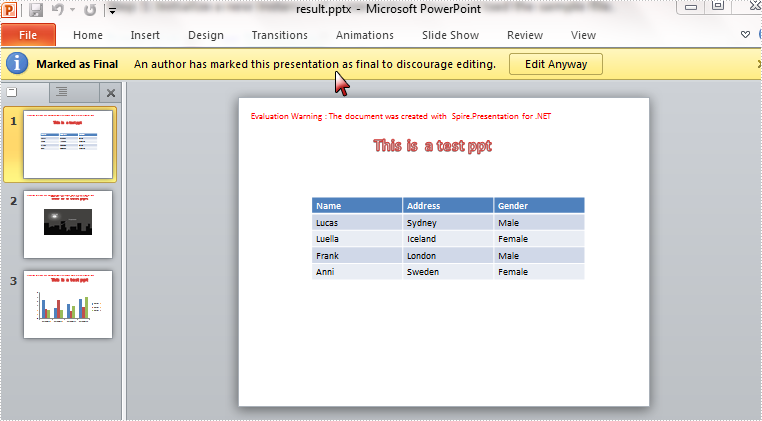
2015-08-06 05:54:52 Written by support iceblueThe Mark as Final command makes a presentation read-only and prevents changes to the document. When you share a presentation that is marked as final, you're telling viewers the presentation is final and no changes on it are wanted. In this article, I'll make a brief introduction about how to mark a presentation as final using Spire.Presentation in C#, VB.NET.
In Spire.Presentation, the presentation class contains a property of DocumentProperty which enables developers to set document properties easily. Here in this case, you are able to mark a presentation as final by setting the Boolean value of MarkAsFinal as true.
Code Snippet:
Step 1: Initialize a new instance of presentation class and load the sample file.
Presentation ppt = new Presentation();
ppt.LoadFromFile("sample.pptx",FileFormat.Pptx2010);
Step 2: Set the value of MarkAsFinal property as true.
ppt.DocumentProperty["_MarkAsFinal"] =true;
Step 3: Save and launch the file.
ppt.SaveToFile("result.pptx",FileFormat.Pptx2010);
System.Diagnostics.Process.Start("result.pptx");
Effect:
Full Code:
using Spire.Presentation;
namespace MarkPPT
{
    class Program
    {
        static void Main(string[] args)
        {
            Presentation ppt = new Presentation();
            ppt.LoadFromFile("sample.pptx", FileFormat.Pptx2010);

            ppt.DocumentProperty["_MarkAsFinal"] = true;

            ppt.SaveToFile("result.pptx", FileFormat.Pptx2010);
            System.Diagnostics.Process.Start("result.pptx");
            System.Diagnostics.Process.Start("result.pptx");

            }
        }
    }
Imports Spire.Presentation
Namespace MarkPPT
	Class Program
		Private Shared Sub Main(args As String())
			Dim ppt As New Presentation()
			ppt.LoadFromFile("sample.pptx", FileFormat.Pptx2010)

			ppt.DocumentProperty("_MarkAsFinal") = True

			ppt.SaveToFile("result.pptx", FileFormat.Pptx2010)
			System.Diagnostics.Process.Start("result.pptx")
			System.Diagnostics.Process.Start("result.pptx")

		End Sub
	End Class
End Namespace
Inserting paragraphs in Word is a fundamental skill for creating well-structured and organized documents. Paragraphs can break down large blocks of text, making it easier for readers to follow the flow of ideas and find specific information. In Word, you can add new paragraphs to represent new ideas or add additional information. This article will demonstrate how to insert a new paragraph in Word in C# using Spire.Doc for .NET.
- Add a Paragraph at the End of a Word Document in C#
- Insert a Paragraph at a Specified Location in Word in C#
Install Spire.Doc for .NET
To begin with, you need to add the DLL files included in the Spire.Doc for .NET package as references in your .NET project. The DLL files can be either downloaded from this link or installed via NuGet.
PM> Install-Package Spire.Doc
Add a Paragraph at the End of a Word Document in C#
To add a new paragraph at the end, you need to get the last section of the Word document through the Document.LastSection property, and then add a paragraph at the end of the section through the Section.AddParagraph() method. The following are the detailed steps:
- Create a Document instance.
- Load a Word document using Document.LoadFromFile() method.
- Get the last section of the document using Document.LastSection property.
- Add a paragraph at the end of the section using Section.AddParagraph() method, and then add text to it using Paragraph.AppendText() method.
- Create a ParagraphStyle object and set the font name, size, style of the paragraph text.
- Apply the paragraph style using Paragraph.ApplyStyle() method
- Save the result document using Document.SaveToFile() method.
- C#
using Spire.Doc;
using Spire.Doc.Documents;
using System.Drawing;

namespace AddParagraph
{
    class Program
    {
        static void Main(string[] args)
        {
            //Create a Document object
            Document doc = new Document();

            //Load a Word document
            doc.LoadFromFile("Test.docx");

            //Get the last section
            Section section = doc.LastSection;

            //Add a paragraph at the end and set its text content
            Paragraph para = section.AddParagraph();
            para.AppendText("Add a paragraph to the end of the document.");

            //Set the paragraph style
            ParagraphStyle style = new ParagraphStyle(doc);
            style.Name = "Style1";
            style.CharacterFormat.FontName = "Times New Roman";
            style.CharacterFormat.FontSize = 12;
            style.CharacterFormat.TextColor = Color.Blue;
            style.CharacterFormat.Bold = true;
            doc.Styles.Add(style);
            para.ApplyStyle("Style1");
            para.Format.BeforeSpacing = 10;

            //Save the result file
            doc.SaveToFile("AddParagraph.docx", FileFormat.Docx2016);
        }
    }
}

Insert a Paragraph at a Specified Location in Word in C#
You can also add a paragraph and then insert it to a specified position through the Section.Paragraphs.Insert(int index, IParagraph paragraph) method. The following are the detailed steps:
- Create a Document instance.
- Load a Word document using Document.LoadFromFile() method.
- Get a specified section using Document.Sections[] property.
- Add a paragraph using Section.AddParagraph() method, and then add text to it using Paragraph.AppendText() method.
- Set the font name, size, style of the paragraph text.
- Insert the newly added paragraph at a specified index using Section.Paragraphs.Insert(int index, IParagraph paragraph) method.
- Save the result document using Document.SaveToFile() method.
- C#
using Spire.Doc;
using Spire.Doc.Documents;
using Spire.Doc.Fields;
using System.Drawing;

namespace InsertParagraph
{
    class Program
    {
        static void Main(string[] args)
        {
            //Create a Document object
            Document doc = new Document();

            //Load a Word document
            doc.LoadFromFile("Test.docx");


            //Get the first section
            Section section = doc.Sections[0];

            //Add a paragraph and set its text content
            Paragraph para = section.AddParagraph();
            TextRange textRange = para.AppendText("Insert a paragraph at a specified location in the Word document.");

            //Set the font name, size, color and style
            textRange.CharacterFormat.TextColor = Color.Blue;
            textRange.CharacterFormat.FontName = "Times New Roman";
            textRange.CharacterFormat.FontSize = 14;
            textRange.CharacterFormat.UnderlineStyle = UnderlineStyle.Single;

            //Insert the paragraph as the third paragraph
            section.Paragraphs.Insert(2, para);

            //Set spacing after the paragraph
            para.Format.AfterSpacing = 10;

            //Save the result file
            doc.SaveToFile("InsertParagraph.docx", FileFormat.Docx2016);
        }
    }
}

Apply for a Temporary License
If you'd like to remove the evaluation message from the generated documents, or to get rid of the function limitations, please request a 30-day trial license for yourself.
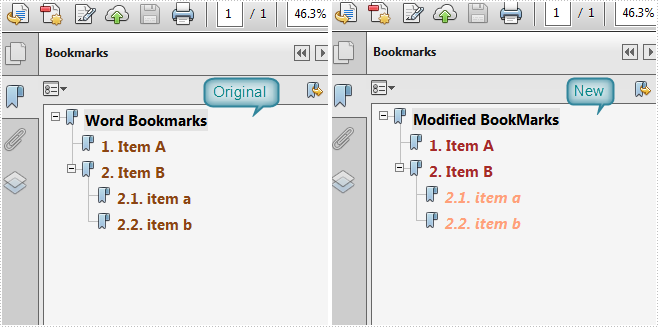
In order to distinguish nested bookmarks more clearly, you can set different font style and font color for parent and child bookmarks respectively. In this article, I’ll introduce how to modify bookmarks in the terms of font style, font color and text using Spire.PDF in C#, VB.NET.
Main Steps:
Step 1: Initialize a new object of PdfDocument and load the existing PDF file.
PdfDocument doc = new PdfDocument("Bookmark.Pdf");
Step 2: Get all bookmarks from the test file.
PdfBookmarkCollection bookmarks = doc.Bookmarks;
Step 3: Traverse very first-level bookmark in the bookmark tree. Change the properties of selected or all bookmarks, including title, color and display style.
foreach (PdfBookmark parentBookmark in bookmarks)
{
    //change "Word Bookmarks" to "M BookMark"
    bookmarks[0].Title = "Modified BookMarks";
    //set the color of the bookmark
    parentBookmark.Color = Color.Black;
    parentBookmark.DisplayStyle = PdfTextStyle.Bold;
    //edit child bookmark of parent bookmark
    EditChildBookmark(parentBookmark);
}
Step 4: In step 3, there is a nested method predefined as below. By invoking this method, we are able to modify child bookmarks of the upper level bookmark. In this example, we have two nested level bookmarks under the first-level bookmark.
static void EditChildBookmark(PdfBookmark parentBookmark)
{
   foreach (PdfBookmark childBookmark in parentBookmark)
   {
        childBookmark.Color = Color.Brown;
        childBookmark.DisplayStyle = PdfTextStyle.Regular;
        EditChild2Bookmark(childBookmark);
    }
}
static void EditChild2Bookmark(PdfBookmark childBookmark)
{
    foreach (PdfBookmark child2Bookmark in childBookmark)
    {
        child2Bookmark.Color = Color.LightSalmon;
        child2Bookmark.DisplayStyle = PdfTextStyle.Italic;
    }
}
Step 5: Save and launch the file.
doc.SaveToFile("Result.Pdf");
System.Diagnostics.Process.Start("Result.Pdf");
Screenshot of Effect:
Entire Code:
using Spire.Pdf;
using Spire.Pdf.Bookmarks;
using System.Drawing;


namespace ModifyBookmarks
{
    class Program
    {
        static void Main(string[] args)
        {
            PdfDocument doc = new PdfDocument("Bookmark.Pdf");
            PdfBookmarkCollection bookmarks = doc.Bookmarks;
            foreach (PdfBookmark parentBookmark in bookmarks)
            {
                //change "Word Bookmarks" to "M BookMark"
                bookmarks[0].Title = "Modified BookMarks";
                //set the color of the bookmark
                parentBookmark.Color = Color.Black;
                parentBookmark.DisplayStyle = PdfTextStyle.Bold;
                //edit child bookmark of parent bookmark
                EditChildBookmark(parentBookmark);
            }
            doc.SaveToFile("Result.Pdf");
            System.Diagnostics.Process.Start("Result.Pdf");
        }
        static void EditChildBookmark(PdfBookmark parentBookmark)
        {
            foreach (PdfBookmark childBookmark in parentBookmark)
            {
                childBookmark.Color = Color.Brown;
                childBookmark.DisplayStyle = PdfTextStyle.Regular;
                EditChild2Bookmark(childBookmark);
            }
        }
        static void EditChild2Bookmark(PdfBookmark childBookmark)
        {
            foreach (PdfBookmark child2Bookmark in childBookmark)
            {
                child2Bookmark.Color = Color.LightSalmon;
                child2Bookmark.DisplayStyle = PdfTextStyle.Italic;
            }
        }
    }
}
Imports Spire.Pdf
Imports Spire.Pdf.Bookmarks
Imports System.Drawing


Namespace ModifyBookmarks
	Class Program
		Private Shared Sub Main(args As String())
			Dim doc As New PdfDocument("Bookmark.Pdf")
			Dim bookmarks As PdfBookmarkCollection = doc.Bookmarks
			For Each parentBookmark As PdfBookmark In bookmarks
				'change "Word Bookmarks" to "M BookMark"
				bookmarks(0).Title = "Modified BookMarks"
				'set the color of the bookmark
				parentBookmark.Color = Color.Black
				parentBookmark.DisplayStyle = PdfTextStyle.Bold
				'edit child bookmark of parent bookmark
				EditChildBookmark(parentBookmark)
			Next
			doc.SaveToFile("Result.Pdf")
			System.Diagnostics.Process.Start("Result.Pdf")
		End Sub
		Private Shared Sub EditChildBookmark(parentBookmark As PdfBookmark)
			For Each childBookmark As PdfBookmark In parentBookmark
				childBookmark.Color = Color.Brown
				childBookmark.DisplayStyle = PdfTextStyle.Regular
				EditChild2Bookmark(childBookmark)
			Next
		End Sub
		Private Shared Sub EditChild2Bookmark(childBookmark As PdfBookmark)
			For Each child2Bookmark As PdfBookmark In childBookmark
				child2Bookmark.Color = Color.LightSalmon
				child2Bookmark.DisplayStyle = PdfTextStyle.Italic
			Next
		End Sub
	End Class
End Namespace
How to set position and alignment for Excel comments in C#
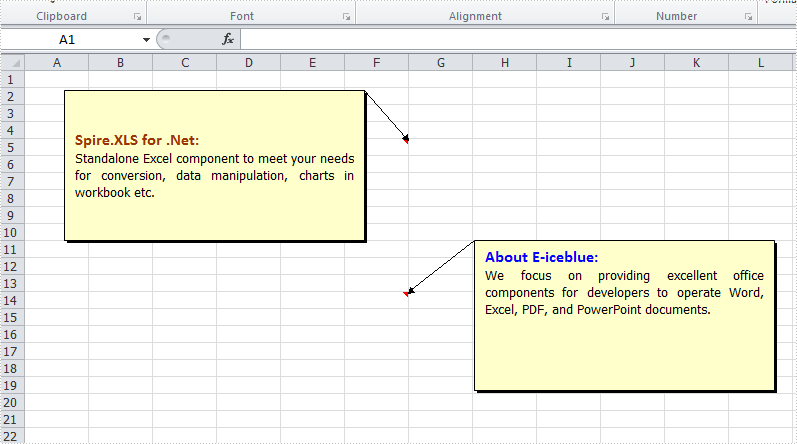
2015-07-29 08:14:31 Written by support iceblueExcel comments are used to add notes to individual cells and it works well to give the reader extra information for the data in the cells. There are articles to show how to add, change comments in Excel using Spire.XLS. This article is going to introduce the method to set the position and text alignment of Excel comments in C# using Spire.XLS.
Note: before start, please download the latest version of Spire.XLS and add the reference in the bin folder as the reference of Visual Studio.
Step 1: Create a new workbook and add a sheet.
            Workbook workbook = new Workbook();
            Worksheet sheet = workbook.Worksheets[0];
Step 2: Set two font styles which will be used in comments.
            ExcelFont font1 = workbook.CreateFont();
            font1.FontName = "Calibri";
            font1.Color = Color.Firebrick;
            font1.IsBold = true;
            font1.Size = 12;
            ExcelFont font2 = workbook.CreateFont();
            font2.FontName = "Calibri";
            font2.Color = Color.Blue;
            font2.Size = 12;
            font2.IsBold = true;
Step 3: Add comment 1 and set its size, text, position and alignment.
            ExcelComment Comment1 = sheet.Range["F5"].Comment;
            Comment1.IsVisible = true;
            Comment1.Height = 150;
            Comment1.Width = 300;
            Comment1.RichText.Text = "Spire.XLS for .Net:\nStandalone Excel component to meet your needs for conversion, data manipulation, charts in workbook etc. ";
            Comment1.RichText.SetFont(0, 19, font1);
            Comment1.TextRotation = TextRotationType.LeftToRight;
            //set the position of Comment
            Comment1.Top = 20;
            Comment1.Left = 40;
            //set the alignment of text in Comment
            Comment1.VAlignment = CommentVAlignType.Center;
            Comment1.HAlignment = CommentHAlignType.Justified;
Step 4: Add comment2 and set its size, text, position and alignment for comparison.
            ExcelComment Comment2= sheet.Range["F14"].Comment;
            Comment2.IsVisible = true;
            Comment2.Height = 150;
            Comment2.Width = 300;
            Comment2.RichText.Text = "About E-iceblue: \nWe focus on providing excellent office components for developers to operate Word, Excel, PDF, and PowerPoint documents.";
            Comment2.TextRotation = TextRotationType.LeftToRight;
            Comment2.RichText.SetFont(0, 16, font2);
            Comment2.Top = 170;
            Comment2.Left = 450;
            Comment2.VAlignment = CommentVAlignType.Top;
            Comment2.HAlignment = CommentHAlignType.Justified;
Step 5: Save the document and launch to see effect.
            workbook.SaveToFile("S3.xlsx", ExcelVersion.Version2010);
            System.Diagnostics.Process.Start("S3.xlsx");
Effects:
Full Codes:
using System;
using System.Collections.Generic;
using System.Linq;
using System.Text;
using Spire.Xls;
using System.Drawing;

namespace How_to_set_Excel_margin_to_print
{
    class Program
    {
        static void Main(string[] args)
        {
            Workbook workbook = new Workbook();
            Worksheet sheet = workbook.Worksheets[0];

            ExcelFont font1 = workbook.CreateFont();
            font1.FontName = "Calibri";
            font1.Color = Color.Firebrick;
            font1.IsBold = true;
            font1.Size = 12;
            ExcelFont font2 = workbook.CreateFont();
            font2.FontName = "Calibri";
            font2.Color = Color.Blue;
            font2.Size = 12;
            font2.IsBold = true;

            ExcelComment Comment1 = sheet.Range["F5"].Comment;
            Comment1.IsVisible = true;
            Comment1.Height = 150;
            Comment1.Width = 300;
            Comment1.RichText.Text = "Spire.XLS for .Net:\nStandalone Excel component to meet your needs for conversion, data manipulation, charts in workbook etc. ";
            Comment1.RichText.SetFont(0, 19, font1);
            Comment1.TextRotation = TextRotationType.LeftToRight;
            Comment1.Top = 20;
            Comment1.Left = 40;
            Comment1.VAlignment = CommentVAlignType.Center;
            Comment1.HAlignment = CommentHAlignType.Justified;

            ExcelComment Comment2= sheet.Range["F14"].Comment;
            Comment2.IsVisible = true;
            Comment2.Height = 150;
            Comment2.Width = 300;
            Comment2.RichText.Text = "About E-iceblue: \nWe focus on providing excellent office components for developers to operate Word, Excel, PDF, and PowerPoint documents.";
            Comment2.TextRotation = TextRotationType.LeftToRight;
            Comment2.RichText.SetFont(0, 16, font2);
            Comment2.Top = 170;
            Comment2.Left = 450;
            Comment2.VAlignment = CommentVAlignType.Top;
            Comment2.HAlignment = CommentHAlignType.Justified;

            workbook.SaveToFile("S3.xlsx", ExcelVersion.Version2010);
            System.Diagnostics.Process.Start("S3.xlsx");
        }
    }
}
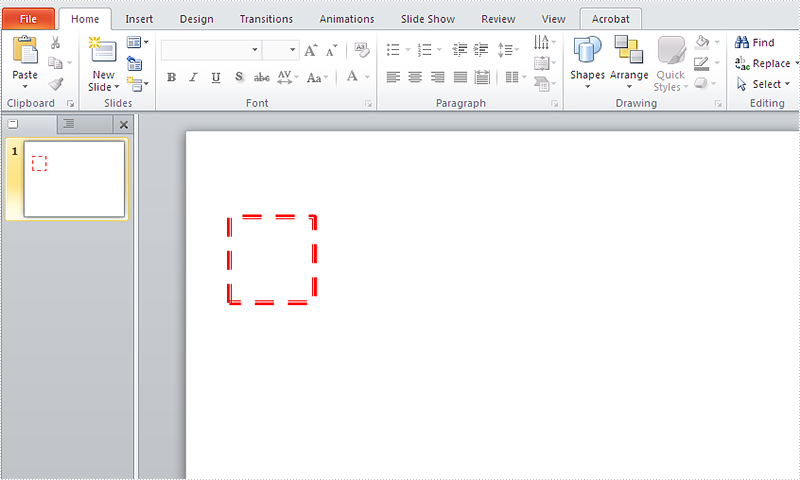
With Spire.Presentation for .NET, developers can add different shapes to slides in C#. We can also use Spire.Presentation to formatting the lines of shape, such as the style, width, dash style and color of the line, etc. This article will show you how to set the format for the shape lines in C#. We will use rectangle for example. Here comes to the code snippet:
Step 1: Create a PPT document.
Presentation presentation = new Presentation();
Step 2: Add a rectangle shape to the slide.
IAutoShape shape = presentation.Slides[0].Shapes.AppendShape(ShapeType.Rectangle, new RectangleF(50, 100, 100, 100));
Step 3: Set the fill color of the rectangle shape.
shape.Fill.FillType = FillFormatType.Solid;
shape.Fill.SolidColor.Color = Color.White;
Step 4: Apply some formatting on the line of the rectangle.
shape.Line.Style = TextLineStyle.ThickThin;
shape.Line.Width = 5;
shape.Line.DashStyle = LineDashStyleType.Dash;
Step 5: Set the color of the line of the rectangle.
shape.ShapeStyle.LineColor.Color = Color.Red;
Step 6: Save the document to file.
presentation.SaveToFile("shape.pptx", FileFormat.Pptx2010);
Effective screenshot:
Full codes:
using Spire.Presentation;
using Spire.Presentation.Drawing;
using System.Drawing;

namespace SetFormat
{

    class Program
    {

        static void Main(string[] args)
        {
            Presentation presentation = new Presentation();

            IAutoShape shape = presentation.Slides[0].Shapes.AppendShape(ShapeType.Rectangle, new RectangleF(50, 100, 100, 100));

            shape.Fill.FillType = FillFormatType.Solid;
            shape.Fill.SolidColor.Color = Color.White;

            shape.Line.Style = TextLineStyle.ThickThin;
            shape.Line.Width = 5;
            shape.Line.DashStyle = LineDashStyleType.Dash;

            shape.ShapeStyle.LineColor.Color = Color.Red;

            presentation.SaveToFile("shape.pptx", FileFormat.Pptx2010);

        }
    }
}
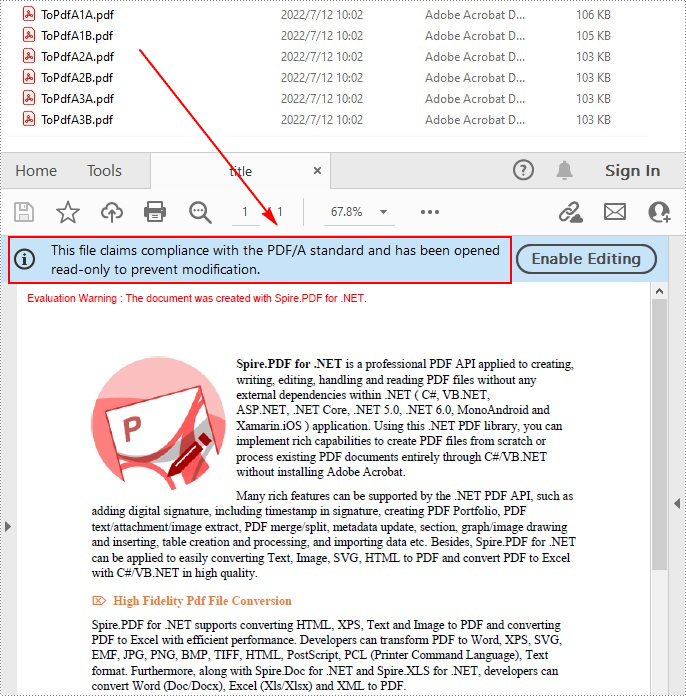
PDF/A is an ISO-standardized version of PDF that supports archiving of files for future use. Documents in PDF/A format can be reproduced in exactly the same way regardless of the software used. Due to its advantages in long-term preservation of digital documents, it may sometimes be necessary to convert PDF to PDF/A. In this article, you will learn how to programmatically convert PDF to PDF/A-1A, 2A, 3A, 1B, 2B and 3B compliant PDF using Spire.PDF for .NET.
Install Spire.PDF for .NET
To begin with, you need to add the DLL files included in the Spire.PDF for.NET package as references in your .NET project. The DLLs files can be either downloaded from this link or installed via NuGet.
PM> Install-Package Spire.PDF
Convert PDF to PDF/A
The detailed steps are as follows.
- Specify the input file path and output folder
- Create a PdfStandardsConverter instance and pass in the input file as a parameter.
- Convert the input file to PdfA1A conformance level using PdfStandardsConverter.ToPdfA1A() method.
- Convert the input file to PdfA1B conformance level using PdfStandardsConverter.ToPdfA1B() method.
- Convert the input file to PdfA2A conformance level using PdfStandardsConverter.ToPdfA2A() method.
- Convert the input file to PdfA2B conformance level using PdfStandardsConverter.ToPdfA2B() method.
- Convert the input file to PdfA3A conformance level using PdfStandardsConverter.ToPdfA3A() method.
- Convert the input file to PdfA3B conformance level using PdfStandardsConverter.ToPdfA3B() method.
- C#
- VB.NET
using System;
using Spire.Pdf.Conversion;

namespace ConvertPdf2Pdfa
{
    class Program
    {
        static void Main(string[] args)
        {
            //Specify input file path
            String inputFile = @"C:\Users\Administrator\Desktop\sample.pdf";

            //Specify output folder
            String outputFolder = @"C:\Users\Administrator\Desktop\Output\";

            //Create a PdfStandardsConverter instance, passing in the input file as a parameter
            PdfStandardsConverter converter = new PdfStandardsConverter(inputFile);

            //Convert to PdfA1A
            converter.ToPdfA1A(outputFolder + "ToPdfA1A.pdf");

            //Convert to PdfA1B
            converter.ToPdfA1B(outputFolder + "ToPdfA1B.pdf");

            //Convert to PdfA2A
            converter.ToPdfA2A(outputFolder + "ToPdfA2A.pdf");

            //Convert to PdfA2B
            converter.ToPdfA2B(outputFolder + "ToPdfA2B.pdf");

            //Convert to PdfA3A
            converter.ToPdfA3A(outputFolder + "ToPdfA3A.pdf");

            //Convert to PdfA3B
            converter.ToPdfA3B(outputFolder + "ToPdfA3B.pdf");
        }
    }
}
Apply for a Temporary License
If you'd like to remove the evaluation message from the generated documents, or to get rid of the function limitations, please request a 30-day trial license for yourself.
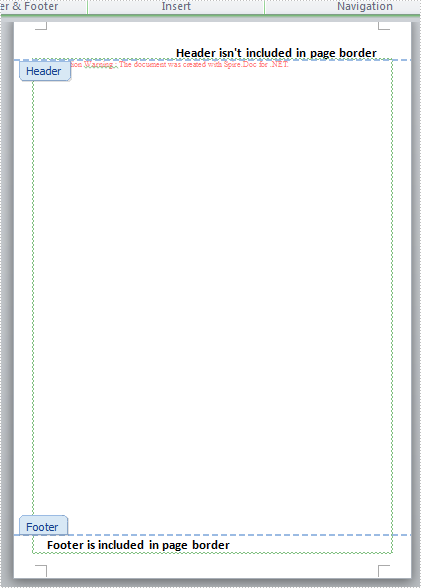
Set whether page border surrounds header/footer or not
2015-07-22 02:21:34 Written by support iceblueIn MS Word page border options, there are checkboxes to choose whether page border surrounds header/footer or not. This feature is very important for which can be used to manage the positional relation between page border and header/footer. Spire.Doc supports to set the two frequently-used features: page border and header/footer, and it supports to manage their spatial relations, too. This article is going to introduce the method to set whether page border surrounds header/footer or not.
Note: before start, please download the latest version of Spire.Doc and add the .dll in the bin folder as the reference of Visual Studio.
Step 1: Create a Word document and add a section.
            Document document = new Document();
            Section section = document.AddSection();
Step 2: Add a sample page border to the document using Spire.Doc library.
            section.PageSetup.Borders.BorderType = BorderStyle.Wave;
            section.PageSetup.Borders.Color = Color.Green;
            section.PageSetup.Borders.Left.Space = 20;
            section.PageSetup.Borders.Right.Space = 20;
Step 3: Add sample header and footer to the document using Spire.Doc library.
            //add a header and set its format
            Paragraph paragraph1 = section.HeadersFooters.Header.AddParagraph();
            paragraph1.Format.HorizontalAlignment = HorizontalAlignment.Right;
            TextRange headerText = paragraph1.AppendText("Header isn't included in page border");
            headerText.CharacterFormat.FontName = "Calibri";
            headerText.CharacterFormat.FontSize = 20;
            headerText.CharacterFormat.Bold = true;

            //add a footer and set its format
            Paragraph paragraph2 = section.HeadersFooters.Footer.AddParagraph();
            paragraph2.Format.HorizontalAlignment = HorizontalAlignment.Left;
            TextRange footerText = paragraph2.AppendText("Footer is included in page border");
            footerText.CharacterFormat.FontName = "Calibri";
            footerText.CharacterFormat.FontSize = 20;
            footerText.CharacterFormat.Bold = true;
Step 4: Set the header not included in the page border while the footer included.
            section.PageSetup.PageBorderIncludeHeader = false;
            section.PageSetup.HeaderDistance = 40;
            section.PageSetup.PageBorderIncludeFooter = true;
            section.PageSetup.FooterDistance = 40;
Step 5: Save the document and launch to see effect.
            document.SaveToFile("result.docx", FileFormat.Docx2013);
            System.Diagnostics.Process.Start("result.docx");
Effects:
Full Codes:
using System;
using System.Collections.Generic;
using System.Linq;
using System.Text;
using Spire.Doc;
using Spire.Doc.Documents;
using Spire.Doc.Fields;
using System.Drawing;

namespace Mirror_Margin
{
    class Program
    {
        static void Main(string[] args)
        {
            Document document = new Document();
            Section section = document.AddSection();

            section.PageSetup.Borders.BorderType = BorderStyle.Wave;
            section.PageSetup.Borders.Color = Color.Green;
            section.PageSetup.Borders.Left.Space = 20;
            section.PageSetup.Borders.Right.Space = 20;

            Paragraph paragraph1 = section.HeadersFooters.Header.AddParagraph();
            paragraph1.Format.HorizontalAlignment = HorizontalAlignment.Right;
            TextRange headerText = paragraph1.AppendText("Header isn't included in page border");
            headerText.CharacterFormat.FontName = "Calibri";
            headerText.CharacterFormat.FontSize = 20;
            headerText.CharacterFormat.Bold = true;

            Paragraph paragraph2 = section.HeadersFooters.Footer.AddParagraph();
            paragraph2.Format.HorizontalAlignment = HorizontalAlignment.Left;
            TextRange footerText = paragraph2.AppendText("Footer is included in page border");
            footerText.CharacterFormat.FontName = "Calibri";
            footerText.CharacterFormat.FontSize = 20;
            footerText.CharacterFormat.Bold = true;

            section.PageSetup.PageBorderIncludeHeader = false;
            section.PageSetup.HeaderDistance = 40;
            section.PageSetup.PageBorderIncludeFooter = true;
            section.PageSetup.FooterDistance = 40;

            document.SaveToFile("result.docx", FileFormat.Docx2013);
            System.Diagnostics.Process.Start("result.docx");
        }
    }
}
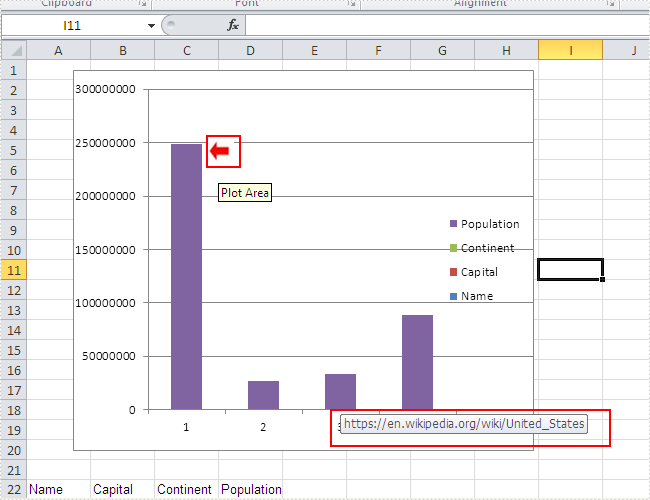
How to add a picture to the chart and then assign a hyperlink to the picture
2015-07-21 01:22:54 Written by support iceblueOne of our users requests a demo of Spire.XLS for how to add a picture to the chart at a specified location and then assign a hyperlink to the picture in C#. To fulfil it, we need to prepare the two things. Firstly, we need to know how to create Excel Charts in C# with the help of Spire.XLS. Secondly, we should have an image that we use to insert to the chart. We will use Excel Column chart for example.
Here comes to the steps. Firstly, please review the sample excel chart that we will add image later.

Step 1: Create a new document and load from file.
Workbook workbook = new Workbook();
workbook.LoadFromFile("sample.xlsx");
Step 2: Get the first worksheet and the first chart in it.
Worksheet workSheet = workbook.Worksheets[0];
Chart chart = workSheet.Charts[0];
Step 3: Add the desired image into the chart and set the image's position and size.
IPictureShape ps = chart.Shapes.AddPicture("1.png");
ps.Top = 180;
ps.Left = 280;
ps.Width = 60;
ps.Height = 80;
Step 4: Assign a hyperlink to the image.
(ps as XlsBitmapShape).SetHyperLink("https://en.wikipedia.org/wiki/United_States", true);
Step 5: Save the document to file.
workbook.SaveToFile("result.xlsx", ExcelVersion.Version2010);
Effective screenshot of adding an image to the chart and assign a hyperlink to the image:
Full codes:
using Spire.Xls;
using Spire.Xls.Core;
using Spire.Xls.Core.Spreadsheet.Shapes;
namespace AddPicturetoChart
{
    class Program
    {

        static void Main(string[] args)
        {
            Workbook workbook = new Workbook();
            workbook.LoadFromFile("sample.xlsx");

            Worksheet workSheet = workbook.Worksheets[0];
            Chart chart = workSheet.Charts[0];

            IPictureShape ps = chart.Shapes.AddPicture("1.png");
            ps.Top = 180;
            ps.Left = 280;
            ps.Width = 60;
            ps.Height = 80;
            (ps as XlsBitmapShape).SetHyperLink("https://en.wikipedia.org/wiki/United_States", true);

            workbook.SaveToFile("result.xlsx", ExcelVersion.Version2010);
        }
    }
}
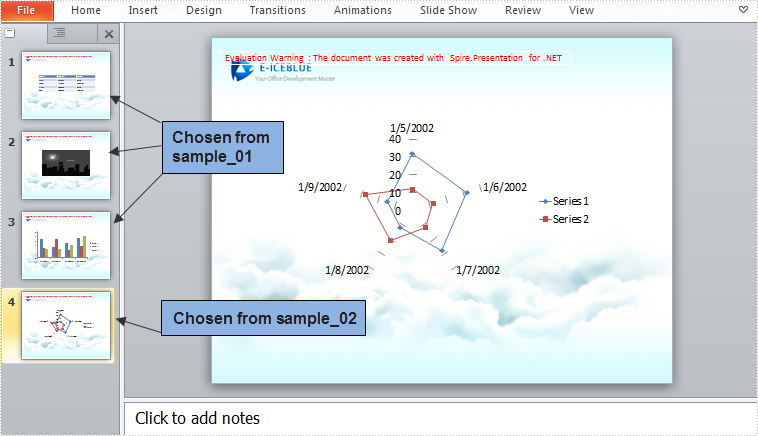
Merge Selected Slides to a Single Presentation in C#, VB.NET
2015-07-14 08:12:26 Written by support iceblueSlide cloning feature provided by Spire.Presentation enables developers to clone one or several slides within one PowerPoint presentation or among multiple presentations. By cloning slide from source presentation to target document, we can easily split a large presentation into small ones and merge multiple presentations to one presentation in reverse. This article presents how to merge selected slides from multiple PowerPoint presentations into one single presentation.
Main Steps
Step 1: Create a new PowerPoint document and remove the default blank slide.
Presentation ppt = new Presentation();
ppt.Slides.RemoveAt(0);
Step 2: Initialize two instances of Presentation class and load the sample PowerPoint file respectively.
Presentation ppt1 = new Presentation("sample_01.pptx",FileFormat.Pptx2010);
Presentation ppt2 = new Presentation("sample_02.pptx", FileFormat.Pptx2010);
Step 3: Append all slides in sample_01 to the new PowerPoint document using method Append(ISlide slide).
for (int i = 0; i < ppt1.Slides.Count; i++)
{
    ppt.Slides.Append(ppt1.Slides[i]);
}
Step 4: Append the second slide in sample_02 to the new presentation.
ppt.Slides.Append(ppt2.Slides[1]);
Step 5: Save and launch the file.
ppt.SaveToFile("result.pptx", FileFormat.Pptx2010);
System.Diagnostics.Process.Start("result.pptx");
Output
Entire Code
using Spire.Presentation;
namespace MergeSlides
{
    class Program
    {
        static void Main(string[] args)
        {
            Presentation ppt = new Presentation();
            Presentation ppt1 = new Presentation("sample_01.pptx", FileFormat.Pptx2010);
            Presentation ppt2 = new Presentation("sample_02.pptx", FileFormat.Pptx2010);
            ppt.Slides.RemoveAt(0);
            //append all slides in ppt1 to ppt
            for (int i = 0; i < ppt1.Slides.Count; i++)
            {
                ppt.Slides.Append(ppt1.Slides[i]);
            }
            //append the second slide in ppt2 to ppt
            ppt.Slides.Append(ppt2.Slides[1]);
            //save and launch the file
            ppt.SaveToFile("result.pptx", FileFormat.Pptx2010);
            System.Diagnostics.Process.Start("result.pptx");

            }
        }
    }
Imports Spire.Presentation
Namespace MergeSlides
	Class Program
		Private Shared Sub Main(args As String())
			Dim ppt As New Presentation()
			Dim ppt1 As New Presentation("sample_01.pptx", FileFormat.Pptx2010)
			Dim ppt2 As New Presentation("sample_02.pptx", FileFormat.Pptx2010)
			ppt.Slides.RemoveAt(0)
			'append all slides in ppt1 to ppt
			For i As Integer = 0 To ppt1.Slides.Count - 1
				ppt.Slides.Append(ppt1.Slides(i))
			Next
			'append the second slide in ppt2 to ppt
			ppt.Slides.Append(ppt2.Slides(1))
			'save and launch the file
			ppt.SaveToFile("result.pptx", FileFormat.Pptx2010)
			System.Diagnostics.Process.Start("result.pptx")

		End Sub
	End Class
End Namespace
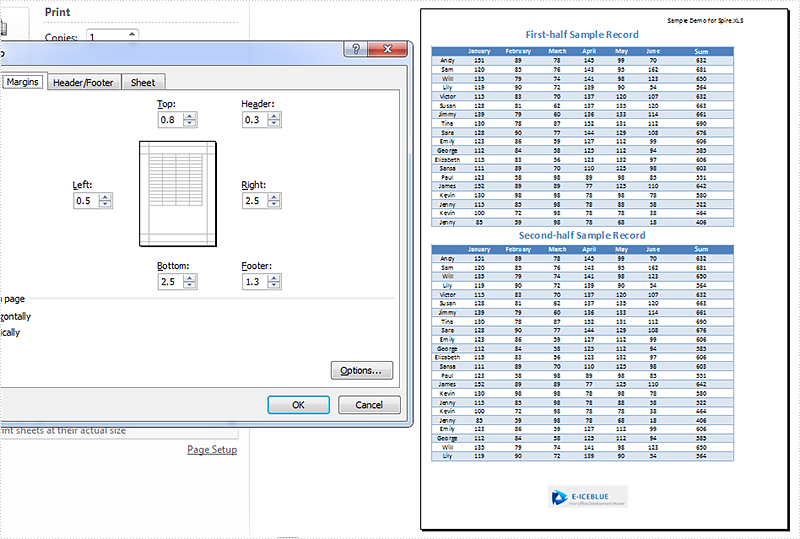
How to set Excel page margins before printing a worksheet in C#
2015-07-14 08:05:16 Written by support icebluePage margins in Excel are the blank spaces between the worksheet data and the edges of the printed page. It is where we could add headers, footers and page numbers, etc. Before printing a worksheet, it's necessary to specify custom margins for a better layout. In Excel, we could set top margin, bottom margin, left margin, right margin, header margin, and footer margin, which are all supported by Spire.XLS library. This article is going to introduce the method to set Excel page margins in C# using Spire.XLS.
Note: Before start, please download the latest version of Spire.Doc and add the .dll in the bin folder as the reference of Visual Studio.
Step 1: Initial a new workbook and load the sample document.
            Workbook workbook = new Workbook();
            workbook.LoadFromFile("Sample.xlsx");
            Worksheet sheet = workbook.Worksheets[0];
Step 2: Set margins for top, bottom, left and right of the worksheet page. Here the unit of measure is Inch (1 inch=2.54 cm).
            sheet.PageSetup.TopMargin = 0.3;
            sheet.PageSetup.BottomMargin = 1;
            sheet.PageSetup.LeftMargin = 0.2;
            sheet.PageSetup.RightMargin = 1;
Step 3: Set the header margin and footer margin.
            sheet.PageSetup.HeaderMarginInch = 0.1;
            sheet.PageSetup.FooterMarginInch = 0.5;
Step 4: Save the document and launch to see effect.
            workbook.SaveToFile("S3.xlsx", ExcelVersion.Version2010);
            System.Diagnostics.Process.Start("S3.xlsx");
Effect:
Full codes:
using System;
using System.Collections.Generic;
using System.Linq;
using System.Text;
using Spire.Xls;

namespace How_to_set_Excel_margin_to_print
{
    class Program
    {
        static void Main(string[] args)
        {
            Workbook workbook = new Workbook();
            workbook.LoadFromFile("Sample.xlsx");
            Worksheet sheet = workbook.Worksheets[0];

            sheet.PageSetup.TopMargin = 0.3;
            sheet.PageSetup.BottomMargin = 1;
            sheet.PageSetup.LeftMargin = 0.2;
            sheet.PageSetup.RightMargin = 1;

            sheet.PageSetup.HeaderMarginInch = 0.1;
            sheet.PageSetup.FooterMarginInch = 0.5;

            workbook.SaveToFile("S3.xlsx", ExcelVersion.Version2010);
            System.Diagnostics.Process.Start("S3.xlsx");

        }
    }
}
