C#/VB.NET: Hide or Show Comments in Excel
Comments in Excel are blocks of text that can be added to cells, mainly used to provide additional explanation or supplemental information about the cell contents. Users can add comments to the specific cells to better explain the data of worksheets. However, sometimes too many comments will cause visual clutter or obstruct other content. To avoid this issue, existing comments can be hidden programmatically to make the worksheet more organized and readable. Hidden comments can also be easily displayed when necessary. In this article, you will learn how to hide or show comments in excel by using Spire.XLS for .NET.
Install Spire.XLS for .NET
To begin with, you need to add the DLL files included in the Spire.XLS for.NET package as references in your .NET project. The DLLs files can be either downloaded from this link or installed via NuGet.
PM> Install-Package Spire.XLS
Hide Comments in Excel
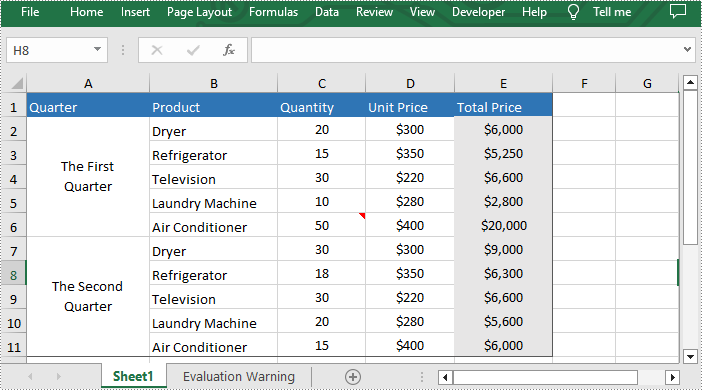
Spire.XLS for .NET provides the Worksheet.Comments[].IsVisble property to control the visibility of comments. You can easily hide existing comments by setting this property to "false". The following are the detailed steps to hide comments in excel.
- Initialize a Workbook instance.
- Load a sample file using Workbook.LoadFromFile() method.
- Get the desired worksheet through Workbook.Worksheets[] property.
- Hide the specific comment in the worksheet by setting Worksheet.Comments[].IsVisble property to "false".
- Finally, save the result file using Workbook.SavaToFile() method.
- C#
- VB.NET
using Spire.Xls;

namespace ShowExcelComments
{
    class Program
    {
        static void Main(string[] args)
        {
            {
                //Initialize a Workbook instance and load the excel document
                Workbook workbook = new Workbook();
                workbook.LoadFromFile("Comments.xlsx");

                //Get the first worksheet
                Worksheet sheet = workbook.Worksheets[0];

                //Hide the specific comment in the worksheet
                sheet.Comments[0].IsVisible = false;

                //Save the document
                workbook.SaveToFile("HideComment.xlsx", ExcelVersion.Version2013);
                workbook.Dispose();
            }
        }
    }
}
Show Comments in Excel
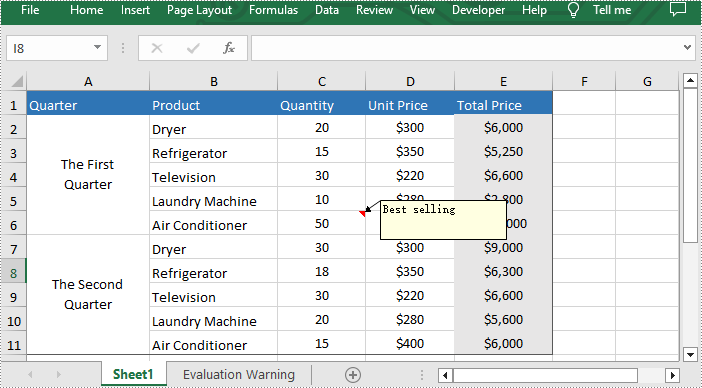
Hidden comments can also be easily displayed when necessary. If you want to show it again, please set Worksheet.Comments[].IsVisble property to "ture". The following are the steps to show comments in excel.
- Initialize a Workbook instance.
- Load a sample file using Workbook.LoadFromFile() method.
- Get the desired worksheet through Workbook.Worksheets[] property.
- Show the specific comment in the worksheet By setting Worksheet.Comments[].IsVisble property to "true".
- Finally, save the result file using Workbook.SavaToFile() method.
- C#
- VB.NET
using Spire.Xls;

namespace ShowExcelComments
{
    class Program
    {
        static void Main(string[] args)
        {
            {
                //Initialize a Workbook instance and load the excel document
                Workbook workbook = new Workbook();
                workbook.LoadFromFile("HideComment.xlsx");

                //Get the first worksheet
                Worksheet sheet = workbook.Worksheets[0];

                //Show the specific comment in the worksheet
                sheet.Comments[0].IsVisible = true;

                //Save the document
                workbook.SaveToFile("ShowComment.xlsx", ExcelVersion.Version2013);
                workbook.Dispose();
            }
        }
    }
}
Apply for a Temporary License
If you'd like to remove the evaluation message from the generated documents, or to get rid of the function limitations, please request a 30-day trial license for yourself.
How to Set Picture Fill for Excel Comment in C#, VB.NET
Spire.XLS enable programmers to insert, modify as well as format comments in Excel. Also, it allows users to fill a comment with solid color, gradient, pattern or a picture to change the look of the comment. This article is going to introduce how to set background image for a comment in Excel using Spire.XLS.
Code Snippet:
Step 1: Initialize an instance of Wordbook and get the first worksheet.
Workbook wb = new Workbook();
Worksheet sheet = wb.Worksheets[0];
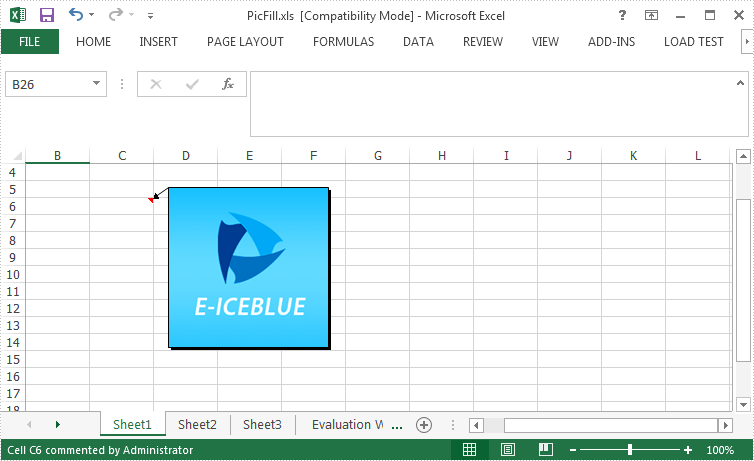
Step 2: Fill the comment with a customized background picture.
Image image = Image.FromFile(@"C: \Users\Administrator\Desktop\logo.png");
sheet.Range["C6"].Comment.Fill.CustomPicture(image, "logo.png");
Step 3: Re-set the size of comment box.
sheet.Range["C6"].Comment.Height = image.Height;
sheet.Range["C6"].Comment.Width = image.Width;
Step 4: Save the file.
wb.SaveToFile("PicFillComment.xls", ExcelVersion.Version97to2003);
Output:
Full Code:
using Spire.Xls;
using System.Drawing;
namespace SetPictureFill
{
    class Program
    {

        static void Main(string[] args)
        {
            {

                Workbook wb = new Workbook();
                Worksheet sheet = wb.Worksheets[0];

                Image image = Image.FromFile(@"C: \Users\Administrator\Desktop\logo.png");
                sheet.Range["C6"].Comment.Fill.CustomPicture(image, "logo.png");
                sheet.Range["C6"].Comment.Height = image.Height;
                sheet.Range["C6"].Comment.Width = image.Width;

                wb.SaveToFile("PicFill.xls", ExcelVersion.Version97to2003);

            }

        }
    }
}
Imports Spire.Xls
Imports System.Drawing
Namespace SetPictureFill
	Class Program

		Private Shared Sub Main(args As String())
			If True Then

				Dim wb As New Workbook()
				Dim sheet As Worksheet = wb.Worksheets(0)

				Dim image__1 As Image = Image.FromFile("C: \Users\Administrator\Desktop\logo.png")
				sheet.Range("C6").Comment.Fill.CustomPicture(image__1, "logo.png")
				sheet.Range("C6").Comment.Height = image__1.Height
				sheet.Range("C6").Comment.Width = image__1.Width

				wb.SaveToFile("PicFill.xls", ExcelVersion.Version97to2003)

			End If

		End Sub
	End Class
End Namespace
How to set position and alignment for Excel comments in C#
Excel comments are used to add notes to individual cells and it works well to give the reader extra information for the data in the cells. There are articles to show how to add, change comments in Excel using Spire.XLS. This article is going to introduce the method to set the position and text alignment of Excel comments in C# using Spire.XLS.
Note: before start, please download the latest version of Spire.XLS and add the reference in the bin folder as the reference of Visual Studio.
Step 1: Create a new workbook and add a sheet.
            Workbook workbook = new Workbook();
            Worksheet sheet = workbook.Worksheets[0];
Step 2: Set two font styles which will be used in comments.
            ExcelFont font1 = workbook.CreateFont();
            font1.FontName = "Calibri";
            font1.Color = Color.Firebrick;
            font1.IsBold = true;
            font1.Size = 12;
            ExcelFont font2 = workbook.CreateFont();
            font2.FontName = "Calibri";
            font2.Color = Color.Blue;
            font2.Size = 12;
            font2.IsBold = true;
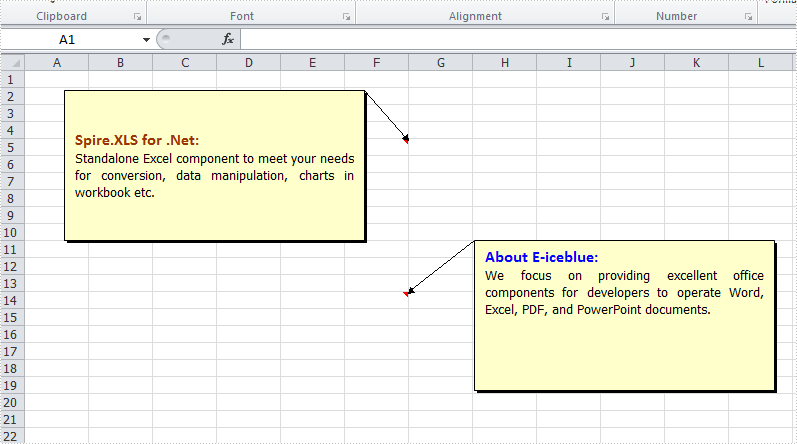
Step 3: Add comment 1 and set its size, text, position and alignment.
            ExcelComment Comment1 = sheet.Range["F5"].Comment;
            Comment1.IsVisible = true;
            Comment1.Height = 150;
            Comment1.Width = 300;
            Comment1.RichText.Text = "Spire.XLS for .Net:\nStandalone Excel component to meet your needs for conversion, data manipulation, charts in workbook etc. ";
            Comment1.RichText.SetFont(0, 19, font1);
            Comment1.TextRotation = TextRotationType.LeftToRight;
            //set the position of Comment
            Comment1.Top = 20;
            Comment1.Left = 40;
            //set the alignment of text in Comment
            Comment1.VAlignment = CommentVAlignType.Center;
            Comment1.HAlignment = CommentHAlignType.Justified;
Step 4: Add comment2 and set its size, text, position and alignment for comparison.
            ExcelComment Comment2= sheet.Range["F14"].Comment;
            Comment2.IsVisible = true;
            Comment2.Height = 150;
            Comment2.Width = 300;
            Comment2.RichText.Text = "About E-iceblue: \nWe focus on providing excellent office components for developers to operate Word, Excel, PDF, and PowerPoint documents.";
            Comment2.TextRotation = TextRotationType.LeftToRight;
            Comment2.RichText.SetFont(0, 16, font2);
            Comment2.Top = 170;
            Comment2.Left = 450;
            Comment2.VAlignment = CommentVAlignType.Top;
            Comment2.HAlignment = CommentHAlignType.Justified;
Step 5: Save the document and launch to see effect.
            workbook.SaveToFile("S3.xlsx", ExcelVersion.Version2010);
            System.Diagnostics.Process.Start("S3.xlsx");
Effects:
Full Codes:
using System;
using System.Collections.Generic;
using System.Linq;
using System.Text;
using Spire.Xls;
using System.Drawing;

namespace How_to_set_Excel_margin_to_print
{
    class Program
    {
        static void Main(string[] args)
        {
            Workbook workbook = new Workbook();
            Worksheet sheet = workbook.Worksheets[0];

            ExcelFont font1 = workbook.CreateFont();
            font1.FontName = "Calibri";
            font1.Color = Color.Firebrick;
            font1.IsBold = true;
            font1.Size = 12;
            ExcelFont font2 = workbook.CreateFont();
            font2.FontName = "Calibri";
            font2.Color = Color.Blue;
            font2.Size = 12;
            font2.IsBold = true;

            ExcelComment Comment1 = sheet.Range["F5"].Comment;
            Comment1.IsVisible = true;
            Comment1.Height = 150;
            Comment1.Width = 300;
            Comment1.RichText.Text = "Spire.XLS for .Net:\nStandalone Excel component to meet your needs for conversion, data manipulation, charts in workbook etc. ";
            Comment1.RichText.SetFont(0, 19, font1);
            Comment1.TextRotation = TextRotationType.LeftToRight;
            Comment1.Top = 20;
            Comment1.Left = 40;
            Comment1.VAlignment = CommentVAlignType.Center;
            Comment1.HAlignment = CommentHAlignType.Justified;

            ExcelComment Comment2= sheet.Range["F14"].Comment;
            Comment2.IsVisible = true;
            Comment2.Height = 150;
            Comment2.Width = 300;
            Comment2.RichText.Text = "About E-iceblue: \nWe focus on providing excellent office components for developers to operate Word, Excel, PDF, and PowerPoint documents.";
            Comment2.TextRotation = TextRotationType.LeftToRight;
            Comment2.RichText.SetFont(0, 16, font2);
            Comment2.Top = 170;
            Comment2.Left = 450;
            Comment2.VAlignment = CommentVAlignType.Top;
            Comment2.HAlignment = CommentHAlignType.Justified;

            workbook.SaveToFile("S3.xlsx", ExcelVersion.Version2010);
            System.Diagnostics.Process.Start("S3.xlsx");
        }
    }
}
Add Comment with Author in Excel
As we know, when we add a comment in MS-Excel, there will be Author appended automatically by Excel program. In fact, there is not the Author property in the comment in MS-Excel, which is just a text with special bold font style, and you can edit, remove, and insert other strings. After adding a comment (e.g., Test comment1) by using Spire.XLS component, there is no author is written into excel file. Check the below picture:
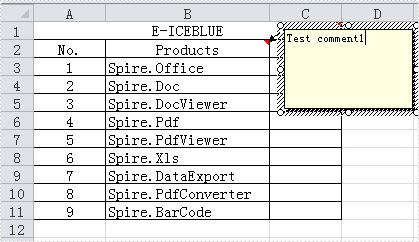
How to add a comment with editable Author property by Spire.XLS component? Just like the comment in the following picture:

Download Spire.XLS for .NET and install it on your computer. Then create CreateComment(CellRange range,string text, string author=null) method to implement it. Firstly, add a comment for a specified range by calling the CellRange.AddComment() method. Then, if the author is specified, create a new font with bold style and apply the font to the author text.
The following is the code for the method:
static ExcelComment CreateComment(CellRange range,string text, string author=null)
        {
           ExcelComment comment= range.AddComment();
           comment.Text = String.IsNullOrEmpty(author) ? text : author + ":\n" + text;
           if (!String.IsNullOrEmpty(author))
           {
               ExcelFont font = range.Worksheet.Workbook.CreateFont();
               font.FontName = "Tahoma";
               font.KnownColor = ExcelColors.Black;
               font.IsBold = true;
               comment.RichText.SetFont(0, author.Length,font);
           }
           return comment;
        }
Private Function CreateComment(ByVal range As CellRange, ByVal text As String, Optional ByVal author As String = Nothing) As ExcelComment
        Dim comment As ExcelComment = range.AddComment()
        comment.Text = If([String].IsNullOrEmpty(author), text, author & ":" & vbLf & text)
        If Not [String].IsNullOrEmpty(author) Then
            Dim font As ExcelFont = range.Worksheet.Workbook.CreateFont()
            font.FontName = "Tahoma"
            font.KnownColor = ExcelColors.Black
            font.IsBold = True
            comment.RichText.SetFont(0, author.Length, font)
        End If
        Return comment
    End Function
Next, you can call the method to add comments with author to your excel file.
CellRange range = sheet.Range["A1"];
CreateComment(range, "Test comment2", "E-iceblue");
Dim range As CellRange = sheet.Range("A1")
CreateComment(range, "Test comment2", "E-iceblue")
C#/VB.NET: Edit or Delete Comments in Excel
Excel comments are additional notes or commentary that can be added to specified cells to provide more in-depth explanations or to offer tips to other users. Once a comment’s been added, Excel provides users with the flexibility to format, edit, delete and show/hide the comment in the worksheet. In this article, you will learn how to programmatically edit or delete existing comments in Excel using Spire.XLS for .NET.
Install Spire.XLS for .NET
To begin with, you need to add the DLL files included in the Spire.XLS for.NET package as references in your .NET project. The DLLs files can be either downloaded from this link or installed via NuGet.
PM> Install-Package Spire.XLS
Edit Comments in Excel
After adding comments to your Excel workbook, you may sometimes need to make changes to the added comments. The below table lists some of the core classes and properties used to get the existing comments and then set new text as well as formatting for the comments.
| Name | Description |
| CellRange.Comment Property | Returns a Comment object that represents the comment associated with the cell in the upper-left corner of the range. |
| ExcelCommentObject Class | Represents a comment. |
| ExcelCommentObject.Text Property | Gets or sets the comment text. |
| ExcelCommentObject.Height Property | Gets or sets height of a comment. |
| ExcelCommentObject.Width Property | Gets or sets width of a comment. |
| ExcelCommentObject.AutoSize Property | Indicates whether the size of the specified object is changed automatically to fit text within its boundaries. |
The following are steps to edit comments in Excel:
- Create a Workbook instance.
- Load an Excel file using Workbook.LoadFromFile() method.
- Get the first worksheet of the Excel file using Workbook.Worksheets[] property.
- Get a comment in a specific cell range using Worksheet.Range.Comment property.
- Set new text and height/width or auto size for the existing comment using the properties of ExcelCommentObject class.
- Save the document to another file using Workbook.SaveToFile() method.
- C#
- VB.NET
using Spire.Xls;
namespace EditExcelComment
{
class Program
{
static void Main(string[] args)
{
// Create a Workbook instance
Workbook workbook = new Workbook();
// Load an Excel file
workbook.LoadFromFile("Comments.xlsx");
// Get the first worksheet
Worksheet sheet = workbook.Worksheets[0];
//Get comments in specific cells and set new comments
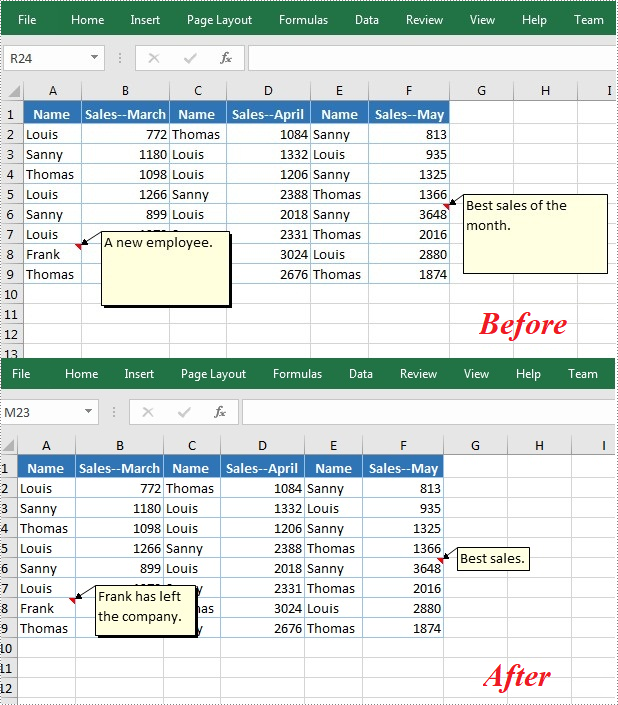
sheet.Range["A8"].Comment.Text = "Frank has left the company.";
sheet.Range["F6"].Comment.Text = "Best sales.";
// Set the height and width of the new comments
sheet.Range["A8"].Comment.Height = 50;
sheet.Range["A8"].Comment.Width = 100;
sheet.Range["F6"].Comment.AutoSize = true;
// Save to file.
workbook.SaveToFile("ModifyComment.xlsx", ExcelVersion.Version2013);
}
}
}
Delete Comments in Excel
The ExcelCommentObject.Remove() method offered by Spire.XLS for .NET allows you to remove a specified comment easily. The detailed steps are as follows:
- Create a Workbook instance.
- Load an Excel file using Workbook.LoadFromFile() method.
- Get the first worksheet of the Excel file using Workbook.Worksheets[] property.
- Get a comment in a specific cell range using Worksheet.Range.Comment property and then delete the comment using ExcelCommentObject.Remove() method.
- Save the document to another file using Workbook.SaveToFile() method.
- C#
- VB.NET
using Spire.Xls;
namespace EditExcelComment
{
class Program
{
static void Main(string[] args)
{
// Create a Workbook instance
Workbook workbook = new Workbook();
// Load an Excel file
workbook.LoadFromFile("Comments.xlsx");
// Get the first worksheet
Worksheet sheet = workbook.Worksheets[0];
//Get the comment in a specific cell and remove it
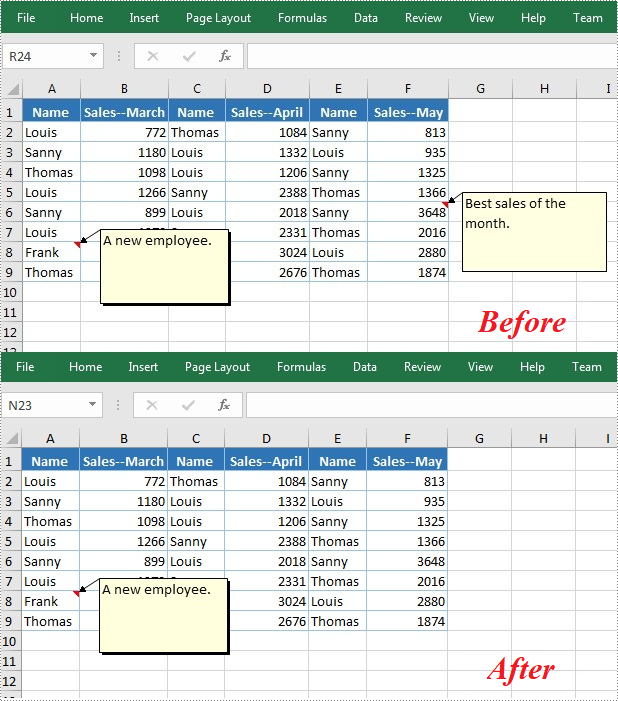
sheet.Range["F6"].Comment.Remove();
// Save to file.
workbook.SaveToFile("DeleteComment.xlsx", ExcelVersion.Version2013);
}
}
}
Apply for a Temporary License
If you'd like to remove the evaluation message from the generated documents, or to get rid of the function limitations, please request a 30-day trial license for yourself.
C#/VB.NET: Add or Format Comments in Excel
In Excel, comments are used to explain the contents in cells or to add additional information that might be useful to readers. Using Spire.XLS for .NET, we can add comments to Excel cells easily as well as customizing the appearance by setting the size of the comment box or applying a font style to the comment text. In this article, we will demonstrate how to add comments to Excel worksheets programmatically in C#/VB.NET from the following two parts.
Install Spire.XLS for .NET
To begin with, you need to add the DLL files included in the Spire.XLS for.NET package as references in your .NET project. The DLLs files can be either downloaded from this link or installed via NuGet.
PM> Install-Package Spire.XLS
Add Comments in an Excel Worksheet
Spire.XLS offers the CellRange.AddComment() method to add the regular text comment to Excel worksheet. The following are the steps.
- Initialize an instance of Workbook class.
- Load an Excel file using Workbook.LoadFromFile() method.
- Get the first worksheet of the Excel file using Workbook.Worksheets[int] property.
- Add a comment in a specific cell range using CellRange.AddComment() method and then set the comment text through the Text property of the ExcelComment object.
- Save the document to another file using Workbook.SaveToFile() method.
- C#
- VB.NET
using Spire.Xls;
namespace WordDemo
{
class Program
{
static void Main(string[] args)
{
//Create a Workbook object
Workbook workbook = new Workbook();
//Load the sample workbook
workbook.LoadFromFile("Sample.xlsx");
//Get the first worksheet
Worksheet sheet = workbook.Worksheets[0];
//Add regular comment to specific cell range C6
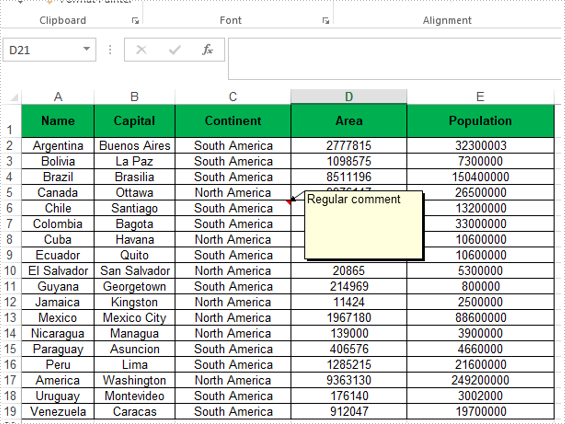
CellRange range = sheet.Range["C6"];
ExcelComment comment = range.AddComment();
comment.Text = "Regular comment";
//Save the Excel workbook.
workbook.SaveToFile("Addcomment.xlsx", ExcelVersion.Version2016);
}
}
Apply Formatting to Comments in an Excel Worksheet
Spire.XLS offers the Comment.RichText.SetFont() method to apply font formatting for comments in Excel worksheets.
- Initialize an instance of Workbook class.
- Load an Excel file using Workbook.LoadFromFile() method.
- Get the first worksheet of the Excel file using Workbook.Worksheets[int] property.
- Add a comment in a specific cell range using CellRange.AddComment() method and then set the comment text.
- Create an ExcelFont object and apply the font to the comment text using ExcelComment.RichText.SetFont() method.
- Save the document to another file using Workbook.SaveToFile() method.
- C#
- VB.NET
using Spire.Xls;
namespace ExcelComment
{
class Program
{
static void Main(string[] args)
{
//Create a Workbook object
Workbook workbook = new Workbook();
//Load the sample workbook
workbook.LoadFromFile("Sample.xlsx");
//Get the first worksheet
Worksheet sheet = workbook.Worksheets[0];
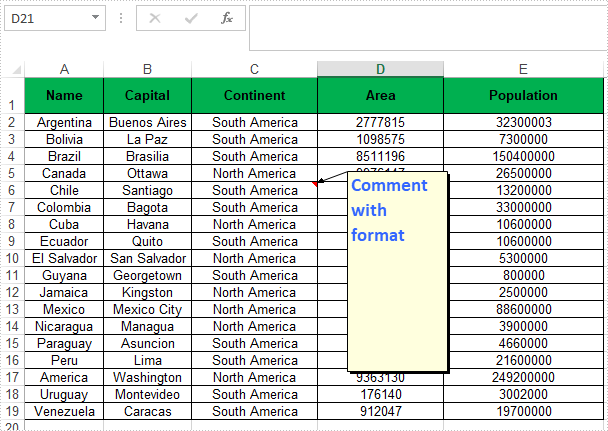
//Add comment to specific cell range C6
CellRange range = sheet.Range["C6"];
ExcelComment comment = range.AddComment();
comment.Text = "Comment with format";
//Set the width and height
comment.Width = 100;
comment.Height = 200;
//Display the comment
comment.Visible = true;
//Create a font
ExcelFont font = workbook.CreateFont();
font.FontName = "Calibri";
font.Size = 14;
font.KnownColor = ExcelColors.LightBlue;
font.IsBold = true;
//Apply the font to the comment text
comment.RichText.SetFont(0,27,font);
//Save the Excel workbook.
workbook.SaveToFile("AddcommentwithFormat.xlsx", ExcelVersion.Version2016);
}
}
}
Apply for a Temporary License
If you'd like to remove the evaluation message from the generated documents, or to get rid of the function limitations, please request a 30-day trial license for yourself.