Spire.PDF for Java 10.2.0 fixes some known issues
We're glad to announce the release of Spire.PDF for Java 10.2.0. In this version, some known issues have been fixed, such as the issue that the creation time obtained from a PDF document was wrong, and the issue that redrawing extracted images to a page failed. More details are listed below.
Here is a list of changes made in this release
| Category | ID | Description |
| Bug | SPIREPDF-6465 | Fixes the issue that the creation time obtained from a PDF document was wrong. |
| Bug | SPIREPDF-6503 | Fixes the issue that redrawing extracted images to a page failed |
| Bug | SPIREPDF-6504 | Fixes the issue that the document size did not change after deleting some pages. |
| Bug | SPIREPDF-6522 | Fixes the issue that the program throws java.lang.ArrayIndexOutOfBoundsException when using PDFTextReplacer in multiple threads. |
Python: Create Column Charts in PowerPoint
A column chart in PowerPoint is a graphical representation of data that uses bars or columns to show comparisons between categories. It is commonly used to display financial data, statistics, and other quantitative information. Each column represents a category, and the height of the column corresponds to the value associated with that category. Column charts are easy to create and customize within PowerPoint, allowing users to quickly visualize their data.
In this article, you will learn how to programmatically create column charts in a PowerPoint document using Spire.Presentation for Python.
- Create a Clustered Column Chart in PowerPoint in Python
- Create a Stacked Column Chart in PowerPoint in Python
Install Spire.Presentation for Python
This scenario requires Spire.Presentation for Python and plum-dispatch v1.7.4. They can be easily installed in your Windows through the following pip command.
pip install Spire.Presentation
If you are unsure how to install, please refer to this tutorial: How to Install Spire.Presentation for Python on Windows
Create a Clustered Column Chart in PowerPoint in Python
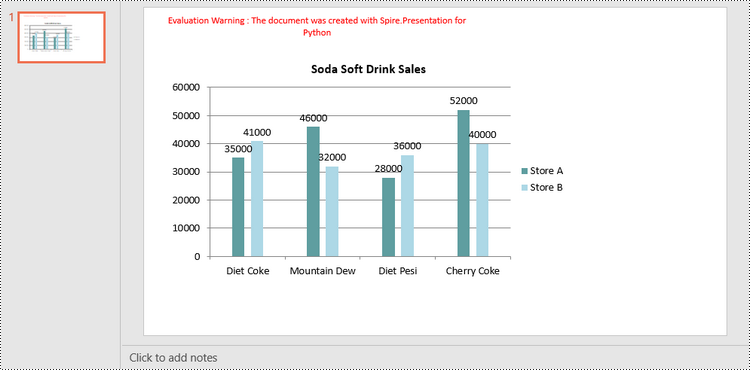
A clustered column chart is a type of bar graph where the bars (or columns) are grouped together in clusters or segments, with each cluster representing a category and the height of the columns within the cluster reflecting the value of a data point for that category.
To add a clustered column chart in PowerPoint using Spire.Prensetion for Python, you can use the ISlide.Shapes.AppendChartInit(type: ChartType, rectangle RectangleF, init bool) method and specify the chart type as ColumnClustered. This method returns an object of IChart class, which you can use to set the chart data, title, series labels, category labels, series values and other attributes.
The following are the steps to create a clustered column chart in PowerPoint in Python.
- Create a Presentation object.
- Get the first slide using Prenstion.Slides[] property.
- Add a clustered column chart to the side using ISlide.Shapes.AppendChartInit(type: ChartType, rectangle RectangleF, init bool).
- Add text and numbers to the chart sheet as chart data using IChart.ChartData property.
- Set series labels, category labels, series values and other attributes using the properties of the IChart class.
- Save the document to a PowerPoint file using Presentation.SaveToFile() method.
- Python
from spire.presentation.common import *
from spire.presentation import *

# Create a Presentation object
presentation = Presentation()

# Set slide size type
presentation.SlideSize.Type = SlideSizeType.Screen16x9

# Get the first slide
slide = presentation.Slides[0]

# Add clustered column chart
rect = RectangleF.FromLTRB(40, 80, 700, 450)
chart = slide.Shapes.AppendChartInit(ChartType.ColumnClustered, rect, False)

# Set chart title
chart.ChartTitle.TextProperties.Text = "Soda Soft Drink Sales"
chart.ChartTitle.TextProperties.IsCentered = True
chart.ChartTitle.Height = 25
chart.HasTitle = True

# Insert text to chart as series labels
chart.ChartData[0,0].Text = "Product"
chart.ChartData[0,1].Text = "Store A"
chart.ChartData[0,2].Text = "Store B"

# Insert text to chart as category labels
chart.ChartData[1,0].Text = "Diet Coke"
chart.ChartData[2,0].Text = "Mountain Dew"
chart.ChartData[3,0].Text = "Diet Pesi"
chart.ChartData[4,0].Text = "Cherry Coke"

# Insert numbers to chart as values of series
Series1 = [35000, 46000, 28000, 52000]
Series2 = [41000, 32000, 36000, 40000]
i = 0
while i < len(Series1):
    chart.ChartData[i + 1,1].NumberValue = Series1[i]
    chart.ChartData[i + 1,2].NumberValue = Series2[i]
    i += 1

# Set series labels
chart.Series.SeriesLabel = chart.ChartData["B1","C1"]

# Set category labels
chart.Categories.CategoryLabels = chart.ChartData["A2","A5"]

# Set values for series
chart.Series[0].Values = chart.ChartData["B2","B5"]
chart.Series[1].Values = chart.ChartData["C2","C5"]

# Set gap width
chart.GapWidth = 350

# Set overlap
chart.OverLap = -50

# Set fill color of each series
chart.Series[0].Fill.FillType = FillFormatType.Solid
chart.Series[0].Fill.SolidColor.Color = Color.get_CadetBlue()
chart.Series[1].Fill.FillType = FillFormatType.Solid
chart.Series[1].Fill.SolidColor.Color = Color.get_LightBlue()

# Add data labels
for i in range(len(Series1)):
    chart.Series[0].DataLabels.Add()
    chart.Series[1].DataLabels.Add()

# Save the document
presentation.SaveToFile("output/ClusteredColumnChart.pptx", FileFormat.Pptx2019)
presentation.Dispose()
Create a Stacked Column Chart in PowerPoint in Python
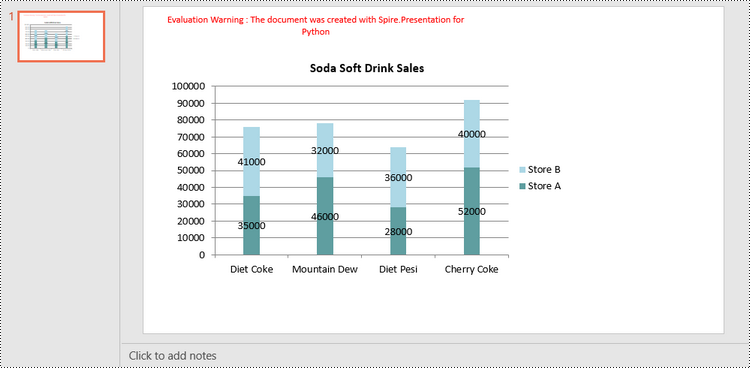
A stacked column chart is a variation of the standard column chart where each column represents a category, and the height of the column corresponds to the total value of the category.
To add a stacked column chart in PowerPoint using Spire.Prensetion for Python, you use the ISlide.Shapes.AppendChartInit(type: ChartType, rectangle RectangleF, init bool) method and specify the chart type as ColumnStacked. Then, you can use to set the chart data, title, series labels, category labels, series values and other attributes using the properties of the IChart class.
The following are the steps to create a stacked column chart in PowerPoint in Python.
- Create a Presentation object.
- Get the first slide using Prenstion.Slides[] property.
- Add a stacked column chart to the side using ISlide.Shapes.AppendChartInit(type: ChartType, rectangle RectangleF, init bool).
- Add text and numbers to the chart sheet as chart data using IChart.ChartData property.
- Set series labels, category labels, series values and other attributes using the properties of the IChart class.
- Save the document to a PowerPoint file using Presentation.SaveToFile() method.
- Python
from spire.presentation.common import *
from spire.presentation import *

# Create a Presentation object
presentation = Presentation()

# Set slide size type
presentation.SlideSize.Type = SlideSizeType.Screen16x9

# Get the first slide
slide = presentation.Slides[0]

# Add a stacked column chart
rect = RectangleF.FromLTRB(40, 80, 700, 450)
chart = slide.Shapes.AppendChartInit(ChartType.ColumnStacked, rect, False)

# Set chart title
chart.ChartTitle.TextProperties.Text = "Soda Soft Drink Sales"
chart.ChartTitle.TextProperties.IsCentered = True
chart.ChartTitle.Height = 25
chart.HasTitle = True

# Insert text to chart as series labels
chart.ChartData[0,0].Text = "Product"
chart.ChartData[0,1].Text = "Store A"
chart.ChartData[0,2].Text = "Store B"

# Insert text to chart as category labels
chart.ChartData[1,0].Text = "Diet Coke"
chart.ChartData[2,0].Text = "Mountain Dew"
chart.ChartData[3,0].Text = "Diet Pesi"
chart.ChartData[4,0].Text = "Cherry Coke"

# Insert numbers to chart as values of series
Series1 = [35000, 46000, 28000, 52000]
Series2 = [41000, 32000, 36000, 40000]
i = 0
while i < len(Series1):
    chart.ChartData[i + 1,1].NumberValue = Series1[i]
    chart.ChartData[i + 1,2].NumberValue = Series2[i]
    i += 1

# Set series labels
chart.Series.SeriesLabel = chart.ChartData["B1","C1"]

# Set category labels
chart.Categories.CategoryLabels = chart.ChartData["A2","A5"]

# Set values for series
chart.Series[0].Values = chart.ChartData["B2","B5"]
chart.Series[1].Values = chart.ChartData["C2","C5"]

# Set gap width
chart.GapWidth = 350

# Set fill color of each series
chart.Series[0].Fill.FillType = FillFormatType.Solid
chart.Series[0].Fill.SolidColor.Color = Color.get_CadetBlue()
chart.Series[1].Fill.FillType = FillFormatType.Solid
chart.Series[1].Fill.SolidColor.Color = Color.get_LightBlue()

# Add data labels
for i in range(len(Series1)):
    chart.Series[0].DataLabels.Add()
    chart.Series[1].DataLabels.Add()

# Save the document
presentation.SaveToFile("output/StackedColumnChart.pptx", FileFormat.Pptx2019)
presentation.Dispose()
Apply for a Temporary License
If you'd like to remove the evaluation message from the generated documents, or to get rid of the function limitations, please request a 30-day trial license for yourself.
Spire.PDF 10.2.2 enhances the conversion from PDF to PDF/A, images, and OFD
We are delighted to announce the release of Spire.PDF 10.2.2. This version enhances the conversion from PDF to PDF/A, images, and OFD. Besides, some known issues are fixed successfully in this version, such as the issue that Find and Highlight text didn't work. More details are listed below.
Here is a list of changes made in this release
| Category | ID | Description |
| Bug | SPIREPDF-6427 SPIREPDF-6489 |
Fixes the issue that Find and Highlight text didn't work. |
| Bug | SPIREPDF-6456 | Fixes the issue that Arabic fonts were lost after converting a PDF document to a PDFA document. |
| Bug | SPIREPDF-6493 | Fixes the issue that the stamp position was shifted when printing PDF documents. |
| Bug | SPIREPDF-6509 | Fixes the issue that it was invalid to print a PDF document with the opposite direction of the front and back when printing on both sides of the document. |
| Bug | SPIREPDF-6510 | Fixes the issue that the program threw a System.NullReferenceException when converting a PDF document to a picture. |
| Bug | SPIREPDF-6524 | Fixes the issue that the font was over-bolded when converting a PDF document to an OFD document and then back to a PDF document. |
Python: Convert Excel to SVG
SVG (Scalable Vector Graphics) is a flexible file format widely used on the web. Unlike traditional image formats, SVG files are not based on pixels. Instead, they use mathematical equations to define shapes, lines, and colors. This unique characteristic allows SVG files to be scaled up or down without any loss of quality, making them an excellent choice for creating interactive and visually appealing graphics. By converting Excel files to SVG, you can seamlessly embed the resulting SVG files into web pages, ensuring smooth integration and display of your Excel data on the web. In this article, we will demonstrate how to convert Excel to SVG format in Python using Spire.XLS for Python.
Install Spire.XLS for Python
This scenario requires Spire.XLS for Python and plum-dispatch v1.7.4. They can be easily installed in your Windows through the following pip command.
pip install Spire.XLS
If you are unsure how to install, please refer to this tutorial: How to Install Spire.XLS for Python on Windows
Convert a Worksheet in Excel to SVG in Python
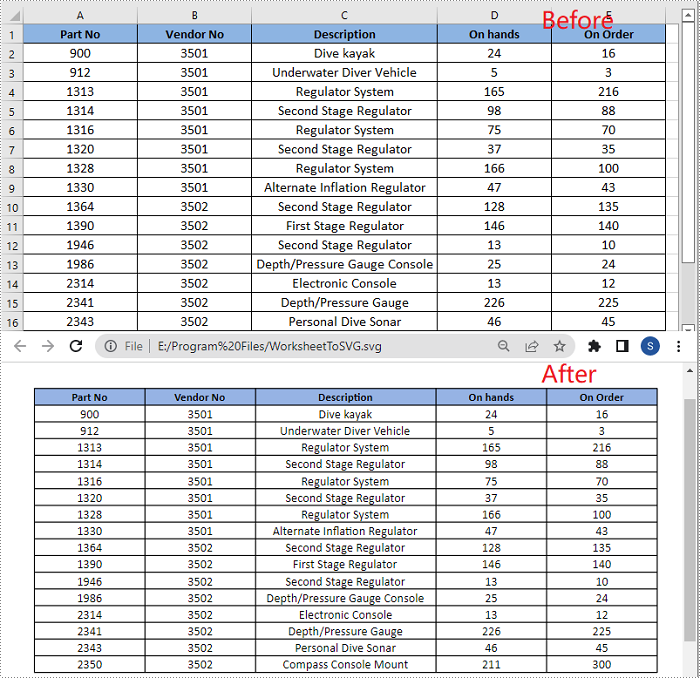
Spire.XLS for Python provides the Worksheet.ToSVGStream() method to convert an Excel worksheet to SVG. The detailed steps are as follows:
- Create an object of the Workbook class.
- Load an Excel file using Workbook.LoadFromFile() method.
- Get a specific worksheet by its index through Workbook.Worksheets[] property.
- Create an object of the Stream class.
- Save the worksheet to an SVG using Worksheet.ToSVGStream() method.
- Python
from spire.xls.common import *
from spire.xls import *

# Create a Workbook object
workbook = Workbook()
# Load an Excel file
workbook.LoadFromFile("Sample1.xlsx")

# Get the first worksheet
worksheet = workbook.Worksheets[0]

# Save the worksheet to an SVG
stream = Stream("WorksheetToSVG.svg")
worksheet.ToSVGStream(stream, 0, 0, 0, 0)
stream.Flush()
stream.Close()

workbook.Dispose()
Convert a Chart Sheet in Excel to SVG in Python
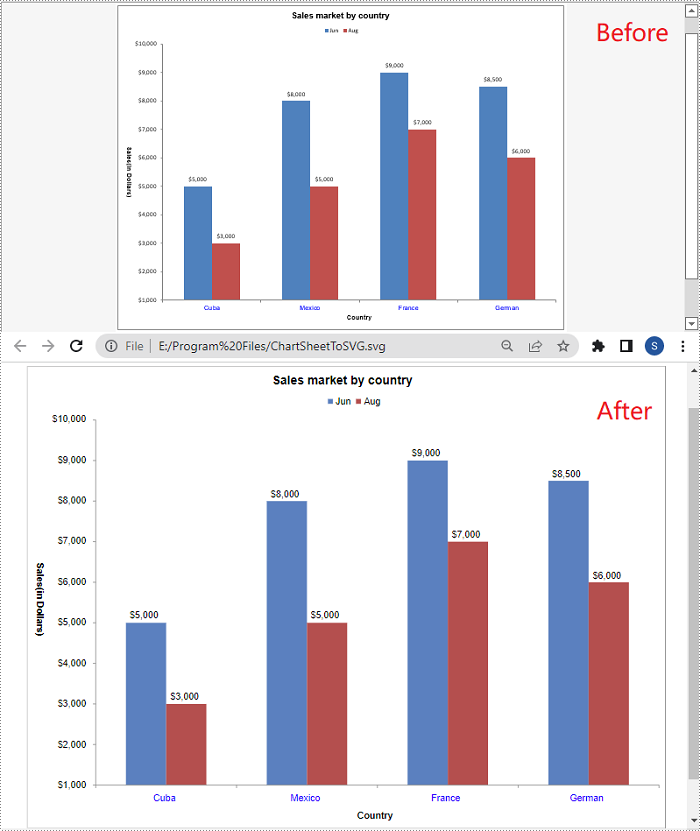
A chart sheet in Excel is a separate sheet within an Excel workbook that is dedicated to displaying a chart. Spire.XLS for Python allows you to convert a chart sheet to SVG by using the ChartSheet.ToSVGStream() method. The detailed steps are as follows:
- Create an object of the Workbook class.
- Load an Excel file using Workbook.LoadFromFile() method.
- Get a specific chart sheet using Workbook.GetChartSheetByName() method.
- Create an object of the Stream class.
- Save the chart sheet to an SVG using ChartSheet.ToSVGStream() method.
- Python
from spire.xls.common import *
from spire.xls import *

# Create a Workbook object
workbook = Workbook()
# Load an Excel file
workbook.LoadFromFile("Sample2.xlsx")

# Get a specific chart sheet
chartSheet = workbook.GetChartSheetByName("Chart1")

# Save the chart sheet to an SVG
stream = Stream("ChartSheetToSVG.svg")
chartSheet.ToSVGStream(stream)
stream.Flush()
stream.Close()

workbook.Dispose()
Apply for a Temporary License
If you'd like to remove the evaluation message from the generated documents, or to get rid of the function limitations, please request a 30-day trial license for yourself.
Python: Accept or Reject Tracked Changes in Excel
Accepting and rejecting tracked changes in Excel are essential features that empower users to effectively manage and control modifications made by multiple contributors. Accepting changes allows users to include modifications in the spreadsheet, facilitating collaboration and ensuring that the final version reflects collective input. Conversely, rejecting changes enables users to maintain the original content and avoid incorporating incorrect or unnecessary modifications. These functions provide users with the ability to maintain data integrity, ensure document accuracy, and streamline the collaborative process in Excel. In this article, we will demonstrate how to accept and reject tracked changes in Excel in Python using Spire.XLS for Python.
Install Spire.XLS for Python
This scenario requires Spire.XLS for Python and plum-dispatch v1.7.4. They can be easily installed in your Windows through the following pip command.
pip install Spire.XLS
If you are unsure how to install, please refer to this tutorial: How to Install Spire.XLS for Python on Windows
Accept Tracked Changes in Excel in Python
Spire.XLS for Python provides the Workbook.HasTrackedChanges property to determine whether an Excel workbook has tracked changes or not. If the property returns True, you can use the Workbook.AcceptAllTrackedChanges() method to accept these changes at once.
The following steps explain how to accept all tracked changes in an Excel workbook using Spire.XLS for Python:
- Create a Workbook object.
- Load a sample Excel workbook using Workbook.LoadFromFile() method.
- Check if the workbook has tracked changes using Workbook.HasTrackedChanges property.
- Accept all tracked changes in the workbook using Workbook.AcceptAllTrackedChanges() method.
- Save the result workbook using Workbook.SaveToFile() method.
- Python
from spire.xls.common import *
from spire.xls import *

# Specify the input and output file paths
inputFile = "Sample.xlsx"
outputFile = "AcceptChanges.xlsx"

# Create a Workbook object
workbook = Workbook()
# Load an Excel file
workbook.LoadFromFile(inputFile)

# Check if the file has tracked changes
if workbook.HasTrackedChanges:
    # Accept all tracked changes in the file
    workbook.AcceptAllTrackedChanges()

# Save the result file
workbook.SaveToFile(outputFile, FileFormat.Version2013)
workbook.Dispose()
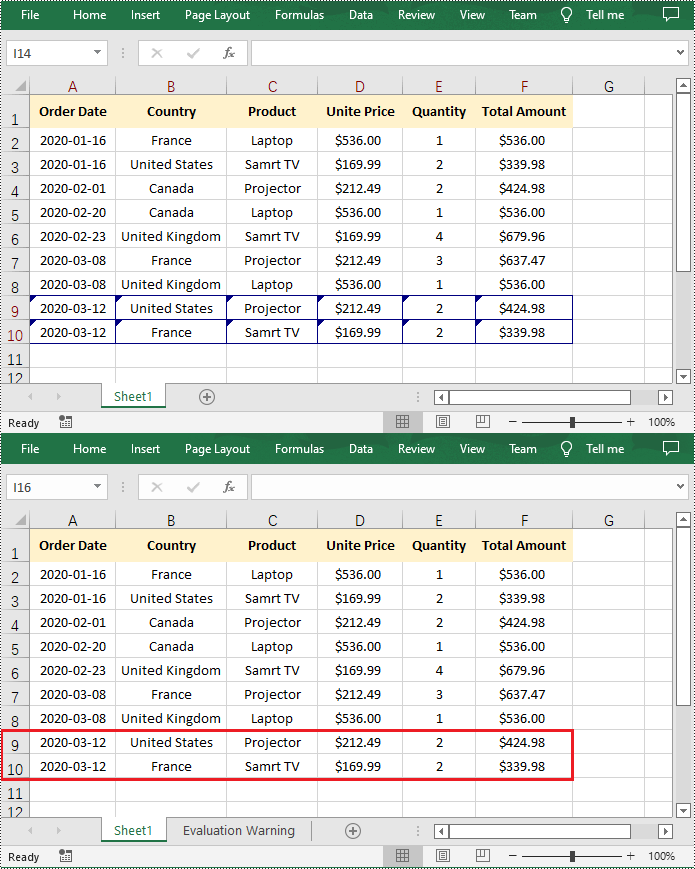
Reject Tracked Changes in Excel in Python
If the changes made to a workbook compromise the integrity of the data, such as introducing errors, inconsistencies, or inaccuracies, you can reject these changes by using the Workbook.RejectAllTrackedChanges() method.
The following steps explain how to reject all tracked changes in an Excel workbook using Spire.XLS for Python:
- Create a Workbook object.
- Load a sample Excel workbook using Workbook.LoadFromFile() method.
- Check if the workbook has tracked changes using Workbook.HasTrackedChanges property.
- Reject all tracked changes in the workbook using Workbook.RejectAllTrackedChanges() method.
- Save the result workbook using Workbook.SaveToFile() method.
- Python
from spire.xls.common import *
from spire.xls import *

# Specify the input and output file paths
inputFile = "Sample.xlsx"
outputFile = "RejectChanges.xlsx"

# Create a Workbook object
workbook = Workbook()
# Load an Excel file
workbook.LoadFromFile(inputFile)

# Check if the file has tracked changes
if workbook.HasTrackedChanges:
    # Reject all tracked changes in the file
    workbook.RejectAllTrackedChanges()

# Save the result file
workbook.SaveToFile(outputFile, FileFormat.Version2013)
workbook.Dispose()
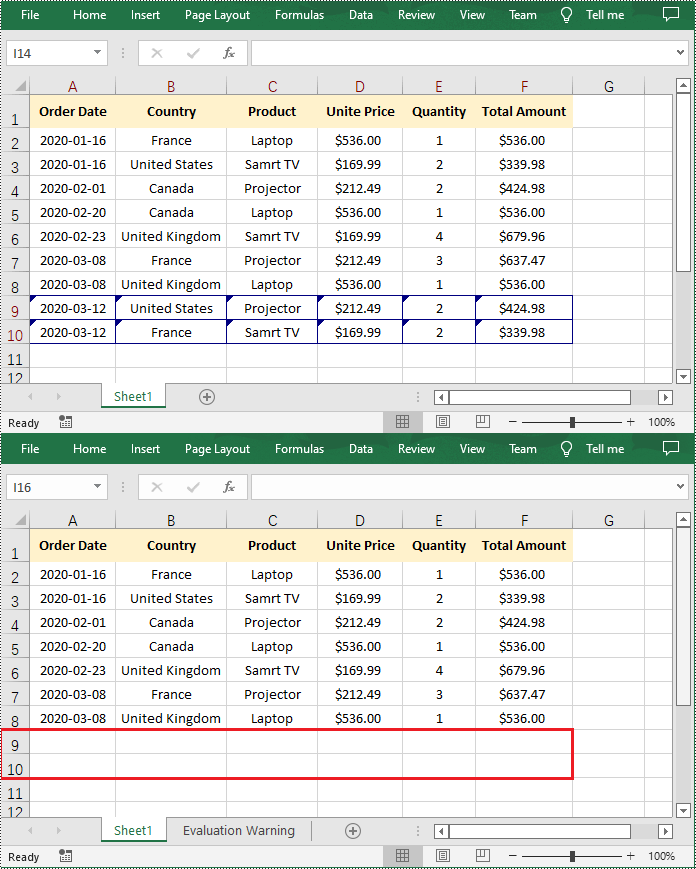
Apply for a Temporary License
If you'd like to remove the evaluation message from the generated documents, or to get rid of the function limitations, please request a 30-day trial license for yourself.
Converting PDF to HTML with Python Code
Table of Contents
Install with Pip
pip install Spire.PDF
Related Links
PDF files are a popular choice for sharing and distributing documents, but it can be quite challenging to extract and repurpose PDF content. Fortunately, converting PDF files to HTML with Python offers an excellent solution for PDF information retrieval and repurposing, which enhances accessibility, searchability, and adaptability. Additionally, HTML format enables search engines to index the content, making it more likely to be discovered on the web. What’s more, with Python's flexibility and ease of use, both beginners and experienced developers can use Python to convert PDF to HTML easily and efficiently.
This article focuses on how to convert PDF to HTML in Python programs. It mainly includes the following topics:
- Overview of Converting PDF to HTML with Python
- Convert PDF to a Single HTML File with Python Code
- Convert PDF to HTML with Images Separated Using Python
- Convert PDF to Multiple HTML Files with Python
- Free License and Technical Support
Overview of Converting PDF to HTML with Python
Python's extensive APIs provide convenience for various PDF document processing operations. Spire.PDF for Python is one of the powerful APIs that can perform various operations on PDF documents, including converting, editing, and merging PDF documents. And, converting PDF to HTML with Python can be implemented effortlessly with this API.
In Spire.PDF for Python, the PdfDocument class represents a PDF document. We can load a PDF file using the LoadFromFile() method under this class and save the document in other formats, like HTML, to achieve simple conversion from PDF to HTML.
Moreover, this API also provides the SetConvertHtmlOptions() method under the PdfDocument.ConversionOptions property to set the image embedding options during the conversion. Below are the parameters that can be passed to this method to set the maximum page number, SVG embedding option, image embedding option, and SVG quality option:
- useEmbeddedSvg (bool): When set to True, it allows embedding SVG in the converted HTML file. The resulting HTML file will include all elements from the PDF document, including images, in a single HTML file.
- useEmbeddedImg (bool): When set to True, it allows embedding images in the converted HTML file. This parameter only works if useEmbeddedSvg is set to False.
- maxPageOneFile (int): Sets the maximum number of pages to include in a single HTML file. If the PDF has more pages than the specified number, multiple HTML files will be generated, each containing a subset of the pages.
- useHighQualityEmbeddedSvg (bool): When set to True, ensures the use of high-quality versions of embedded SVG images in the HTML conversion process.
Typical workflow of converting PDF to HTML in Python using Spire.PDF for Python:
- Create an object of PdfDocument class and load a PDF document using PdfDocument.LoadFromFile(string fileName) method.
- Set the conversion options using PdfDocument.ConversionOptions.SetConvertHtmlOptions() method.
- Convert the document to HTML format and save it using PdfDocument.SaveToFile(string fileName, FileFormat.HTML) method.
Users can download Spire.PDF for Python and import it to their projects, or install it with PyPI:
pip install Spire.PDF
Convert PDF to a Single HTML File with Python Code
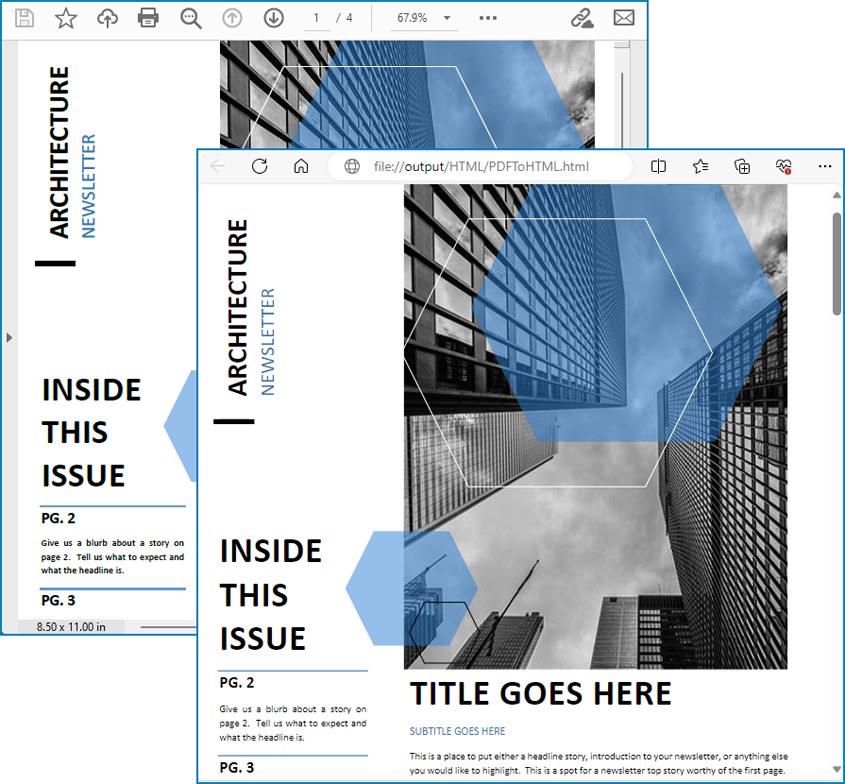
This code example shows how to convert PDF to HTML with Python directly without setting any conversion options. In this case, we only need to load a PDF file with the LoadFromFile method and save it as an HTML file with the SaveToFile method. The converted HTML file will be a single HTML file with images and other elements embedded in it.
Code Example:
- Python
from spire.pdf.common import *
from spire.pdf import *

# Craete an object of PdfDocument class
doc = PdfDocument()

# Load a PDF document
doc.LoadFromFile("G:/Documents/ARCHITECTURE.pdf")

# Convert the document to HTML
doc.SaveToFile("output/HTML/PDFToHTML.html", FileFormat.HTML)
doc.Close()
Conversion Result:
Convert PDF to HTML with Images Separated Using Python
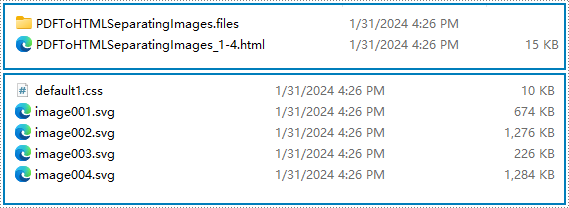
By setting the useEmbeddedSvg parameter to False, we can convert the PDF document into an HTML file with images and CSS files separated from it and stored in a folder. This makes it convenient to further edit the converted HTML file and perform additional operations on the images.
Code Example:
- Python
from spire.pdf.common import *
from spire.pdf import *

# Craete an object of PdfDocument class
doc = PdfDocument()

# Load a PDF document
doc.LoadFromFile("ARCHITECTURE.pdf")

# Disable embedding SVG
doc.ConvertOptions.SetPdfToHtmlOptions(False)

# Convert the document to HTML
doc.SaveToFile("output/HTML/PDFToHTMLWithoutEmbeddingSVG.html", FileFormat.HTML)
doc.Close()
Conversion Result:
Convert PDF to Multiple HTML Files with Python
With the precondition that useEmbeddedSvg is set to False, the SetPdfToHtmlOptions method allows for the use of the maxPageOneFile (int) parameter to determine the maximum number of pages included in each converted HTML file. This feature enables PDF document splitting in the conversion process. For instance, setting the parameter to 1 will result in each page being converted into a separate HTML file.
Code Example:
- Python
from spire.pdf.common import *
from spire.pdf import *

# Craete an object of PdfDocument class
doc = PdfDocument()

# Load a PDF document
doc.LoadFromFile("ARCHITECTURE.pdf")

# Disable embedding SVG
doc.ConvertOptions.SetPdfToHtmlOptions(False, False, 1, False)

# Convert the document to HTML
doc.SaveToFile("output/HTML/PDFToHTMLLimitingPage.html", FileFormat.HTML)
doc.Close()
Conversion Result:

Free License and Technical Support
Spire.PDF for Python offers users a free license for trial to all users, including both enterprise and individual users. Apply for a temporary license to use this Python API for converting PDF documents to HTML files, removing any usage restrictions or watermarks.
For any issues encountered during the PDF to HTML conversion using this API, users can seek technical support on the Spire.PDF forum.
Conclusion
This article demonstrates how to convert PDF to HTML using Python and provides various conversion options, such as converting to a single HTML file, separating HTML files from images, and splitting the PDF document during conversion. With Spire.PDF for Python, users have access to a straightforward and efficient method for Python in PDF to HTML conversion, supporting flexible customization options.
Spire.Doc 12.1.17 enhances the conversion from Word to PDF and HTML
We are pleased to announce the release of Spire.Doc 12.1.17. In this version, the left and right indentation function of a paragraph supports setting the number of characters. The conversion from Word to PDF and HTML has also been enhanced. In addition, some known issues have also been fixed, such as the issue that the content format was incorrect when converting Word documents to PDF documents. More details are listed below.
Here is a list of changes made in this release
| Category | ID | Description |
| New feature | SPIREDOC-9979 SPIREDOC-10058 |
The left and right indentation function of the paragraph supports the option of setting the number of characters.
// Set left indentation by character count paragraph.Format.LeftIndentChars = 10; // Set right indentation by character count paragraph.Format.RightIndentChars = 10; |
| Bug | SPIREDOC-3363 | Fixes the issue that the content format was incorrect when converting Word documents to PDF documents. |
| Bug | SPIREDOC-3363 SPIREDOC-10083 |
Fixes the issue that the font changed when converting Word documents to PDF documents. |
| Bug | SPIREDOC-9136 | Fixes the issue that the document structure tags were lost when converting Word documents to PDF documents. |
| Bug | SPIREDOC-9718 | Fixes the issue that the fonts of formula content in saved Docx documents had extra italic effects. |
| Bug | SPIREDOC-9756 | Fixes the issue that the program threw System.ArgumentException when converting Word documents to HTML documents. |
| Bug | SPIREDOC-10001 | Fixes the issue that table border changed when converting Word documents to PDF documents. |
| Bug | SPIREDOC-10016 | Fixes the issue that there was an extra blank paragraph after replacing bookmark content. |
| Bug | SPIREDOC-10084 | Fixes the issue that font bold style was lost when converting Word documents to PDF documents. |
| Bug | SPIREDOC-10110 | Fixes the issue that the program threw System.ArgumentOutOfRangeException when loading Doc documents. |
| Bug | SPIREDOC-10111 | Fixes the issue that content was indented when converting Word documents to PDF documents. |
| Bug | SPIREDOC-10119 | Fixes the issue that getting codes in cross-reference fields failed. |
| Bug | SPIREDOC-10132 | Fixes the issue that the program threw System.ArgumentOutOfRangeException when getting FixedLayoutDocument objects in blank documents. |
| Bug | SPIREDOC-10195 | Fixes the issue that the program threw System.NullReferenceException when deleting bookmark content after copying documents. |
C# Solution for PDF to Image Conversion
Table of Contents
Installed via NuGet
PM> Install-Package Spire.PDF
Related Links
PDF files are widely used in daily work due to their stable layout, easy transferability and high readability. In some cases, you may need to convert PDF to images. Saving content as images not only speeds up loading, but also reduces the risk of accidental editing. In addition, if you want to embed PDF files or pages into other documents or web pages, converting them to specified image formats is an excellent choice. This passage covers the details of using C# to convert PDF to image. And you can effortlessly convert PDF to the desired image formats with C# code while preserving the visual fidelity of the original content.
- C# Library for PDF Conversion
- Classification of Image Formats
- Convert PDF to PNG/JPG/BMP/EMF/TIFF in C#
- Convert PDF to SVG in C#
- Convert PDF to a Multiple-Page TIFF in C#
C# Library for PDF Conversion
This article demonstrates how to convert PDF to image using Spire.PDF for .NET, which is a reliable PDF processing library that enables you to manipulate and convert PDF files within .NET applications. With it, you can even adjust the properties of the image, such as its size and pixels, during the conversion from PDF to image.
In addition to image, this library also allows you to convert PDF to Word, PDF to HTML, PDF to XPS, and so on.
You can either download it and reference the DLL file manually or install it via NuGet using the following command:
PM> Install-Package Spire.PDF
Classification of Image Formats
In computer graphics, images can be classified into two main categories:
- Bitmap images are composed of a grid of individual pixels, where each pixel is assigned a specific color. Common bitmap image formats include PNG, JPG, BMP, EMF and TIFF.
- Vector graphics, on the other hand, represent images using mathematical equations and geometric shapes such as lines, curves, and polygons. Common vector graphic formats include SVG and EPS.
Currently, Spire.PDF for .NET supports the PNG/JPG/BMP/EMF/TIFF/SVG formats. Next, I will give you the details of each conversion.
Convert PDF to PNG/JPG/BMP/EMF/TIFF in C#
Steps
- Create a PdfDocument instance and load a PDF file from disk by using LoadFromFile() method.
- Call the SaveAsImage(int pageIndex, PdfImageType type, int dpiX, int dpiY) method to convert the specified page to an image.
- Finally, save images as JPG files using Image.Save(string filename, ImageFormat format) method. In this case, I take PDF to JPG as an example. You can also change the format if you like.
Sample Code
- C#
using Spire.Pdf;
using Spire.Pdf.Graphics;
using System.Drawing;
using System.Drawing.Imaging;

namespace PDFtoImage
{
    class Program
    {
        static void Main(string[] args)
        {
            //Create a PdfDocument instance
            PdfDocument pdf = new PdfDocument();

            //Load a sample PDF file
            pdf.LoadFromFile("C:\\Users\\Administrator\\Desktop\\Input.pdf");

            //Convert the first page to an image and set the image Dpi
            Image image = pdf.SaveAsImage(0, PdfImageType.Bitmap, 500, 500);

            //Save images as JPG format to a specified folder
            image.Save("C:\\Users\\Administrator\\Desktop\\Image\\ToImage.jpg", ImageFormat.Jpeg);

            //Close the document
            pdf.Close();
        }
    }
}
Convert PDF to SVG in C#
Steps
- Create a PdfDocument instance and load a PDF file from disk by using LoadFromFile() method.
- Convert the first page to SVG using the SaveToFile(string filename, int startIndex, int endIndex, FileFormat fileFormat) method. You can specify the page index you want to convert in the parameter.
Sample Code
- C#
using Spire.Pdf;

namespace PDFtoSVG
{
    class Program
    {
        static void Main(string[] args)
        {
            //Create a PdfDocument instance
            PdfDocument pdf = new PdfDocument();

            //Load a sample PDF file
            pdf.LoadFromFile("C:\\Users\\Administrator\\Desktop\\Input.pdf");

            //Convert the first page to SVG
            pdf.SaveToFile("C:\\Users\\Administrator\\Desktop\\Image\\ToImage.svg", 0, 0, FileFormat.SVG);

            //Close the document
            pdf.Close();
        }
    }
}
Convert PDF to a Multiple-Page TIFF in C#
Compared with other image formats, TIFF allows multiple images or pages to be stored in a single file. This feature makes it a popular choice among users in some cases.
In this section, I will show you how to convert a PDF file into a multi-page TIFF file. To achieve this conversion, we can customize the following methods.- SaveAsImage() method supports converting each PDF page to an image and then returns an array of images.
- GetEncoderInfo() method supports finding and returning matching image encoder information based on the given MIME type.
- JoinTiffImages() method is used to merge multiple images into a single TIFF file. It works by looping through each image in the image array and saving it according to the specified encoder parameters.
Steps
- Create a PdfDocument instance and load a PDF file from disk by using LoadFromFile() method.
- Call SaveAsImage() method to convert each page of the PDF to an image and save it in the image array.
- Finally, call JoinTiffImages() method to merge the converted TIFF images into a multi-page TIFF file.
Sample Code
- C#
using System;
using System.Drawing;
using System.Drawing.Imaging;
using Spire.Pdf;
namespace SavePdfAsTiff
{
    class Program
    {
        static void Main(string[] args)
        {
            // Create a PdfDocument instance
            PdfDocument pdf = new PdfDocument();

            // Load the PDF file
            pdf.LoadFromFile("C:\\Users\\Administrator\\Desktop\\Input.pdf");

            // Convert PDF pages to images and save them as an image array
            Image[] images = SaveAsImage(pdf);

            // Merge the converted TIFF images into a multi-page TIFF file
            JoinTiffImages(images, "C:\\Users\\Administrator\\Desktop\\Image\\ToImage.tiff", EncoderValue.CompressionLZW);
        }

        private static Image[] SaveAsImage(PdfDocument pdf)
        {
            // Create an image array with the size equal to the number of PDF pages
            Image[] images = new Image[pdf.Pages.Count];

            //Iterate through each page of PDF
            for (int i = 0; i < pdf.Pages.Count; i++)
            {
                //Convert these pages to images
                images[i] = pdf.SaveAsImage(i);
            }
            return images;
        }

        private static ImageCodecInfo GetEncoderInfo(string mimeType)
        {
            // Get all available image encoders
            ImageCodecInfo[] encoders = ImageCodecInfo.GetImageEncoders();
            for (int j = 0; j < encoders.Length; j++)
            {
                // Find the encoder that matches the specified mime type
                if (encoders[j].MimeType == mimeType)
                    return encoders[j];
            }
            // An exception is thrown if no matching encoder is found
            throw new Exception(mimeType + " mime type not found in ImageCodecInfo");
        }

        public static void JoinTiffImages(Image[] images, string outFile, EncoderValue compressEncoder)
        {
            //Set the parameters of the image encoder
            Encoder enc = Encoder.SaveFlag;
            EncoderParameters ep = new EncoderParameters(2);
            ep.Param[0] = new EncoderParameter(enc, (long)EncoderValue.MultiFrame);
            ep.Param[1] = new EncoderParameter(Encoder.Compression, (long)compressEncoder);

            // Initialize the first image as the base for merging
            Image pages = images[0];
            int frame = 0;

            // Get the encoder information for TIFF format
            ImageCodecInfo info = GetEncoderInfo("image/tiff");

            // Iterate through each image
            foreach (Image img in images)
            {
                if (frame == 0)
                {
                    // If it's the first frame, set it as the current base image
                    pages = img;

                    // Save the first frame using the specified encoder parameters
                    pages.Save(outFile, info, ep);
                }
                else
                {
                    // For intermediate frames, update the encoder parameter to indicate a new page
                    ep.Param[0] = new EncoderParameter(enc, (long)EncoderValue.FrameDimensionPage);

                    // Save the intermediate frame
                    pages.SaveAdd(img, ep);
                }
                if (frame == images.Length - 1)
                {
                    // If it's the last frame, flush the encoder parameters to close the file
                    ep.Param[0] = new EncoderParameter(enc, (long)EncoderValue.Flush);
                    pages.SaveAdd(ep);
                }
                frame++;
            }
        }
    }
}
Free Trial of C# Library
Spire.PDF for .NET provides free usage to help users better evaluate product features without restrictions. You can obtain a Free 30-Day Temporary License from the following link to convert PDF to image in C#.
Conclusion
In this post, you have learned how to convert PDF to popular image formats using C#. Spire.PDF for .NET can also help you with other PDF processing tasks, such as creating PDF, merging PDF, comparing PDF, and so on. In a word, this library simplifies the process and allows developers to focus on building powerful applications that involve PDF manipulation tasks.
C# Convert Excel to Images (JPG, PNG, BMP, EMF, SVG) without MS Office
Table of Contents
- C# Library to Convert Excel to Images
- Convert an Excel Worksheet to JPG, PNG and BMP Images
- Convert an Excel Worksheet to an EMF Image
- Convert an Excel Worksheet to an SVG Image
- Convert an Excel Worksheet to an Image with a Specific Resolution
- Convert an Excel Worksheet to an Image without White Margins
- Convert a Specific Cell Range of an Excel Worksheet to an Image
- Get a Free License
- Conclusion
- See Also
Installed via NuGet
PM> Install-Package Spire.XLS
Related Links
Sharing Excel files with others can sometimes be inconvenient due to various reasons. For instance, recipients may not have Excel installed on their devices, or they may be using a different operating system that is not compatible with Excel. This can lead to compatibility issues and difficulties in accessing and viewing the shared files. Furthermore, Excel files can be large in size, making them challenging to send via email or other file-sharing platforms with size restrictions.
Converting Excel to images addresses these challenges by providing a simplified and visually appealing way to present data. With images, you can capture the essence of the data in a single snapshot, making it easier for recipients to grasp the information at a glance. Whether it's a chart, graph, or table, converting Excel to images allows you to transform complex data into a visually engaging format.
In this blog, we will elaborate on how to convert Excel to various image formats such as JPG, PNG, BMP, EMF, and SVG using C#.
- Convert an Excel Worksheet to JPG, PNG and BMP Images in C#
- Convert an Excel Worksheet to an EMF Image in C#
- Convert an Excel Worksheet to an SVG Image in C#
- Convert an Excel Worksheet to an Image with a Specific Resolution in C#
- Convert an Excel Worksheet to an Image without White Margins in C#
- Convert a Specific Cell Range of an Excel Worksheet to an Image in C#
C# Library to Convert Excel to Images
To convert Excel to images using C#, you can use Spire.XLS for .NET, which is a professional Excel API that supports creating, reading, writing, printing, and converting Excel files in .NET applications without relying on Microsoft Office.
To install Spire.XLS for .NET, you can execute the following command in the NuGet Package Manager Console:
PM> Install-Package Spire.XLS
Convert an Excel Worksheet to JPG, PNG and BMP Images in C#
JPG, PNG, and BMP are popular image file formats used to store and display digital images. Here's a concise description of each format:
JPG (or JPEG):
JPG (or JPEG) is a widely used image format known for its efficient compression algorithm. It is commonly used for storing photographs and complex images with many colors.
PNG (Portable Network Graphics):
PNG is a lossless image format designed as a replacement for GIF (Graphics Interchange Format). It supports high-quality images with transparency and a wide range of colors. PNG files are often used for graphics, logos, and images with sharp edges or text.
BMP (Bitmap):
BMP is a basic image format that stores graphics in an uncompressed form. It was developed by Microsoft and is often used when precise pixel-level control is required or when compatibility with older software or systems is necessary.
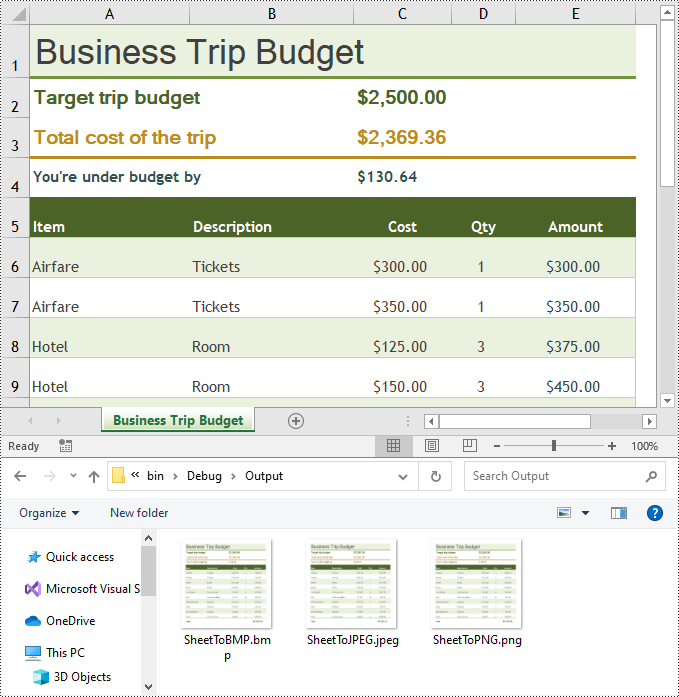
Here is a code example that shows how to convert an Excel worksheet to JPG, PNG, and BMP images using C# and Spire.XLS for .NET:
- Python
using Spire.Xls;
    using System.Drawing.Imaging;

    namespace ConvertExcelToImage
    {
        internal class Program
        {
            static void Main(string[] args)
            {
                //Create a Workbook object
                Workbook workbook = new Workbook();
                //Open an Excel file
                workbook.LoadFromFile("Sample.xlsx");

                //Get the first worksheet
                Worksheet worksheet = workbook.Worksheets[0];

                //Save the worksheet to JPEG, PNG, and BMP images
                worksheet.SaveToImage("Output//SheetToJPEG.jpeg", ImageFormat.Jpeg);
                worksheet.SaveToImage("Output//SheetToPNG.png", ImageFormat.Png);
                worksheet.SaveToImage("Output//SheetToBMP.bmp", ImageFormat.Bmp);

                workbook.Dispose();
            }
        }
    }
Convert an Excel Worksheet to an EMF Image in C#
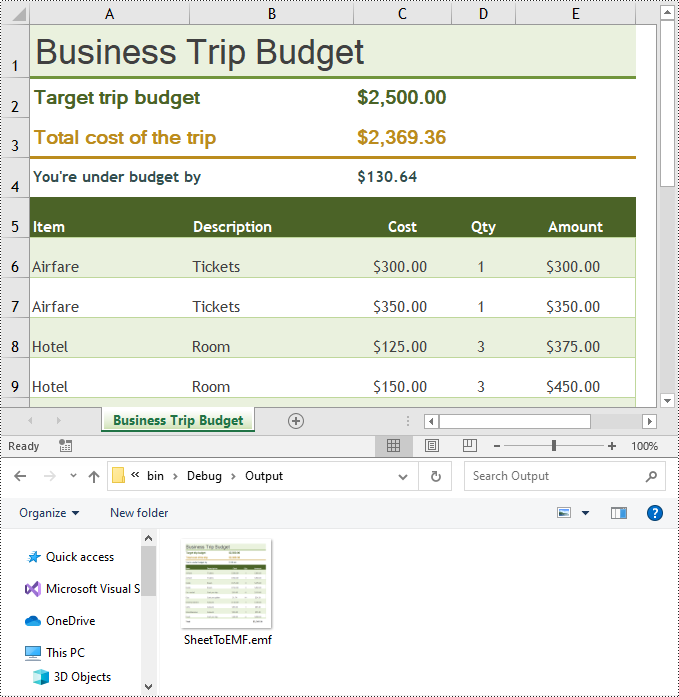
EMF is a vector-based image format that retains the scalability and high-quality resolution of the original worksheet. Converting Excel to EMF allows for further editing and manipulation of the image using compatible software, making it suitable for professional graphics and design purposes.
Here is a code example that shows how to convert an Excel worksheet to an EMF image using C# and Spire.XLS for .NET:
- Python
using Spire.Xls;
    using System.Drawing;
    using System.Drawing.Imaging;
    using System.IO;

    namespace ConvertExcelToEMF
    {
        internal class Program
        {
            static void Main(string[] args)
            {
                //Create a Workbook object and load the Excel file
                Workbook workbook = new Workbook();
                workbook.LoadFromFile("Sample.xlsx");

                //Get the first worksheet
                Worksheet worksheet = workbook.Worksheets[0];

                //Create a memory stream
                using (MemoryStream stream = new MemoryStream())
                {
                    //Save the worksheet to the memory stream as EMF
                    worksheet.ToEMFStream(stream, worksheet.FirstRow, worksheet.FirstColumn, worksheet.LastRow, worksheet.LastColumn, EmfType.EmfPlusDual);

                    //Create an Image object from the memory stream
                    using (Image img = Image.FromStream(stream))
                    {
                        //Save the image as an EMF file
                        img.Save("Output//SheetToEMF.emf", ImageFormat.Emf);
                    }
                }

                workbook.Dispose();
            }
        }
    }
Convert an Excel Worksheet to an SVG Image in C#
SVG is an XML-based vector image format that supports interactivity and can be scaled without loss of quality. Converting Excel to SVG allows for dynamic and responsive rendering of the worksheet, making it ideal for web applications, data visualizations, and responsive design workflows.
Here is a code example that shows how to convert an Excel worksheet to an SVG image using C# and Spire.XLS for .NET:
- Python
using Spire.Xls;
    using System.IO;

    namespace ConvertExcelToSVG
    {
        internal class Program
        {
            static void Main(string[] args)
            {
                //Create a Workbook object
                Workbook workbook = new Workbook();
                //Open an Excel file
                workbook.LoadFromFile("Sample.xlsx");

                //Get the first worksheet
                Worksheet worksheet = workbook.Worksheets[0];

                //Save the worksheet to SVG
                using (FileStream fs = new FileStream("Output//SheetToSVG.svg", FileMode.Create))
                {

                    worksheet.ToSVGStream(fs, worksheet.FirstRow, worksheet.FirstColumn, worksheet.LastRow, worksheet.LastColumn);
                }

                workbook.Dispose();
            }
        }
    }
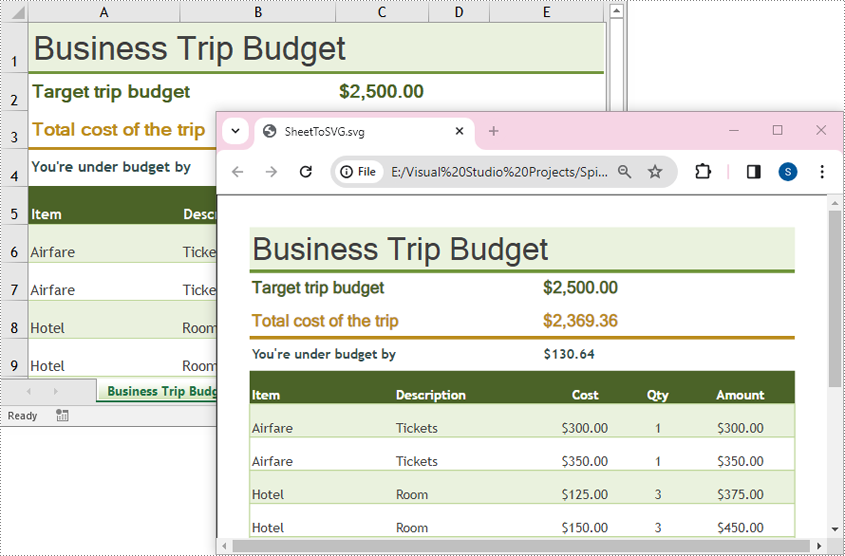
Convert an Excel Worksheet to an Image with a Specific Resolution in C#
When converting an Excel worksheet to an image, Spire.XLS for .NET does not offer a direct method to specify the image resolution. However, you can use the methods of the Bitmap and Graphics classes to adjust the resolution of the resulting images effortlessly.
Here is a code example that shows how to convert an Excel worksheet to an image with a specific resolution using C# and Spire.XLS for .NET:
- Python
using Spire.Xls;
    using System.Drawing;
    using System.Drawing.Imaging;
    using System.IO;

    namespace ConvertExcelToImageWithCustomResolution
    {
        internal class Program
        {
            static void Main(string[] args)
            {
                //Create a Workbook object
                Workbook workbook = new Workbook();
                //Open an Excel file
                workbook.LoadFromFile("Sample.xlsx");

                //Get the first worksheet
                Worksheet worksheet = workbook.Worksheets[0];

                //Convert the worksheet to EMF stream
                using (MemoryStream ms = new MemoryStream())
                {
                    worksheet.ToEMFStream(ms, 1, 1, worksheet.LastRow, worksheet.LastColumn);

                    //Create an image from the EMF stream
                    Image image = Image.FromStream(ms);
                    //Call the ResetResolution() method to change the resolution of the image
                    Bitmap images = ResetResolution(image as Metafile, 300);

                    //Save the image in JPG file format
                    images.Save("Output//SheetToImageWithCustomResolution.jpg", ImageFormat.Jpeg);
                }

                workbook.Dispose();
            }

            //Create a custom method to change image resolution
            private static Bitmap ResetResolution(Metafile mf, float resolution)
            {
                int width = (int)(mf.Width * resolution / mf.HorizontalResolution);
                int height = (int)(mf.Height * resolution / mf.VerticalResolution);
                Bitmap bmp = new Bitmap(width, height);
                bmp.SetResolution(resolution, resolution);
                Graphics g = Graphics.FromImage(bmp);
                g.DrawImage(mf, 0, 0);
                g.Dispose();
                return bmp;
            }
        }
    }
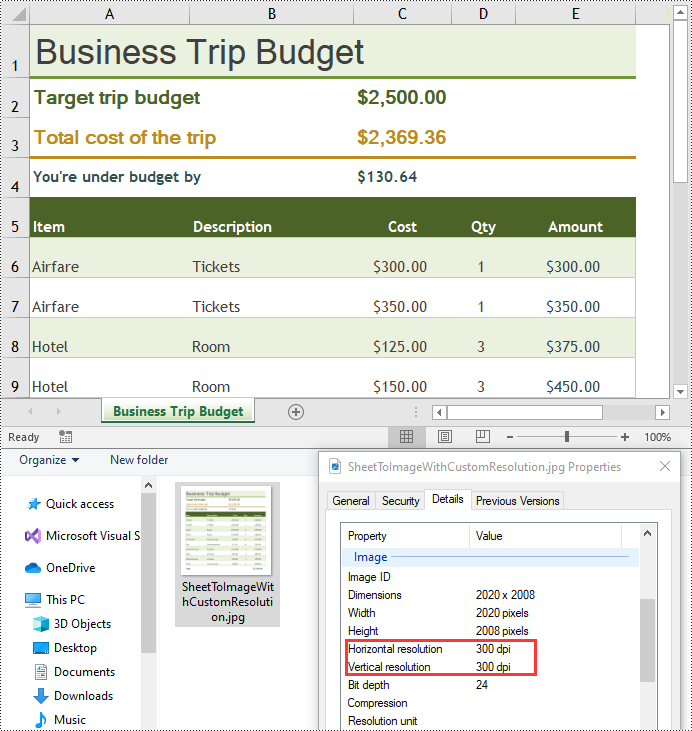
Convert an Excel Worksheet to an Image without White Margins in C#
Converting an Excel worksheet to an image without white margins is useful for eliminating unnecessary white space and focusing on the content of the spreadsheet. By removing white margins, the resulting images will contain only the actual data and visuals from the Excel file, making them more visually appealing and suitable for certain use cases.
Here is a code example that shows how to convert an Excel worksheet to an image without white margins using C# and Spire.XLS for .NET:
- Python
using Spire.Xls;
    using System.Drawing.Imaging;

    namespace ConvertExcelToImage
    {
        internal class Program
        {
            static void Main(string[] args)
            {
                //Create a Workbook object
                Workbook workbook = new Workbook();
                //Open an Excel file
                workbook.LoadFromFile("Sample.xlsx");

                //Get the first worksheet
                Worksheet worksheet = workbook.Worksheets[0];

                //Set the margin of the worksheet to 0
                worksheet.PageSetup.LeftMargin = 0;
                worksheet.PageSetup.BottomMargin = 0;
                worksheet.PageSetup.TopMargin = 0;
                worksheet.PageSetup.RightMargin = 0;

                //Save the worksheet to an image
                worksheet.SaveToImage("Output//SheetToImageWithoutMargins.png", ImageFormat.Png);

                workbook.Dispose();
            }
        }
    }
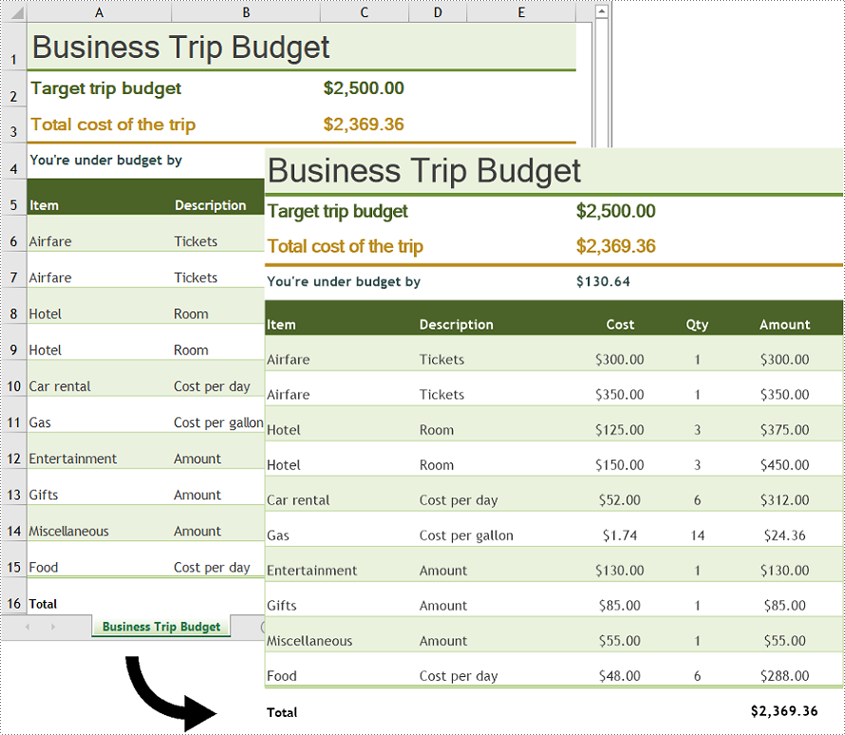
Convert a Specific Cell Range of an Excel Worksheet to an Image in C#
In addition to converting an entire worksheet to an image, Spire.XLS for .NET allows you to convert a specific cell range to an image. This can be useful for sharing or presenting a portion of data within a worksheet.
Here is a code example that shows how to convert a specific cell range of an Excel worksheet to an image using C# and Spire.XLS for .NET:
- Python
using Spire.Xls;
    using System.IO;

    namespace ConvertCellRangeToImage
    {
        internal class Program
        {
            static void Main(string[] args)
            {
                //Create a Workbook object
                Workbook workbook = new Workbook();
                //Open an Excel file
                workbook.LoadFromFile("Sample.xlsx");

                //Get the first worksheet
                Worksheet worksheet = workbook.Worksheets[0];

                //Save a specific range of cells within the worksheet to an image
                worksheet.ToImage(5, 1, 16, 5).Save("Output//CellRangeToImage.png");

                workbook.Dispose();
            }
        }
    }
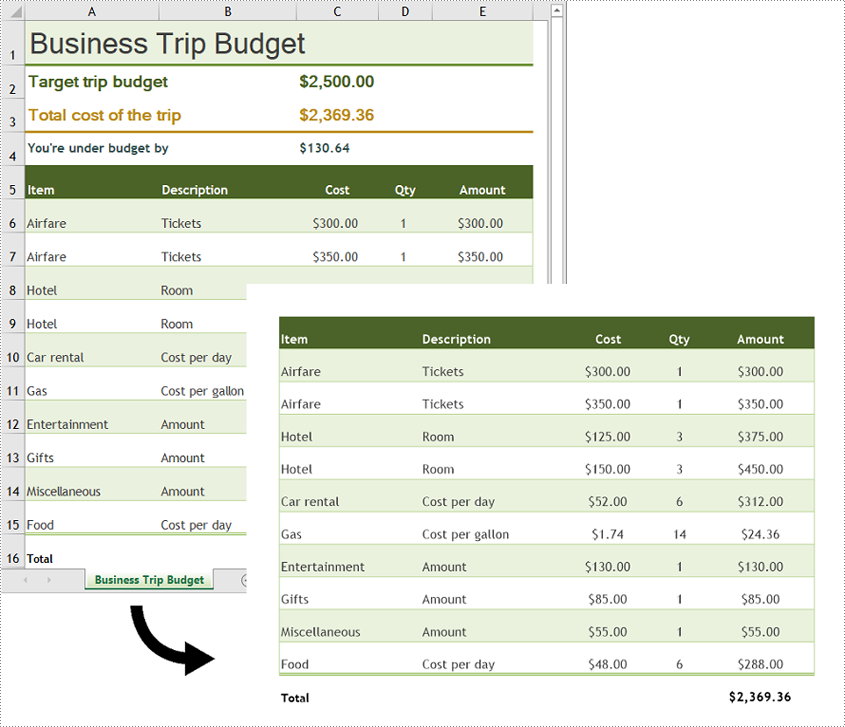
Get a Free License
To fully experience the capabilities of Spire.XLS for .NET without any evaluation limitations, you can request a free 30-day trial license.
Conclusion
This blog provides a comprehensive overview of how to convert Excel Worksheets to images using Spire.XLS for .NET. However, it's important to highlight that Spire.XLS supports converting Excel files to a variety of file formats beyond images. These additional conversion options include Excel to PDF, Excel to HTML, Excel to Text, Excel to XPS, and more.
Spire.Office for C++ 9.1.0 is released
We are delighted to announce the release of Spire.Office for C++ 9.1.0. In this version, Spire.XLS for C++ adds a custom exception class called SpireException. In addition, the issue that the header height became wider after converting Excel to PDF is fixed when the system language environment was set to Spanish. More details are listed below.
Here is a list of changes made in this release
Spire.XLS for C++
| Category | ID | Description |
| New feature | - | Adds a custom exception class called SpireException. |
| Bug | SPIREXLS-5040 | Fixes the issue that the header height was increased after converting Excel to a PDF when the system language environment was set to Spanish. |