
Как создать файлы XLSX с помощью Python | Spire.XLS
Оглавление
Установка через NuGet
PM> Install-Package Spire.XLS
Похожие ссылки
Эффективная запись файлов Excel является неотъемлемой частью рабочих процессов на основе Python для анализа данных, составления отчетов и автоматизации. Среди множества доступных библиотек Spire.XLS for Python выделяется как мощное, независимое от Excel решение, поддерживающее сложные функции, такие как диаграммы, формулы, условное форматирование, шифрование и обработка больших наборов данных.
В этом руководстве показано, как записывать файлы XLSX с помощью Python, используя Spire.XLS for Python, и рассматриваются все детали, от базовой записи до расширенного форматирования, при этом используется надежная и готовая к использованию в корпоративной среде библиотека Excel.
- Как записывать файлы XLSX с помощью Spire.XLS for Python
- Запись различных типов данных в файлы XLSX с помощью Python
- Применение форматирования и стилей к ячейкам Excel с помощью Python
Как записывать файлы XLSX с помощью Spire.XLS for Python
Зачем использовать Spire.XLS for Python?
Spire.XLS for Python — это многофункциональная библиотека, которая позволяет разработчикам читать, записывать и управлять файлами Excel без необходимости установки Microsoft Office. Она создана для обеспечения производительности и гибкости, что делает ее идеальной для задач автоматизации и крупномасштабной отчетности.
Основные преимущества:
- Универсальный API: чтение/запись .xls и .xlsx, форматирование ячеек, вставка формул, преобразование файлов и многое другое.
- Кроссплатформенная поддержка: доступно для .NET, Java, Python и совместимо с облачными средами.
- Расширенные функции Excel: поддержка диаграмм, сводных таблиц, условного форматирования и защиты.
- Надежная документация и поддержка: обширная справочная информация по API, учебные пособия, форум для разработчиков и служба поддержки.
- Доступна бесплатная версия: идеально подходит для простой обработки файлов Excel без затрат на лицензирование.
Установка Spire.XLS for Python
Вы можете установить полную или бесплатную версию Spire.XLS в зависимости от ваших требований.
Полная версия:
pip install spire.xls
Бесплатная версия (для небольших файлов и простых случаев использования):
pip install spire.xls.free
Основные шаги по записи файлов XLSX
Чтобы записывать данные в файлы Excel с помощью Python, выполните следующие основные шаги:
- Создайте новую книгу Excel с помощью конструктора Workbook().
- Загрузите существующий файл XLSX (необязательно) с помощью метода Workbook.LoadFromFile().
- Добавьте или получите рабочий лист с помощью метода Workbook.Worksheets.Add() или метода get_Item().
- Получите доступ к ячейкам с помощью метода Worksheet.Range.get_Item().
- Запишите данные, используя свойства класса CellRange, такие как Value, Text, NumberValue и т. д.
- Сохраните книгу с помощью метода Workbook.SaveToFile().
Пример кода базовой записи файла XLSX
- Python
from spire.xls import Workbook, ExcelVersion
# Создайте объект Workbook
workbook = Workbook()
# Получите первый рабочий лист по умолчанию
sheet = workbook.Worksheets.get_Item(0)
# Запишите строку в ячейку B2
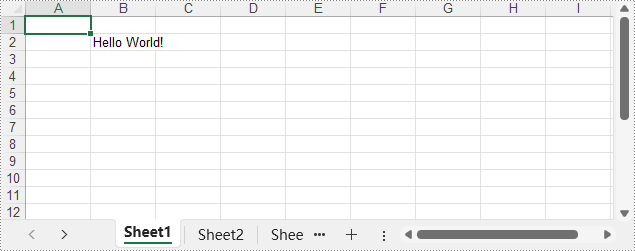
sheet.Range.get_Item(2, 2).Text = "Привет, мир!"
# Сохраните книгу
workbook.SaveToFile("output/BasicWorkbook.xlsx", ExcelVersion.Version2016)
workbook.Dispose()
Выходной файл XLSX:
Запись различных типов данных в файлы XLSX с помощью Python
Spire.XLS предлагает в классе CellRange ряд свойств, которые поддерживают запись различных типов данных непосредственно в ячейки Excel, таких как строки, значения даты и времени, логические значения и числовые значения. Это позволяет разработчикам легко записывать типизированные значения непосредственно в ячейки файла XLSX.
Поддерживаемые типы данных и их свойства
| Свойство | Тип значения | Функция |
| NumberValue | float | Устанавливает числовое значение |
| Text | str | Устанавливает обычный текст |
| DateTimeValue | datetime | Устанавливает дату и время |
| BooleanValue | bool | Устанавливает логическое значение |
| Formula | str | Вставляет формулу |
| HtmlString | str | Вставляет текст в формате HTML |
| Value | str | Устанавливает общее значение |
Пример кода – запись различных типов данных
- Python
from spire.xls import Workbook, ExcelVersion, DateTime, HorizontalAlignType, Stream, ImageFormatType
# Создайте объект Workbook
workbook = Workbook()
# Получите первый рабочий лист по умолчанию
sheet = workbook.Worksheets.get_Item(0)
# Запишите текст в ячейку B1
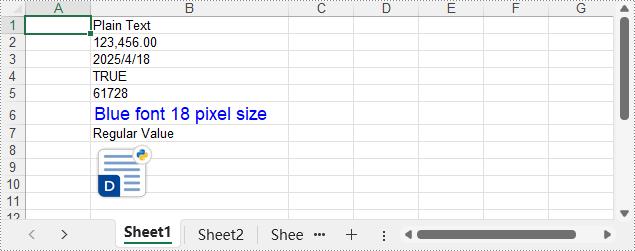
sheet.Range.get_Item(1, 2).Text = "Обычный текст"
# Запишите число в ячейку B2
sheet.Range.get_Item(2, 2).NumberValue = 123456
sheet.Range.get_Item(2, 2).NumberFormat = "#,##0.00"
# Запишите дату в ячейку B3
sheet.Range.get_Item(3, 2).DateTimeValue = DateTime.get_UtcNow()
# Запишите логическое значение в ячейку B4
sheet.Range.get_Item(4, 2).BooleanValue = True
# Запишите формулу в ячейку B5
sheet.Range.get_Item(5, 2).Formula = "B2/2"
# Запишите строку HTML в ячейку B6
sheet.Range.get_Item(6, 2).HtmlString = "<p><span style='color: blue; font-size: 18px;'>Синий шрифт размером 18 пикселей</span></p>"
# Запишите обычное значение в ячейку B7
sheet.Range.get_Item(7, 2).Value = "Обычное значение"
# Вставьте изображение в ячейку B8
with open("Logo.png", "rb") as f:
imageBytes = f.read()
stream = Stream(imageBytes)
sheet.Pictures.Add(8, 2, stream, ImageFormatType.Png)
# Установите базовое форматирование
sheet.Range.get_Item(1, 2, 8, 2).HorizontalAlignment = HorizontalAlignType.Left
sheet.AutoFitColumn(2)
for i in range(sheet.Range.Columns.Count):
for j in range(sheet.Range.Rows.Count):
sheet.Range.get_Item(j + 1, i + 1).HorizontalAlignment = HorizontalAlignType.Left
# Сохраните книгу в файл XLSX
workbook.SaveToFile("output/WriteDataExcelCell.xlsx", ExcelVersion.Version2016)
workbook.Dispose()
Выходной файл XLSX:
Применение форматирования и стилей к ячейкам Excel с помощью Python
Форматирование играет ключевую роль в создании понятных и профессиональных отчетов Excel. С помощью Spire.XLS for Python вы можете настраивать внешний вид ячеек, используя шрифты, цвета, выравнивание, числовые форматы и встроенные стили. Эти инструменты помогают улучшить читаемость и представить ваши данные в отточенном и последовательном виде, что идеально подходит для отчетности и автоматизации.
В следующем примере кода показано, как форматировать рабочие листы с помощью Python.
Форматирование ячеек с помощью шрифта, цвета, границ и выравнивания
- Python
from spire.xls import Workbook, Color, LineStyleType, BordersLineType, HorizontalAlignType
# Создайте объект Workbook
workbook = Workbook()
# Загрузите файл XLSX
workbook.LoadFromFile("Sample.xlsx")
# Получите первый рабочий лист
sheet = workbook.Worksheets.get_Item(0)
# Установите стили шрифта
# Строка заголовка
sheet.Rows.get_Item(0).Style.Font.FontName = "Times New Roman"
sheet.Rows.get_Item(0).Style.Font.Size = 14
sheet.Rows.get_Item(0).Style.Font.IsBold = True
# Строки данных
for i in range(1, sheet.Rows.Count):
sheet.Rows.get_Item(i).Style.Font.FontName = "Arial"
sheet.Rows.get_Item(i).Style.Font.Size = 12
# Установите цвета ячеек
# Строка заголовка
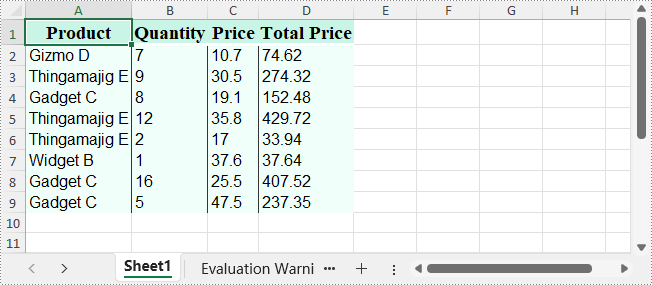
sheet.Rows.get_Item(0).Style.Color = Color.FromRgb(200, 245, 230)
# Строки данных
for i in range(1, sheet.Rows.Count):
sheet.Rows.get_Item(i).Style.Color = Color.FromRgb(240, 255, 250)
# Установите стили границ
# Строка заголовка
sheet.Rows.get_Item(0).Style.Borders.get_Item(BordersLineType.EdgeBottom).LineStyle = LineStyleType.Thick
sheet.Rows.get_Item(0).Style.Borders.get_Item(BordersLineType.EdgeBottom).Color = Color.get_White()
# Строки данных
for i in range(1, sheet.Rows.Count):
sheet.Rows.get_Item(i).BorderInside(LineStyleType.Thin, Color.get_Black())
# Установите выравнивание
# Строка заголовка
sheet.Rows.get_Item(0).Style.HorizontalAlignment = HorizontalAlignType.Center
# Строки данных
for i in range(1, sheet.Rows.Count):
sheet.Rows.get_Item(i).Style.HorizontalAlignment = HorizontalAlignType.Left
# Автоматически подбирать ширину столбца
for i in range(sheet.Columns.Count):
sheet.AutoFitColumn(i + 1)
# Сохраните файл Excel
workbook.SaveToFile("output/FormatXLSXFile.xlsx")
workbook.Dispose()
Выходной файл XLSX:
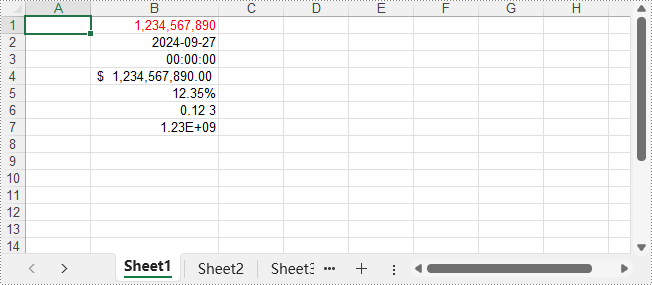
Установка числовых форматов для ячеек
- Python
from spire.xls import Workbook, ExcelVersion

# Создайте экземпляр Workbook
workbook = Workbook()

# Получите первый рабочий лист
sheet = workbook.Worksheets.get_Item(0)

# Отформатируйте ячейку как число
sheet.Range.get_Item(1, 2).NumberValue = 1234567890
sheet.Range.get_Item(1, 2).NumberFormat = "[Red]#,##0;[Green]#,##0"

# Отформатируйте ячейку как дату
sheet.Range.get_Item(2, 2).NumberValue = 45562
sheet.Range.get_Item(2, 2).NumberFormat = "yyyy-mm-dd"

# Отформатируйте ячейку как время
sheet.Range.get_Item(3, 2).NumberValue = 45562
sheet.Range.get_Item(3, 2).NumberFormat = "hh:mm:ss"

# Отформатируйте ячейку как валюту
sheet.Range.get_Item(4, 2).NumberValue = 1234567890
sheet.Range.get_Item(4, 2).NumberFormat = "_($* #,##0.00_);_($* (#,##0.00);_($* ""-""??_);_(@_)"

# Отформатируйте ячейку как процент
sheet.Range.get_Item(5, 2).NumberValue = 0.1234567890
sheet.Range.get_Item(5, 2).NumberFormat = "0.00%"

# Отформатируйте ячейку как дробь
sheet.Range.get_Item(6, 2).NumberValue = 0.1234567890
sheet.Range.get_Item(6, 2).NumberFormat = "0.00_ ?"

# Отформатируйте ячейку как научное число
sheet.Range.get_Item(7, 2).NumberValue = 1234567890
sheet.Range.get_Item(7, 2).NumberFormat = "0.00E+00"

# Автоматически подбирать ширину столбца
for i in range(sheet.Columns.Count):
    sheet.AutoFitColumn(i + 1)

# Сохраните файл Excel
workbook.SaveToFile("output/SetNumberFormat.xlsx", ExcelVersion.Version2016)
workbook.Dispose()
Выходной файл XLSX:
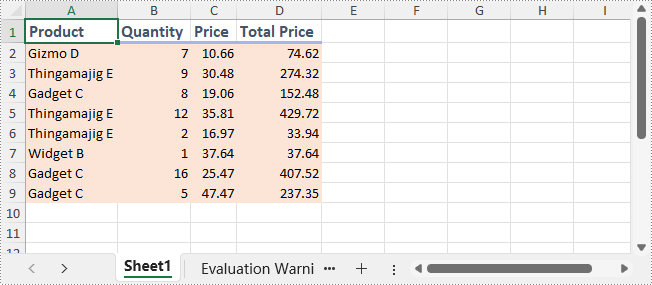
Применение встроенных стилей к ячейкам
- Python
from spire.xls import Workbook, BuiltInStyles

# Создайте экземпляр Workbook
workbook = Workbook()

# Загрузите файл Excel
workbook.LoadFromFile("Sample.xlsx")

# Получите первый рабочий лист
sheet = workbook.Worksheets.get_Item(0)

# Примените встроенный стиль заголовка к первой строке
sheet.Rows.get_Item(0).BuiltInStyle = BuiltInStyles.Heading2

# Примените встроенный стиль нижнего колонтитула к строкам данных
for i in range(1, sheet.Rows.Count):
    sheet.Rows.get_Item(i).BuiltInStyle = BuiltInStyles.Accent2_20

# Автоматически подбирать ширину столбца
for i in range(sheet.Columns.Count):
    sheet.AutoFitColumn(i + 1)

# Сохраните файл Excel
workbook.SaveToFile("output/ApplyBuiltInStyle.xlsx")
workbook.Dispose()
Выходной файл XLSX:
Заключение
В этом руководстве мы рассмотрели, как записывать файлы XLSX с помощью Python, используя Spire.XLS — от базовой записи до форматирования. Будь то создание отчетов, автоматизация экспорта или создание приложений, управляемых данными, Spire.XLS for Python предлагает надежное и эффективное решение для создания файлов Excel.
Получите бесплатную лицензию
Вы можете запросить 30-дневную бесплатную пробную лицензию на полную версию Spire.XLS for Python. Это позволит вам изучить все расширенные функции без ограничений в течение пробного периода.
Wie man XLSX-Dateien mit Python schreibt | Spire.XLS
Inhaltsverzeichnis
Installation über NuGet
PM> Install-Package Spire.XLS
Verwandte Links
Das effiziente Schreiben von Excel-Dateien ist in Python-basierten Arbeitsabläufen für Datenanalyse, Berichterstattung und Automatisierung unerlässlich. Unter den vielen verfügbaren Bibliotheken sticht Spire.XLS for Python als leistungsstarke, von Excel unabhängige Lösung hervor, die komplexe Funktionen wie Diagramme, Formeln, bedingte Formatierung, Verschlüsselung und die Verarbeitung großer Datenmengen unterstützt.
Diese Anleitung zeigt, wie man mit Spire.XLS for Python XLSX-Dateien mit Python schreibt. Dabei werden Details vom einfachen Schreiben bis zur erweiterten Formatierung behandelt – und das alles mit einer zuverlässigen und unternehmenstauglichen Excel-Bibliothek.
- Wie man XLSX-Dateien mit Spire.XLS for Python schreibt
- Verschiedene Datentypen mit Python in XLSX-Dateien schreiben
- Formatierungen und Stile mit Python auf Excel-Zellen anwenden
Wie man XLSX-Dateien mit Spire.XLS for Python schreibt
Warum Spire.XLS for Python verwenden?
Spire.XLS for Python ist eine funktionsreiche Bibliothek, die es Entwicklern ermöglicht, Excel-Dateien zu lesen, zu schreiben und zu bearbeiten, ohne dass Microsoft Office erforderlich ist. Sie ist auf Leistung und Flexibilität ausgelegt und eignet sich daher ideal für Automatisierungsaufgaben und umfangreiche Berichterstattungen.
Wichtige Vorteile:
- All-in-One-API: Lesen/Schreiben von .xls und .xlsx, Formatieren von Zellen, Einfügen von Formeln, Konvertieren von Dateien und mehr.
- Plattformübergreifende Unterstützung: Verfügbar für .NET, Java, Python und kompatibel mit cloud-basierten Umgebungen.
- Erweiterte Excel-Funktionen: Unterstützt Diagramme, Pivot-Tabellen, bedingte Formatierung und Schutz.
- Zuverlässige Dokumentation & Support: Umfangreiche API-Referenz, Tutorials, Entwicklerforum und Support-Team.
- Kostenlose Edition verfügbar: Ideal für die einfache Verarbeitung von Excel-Dateien ohne Lizenzkosten.
Installation von Spire.XLS for Python
Sie können je nach Ihren Anforderungen entweder die Vollversion oder die kostenlose Version von Spire.XLS installieren.
Vollversion:
pip install spire.xls
Kostenlose Version (für kleinere Dateien und grundlegende Anwendungsfälle):
pip install spire.xls.free
Grundlegende Schritte zum Schreiben von XLSX-Dateien
Um mit Python in Excel-Dateien zu schreiben, befolgen Sie diese grundlegenden Schritte:
- Erstellen Sie eine neue Excel-Arbeitsmappe über den Workbook()-Konstruktor.
- Laden Sie eine vorhandene XLSX-Datei (optional) mit der Methode Workbook.LoadFromFile().
- Fügen Sie ein Arbeitsblatt mit der Methode Workbook.Worksheets.Add() hinzu oder rufen Sie es mit der Methode get_Item() ab.
- Greifen Sie über die Methode Worksheet.Range.get_Item() auf Zellen zu.
- Schreiben Sie Daten mithilfe von Eigenschaften der Klasse CellRange, wie z. B. Value, Text, NumberValue usw.
- Speichern Sie die Arbeitsmappe mit der Methode Workbook.SaveToFile().
Beispielcode für das grundlegende Schreiben von XLSX-Dateien
- Python
from spire.xls import Workbook, ExcelVersion

# Erstellen Sie ein Workbook-Objekt
workbook = Workbook()

# Rufen Sie das erste Standardarbeitsblatt ab
sheet = workbook.Worksheets.get_Item(0)

# Schreiben Sie eine Zeichenfolge in die Zelle B2
sheet.Range.get_Item(2, 2).Text = "Hallo Welt!"

# Speichern Sie die Arbeitsmappe
workbook.SaveToFile("output/BasicWorkbook.xlsx", ExcelVersion.Version2016)
workbook.Dispose()
Die Ausgabe-XLSX-Datei:
Verschiedene Datentypen mit Python in XLSX-Dateien schreiben
Spire.XLS bietet in der Klasse CellRange eine Reihe von Eigenschaften, die das direkte Schreiben verschiedener Datentypen wie Zeichenfolgen, Datums- und Zeitwerte, boolesche Werte und numerische Werte in Excel-Zellen unterstützen. Dies erleichtert Entwicklern das Schreiben typisierter Werte direkt in die Zellen einer XLSX-Datei.
Unterstützte Datentypen und ihre Eigenschaften
| Eigenschaft | Werttyp | Funktion |
| NumberValue | float | Setzt einen Zahlenwert |
| Text | str | Setzt einfachen Text |
| DateTimeValue | datetime | Setzt ein Datum und eine Uhrzeit |
| BooleanValue | bool | Setzt einen booleschen Wert |
| Formula | str | Fügt eine Formel ein |
| HtmlString | str | Fügt HTML-formatierten Text ein |
| Value | str | Setzt einen generischen Wert |
Codebeispiel – Schreiben verschiedener Datentypen
- Python
from spire.xls import Workbook, ExcelVersion, DateTime, HorizontalAlignType, Stream, ImageFormatType

# Erstellen Sie ein Workbook-Objekt
workbook = Workbook()

# Rufen Sie das erste Standardarbeitsblatt ab
sheet = workbook.Worksheets.get_Item(0)

# Schreiben Sie Text in die Zelle B1
sheet.Range.get_Item(1, 2).Text = "Einfacher Text"
# Schreiben Sie eine Zahl in die Zelle B2
sheet.Range.get_Item(2, 2).NumberValue = 123456
sheet.Range.get_Item(2, 2).NumberFormat = "#,##0.00"
# Schreiben Sie ein Datum in die Zelle B3
sheet.Range.get_Item(3, 2).DateTimeValue = DateTime.get_UtcNow()
# Schreiben Sie einen booleschen Wert in die Zelle B4
sheet.Range.get_Item(4, 2).BooleanValue = True
# Schreiben Sie eine Formel in die Zelle B5
sheet.Range.get_Item(5, 2).Formula = "B2/2"
# Schreiben Sie eine HTML-Zeichenfolge in die Zelle B6
sheet.Range.get_Item(6, 2).HtmlString = "<p><span style='color: blue; font-size: 18px;'>Blaue Schriftart 18 Pixel Größe</span></p>"
# Schreiben Sie einen regulären Wert in die Zelle B7
sheet.Range.get_Item(7, 2).Value = "Regulärer Wert"
# Fügen Sie ein Bild in Zelle B8 ein
with open("Logo.png", "rb") as f:
    imageBytes = f.read()
stream = Stream(imageBytes)
sheet.Pictures.Add(8, 2, stream, ImageFormatType.Png)

# Grundlegende Formatierung festlegen
sheet.Range.get_Item(1, 2, 8, 2).HorizontalAlignment = HorizontalAlignType.Left
sheet.AutoFitColumn(2)
for i in range(sheet.Range.Columns.Count):
    for j in range(sheet.Range.Rows.Count):
        sheet.Range.get_Item(j + 1, i + 1).HorizontalAlignment = HorizontalAlignType.Left

# Speichern Sie die Arbeitsmappe in einer XLSX-Datei
workbook.SaveToFile("output/WriteDataExcelCell.xlsx", ExcelVersion.Version2016)
workbook.Dispose()
Die Ausgabe-XLSX-Datei:
Formatierungen und Stile mit Python auf Excel-Zellen anwenden
Die Formatierung spielt eine Schlüsselrolle, um Excel-Berichte klar und professionell zu gestalten. Mit Spire.XLS for Python können Sie das Erscheinungsbild von Zellen mithilfe von Schriftarten, Farben, Ausrichtung, Zahlenformaten und integrierten Stilen anpassen. Diese Werkzeuge verbessern die Lesbarkeit und präsentieren Ihre Daten auf eine ausgefeilte und konsistente Weise – ideal für Berichterstattung und Automatisierung.
Das folgende Codebeispiel zeigt, wie Arbeitsblätter mit Python formatiert werden.
Zellen mit Schriftart, Farbe, Rahmen und Ausrichtung formatieren
- Python
from spire.xls import Workbook, Color, LineStyleType, BordersLineType, HorizontalAlignType

# Erstellen Sie ein Workbook-Objekt
workbook = Workbook()

# Laden Sie die XLSX-Datei
workbook.LoadFromFile("Sample.xlsx")

# Rufen Sie das erste Arbeitsblatt ab
sheet = workbook.Worksheets.get_Item(0)

# Legen Sie die Schriftstile fest
# Kopfzeile
sheet.Rows.get_Item(0).Style.Font.FontName = "Times New Roman"
sheet.Rows.get_Item(0).Style.Font.Size = 14
sheet.Rows.get_Item(0).Style.Font.IsBold = True
# Datenzeilen
for i in range(1, sheet.Rows.Count):
    sheet.Rows.get_Item(i).Style.Font.FontName = "Arial"
    sheet.Rows.get_Item(i).Style.Font.Size = 12

# Legen Sie die Zellenfarben fest
# Kopfzeile
sheet.Rows.get_Item(0).Style.Color = Color.FromRgb(200, 245, 230)
# Datenzeilen
for i in range(1, sheet.Rows.Count):
    sheet.Rows.get_Item(i).Style.Color = Color.FromRgb(240, 255, 250)

# Legen Sie die Rahmenstile fest
# Kopfzeile
sheet.Rows.get_Item(0).Style.Borders.get_Item(BordersLineType.EdgeBottom).LineStyle = LineStyleType.Thick
sheet.Rows.get_Item(0).Style.Borders.get_Item(BordersLineType.EdgeBottom).Color = Color.get_White()
# Datenzeilen
for i in range(1, sheet.Rows.Count):
    sheet.Rows.get_Item(i).BorderInside(LineStyleType.Thin, Color.get_Black())

# Legen Sie die Ausrichtung fest
# Kopfzeile
sheet.Rows.get_Item(0).Style.HorizontalAlignment = HorizontalAlignType.Center
# Datenzeilen
for i in range(1, sheet.Rows.Count):
    sheet.Rows.get_Item(i).Style.HorizontalAlignment = HorizontalAlignType.Left

# Passen Sie die Spaltenbreite automatisch an
for i in range(sheet.Columns.Count):
    sheet.AutoFitColumn(i + 1)

# Speichern Sie die Excel-Datei
workbook.SaveToFile("output/FormatXLSXFile.xlsx")
workbook.Dispose()
Die Ausgabe-XLSX-Datei:
Zahlenformate für Zellen festlegen
- Python
from spire.xls import Workbook, ExcelVersion

# Erstellen Sie eine Workbook-Instanz
workbook = Workbook()

# Rufen Sie das erste Arbeitsblatt ab
sheet = workbook.Worksheets.get_Item(0)

# Formatieren Sie eine Zelle als Zahl
sheet.Range.get_Item(1, 2).NumberValue = 1234567890
sheet.Range.get_Item(1, 2).NumberFormat = "[Red]#,##0;[Green]#,##0"

# Formatieren Sie eine Zelle als Datum
sheet.Range.get_Item(2, 2).NumberValue = 45562
sheet.Range.get_Item(2, 2).NumberFormat = "yyyy-mm-dd"

# Formatieren Sie eine Zelle als Uhrzeit
sheet.Range.get_Item(3, 2).NumberValue = 45562
sheet.Range.get_Item(3, 2).NumberFormat = "hh:mm:ss"

# Formatieren Sie eine Zelle als Währung
sheet.Range.get_Item(4, 2).NumberValue = 1234567890
sheet.Range.get_Item(4, 2).NumberFormat = "_($* #,##0.00_);_($* (#,##0.00);_($* ""-""??_);_(@_)"

# Formatieren Sie eine Zelle als Prozentsatz
sheet.Range.get_Item(5, 2).NumberValue = 0.1234567890
sheet.Range.get_Item(5, 2).NumberFormat = "0.00%"

# Formatieren Sie eine Zelle als Bruch
sheet.Range.get_Item(6, 2).NumberValue = 0.1234567890
sheet.Range.get_Item(6, 2).NumberFormat = "0.00_ ?"

# Formatieren Sie eine Zelle als wissenschaftliche Zahl
sheet.Range.get_Item(7, 2).NumberValue = 1234567890
sheet.Range.get_Item(7, 2).NumberFormat = "0.00E+00"

# Passen Sie die Spaltenbreite automatisch an
for i in range(sheet.Columns.Count):
    sheet.AutoFitColumn(i + 1)

# Speichern Sie die Excel-Datei
workbook.SaveToFile("output/SetNumberFormat.xlsx", ExcelVersion.Version2016)
workbook.Dispose()
Die Ausgabe-XLSX-Datei:
Integrierte Stile auf Zellen anwenden
- Python
from spire.xls import Workbook, BuiltInStyles

# Erstellen Sie eine Workbook-Instanz
workbook = Workbook()

# Laden Sie die Excel-Datei
workbook.LoadFromFile("Sample.xlsx")

# Rufen Sie das erste Arbeitsblatt ab
sheet = workbook.Worksheets.get_Item(0)

# Wenden Sie den integrierten Kopfzeilenstil auf die erste Zeile an
sheet.Rows.get_Item(0).BuiltInStyle = BuiltInStyles.Heading2

# Wenden Sie den integrierten Fußzeilenstil auf die Datenzeilen an
for i in range(1, sheet.Rows.Count):
    sheet.Rows.get_Item(i).BuiltInStyle = BuiltInStyles.Accent2_20

# Passen Sie die Spaltenbreite automatisch an
for i in range(sheet.Columns.Count):
    sheet.AutoFitColumn(i + 1)

# Speichern Sie die Excel-Datei
workbook.SaveToFile("output/ApplyBuiltInStyle.xlsx")
workbook.Dispose()
Die Ausgabe-XLSX-Datei:
Fazit
In dieser Anleitung haben wir untersucht, wie man mit Spire.XLS XLSX-Dateien mit Python schreibt – vom einfachen Schreiben bis zur Formatierung. Ob es um das Erstellen von Berichten, das Automatisieren von Exporten oder das Erstellen datengesteuerter Anwendungen geht, Spire.XLS for Python bietet eine zuverlässige und effiziente Lösung für die Erstellung von Excel-Dateien.
Holen Sie sich eine kostenlose Lizenz
Sie können eine 30-tägige kostenlose Testlizenz für die Vollversion von Spire.XLS for Python anfordern. Damit können Sie während des Testzeitraums alle erweiterten Funktionen ohne Einschränkungen erkunden.
Cómo Escribir Archivos XLSX con Python | Spire.XLS
Tabla de contenidos
Instalar a través de NuGet
PM> Install-Package Spire.XLS
Enlaces relacionados
La escritura eficiente de archivos de Excel es esencial en los flujos de trabajo basados en Python para el análisis de datos, la generación de informes y la automatización. Entre las muchas bibliotecas disponibles, Spire.XLS for Python se destaca como una solución potente e independiente de Excel que admite funciones complejas como gráficos, fórmulas, formato condicional, cifrado y manejo de grandes conjuntos de datos.
Esta guía mostrará cómo escribir archivos XLSX con Python usando Spire.XLS for Python, cubriendo detalles desde la escritura básica hasta el formato avanzado, todo mientras se utiliza la biblioteca de Excel confiable y lista para la empresa.
- Cómo escribir archivos XLSX con Spire.XLS for Python
- Escribir diferentes tipos de datos en archivos XLSX usando Python
- Aplicar formato y estilos a las celdas de Excel con Python
Cómo escribir archivos XLSX con Spire.XLS for Python
¿Por qué usar Spire.XLS for Python?
Spire.XLS for Python es una biblioteca rica en funciones que permite a los desarrolladores leer, escribir y manipular archivos de Excel sin necesidad de Microsoft Office. Está diseñada para ofrecer rendimiento y flexibilidad, lo que la hace ideal para tareas de automatización e informes a gran escala.
Beneficios clave:
- API todo en uno: Lee/escribe .xls y .xlsx, formatea celdas, inserta fórmulas, convierte archivos y más.
- Soporte multiplataforma: Disponible para .NET, Java, Python y compatible con entornos basados en la nube.
- Funciones avanzadas de Excel: Admite gráficos, tablas dinámicas, formato condicional y protección.
- Documentación y soporte confiables: Amplia referencia de API, tutoriales, foro de desarrolladores y equipo de soporte.
- Edición gratuita disponible: Ideal para el procesamiento ligero de archivos de Excel sin costos de licencia.
Instalación de Spire.XLS for Python
Puede instalar la versión completa o la versión gratuita de Spire.XLS según sus requisitos.
Versión completa:
pip install spire.xls
Versión gratuita (para archivos más pequeños y casos de uso básicos):
pip install spire.xls.free
Pasos básicos para escribir archivos XLSX
Para escribir en archivos de Excel usando Python, siga estos pasos fundamentales:
- Cree un nuevo libro de Excel a través del constructor Workbook().
- Cargue un archivo XLSX existente (opcional) con el método Workbook.LoadFromFile().
- Agregue u obtenga una hoja de cálculo usando el método Workbook.Worksheets.Add() o el método get_Item().
- Acceda a las celdas a través del método Worksheet.Range.get_Item().
- Escriba datos usando las propiedades de la clase CellRange, como Value, Text, NumberValue, etc.
- Guarde el libro de trabajo usando el método Workbook.SaveToFile().
Ejemplo de código de escritura básica de archivos XLSX
- Python
from spire.xls import Workbook, ExcelVersion

# Crear un objeto Workbook
workbook = Workbook()

# Obtener la primera hoja de cálculo predeterminada
sheet = workbook.Worksheets.get_Item(0)

# Escribir una cadena en la celda B2
sheet.Range.get_Item(2, 2).Text = "¡Hola, mundo!"

# Guardar el libro de trabajo
workbook.SaveToFile("output/BasicWorkbook.xlsx", ExcelVersion.Version2016)
workbook.Dispose()
El archivo XLSX de salida:
Escribir diferentes tipos de datos en archivos XLSX usando Python
Spire.XLS ofrece una serie de propiedades en la clase CellRange que admiten la escritura de varios tipos de datos directamente en las celdas de Excel, como cadenas, valores de fecha y hora, valores booleanos y valores numéricos. Esto facilita a los desarrolladores la escritura de valores tipados directamente en las celdas de un archivo XLSX.
Tipos de datos admitidos y sus propiedades
| Propiedad | Tipo de valor | Función |
| NumberValue | float | Establece un valor numérico |
| Text | str | Establece texto sin formato |
| DateTimeValue | datetime | Establece una fecha y hora |
| BooleanValue | bool | Establece un valor booleano |
| Formula | str | Inserta una fórmula |
| HtmlString | str | Inserta texto con formato HTML |
| Value | str | Establece un valor genérico |
Ejemplo de código – Escribir varios tipos de datos
- Python
from spire.xls import Workbook, ExcelVersion, DateTime, HorizontalAlignType, Stream, ImageFormatType

# Crear un objeto Workbook
workbook = Workbook()

# Obtener la primera hoja de cálculo predeterminada
sheet = workbook.Worksheets.get_Item(0)

# Escribir texto en la celda B1
sheet.Range.get_Item(1, 2).Text = "Texto sin formato"
# Escribir un número en la celda B2
sheet.Range.get_Item(2, 2).NumberValue = 123456
sheet.Range.get_Item(2, 2).NumberFormat = "#,##0.00"
# Escribir una fecha en la celda B3
sheet.Range.get_Item(3, 2).DateTimeValue = DateTime.get_UtcNow()
# Escribir un valor booleano en la celda B4
sheet.Range.get_Item(4, 2).BooleanValue = True
# Escribir una fórmula en la celda B5
sheet.Range.get_Item(5, 2).Formula = "B2/2"
# Escribir una cadena HTML en la celda B6
sheet.Range.get_Item(6, 2).HtmlString = "<p><span style='color: blue; font-size: 18px;'>Fuente azul tamaño 18 píxeles</span></p>"
# Escribir un valor regular en la celda B7
sheet.Range.get_Item(7, 2).Value = "Valor regular"
# Insertar una imagen en la celda B8
with open("Logo.png", "rb") as f:
    imageBytes = f.read()
stream = Stream(imageBytes)
sheet.Pictures.Add(8, 2, stream, ImageFormatType.Png)

# Establecer formato básico
sheet.Range.get_Item(1, 2, 8, 2).HorizontalAlignment = HorizontalAlignType.Left
sheet.AutoFitColumn(2)
for i in range(sheet.Range.Columns.Count):
    for j in range(sheet.Range.Rows.Count):
        sheet.Range.get_Item(j + 1, i + 1).HorizontalAlignment = HorizontalAlignType.Left

# Guardar el libro de trabajo en un archivo XLSX
workbook.SaveToFile("output/WriteDataExcelCell.xlsx", ExcelVersion.Version2016)
workbook.Dispose()
El archivo XLSX de salida:
Aplicar formato y estilos a las celdas de Excel con Python
El formato juega un papel clave para que los informes de Excel sean claros y profesionales. Con Spire.XLS for Python, puede personalizar la apariencia de las celdas usando fuentes, colores, alineación, formatos de número y estilos integrados. Estas herramientas ayudan a mejorar la legibilidad y a presentar sus datos de una manera pulida y consistente, ideal para la generación de informes y la automatización.
El siguiente ejemplo de código muestra cómo dar formato a las hojas de cálculo usando Python.
Formatear celdas con fuente, color, borde y alineación
- Python
from spire.xls import Workbook, Color, LineStyleType, BordersLineType, HorizontalAlignType

# Crear un objeto Workbook
workbook = Workbook()

# Cargar el archivo XLSX
workbook.LoadFromFile("Sample.xlsx")

# Obtener la primera hoja de cálculo
sheet = workbook.Worksheets.get_Item(0)

# Establecer los estilos de fuente
# Fila de encabezado
sheet.Rows.get_Item(0).Style.Font.FontName = "Times New Roman"
sheet.Rows.get_Item(0).Style.Font.Size = 14
sheet.Rows.get_Item(0).Style.Font.IsBold = True
# Filas de datos
for i in range(1, sheet.Rows.Count):
    sheet.Rows.get_Item(i).Style.Font.FontName = "Arial"
    sheet.Rows.get_Item(i).Style.Font.Size = 12

# Establecer los colores de las celdas
# Fila de encabezado
sheet.Rows.get_Item(0).Style.Color = Color.FromRgb(200, 245, 230)
# Filas de datos
for i in range(1, sheet.Rows.Count):
    sheet.Rows.get_Item(i).Style.Color = Color.FromRgb(240, 255, 250)

# Establecer los estilos de borde
# Fila de encabezado
sheet.Rows.get_Item(0).Style.Borders.get_Item(BordersLineType.EdgeBottom).LineStyle = LineStyleType.Thick
sheet.Rows.get_Item(0).Style.Borders.get_Item(BordersLineType.EdgeBottom).Color = Color.get_White()
# Filas de datos
for i in range(1, sheet.Rows.Count):
    sheet.Rows.get_Item(i).BorderInside(LineStyleType.Thin, Color.get_Black())

# Establecer la alineación
# Fila de encabezado
sheet.Rows.get_Item(0).Style.HorizontalAlignment = HorizontalAlignType.Center
# Filas de datos
for i in range(1, sheet.Rows.Count):
    sheet.Rows.get_Item(i).Style.HorizontalAlignment = HorizontalAlignType.Left

# Ajustar automáticamente el ancho de la columna
for i in range(sheet.Columns.Count):
    sheet.AutoFitColumn(i + 1)

# Guardar el archivo de Excel
workbook.SaveToFile("output/FormatXLSXFile.xlsx")
workbook.Dispose()
El archivo XLSX de salida:
Establecer formatos de número para las celdas
- Python
from spire.xls import Workbook, ExcelVersion

# Crear una instancia de Workbook
workbook = Workbook()

# Obtener la primera hoja de cálculo
sheet = workbook.Worksheets.get_Item(0)

# Formatear una celda como número
sheet.Range.get_Item(1, 2).NumberValue = 1234567890
sheet.Range.get_Item(1, 2).NumberFormat = "[Red]#,##0;[Green]#,##0"

# Formatear una celda como fecha
sheet.Range.get_Item(2, 2).NumberValue = 45562
sheet.Range.get_Item(2, 2).NumberFormat = "yyyy-mm-dd"

# Formatear una celda como hora
sheet.Range.get_Item(3, 2).NumberValue = 45562
sheet.Range.get_Item(3, 2).NumberFormat = "hh:mm:ss"

# Formatear una celda como moneda
sheet.Range.get_Item(4, 2).NumberValue = 1234567890
sheet.Range.get_Item(4, 2).NumberFormat = "_($* #,##0.00_);_($* (#,##0.00);_($* ""-""??_);_(@_)"

# Formatear una celda como porcentaje
sheet.Range.get_Item(5, 2).NumberValue = 0.1234567890
sheet.Range.get_Item(5, 2).NumberFormat = "0.00%"

# Formatear una celda como fracción
sheet.Range.get_Item(6, 2).NumberValue = 0.1234567890
sheet.Range.get_Item(6, 2).NumberFormat = "0.00_ ?"

# Formatear una celda como número científico
sheet.Range.get_Item(7, 2).NumberValue = 1234567890
sheet.Range.get_Item(7, 2).NumberFormat = "0.00E+00"

# Ajustar automáticamente el ancho de la columna
for i in range(sheet.Columns.Count):
    sheet.AutoFitColumn(i + 1)

# Guardar el archivo de Excel
workbook.SaveToFile("output/SetNumberFormat.xlsx", ExcelVersion.Version2016)
workbook.Dispose()
El archivo XLSX de salida:
Aplicar estilos integrados a las celdas
- Python
from spire.xls import Workbook, BuiltInStyles

# Crear una instancia de Workbook
workbook = Workbook()

# Cargar el archivo de Excel
workbook.LoadFromFile("Sample.xlsx")

# Obtener la primera hoja de cálculo
sheet = workbook.Worksheets.get_Item(0)

# Aplicar estilo de encabezado integrado a la primera fila
sheet.Rows.get_Item(0).BuiltInStyle = BuiltInStyles.Heading2

# Aplicar estilo de pie de página integrado a las filas de datos
for i in range(1, sheet.Rows.Count):
    sheet.Rows.get_Item(i).BuiltInStyle = BuiltInStyles.Accent2_20

# Ajustar automáticamente el ancho de la columna
for i in range(sheet.Columns.Count):
    sheet.AutoFitColumn(i + 1)

# Guardar el archivo de Excel
workbook.SaveToFile("output/ApplyBuiltInStyle.xlsx")
workbook.Dispose()
El archivo XLSX de salida:
Conclusión
En esta guía, exploramos cómo escribir archivos XLSX con Python usando Spire.XLS, desde la escritura básica hasta el formato. Ya sea para generar informes, automatizar exportaciones o crear aplicaciones basadas en datos, Spire.XLS for Python ofrece una solución confiable y eficiente para la generación de archivos de Excel.
Obtenga una licencia gratuita
Puede solicitar una licencia de prueba gratuita de 30 días para la versión completa de Spire.XLS for Python. Esto le permite explorar todas las funciones avanzadas sin limitaciones durante el período de prueba.
Python으로 XLSX 파일 작성하기 | Spire.XLS
NuGet을 통해 설치
PM> Install-Package Spire.XLS
관련 링크
Excel 파일을 효율적으로 작성하는 것은 데이터 분석, 보고 및 자동화를 위한 Python 기반 워크플로우에서 필수적입니다. 사용 가능한 많은 라이브러리 중에서 Spire.XLS for Python은 차트, 수식, 조건부 서식, 암호화 및 대용량 데이터 세트 처리와 같은 복잡한 기능을 지원하는 강력하고 Excel에 독립적인 솔루션으로 돋보입니다.
이 가이드에서는 신뢰할 수 있고 엔터프라이즈급 Excel 라이브러리를 사용하면서 Spire.XLS for Python을 사용하여 Python으로 XLSX 파일을 작성하는 방법을 기본적인 작성부터 고급 서식 지정까지 자세히 설명합니다.
- Spire.XLS for Python으로 XLSX 파일을 작성하는 방법
- Python을 사용하여 XLSX 파일에 다양한 유형의 데이터 작성
- Python으로 Excel 셀에 서식 및 스타일 적용
Spire.XLS for Python으로 XLSX 파일을 작성하는 방법
Spire.XLS for Python을 사용하는 이유
Spire.XLS for Python은 개발자가 Microsoft Office 없이 Excel 파일을 읽고, 쓰고, 조작할 수 있게 해주는 기능이 풍부한 라이브러리입니다. 성능과 유연성을 위해 제작되어 자동화 작업 및 대규모 보고에 이상적입니다.
주요 이점:
- 올인원 API: .xls 및 .xlsx 읽기/쓰기, 셀 서식 지정, 수식 삽입, 파일 변환 등.
- 크로스 플랫폼 지원: .NET, Java, Python에서 사용 가능하며 클라우드 기반 환경과 호환됩니다.
- 고급 Excel 기능: 차트, 피벗 테이블, 조건부 서식 및 보호를 지원합니다.
- 신뢰할 수 있는 문서 및 지원: 광범위한 API 참조, 튜토리얼, 개발자 포럼 및 지원팀.
- 무료 버전 사용 가능: 라이선스 비용 없이 가벼운 Excel 파일 처리에 이상적입니다.
Spire.XLS for Python 설치
요구 사항에 따라 Spire.XLS의 전체 버전 또는 무료 버전을 설치할 수 있습니다.
전체 버전:
pip install spire.xls
무료 버전 (작은 파일 및 기본 사용 사례용):
pip install spire.xls.free
기본 XLSX 파일 작성 단계
Python을 사용하여 Excel 파일에 쓰려면 다음 기본 단계를 따르십시오.
- Workbook() 생성자를 통해 새 Excel 통합 문서를 만듭니다.
- Workbook.LoadFromFile() 메서드를 사용하여 기존 XLSX 파일을 로드합니다(선택 사항).
- Workbook.Worksheets.Add() 메서드 또는 get_Item() 메서드를 사용하여 워크시트를 추가하거나 가져옵니다.
- Worksheet.Range.get_Item() 메서드를 통해 셀에 액세스합니다.
- Value, Text, NumberValue 등과 같은 CellRange 클래스 아래의 속성을 사용하여 데이터를 작성합니다.
- Workbook.SaveToFile() 메서드를 사용하여 통합 문서를 저장합니다.
기본 XLSX 파일 작성 코드 예제
- Python
from spire.xls import Workbook, ExcelVersion

# Workbook 객체 생성
workbook = Workbook()

# 첫 번째 기본 워크시트 가져오기
sheet = workbook.Worksheets.get_Item(0)

# B2 셀에 문자열 쓰기
sheet.Range.get_Item(2, 2).Text = "안녕하세요!"

# 통합 문서 저장
workbook.SaveToFile("output/BasicWorkbook.xlsx", ExcelVersion.Version2016)
workbook.Dispose()
출력 XLSX 파일:
Python을 사용하여 XLSX 파일에 다양한 유형의 데이터 작성
Spire.XLS는 CellRange 클래스에서 문자열, 날짜-시간 값, 부울 값 및 숫자 값과 같은 다양한 데이터 유형을 Excel 셀에 직접 쓸 수 있도록 지원하는 일련의 속성을 제공합니다. 이를 통해 개발자는 형식화된 값을 XLSX 파일의 셀에 직접 쉽게 쓸 수 있습니다.
지원되는 데이터 유형 및 속성
| 속성 | 값 유형 | 기능 |
| NumberValue | float | 숫자 값을 설정합니다 |
| Text | str | 일반 텍스트를 설정합니다 |
| DateTimeValue | datetime | 날짜 및 시간을 설정합니다 |
| BooleanValue | bool | 부울 값을 설정합니다 |
| Formula | str | 수식을 삽입합니다 |
| HtmlString | str | HTML 형식의 텍스트를 삽입합니다 |
| Value | str | 일반 값을 설정합니다 |
코드 예제 – 다양한 데이터 유형 작성
- Python
from spire.xls import Workbook, ExcelVersion, DateTime, HorizontalAlignType, Stream, ImageFormatType

# Workbook 객체 생성
workbook = Workbook()

# 첫 번째 기본 워크시트 가져오기
sheet = workbook.Worksheets.get_Item(0)

# B1 셀에 텍스트 쓰기
sheet.Range.get_Item(1, 2).Text = "일반 텍스트"
# B2 셀에 숫자 쓰기
sheet.Range.get_Item(2, 2).NumberValue = 123456
sheet.Range.get_Item(2, 2).NumberFormat = "#,##0.00"
# B3 셀에 날짜 쓰기
sheet.Range.get_Item(3, 2).DateTimeValue = DateTime.get_UtcNow()
# B4 셀에 부울 값 쓰기
sheet.Range.get_Item(4, 2).BooleanValue = True
# B5 셀에 수식 쓰기
sheet.Range.get_Item(5, 2).Formula = "B2/2"
# B6 셀에 HTML 문자열 쓰기
sheet.Range.get_Item(6, 2).HtmlString = "<p><span style='color: blue; font-size: 18px;'>파란색 글꼴 18픽셀 크기</span></p>"
# B7 셀에 일반 값 쓰기
sheet.Range.get_Item(7, 2).Value = "일반 값"
# B8 셀에 그림 삽입
with open("Logo.png", "rb") as f:
    imageBytes = f.read()
stream = Stream(imageBytes)
sheet.Pictures.Add(8, 2, stream, ImageFormatType.Png)

# 기본 서식 설정
sheet.Range.get_Item(1, 2, 8, 2).HorizontalAlignment = HorizontalAlignType.Left
sheet.AutoFitColumn(2)
for i in range(sheet.Range.Columns.Count):
    for j in range(sheet.Range.Rows.Count):
        sheet.Range.get_Item(j + 1, i + 1).HorizontalAlignment = HorizontalAlignType.Left

# 통합 문서를 XLSX 파일로 저장
workbook.SaveToFile("output/WriteDataExcelCell.xlsx", ExcelVersion.Version2016)
workbook.Dispose()
출력 XLSX 파일:
Python으로 Excel 셀에 서식 및 스타일 적용
서식은 Excel 보고서를 명확하고 전문적으로 만드는 데 핵심적인 역할을 합니다. Spire.XLS for Python을 사용하면 글꼴, 색상, 맞춤, 숫자 서식 및 내장 스타일을 사용하여 셀 모양을 사용자 지정할 수 있습니다. 이러한 도구는 가독성을 높이고 데이터를 세련되고 일관된 방식으로 제공하여 보고 및 자동화에 이상적입니다.
다음 코드 예제는 Python을 사용하여 워크시트의 서식을 지정하는 방법을 보여줍니다.
글꼴, 색상, 테두리 및 맞춤으로 셀 서식 지정
- Python
from spire.xls import Workbook, Color, LineStyleType, BordersLineType, HorizontalAlignType

# Workbook 객체 생성
workbook = Workbook()

# XLSX 파일 로드
workbook.LoadFromFile("Sample.xlsx")

# 첫 번째 워크시트 가져오기
sheet = workbook.Worksheets.get_Item(0)

# 글꼴 스타일 설정
# 헤더 행
sheet.Rows.get_Item(0).Style.Font.FontName = "Times New Roman"
sheet.Rows.get_Item(0).Style.Font.Size = 14
sheet.Rows.get_Item(0).Style.Font.IsBold = True
# 데이터 행
for i in range(1, sheet.Rows.Count):
    sheet.Rows.get_Item(i).Style.Font.FontName = "Arial"
    sheet.Rows.get_Item(i).Style.Font.Size = 12

# 셀 색상 설정
# 헤더 행
sheet.Rows.get_Item(0).Style.Color = Color.FromRgb(200, 245, 230)
# 데이터 행
for i in range(1, sheet.Rows.Count):
    sheet.Rows.get_Item(i).Style.Color = Color.FromRgb(240, 255, 250)

# 테두리 스타일 설정
# 헤더 행
sheet.Rows.get_Item(0).Style.Borders.get_Item(BordersLineType.EdgeBottom).LineStyle = LineStyleType.Thick
sheet.Rows.get_Item(0).Style.Borders.get_Item(BordersLineType.EdgeBottom).Color = Color.get_White()
# 데이터 행
for i in range(1, sheet.Rows.Count):
    sheet.Rows.get_Item(i).BorderInside(LineStyleType.Thin, Color.get_Black())

# 맞춤 설정
# 헤더 행
sheet.Rows.get_Item(0).Style.HorizontalAlignment = HorizontalAlignType.Center
# 데이터 행
for i in range(1, sheet.Rows.Count):
    sheet.Rows.get_Item(i).Style.HorizontalAlignment = HorizontalAlignType.Left

# 열 너비 자동 맞춤
for i in range(sheet.Columns.Count):
    sheet.AutoFitColumn(i + 1)

# Excel 파일 저장
workbook.SaveToFile("output/FormatXLSXFile.xlsx")
workbook.Dispose()
출력 XLSX 파일:
셀에 숫자 서식 설정
- Python
from spire.xls import Workbook, ExcelVersion

# Workbook 인스턴스 생성
workbook = Workbook()

# 첫 번째 워크시트 가져오기
sheet = workbook.Worksheets.get_Item(0)

# 셀 서식을 숫자로 지정
sheet.Range.get_Item(1, 2).NumberValue = 1234567890
sheet.Range.get_Item(1, 2).NumberFormat = "[Red]#,##0;[Green]#,##0"

# 셀 서식을 날짜로 지정
sheet.Range.get_Item(2, 2).NumberValue = 45562
sheet.Range.get_Item(2, 2).NumberFormat = "yyyy-mm-dd"

# 셀 서식을 시간으로 지정
sheet.Range.get_Item(3, 2).NumberValue = 45562
sheet.Range.get_Item(3, 2).NumberFormat = "hh:mm:ss"

# 셀 서식을 통화로 지정
sheet.Range.get_Item(4, 2).NumberValue = 1234567890
sheet.Range.get_Item(4, 2).NumberFormat = "_($* #,##0.00_);_($* (#,##0.00);_($* ""-""??_);_(@_)"

# 셀 서식을 백분율로 지정
sheet.Range.get_Item(5, 2).NumberValue = 0.1234567890
sheet.Range.get_Item(5, 2).NumberFormat = "0.00%"

# 셀 서식을 분수로 지정
sheet.Range.get_Item(6, 2).NumberValue = 0.1234567890
sheet.Range.get_Item(6, 2).NumberFormat = "0.00_ ?"

# 셀 서식을 과학적 숫자로 지정
sheet.Range.get_Item(7, 2).NumberValue = 1234567890
sheet.Range.get_Item(7, 2).NumberFormat = "0.00E+00"

# 열 너비 자동 맞춤
for i in range(sheet.Columns.Count):
    sheet.AutoFitColumn(i + 1)

# Excel 파일 저장
workbook.SaveToFile("output/SetNumberFormat.xlsx", ExcelVersion.Version2016)
workbook.Dispose()
출력 XLSX 파일:
셀에 내장 스타일 적용
- Python
from spire.xls import Workbook, BuiltInStyles

# Workbook 인스턴스 생성
workbook = Workbook()

# Excel 파일 로드
workbook.LoadFromFile("Sample.xlsx")

# 첫 번째 워크시트 가져오기
sheet = workbook.Worksheets.get_Item(0)

# 첫 번째 행에 내장 헤더 스타일 적용
sheet.Rows.get_Item(0).BuiltInStyle = BuiltInStyles.Heading2

# 데이터 행에 내장 바닥글 스타일 적용
for i in range(1, sheet.Rows.Count):
    sheet.Rows.get_Item(i).BuiltInStyle = BuiltInStyles.Accent2_20

# 열 너비 자동 맞춤
for i in range(sheet.Columns.Count):
    sheet.AutoFitColumn(i + 1)

# Excel 파일 저장
workbook.SaveToFile("output/ApplyBuiltInStyle.xlsx")
workbook.Dispose()
출력 XLSX 파일:
결론
이 가이드에서는 Spire.XLS를 사용하여 Python으로 XLSX 파일을 작성하는 방법을 기본적인 작성부터 서식 지정까지 살펴보았습니다. 보고서 생성, 내보내기 자동화 또는 데이터 기반 애플리케이션 구축 등 어떤 작업이든 Spire.XLS for Python은 Excel 파일 생성을 위한 신뢰할 수 있고 효율적인 솔루션을 제공합니다.
무료 라이선스 받기
Spire.XLS for Python 전체 버전에 대한 30일 무료 평가판 라이선스를 요청할 수 있습니다. 이를 통해 평가 기간 동안 제한 없이 모든 고급 기능을 탐색할 수 있습니다.
Come Scrivere File XLSX con Python | Spire.XLS
Indice
Installazione tramite NuGet
PM> Install-Package Spire.XLS
Link correlati
La scrittura efficiente di file Excel è essenziale nei flussi di lavoro basati su Python per l'analisi dei dati, il reporting e l'automazione. Tra le molte librerie disponibili, Spire.XLS for Python si distingue come una soluzione potente e indipendente da Excel che supporta funzionalità complesse come grafici, formule, formattazione condizionale, crittografia e gestione di grandi set di dati.
Questa guida mostrerà come scrivere file XLSX con Python utilizzando Spire.XLS for Python, coprendo i dettagli dalla scrittura di base alla formattazione avanzata, il tutto utilizzando una libreria Excel affidabile e pronta per l'uso aziendale.
- Come scrivere file XLSX con Spire.XLS for Python
- Scrivere diversi tipi di dati in file XLSX utilizzando Python
- Applicare formattazione e stili alle celle di Excel con Python
Come scrivere file XLSX con Spire.XLS for Python
Perché usare Spire.XLS for Python?
Spire.XLS for Python è una libreria ricca di funzionalità che consente agli sviluppatori di leggere, scrivere e manipolare file Excel senza bisogno di Microsoft Office. È costruita per garantire prestazioni e flessibilità, rendendola ideale per attività di automazione e reporting su larga scala.
Vantaggi principali:
- API All-in-One: Lettura/scrittura di .xls e .xlsx, formattazione di celle, inserimento di formule, conversione di file e altro ancora.
- Supporto multipiattaforma: Disponibile per .NET, Java, Python e compatibile con ambienti basati su cloud.
- Funzionalità avanzate di Excel: Supporta grafici, tabelle pivot, formattazione condizionale e protezione.
- Documentazione e supporto affidabili: Riferimenti API estesi, tutorial, forum per sviluppatori e team di supporto.
- Edizione gratuita disponibile: Ideale per l'elaborazione leggera di file Excel senza costi di licenza.
Installazione di Spire.XLS for Python
È possibile installare la versione completa o la versione gratuita di Spire.XLS a seconda delle proprie esigenze.
Versione completa:
pip install spire.xls
Versione gratuita (per file più piccoli e casi d'uso di base):
pip install spire.xls.free
Passaggi di base per la scrittura di file XLSX
Per scrivere su file Excel utilizzando Python, segui questi passaggi fondamentali:
- Crea una nuova cartella di lavoro Excel tramite il costruttore Workbook().
- Carica un file XLSX esistente (opzionale) con il metodo Workbook.LoadFromFile().
- Aggiungi o ottieni un foglio di lavoro utilizzando il metodo Workbook.Worksheets.Add() o il metodo get_Item().
- Accedi alle celle tramite il metodo Worksheet.Range.get_Item().
- Scrivi i dati utilizzando le proprietà della classe CellRange, come Value, Text, NumberValue, ecc.
- Salva la cartella di lavoro utilizzando il metodo Workbook.SaveToFile().
Esempio di codice per la scrittura di base di un file XLSX
- Python
from spire.xls import Workbook, ExcelVersion

# Crea un oggetto Workbook
workbook = Workbook()

# Ottieni il primo foglio di lavoro predefinito
sheet = workbook.Worksheets.get_Item(0)

# Scrivi una stringa nella cella B2
sheet.Range.get_Item(2, 2).Text = "Ciao mondo!"

# Salva la cartella di lavoro
workbook.SaveToFile("output/BasicWorkbook.xlsx", ExcelVersion.Version2016)
workbook.Dispose()
Il file XLSX di output:
Scrivere diversi tipi di dati in file XLSX utilizzando Python
Spire.XLS offre una serie di proprietà nella classe CellRange che supportano la scrittura di vari tipi di dati direttamente nelle celle di Excel, come stringhe, valori di data e ora, valori booleani e valori numerici. Ciò rende facile per gli sviluppatori scrivere valori tipizzati direttamente nelle celle di un file XLSX.
Tipi di dati supportati e loro proprietà
| Proprietà | Tipo di valore | Funzione |
| NumberValue | float | Imposta un valore numerico |
| Text | str | Imposta testo semplice |
| DateTimeValue | datetime | Imposta una data e un'ora |
| BooleanValue | bool | Imposta un valore booleano |
| Formula | str | Inserisce una formula |
| HtmlString | str | Inserisce testo formattato in HTML |
| Value | str | Imposta un valore generico |
Esempio di codice – Scrittura di vari tipi di dati
- Python
from spire.xls import Workbook, ExcelVersion, DateTime, HorizontalAlignType, Stream, ImageFormatType

# Crea un oggetto Workbook
workbook = Workbook()

# Ottieni il primo foglio di lavoro predefinito
sheet = workbook.Worksheets.get_Item(0)

# Scrivi testo nella cella B1
sheet.Range.get_Item(1, 2).Text = "Testo semplice"
# Scrivi un numero nella cella B2
sheet.Range.get_Item(2, 2).NumberValue = 123456
sheet.Range.get_Item(2, 2).NumberFormat = "#,##0.00"
# Scrivi una data nella cella B3
sheet.Range.get_Item(3, 2).DateTimeValue = DateTime.get_UtcNow()
# Scrivi un valore booleano nella cella B4
sheet.Range.get_Item(4, 2).BooleanValue = True
# Scrivi una formula nella cella B5
sheet.Range.get_Item(5, 2).Formula = "B2/2"
# Scrivi una stringa HTML nella cella B6
sheet.Range.get_Item(6, 2).HtmlString = "<p><span style='color: blue; font-size: 18px;'>Carattere blu dimensione 18 pixel</span></p>"
# Scrivi un valore normale nella cella B7
sheet.Range.get_Item(7, 2).Value = "Valore normale"
# Inserisci un'immagine nella cella B8
with open("Logo.png", "rb") as f:
    imageBytes = f.read()
stream = Stream(imageBytes)
sheet.Pictures.Add(8, 2, stream, ImageFormatType.Png)

# Imposta la formattazione di base
sheet.Range.get_Item(1, 2, 8, 2).HorizontalAlignment = HorizontalAlignType.Left
sheet.AutoFitColumn(2)
for i in range(sheet.Range.Columns.Count):
    for j in range(sheet.Range.Rows.Count):
        sheet.Range.get_Item(j + 1, i + 1).HorizontalAlignment = HorizontalAlignType.Left

# Salva la cartella di lavoro in un file XLSX
workbook.SaveToFile("output/WriteDataExcelCell.xlsx", ExcelVersion.Version2016)
workbook.Dispose()
Il file XLSX di output:
Applicare formattazione e stili alle celle di Excel con Python
La formattazione gioca un ruolo chiave nel rendere i report di Excel chiari e professionali. Con Spire.XLS for Python, è possibile personalizzare l'aspetto delle celle utilizzando caratteri, colori, allineamento, formati numerici e stili predefiniti. Questi strumenti aiutano a migliorare la leggibilità e a presentare i dati in modo raffinato e coerente, ideale per il reporting e l'automazione.
L'esempio di codice seguente mostra come formattare i fogli di lavoro utilizzando Python.
Formattare le celle con carattere, colore, bordo e allineamento
- Python
from spire.xls import Workbook, Color, LineStyleType, BordersLineType, HorizontalAlignType

# Crea un oggetto Workbook
workbook = Workbook()

# Carica il file XLSX
workbook.LoadFromFile("Sample.xlsx")

# Ottieni il primo foglio di lavoro
sheet = workbook.Worksheets.get_Item(0)

# Imposta gli stili del carattere
# Riga di intestazione
sheet.Rows.get_Item(0).Style.Font.FontName = "Times New Roman"
sheet.Rows.get_Item(0).Style.Font.Size = 14
sheet.Rows.get_Item(0).Style.Font.IsBold = True
# Righe di dati
for i in range(1, sheet.Rows.Count):
    sheet.Rows.get_Item(i).Style.Font.FontName = "Arial"
    sheet.Rows.get_Item(i).Style.Font.Size = 12

# Imposta i colori delle celle
# Riga di intestazione
sheet.Rows.get_Item(0).Style.Color = Color.FromRgb(200, 245, 230)
# Righe di dati
for i in range(1, sheet.Rows.Count):
    sheet.Rows.get_Item(i).Style.Color = Color.FromRgb(240, 255, 250)

# Imposta gli stili dei bordi
# Riga di intestazione
sheet.Rows.get_Item(0).Style.Borders.get_Item(BordersLineType.EdgeBottom).LineStyle = LineStyleType.Thick
sheet.Rows.get_Item(0).Style.Borders.get_Item(BordersLineType.EdgeBottom).Color = Color.get_White()
# Righe di dati
for i in range(1, sheet.Rows.Count):
    sheet.Rows.get_Item(i).BorderInside(LineStyleType.Thin, Color.get_Black())

# Imposta l'allineamento
# Riga di intestazione
sheet.Rows.get_Item(0).Style.HorizontalAlignment = HorizontalAlignType.Center
# Righe di dati
for i in range(1, sheet.Rows.Count):
    sheet.Rows.get_Item(i).Style.HorizontalAlignment = HorizontalAlignType.Left

# Adatta automaticamente la larghezza della colonna
for i in range(sheet.Columns.Count):
    sheet.AutoFitColumn(i + 1)

# Salva il file Excel
workbook.SaveToFile("output/FormatXLSXFile.xlsx")
workbook.Dispose()
Il file XLSX di output:
Impostare i formati numerici per le celle
- Python
from spire.xls import Workbook, ExcelVersion

# Crea un'istanza di Workbook
workbook = Workbook()

# Ottieni il primo foglio di lavoro
sheet = workbook.Worksheets.get_Item(0)

# Formatta una cella come numero
sheet.Range.get_Item(1, 2).NumberValue = 1234567890
sheet.Range.get_Item(1, 2).NumberFormat = "[Red]#,##0;[Green]#,##0"

# Formatta una cella come data
sheet.Range.get_Item(2, 2).NumberValue = 45562
sheet.Range.get_Item(2, 2).NumberFormat = "yyyy-mm-dd"

# Formatta una cella come ora
sheet.Range.get_Item(3, 2).NumberValue = 45562
sheet.Range.get_Item(3, 2).NumberFormat = "hh:mm:ss"

# Formatta una cella come valuta
sheet.Range.get_Item(4, 2).NumberValue = 1234567890
sheet.Range.get_Item(4, 2).NumberFormat = "_($* #,##0.00_);_($* (#,##0.00);_($* ""-""??_);_(@_)"

# Formatta una cella come percentuale
sheet.Range.get_Item(5, 2).NumberValue = 0.1234567890
sheet.Range.get_Item(5, 2).NumberFormat = "0.00%"

# Formatta una cella come frazione
sheet.Range.get_Item(6, 2).NumberValue = 0.1234567890
sheet.Range.get_Item(6, 2).NumberFormat = "0.00_ ?"

# Formatta una cella come numero scientifico
sheet.Range.get_Item(7, 2).NumberValue = 1234567890
sheet.Range.get_Item(7, 2).NumberFormat = "0.00E+00"

# Adatta automaticamente la larghezza della colonna
for i in range(sheet.Columns.Count):
    sheet.AutoFitColumn(i + 1)

# Salva il file Excel
workbook.SaveToFile("output/SetNumberFormat.xlsx", ExcelVersion.Version2016)
workbook.Dispose()
Il file XLSX di output:
Applicare stili predefiniti alle celle
- Python
from spire.xls import Workbook, BuiltInStyles

# Crea un'istanza di Workbook
workbook = Workbook()

# Carica il file Excel
workbook.LoadFromFile("Sample.xlsx")

# Ottieni il primo foglio di lavoro
sheet = workbook.Worksheets.get_Item(0)

# Applica lo stile di intestazione predefinito alla prima riga
sheet.Rows.get_Item(0).BuiltInStyle = BuiltInStyles.Heading2

# Applica lo stile a piè di pagina predefinito alle righe di dati
for i in range(1, sheet.Rows.Count):
    sheet.Rows.get_Item(i).BuiltInStyle = BuiltInStyles.Accent2_20

# Adatta automaticamente la larghezza della colonna
for i in range(sheet.Columns.Count):
    sheet.AutoFitColumn(i + 1)

# Salva il file Excel
workbook.SaveToFile("output/ApplyBuiltInStyle.xlsx")
workbook.Dispose()
Il file XLSX di output:
Conclusione
In questa guida, abbiamo esplorato come scrivere file XLSX con Python utilizzando Spire.XLS, dalla scrittura di base alla formattazione. Che si tratti di generare report, automatizzare esportazioni o creare applicazioni basate sui dati, Spire.XLS for Python offre una soluzione affidabile ed efficiente per la generazione di file Excel.
Ottieni una licenza gratuita
Puoi richiedere una licenza di prova gratuita di 30 giorni per la versione completa di Spire.XLS for Python. Ciò ti consente di esplorare tutte le funzionalità avanzate senza limitazioni durante il periodo di prova.
Comment écrire des fichiers XLSX avec Python | Spire.XLS
Table des matières
Installer via NuGet
PM> Install-Package Spire.XLS
Liens connexes
La création efficace de fichiers Excel est essentielle dans les flux de travail basés sur Python pour l'analyse de données, le reporting et l'automatisation. Parmi les nombreuses bibliothèques disponibles, Spire.XLS for Python se distingue comme une solution puissante et indépendante d'Excel qui prend en charge des fonctionnalités complexes telles que les graphiques, les formules, la mise en forme conditionnelle, le cryptage et la gestion de grands ensembles de données.
Ce guide montrera comment écrire des fichiers XLSX avec Python en utilisant Spire.XLS for Python, couvrant les détails de l'écriture de base à la mise en forme avancée, le tout en utilisant la bibliothèque Excel fiable et prête pour l'entreprise.
- Comment écrire des fichiers XLSX avec Spire.XLS for Python
- Écrire différents types de données dans des fichiers XLSX avec Python
- Appliquer des formats et des styles aux cellules Excel avec Python
Comment écrire des fichiers XLSX avec Spire.XLS for Python
Pourquoi utiliser Spire.XLS for Python ?
Spire.XLS for Python est une bibliothèque riche en fonctionnalités qui permet aux développeurs de lire, d'écrire et de manipuler des fichiers Excel sans avoir besoin de Microsoft Office. Elle est conçue pour la performance et la flexibilité, ce qui la rend idéale pour les tâches d'automatisation et les rapports à grande échelle.
Principaux avantages :
- API tout-en-un : Lecture/écriture de .xls et .xlsx, mise en forme des cellules, insertion de formules, conversion de fichiers, et plus encore.
- Support multiplateforme : Disponible pour .NET, Java, Python, et compatible avec les environnements basés sur le cloud.
- Fonctionnalités Excel avancées : Prend en charge les graphiques, les tableaux croisés dynamiques, la mise en forme conditionnelle et la protection.
- Documentation et support fiables : Référence API complète, tutoriels, forum des développeurs et équipe de support.
- Édition gratuite disponible : Idéale pour le traitement léger de fichiers Excel sans frais de licence.
Installation de Spire.XLS for Python
Vous pouvez installer la version complète ou la version gratuite de Spire.XLS en fonction de vos besoins.
Version complète :
pip install spire.xls
Version gratuite (pour les fichiers plus petits et les cas d'utilisation de base) :
pip install spire.xls.free
Étapes de base pour l'écriture de fichiers XLSX
Pour écrire dans des fichiers Excel avec Python, suivez ces étapes fondamentales :
- Créez un nouveau classeur Excel via le constructeur Workbook().
- Chargez un fichier XLSX existant (facultatif) avec la méthode Workbook.LoadFromFile().
- Ajoutez ou obtenez une feuille de calcul en utilisant la méthode Workbook.Worksheets.Add() ou la méthode get_Item().
- Accédez aux cellules via la méthode Worksheet.Range.get_Item().
- Écrivez des données en utilisant les propriétés de la classe CellRange, telles que Value, Text, NumberValue, etc.
- Enregistrez le classeur en utilisant la méthode Workbook.SaveToFile().
Exemple de code d'écriture de fichier XLSX de base
- Python
from spire.xls import Workbook, ExcelVersion

# Créer un objet Workbook
workbook = Workbook()

# Obtenir la première feuille de calcul par défaut
sheet = workbook.Worksheets.get_Item(0)

# Écrire une chaîne dans la cellule B2
sheet.Range.get_Item(2, 2).Text = "Bonjour le monde!"

# Enregistrer le classeur
workbook.SaveToFile("output/BasicWorkbook.xlsx", ExcelVersion.Version2016)
workbook.Dispose()
Le fichier XLSX de sortie :
Écrire différents types de données dans des fichiers XLSX avec Python
Spire.XLS offre une série de propriétés dans la classe CellRange qui permettent d'écrire divers types de données directement dans les cellules Excel, tels que des chaînes de caractères, des valeurs date-heure, des valeurs booléennes et des valeurs numériques. Cela facilite l'écriture de valeurs typées directement dans les cellules d'un fichier XLSX par les développeurs.
Types de données pris en charge et leurs propriétés
| Propriété | Type de valeur | Fonction |
| NumberValue | float | Définit une valeur numérique |
| Text | str | Définit du texte brut |
| DateTimeValue | datetime | Définit une date et une heure |
| BooleanValue | bool | Définit une valeur booléenne |
| Formula | str | Insère une formule |
| HtmlString | str | Insère du texte formaté en HTML |
| Value | str | Définit une valeur générique |
Exemple de code – Écriture de divers types de données
- Python
from spire.xls import Workbook, ExcelVersion, DateTime, HorizontalAlignType, Stream, ImageFormatType

# Créer un objet Workbook
workbook = Workbook()

# Obtenir la première feuille de calcul par défaut
sheet = workbook.Worksheets.get_Item(0)

# Écrire du texte dans la cellule B1
sheet.Range.get_Item(1, 2).Text = "Texte brut"
# Écrire un nombre dans la cellule B2
sheet.Range.get_Item(2, 2).NumberValue = 123456
sheet.Range.get_Item(2, 2).NumberFormat = "#,##0.00"
# Écrire une date dans la cellule B3
sheet.Range.get_Item(3, 2).DateTimeValue = DateTime.get_UtcNow()
# Écrire une valeur booléenne dans la cellule B4
sheet.Range.get_Item(4, 2).BooleanValue = True
# Écrire une formule dans la cellule B5
sheet.Range.get_Item(5, 2).Formula = "B2/2"
# Écrire une chaîne HTML dans la cellule B6
sheet.Range.get_Item(6, 2).HtmlString = "<p><span style='color: blue; font-size: 18px;'>Police bleue taille 18 pixels</span></p>"
# Écrire une valeur normale dans la cellule B7
sheet.Range.get_Item(7, 2).Value = "Valeur normale"
# Insérer une image dans la cellule B8
with open("Logo.png", "rb") as f:
    imageBytes = f.read()
stream = Stream(imageBytes)
sheet.Pictures.Add(8, 2, stream, ImageFormatType.Png)

# Appliquer une mise en forme de base
sheet.Range.get_Item(1, 2, 8, 2).HorizontalAlignment = HorizontalAlignType.Left
sheet.AutoFitColumn(2)
for i in range(sheet.Range.Columns.Count):
    for j in range(sheet.Range.Rows.Count):
        sheet.Range.get_Item(j + 1, i + 1).HorizontalAlignment = HorizontalAlignType.Left

# Enregistrer le classeur dans un fichier XLSX
workbook.SaveToFile("output/WriteDataExcelCell.xlsx", ExcelVersion.Version2016)
workbook.Dispose()
Le fichier XLSX de sortie :
Appliquer des formats et des styles aux cellules Excel avec Python
La mise en forme joue un rôle clé pour rendre les rapports Excel clairs et professionnels. Avec Spire.XLS for Python, vous pouvez personnaliser l'apparence des cellules en utilisant des polices, des couleurs, des alignements, des formats de nombre et des styles intégrés. Ces outils aident à améliorer la lisibilité et à présenter vos données de manière soignée et cohérente, ce qui est idéal pour le reporting et l'automatisation.
L'exemple de code suivant montre comment mettre en forme des feuilles de calcul avec Python.
Mettre en forme les cellules avec police, couleur, bordure et alignement
- Python
from spire.xls import Workbook, Color, LineStyleType, BordersLineType, HorizontalAlignType

# Créer un objet Workbook
workbook = Workbook()

# Charger le fichier XLSX
workbook.LoadFromFile("Sample.xlsx")

# Obtenir la première feuille de calcul
sheet = workbook.Worksheets.get_Item(0)

# Définir les styles de police
# Ligne d'en-tête
sheet.Rows.get_Item(0).Style.Font.FontName = "Times New Roman"
sheet.Rows.get_Item(0).Style.Font.Size = 14
sheet.Rows.get_Item(0).Style.Font.IsBold = True
# Lignes de données
for i in range(1, sheet.Rows.Count):
    sheet.Rows.get_Item(i).Style.Font.FontName = "Arial"
    sheet.Rows.get_Item(i).Style.Font.Size = 12

# Définir les couleurs des cellules
# Ligne d'en-tête
sheet.Rows.get_Item(0).Style.Color = Color.FromRgb(200, 245, 230)
# Lignes de données
for i in range(1, sheet.Rows.Count):
    sheet.Rows.get_Item(i).Style.Color = Color.FromRgb(240, 255, 250)

# Définir les styles de bordure
# Ligne d'en-tête
sheet.Rows.get_Item(0).Style.Borders.get_Item(BordersLineType.EdgeBottom).LineStyle = LineStyleType.Thick
sheet.Rows.get_Item(0).Style.Borders.get_Item(BordersLineType.EdgeBottom).Color = Color.get_White()
# Lignes de données
for i in range(1, sheet.Rows.Count):
    sheet.Rows.get_Item(i).BorderInside(LineStyleType.Thin, Color.get_Black())

# Définir l'alignement
# Ligne d'en-tête
sheet.Rows.get_Item(0).Style.HorizontalAlignment = HorizontalAlignType.Center
# Lignes de données
for i in range(1, sheet.Rows.Count):
    sheet.Rows.get_Item(i).Style.HorizontalAlignment = HorizontalAlignType.Left

# Ajuster automatiquement la largeur de la colonne
for i in range(sheet.Columns.Count):
    sheet.AutoFitColumn(i + 1)

# Enregistrer le fichier Excel
workbook.SaveToFile("output/FormatXLSXFile.xlsx")
workbook.Dispose()
Le fichier XLSX de sortie :
Définir les formats de nombre pour les cellules
- Python
from spire.xls import Workbook, ExcelVersion

# Créer une instance de Workbook
workbook = Workbook()

# Obtenir la première feuille de calcul
sheet = workbook.Worksheets.get_Item(0)

# Mettre en forme une cellule en tant que nombre
sheet.Range.get_Item(1, 2).NumberValue = 1234567890
sheet.Range.get_Item(1, 2).NumberFormat = "[Red]#,##0;[Green]#,##0"

# Mettre en forme une cellule en tant que date
sheet.Range.get_Item(2, 2).NumberValue = 45562
sheet.Range.get_Item(2, 2).NumberFormat = "yyyy-mm-dd"

# Mettre en forme une cellule en tant qu'heure
sheet.Range.get_Item(3, 2).NumberValue = 45562
sheet.Range.get_Item(3, 2).NumberFormat = "hh:mm:ss"

# Mettre en forme une cellule en tant que devise
sheet.Range.get_Item(4, 2).NumberValue = 1234567890
sheet.Range.get_Item(4, 2).NumberFormat = "_($* #,##0.00_);_($* (#,##0.00);_($* ""-""??_);_(@_)"

# Mettre en forme une cellule en tant que pourcentage
sheet.Range.get_Item(5, 2).NumberValue = 0.1234567890
sheet.Range.get_Item(5, 2).NumberFormat = "0.00%"

# Mettre en forme une cellule en tant que fraction
sheet.Range.get_Item(6, 2).NumberValue = 0.1234567890
sheet.Range.get_Item(6, 2).NumberFormat = "0.00_ ?"

# Mettre en forme une cellule en tant que nombre scientifique
sheet.Range.get_Item(7, 2).NumberValue = 1234567890
sheet.Range.get_Item(7, 2).NumberFormat = "0.00E+00"

# Ajuster automatiquement la largeur de la colonne
for i in range(sheet.Columns.Count):
    sheet.AutoFitColumn(i + 1)

# Enregistrer le fichier Excel
workbook.SaveToFile("output/SetNumberFormat.xlsx", ExcelVersion.Version2016)
workbook.Dispose()
Le fichier XLSX de sortie :
Appliquer des styles intégrés aux cellules
- Python
from spire.xls import Workbook, BuiltInStyles

# Créer une instance de Workbook
workbook = Workbook()

# Charger le fichier Excel
workbook.LoadFromFile("Sample.xlsx")

# Obtenir la première feuille de calcul
sheet = workbook.Worksheets.get_Item(0)

# Appliquer le style d'en-tête intégré à la première ligne
sheet.Rows.get_Item(0).BuiltInStyle = BuiltInStyles.Heading2

# Appliquer le style de pied de page intégré aux lignes de données
for i in range(1, sheet.Rows.Count):
    sheet.Rows.get_Item(i).BuiltInStyle = BuiltInStyles.Accent2_20

# Ajuster automatiquement la largeur de la colonne
for i in range(sheet.Columns.Count):
    sheet.AutoFitColumn(i + 1)

# Enregistrer le fichier Excel
workbook.SaveToFile("output/ApplyBuiltInStyle.xlsx")
workbook.Dispose()
Le fichier XLSX de sortie :
Conclusion
Dans ce guide, nous avons exploré comment écrire des fichiers XLSX avec Python en utilisant Spire.XLS, de l'écriture de base à la mise en forme. Qu'il s'agisse de générer des rapports, d'automatiser des exportations ou de créer des applications basées sur les données, Spire.XLS for Python offre une solution fiable et efficace pour la génération de fichiers Excel.
Obtenir une licence gratuite
Vous pouvez demander une licence d'essai gratuite de 30 jours pour la version complète de Spire.XLS for Python. Cela vous permet d'explorer toutes les fonctionnalités avancées sans limitations pendant la période d'essai.
Read Word DOC or DOCX Files in Python - Extract Text, Images, Tables and More

Reading Word documents in Python is a common task for developers who work with document automation, data extraction, or content processing. Whether you're working with modern .docx files or legacy .doc formats, being able to open, read, and extract content like text, tables, and images from Word files can save time and streamline your workflows.
While many Python libraries support .docx, reading .doc files—the older binary format—can be more challenging. Fortunately, there are reliable methods for handling both file types in Python.
In this tutorial, you'll learn how to read Word documents (.doc and .docx) in Python using the Spire.Doc for Python library. We'll walk through practical code examples to extract text, images, tables, comments, lists, and even metadata. Whether you're building an automation script or a full document parser, this guide will help you work with Word files effectively across formats.
Table of Contents
- Why Read Word Documents Programmatically in Python?
- Install the Library for Parsing Word Documents in Python
- Read Text from Word DOC or DOCX in Python
- Read Specific Elements from a Word Document in Python
- Conclusion
- FAQs
Why Read Word Documents Programmatically in Python?
Reading Word files using Python allows for powerful automation of content processing tasks, such as:
- Extracting data from reports, resumes, or forms.
- Parsing and organizing content into databases or dashboards.
- Converting or analyzing large volumes of Word documents.
- Integrating document reading into web apps, APIs, or back-end systems.
Programmatic reading eliminates manual copy-paste workflows and ensures consistent and scalable results.
Install the Library for Parsing Word Documents in Python
To read .docx and .doc files in Python, you need a library that can handle both formats. Spire.Doc for Python is a versatile and easy-to-use library that lets you extract text, images, tables, comments, lists, and metadata from Word documents. It runs independently of Microsoft Word, so Office installation is not required.
To get started, install Spire.Doc easily with pip:
pip install Spire.Doc
Read Text from Word DOC or DOCX in Python
Extracting text from Word documents is a common requirement in many automation and data processing tasks. Depending on your needs, you might want to read the entire content or focus on specific sections or paragraphs. This section covers both approaches.
Get Text from Entire Document
When you need to retrieve the complete textual content of a Word document — for tasks like full-text indexing or simple content export — you can use the Document.GetText() method. The following example demonstrates how to load a Word file, extract all text, and save it to a file:
from spire.doc import *

# Load the Word .docx or .doc file
document = Document()
document.LoadFromFile("sample.docx")

# Get all text
text = document.GetText()

# Save to a text file
with open("extracted_text.txt", "w", encoding="utf-8") as file:
    file.write(text)

document.Close()

Get Text from Specific Section or Paragraph
Many documents, such as reports or contracts, are organized into multiple sections. Extracting text from a specific section enables targeted processing when you need content from a particular part only. By iterating through the paragraphs of the selected section, you can isolate the relevant text:
from spire.doc import *

# Load the Word .docx or .doc file
document = Document()
document.LoadFromFile("sample.docx")

# Access the desired section
section = document.Sections[0]

# Get text from the paragraphs of the section
with open("paragraphs_output.txt", "w", encoding="utf-8") as file:
    for paragraph in section.Paragraphs:
        file.write(paragraph.Text + "\n")

document.Close()
Read Specific Elements from a Word Document in Python
Beyond plain text, Word documents often include rich content like images, tables, comments, lists, metadata, and more. These elements can easily be programmatically accessed and extracted.
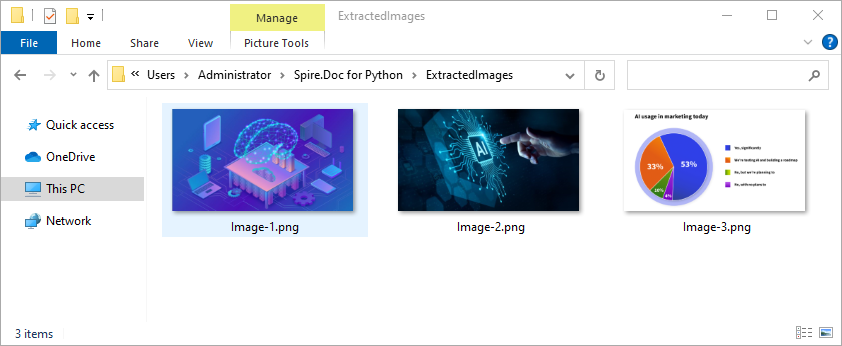
Extract Images
Word documents often embed images like logos, charts, or illustrations. To extract these images:
- Traverse each paragraph and its child objects.
- Identify objects of type DocPicture.
- Retrieve the image bytes and save them as separate files.
from spire.doc import *
import os

# Load the Word document
document = Document()
document.LoadFromFile("sample.docx")

# Create a list to store image byte data
images = []

# Iterate over sections
for s in range(document.Sections.Count):
    section = document.Sections[s]

    # Iterate over paragraphs
    for p in range(section.Paragraphs.Count):
        paragraph = section.Paragraphs[p]

        # Iterate over child objects
        for c in range(paragraph.ChildObjects.Count):
            obj = paragraph.ChildObjects[c]
            # Extract image data
            if isinstance(obj, DocPicture):
                picture = obj
                # Get image bytes
                dataBytes = picture.ImageBytes
                # Store in the list
                images.append(dataBytes)

# Create the output directory if it doesn't exist
output_folder = "ExtractedImages"
os.makedirs(output_folder, exist_ok=True)

# Save each image from byte data
for i, item in enumerate(images):
    fileName = f"Image-{i+1}.png"
    with open(os.path.join(output_folder, fileName), 'wb') as imageFile:
        imageFile.write(item)

# Close the document
document.Close()
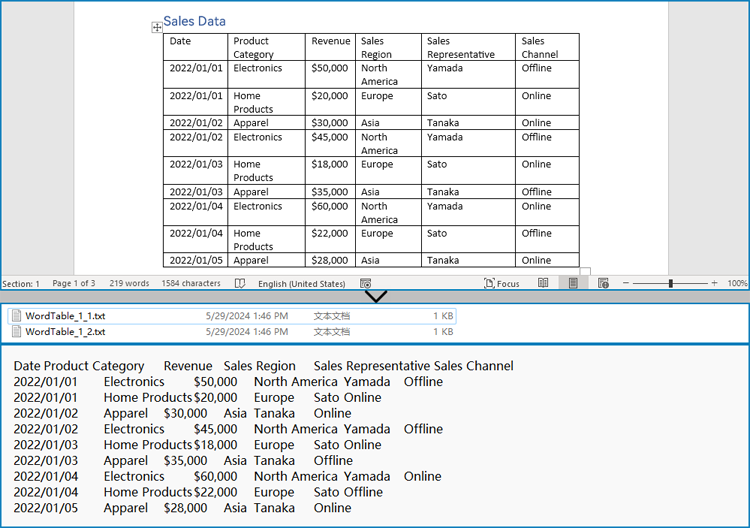
Get Table Data
Tables organize data such as schedules, financial records, or lists. To extract all tables and their content:
- Loop through tables in each section.
- Loop through rows and cells in each table.
- Traverse over each cell’s paragraphs and combine their texts.
- Save the extracted table data in a readable text format.
from spire.doc import *
import os

# Load the Word document
document = Document()
document.LoadFromFile("tables.docx")

# Ensure output directory exists
output_dir = "output/Tables"
os.makedirs(output_dir, exist_ok=True)

# Loop through each section
for s in range(document.Sections.Count):
    section = document.Sections[s]
    tables = section.Tables

    # Loop through each table in the section
    for i in range(tables.Count):
        table = tables[i]
        table_data = ""

        # Loop through each row
        for j in range(table.Rows.Count):
            row = table.Rows[j]

            # Loop through each cell
            for k in range(row.Cells.Count):
                cell = row.Cells[k]
                cell_text = ""

                # Combine text from all paragraphs in the cell
                for p in range(cell.Paragraphs.Count):
                    para_text = cell.Paragraphs[p].Text
                    cell_text += para_text + " "

                table_data += cell_text.strip()

                # Add tab between cells (except after the last cell)
                if k < row.Cells.Count - 1:
                    table_data += "\t"
            table_data += "\n"

        # Save the table data to a separate text file
        output_path = os.path.join(output_dir, f"WordTable_{s+1}_{i+1}.txt")
        with open(output_path, "w", encoding="utf-8") as output_file:
            output_file.write(table_data)

# Close the document
document.Close()
Read Lists
Lists are frequently used to structure content in Word documents. This example identifies paragraphs formatted as list items and writes the list marker together with the text to a file.
from spire.doc import *

# Load the Word document
document = Document()
document.LoadFromFile("sample.docx")

# Open a text file for writing the list items
with open("list_items.txt", "w", encoding="utf-8") as output_file:

    # Iterate over sections
    for s in range(document.Sections.Count):
        section = document.Sections[s]

        # Iterate over paragraphs
        for p in range(section.Paragraphs.Count):
            paragraph = section.Paragraphs[p]

            # Check if the paragraph is a list
            if paragraph.ListFormat.ListType != ListType.NoList:
                # Write the combined list marker and paragraph text to file
                output_file.write(paragraph.ListText + paragraph.Text + "\n")

# Close the document
document.Close()
Extract Comments
Comments are typically used for collaboration and feedback in Word documents. This code retrieves all comments, including the author and content, and saves them to a file with clear formatting for later review or audit.
from spire.doc import *

# Load the Word .docx or .doc document
document = Document()
document.LoadFromFile("sample.docx")

# Open a text file to save comments
with open("extracted_comments.txt", "w", encoding="utf-8") as output_file:

    # Iterate over the comments
    for i in range(document.Comments.Count):
        comment = document.Comments[i]

        # Write comment header with comment number
        output_file.write(f"Comment {i + 1}:\n")

        # Write comment author
        output_file.write(f"Author: {comment.Format.Author}\n")

        # Extract full comment text by concatenating all paragraph texts
        comment_text = ""
        for j in range(comment.Body.Paragraphs.Count):
            paragraph = comment.Body.Paragraphs[j]
            comment_text += paragraph.Text + "\n"

        # Write the comment text
        output_file.write(f"Content: {comment_text.strip()}\n")

        # Add a blank line between comments
        output_file.write("\n")

# Close the document
document.Close()
Retrieve Metadata (Document Properties)
Metadata provides information about the document such as author, title, creation date, and modification date. This code extracts common built-in properties for reporting or cataloging purposes.
from spire.doc import *

# Load the Word .docx or .doc document
document = Document()
document.LoadFromFile("sample.docx")

# Get the built-in document properties
props = document.BuiltinDocumentProperties

# Open a text file to write the properties
with open("document_properties.txt", "w", encoding="utf-8") as output_file:
    output_file.write(f"Title: {props.Title}\n")
    output_file.write(f"Author: {props.Author}\n")
    output_file.write(f"Subject: {props.Subject}\n")
    output_file.write(f"Created: {props.CreateDate}\n")
    output_file.write(f"Modified: {props.LastSaveDate}\n")

# Close the document
document.Close()
Conclusion
Reading both .doc and .docx Word documents in Python is fully achievable with the right tools. With Spire.Doc, you can:
- Read text from the entire document, any section or paragraph.
- Extract tables and process structured data.
- Export images embedded in the document.
- Extract comments and lists from the document.
- Work with both modern and legacy Word formats without extra effort.
Try Spire.Doc today to simplify your Word document parsing workflows in Python!
FAQs
Q1: How do I read a Word DOC or DOCX file in Python?
A1: Use a Python library like Spire.Doc to load and extract content from Word files.
Q2: Do I need Microsoft Word installed to use Spire.Doc?
A2: No, it works without any Office installation.
Q3: Can I generate or update Word documents with Spire.Doc?
A3: Yes, Spire.Doc not only allows you to read and extract content from Word documents but also provides powerful features to create, modify, and save Word files programmatically.
Get a Free License
To fully experience the capabilities of Spire.Doc for Python without any evaluation limitations, you can request a free 30-day trial license.
Spire.XLS for Java 15.6.3 supports font stream when applying custom fonts
We’re glad to announce the release of Spire.XLS for Java 15.6.3. This version starts to support font stream when applying custom fonts, and support retrieving the cell location of embedded images. Meanwhile, a number of known bugs have been successfully fixed. More details are listed below.
Here is a list of changes made in this release:
| Category | ID | Description |
| New feature | SPIREXLS-5817 | Added support for font stream data when applying custom fonts.
Workbook book = new Workbook();
FileInputStream stream = new FileInputStream("fontpath");
book.setCustomFontStreams(new FileInputStream[]{stream});
|
| New feature | SPIREXLS-5821 | Added support for setting setIsSaveBlankCell to control whether to export extra blank cells when converting Excel to HTML.
Workbook workbook = new Workbook(); workbook.loadFromFile(inputFile); WorksheetsCollection sheets = workbook.getWorksheets(); HTMLOptions options = new HTMLOptions(); options.setImageEmbedded(true); options.setStyleDefine(HTMLOptions.StyleDefineType.Inline); options.setIsSaveBlankCell(true); |
| New feature | SPIREXLS-5822 | Added support for retrieving the cell location of embedded images.
Worksheet worksheet=wb.getWorksheets().get(0); ExcelPicture[] cellimages=worksheet.getCellImages(); cellimages[0].getEmbedCellName() |
| Bug | SPIREXLS-5522 | Fixed the issue where sheet.getCellImages() could not retrieve images inserted by Office 365. |
| Bug | SPIREXLS-5803 | Fixed the issue where page numbering was incorrect when converting Excel to PDF. |
| Bug | SPIREXLS-5812 | Fixed the issue that caused a "NullPointerException" when copying Excel and saving it as .xls. |
| Bug | SPIREXLS-5813 | Fixed the issue where text content was truncated when converting Excel to PDF. |
| Bug | SPIREXLS-5815 | Fixed the issue that caused the error "For input string: 'OP_ID'" when converting CSV to Excel. |
| Bug | SPIREXLS-5816 | Fixed the issue where autoFitColumns() behaved incorrectly. |
| Bug | SPIREXLS-5823 | Fixed the issue where cell styling was inconsistent when converting Excel to HTML with setIsFixedTableColWidth enabled. |
| Bug | SPIREXLS-5844 | Fixed the issue that caused the error "Specified argument was out of the range of valid values" when converting Excel to HTML. |
| Bug | SPIREXLS-5852 SPIREXLS-5855 |
Fixed the issue where Excel was rendered incorrectly when converting to HTML. |
How to Add Data Bars in Excel (Manual & Java Automation Guide)
Table of Contents
Install with Maven
<dependency>
<groupId>e-iceblue</groupId>
<artifactId>spire.xls</artifactId>
<version>15.5.1</version>
</dependency>
Related Links
Working with Excel data can get overwhelming when numbers pile up and insights get buried. Data bars offer a quick, visual way to highlight values directly within cells, making it easy to spot trends and compare numbers at a glance. Whether it’s a sales report, project tracker, or budget sheet, data bars help turn raw data into clear visuals—no charts needed. In this guide, you’ll learn how to add data bars in Excel, both manually and with Java.
- Add Data Bars to Cells in Excel Manually
- Limitations of Manual Operation
- Add Data Bars in Excel Using Java
- Conclusion
How to Add Data Bars to Cells in Excel (Manual Method)
In this section, we’ll walk through the simple steps to add data bars to cells in Excel manually. This method allows you to quickly visualize your data without complex formulas, making it easy to highlight trends and compare values directly within your spreadsheet.
Steps to Add Data Bars in Excel:
- Open your source Excel file.
- Select the range of cells where you want to add data bars.
- Go to the Home tab.
- Click the Conditional Formatting dropdown arrow.
- In the expanded menu, select Data Bars, then choose either Gradient Fill or Solid Fill based on your preference.
Tip: If you want to add solid fill red data bars in Excel, just choose the "Red Data Bar" in the expanded menu.

Limitations of Manual Operation
While manually adding data bars in Excel can be useful for smaller tasks, there are several limitations:
-
Time-Consuming for Multiple Files: If you need to apply data bars to many spreadsheets or worksheets, doing it manually becomes a repetitive and time-consuming process. This is especially problematic when dealing with large datasets or multiple reports.
-
Inconsistent Chart Styles: When working with multiple sheets or teams, manually adding data bars can lead to inconsistencies in chart styles. Without a standardized approach, different users may apply different formats, resulting in uneven visual presentation across reports.
-
Not Ideal for Automated Reporting: For businesses or teams that need to generate reports frequently, manual data bar insertion is impractical. It’s inefficient when dealing with dynamic data or when reports need to be updated regularly, as each update requires manual intervention.
How to Add Data Bars in Excel Using Java
Now that we've covered the limitations of manual data bars, let's move on to an automated solution using Java. For this, we’ll be using Spire.XLS for Java, a powerful library that allows seamless manipulation of Excel files programmatically.
How to Get Started with Spire.XLS for Java
To get started, simply download Spire.XLS or include it in your Java project using Maven:
<repositories>
    <repository>
        <id>com.e-iceblue</id>
        <name>e-iceblue</name>
        <url>https://repo.e-iceblue.com/nexus/content/groups/public/</url>
    </repository>
</repositories>
<dependencies>
    <dependency>
        <groupId>e-iceblue</groupId>
        <artifactId>spire.xls</artifactId>
        <version>15.6.3</version>
    </dependency>
</dependencies>
Once installed, you can start using it to automate your Excel tasks, including adding data bars to your sheets or adding traffic light icons. Now, let’s jump into the code!
The code below demonstrates how to add a light green solid data bar in Excel to visualize the product inventory levels:
import com.spire.xls.*;
import com.spire.xls.core.*;
import java.awt.*;

public class applyDataBars {
    public static void main(String[] args)  {

        // Create a Workbook instance
        Workbook workbook = new Workbook();

        // Load an Excel file
        workbook.loadFromFile("/sales report.xlsx");

        // Get the first worksheet.
        Worksheet sheet = workbook.getWorksheets().get(0);

        // Get the specific cell range
        CellRange range = sheet.getCellRange("B2:B15");

        // Add the conditional formatting of data bars in the cell range
        IConditionalFormat format = range.getConditionalFormats().addCondition();
        format.setFormatType( ConditionalFormatType.DataBar);

        // Set color for the data bars
        format.getDataBar().setBarColor(new Color(180, 220, 180));
        format.getDataBar().setShowValue(true);

        // Save to file
        workbook.saveToFile("/ApplyDataBars.xlsx", ExcelVersion.Version2013);
    }
}

Key Steps Explained:
- Create a Workbook object and load the Excel file
Create a new Workbook object, then load the existing Excel file with Workbook.loadFromFile() method.
- Get the worksheet and define the cell range for conditional formatting
Access the desired worksheet using Workbook.getWorksheets().get() method; and specify the range of cells where you want to apply data bars with Worksheet.getCellRange().
- Add a conditional format to the specified cell range
Use ConditionalFormats. addCondition() method to add a new conditional format to the selected range. Then call ConditionalFormatWrapper.setFormatType() method to set the conditional format type as data bar.
- Set the color of the data bars and choose whether to show values in the cells
Configure the data bar’s color using DataBar().setBarColor() method; and optionally, enable or disable the display of values in the cells with DataBar().setShowValue() method.
Tip: The RGB values in the code represent light green. If you prefer not to adjust the parameters, you can easily add green data bars in Excel by simply setting it to green with:format.getDataBar().setBarColor(Color.GREEN)
- Save the modified Excel workbook as a new file
Save the updated workbook with Workbook.saveToFile() method.
Conclusion
In this guide, we’ve learned how to add data bars in Excel using both manual and Java-based methods. Data bars are a powerful tool for quickly visualizing your data, whether you're working with sales reports, inventory management, or financial data. By automating the process with Java, you can save time and ensure consistency across multiple files.
Ready to boost your Excel productivity? Start applying data bars today and explore more automation options with Spire.XLS for Java!
ALSO READ:
Spire.Presentation 10.6.4 enhances conversions from PowerPoint to PDF
We are delighted to announce the release of Spire.Presentation 10.6.4. The latest version enhances the conversion from PowerPoint to PDF. Besides, the issue where shapes were rendered incorrectly when converting slides to SVG is fixed successfully. More details are listed below.
Here is a list of changes made in this release
| Category | ID | Description |
| Bug | SPIREPPT-2876 | Fixes an issue where shapes were rendered incorrectly when converting slides to SVG. |
| Bug | SPIREPPT-2892 | Fixes an issue where images were cropped during PowerPoint-to-PDF conversion. |