
Insert Shape and shape group in Word Document in C#, VB.NET
MS Word allows users to select a shape from shapes menu, drag and place it to any desired location on the page. From Spire.Doc Version 6.0 or above, we added a new feature to work with shape using code. The following section will present how to insert shapes and shape group in a Word document at the specified locations using Spire.Doc.
Code Snippets:
Step 1: Initialize a new instance of Document class.
Document doc = new Document();
Step 2: Add a new section to Word document, and add a paragraph to the section.
Section sec = doc.AddSection();
Paragraph para1 =sec.AddParagraph();
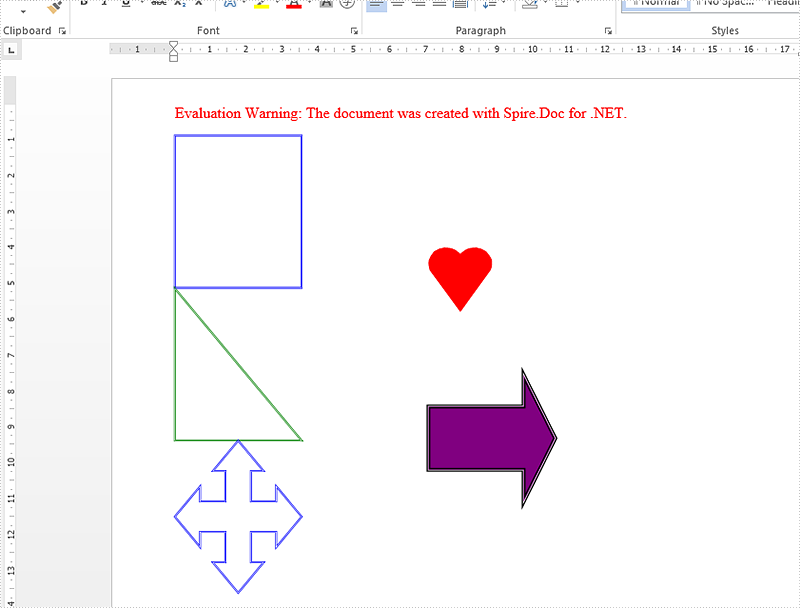
Step 3: Add shapes to the paragraph by calling AppendShape() method. In order to locate where the shape will be placed, you can just set the HorizontalPosition and VerticalPosition properties of ShapeObject class. We can also format the shape by set the FillColor,StrokeColor and LineStyle properties.
ShapeObject shape1 = para1.AppendShape(50, 50, ShapeType.Heart);

shape1.FillColor = Color.Red;
shape1.StrokeColor = Color.Red;
shape1.HorizontalPosition = 200;
shape1.VerticalPosition = 100;

ShapeObject shape2 = para1.AppendShape(100, 100, ShapeType.Arrow);

shape2.FillColor = Color.Purple;
shape2.StrokeColor = Color.Black;
shape2.LineStyle = ShapeLineStyle.Double;
shape2.StrokeWeight = 3;
shape2.HorizontalPosition = 200;
shape2.VerticalPosition = 200;
Step 4: Add a new paragraph and insert a shape group to the paragraph by calling AppendShapeGroup() method.
Paragraph para2 = sec.AddParagraph();
ShapeGroup shapegr = para2.AppendShapeGroup(200, 400);

shapegr.ChildObjects.Add(new ShapeObject(doc, ShapeType.Rectangle)
{
    Width = 500,
    Height = 300,
    LineStyle = ShapeLineStyle.ThickThin,
    StrokeColor = System.Drawing.Color.Blue,

    StrokeWeight = 1.5,
});
shapegr.ChildObjects.Add(new ShapeObject(doc, ShapeType.RightTriangle)
{
    Width = 500,
    Height = 300,
    VerticalPosition = 301,
    LineStyle = ShapeLineStyle.ThickThin,
    StrokeColor = System.Drawing.Color.Green,
    StrokeWeight = 1.5,
});
shapegr.ChildObjects.Add(new ShapeObject(doc, ShapeType.QuadArrow)
{
    Width = 500,
    Height = 300,
    VerticalPosition = 601,
    LineStyle = ShapeLineStyle.ThickThin,
    StrokeColor = System.Drawing.Color.Blue,
    StrokeWeight = 1.5,
});
Step 5: Save the document to file.
doc.SaveToFile("InsertShapes.docx", FileFormat.Docx2010);
Result:
Full code:
using Spire.Doc;
using Spire.Doc.Documents;
using Spire.Doc.Fields;
using System.Drawing;
namespace InsertShape
{
    class Program
    {
        static void Main(string[] args)
        {
            Document doc = new Document();
            Section sec = doc.AddSection();
            Paragraph para1 = sec.AddParagraph();

            ShapeObject shape1 = para1.AppendShape(50, 50, ShapeType.Heart);

            shape1.FillColor = Color.Red;
            shape1.StrokeColor = Color.Red;
            shape1.HorizontalPosition = 200;
            shape1.VerticalPosition = 100;

            ShapeObject shape2 = para1.AppendShape(100, 100, ShapeType.Arrow);

            shape2.FillColor = Color.Purple;
            shape2.StrokeColor = Color.Black;
            shape2.LineStyle = ShapeLineStyle.Double;
            shape2.StrokeWeight = 3;
            shape2.HorizontalPosition = 200;
            shape2.VerticalPosition = 200;

            Paragraph para2 = sec.AddParagraph();
            ShapeGroup shapegr = para2.AppendShapeGroup(200, 400);

            shapegr.ChildObjects.Add(new ShapeObject(doc, ShapeType.Rectangle)
            {
                Width = 500,
                Height = 300,
                LineStyle = ShapeLineStyle.ThickThin,
                StrokeColor = System.Drawing.Color.Blue,

                StrokeWeight = 1.5,
            });
            shapegr.ChildObjects.Add(new ShapeObject(doc, ShapeType.RightTriangle)
            {
                Width = 500,
                Height = 300,
                VerticalPosition = 301,
                LineStyle = ShapeLineStyle.ThickThin,
                StrokeColor = System.Drawing.Color.Green,
                StrokeWeight = 1.5,
            });
            shapegr.ChildObjects.Add(new ShapeObject(doc, ShapeType.QuadArrow)
            {
                Width = 500,
                Height = 300,
                VerticalPosition = 601,
                LineStyle = ShapeLineStyle.ThickThin,
                StrokeColor = System.Drawing.Color.Blue,
                StrokeWeight = 1.5,
            });

            doc.SaveToFile("InsertShapes.docx", FileFormat.Docx2010);
        }
    }
}
Imports Spire.Doc
Imports Spire.Doc.Documents
Imports Spire.Doc.Fields
Imports System.Drawing
Namespace InsertShape
	Class Program
		Private Shared Sub Main(args As String())
			Dim doc As New Document()
			Dim sec As Section = doc.AddSection()
			Dim para1 As Paragraph = sec.AddParagraph()

			Dim shape1 As ShapeObject = para1.AppendShape(50, 50, ShapeType.Heart)

			shape1.FillColor = Color.Red
			shape1.StrokeColor = Color.Red
			shape1.HorizontalPosition = 200
			shape1.VerticalPosition = 100

			Dim shape2 As ShapeObject = para1.AppendShape(100, 100, ShapeType.Arrow)

			shape2.FillColor = Color.Purple
			shape2.StrokeColor = Color.Black
			shape2.LineStyle = ShapeLineStyle.[Double]
			shape2.StrokeWeight = 3
			shape2.HorizontalPosition = 200
			shape2.VerticalPosition = 200

			Dim para2 As Paragraph = sec.AddParagraph()
			Dim shapegr As ShapeGroup = para2.AppendShapeGroup(200, 400)


			shapegr.ChildObjects.Add(New ShapeObject(doc, ShapeType.Rectangle) With { _
				Key .Width = 500, _
				Key .Height = 300, _
				Key .LineStyle = ShapeLineStyle.ThickThin, _
				Key .StrokeColor = System.Drawing.Color.Blue, _
				Key .StrokeWeight = 1.5 _
			})
			shapegr.ChildObjects.Add(New ShapeObject(doc, ShapeType.RightTriangle) With { _
				Key .Width = 500, _
				Key .Height = 300, _
				Key .VerticalPosition = 301, _
				Key .LineStyle = ShapeLineStyle.ThickThin, _
				Key .StrokeColor = System.Drawing.Color.Green, _
				Key .StrokeWeight = 1.5 _
			})
			shapegr.ChildObjects.Add(New ShapeObject(doc, ShapeType.QuadArrow) With { _
				Key .Width = 500, _
				Key .Height = 300, _
				Key .VerticalPosition = 601, _
				Key .LineStyle = ShapeLineStyle.ThickThin, _
				Key .StrokeColor = System.Drawing.Color.Blue, _
				Key .StrokeWeight = 1.5 _
			})

			doc.SaveToFile("InsertShapes.docx", FileFormat.Docx2010)
		End Sub
	End Class
End Namespace
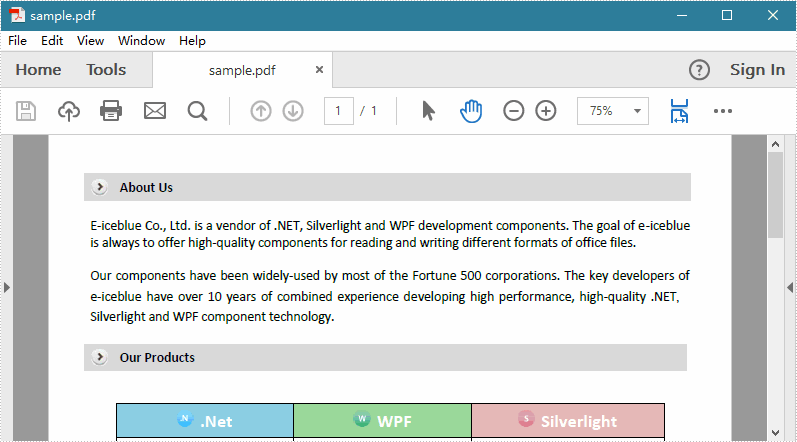
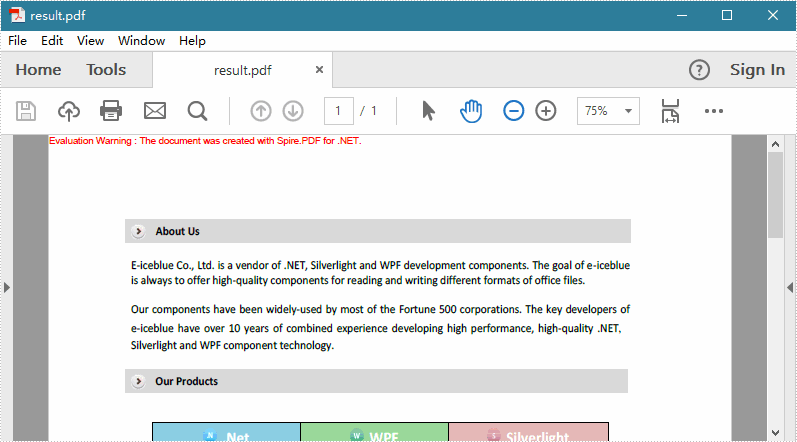
Insert a new PDF page to an existing PDF at a specified index
Spire.PDF offers a method of PdfDocument.MergeFiles(); to enable developers to merge PDF files easily and conveniently. This article will show you how to insert a new page from the first PDF into the second PDF file at a specified index by using the method of Pages.Insert(); offered by Spire.PDF.
Note: Before Start, please download the latest version of Spire.PDF and add Spire.PDF.dll in the bin folder as the reference of Visual Studio.
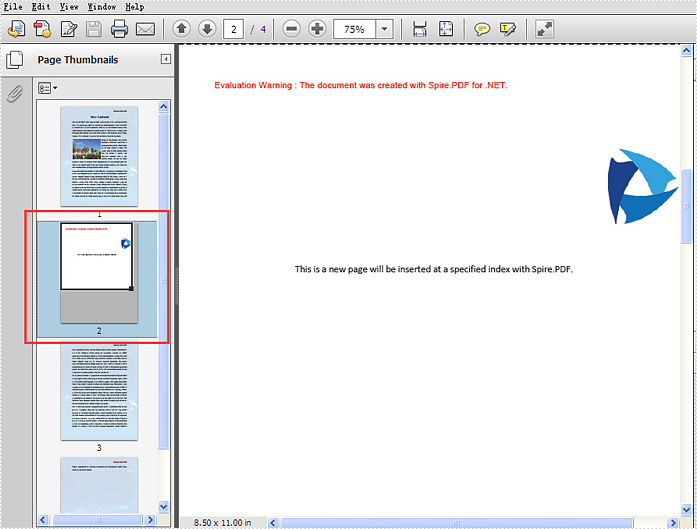
Here comes to the steps of how to insert the page from the first PDF (sample.pdf) into the second PDF (test.pdf) at a specified index:
Step 1: Create the first PDF document and load file.
PdfDocument doc1 = new PdfDocument();
doc1.LoadFromFile("sample.pdf");
Step 2: Create the second PDF document and load file.
PdfDocument doc2 = new PdfDocument();
doc2.LoadFromFile("test.pdf");
Step 3: Get the first page and its size from the first PDF document.
PdfPageBase page = doc1.Pages[0];
SizeF size = page.Size;
Step 4: Inserts a new blank page with the specified size at the specified index into the second PDF.
PdfPageBase newPage = doc2.Pages.Insert(1, size);
Step 5: Copy the contents on the page into the second PDF.
newPage.Canvas.DrawTemplate(page.CreateTemplate(), new PointF(0, 0));
Step 6: Save the document to file.
doc2.SaveToFile("result.pdf");
Effective screenshot of insert a new PDF page to an existing PDF at a specified index:
Full codes:
using Spire.Pdf;
using System.Drawing;

namespace InsertNewPage
{
    class Program
    {
        static void Main(string[] args)
        {
            PdfDocument doc1 = new PdfDocument();
            doc1.LoadFromFile("sample.pdf");
            PdfDocument doc2 = new PdfDocument();
            doc2.LoadFromFile("test.pdf");

            PdfPageBase page = doc1.Pages[0];
            SizeF size = page.Size;

            PdfPageBase newPage = doc2.Pages.Insert(1, size);
            newPage.Canvas.DrawTemplate(page.CreateTemplate(), new PointF(0, 0));

            doc2.SaveToFile("result.pdf");
        }
    }
}
C#/VB.NET: Hide or Unhide Slides in PowerPoint
Microsoft PowerPoint lets you hide specific slides so they won’t appear during the slide show. You can also unhide the hidden slides at any time if you wish them to be visible in future presentations. In this article, you will learn how to hide or unhide slides in PowerPoint in C# and VB.NET using Spire.Presentation for .NET library.
Install Spire.Presentation for .NET
To begin with, you need to add the DLL files included in the Spire.Presentation for.NET package as references in your .NET project. The DLL files can be either downloaded from this link or installed via NuGet.
PM> Install-Package Spire.Presentation
Hide or Unhide Slides in PowerPoint in C# and VB.NET
The following are the steps to hide or unhide a slide in PowerPoint:
- Create an instance of Presentation class.
- Load a PowerPoint document using Presentation.LoadFromFile() method.
- Get the slide that you want to hide or unhide by its index using Presentation.Slides[index] property.
- Hide or unhide the slide by setting the ISlide.Hidden property as true or false.
- Save the result document using Presentation.SaveToFile() method.
- C#
- VB.NET
using Spire.Presentation;

namespace HideOrUnhideSlides
{
    class Program
    {
        static void Main(string[] args)
        {
            //Create a Presentation instance
            Presentation ppt = new Presentation();
            //Load a PowerPoint document
            ppt.LoadFromFile("Sample.pptx");

            //Get the first slide
            ISlide slide = ppt.Slides[0];

            //Hide the slide
            slide.Hidden = true;
            //Unhide the slide
            //slide.Hidden = false;

            //Save the result document
            ppt.SaveToFile("Result.pptx", FileFormat.Pptx2013);
        }
    }
}
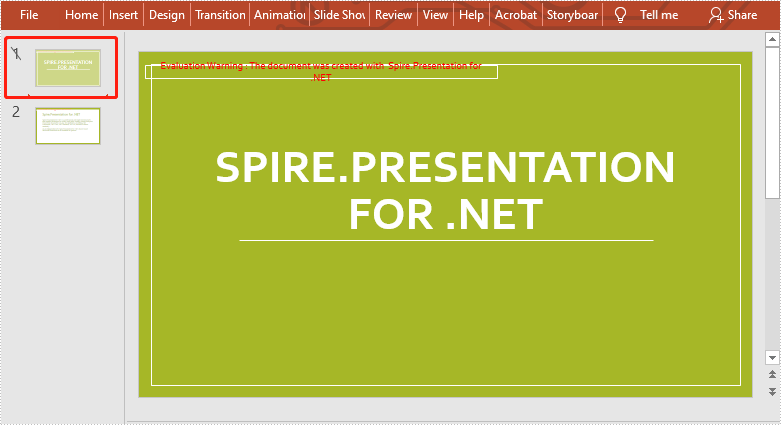
The following is the result document after hiding the first slide:
Apply for a Temporary License
If you'd like to remove the evaluation message from the generated documents, or to get rid of the function limitations, please request a 30-day trial license for yourself.
How to Add, Select and Remove an Item in Combo Box in C#, VB.NET
A combo box is a commonly-used GUI widget. It is a combination of a drop-down list or list box and a single-line textbox, allowing the user either to type a value directly into the control or choose from the list of existing options. In this article, we'll introduce how to programmatically manage the item of combo box in Word file using Spire.Doc.
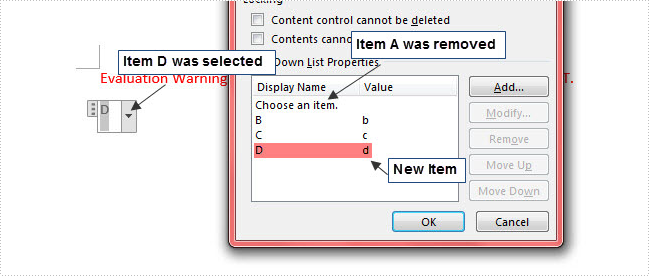
Here is a combo box in the sample Word document, which contains three items including A, B and C. In the following section, we'll add, select and remove an item in the combo box using code.

Code Snippet:
Step 1: Initialize a new instance of Document class and load the sample Word file.
Document document = new Document();
document.LoadFromFile( "test.docx");
Step 2: Get the combo box from the file.
foreach (Section section in document.Sections)
{
    foreach (Body body in section.ChildObjects)
    {
        foreach (DocumentObject bodyObj in body.ChildObjects)
        {
            if (bodyObj is StructureDocumentTag)
            {
                if ((bodyObj as StructureDocumentTag).SDTProperties.SDTType == SdtType.ComboBox)
                {
                    SdtComboBox combo = (bodyObj as StructureDocumentTag).SDTProperties.ControlProperties as SdtComboBox;

               }
            }
        }
    }

}
Step 3: Create a new item and set two parameters for it: display text and value. Call ListItems.Add() method to add the new item into combo box.
SdtListItem item = new SdtListItem("D","d");
combo.ListItems.Add(item);
Step 4: Call ListItems.RemoveAt() method to remove an item by its index.
combo.ListItems.RemoveAt(0);
Step 5: Call ListItems.SelectedValue() to choose an item from combo box.
combo.ListItems.SelectedValue = sdtItem;
Step 6: Save and launch the file.
document.SaveToFile("result.docx", FileFormat.Docx2013);
System.Diagnostics.Process.Start("result.docx");
Output:
Entire Code:
using Spire.Doc;
using Spire.Doc.Documents;
namespace IteminCombo
    class Program
    {
        static void Main(string[] args)
        {
            Document document = new Document();
            document.LoadFromFile("test.docx");
            foreach (Section section in document.Sections)
            {
                foreach (Body body in section.ChildObjects)
                {
                    foreach (DocumentObject bodyObj in body.ChildObjects)
                    {
                        if (bodyObj is StructureDocumentTag)
                        {
                            if ((bodyObj as StructureDocumentTag).SDTProperties.SDTType == SdtType.ComboBox)
                            {
                                SdtComboBox combo = (bodyObj as StructureDocumentTag).SDTProperties.ControlProperties as SdtComboBox;
                                SdtListItem item = new SdtListItem("D", "d");
                                combo.ListItems.Add(item);
                                foreach (SdtListItem sdtItem in combo.ListItems)
                                {
                                    if (string.CompareOrdinal(sdtItem.Value, "d") == 0)
                                    {
                                        combo.ListItems.SelectedValue = sdtItem;
                                    }
                                }
                                combo.ListItems.RemoveAt(1);
                            }
                        }
                    }
                }

            }
            document.SaveToFile("result.docx", FileFormat.Docx2013);
            System.Diagnostics.Process.Start("result.docx");
        }
    }
}
Dim document As New Document()
document.LoadFromFile("test.docx")
For Each section As Section In document.Sections
	For Each body As Body In section.ChildObjects
		For Each bodyObj As DocumentObject In body.ChildObjects
			If TypeOf bodyObj Is StructureDocumentTag Then
				If TryCast(bodyObj, StructureDocumentTag).SDTProperties.SDTType = SdtType.ComboBox Then
					Dim combo As SdtComboBox = TryCast(TryCast(bodyObj, StructureDocumentTag).SDTProperties.ControlProperties, SdtComboBox)
					Dim item As New SdtListItem("D", "d")
					combo.ListItems.Add(item)
					For Each sdtItem As SdtListItem In combo.ListItems
						If String.CompareOrdinal(sdtItem.Value, "d") = 0 Then
							combo.ListItems.SelectedValue = sdtItem
						End If
					Next
					combo.ListItems.RemoveAt(1)
				End If
			End If
		Next

	Next
Next
document.SaveToFile("result.docx", FileFormat.Docx2013)
System.Diagnostics.Process.Start("result.docx")
How to realize paging with Spire.PDFViewer for ASP.NET
Turning to the previous page, the next page, the first page, the last page, or even switch to any existing target page is the frequently used manipulation, which helps us to save a lot of time on viewing a PDF document with multiple pages on website.
How can we achieve this function programmatically in ASP.NET? Spire.PDFViewer for ASP.NET provides developers the feature of paging which allows users to turn page according to their requirements. This article will demonstrate how to realize paging with Spire.PDFViewer for ASP.NET.
Note: Please download Spire.PDFViewer for ASP.NET and install it correctly.
Then follow the detail steps below:
Step 1: create a new project and add the .dll files from bin folder of Spire.PDFViewer as references.
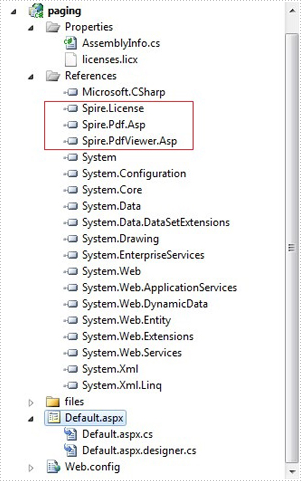
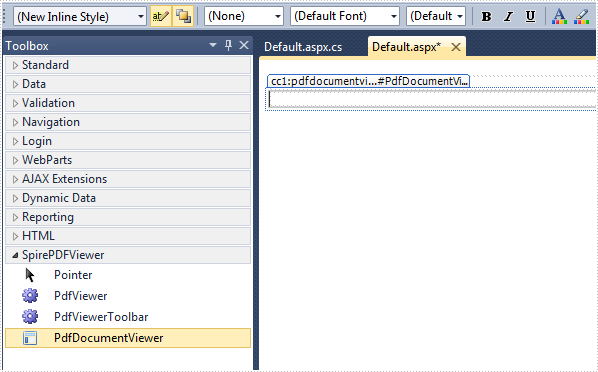
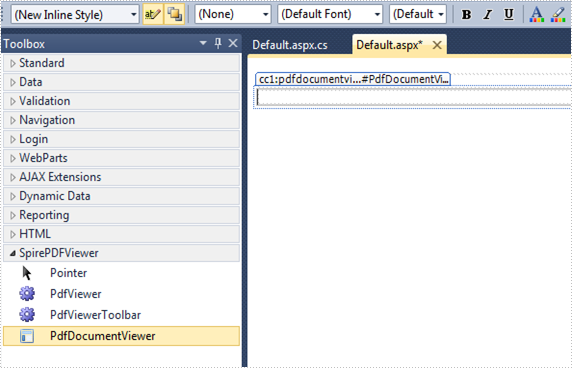
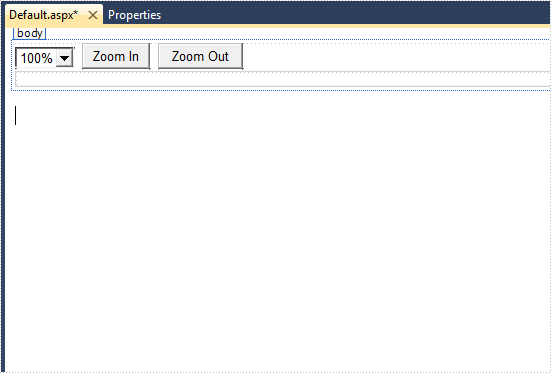
Step 2: Add the PDFDocumentViewer control of Spire.PDFViewer into toolbox and drag it into Deafault.aspx.
Step 3: Paging.
Main code:
Section 1: Call the LoadFromFile() method of PdfDocumentViewer to load a sample PDF file in Default.aspx.cs. Note that you have to add the following if statement and !IsPostBack property before loading the pdf file.
protected void Page_Load(object sender, EventArgs e)
        {
            if (!IsPostBack)
            {
                //load the sample PDF file
                this.PdfDocumentViewer1.CacheInterval = 1000;
                this.PdfDocumentViewer1.CacheTime = 1200;
                this.PdfDocumentViewer1.CacheNumberImage = 1000;
                this.PdfDocumentViewer1.ScrollInterval = 300;
                this.PdfDocumentViewer1.ZoomFactor = 1f;
                this.PdfDocumentViewer1.CustomErrorMessages = "";
                this.PdfDocumentViewer1.LoadFromFile("files/PDFViewer.pdf");
            }
        }
Section 2: Drag four buttons and a textbox from toolbox into Deafault.aspx, set their properties as below.
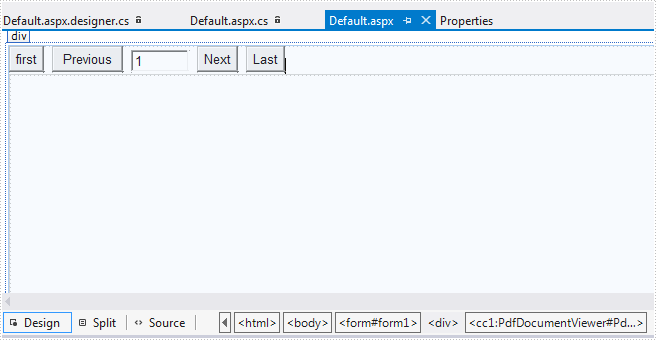
The generated source code in Deafault.aspx:
<div>
        <input type="button" id="btnFirst" value="first" onclick="pdfdocumentviewer1.FirstPage()" />
        <input type="button" id="btnPrevious" value="Previous" onclick="pdfdocumentviewer1.PreviousPage()" />
        <input type="text" id="PdfDocumentViewer1_PdfViewerCurrentPage" value="1" style="width: 50px;" />
        <span id="PdfDocumentViewer1_PdfViwerCountPage"></span>
        <input type="button" id="btnNext" value="Next" onclick="pdfdocumentviewer1.NextPage()" />
        <input type="button" id="btnLast" value="Last" onclick="pdfdocumentviewer1.LastPage()" />

        <cc1:PdfDocumentViewer id="PdfDocumentViewer1" runat="server">
        </cc1:PdfDocumentViewer>
</div>
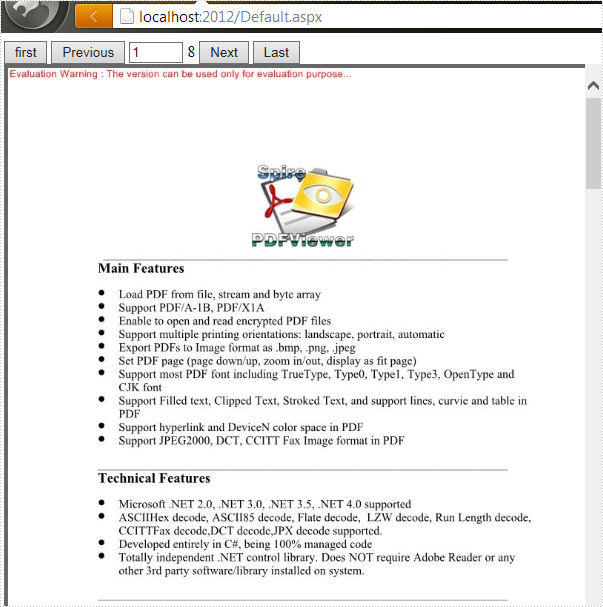
Run the project and you'll get the following output:
Enlarge PDF Margins without Changing Page Size in C#/VB.NET
PDF margins are white spaces between body contents and page edge. Unlike Word, margins in PDF document are not easy to be modified as Adobe does not provide any functionality for users to manipulate margins freely. However, you can change the page scaling (enlarge/compress content) or crop page to get fitted margins. In this article, you will learn how to enlarge PDF margins by compressing content.
Step 1: Create a PdfDocument object to load the original PDF document.
PdfDocument origDoc = new PdfDocument();
origDoc.LoadFromFile("sample.pdf");
Step 2: Create another PdfDocument object.
PdfDocument destDoc = new PdfDocument();
Step 3: Set the increments that you want to add to the margins in the existing PDF document.
float top = 50;
float bottom = 50;
float left = 50;
float right = 50;
Step 4: Transfer the compressed content from the original document to the new PDF document.
foreach (PdfPageBase page in origDoc.Pages)
{
    PdfPageBase newPage = destDoc.Pages.Add(page.Size, new PdfMargins(0));
    newPage.Canvas.ScaleTransform((page.ActualSize.Width - left - right) / page.ActualSize.Width,
                        (page.ActualSize.Height - top - bottom) / page.ActualSize.Height);
    newPage.Canvas.DrawTemplate(page.CreateTemplate(), new PointF(left, top));
}
Step 5: Save to file.
destDoc.SaveToFile("result.pdf", FileFormat.PDF);
Original PDF:
Result:
Full Code:
using Spire.Pdf;
using Spire.Pdf.Graphics;
using System.Drawing;


namespace ChangeMargins
{
    class Program
    {
        static void Main(string[] args)
        {
            PdfDocument origDoc = new PdfDocument();
            origDoc.LoadFromFile("sample.pdf");
            PdfDocument destDoc = new PdfDocument();

            float top = 50;
            float bottom = 50;
            float left = 50;
            float right = 50;

            foreach (PdfPageBase page in origDoc.Pages)
            {
                PdfPageBase newPage = destDoc.Pages.Add(page.Size, new PdfMargins(0));
                newPage.Canvas.ScaleTransform((page.ActualSize.Width - left - right) / page.ActualSize.Width,
                                    (page.ActualSize.Height - top - bottom) / page.ActualSize.Height);
                newPage.Canvas.DrawTemplate(page.CreateTemplate(), new PointF(left, top));
            }

            destDoc.SaveToFile("result.pdf", FileFormat.PDF);
        }
    }
}
Imports Spire.Pdf
Imports Spire.Pdf.Graphics
Imports System.Drawing


Namespace ChangeMargins
	Class Program
		Private Shared Sub Main(args As String())
			Dim origDoc As New PdfDocument()
			origDoc.LoadFromFile("sample.pdf")
			Dim destDoc As New PdfDocument()

			Dim top As Single = 50
			Dim bottom As Single = 50
			Dim left As Single = 50
			Dim right As Single = 50

			For Each page As PdfPageBase In origDoc.Pages
				Dim newPage As PdfPageBase = destDoc.Pages.Add(page.Size, New PdfMargins(0))
				newPage.Canvas.ScaleTransform((page.ActualSize.Width - left - right) / page.ActualSize.Width, (page.ActualSize.Height - top - bottom) / page.ActualSize.Height)
				newPage.Canvas.DrawTemplate(page.CreateTemplate(), New PointF(left, top))
			Next

			destDoc.SaveToFile("result.pdf", FileFormat.PDF)
		End Sub
	End Class
End Namespace
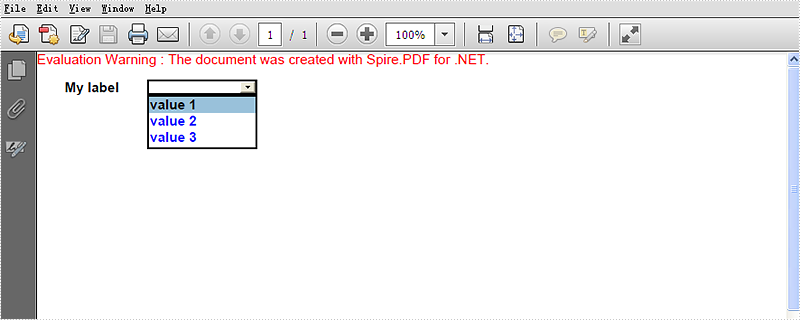
Set the font and color for the text on PDF Combo Box field area
With the help of Spire.PDF, developers can easily add new text to the PDF; create form fields to both the new and existing PDF file. Spire.PDF also owns the ability to set the text formatting for the PDF fields' area. This article will show you how to set the font and color for PDF Combo Box field by the method of PdfComboBoxField.
Note: Before Start, please download the latest version of Spire.PDF and add Spire.PDF.dll in the bin folder as the reference of Visual Studio.
Here comes to the details:
Step 1: Create a new PDF document.
PdfDocument doc = new PdfDocument();
Step 2: Add a new page to the PDF document and set the page size for the page.
PdfPageBase page = doc.Pages.Add(PdfPageSize.A4, new PdfMargins());
Step 3: Draw the text to the PDF page and set the location, font and color for the text.
PdfTrueTypeFont font = new PdfTrueTypeFont(new Font("Arial", 10f, FontStyle.Bold));
RectangleF labelBounds = new RectangleF(20, 20, 40, font.Height);
page.Canvas.DrawString("My label", font, PdfBrushes.Black, labelBounds);
Step 4: Create a Combo Box and add value for it. Use comboBox.Font and comboBox.ForeColor to set the font and color for the text on Combo Box area.
PdfComboBoxField comboBox = new PdfComboBoxField(page, "cmb");
comboBox.Bounds = new RectangleF(80, 20, 80, font.Height);
comboBox.Font = font;
comboBox.ForeColor = Color.Blue;
comboBox.Items.Add(new PdfListFieldItem("value 1", "text 1"));
comboBox.Items.Add(new PdfListFieldItem("value 2", "text 2"));
comboBox.Items.Add(new PdfListFieldItem("value 3", "text 3"));
Step 5: Add the Combo Box to the PDF file.
doc.Form.Fields.Add(comboBox);
Step 6: Save the document to file and launch to preview it.
string file = string.Format("result.pdf", Guid.NewGuid().ToString());
doc.SaveToFile(file);
System.Diagnostics.Process.Start(file);
Effective screenshot after setting the font and color for text on the Combo Box area:
Full codes:
using Spire.Pdf;
using Spire.Pdf.Fields;
using Spire.Pdf.Graphics;
using System;
using System.Drawing;


namespace SetFontColorInComboboxField
{
    class Program
    {
        static void Main(string []args)
        {
            PdfDocument doc = new PdfDocument();

            PdfPageBase page = doc.Pages.Add(PdfPageSize.A4, new PdfMargins());

            PdfTrueTypeFont font = new PdfTrueTypeFont(new Font("Arial", 10f, FontStyle.Bold));
            RectangleF labelBounds = new RectangleF(20, 20, 40, font.Height);
            page.Canvas.DrawString("My label", font, PdfBrushes.Black, labelBounds);

            PdfComboBoxField comboBox = new PdfComboBoxField(page, "cmb");
            comboBox.Bounds = new RectangleF(80, 20, 80, font.Height);
            comboBox.Font = font;
            comboBox.ForeColor = Color.Blue;
            comboBox.Items.Add(new PdfListFieldItem("value 1", "text 1"));
            comboBox.Items.Add(new PdfListFieldItem("value 2", "text 2"));
            comboBox.Items.Add(new PdfListFieldItem("value 3", "text 3"));

            doc.Form.Fields.Add(comboBox);

            string file = string.Format("result.pdf", Guid.NewGuid().ToString());
            doc.SaveToFile(file);
            System.Diagnostics.Process.Start(file);
        }
    }
}
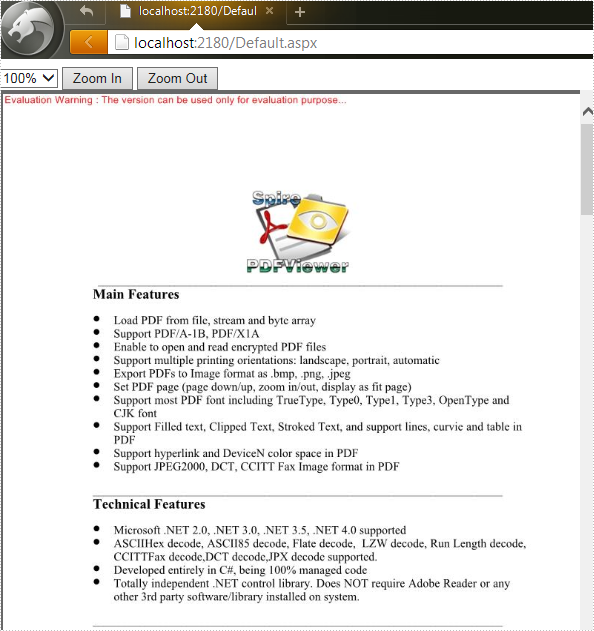
How to Zoom PDF File via PDFDocumentViewer in ASP.NET
Spire.PDFViewer for ASP.NET contains two controls: PDFViewer and PDFDocumentViewer. Generally, PDFDocumentViewer is used for loading and viewing PDF files on website. But actually, it can also achieve other features such as zoom, fit and page after a simple design.
We've introduced the usage of PDFViewer in the previous article, so this article will illustrate how to zoom PDF File via PDFDocumentViewer in ASP.NET.
Before start, download Spire.PDFViewer for ASP.NET and install it on your system.
Step 1: Create a new ASP.NET Empty Web Application in Visual Studio. Add a new web Form to the project.
Step 2: Add the .dll files from the bin folder as the references of this project.

Step 3: Add the PDFDocumentViewer control into toolbox and drag it into Deafault.aspx.
(Detail manipulations of step 1, 2, 3 refer to this article: How to use Spire.PDFViewer for ASP.NET)
Step 4: Zoom PDF file via Spire. PDFDocumentViewer. Zoom feature is divided into three types in this article:
- Zoom: choose the zoom percentage manually.
- Zoom in: Increase the display page page zoom factor by ten percent.
- Zoom out: decrease the display page page zoom factor by ten percent.
Main codes
Section 1: Call the LoadFromFile() method of PdfDocumentViewer to load a sample PDF file in Default.aspx.cs. Note that you have to add the following if statement and !IsPostBack property before loading the pdf file.
protected void Page_Load(object sender, EventArgs e)
        {
            if (!IsPostBack)
            {
                //load the sample PDF file
                this.PdfDocumentViewer1.CacheInterval = 1000;
                this.PdfDocumentViewer1.CacheTime = 1200;
                this.PdfDocumentViewer1.CacheNumberImage = 1000;
                this.PdfDocumentViewer1.ScrollInterval = 300;
                this.PdfDocumentViewer1.ZoomFactor = 1f;
                this.PdfDocumentViewer1.CustomErrorMessages = "";
                this.PdfDocumentViewer1.LoadFromFile("files/PDFViewer.pdf");
            }
        }
Section 2: Design, Drag a DropDownList and two buttons from toolbox into Deafault.aspx, set the properties like "ID", "text" etc. as below.
Generated source code is shown here:
<select id="PdfDocumentViewer1_SelectCurrentZoomLevel" name="PdfDocumentViewer1_SelectCurrentZoomLevel" onchange="pdfdocumentviewer1.SelectDropdownBox(this.value)">
            <option value="0.5">50%</option>
            <option value="0.75">75%</option>
            <option value="1" selected="selected">100%</option>
            <option value="1.5">150%</option>
            <option value="2">200%</option>
            <option value="4">400%</option>
        </select>
        <input type="button" id="btnZoomIn" value="Zoom In" onclick="pdfdocumentviewer1.ZoomPage()" />
        <input type="button" id="btnZoomOut" value="Zoom Out" onclick="pdfdocumentviewer1.NarrowPage()" />
Effect screenshot after designing:
C#: Copy Content from One Word Document to Another
Transferring content between Microsoft Word documents is a frequent need for many users. Whether you're consolidating information from multiple sources or reorganizing the structure of a document, being able to effectively copy and paste text, graphics, and formatting is crucial.
This article demonstrates how to copy content from one Word document to another using C# and Spire.Doc for .NET.
- Copy Specified Paragraphs from One Word Document to Another
- Copy a Section from One Word Document to Another
- Copy the Entire Document and Append it to Another
- Create a Copy of a Word Document
Install Spire.Doc for .NET
To begin with, you need to add the DLL files included in the Spire.Doc for.NET package as references in your .NET project. The DLL files can be either downloaded from this link or installed via NuGet.
PM> Install-Package Spire.Doc
Copy Specified Paragraphs from One Word Document to Another in C#
With Spire.Doc library for .NET, you can clone individual paragraphs using the Paragraph.Clone() method, and then add the cloned paragraphs to a different Word document using the ParagraphCollection.Add() method. This allows you to selectively copy and transfer content between documents.
To copy specified paragraphs from one Word document to another, follow these steps:
- Create a Document object to load the source file.
- Create another Document object to load the target file.
- Get the specified paragraphs from the source file.
- Clone these paragraphs using Paragraph.Clone() method.
- Add the cloned paragraphs to the target file using ParagraphCollection.Add() method.
- Save the target file to a different Word file.
- C#
using Spire.Doc;
using Spire.Doc.Documents;

namespace CopyParagraphs
{
    class Program
    {
        static void Main(string[] args)
        {
            // Create a Document object
            Document sourceDoc = new Document();

            // Load the source file
            sourceDoc.LoadFromFile("C:\\Users\\Administrator\\Desktop\\source.docx");

            // Get the specified paragraphs from the source file
            Paragraph p1 = sourceDoc.Sections[0].Paragraphs[8];
            Paragraph p2 = sourceDoc.Sections[0].Paragraphs[9];

            // Create another Document object
            Document targetDoc = new Document();

            // Load the target file
            targetDoc.LoadFromFile("C:\\Users\\Administrator\\Desktop\\target.docx");

            // Get the last section
            Section lastSection = targetDoc.LastSection;

            // Add the paragraphs from the soure file to the target file
            lastSection.Paragraphs.Add((Paragraph)p1.Clone());
            lastSection.Paragraphs.Add((Paragraph)p2.Clone());

            // Save the target file to a different Word file
            targetDoc.SaveToFile("CopyParagraphs.docx", FileFormat.Docx2019);

            // Dispose resources
            sourceDoc.Dispose();
            targetDoc.Dispose();
        }
    }
}

Copy a Section from One Word Document to Another in C#
A section in a Word document can contain not only paragraphs, but also other elements such as tables. To copy an entire section from one Word document to another, you need to iterate through all the child objects within the section and add them individually to a specified section in the target document.
The steps to copy a section between different Word documents are:
- Create Document objects to load the source file and the target file, respectively.
- Get the specified section from the source file.
- Iterate through the child objects in the section, and clone these objects using DocumentObject.Clone() method.
- Add the cloned child objects to a specified section of the target file using DocumentObjectCollection.Add() method.
- Save the updated target file to a new file.
- C#
using Spire.Doc;

namespace CopySection
{
    class Program
    {
        static void Main(string[] args)
        {
            // Create a Document object
            Document sourceDoc = new Document();

            // Load the source file
            sourceDoc.LoadFromFile("C:\\Users\\Administrator\\Desktop\\source.docx");

            // Get the specified section from the source file
            Section section = sourceDoc.Sections[0];

            // Create another Document object
            Document targetDoc = new Document();

            // Load the target file
            targetDoc.LoadFromFile("C:\\Users\\Administrator\\Desktop\\target.docx");

            // Get the last section of the target file
            Section lastSection = targetDoc.LastSection;

            // Iterate through the child objects in the selected section
            foreach (DocumentObject obj in section.Body.ChildObjects)
            {
                // Add the child object to the last section of the target file
                lastSection.Body.ChildObjects.Add(obj.Clone());
            }

            // Save the target file to a different Word file
            targetDoc.SaveToFile("CopySection.docx", FileFormat.Docx2019);

            // Dispose resources
            sourceDoc.Dispose();
            targetDoc.Dispose();
        }
    }
}
Copy the Entire Document and Append it to Another in C#
To copy the full contents from one Word document into another, you can use the Document.InsertTextFromFile() method. This method appends the source document's contents to the target document, starting on a new page.
The steps to copy the entire document and append it to another are as follows:
- Create a Document object.
- Load a Word file (target file) from the given file path.
- Insert content of a different Word document to the target file using Document.InsertTextFromFile() method.
- Save the updated target file to a new Word document.
- C#
using Spire.Doc;

namespace CopyEntireDocument
{
    class Program
    {
        static void Main(string[] args)
        {
            // Specify the path of the source document
            String sourceFile = "C:\\Users\\Administrator\\Desktop\\source.docx";

            // Create a Document object
            Document targetDoc = new Document();

            // Load the target file
            targetDoc.LoadFromFile("C:\\Users\\Administrator\\Desktop\\target.docx");

            // Insert content of the source file to the target file
            targetDoc.InsertTextFromFile(sourceFile, FileFormat.Docx);

            // Save the target file to a different Word file
            targetDoc.SaveToFile("CopyEntireDocuemnt.docx", FileFormat.Docx2019);

            // Dispose resources
            targetDoc.Dispose();
        }
    }
}
Create a Copy of a Word Document in C#
Using Spire.Doc library for .NET, you can leverage the Document.Clone() method to easily duplicate a Word document.
Here are the steps to create a copy of a Word document:
- Create a Document object.
- Load a Word file from the given file path.
- Clone the file using Document.Clone() method.
- Save the cloned document to a new Word file.
- C#
using Spire.Doc;

namespace CloneWordDocument
{
    class Program
    {
        static void Main(string[] args)
        {
            // Create a new document object
            Document sourceDoc = new Document();

            // Load a Word file
            sourceDoc.LoadFromFile("C:\\Users\\Administrator\\Desktop\\sample.docx");

            // Clone the document
            Document newDoc = sourceDoc.Clone();

            // Save the cloned document as a docx file
            newDoc.SaveToFile("Copy.docx", FileFormat.Docx);

            // Dispose resources
            sourceDoc.Dispose();
            newDoc.Dispose();
        }
    }
}
Apply for a Temporary License
If you'd like to remove the evaluation message from the generated documents, or to get rid of the function limitations, please request a 30-day trial license for yourself.
How to add layers to PDF file in C#
Developers can use PDF layer to set some content to be visible and others to be invisible in the same PDF file. It makes the PDF Layer widely be used to deal with related contents within the same PDF. Now developers can easily add page layers by using class PdfPageLayer offered by Spire.PDF. This article will focus on showing how to add layers to a PDF file in C# with the help of Spire.PDF.
Note: Before Start, please download the latest version of Spire.PDF and add Spire.PDF.dll in the bin folder as the reference of Visual Studio.
Here comes to the details:
Step 1: Create a new PDF document
PdfDocument pdfdoc = new PdfDocument();
Step 2: Add a new page to the PDF document.
PdfPageBase page = pdfdoc.Pages.Add();
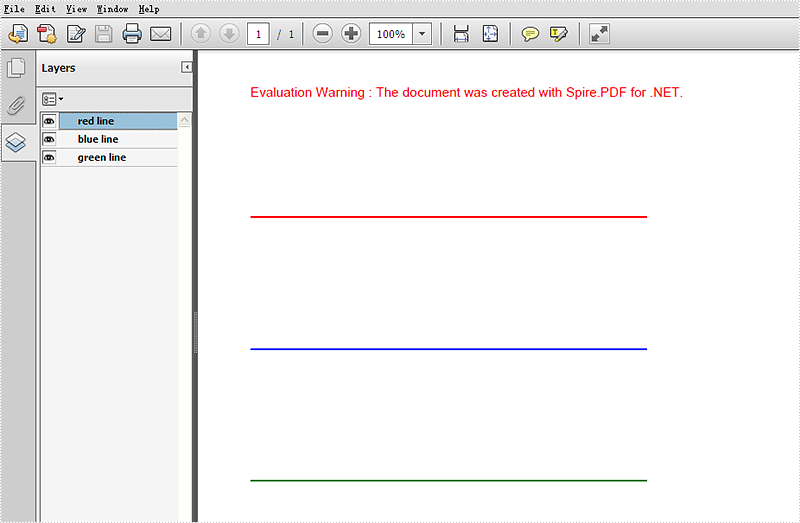
Step 3: Add a layer named "red line" to the PDF page.
PdfPageLayer layer = page.PageLayers.Add("red line");
Step 4: Draw a red line to the added layer.
layer.Graphics.DrawLine(new PdfPen(PdfBrushes.Red, 1), new PointF(0, 100), new PointF(300, 100));
Step 5: Use the same method above to add the other two layers to the PDF page.
layer = page.PageLayers.Add("blue line");
layer.Graphics.DrawLine(new PdfPen(PdfBrushes.Blue, 1), new PointF(0, 200), new PointF(300, 200));
layer = page.PageLayers.Add("green line");
layer.Graphics.DrawLine(new PdfPen(PdfBrushes.Green, 1), new PointF(0, 300), new PointF(300, 300));
Step 6: Save the document to file.
pdfdoc.SaveToFile("AddLayers.pdf", FileFormat.PDF);
Effective screenshot:
Full codes:
using Spire.Pdf;
using Spire.Pdf.Graphics;
using System.Drawing;

namespace AddLayer
{
    class Program
    {
        static void Main(string[] args)
        {
            PdfDocument pdfdoc = new PdfDocument();
            PdfPageBase page = pdfdoc.Pages.Add();
            PdfPageLayer layer = page.PageLayers.Add("red line");
            layer.Graphics.DrawLine(new PdfPen(PdfBrushes.Red, 1), new PointF(0, 100), new PointF(300, 100));
            layer = page.PageLayers.Add("blue line");
            layer.Graphics.DrawLine(new PdfPen(PdfBrushes.Blue, 1), new PointF(0, 200), new PointF(300, 200));
            layer = page.PageLayers.Add("green line");
            layer.Graphics.DrawLine(new PdfPen(PdfBrushes.Green, 1), new PointF(0, 300), new PointF(300, 300));
            pdfdoc.SaveToFile("AddLayers.pdf", FileFormat.PDF);
        }
    }
}