
.NET (1273)
Children categories
The sample demonstrates how to add bookmark into Word for Silverlight via Spire.Doc.
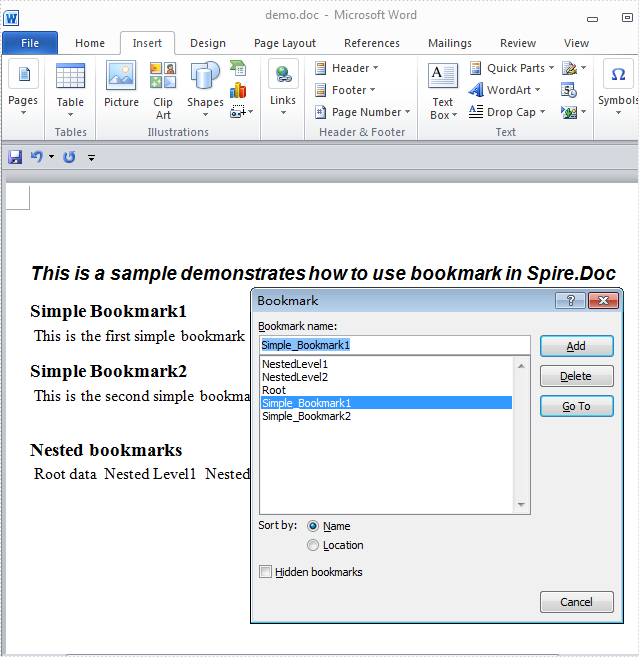
Table in Microsoft Word is used to present data information which can assist to explain specified paragraph contents. In order to have a better appearance, people can set Word table style. This guide shows how to use Spire.Doc to set table style in Word with C#/VB.NET.
Download Spire.Doc (or Spire.Office) with .NET Framework 2.0 (or above) together. Once make sure Spire.Doc (or Spire.Office) are correctly installed on system, follow the steps below to set Word table style
In this example, a Word document with table has been prepared. It is a student transcript template from Office.com.
Step 1: Create a C#/VB.NET project in Visual Studio. Add Spire.Doc.dll as reference.
Document document = new Document();
document.LoadFromFile(@"E:\work\Documents\Student Transcript.docx");
Dim document As New Document()
document.LoadFromFile("E:\work\Documents\Student Transcript.docx")
Step 2: Set Table Style
Get table which you want to set style
Because table1 type is different from document.Sections[0].Tables[1] type, so use (Table) to transformed forcibly.
Table table1 = (Table)document.Sections[0].Tables[1];
Dim table1 As Table = CType(document.Sections(0).Tables(1), Table)
Set table row height.
table1.Rows[0].Height = 25;
table1.Rows(0).Height = 25
Set Table Style
In order to have distinction. Keep the first cell in first row as before and set style for the second cell. Firstly, set alignment and background color for the second cell. Secondly, declare a paragraph style, including font size, color and apply this style in cell.
table1.Rows[0].Cells[1].CellFormat.VerticalAlignment = VerticalAlignment.Middle;
table1.Rows[0].Cells[1].CellFormat.BackColor = Color.LimeGreen;

ParagraphStyle style = new ParagraphStyle(document);
style.Name = "TableStyle";
style.CharacterFormat.FontSize = 14;
style.CharacterFormat.TextColor = Color.GhostWhite;
document.Styles.Add(style);
table1.Rows[0].Cells[1].Paragraphs[0].ApplyStyle(style.Name);
table1.Rows(0).Cells(1).CellFormat.VerticalAlignment = VerticalAlignment.Middle
table1.Rows(0).Cells(1).CellFormat.BackColor = Color.LimeGreen

Dim style As New ParagraphStyle(document)
style.Name = "TableStyle"
style.CharacterFormat.FontSize = 14
style.CharacterFormat.TextColor = Color.GhostWhite
document.Styles.Add(style)
table1.Rows(0).Cells(1).Paragraphs(0).ApplyStyle(style.Name)
Step 3: Save and Launch
document.SaveToFile("WordTable.docx", FileFormat.Docx);
System.Diagnostics.Process.Start("WordTable.docx");
document.SaveToFile("WordTable.docx", FileFormat.Docx)
System.Diagnostics.Process.Start("WordTable.docx")
Effective Screenshot:

This guide shows how to set Word table style such as size and color via Spire.Doc. However, Spire.Doc can do a lot on operating Word document Click to learn more
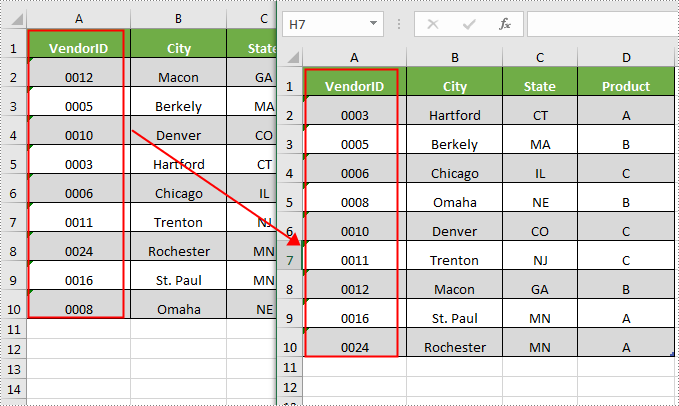
Sorting in Excel is one of the most commonly used features in data analysis. It allows users to sort text, numbers, dates and times in ascending, descending or alphabetical order. This article will demonstrate how to programmatically sort data in a cell range using Spire.XLS for .NET.
Install Spire.XLS for .NET
To begin with, you need to add the DLL files included in the Spire.XLS for.NET package as references in your .NET project. The DLL files can be either downloaded from this link or installed via NuGet.
PM> Install-Package Spire.XLS
Sort Data in Excel
The detailed steps are as follows.
- Create a Workbook instance.
- Load a sample Excel document using Workbook.LoadFromFile() method.
- Get the first worksheet using Workbook.Worksheets[index] property.
- Get a sort fields collection using Workbook.DataSorter.SortColumns property, and then specify the column that need to be sorted and the sort mode in the collection using SortColumns.Add(Int key, SortComparsionType, OrderBy) method.
- Sort the data in the specified cell range using Workbook.DataSorter.Sort(CellRange range) method.
- Save the result document using Workbook.SaveToFile() method.
- C#
- VB.NET
using Spire.Xls;

namespace SortData
{
    class Program
    {
        static void Main(string[] args)
        {
            //Create a Workbook instance
            Workbook workbook = new Workbook();

            //Load a sample Excel document
            workbook.LoadFromFile("sample.xlsx");

            //Get the first worksheet
            Worksheet worksheet = workbook.Worksheets[0];

            //Specify the column that need to be sorted and the sort mode (ascending or descending)
            workbook.DataSorter.SortColumns.Add(0, SortComparsionType.Values, OrderBy.Ascending);

            //Sort data in the specified cell range
            workbook.DataSorter.Sort(worksheet.Range["A1:D10"]);

            //Save the result document
            workbook.SaveToFile("Sort.xlsx", ExcelVersion.Version2016);
        }
    }
}
Apply for a Temporary License
If you'd like to remove the evaluation message from the generated documents, or to get rid of the function limitations, please request a 30-day trial license for yourself.
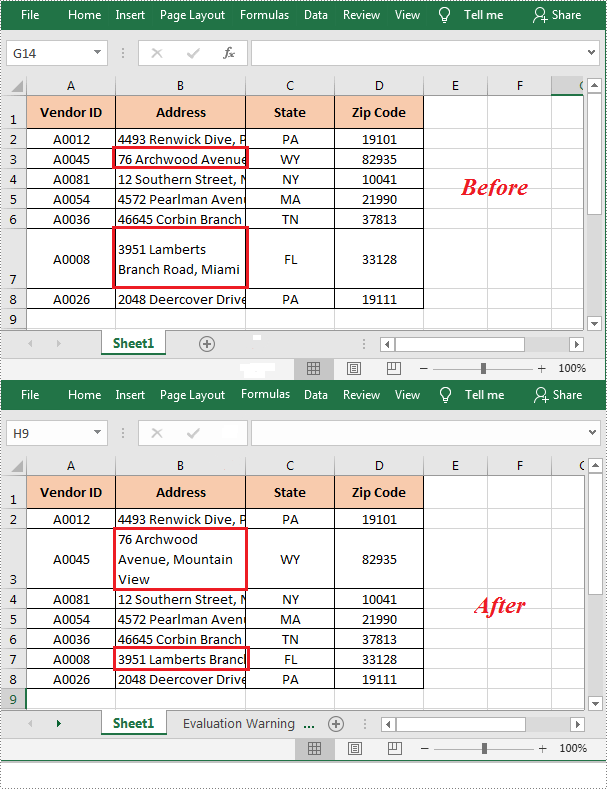
In Excel, the content of a cell may look incomplete when it exceeds the length of the cell. Under the circumstance, you can apply wrap text in the cell to ensure that all content can be viewed at once. This article will demonstrate how to programmatically wrap or unwrap text in Excel cells using Spire.XLS for .NET.
Install Spire.XLS for .NET
To begin with, you need to add the DLL files included in the Spire.XLS for .NET package as references in your .NET project. The DLL files can be either downloaded from this link or installed via NuGet.
PM> Install-Package Spire.XLS
Wrap or Unwrap Text in Excel Cells
The detailed steps are as follows.
- Create a Workbook object.
- Load a sample Excel file using Workbook.LoadFromFile() method.
- Get a specified worksheet using Workbook.Worksheets[] property.
- Get a specified cell using Worksheet.Range[] property.
- Get the style of the specified cell using CellRange.Style property.
- Wrap text in the specified cell by setting the CellStyle.WrapText property to true. Or set the property to false to unwrap text in the specified cell.
- Save the result file using Workbook.SaveToFile() method.
- C#
- VB.NET
using Spire.Xls;

namespace WrapText
{
    class Program
    {
        static void Main(string[] args)
        {
            //Create a Workbook object
            Workbook workbook = new Workbook();

            //Load a sample Excel file
            workbook.LoadFromFile(@"D:\Files\sample.xlsx");

            //Get the first worksheet
            Worksheet sheet = workbook.Worksheets[0];

            //Wrap text in cell B3
            sheet.Range["B3"].Style.WrapText = true;

            //Unwrap text in cell B7
            sheet.Range["B7"].Style.WrapText = false;

            //Save the result file
            workbook.SaveToFile("WarpText.xlsx", ExcelVersion.Version2010);
        }
    }
}
Apply for a Temporary License
If you'd like to remove the evaluation message from the generated documents, or to get rid of the function limitations, please request a 30-day trial license for yourself.
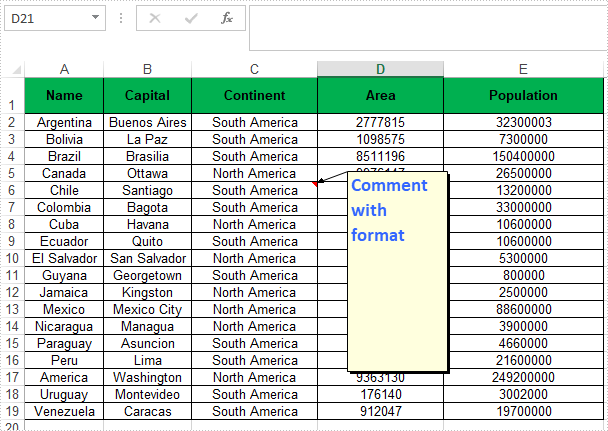
In Excel, comments are used to explain the contents in cells or to add additional information that might be useful to readers. Using Spire.XLS for .NET, we can add comments to Excel cells easily as well as customizing the appearance by setting the size of the comment box or applying a font style to the comment text. In this article, we will demonstrate how to add comments to Excel worksheets programmatically in C#/VB.NET from the following two parts.
Install Spire.XLS for .NET
To begin with, you need to add the DLL files included in the Spire.XLS for.NET package as references in your .NET project. The DLLs files can be either downloaded from this link or installed via NuGet.
PM> Install-Package Spire.XLS
Add Comments in an Excel Worksheet
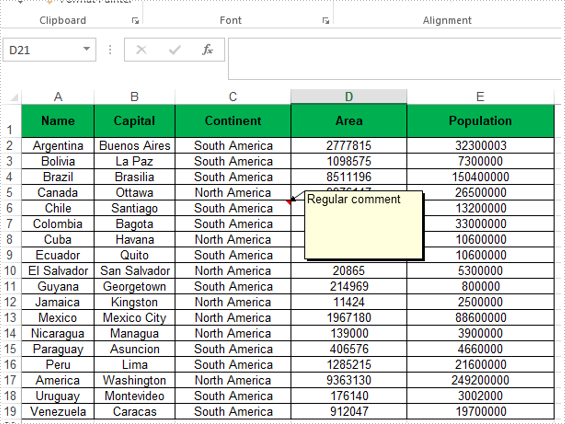
Spire.XLS offers the CellRange.AddComment() method to add the regular text comment to Excel worksheet. The following are the steps.
- Initialize an instance of Workbook class.
- Load an Excel file using Workbook.LoadFromFile() method.
- Get the first worksheet of the Excel file using Workbook.Worksheets[int] property.
- Add a comment in a specific cell range using CellRange.AddComment() method and then set the comment text through the Text property of the ExcelComment object.
- Save the document to another file using Workbook.SaveToFile() method.
- C#
- VB.NET
using Spire.Xls;

namespace WordDemo
{
    class Program
    {
        static void Main(string[] args)
        {
            //Create a Workbook object
            Workbook workbook = new Workbook();

            //Load the sample workbook
            workbook.LoadFromFile("Sample.xlsx");

            //Get the first worksheet
            Worksheet sheet = workbook.Worksheets[0];

            //Add regular comment to specific cell range C6
            CellRange range = sheet.Range["C6"];
            ExcelComment comment = range.AddComment();
            comment.Text = "Regular comment";

            //Save the Excel workbook.
            workbook.SaveToFile("Addcomment.xlsx", ExcelVersion.Version2016);

        }
}
Apply Formatting to Comments in an Excel Worksheet
Spire.XLS offers the Comment.RichText.SetFont() method to apply font formatting for comments in Excel worksheets.
- Initialize an instance of Workbook class.
- Load an Excel file using Workbook.LoadFromFile() method.
- Get the first worksheet of the Excel file using Workbook.Worksheets[int] property.
- Add a comment in a specific cell range using CellRange.AddComment() method and then set the comment text.
- Create an ExcelFont object and apply the font to the comment text using ExcelComment.RichText.SetFont() method.
- Save the document to another file using Workbook.SaveToFile() method.
- C#
- VB.NET
using Spire.Xls;

namespace ExcelComment
{
    class Program
    {
        static void Main(string[] args)
        {
            //Create a Workbook object
            Workbook workbook = new Workbook();

            //Load the sample workbook
            workbook.LoadFromFile("Sample.xlsx");

            //Get the first worksheet
            Worksheet sheet = workbook.Worksheets[0];

            //Add comment to specific cell range C6
            CellRange range = sheet.Range["C6"];
            ExcelComment comment = range.AddComment();
            comment.Text = "Comment with format";

            //Set the width and height
            comment.Width = 100;
            comment.Height = 200;

            //Display the comment
            comment.Visible = true;

            //Create a font
            ExcelFont font = workbook.CreateFont();
            font.FontName = "Calibri";
            font.Size = 14;
            font.KnownColor = ExcelColors.LightBlue;
            font.IsBold = true;

            //Apply the font to the comment text
            comment.RichText.SetFont(0,27,font);

            //Save the Excel workbook.
            workbook.SaveToFile("AddcommentwithFormat.xlsx", ExcelVersion.Version2016);

        }
    }
}
Apply for a Temporary License
If you'd like to remove the evaluation message from the generated documents, or to get rid of the function limitations, please request a 30-day trial license for yourself.
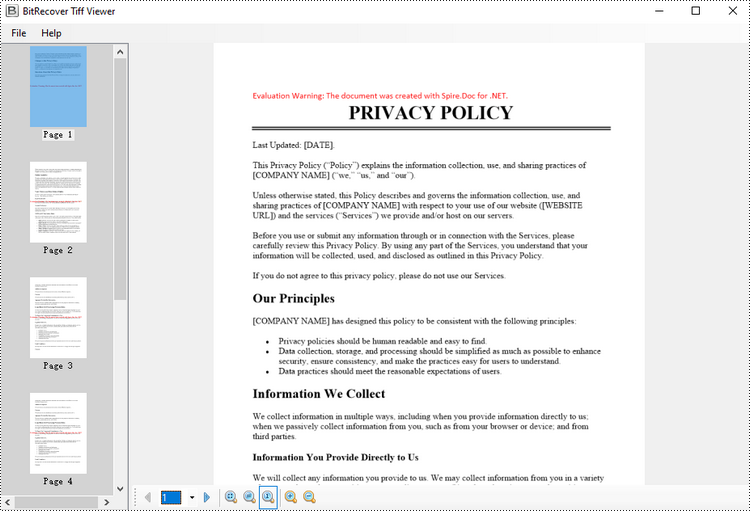
Converting Word to TIFF can be useful in various scenarios. TIFF files have high quality and wide support, making them versatile for sharing documents. The conversion also "flattens" the Word document, preserving the layout so it appears exactly as the original. This can be helpful when the document needs to be incorporated into another application or workflow that requires image-based files.
In this article, you will learn how to convert Word to TIFF using C# and the Spire.Doc for .NET library.
Install Spire.Doc for .NET
To begin with, you need to add the DLL files included in the Spire.Doc for.NET package as references in your .NET project. The DLL files can be either downloaded from this link or installed via NuGet.
PM> Install-Package Spire.Doc
Convert Word to TIFF in C#
Spire.Doc for .NET provides the Document.SaveToImages() method, which enables developers to convert an entire document into an array of images. Subsequently, these individual images can be combined into a single TIFF image using the built-in .NET library.
The steps to convert Word to TIFF using C# are as follows.
- Create a Document object.
- Load a Word document using Document.LoadFile() method.
- Convert the document into an array of images using Document.SaveToImages() method.
- Combine these images into a single TIFF file using the custom method ConvertImagesToTiff().
- C#
using Spire.Doc;
using Spire.Doc.Documents;
using System.Drawing;
using System.Drawing.Imaging;

namespace WordToTiff
{
    class Program
    {
        static void Main(string[] args)
        {
            // Create a Document object
            Document doc = new Document();

            // Load a Word document
            doc.LoadFromFile("C:\\Users\\Administrator\\Desktop\\input.docx");

            // Convert the whole document to images
            Image[] images = doc.SaveToImages(ImageType.Bitmap);

            // Convert multiple images into a TIFF file
            ConvertImagesToTiff(images, "ToTiff.tiff", EncoderValue.CompressionLZW);

            // Dispose resource
            doc.Dispose();
        }

        private static ImageCodecInfo GetEncoderInfo(string mimeType)
        {
            // Get the image encoders
            ImageCodecInfo[] encoders = ImageCodecInfo.GetImageEncoders();
            for (int j = 0; j < encoders.Length; j++)
            {
                // Find the encoder that matches the specified MIME type
                if (encoders[j].MimeType == mimeType)
                    return encoders[j];
            }
            throw new Exception(mimeType + " mime type not found in ImageCodecInfo");
        }

        public static void ConvertImagesToTiff(Image[] images, string outFile, EncoderValue compressEncoder)
        {
            // Set the encoder parameters
            Encoder enc = Encoder.SaveFlag;
            EncoderParameters ep = new EncoderParameters(2);
            ep.Param[0] = new EncoderParameter(enc, (long)EncoderValue.MultiFrame);
            ep.Param[1] = new EncoderParameter(Encoder.Compression, (long)compressEncoder);

            // Get the first image
            Image pages = images[0];

            // Create a variable
            int frame = 0;

            // Get an ImageCodecInfo object for processing TIFF image codec information
            ImageCodecInfo info = GetEncoderInfo("image/tiff");

            // Iterate through each Image
            foreach (Image img in images)
            {
                // If it's the first frame, save it to the output file with specified encoder parameters
                if (frame == 0)
                {
                    pages = img;
                    pages.Save(outFile, info, ep);
                }
                else
                {
                    // Save the intermediate frames
                    ep.Param[0] = new EncoderParameter(enc, (long)EncoderValue.FrameDimensionPage);

                    pages.SaveAdd(img, ep);
                }

                // If it's the last frame, flush the encoder parameters and close the file
                if (frame == images.Length - 1)
                {
                    ep.Param[0] = new EncoderParameter(enc, (long)EncoderValue.Flush);
                    pages.SaveAdd(ep);
                }
                frame++;
            }
        }
    }
}
Apply for a Temporary License
If you'd like to remove the evaluation message from the generated documents, or to get rid of the function limitations, please request a 30-day trial license for yourself.
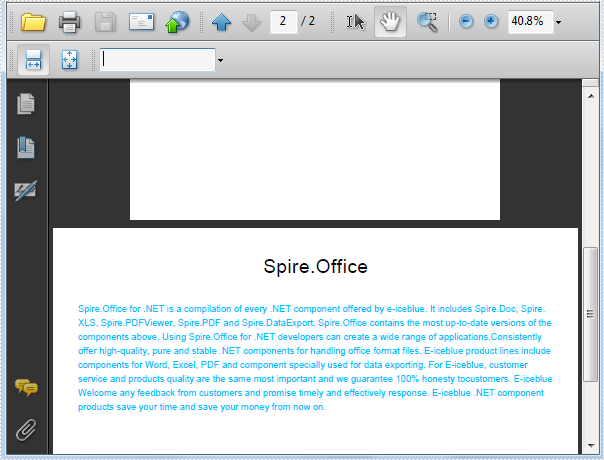
The sample demonstrates how to set PDF page orientation for Silverlight via Spire.PDF.
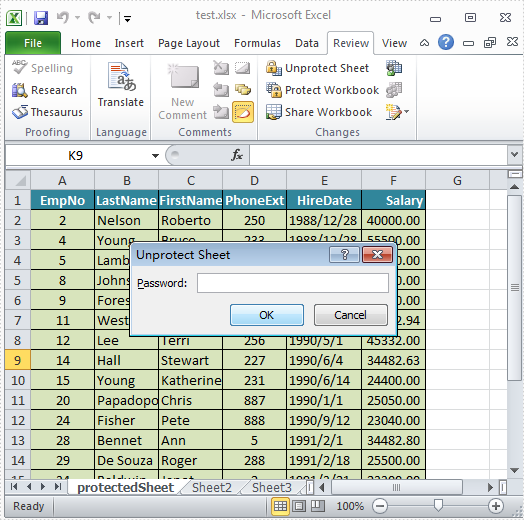
The sample demonstrates how to Lock Worksheet in Silverlight via Spire.XLS.
The sample demonstrates how to insert comments into Word for Silverlight via Spire.Doc.
Document properties, also known as metadata, are a set of data that describe a document. In Excel, you can add built-in document properties such as author, title, and keywords to quickly locate and identify documents in a folder. Or you can also add custom properties to provide more information about the Excel document. In this article, you will learn how to programmatically add built-in and custom document properties to an Excel document using Spire.XLS for .NET.
- Add Built-in Document Properties in Excel in C# and VB.NET
- Add Custom Document Properties in Excel in C# and VB.NET
Install Spire.XLS for .NET
To begin with, you need to add the DLL files included in the Spire.XLS for .NET package as references in your .NET project. The DLL files can be either downloaded from this link or installed via NuGet.
PM> Install-Package Spire.XLS
Add Built-in Document Properties in Excel in C# and VB.NET
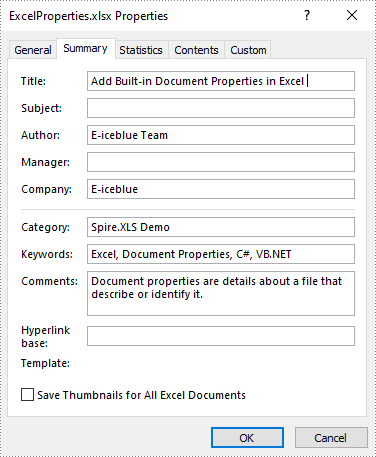
Built-in document properties are basic information about a document such as title, subject, author, category, etc. The names of these properties are predefined that cannot be edited, but Spire.XLS for .NET allows you to set specific values for these properties. The following are the detailed steps.
- Create a Workbook object.
- Load a sample Excel document using Workbook.LoadFromFile() method.
- Get the built-in document properties of the document using Workbook.DocumentProperties property.
- Set specific document properties such as title, author, keywords and comments using the properties of BuiltInDocumentProperties class.
- Save the result document using Workbook.SaveToFile() method.
- C#
- VB.NET
using Spire.Xls;

namespace ExcelProperties
{
    class Program
    {
        static void Main(string[] args)
        {
            //Create a Workbook object
            Workbook workbook = new Workbook();

            //Load a sample Excel document
            workbook.LoadFromFile("sample.xlsx");

            //Set built-in document properties for the Excel workbook
            workbook.DocumentProperties.Author = "E-iceblue Team";
            workbook.DocumentProperties.Title = "Add Built-in Document Properties in Excel ";
            workbook.DocumentProperties.Keywords = "Excel, Document Properties, C#, VB.NET";
            workbook.DocumentProperties.Category = "Spire.XLS Demo";
            workbook.DocumentProperties.Company = "E-iceblue";
            workbook.DocumentProperties.Comments = "Document properties are details about a file that describe or identify it.";

            //Save the result document
            workbook.SaveToFile("ExcelProperties.xlsx", FileFormat.Version2013);
        }
    }
}
Add Custom Document Properties in Excel in C# and VB.NET
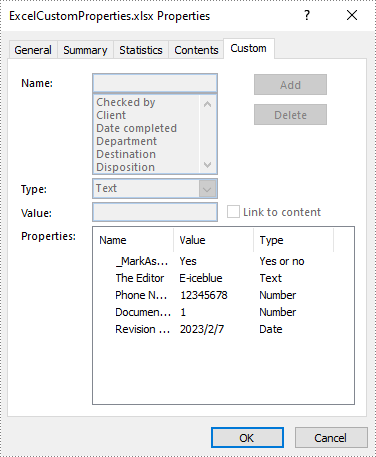
Custom document properties are additional properties that you can define for an Excel document. Spire.XLS for .NET allows you to add custom properties with specified names and values using ICustomDocumentProperties.Add() method. The following are the detailed steps.
- Create a Workbook object.
- Load a sample Excel document using Workbook.LoadFromFile() method.
- Get the custom document properties of the document using Workbook.CustomDocumentProperties property.
- Add custom document properties with different data types to the document using ICustomDocumentProperties.Add() method.
- Save the result document using Workbook.SaveToFile() method.
- C#
- VB.NET
using Spire.Xls;
using System;

namespace CustomExcelProperties
{
    class Program
    {
        static void Main(string[] args)
        {
            //Create a Workbook object
            Workbook workbook = new Workbook();

            //Load a sample Excel document
            workbook.LoadFromFile("sample.xlsx");

            //Add custom document properties to the document
            workbook.CustomDocumentProperties.Add("_MarkAsFinal", true);
            workbook.CustomDocumentProperties.Add("The Editor", "E-iceblue");
            workbook.CustomDocumentProperties.Add("Phone Number", 12345678);
            workbook.CustomDocumentProperties.Add("Document ID", 1);
            workbook.CustomDocumentProperties.Add("Revision Date", DateTime.Now);

            //Save the result document
            workbook.SaveToFile("ExcelCustomProperties.xlsx", FileFormat.Version2013);
        }
    }
}
Apply for a Temporary License
If you'd like to remove the evaluation message from the generated documents, or to get rid of the function limitations, please request a 30-day trial license for yourself.
