Spire.Office for Java 9.5.0 is released
We are excited to announce the release of Spire.Office for java 9.5.0. In this version, Spire.PDF for Java retrieving JavaScript content from PDF documents; Spire.Doc for java supports ignoring comparing headers and footers when comparing PDF documents; Spire.XLS for Java enhances the conversion from Excel to PDF. Besides, a lot of known issues are fixed successfully in this version. More details are listed below.
Here is a list of changes made in this release
Spire.PDF for Java
| Category | ID | Description |
| New feature | SPIREPDF-6644 | Adds a constructor method "PdfInkAnnotation ink = new PdfInkAnnotation(Rectangle2D rect, List<int[]> inkList)" to address the issue of PdfInkAnnotation not displaying in the browser.
PdfDocument doc = new PdfDocument();
PdfPageBase pdfPage = doc.getPages().add();
ArrayList inkList = new ArrayList();
int[] intPoints = new int[]
     {
         100,800,
         200,800,
         200,700
     };
inkList.add(intPoints);
Rectangle2D rect = new Rectangle2D.Float();
rect.setFrame(new Point2D.Float(0, 0), new Dimension((int)pdfPage.getActualSize().getWidth(), (int)pdfPage.getActualSize().getHeight()));
PdfInkAnnotation ink= new PdfInkAnnotation(rect,inkList);
ink.setColor(new PdfRGBColor(Color.RED));
ink.getBorder().setWidth(12);
ink.setText("e-iceblue");
pdfPage.getAnnotations().add(ink);
doc.saveToFile("inkAnnotation.pdf");
|
| New feature | SPIREPDF-6672 | Supports retrieving Javascript content from PDF documents.
PdfPageBase page = pdf.getPages().get(0);
StringBuilder stringBuilder = new StringBuilder();
java.util.List<PdfJavaScriptAction> list = pdf.getNames().getJavaScripts();
stringBuilder.append(list.get(2).getScript()+"\r\n");
list.get(0).setScript("new javaScript code");
PdfAnnotationCollection annotationCollection = page.getAnnotations();
for(int i = 0;i < annotationCollection.getCount();i++){
    PdfLinkAnnotationWidget annotation = (PdfLinkAnnotationWidget) annotationCollection.get(i);
    stringBuilder.append("Method name:"+"\r\n");
    String script = ((PdfJavaScriptAction) annotation.getAction()).getScript();
    stringBuilder.append(script+"\r\n");
}
|
| Bug | SPIREPDF-6662 SPIREPDF-6667 |
Fixes the issue that the text in tables was not being extracted completely. |
| Bug | SPIREPDF-6675 | Fixes the issue that the application threw a "java.lang.NullPointerException" exception when saving a PDF document after flattening form fields. |
Spire.Doc for Java
| Category | ID | Description |
| New feature | SPIREDOC-10156 | Supports ignoring headers and footers when comparing PDF documents.
CompareOptions options=new CompareOptions(); Options.IgnoreHeadersAndFooters=true;//Default is false |
| Bug | SPIREDOC-9330 SPIREDOC-10446 |
Fixes the issue that the text was garbled after converting a DOCX document to a PDF document. |
| Bug | SPIREDOC-9309 | Fixes the issue that the content was messed up after converting a DOCX document to a PDF document. |
| Bug | SPIREDOC-9349 | Fixes the issue that the content appeared different when it was opened with WPS tool after loading and saving the document. |
| Bug | SPIREDOC-10137 | Fix the issue that the text direction of the vertical text box was incorrect after converting a Word document to a PDF document. |
| Bug | SPIREDOC-10373 | Fix the issue that the program threw "cannot be cast to java.lang.Float" exception when comparing Word documents. |
| Bug | SPIREDOC-10383 | Fixed the issue that the paragraph alignment was incorrect after converting HTML to Word documents. |
| Bug | SPIREDOC-10408 | Fixed the issue that the program threw "Specified argument was out of the range of valid values" exception when loading Word documents. |
| Bug | SPIREDOC-10455 | Fix the issue that paging was incorrect after converting Word documents to PDF documents using WPS rules. |
| Bug | SPIREDOC-10459 | Fixed the issue that images were rotated after converting Word documents to PDF documents. |
| Bug | SPIREDOC-10466 | Fix the issue that extra content appeared after converting Word documents to PDF documents. |
| Bug | SPIREDOC-10481 | Fix the problem that the program threw a "NullPointerException" when converting Word documents to PDF documents. |
| Bug | SPIREDOC-10485 | Fix the issue that extra blank pages appeared after converting Word documents to PDF documents using WPS rules. |
| Bug | SPIREDOC-10513 | Fix the issue that the content of the drop-down box was garbled after converting a Word document to a PDF document. |
Spire.XLS for Java
| Category | ID | Description |
| Bug | SPIREXLS-5215 | Fixes the issue that the program threw "NullPointerException" when converting an Excel document to an HTML document. |
| Bug | SPIREXLS-5219 | Fixes the issue that the content of charts was incorrect after converting them to pictures. |
| Bug | SPIREXLS-5221 | Fixes the issue that the program threw "NullPointerException" exception when calling calculateAllValue() method to calculate formulas and convert Excel documents to pictures. |
| Bug | SPIREXLS-5222 | Fixes the issue that the chart content was incorrect after converting an Excel document to a PDF document. |
| Bug | SPIREXLS-5224 | Fixes an issue that the chart style was incorrect after loading and saving an XLSM document. |
| Bug | SPIREXLS-5230 | Fixes the issue that the XLOOKUP formula was calculated incorrectly. |
Spire.Presentation for Java
| Category | ID | Description |
| Bug | SPIREPPT-2466 | Optimizes the time consumption for converting PPTX to PDF. |
| Bug | SPIREPPT-2471 | Fixes the issue that the comments were incorrect after merging multiple PPTX files. |
| Bug | SPIREPPT-2486 | Fixed the issue that the application threw the "StringIndexOutOfBoundsException" when converting PowerPoint to HTML. |
| Bug | SPIREPPT-2504 | Fixes the issue that charts were blurred after converting PowerPoint to images. |
Python: Reorder Columns or Rows in Excel
Reordering columns or rows in Excel is a simple process that allows you to change the arrangement of data within your spreadsheet. This can be useful for better organizing your data or aligning it with other columns or rows. You can reorder by using drag-and-drop, cut and paste, or keyboard shortcuts depending on the version of Excel you are using.
This article focus on introducing how to programmatically reorder columns or rows in an Excel worksheet in Python using Spire.XLS for Python.
Install Spire.XLS for Python
This scenario requires Spire.XLS for Python and plum-dispatch v1.7.4. They can be easily installed in your system through the following pip command.
pip install Spire.XLS
If you are unsure how to install, please refer to this tutorial: How to Install Spire.XLS for Python on Windows
Reorder Columns in Excel in Python
Spire.XLS does not provide a straightforward way to reorganize the order of columns or rows within an Excel worksheet. The solution requires creating a duplicate of the target worksheet. Then, you can copy the columns or rows from the copied worksheet and paste them into the original worksheet in the new preferred column or row sequence.
The following are the steps to reorder columns in an Excel worksheet using Python.
- Create a Workbook object.
- Load an Excel document from the specified file path.
- Get the target worksheet using Workbook.Worksheets[index] property.
- Specify the new column order within a list.
- Create a temporary sheet and copy the data from the target sheet into it.
- Copy the columns from the temporary worksheet to the target worksheet in the desired order using Worksheet.Columns[index].Copy() method.
- Remove the temporary sheet.
- Save the workbook to a different Excel document.
- Python
from spire.xls import *
from spire.xls.common import *

# Create a Workbook object
workbook = Workbook()

# Load the Excel document
workbook.LoadFromFile("C:\\Users\\Administrator\\Desktop\\Input.xlsx")

# Get a specific worksheet
targetSheet = workbook.Worksheets[0]

# Specify the new column order in a list (the column index starts from 0)
newColumnOrder = [3, 0, 1, 2, 4, 5 ,6, 7]

# Add a temporary worksheet
tempSheet = workbook.Worksheets.Add("temp")

# Copy data from the target worksheet to the temporary sheet
tempSheet.CopyFrom(targetSheet)

# Iterate through the newColumnOrder list
for i in range(len(newColumnOrder)):

    # Copy the column from the temporary sheet to the target sheet in the new order
    tempSheet.Columns[newColumnOrder[i]].Copy(targetSheet.Columns[i], True, True)

    # Reset the column width in the target sheet
    targetSheet.Columns[i].ColumnWidth = tempSheet.Columns[newColumnOrder[i]].ColumnWidth

# Remove the temporary sheet
workbook.Worksheets.Remove(tempSheet)

# Save the workbook to another Excel file
workbook.SaveToFile("output/ReorderColumns.xlsx", FileFormat.Version2016)

# Dispose resources
workbook.Dispose()
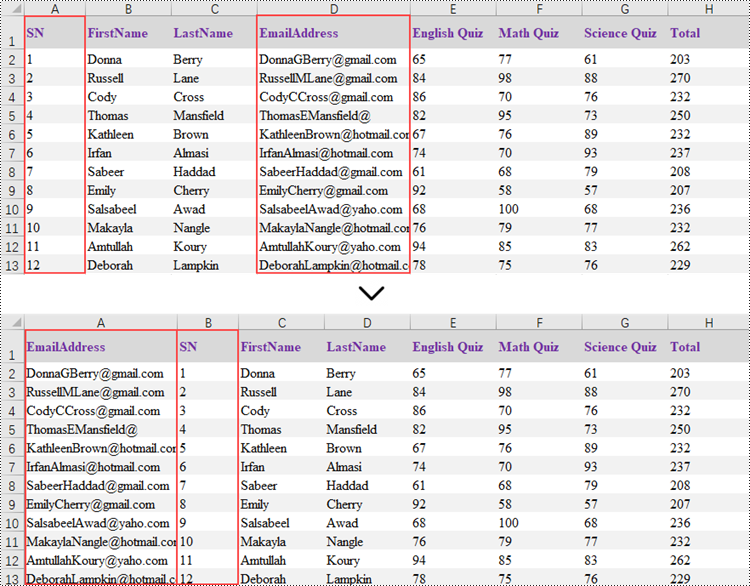
Reorder Rows in Excel in Python
Rearranging the rows in an Excel spreadsheet follows a similar approach to reorganizing the columns. The steps to reorder the rows within an Excel worksheet are as outlined below.
- Create a Workbook object.
- Load an Excel document from the specified file path.
- Get the target worksheet using Workbook.Worksheets[index] property.
- Specify the new row order within a list.
- Create a temporary sheet and copy the data from the target sheet into it.
- Copy the rows from the temporary worksheet to the target worksheet in the desired order using Worksheet.Rows[index].Copy() method.
- Remove the temporary sheet.
- Save the workbook to a different Excel document.
- Python
from spire.xls import *
from spire.xls.common import *

# Create a Workbook object
workbook = Workbook()

# Load the Excel document
workbook.LoadFromFile("C:\\Users\\Administrator\\Desktop\\Input.xlsx")

# Get a specific worksheet
targetSheet = workbook.Worksheets[0]

# Specify the new row order in a list (the row index starts from 0)
newRowOrder = [0, 2, 3, 1, 4, 5 ,6, 7, 8, 9, 10, 11, 12]

# Add a temporary worksheet
tempSheet = workbook.Worksheets.Add("temp")

# Copy data from the first worksheet to the temporary sheet
tempSheet.CopyFrom(targetSheet)

# Iterate through the newRowOrder list
for i in range(len(newRowOrder)):

    # Copy the row from the temporary sheet to the target sheet in the new order
    tempSheet.Rows[newRowOrder[i]].Copy(targetSheet.Rows[i], True, True)

    # Reset the row height in the target sheet
    targetSheet.Rows[i].RowHeight = tempSheet.Rows[newRowOrder[i]].RowHeight

# Remove the temporary sheet
workbook.Worksheets.Remove(tempSheet)

# Save the workbook to another Excel file
workbook.SaveToFile("output/ReorderRows.xlsx", FileFormat.Version2016)

# Dispose resources
workbook.Dispose()
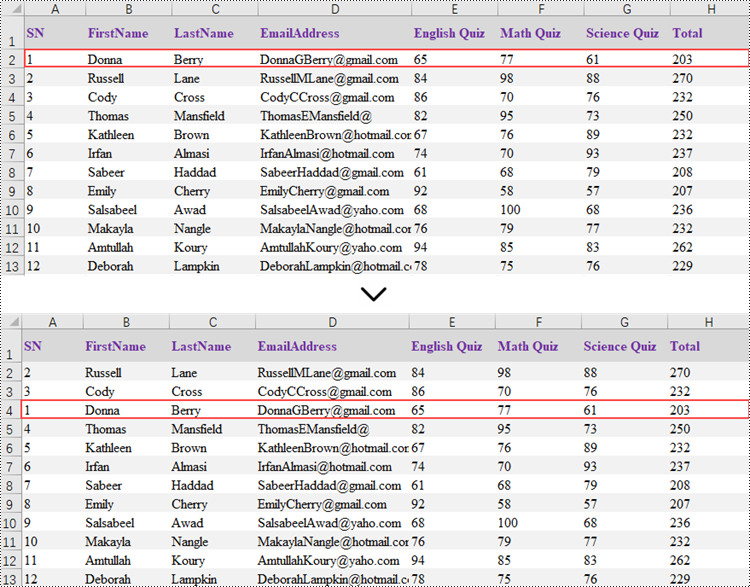
Apply for a Temporary License
If you'd like to remove the evaluation message from the generated documents, or to get rid of the function limitations, please request a 30-day trial license for yourself.
Java: Convert Markdown to Word and PDF
Markdown is a popular format among writers and developers for its simplicity and readability, allowing content to be formatted using easy-to-write plain text syntax. However, converting Markdown files to universally accessible formats like Word documents and PDF files is essential for sharing documents with readers, enabling complex formatting, and ensuring capability and consistency across devices and platforms. This article demonstrates how to convert Markdown files to Word and PDF files with the powerful library Spire.Doc for Java, enhancing the versatility and distribution potential of your written content.
- Convert a Markdown File to a Word Document with Java
- Convert a Markdown File to a PDF Document with Java
- Customizing Page Settings of the Result Document
Install Spire.Doc for Java
First of all, you're required to add the Spire.Doc.jar file as a dependency in your Java program. The JAR file can be downloaded from this link. If you use Maven, you can easily import the JAR file in your application by adding the following code to your project's pom.xml file.
<repositories>
    <repository>
        <id>com.e-iceblue</id>
        <name>e-iceblue</name>
        <url>https://repo.e-iceblue.com/nexus/content/groups/public/</url>
    </repository>
</repositories>
<dependencies>
    <dependency>
        <groupId>e-iceblue</groupId>
        <artifactId>spire.doc</artifactId>
        <version>12.11.0</version>
    </dependency>
</dependencies>
Convert a Markdown File to a Word Document with Java
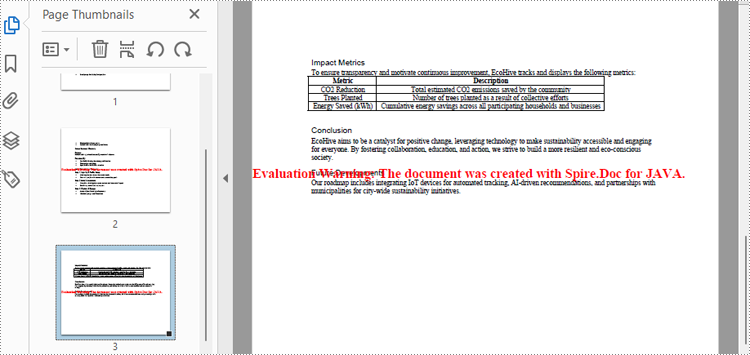
Spire.Doc for Java provides a simple way to convert Markdown format to Word and PDF document formats by using the Document.loadFromFile(String: fileName, FileFormat.Markdown) method to load the Markdown file and the Document.saveToFile(String: fileName, FileFormat: fileFormat) method to save the file as a Word or PDF document.
It should be noted that since images are stored as links in Markdown files, they need to be further processed after conversion if they are to be retained.
The detailed steps for converting a Markdown file to a Word document are as follows:
- Create an instance of Document class.
- Load a Markdown file using Document.loadFromFile(String: fileName, FileFormat.Markdown) method.
- Save the Markdown file as Word document using Document.saveToFile(String: fileName, FileFormat.Docx) method.
- Java
import com.spire.doc.Document;
import com.spire.doc.FileFormat;

public class MarkdownToWord {
    public static void main(String[] args) {
        // Create an instance of Document
        Document doc = new Document();

        // Load a Markdown file
        doc.loadFromFile("Sample.md", FileFormat.Markdown);

        // Save the Markdown file as Word document
        doc.saveToFile("output/MarkdownToWord.docx", FileFormat.Docx);
        doc.dispose();
    }
}
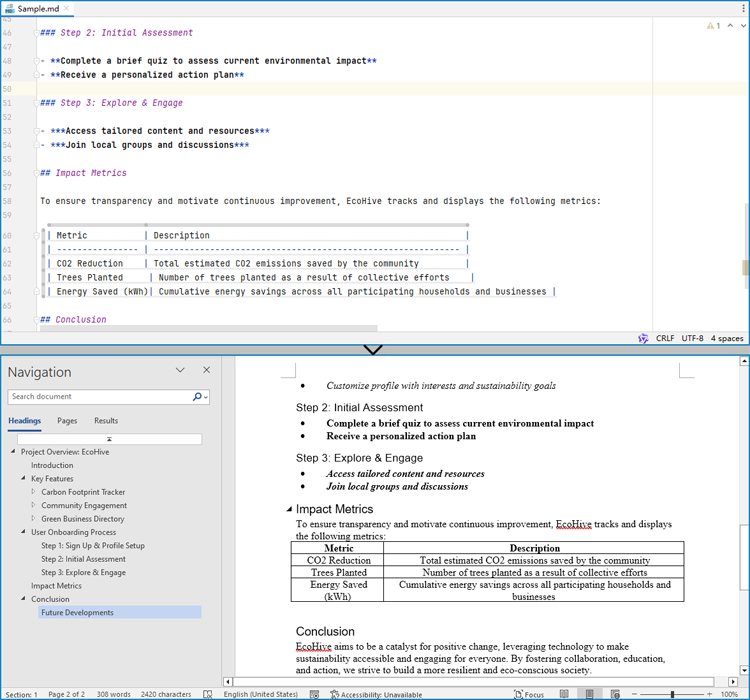
Convert a Markdown File to a PDF Document with Java
By using the FileFormat.PDF Enum as the format parameter of the Document.saveToFile() method, the Markdown file can be directly converted to a PDF document.
The detailed steps for converting a Markdown file to a PDF document are as follows:
- Create an instance of Document class.
- Load a Markdown file using Document.loadFromFile(String: fileName, FileFormat.Markdown) method.
- Save the Markdown file as PDF document using Document.saveToFile(String: fileName, FileFormat.PDF) method.
- Java
import com.spire.doc.Document;
import com.spire.doc.FileFormat;

public class MarkdownToPDF {
    public static void main(String[] args) {
        // Create an instance of the Document class
        Document doc = new Document();

        // Load a Markdown file
        doc.loadFromFile("Sample.md");

        // Save the Markdown file as a PDF file
        doc.saveToFile("output/MarkdownToPDF.pdf", FileFormat.PDF);
        doc.dispose();
    }
}
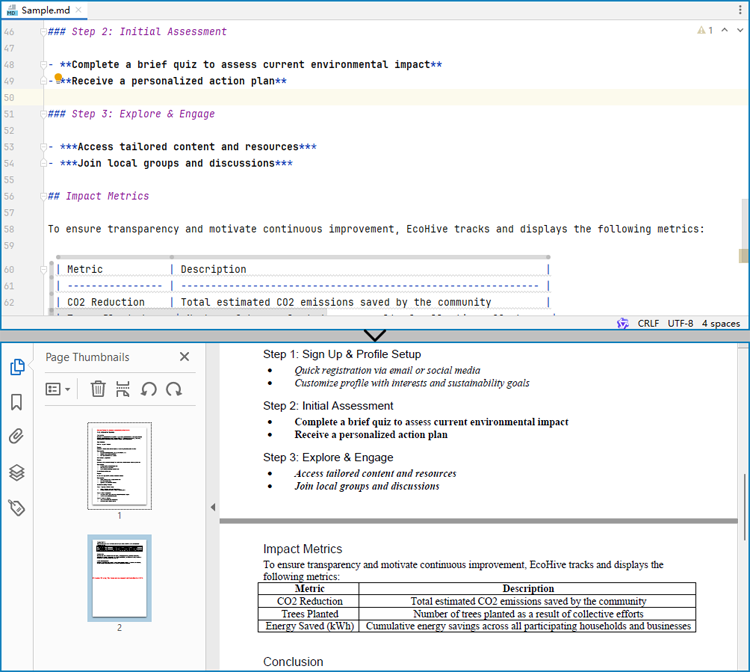
Customizing Page Settings of the Result Document
Spire.Doc for Java also provides methods under PageSetup class to do page setup before the conversion, allowing control over page settings such as page margins and page size of the resulting document.
The following are the steps to customize the page settings of the resulting document:
- Create an instance of Document class.
- Load a Markdown file using Document.loadFromFile(String: fileName, FileFormat.Markdown) method.
- Get the first section using Document.getSections().get() method.
- Set the page size, page orientation, and page margins using methods under PageSetup class.
- Save the Markdown file as PDF document using Document.saveToFile(String: fileName, FileFormat.PDF) method.
- Java
import com.spire.doc.Document;
import com.spire.doc.FileFormat;
import com.spire.doc.PageSetup;
import com.spire.doc.Section;
import com.spire.doc.documents.MarginsF;
import com.spire.doc.documents.PageOrientation;
import com.spire.doc.documents.PageSize;

public class PageSettingMarkdown {
    public static void main(String[] args) {
        // Create an instance of the Document class
        Document doc = new Document();

        // Load a Markdown file
        doc.loadFromFile("Sample.md");

        // Get the first section
        Section section = doc.getSections().get(0);

        // Set the page size, orientation, and margins
        PageSetup pageSetup = section.getPageSetup();
        pageSetup.setPageSize(PageSize.Letter);
        pageSetup.setOrientation(PageOrientation.Landscape);
        pageSetup.setMargins(new MarginsF(100, 100, 100, 100));

        // Save the Markdown file as a PDF file
        doc.saveToFile("output/MarkdownToPDF.pdf", FileFormat.PDF);
        doc.dispose();
    }
}
Apply for a Temporary License
If you'd like to remove the evaluation message from the generated documents, or to get rid of the function limitations, please request a 30-day trial license for yourself.
Spire.Doc 12.5.5 supports preserving FormField and SDT data and setting comment display when converting Word to PDF
We are excited to announce the release of Spire.Doc 12.5.5. This version supports preserving FormField and SDT data and setting the comment display mode when converting Word to PDF. Besides, it enhances the conversion from Word to HTML and HTML to Word. Moreover, some known issues are fixed successfully in this version, such as the issue that the program threw “ArgumentOutOfRangeException” exception when loading Word documents.
Here is a list of changes made in this release
| Category | ID | Description |
| New feature | - | Supports preserving FormField (CheckBox, DropDown, TextFormField) and SDT (CheckBox, Text, RichText, DropDownList, ComboBox) data when converting Word to PDF.
ToPdfParameterList.PreserveFormFields = true; |
| New feature | - | Supports setting three display modes for comments (Hide, ShowInBalloons, ShowInAnnotations) when converting Word to PDF.
Document.LayoutOptions.CommentDisplayMode = CommentDisplayMode.ShowInAnnotations; |
| Bug | SPIREDOC-10152 | Fixes the issue that the table widths and fonts are not correct when converting HTML to Word. |
| Bug | SPIREDOC-10363 | Fixes the issue that the program threw "ArgumentOutOfRangeException" when loading Word documents. |
| Bug | SPIREDOC-10371 | Fixes the issue that headings were missing after converting Word to HTML. |
| Bug | SPIREDOC-10376 | Fixes the issue that table borders were missing after converting Word to HTML. |
| Bug | SPIREDOC-10402 | Fixes the issue that tables were missing when converting Word to HTML. |
| Bug | SPIREDOC-10421 | Fixes the issue that the program threw "InvalidCastException" exception when comparing Word documents. |
| Bug | SPIREDOC-10427 | Fixes the issue that the header was lost after adding a watermark to Word and saving it to PDF. |
Python: Read or Remove Document Properties in Excel
Document properties provide additional information about an Excel file, such as author, title, subject, and other metadata associated with the file. Retrieving these properties from Excel can help users gain insight into the file content and history, enabling better organization and management of files. At times, users may also need to remove document properties to protect the privacy and confidentiality of the information contained in the file. In this article, you will learn how to read or remove document properties in Excel in Python using Spire.XLS for Python.
- Read Standard and Custom Document Properties in Excel
- Remove Standard and Custom Document Properties in Excel
Install Spire.XLS for Python
This scenario requires Spire.XLS for Python and plum-dispatch v1.7.4. They can be easily installed in your Windows through the following pip command.
pip install Spire.XLS
If you are unsure how to install, please refer to this tutorial: How to Install Spire.XLS for Python on Windows
Read Standard and Custom Document Properties in Excel in Python
Excel properties are divided into two main categories:
- Standard Properties: These are predefined properties that are built into Excel files. They typically include basic details about the file such as title, subject, author, keywords, etc.
- Custom Properties: These are user-defined attributes that can be added to Excel to track additional information about the file based on your specific needs.
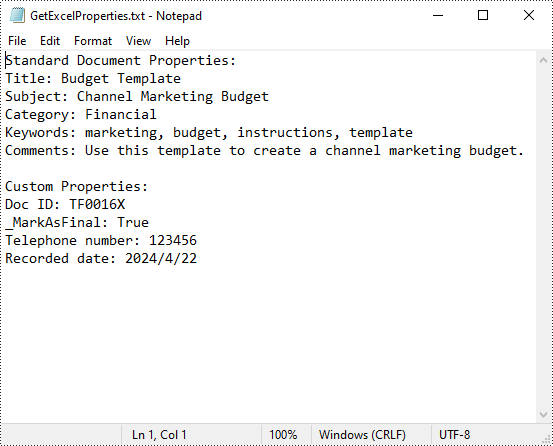
Spire.XLS for Python allows to read both the standard and custom document properties of an Excel file. The following are the detailed steps:
- Create a Workbook instance.
- Load an Excel file using Workbook.LoadFromFile() method.
- Create a StringBuilder instance.
- Get a collection of all standard document properties using Workbook.DocumentProperties property.
- Get specific standard document properties using the properties of the BuiltInDocumentProperties class and append them to the StringBuilder instance.
- Get a collection of all custom document properties using Workbook.CustomDocumentProperties property.
- Iterate through the collection.
- Get the name, type, and value of each custom document property using ICustomDocumentProperties[].Name, ICustomDocumentProperties[].PropertyType and ICustomDocumentProperties[].Value properties.
- Determine the specific property type, and then convert the property value to the value of the corresponding data type.
- Append the property name and converted property value to the StringBuilder instance using StringBuilde.append() method.
- Write the content of the StringBuilder instance into a txt file.
- Python
from spire.xls import *
from spire.xls.common import *

def AppendAllText(fname: str, text: List[str]):
    fp = open(fname, "w")
    for s in text:
        fp.write(s + "\n")
    fp.close()

inputFile = "Budget Template.xlsx"
outputFile = "GetExcelProperties.txt"

# Create a Workbook instance
workbook = Workbook()

# Load an Excel document from disk
workbook.LoadFromFile(inputFile)

# Create a StringBuilder instance
builder = []

# Get a collection of all standard document properties
standardProperties = workbook.DocumentProperties

# Get specific standard properties and append them to the StringBuilder instance
builder.append("Standard Document Properties:")
builder.append("Title: " + standardProperties.Title)
builder.append("Subject: " + standardProperties.Subject)
builder.append("Category: " + standardProperties.Category)
builder.append("Keywords: " + standardProperties.Keywords)
builder.append("Comments: " + standardProperties.Comments)
builder.append("")

# Get a collection of all custom document properties
customProperties = workbook.CustomDocumentProperties

builder.append("Custom Properties:")
# Iterate through the collection
for i in range(len(customProperties)):

    # Get the name, type, and value of each custom document property
    name = customProperties[i].Name
    type = customProperties[i].PropertyType
    obj = customProperties[i].Value

    # Determine the specific property type, and then convert the property value to the value of the corresponding data type
    value = None
    if type == PropertyType.Double:
        value = Double(obj).Value
    elif type == PropertyType.DateTime:
        value = DateTime(obj).ToShortDateString()
    elif type == PropertyType.Bool:
        value = Boolean(obj).Value
    elif type == PropertyType.Int:
        value = Int32(obj).Value
    elif type == PropertyType.Int32:
        value = Int32(obj).Value
    else:
        value = String(obj).Value

    # Append the property name and converted property value to the StringBuilder instance
    builder.append(name + ": " + str(value))

# Write the content of the StringBuilder instance into a text file
AppendAllText(outputFile, builder)
workbook.Dispose()
Remove Standard and Custom Document Properties in Excel in Python
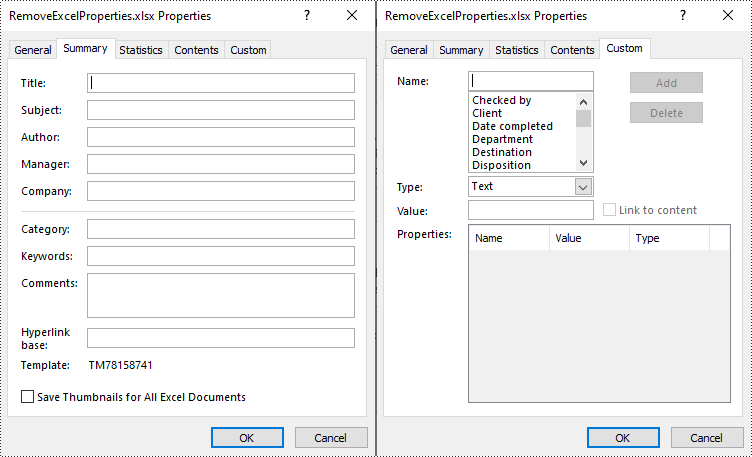
You can easily delete standard document properties from an Excel file by setting their values as empty. For custom document properties, you can use the ICustomDocumentProperties.Remove() method to delete them. The following are the detailed steps:
- Create a Workbook instance.
- Load a sample Excel file using Workbook.LoadFromFile() method.
- Get a collection of all standard document properties using Workbook.DocumentProperties property.
- Set the values of specific standard document properties as empty through the corresponding properties of the BuiltInDocumentProperties class.
- Get a collection of all custom document properties using Workbook.CustomDocumentProperties property.
- Iterate through the collection.
- Delete each custom property from the collection by its name using ICustomDocumentProperties.Remove() method.
- Save the result file using Workbook.SaveToFile() method.
- Python
from spire.xls import *
from spire.xls.common import *

inputFile = "Budget Template.xlsx"
outputFile = "RemoveExcelProperties.xlsx"

# Create a Workbook instance
workbook = Workbook()

# Load an Excel document from disk
workbook.LoadFromFile(inputFile)

# Get a collection of all standard document properties
standardProperties = workbook.DocumentProperties

# Set the value of each standard document property as empty
standardProperties.Title = ""
standardProperties.Subject = ""
standardProperties.Category = ""
standardProperties.Keywords = ""
standardProperties.Comments = ""

# Get a collection of all custom document properties
customProperties = workbook.CustomDocumentProperties

# Iterate through the collection
for i in range(len(customProperties) - 1, -1, -1):
    # Delete each custom document property from the collection by its name
    customProperties.Remove(customProperties[i].Name)

# Save the result file
workbook.SaveToFile(outputFile, ExcelVersion.Version2016)
workbook.Dispose()
Apply for a Temporary License
If you'd like to remove the evaluation message from the generated documents, or to get rid of the function limitations, please request a 30-day trial license for yourself.
Python: Set Alignment for Table and Table Text in Word
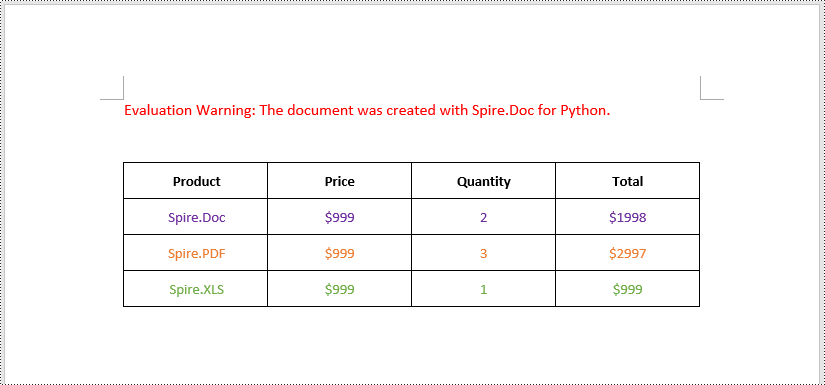
Proper alignment of tables and text in Microsoft Word is crucial for creating visually appealing and easy-to-read documents. By aligning table headers, numeric data, and text appropriately, you can enhance the organization and clarity of your information, making it more accessible to your readers. In this article, we will demonstrate how to align tables and the text in table cells in Microsoft Word in Python using Spire.Doc for Python.
Install Spire.Doc for Python
This scenario requires Spire.Doc for Python and plum-dispatch v1.7.4. They can be easily installed in your Windows through the following pip commands.
pip install Spire.Doc
If you are unsure how to install, please refer to this tutorial: How to Install Spire.Doc for Python on Windows
Align Tables in Word in Python
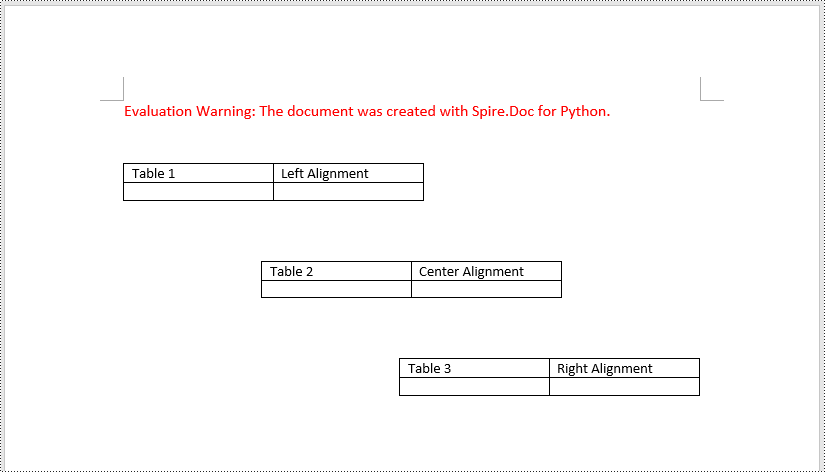
A table in a Word document can be aligned to the left, center, or right side by using the Table.TableFormat.HorizontalAlignment property. The detailed steps are as follows.
- Create an instance of the Document class.
- Load a Word document using Document.LoadFromFile() method.
- Get a specific section in the document using Document.Sections[index] property.
- Get a specific table in the section using Section.Tables[index] property.
- Set the alignment for the table using Table.TableFormat.HorizontalAlignment property.
- Save the result document using Document.SaveToFile() method.
- Python
from spire.doc import *
from spire.doc.common import *

# Create an instance of the Document class
document = Document()
# Load a Word document
document.LoadFromFile("Tables.docx")

# Get the first section in the document
section = document.Sections[0]

# Get the first, second, and third tables in the section
table1 = section.Tables[0]
table2 = section.Tables[1]
table3 = section.Tables[2]

# Align the first table to the left
table1.TableFormat.HorizontalAlignment = RowAlignment.Left
# Align the second table to the center
table2.TableFormat.HorizontalAlignment = RowAlignment.Center
# Align the third table to the right
table3.TableFormat.HorizontalAlignment = RowAlignment.Right

# Save the result document
document.SaveToFile("AlignTable.docx", FileFormat.Docx2013)
document.Close()
Align the Text in Table Cells in Word in Python
The text within a table cell can be horizontally aligned to the left, center, or right side using the TableCell.Paragraphs[index].Format.HorizontalAlignment property. Additionally, they can also be vertically aligned to the top, center, or bottom of the cell using the TableCell.CellFormat.VerticalAlignment property. The detailed steps are as follows.
- Create an instance of the Document class.
- Load a Word document using Document.LoadFromFile() method.
- Get a specific section in the document using Document.Sections[index] property.
- Get a specific table in the section using Section.Tables[index] property.
- Loop through the rows in the table.
- Loop through the cells in each row.
- Set the vertical alignment for the text in each cell using TableCell.CellFormat.VerticalAlignment property.
- Loop through the paragraphs in each cell.
- Set the horizontal alignment for each paragraph using TableCell.Paragraphs[index].Format.HorizontalAlignment property.
- Save the result document using Document.SaveToFile() method.
- Python
from spire.doc import *
from spire.doc.common import *

# Create an instance of the Document class
document = Document()
# Load a Word document
document.LoadFromFile("Table.docx")

# Get the first section in the document
section = document.Sections[0]

# Get the first tables in the section
table = section.Tables[0]

# Loop through the rows in the table
for row_index in range(table.Rows.Count):
    row = table.Rows[row_index]
    # Loop through the cells in the row
    for cell_Index in range(row.Cells.Count):
        cell = row.Cells[cell_Index]
        # Vertically align the text in the cell to the center
        cell.CellFormat.VerticalAlignment = VerticalAlignment.Middle
        # Horizontally align the text in the cell to the center
        for para_index in range(cell.Paragraphs.Count):
            paragraph = cell.Paragraphs[para_index]
            paragraph.Format.HorizontalAlignment = HorizontalAlignment.Center

# Save the result document
document.SaveToFile("AlignTableText.docx", FileFormat.Docx2013)
document.Close()
Apply for a Temporary License
If you'd like to remove the evaluation message from the generated documents, or to get rid of the function limitations, please request a 30-day trial license for yourself.
Spire.XLS 14.5.3 supports adding images to the first page header and footer
We're pleased to announce the release of Spire.XLS 14.5.3. This version supports adding images to the first page header and footer, obtaining active selection range, as well as finding cells based on regular expressions. In addition, some known issues that occurred when converting Excel to PDF/ images, importing data into Excel, and autofitting columns have been successfully fixed. More details are shown below.
Here is a list of changes made in this release
| Category | ID | Description |
| New feature | SPIREXLS-5128 | Supports adding images to the first page header and footer.
//Load image System.Drawing.Image bufferedImage = System.Drawing.Image.FromFile(inputFile_Img); //Set image on first page header and footer wb.Worksheets[0].PageSetup.FirstLeftHeaderImage = bufferedImage; wb.Worksheets[0].PageSetup.FirstLeftFooterImage = bufferedImage; wb.Worksheets[1].PageSetup.FirstCenterHeaderImage = bufferedImage; wb.Worksheets[1].PageSetup.FirstCenterFooterImage = bufferedImage; wb.Worksheets[2].PageSetup.FirstRightHeaderImage = bufferedImage; wb.Worksheets[2].PageSetup.FirstRightFooterImage = bufferedImage; |
| New feature | SPIREXLS-5195 | Supports obtaining active selection range.
Worksheet worksheet = workbook.Worksheets[0];
string Information = null;
foreach (CellRange range in worksheet.ActiveSelectionRange)
{
Information += "RangeAddressLocal:"+ range.RangeAddressLocal+"\r\n";
Information += "ColumnCount:" + range.ColumnCount + "\r\n";
Information += "ColumnWidth:" + range.ColumnWidth + "\r\n";
Information += "Column:" + range.Column + "\r\n";
Information += "RowCount:" + range.RowCount+ "\r\n";
Information += "RowHeight:" + range.RowHeight + "\r\n";
Information += "Row:" + range.Row + "\r\n";
}
File.WriteAllText(outputFile_TXT,Information);
|
| New feature | SPIREXLS-5200 | Supports finding cells based on regular expressions.
CellRange[] ranges = sheet.FindAllString(".*test.", false, false, true);
|
| Bug | SPIREXLS-5075 | Fixes the issue that the image was lost after converting Excel to image. |
| Bug | SPIREXLS-5151 | Fixes the issue that the content in the generated PDF document was lost after converting Excel to PDF on the Kirin system. |
| Bug | SPIREXLS-5186 | Fixes the issue that the application threw the "System.NullPointerException" when converting sheet to image. |
| Bug | SPIREXLS-5197 | Fixes the issue that the border obtained from merged area was incorrect. |
| Bug | SPIREXLS-5198 | Fixes the issue that the text and alternative text obtained from checkboxes were incorrect. |
| Bug | SPIREXLS-5214 | Fixes the issue that it failed to set the active cell using the SetActiveCell() method. |
| Bug | SPIREXLS-5216 | Fixes the issue that the textboxes added to charts were not displayed. |
| Bug | SPIREXLS-5218 | Fixes the issue that the name obtained from checkbox was incorrect. |
| Bug | SPIREXLS-5225 | Fixes the issue that the mouse cursor position was incorrect after importing data into Excel using the InsertDataTable() method. |
| Bug | SPIREXLS-5228 | Fixes the issue that some graphics and lines were lost after converting Excel document to PDF document. |
| Bug | SPIREXLS-5234 | Fixes the issue that it failed to autofit columns using the AutoFitCoumns() method. |
Python: Create and Scan QR Codes
QR codes are a type of two-dimensional barcode that can store a variety of information, including URLs, contact details, and even payment information. QR codes have become increasingly popular, allowing for quick and convenient access to digital content, making them a useful tool in our modern, technology-driven world.
In this article, you will learn how to create and scan QR codes in Python using Spire.Barcode for Python.
Get a Free Trial License
The trial version of Spire.Barcode for Python does not support scanning QR code images without a valid license being applied. Additionally, it displays an evaluation message on any QR code images that are generated.
To remove these limitations, you can get a 30-day trial license for free.
Create a QR Code in Python
Spire.Barcode for Python offers the BarcodeSettings class, which enables you to configure the settings for generating a barcode. These settings encompass the barcode type, the data to be encoded, the color, the margins, and the horizontal and vertical resolution.
After you have set up the desired settings, you can create a BarcodeGenerator instance using those configurations. Subsequently, you can invoke the GenerateImage() method of the generator to produce the barcode image.
The following are the steps to create a QR code in Python.
- Create a BarcodeSettings object.
- Set the barcode type to QR code using BarcodeSettings.Type property.
- Set the data of the 2D barcode using BarcodeSettings.Data2D property.
- Set other attributes of the barcode using the properties under the BarcodeSettings object.
- Create a BarCodeGenerator object based on the settings.
- Create a QR code image using BarCodeGenerator.GenerateImage() method.
- Python
from spire.barcode import *

# Write all bytes to a file
def WriteAllBytes(fname: str, data):
    with open(fname, "wb") as fp:
        fp.write(data)
    fp.close()

# Apply license key
License.SetLicenseKey("license key")

# Create a BarcodeSettings object
barcodeSettings = BarcodeSettings()

# Set the type of barcode to QR code
barcodeSettings.Type = BarCodeType.QRCode

# Set the data for the 2D barcode
barcodeSettings.Data2D = "Hello, World"

# Set margins
barcodeSettings.LeftMargin = 0.2
barcodeSettings.RightMargin = 0.2
barcodeSettings.TopMargin = 0.2
barcodeSettings.BottomMargin = 0.2

# Set the horizontal resolution
barcodeSettings.DpiX = 500

# Set the vertical resolution
barcodeSettings.DpiY = 500

# Set error correction level
barcodeSettings.QRCodeECL = QRCodeECL.M

# Do not display text on barcode
barcodeSettings.ShowText = False

# Add a logo at the center of the QR code
barcodeSettings.SetQRCodeLogoImage("C:\\Users\\Administrator\\Desktop\\logo.png")

# Create an instance of BarCodeGenerator with the specified settings
barCodeGenerator = BarCodeGenerator(barcodeSettings)

# Generate the image for the barcode
image = barCodeGenerator.GenerateImage()

# Write the PNG image to disk
WriteAllBytes("output/QRCode.png", image)

Scan a QR Code Image in Python
Spire.Barcode provides the BarcodeScanner class, which is responsible for barcode image recognition. This class offers several methods to extract data from barcodes, including:
- ScanOneFile(): Scans a single barcode image file and returns the extracted data.
- ScanFile(): Scans all barcodes present in a specified image file and returns the extracted data.
- ScanStream(): Scans barcodes from a stream of image data and returns the extracted information.
The following code demonstrates how to scan a QR code image using it.
- Python
from spire.barcode import *

# Apply license key
License.SetLicenseKey("license key")

# Scan an image file that contains one barcode
result = BarcodeScanner.ScanOneFile("C:\\Users\\Administrator\\Desktop\\QRCode.png")

# Scan an image file that contains multiple barcodes
# results = BarcodeScanner.ScanFile("C:\\Users\\Administrator\\Desktop\\Image.png")

# Print the result
print(result)

Python: Highlight Text in PowerPoint Presentation
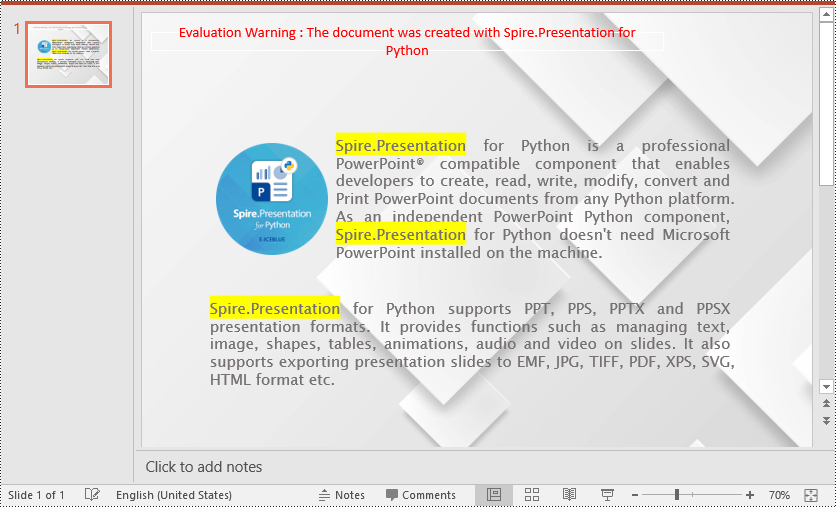
Highlighting important text in your PowerPoint slides can be an effective way to draw your audience's attention and emphasize key points. Whether you are presenting complex information or delivering a persuasive pitch, using text highlighting can make your slides more visually engaging and help your message stand out. In this article, we will demonstrate how to highlight text in a PowerPoint presentation in Python using Spire.Presentation for Python.
Install Spire.Presentation for Python
This scenario requires Spire.Presentation for Python. It can be easily installed in your Windows through the following pip command.
pip install Spire.Presentation
If you are unsure how to install, please refer to this tutorial: How to Install Spire.Presentation for Python on Windows
Highlight Text in PowerPoint Presentation in Python
Spire.Presentation for Python provides a method called IAutoShape.TextFrame.HighLightText(text: str, color: Color, options: TextHighLightingOptions) to highlight specific text within the shapes of a PowerPoint presentation.
Follow the steps below to highlight specified text in your presentation using Spire.Presentation for Python:
- Create an instance of the Presentation class.
- Load a PowerPoint presentation using the Presentation.LoadFromFile() method.
- Create an instance of the TextHighLightingOptions class, and set the text highlighting options such as whole words only and case sensitive through the TextHighLightingOptions.WholeWordsOnly and TextHighLightingOptions.CaseSensitive properties.
- Loop through the slides in the presentation and the shapes on each slide.
- Check if the current shape is of IAutoShape type.
- If the result is true, typecast it to an IAutoShape object.
- Highlight all matches of specific text in the shape using the IAutoShape.TextFrame.HighLightText(text: str, color: Color, options: TextHighLightingOptions) method.
- Save the result presentation to a new file using the Presentation.SaveToFile() method.
- Python
from spire.presentation.common import *
from spire.presentation import *

# Specify the input and output file paths
input_file = "Example.pptx"
output_file = "HighlightText.pptx"

# Create an instance of the Presentation class
ppt = Presentation()
# Load the PowerPoint presentation
ppt.LoadFromFile(input_file)

# Specify the text to highlight
text_to_highlight = "Spire.Presentation"
# Specify the highlight color
highlight_color = Color.get_Yellow()

# Create an instance of the TextHighLightingOptions class
options = TextHighLightingOptions()
# Set the highlight options (case sensitivity and whole word highlighting)
options.WholeWordsOnly = True
options.CaseSensitive = True

# Loop through the slides in the presentation
for slide in ppt.Slides:
    # Loop through the shapes on each slide
    for shape in slide.Shapes:
            # Check if the shape is of IAutoShape type
            if isinstance (shape, IAutoShape):
                # Typecast the shape to an IAutoShape object
                auto_shape = IAutoShape(shape)
                # Search and highlight specified text within the shape
                auto_shape.TextFrame.HighLightText(text_to_highlight, highlight_color, options)

# Save the result presentation to a new PPTX file
ppt.SaveToFile(output_file, FileFormat.Pptx2013)
ppt.Dispose()
Apply for a Temporary License
If you'd like to remove the evaluation message from the generated documents, or to get rid of the function limitations, please request a 30-day trial license for yourself.
Python: Get Coordinates of the Specified Text or Image in PDF
Retrieving the coordinates of text or images within a PDF document can quickly locate specific elements, which is valuable for extracting content from PDFs. This capability also enables adding annotations, marks, or stamps to the desired locations in a PDF, allowing for more advanced document processing and manipulation.
In this article, you will learn how to get coordinates of the specified text or image in a PDF document using Spire.PDF for Python.
- Get Coordinates of the Specified Text in PDF in Python
- Get Coordinates of the Specified Image in PDF in Python
Install Spire.PDF for Python
This scenario requires Spire.PDF for Python and plum-dispatch v1.7.4. They can be easily installed in your Windows through the following pip command.
pip install Spire.PDF
If you are unsure how to install, please refer to this tutorial: How to Install Spire.PDF for Python on Windows
Coordinate System in Spire.PDF
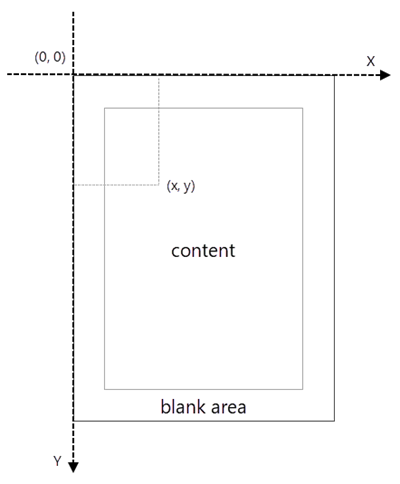
When using Spire.PDF to process an existing PDF document, the origin of the coordinate system is located at the top left corner of the page. The X-axis extends horizontally from the origin to the right, and the Y-axis extends vertically downward from the origin (shown as below).
Get Coordinates of the Specified Text in PDF in Python
To find the coordinates of a specific piece of text within a PDF document, you must first use the PdfTextFinder.Find() method to locate all instances of the target text on a particular page. Once you have found these instances, you can then access the PdfTextFragment.Positions property to retrieve the precise (X, Y) coordinates for each instance of the text.
The steps to get coordinates of the specified text in PDF are as follows.
- Create a PdfDocument object.
- Load a PDF document from a specified path.
- Get a specific page from the document.
- Create a PdfTextFinder object.
- Specify find options through PdfTextFinder.Options property.
- Search for a string within the page using PdfTextFinder.Find() method.
- Get a specific instance of the search results.
- Get X and Y coordinates of the text through PdfTextFragment.Positions[0].X and PdfTextFragment.Positions[0].Y properties.
- Python
from spire.pdf.common import *
from spire.pdf import *

# Create a PdfDocument object
doc = PdfDocument()

# Load a PDF document
doc.LoadFromFile("C:\\Users\\Administrator\\Desktop\\Privacy Policy.pdf")

# Get a specific page
page = doc.Pages[0]

# Create a PdfTextFinder object
textFinder = PdfTextFinder(page)

# Specify find options
findOptions = PdfTextFindOptions()
findOptions.Parameter = TextFindParameter.IgnoreCase
findOptions.Parameter = TextFindParameter.WholeWord
textFinder.Options = findOptions

# Search for the string "PRIVACY POLICY" within the page
findResults = textFinder.Find("PRIVACY POLICY")

# Get the first instance of the results
result = findResults[0]

# Get X/Y coordinates of the found text
x = int(result.Positions[0].X)
y = int(result.Positions[0].Y)
print("The coordinates of the first instance of the found text are:", (x, y))

# Dispose resources
doc.Dispose()

Get Coordinates of the Specified Image in PDF in Python
Spire.PDF for Python provides the PdfImageHelper class, which allows users to extract image details from a specific page within a PDF file. By doing so, you can leverage the PdfImageInfo.Bounds property to retrieve the (X, Y) coordinates of an individual image.
The steps to get coordinates of the specified image in PDF are as follows.
- Create a PdfDocument object.
- Load a PDF document from a specified path.
- Get a specific page from the document.
- Create a PdfImageHelper object.
- Get the image information from the page using PdfImageHelper.GetImagesInfo() method.
- Get X and Y coordinates of a specific image through PdfImageInfo.Bounds property.
- Python
from spire.pdf.common import *
from spire.pdf import *

# Create a PdfDocument object
doc = PdfDocument()

# Load a PDF document
doc.LoadFromFile("C:\\Users\\Administrator\\Desktop\\Privacy Policy.pdf")

# Get a specific page
page = doc.Pages[0]

# Create a PdfImageHelper object
imageHelper = PdfImageHelper()

# Get image information from the page
imageInformation = imageHelper.GetImagesInfo(page)

# Get X/Y coordinates of a specific image
x = int(imageInformation[0].Bounds.X)
y = int(imageInformation[0].Bounds.Y)
print("The coordinates of the specified image are:", (x, y))

# Dispose resources
doc.Dispose()

Apply for a Temporary License
If you'd like to remove the evaluation message from the generated documents, or to get rid of the function limitations, please request a 30-day trial license for yourself.