
Worksheet (8)
Reordering columns or rows in Excel is a simple process that allows you to change the arrangement of data within your spreadsheet. This can be useful for better organizing your data or aligning it with other columns or rows. You can reorder by using drag-and-drop, cut and paste, or keyboard shortcuts depending on the version of Excel you are using.
This article focus on introducing how to programmatically reorder columns or rows in an Excel worksheet in Python using Spire.XLS for Python.
Install Spire.XLS for Python
This scenario requires Spire.XLS for Python and plum-dispatch v1.7.4. They can be easily installed in your system through the following pip command.
pip install Spire.XLS
If you are unsure how to install, please refer to this tutorial: How to Install Spire.XLS for Python on Windows
Reorder Columns in Excel in Python
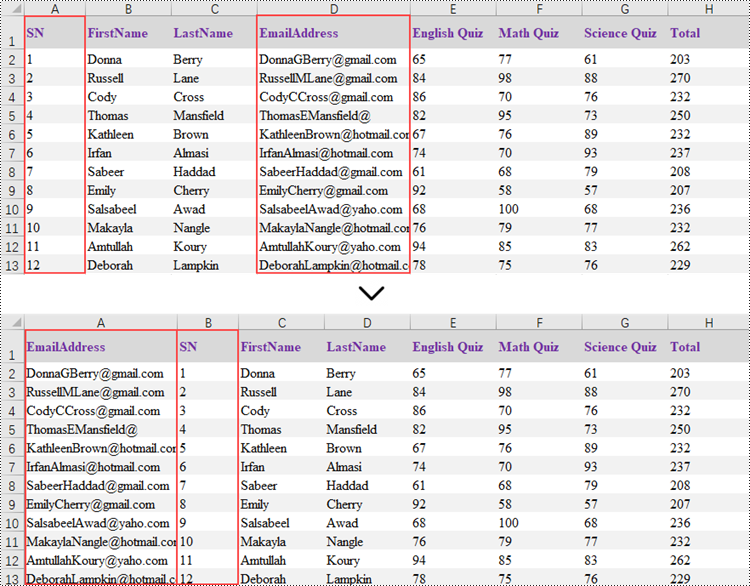
Spire.XLS does not provide a straightforward way to reorganize the order of columns or rows within an Excel worksheet. The solution requires creating a duplicate of the target worksheet. Then, you can copy the columns or rows from the copied worksheet and paste them into the original worksheet in the new preferred column or row sequence.
The following are the steps to reorder columns in an Excel worksheet using Python.
- Create a Workbook object.
- Load an Excel document from the specified file path.
- Get the target worksheet using Workbook.Worksheets[index] property.
- Specify the new column order within a list.
- Create a temporary sheet and copy the data from the target sheet into it.
- Copy the columns from the temporary worksheet to the target worksheet in the desired order using Worksheet.Columns[index].Copy() method.
- Remove the temporary sheet.
- Save the workbook to a different Excel document.
- Python
from spire.xls import *
from spire.xls.common import *

# Create a Workbook object
workbook = Workbook()

# Load the Excel document
workbook.LoadFromFile("C:\\Users\\Administrator\\Desktop\\Input.xlsx")

# Get a specific worksheet
targetSheet = workbook.Worksheets[0]

# Specify the new column order in a list (the column index starts from 0)
newColumnOrder = [3, 0, 1, 2, 4, 5 ,6, 7]

# Add a temporary worksheet
tempSheet = workbook.Worksheets.Add("temp")

# Copy data from the target worksheet to the temporary sheet
tempSheet.CopyFrom(targetSheet)

# Iterate through the newColumnOrder list
for i in range(len(newColumnOrder)):

    # Copy the column from the temporary sheet to the target sheet in the new order
    tempSheet.Columns[newColumnOrder[i]].Copy(targetSheet.Columns[i], True, True)

    # Reset the column width in the target sheet
    targetSheet.Columns[i].ColumnWidth = tempSheet.Columns[newColumnOrder[i]].ColumnWidth

# Remove the temporary sheet
workbook.Worksheets.Remove(tempSheet)

# Save the workbook to another Excel file
workbook.SaveToFile("output/ReorderColumns.xlsx", FileFormat.Version2016)

# Dispose resources
workbook.Dispose()
Reorder Rows in Excel in Python
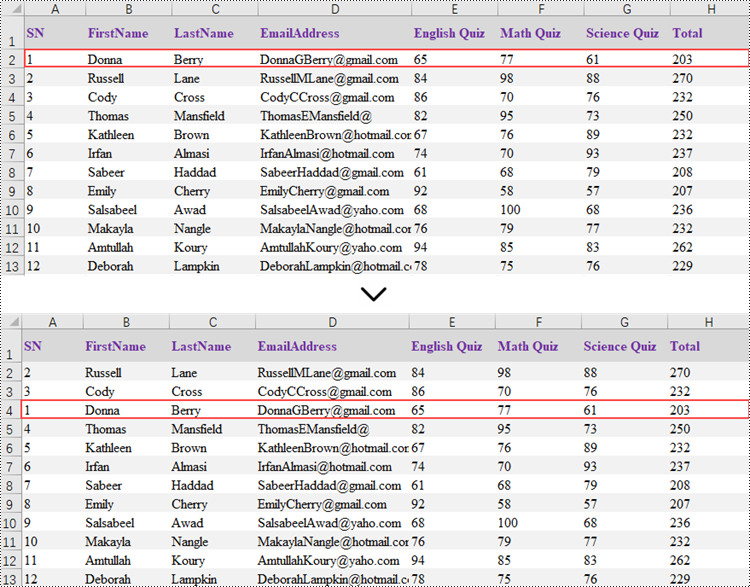
Rearranging the rows in an Excel spreadsheet follows a similar approach to reorganizing the columns. The steps to reorder the rows within an Excel worksheet are as outlined below.
- Create a Workbook object.
- Load an Excel document from the specified file path.
- Get the target worksheet using Workbook.Worksheets[index] property.
- Specify the new row order within a list.
- Create a temporary sheet and copy the data from the target sheet into it.
- Copy the rows from the temporary worksheet to the target worksheet in the desired order using Worksheet.Rows[index].Copy() method.
- Remove the temporary sheet.
- Save the workbook to a different Excel document.
- Python
from spire.xls import *
from spire.xls.common import *

# Create a Workbook object
workbook = Workbook()

# Load the Excel document
workbook.LoadFromFile("C:\\Users\\Administrator\\Desktop\\Input.xlsx")

# Get a specific worksheet
targetSheet = workbook.Worksheets[0]

# Specify the new row order in a list (the row index starts from 0)
newRowOrder = [0, 2, 3, 1, 4, 5 ,6, 7, 8, 9, 10, 11, 12]

# Add a temporary worksheet
tempSheet = workbook.Worksheets.Add("temp")

# Copy data from the first worksheet to the temporary sheet
tempSheet.CopyFrom(targetSheet)

# Iterate through the newRowOrder list
for i in range(len(newRowOrder)):

    # Copy the row from the temporary sheet to the target sheet in the new order
    tempSheet.Rows[newRowOrder[i]].Copy(targetSheet.Rows[i], True, True)

    # Reset the row height in the target sheet
    targetSheet.Rows[i].RowHeight = tempSheet.Rows[newRowOrder[i]].RowHeight

# Remove the temporary sheet
workbook.Worksheets.Remove(tempSheet)

# Save the workbook to another Excel file
workbook.SaveToFile("output/ReorderRows.xlsx", FileFormat.Version2016)

# Dispose resources
workbook.Dispose()
Apply for a Temporary License
If you'd like to remove the evaluation message from the generated documents, or to get rid of the function limitations, please request a 30-day trial license for yourself.
Python: Set the Background Color and Image for Excel Worksheets
2024-03-15 08:01:56 Written by support iceblueFor data analysis and reporting, visual aesthetics play a significant role in presenting information effectively. When working with Excel worksheets, the ability to set background colors and images enhances the overall readability and impact of the data. By leveraging the power of Python, developers can effortlessly manipulate Excel files and customize the appearance of their worksheets. This article demonstrates how to use Spire.XLS for Python to set the background color and image for Excel worksheets with Python programs.
Install Spire.XLS for Python
This scenario requires Spire.XLS for Python and plum-dispatch v1.7.4. They can be easily installed in your Windows through the following pip command.
pip install Spire.XLS
If you are unsure how to install, please refer to: How to Install Spire.XLS for Python on Windows
Set the Background Color for an Excel Worksheet
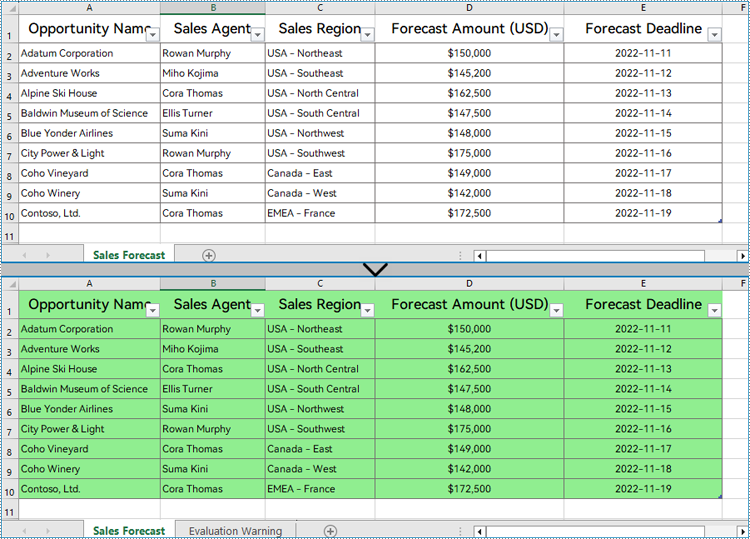
With Spire.XLS for Python, developers can set the background color for a specified cell range through CellRange.Style.Color property. The detailed steps for setting the background color for the used cell range in a worksheet are as follows:
- Create an instance of Workbook class.
- Load an Excel workbook using Workbook.LoadFromFile() method.
- Get a worksheet using Workbook.Worksheets.get_Item() method.
- Get the used range in the worksheet through Worksheet.AllocatedRange property.
- Set the background color of the used range through CellRange.Style.Color property.
- Save the workbook using Workbook.SaveToFile() method.
- Python
from spire.xls import *
from spire.xls.common import *

# Create an instance of Workbook class
wb = Workbook()

# Load an Excel file
wb.LoadFromFile("Sample.xlsx")

# Get a worksheet
sheet = wb.Worksheets.get_Item(0)

# Get the used range of the worksheet
usedRange = sheet.AllocatedRange

# Set the background color of the used range to a light and soft color
usedRange.Style.Color = Color.FromRgb(144, 238, 144)

# Save the workbook
wb.SaveToFile("output/ExcelBackgroundColor.xlsx", FileFormat.Version2016)
wb.Dispose()
Set the Background Image for an Excel Worksheet
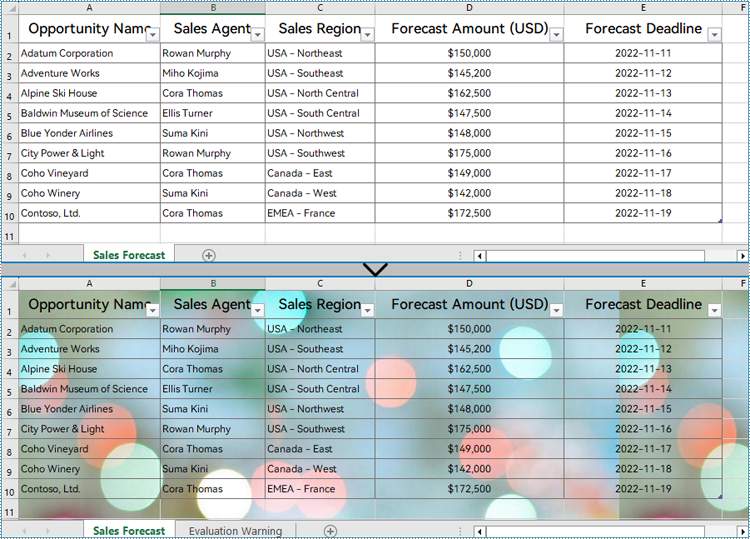
Setting a background image for an Excel worksheet can be accomplished through PageSetup class. Using the Worksheet.PageSetup.BackgroundImage property, developers can set the image background for the entire worksheet. Detailed steps are as follows:
- Create an instance of Workbook class.
- Load an Excel workbook using Workbook.LoadFromFile() method.
- Get a worksheet using Workbook.Worksheets.get_Item() method.
- Load an image using Stream() method.
- Set the background image of the worksheet through Worksheet.PageSetup.BackgroundImage property.
- Save the workbook using Workbook.SaveToFile() method.
- Python
from spire.xls import *
from spire.xls.common import *

# Create an instance of Workbook class
wb = Workbook()

# Load an Excel file
wb.LoadFromFile("Sample.xlsx")

# Get a worksheet
sheet = wb.Worksheets.get_Item(0)

# Load an image
image = Stream("BackgroundImage.jpg")

# Set the background of the worksheet
sheet.PageSetup.BackgoundImage = image

# Save the workbook
wb.SaveToFile("output/ExcelBackgroundImage.xlsx", FileFormat.Version2016)
wb.Dispose()
Apply for a Temporary License
If you'd like to remove the evaluation message from the generated documents, or to get rid of the function limitations, please request a 30-day trial license for yourself.
Moving and deleting worksheets in Excel are essential operations that allow you to organize and manage your workbook efficiently. Moving worksheets enables you to adjust the order of worksheets to match your specific needs or bring related information together. While deleting worksheets helps you eliminate unwanted or redundant sheets, creating a cleaner and more organized workspace. In this article, we will demonstrate how to move and delete worksheets in Excel in Python using Spire.XLS for Python.
Install Spire.XLS for Python
This scenario requires Spire.XLS for Python and plum-dispatch v1.7.4. They can be easily installed in your Windows through the following pip command.
pip install Spire.XLS
If you are unsure how to install, please refer to this tutorial: How to Install Spire.XLS for Python on Windows
Move a Worksheet in Excel in Python
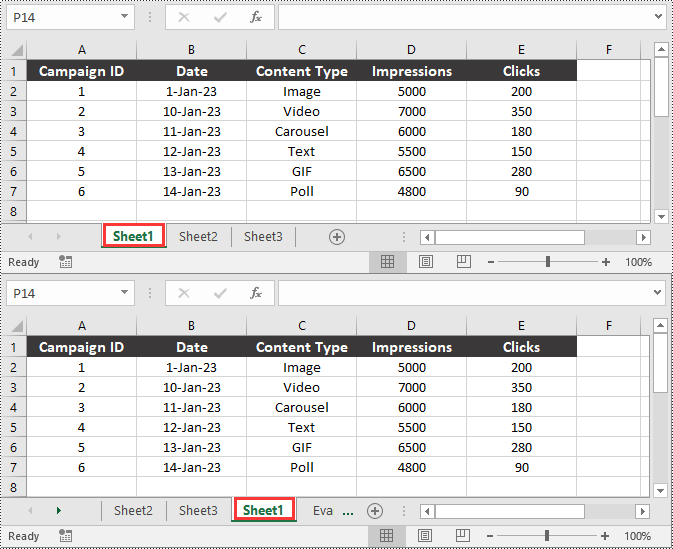
You can easily move a worksheet in an Excel file to another position by using the Worksheet.MoveWorksheet() method provided by Spire.XLS for Python. The detailed steps are as follows.
- Create an object of the Workbook class.
- Load an Excel file using the Workbook.LoadFromFile() method.
- Get a specific worksheet in the file using the Workbook.Worksheet[] property.
- Move the worksheet to another position in the file using the Worksheet.MoveWorksheet() method.
- Save the result file using the Workbook.SaveToFile() method.
- Python
from spire.xls import *
from spire.xls.common import *

# Create an object of the Workbook class
workbook = Workbook()
# Load a sample Excel file
workbook.LoadFromFile("Sample.xlsx")

# Get a specific worksheet in the file by its index
sheet = workbook.Worksheets[0]
# Or get a specific worksheet in the file by its name
# sheet = workbook.Worksheets["Sheet1"]

# Move the worksheet to the 3rd position in the file
sheet.MoveWorksheet(2)

# Save the result file
workbook.SaveToFile("MoveWorksheet.xlsx", ExcelVersion.Version2016)
workbook.Dispose()
Delete a Worksheet in Excel in Python
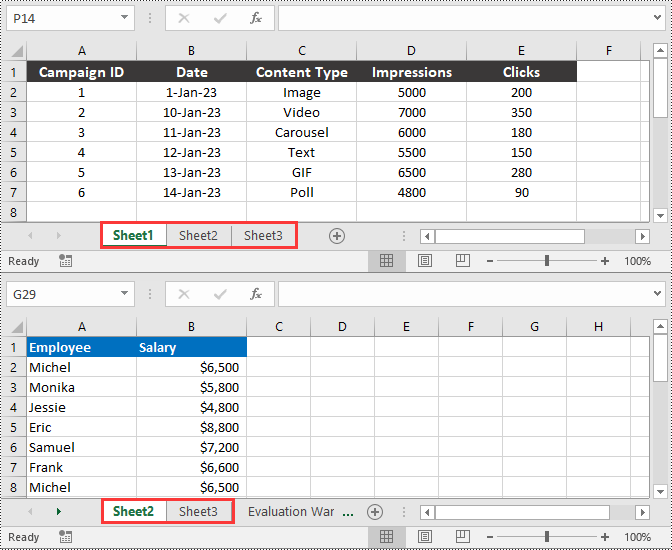
You can delete a specific worksheet from an Excel file by using the Workbook.Worksheets.RemoveAt() or Workbook.Worksheets.Remove() method provided by Spire.XLS for Python. The detailed steps are as follows.
- Create an object of the Workbook class.
- Load an Excel file using the Workbook.LoadFromFile() method.
- Remove a specific worksheet from the file using the Workbook.Worksheets.RemoveAt() or Workbook.Worksheets.Remove() method.
- Save the result file using the Workbook.SaveToFile() method.
- Python
from spire.xls import *
from spire.xls.common import *

# Create an object of the Workbook class
workbook = Workbook()
# Load a sample Excel file
workbook.LoadFromFile("Sample.xlsx")

# Remove a specific worksheet in the file by its index
workbook.Worksheets.RemoveAt(0)

# Or get a specific worksheet in the file by its name and then remove it
# worksheet = workbook.Worksheets["Sheet1"]
# workbook.Worksheets.Remove(worksheet)

# Save the result file
workbook.SaveToFile("DeleteWorksheet.xlsx", ExcelVersion.Version2016)
workbook.Dispose()
Apply for a Temporary License
If you'd like to remove the evaluation message from the generated documents, or to get rid of the function limitations, please request a 30-day trial license for yourself.
Gridlines in Microsoft Excel provide a visual aid that helps users navigate through data and maintain a structured layout. By default, Excel displays gridlines in a light color to separate cells, making it easier to distinguish and locate specific data. However, there are instances when you may want to hide or even modify the appearance of gridlines to suit your specific needs. In this article, we will explore how to hide, show, and change gridlines in Excel in Python using Spire.XLS for Python.
Install Spire.XLS for Python
This scenario requires Spire.XLS for Python and plum-dispatch v1.7.4. They can be easily installed in your Windows through the following pip command.
pip install Spire.XLS
If you are unsure how to install, please refer to this tutorial: How to Install Spire.XLS for Python on Windows
Hide or Show Gridlines in Excel in Python
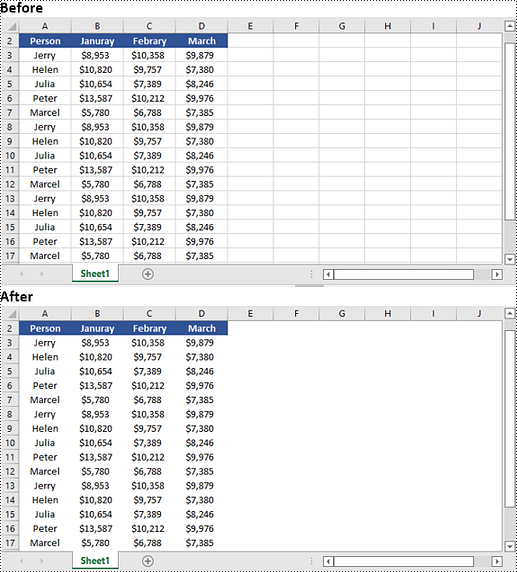
The Worksheet.GridLinesVisible property provided by Spire.XLS for Python is used to control the visibility of gridlines in an Excel worksheet. If you want to hide the gridlines in the worksheet, set this property to False. Conversely, if you wish to make the hidden gridlines visible again, set this property to True. The detailed steps are as follows.
- Create an object of the Workbook class.
- Load an Excel file using the Workbook.LoadFromFile() method.
- Get a specific worksheet by its index using the Workbook.Worksheets[index] property.
- Hide or show the gridlines in the worksheet by setting the Worksheet.GridLinesVisible property as False or True.
- Save the result file using the Workbook.SaveToFile() method.
- Python
from spire.xls import *
from spire.xls.common import *

# Create a Workbook object
workbook = Workbook()
# Load an Excel file
workbook.LoadFromFile("Input.xlsx")

# Get the first worksheet
sheet = workbook.Worksheets[0]

# Hide the gridlines in the worksheet
sheet.GridLinesVisible = False

# Show the hidden gridlines in the worksheet
# sheet.GridLinesVisible = True

# Save the result file
workbook.SaveToFile("HideGridlines.xlsx", ExcelVersion.Version2016)

workbook.Dispose()
Change Gridlines in Excel in Python
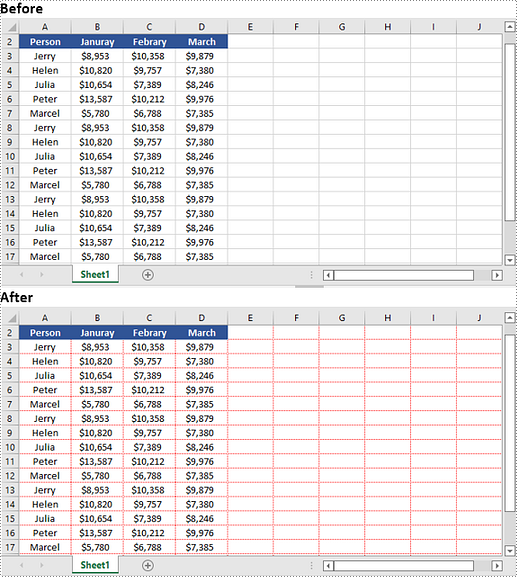
Spire.XLS for Python provides the Worksheet.GridLineColor property, which allows you to customize the color of gridlines in an Excel worksheet. By using this property, you can change the default color of gridlines to your desired choice. The detailed steps are as follows.
- Create an object of the Workbook class.
- Load an Excel file using the Workbook.LoadFromFile() method.
- Get a specific worksheet by its index using the Workbook.Worksheets[index] property.
- Change the color of the gridlines in the worksheet using the Worksheet.GridLineColor property.
- Save the result file using the Workbook.SaveToFile() method.
- Python
from spire.xls import *
from spire.xls.common import *

# Create a Workbook object
workbook = Workbook()
# Load an Excel file
workbook.LoadFromFile("Input.xlsx")

# Get the first worksheet
sheet = workbook.Worksheets[0]

# Change the color of the gridlines in the worksheet
sheet.GridLineColor = ExcelColors.Red

# Save the result file
workbook.SaveToFile("ChangeGridlineColor.xlsx", ExcelVersion.Version2016)

workbook.Dispose()
Apply for a Temporary License
If you'd like to remove the evaluation message from the generated documents, or to get rid of the function limitations, please request a 30-day trial license for yourself.
A page break is a markup that divides the content of a document or spreadsheet into multiple pages for printing or display. This feature can be used to adjust the page layout of a document to ensure that each page contains the appropriate information. By placing page breaks appropriately, you can also ensure that your document is presented in a better format and layout when printed. This article will explain how to insert or remove horizontal/vertical page breaks in Excel on the Python platform by using Spire.XLS for Python.
- Insert Horizontal Page Breaks in Excel Using Python
- Insert Vertical Page Breaks in Excel Using Python
- Remove Horizontal Page Breaks from Excel Using Python
- Remove Vertical Page Breaks from Excel Using Python
Install Spire.XLS for Python
This scenario requires Spire.XLS for Python and plum-dispatch v1.7.4. They can be easily installed in your Windows through the following pip commands.
pip install Spire.XLS
If you are unsure how to install, please refer to this tutorial: How to Install Spire.XLS for Python on Windows
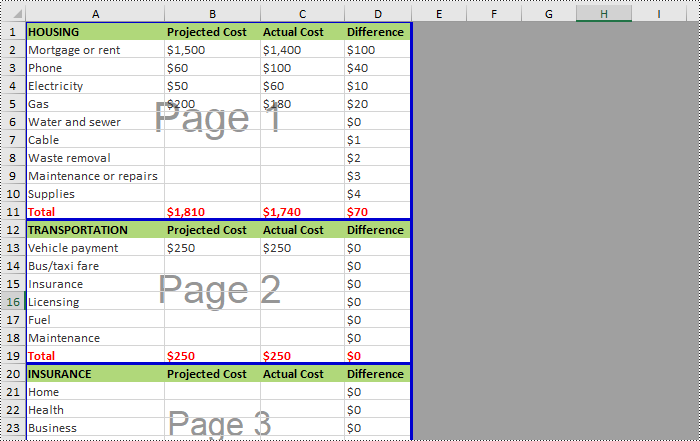
Insert Horizontal Page Breaks in Excel Using Python
Spire.XLS for Python supports inserting horizontal page breaks to specified cell ranges by calling Worksheet.HPageBreaks.Add(CellRange) method. The following are detailed steps.
- Create a Workbook instance.
- Load an Excel file from disk using Workbook.LoadFromFile() method.
- Get a specified worksheet using Workbook.Worksheets[] property.
- Insert horizontal page breaks to specified cell ranges using Worksheet.HPageBreaks.Add(CellRange) method.
- Set view mode to Preview mode by Worksheet.ViewMode property.
- Save the result file using Workbook.SaveToFile() method.
- Python
from spire.xls import *
from spire.xls.common import *

inputFile = "C:/Users/Administrator/Desktop/Sample.xlsx"
outputFile = "C:/Users/Administrator/Desktop/InsertHPageBreak.xlsx"

#Create a Workbook instance
workbook = Workbook()

#Load an Excel file from disk
workbook.LoadFromFile(inputFile)

#Get the first worksheet of this file
sheet = workbook.Worksheets[0]

#Insert horizontal page breaks to specified cell ranges
sheet.HPageBreaks.Add(sheet.Range["A12"])
sheet.HPageBreaks.Add(sheet.Range["A20"])

#Set view mode to Preview mode
sheet.ViewMode = ViewMode.Preview

#Save the result file
workbook.SaveToFile(outputFile, ExcelVersion.Version2013)
workbook.Dispose()
Insert Vertical Page Breaks in Excel Using Python
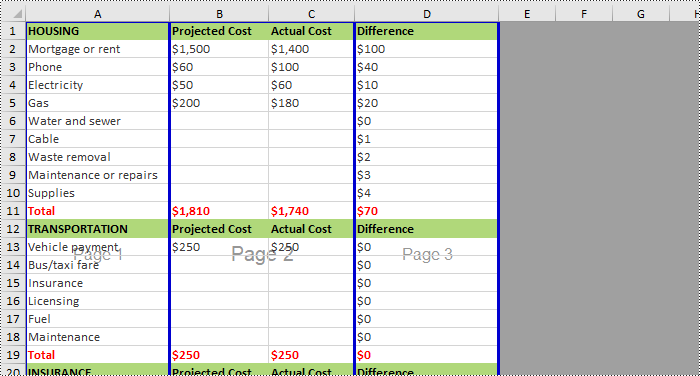
Spire.XLS for Python also supports inserting vertical page breaks to specified cell ranges by calling Worksheet.VPageBreaks.Add(CellRange) method. The following are detailed steps.
- Create a Workbook instance.
- Load an Excel file from disk using Workbook.LoadFromFile() method.
- Get a specified worksheet using Workbook.Worksheets[] property.
- Insert vertical page breaks to specified cell ranges using Worksheet.VPageBreaks.Add(CellRange) method.
- Set view mode to Preview mode using Worksheet.ViewMode property.
- Save the result file using Workbook.SaveToFile() method.
- Python
from spire.xls import *
from spire.xls.common import *

inputFile = "C:/Users/Administrator/Desktop/Sample.xlsx"
outputFile = "C:/Users/Administrator/Desktop/InsertVPageBreak.xlsx"

#Create a Workbook instance
workbook = Workbook()

#Load an Excel file from disk
workbook.LoadFromFile(inputFile)

#Get the first worksheet of this file
sheet = workbook.Worksheets[0]

#Insert vertical page breaks to specified cell ranges
sheet.VPageBreaks.Add(sheet.Range["B1"])
sheet.VPageBreaks.Add(sheet.Range["D3"])

#Set view mode to Preview mode
sheet.ViewMode = ViewMode.Preview

#Save the result file
workbook.SaveToFile(outputFile, ExcelVersion.Version2013)
workbook.Dispose()
Remove Horizontal Page Breaks from Excel Using Python
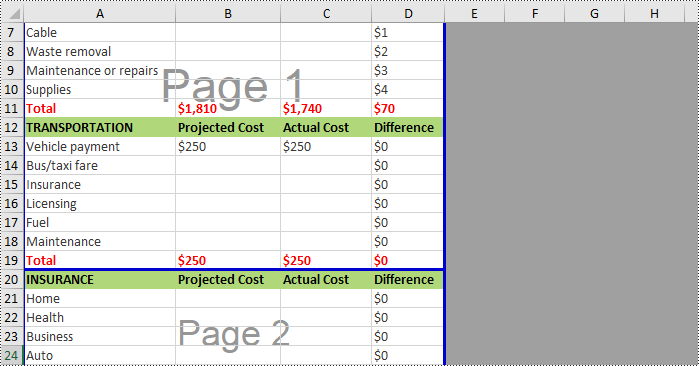
If you want to remove horizontal page breaks from Excel, call the Worksheet.HPageBreaks.RemoveAt() or Worksheet.HPageBreaks.Clear() methods. The following are detailed steps.
- Create a Workbook instance.
- Load an Excel file from disk using Workbook.LoadFromFile() method.
- Get a specified worksheet using Workbook.Worksheets[] property.
- Remove all the horizontal page breaks by calling Worksheet.HPageBreaks.Clear() method or remove a specific horizontal page break by calling Worksheet.HPageBreaks.RemoveAt() method.
- Set view mode to Preview mode using Worksheet.ViewMode property.
- Save the result file using Workbook.SaveToFile() method.
- Python
from spire.xls import *
from spire.xls.common import *

inputFile = "C:/Users/Administrator/Desktop/InsertHPageBreak.xlsx"
outputFile = "C:/Users/Administrator/Desktop/RemoveHPageBreak.xlsx"

#Create a Workbook instance
workbook = Workbook()

#Load an Excel file from disk
workbook.LoadFromFile(inputFile)

#Get the first worksheet from this file
sheet = workbook.Worksheets[0]

#Clear all the horizontal page breaks
#sheet.HPageBreaks.Clear()

#Remove the first horizontal page break
sheet.HPageBreaks.RemoveAt(0)

#Set view mode to Preview mode
sheet.ViewMode = ViewMode.Preview

#Save the result file
workbook.SaveToFile(outputFile, ExcelVersion.Version2013)
workbook.Dispose()
Remove Vertical Page Breaks from Excel Using Python
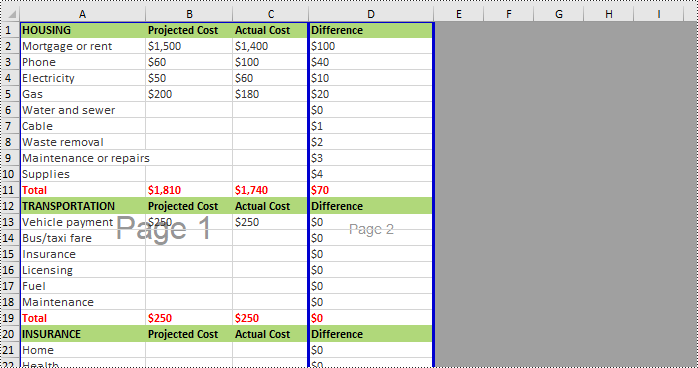
If you want to remove vertical page breaks from Excel, call the Worksheet.VPageBreaks.RemoveAt() or Worksheet.VPageBreaks.Clear() methods. The following are detailed steps.
- Create a Workbook instance.
- Load an Excel file from disk using Workbook.LoadFromFile() method.
- Get a specified worksheet using Workbook.Worksheets[] property.
- Remove all the vertical page breaks by calling Worksheet.VPageBreaks.Clear() method or remove a specific vertical page break by calling Worksheet.VPageBreaks.RemoveAt() method.
- Set view mode to Preview mode using Worksheet.ViewMode property.
- Save the result file using Workbook.SaveToFile() method.
- Python
from spire.xls import *
from spire.xls.common import *

inputFile = "C:/Users/Administrator/Desktop/InsertVPageBreak.xlsx"
outputFile = "C:/Users/Administrator/Desktop/RemoveVPageBreak.xlsx"

#Create a Workbook instance
workbook = Workbook()

#Load an Excel file from disk
workbook.LoadFromFile(inputFile)

#Get the first worksheet from this file
sheet = workbook.Worksheets[0]

#Clear all the vertical page breaks
#sheet.VPageBreaks.Clear()

#Remove the first vertical page break
sheet.VPageBreaks.RemoveAt(0)

#Set view mode to Preview mode
sheet.ViewMode = ViewMode.Preview

#Save the result file
workbook.SaveToFile(outputFile, ExcelVersion.Version2013)
workbook.Dispose()
Apply for a Temporary License
If you'd like to remove the evaluation message from the generated documents, or to get rid of the function limitations, please request a 30-day trial license for yourself.
A workbook can consist of one or more worksheets, and each worksheet is independent. When dealing with an existing Excel file or creating a new Excel file from scratch, we can add worksheets as needed to better manage and analyze data. In this article, we will show you how to add worksheets to Excel programmatically by using Spire.XLS for Python.
- Add a Worksheet to an Existing Excel file
- Add a Worksheet to a New Excel file
- Add Multiple Worksheets to a New Excel file
Install Spire.XLS for Python
This scenario requires Spire.XLS for Python and plum-dispatch v1.7.4. They can be easily installed in your Windows through the following pip command.
pip install Spire.XLS
If you are unsure how to install, please refer to this tutorial: How to Install Spire.XLS for Python on Windows
Add a Worksheet to an Existing Excel file
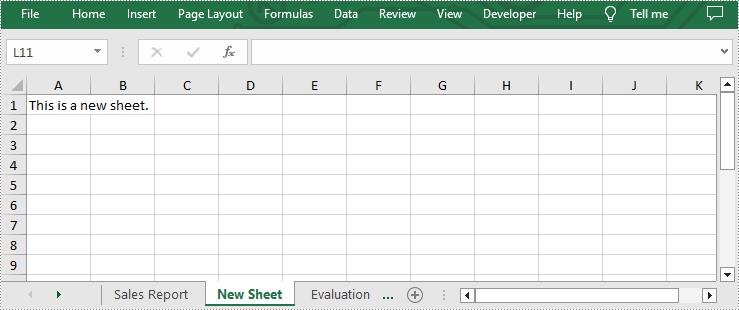
Spire.XLS for Python allows users to add a new worksheet to an existing Excel file by using Workbook.Worksheets.Add(sheetName) method. The following are detailed steps.
- Create an object of Workbook class.
- Load an Excel file using Workbook.LoadFromFile() method.
- Add a new sheet to this file using Workbook.Worksheets.Add(sheetName) method.
- Add desired text to cell A1 by Worksheet.Range[cellName].Text property.
- Save the result file using Workbook.SaveToFile() method.
- Python
from spire.xls import *
from spire.xls.common import *

inputFile = "sample.xlsx"
outputFile = "AddWorksheet.xlsx"

#Create an object of Workbook class
workbook = Workbook()

#Load an Excel file from disk
workbook.LoadFromFile(inputFile)

#Add a new worksheet to this file
sheet = workbook.Worksheets.Add("New Sheet")

#Add desired text to cell A1
sheet.Range["A1"].Text = "This is a new sheet."

#Save the result file
workbook.SaveToFile(outputFile, ExcelVersion.Version2013)
workbook.Dispose()
Add a Worksheet to a New Excel file
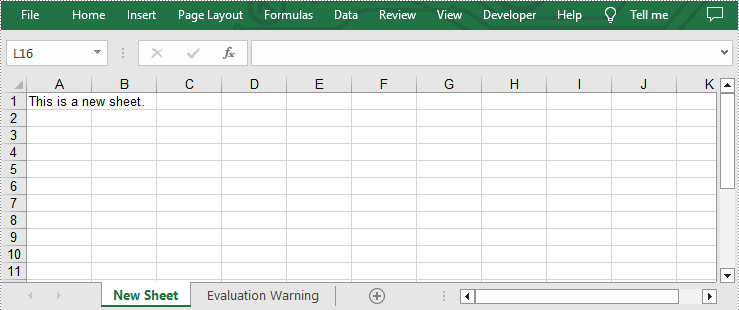
In addition to adding worksheets to existing Excel files, you can also add worksheets to a newly created Excel files with the same method. You just need to clear the default worksheet before adding by calling Workbook.Worksheets.Clear() method. The following are detailed steps.
- Create an object of Workbook class.
- Clear the default worksheets using Workbook.Worksheets.Clear() method.
- Add a new sheet to the new workbook by using Workbook.Worksheets.Add(sheetName) method.
- Add desired text to cell A1 by Worksheet.Range[cellName].Text property.
- Save the result file using Workbook.SaveToFile() method.
- Python
from spire.xls import *
from spire.xls.common import *

outputFile = "AddWorksheet.xlsx"

#Create an object of Workbook class
workbook = Workbook()

#Clear the default sheets
workbook.Worksheets.Clear()

#Add a new worksheet to the new file
sheet = workbook.Worksheets.Add("New Sheet")

#Add desired text to cell A1
sheet.Range["A1"].Text = "This is a new sheet."

#Save the result file
workbook.SaveToFile(outputFile, ExcelVersion.Version2013)
workbook.Dispose()
Add Multiple Worksheets to a New Excel file
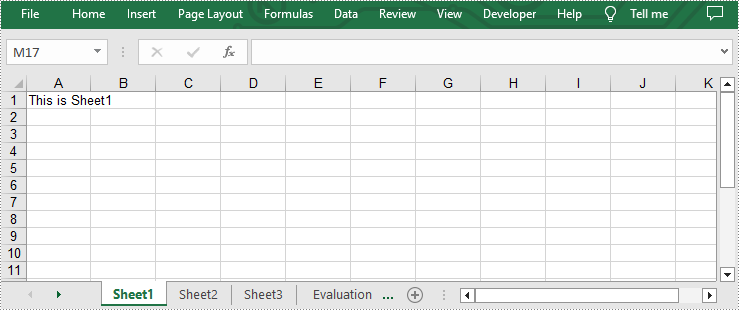
If you want to add multiple worksheets to a newly created Excel file, you can use Workbook.CreateEmptySheets(sheetCount) method to add a specified number of worksheets. The following are detailed steps.
- Create an object of Workbook class.
- Add three sheets to this file by using Workbook.CreateEmptySheets(sheetCount) method.
- Loop through the added worksheets and add text to cell A1 in each worksheet by Worksheet.Range[cellName].Text property.
- Save the result file using Workbook.SaveToFile() method.
- Python
from spire.xls import *
from spire.xls.common import *

outputFile = "AddWorksheet.xlsx"

#Create an object of Workbook class
workbook = Workbook()

#Add three sheets to this file
sheetCount = 3
workbook.CreateEmptySheets(sheetCount)

#Loop through the added worksheets
for i in range(sheetCount):

    #Add text to cell A1 in each worksheet
    sheet = workbook.Worksheets[i]
    sheet.Range["A1"].Text = "This is Sheet{}".format(i+1)

#Save the result file
workbook.SaveToFile(outputFile, ExcelVersion.Version2013)
workbook.Dispose()
Apply for a Temporary License
If you'd like to remove the evaluation message from the generated documents, or to get rid of the function limitations, please request a 30-day trial license for yourself.
The Excel workbook is a powerful spreadsheet that enables the creation, manipulation, and analysis of data in a variety of ways. One of the useful features that workbooks offer is the ability to hide or unhide worksheets in a workbook. Hiding worksheets can help protect sensitive or confidential information, reduce clutter, or organize data more efficiently. And when users need to re-display the hidden worksheets, they can also unhide them with simple operations. This article is going to explain how to hide or unhide worksheets in Excel workbooks through Python programs using Sprie.XLS for Python.
Install Spire.XLS for Python
This scenario requires Spire.XLS for Python and plum-dispatch v1.7.4. They can be easily installed in your Windows through the following pip command.
pip install Spire.XLS
If you are unsure how to install, please refer to this tutorial: How to Install Spire.XLS for Python on Windows
Hide Excel Worksheets in Python
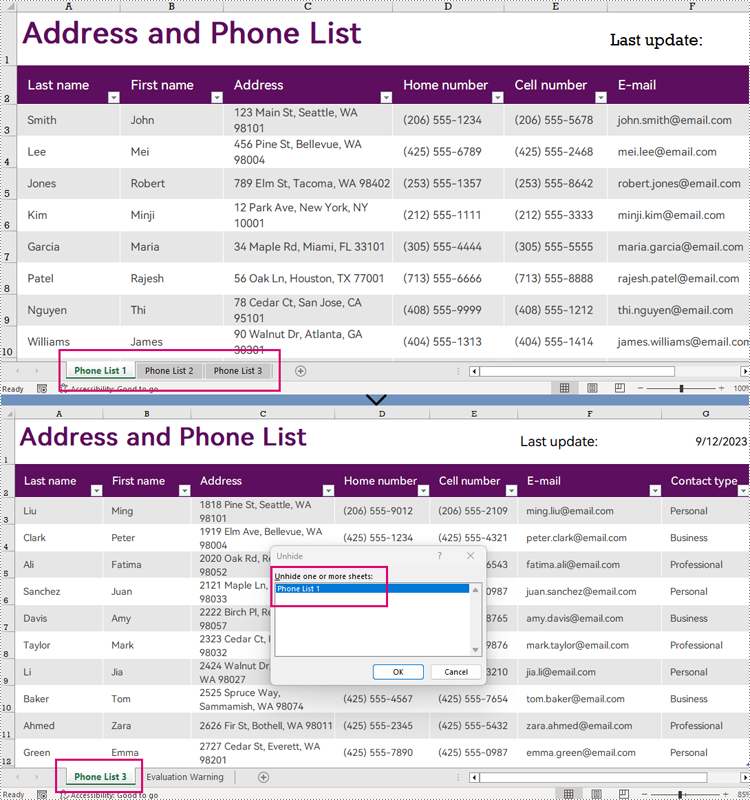
The Worksheet.Visibility property in Spire.XLS for Python can be used to set the visibility of a worksheet. By assigning WorksheetVisibility.Hidden or WorksheetVisibility.StrongHidden to this property, users can change the visibility of a worksheet to hidden or very hidden (completely not shown in Excel and can only be unhidden through code).
The detailed steps for hiding worksheets are as follows:
- Create an object of Workbook class.
- Load a workbook using Workbook.LoadFromFile() method.
- Change the status of the first worksheet to hidden by assigning WorksheetVisibility.Hidden to the Workbook.Worksheets[].Visibility property.
- Change the status of the second worksheet to very hidden by assigning WorksheetVisibility.StrongHidden to the Workbook.Worksheets[].Visibility property.
- Save the workbook using Workbook.SaveToFile() method.
- Python
from spire.common import *
from spire.xls.common import *

# Create an object of Workbook
workbook = Workbook()

# Load an Excel workbook
workbook.LoadFromFile("Sample.xlsx")

# Hide the first worksheet
workbook.Worksheets[0].Visibility = WorksheetVisibility.Hidden

# Change the second worksheet to very hidden
workbook.Worksheets[1].Visibility = WorksheetVisibility.StrongHidden

# Save the workbook
workbook.SaveToFile("output/HideWorksheets.xlsx")
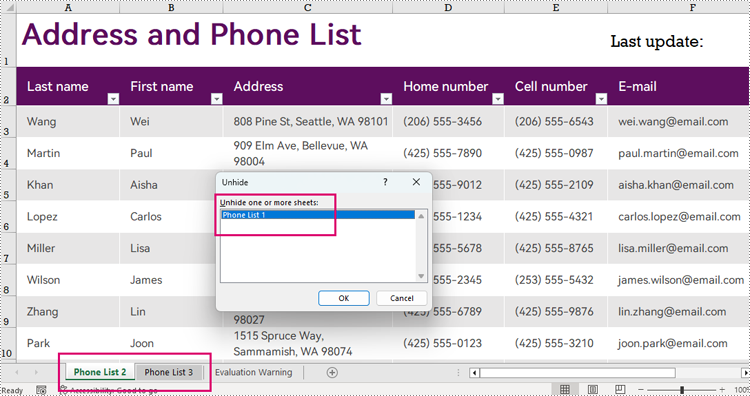
Unhide Excel Worksheets in Python
Unhiding a worksheet can be done by assigning WorksheetVisibility.Visible to the Workbook.Worksheets[].Visibility property. The detailed steps are as follows:
- Create an object of Workbook class.
- Load a workbook using Workbook.LoadFromFile() method.
- Unhide the very hidden worksheet by assigning WorksheetVisibility.Visible to the Workbook.Worksheets[].Visibility property.
- Save the workbook using Workbook.SaveToFile() method.
- Python
from spire.common import *
from spire.xls.common import *

# Create an object of Workbook
workbook = Workbook()

# Load an Excel workbook
workbook.LoadFromFile("output/HideWorksheets.xlsx")

# Unhide the second worksheet
workbook.Worksheets[1].Visibility = WorksheetVisibility.Visible

# Save the workbook
workbook.SaveToFile("output/UnhideWorksheet.xlsx")
Apply for a Temporary License
If you'd like to remove the evaluation message from the generated documents, or to get rid of the function limitations, please request a 30-day trial license for yourself.
Copying worksheets in Excel is a critical skill to have, especially when you need to create new worksheets based on existing ones. By utilizing the copy function, you can avoid potential errors that may arise from manually recreating the same content. This not only saves time and effort but also ensures that your data remains accurate and reliable. In this article, we will demonstrate how to copy worksheets in Excel in Python using Spire.XLS for Python.
- Copy a Worksheet in the Same Excel Workbook
- Copy a Worksheet to Another Excel Workbook
- Copy Visible Worksheets to a New Excel Workbook
Install Spire.XLS for Python
This scenario requires Spire.XLS for Python and plum-dispatch v1.7.4. They can be easily installed in your Windows through the following pip command.
pip install Spire.XLS
If you are unsure how to install, please refer to this tutorial: How to Install Spire.XLS for Python on Windows
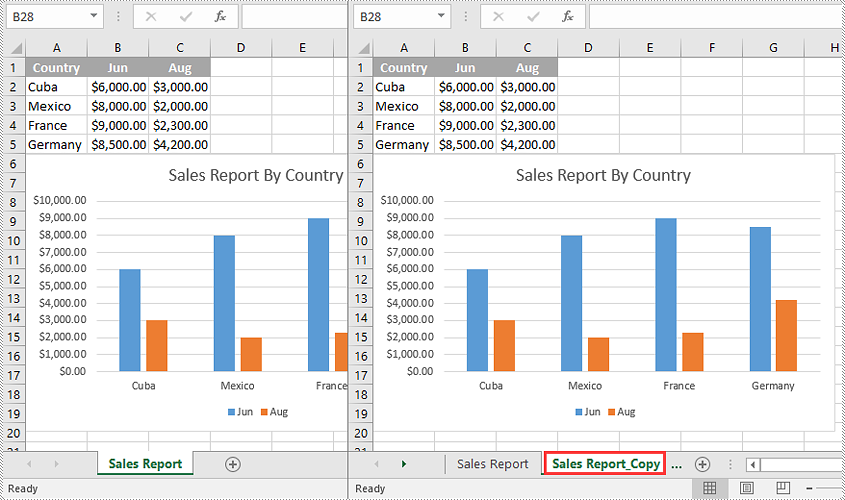
Copy a Worksheet in the Same Excel Workbook in Python
You can copy a worksheet within the same workbook by adding a new worksheet to the workbook and then copying the data from the original worksheet to the new one.
The following steps demonstrate how to copy a worksheet within the same workbook:
- Initialize an instance of the Workbook class.
- Load an Excel workbook using the Workbook.LoadFromFile() method.
- Get a specific worksheet using the Workbook.Worksheets[int index] property.
- Add a new worksheet to the workbook using the Workbook.Worksheets.Add() method.
- Copy the data from the specific worksheet to the new worksheet using the Worksheet.CopyFrom(Worksheet worksheet) method.
- Save the resulting workbook to another file using the Workbook.SaveToFile() method.
- Python
from spire.xls import *
from spire.xls.common import *

#Initialize an instance of the Workbook class
workbook = Workbook()
#Load an Excel workbook
workbook.LoadFromFile("Input.xlsx")

#Get the first worksheet
sourceSheet = workbook.Worksheets[0]

sheetName = sourceSheet.Name + "_Copy"

#Add a new worksheet with a specific name to the workbook
destSheet = workbook.Worksheets.Add(sheetName)

#Copy the first worksheet to the newly added worksheet
destSheet.CopyFrom(sourceSheet)

#Save the result workbook to another file
workbook.SaveToFile("CopyInSameWorkbook.xlsx", ExcelVersion.Version2013)
workbook.Dispose()
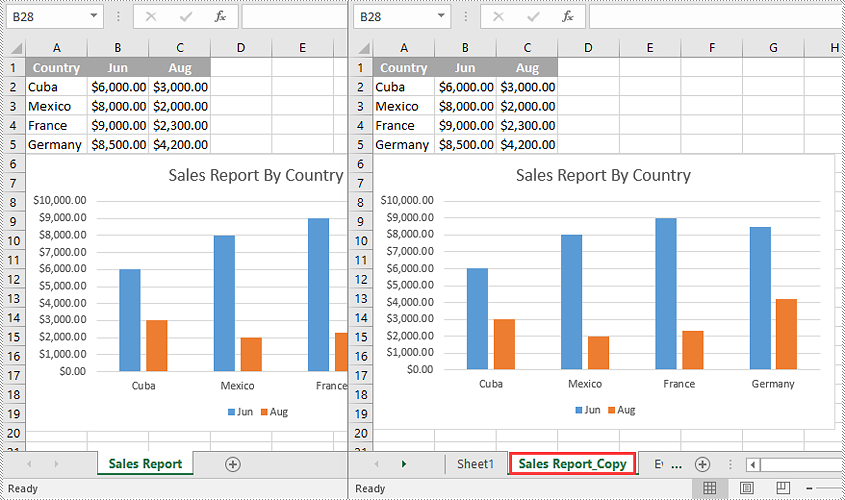
Copy a Worksheet to Another Excel Workbook in Python
To copy a worksheet from one workbook to another, you need to add a new worksheet to the destination workbook and then copy the data of the worksheet from the source workbook to the new worksheet of the destination workbook. If you want to maintain the source formatting, you can copy the theme of the source workbook to the destination workbook.
The following steps demonstrate how to copy a worksheet from one workbook to another:
- Initialize an instance of the Workbook class.
- Load the source workbook using the Workbook.LoadFromFile() method.
- Get a specific worksheet using the Workbook.Worksheets[int index] property.
- Initialize an instance of the Workbook class.
- Load the destination workbook using the Workbook.LoadFromFile() method.
- Add a new worksheet to the destination workbook using the Workbook.Worksheets.Add() method.
- Copy the specific worksheet of the source workbook to the new worksheet of the destination workbook using the Worksheet.CopyFrom(Worksheet worksheet) method.
- Copy the theme from the source workbook to the destination workbook using the Workbook.CopyTheme (Workbook srcWorkbook) method.
- Save the resulting workbook to another file using the Workbook.SaveToFile() method.
- Python
from spire.xls import *
from spire.xls.common import *

#Initialize an instance of the Workbook class
sourceWorkbook = Workbook()
#Load the source Excel workbook
sourceWorkbook.LoadFromFile("CopyWorksheets-Input.xlsx")

#Get the first worksheet of the source workbook
sourceSheet = sourceWorkbook.Worksheets[0]
#Get the name of the first worksheet
sheetName = sourceSheet.Name + "_Copy"

#Initialize an instance of the Workbook class
destWorkbook = Workbook()
 #Load the destination Excel workbook
destWorkbook.LoadFromFile("CopyWorksheets-Sample.xlsx")

#Add a new worksheet with a specific name to the destination workbook
destSheet = destWorkbook.Worksheets.Add(sheetName)

#Copy the first worksheet of the source workbook to the new worksheet of the destination workbook
destSheet.CopyFrom(sourceSheet)

#Copy the theme from the source workbook to the destination workbook
destWorkbook.CopyTheme(sourceWorkbook)

#Save the destination workbook to another file
destWorkbook.SaveToFile("CopyToAnotherWorkbook.xlsx", ExcelVersion.Version2013)

sourceWorkbook.Dispose()
destWorkbook.Dispose()
Copy Visible Worksheets to a New Excel Workbook in Python
If you only want to share visible worksheets rather than the entire workbook with others, you can copy the visible worksheets to a new workbook.
The following steps demonstrate how to copy visible worksheets from a workbook to a new workbook:
- Initialize an instance of the Workbook class.
- Load the source workbook using the Workbook.LoadFromFile() method.
- Initialize an instance of the Workbook class to create a new workbook, then clear the default worksheets in the new workbook using the Workbook.Worksheets.Clear() method.
- Iterate through all the worksheets in the source workbook.
- Check if the current worksheet is visible using the Worksheet.Visibility property.
- If the result is true, add a new worksheet to the new workbook using the Workbook.Worksheets.Add() method.
- Copy the worksheet from the source workbook to the new worksheet of the new workbook using the Worksheet.CopyFrom(Worksheet worksheet) method.
- Copy the theme from the source workbook to the new workbook using the Workbook.CopyTheme(Workbook srcWorkbook) method.
- Save the resulting workbook to another file using the Workbook.SaveToFile() method.
- Python
from spire.xls import *
from spire.xls.common import *

#Initialize an instance of the Workbook class
sourceWorkbook = Workbook()
#Load the source Excel workbook
sourceWorkbook.LoadFromFile("CopyWorksheets-Input.xlsx")

#Initialize an instance of the Workbook class to create a new workbook
newWorkbook = Workbook()
newWorkbook.Version = ExcelVersion.Version2013
#Clear the default worksheets in the new workbook
newWorkbook.Worksheets.Clear()

#Iterate through all the worksheets in the source workbook
for sourceSheet in sourceWorkbook.Worksheets:
    #Check if the current worksheet is visible
    if sourceSheet.Visibility == WorksheetVisibility.Visible:
        sheetName = sourceSheet.Name + "_Copy"
        #Add a new worksheet with a specific name to the new workbook
        destSheet = newWorkbook.Worksheets.Add(sheetName)
        #Copy the worksheet from the source workbook to the new worksheet of the new workbook
        destSheet.CopyFrom(sourceSheet)

#Copy the theme from the source workbook to the new workbook
newWorkbook.CopyTheme(sourceWorkbook)

#Save the new workbook to another file
newWorkbook.SaveToFile("CopyVisibleSheetsToNewWorkbook.xlsx", ExcelVersion.Version2013)
sourceWorkbook.Dispose()
newWorkbook.Dispose()
Apply for a Temporary License
If you'd like to remove the evaluation message from the generated documents, or to get rid of the function limitations, please request a 30-day trial license for yourself.
