Python: Apply Shadow, Transparent, and 3D Effects to Text in PowerPoint
Enhancing the visual appeal of your PowerPoint presentations is crucial for capturing your audience's attention. One effective way to achieve this is by applying advanced text effects such as shadows, transparency, and 3D effects. These techniques can add depth, dimension, and a modern look to your text, making your slides more engaging and professional. In this article, we'll demonstrate how to apply shadow, transparent and 3D effects to text in PowerPoint in Python using Spire.Presentation for Python.
- Apply Shadow Effect to Text in PowerPoint in Python
- Apply Transparent Effect to Text in PowerPoint in Python
- Apply 3D Effect to Text in PowerPoint in Python
Install Spire.Presentation for Python
This scenario requires Spire.Presentation for Python. It can be easily installed in your Windows through the following pip command.
pip install Spire.Presentation
If you are unsure how to install, please refer to this tutorial: How to Install Spire.Presentation for Python on Windows
Apply Shadow Effect to Text in PowerPoint in Python
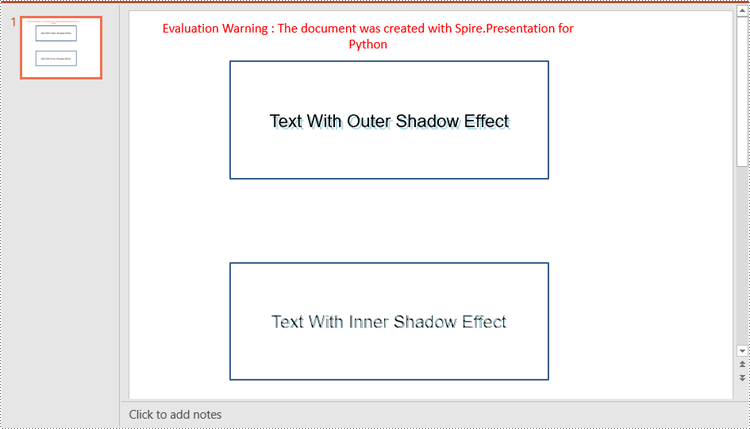
Spire.Presentation for Python offers the InnerShadowEffect and OuterShadowEffect classes for creating inner and outer shadow effects. These shadow effects can then be applied to the text within shapes by using the IAutoShape.TextFrame.TextRange.EffectDag.InnerShadowEffect and IAutoShape.TextFrame.TextRange.EffectDag.OuterShadowEffect properties. The detailed steps are as follows.
- Create an object of the Presentation class.
- Get a specific slide in the presentation using the Presentation.Slides[index] property.
- Add a shape to the slide using the ISilde.Shapes.AppendShape() method.
- Add text to the shape using the IAutoShape.AppendTextFrame() method.
- Create an inner or outer shadow effect using the InnerShadowEffect or OuterShadowEffect class.
- Set the blur radius, direction, distance and color, for the inner or outer shadow effect using the properties offered by the InnerShadowEffect or OuterShadowEffect class.
- Apply the inner or outer shadow effect to the text within the shape using the IAutoShape.TextFrame.TextRange.EffectDag.InnerShadowEffect or IAutoShape.TextFrame.TextRange.EffectDag.OuterShadowEffect property.
- Save the resulting presentation using the Presentation.SaveToFile() method.
- Python
from spire.presentation.common import *
from spire.presentation import *

# Create an object of the Presentation class
ppt = Presentation()

# Get the first slide
slide = ppt.Slides[0]

# Add the first rectangular shape to the slide
shape = slide.Shapes.AppendShape(ShapeType.Rectangle, RectangleF.FromLTRB(120, 60, 500, 200))
shape.Fill.FillType = FillFormatType.none

# Add text to the shape
shape.AppendTextFrame("Text With Outer Shadow Effect")
shape.TextFrame.Paragraphs[0].TextRanges[0].LatinFont = TextFont("Arial")
shape.TextFrame.Paragraphs[0].TextRanges[0].FontHeight = 21
shape.TextFrame.Paragraphs[0].TextRanges[0].Fill.FillType = FillFormatType.Solid
shape.TextFrame.Paragraphs[0].TextRanges[0].Fill.SolidColor.Color = Color.get_Black()

# Create an outer shadow effect
outerShadow = OuterShadowEffect()
# Set the blur radius, direction, distance and color for the outer shadow effect
outerShadow.BlurRadius = 0
outerShadow.Direction = 50
outerShadow.Distance = 10
outerShadow.ColorFormat.Color = Color.get_LightBlue()

# Apply the outer shadow effect to the text in the first rectangular shape
shape.TextFrame.TextRange.EffectDag.OuterShadowEffect = outerShadow

# Add the second rectangular shape to the slide
shape = slide.Shapes.AppendShape(ShapeType.Rectangle, RectangleF.FromLTRB(120, 300, 500, 440))
shape.Fill.FillType = FillFormatType.none

# Add text to the shape
shape.AppendTextFrame("Text With Inner Shadow Effect")
shape.TextFrame.Paragraphs[0].TextRanges[0].LatinFont = TextFont("Arial")
shape.TextFrame.Paragraphs[0].TextRanges[0].FontHeight = 21
shape.TextFrame.Paragraphs[0].TextRanges[0].Fill.FillType = FillFormatType.Solid
shape.TextFrame.Paragraphs[0].TextRanges[0].Fill.SolidColor.Color = Color.get_Black()

# Create an inner shadow effect
innerShadow = InnerShadowEffect()
# Set the blur radius, direction, distance and color for the inner shadow effect
innerShadow.BlurRadius = 0
innerShadow.Direction = 50
innerShadow.Distance = 10
innerShadow.ColorFormat.Color = Color.get_LightBlue()

# Apply the inner shadow effect to the text in the second rectangular shape
shape.TextFrame.TextRange.EffectDag.InnerShadowEffect = innerShadow

# Save the resulting presentation
ppt.SaveToFile("SetShadowEffect.pptx", FileFormat.Pptx2013)
ppt.Dispose()
Apply Transparent Effect to Text in PowerPoint in Python
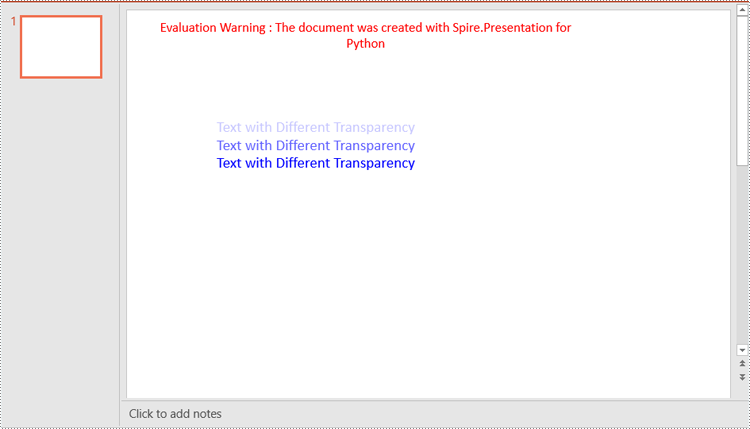
Spire.Presentation for Python does not offer a direct method to apply transparency effect to text, but you can control the transparency by adjusting the alpha value of the text color. The detailed steps are as follows.
- Create an object of the Presentation class.
- Get a specific slide in the presentation using the Presentation.Slides[index] property.
- Add a shape to the slide using the ISilde.Shapes.AppendShape() method.
- Retrieve the paragraph collection from the text frame within the shape using the IAutoShape.TextFrame.Paragraphs property, then remove any default paragraphs from the collection using the ParagraphList.Clear() method.
- Add new paragraphs to the collection using the ParagraphList.Append() method, and insert text into each paragraph using the TextParagraph.TextRanges.Append() method.
- Set the fill type of the text to solid using the TextRange.Fill.FillType property.
- Adjust the transparency of the text by setting the color with varying alpha values using the Color.FromArgb(alpha:int, red:int, green:int, blue:int) method, where the alpha value controls the transparency level—the lower the alpha, the more transparent the text.
- Save the resulting presentation using the Presentation.SaveToFile() method.
- Python
from spire.presentation.common import *
from spire.presentation import *

# Create an object of the Presentation class
ppt = Presentation()

# Get the first slide
slide = ppt.Slides[0]

# Add a rectangular shape to the slide
textboxShape = slide.Shapes.AppendShape(ShapeType.Rectangle, RectangleF.FromLTRB(100, 100, 400, 220))
# Make the border of the shape transparent
textboxShape.ShapeStyle.LineColor.Color = Color.get_Transparent()
# Set the shape's fill to none
textboxShape.Fill.FillType = FillFormatType.none

# Retrieve the paragraph collection from the text frame within the shape
paras = textboxShape.TextFrame.Paragraphs
# Remove any default paragraphs
paras.Clear()

# Add three new paragraphs to the text frame, each with a different transparency level for the text
alpha = 55  # Initial alpha value for text transparency
for i in range(3):
    # Create and add a new paragraph
    paras.Append(TextParagraph())
    # Add text to the paragraph
    paras[i].TextRanges.Append(TextRange("Text with Different Transparency"))
    # Set the text fill type to solid
    paras[i].TextRanges[0].Fill.FillType = FillFormatType.Solid
    # Set the text color with varying transparency, controlled by the alpha value
    paras[i].TextRanges[0].Fill.SolidColor.Color = Color.FromArgb(
        alpha,
        Color.get_Blue().R,
        Color.get_Blue().G,
        Color.get_Blue().B
    )
    # Increase alpha value to reduce transparency for the next paragraph
    alpha += 100

# Save the resulting presentation
ppt.SaveToFile("SetTransparency.pptx", FileFormat.Pptx2013)
ppt.Dispose()
Apply 3D Effect to Text in PowerPoint in Python
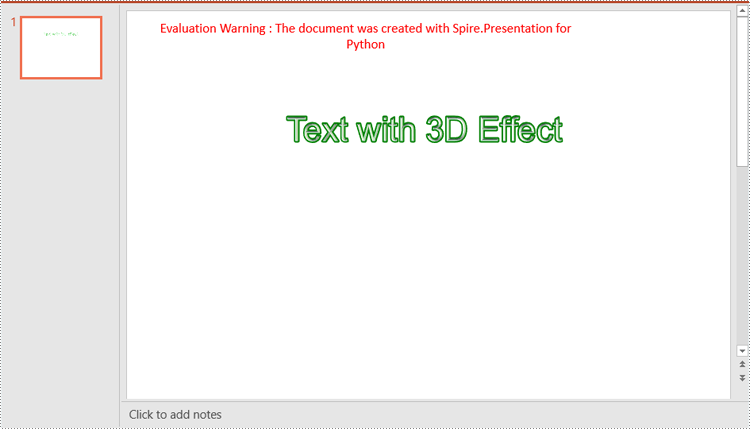
The FormatThreeD class in Spire.Presentation for Python is used for creating a 3D effect. You can access the FormatThreeD object using the IAutoShape.TextFrame.TextThreeD property, then use the properties of the FormatThreeD class to configure the settings for the 3D effect. The detailed steps are as follows.
- Create an object of the Presentation class.
- Get a specific slide in the presentation using the Presentation.Slides[index] property.
- Add a shape to the slide using the ISilde.Shapes.AppendShape() method.
- Add text to the shape using the IAutoshape.AppendTextFrame() method.
- Access the FormatThreeD object using the IAutoShape.TextFrame.TextThreeD property.
- Set the material type, top bevel type, contour color and width, and lighting type for the 3D effect through the properties of the FormatThreeD class.
- Save the resulting presentation using the Presentation.SaveToFile() method.
- Python
from spire.presentation.common import *
from spire.presentation import *

# Create an object of the Presentation class
ppt = Presentation()

# Get the first slide
slide = ppt.Slides[0]

# Add a rectangular shape to the slide
shape = slide.Shapes.AppendShape(ShapeType.Rectangle, RectangleF.FromLTRB(30, 40, 680, 240))
# Make the border of the shape transparent
shape.ShapeStyle.LineColor.Color = Color.get_Transparent()
# Set the shape's fill to none
shape.Fill.FillType = FillFormatType.none

# Add text to the shape
shape.AppendTextFrame("Text with 3D Effect")
# Set text color
textRange = shape.TextFrame.TextRange
textRange.Fill.FillType = FillFormatType.Solid
textRange.Fill.SolidColor.Color = Color.get_LightBlue()
# Set font
textRange.FontHeight = 40
textRange.LatinFont = TextFont("Arial")

# Access the FormatThreeD object
threeD = shape.TextFrame.TextThreeD
# Set the material type for the 3D effect
threeD.ShapeThreeD.PresetMaterial = PresetMaterialType.Metal
# Set the top bevel type for the 3D effect
threeD.ShapeThreeD.TopBevel.PresetType = BevelPresetType.Circle
# Set the contour color and width for the 3D effect
threeD.ShapeThreeD.ContourColor.Color = Color.get_Green()
threeD.ShapeThreeD.ContourWidth = 3
# Set the lighting type for the 3D effect
threeD.LightRig.PresetType = PresetLightRigType.Sunrise

# Save the resulting presentation
ppt.SaveToFile("Set3DEffect.pptx", FileFormat.Pptx2013)
ppt.Dispose()
Apply for a Temporary License
If you'd like to remove the evaluation message from the generated documents, or to get rid of the function limitations, please request a 30-day trial license for yourself.
Python: Highlight Text in PowerPoint Presentation
Highlighting important text in your PowerPoint slides can be an effective way to draw your audience's attention and emphasize key points. Whether you are presenting complex information or delivering a persuasive pitch, using text highlighting can make your slides more visually engaging and help your message stand out. In this article, we will demonstrate how to highlight text in a PowerPoint presentation in Python using Spire.Presentation for Python.
Install Spire.Presentation for Python
This scenario requires Spire.Presentation for Python. It can be easily installed in your Windows through the following pip command.
pip install Spire.Presentation
If you are unsure how to install, please refer to this tutorial: How to Install Spire.Presentation for Python on Windows
Highlight Text in PowerPoint Presentation in Python
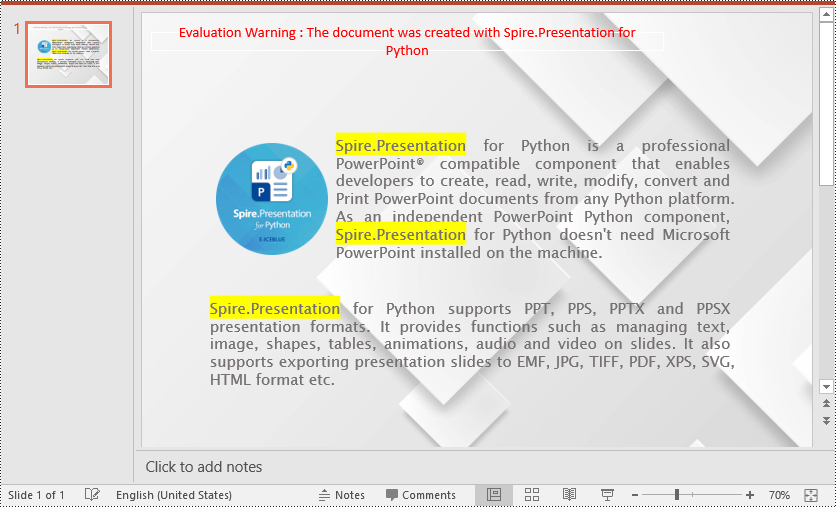
Spire.Presentation for Python provides a method called IAutoShape.TextFrame.HighLightText(text: str, color: Color, options: TextHighLightingOptions) to highlight specific text within the shapes of a PowerPoint presentation.
Follow the steps below to highlight specified text in your presentation using Spire.Presentation for Python:
- Create an instance of the Presentation class.
- Load a PowerPoint presentation using the Presentation.LoadFromFile() method.
- Create an instance of the TextHighLightingOptions class, and set the text highlighting options such as whole words only and case sensitive through the TextHighLightingOptions.WholeWordsOnly and TextHighLightingOptions.CaseSensitive properties.
- Loop through the slides in the presentation and the shapes on each slide.
- Check if the current shape is of IAutoShape type.
- If the result is true, typecast it to an IAutoShape object.
- Highlight all matches of specific text in the shape using the IAutoShape.TextFrame.HighLightText(text: str, color: Color, options: TextHighLightingOptions) method.
- Save the result presentation to a new file using the Presentation.SaveToFile() method.
- Python
from spire.presentation.common import *
from spire.presentation import *

# Specify the input and output file paths
input_file = "Example.pptx"
output_file = "HighlightText.pptx"

# Create an instance of the Presentation class
ppt = Presentation()
# Load the PowerPoint presentation
ppt.LoadFromFile(input_file)

# Specify the text to highlight
text_to_highlight = "Spire.Presentation"
# Specify the highlight color
highlight_color = Color.get_Yellow()

# Create an instance of the TextHighLightingOptions class
options = TextHighLightingOptions()
# Set the highlight options (case sensitivity and whole word highlighting)
options.WholeWordsOnly = True
options.CaseSensitive = True

# Loop through the slides in the presentation
for slide in ppt.Slides:
    # Loop through the shapes on each slide
    for shape in slide.Shapes:
            # Check if the shape is of IAutoShape type
            if isinstance (shape, IAutoShape):
                # Typecast the shape to an IAutoShape object
                auto_shape = IAutoShape(shape)
                # Search and highlight specified text within the shape
                auto_shape.TextFrame.HighLightText(text_to_highlight, highlight_color, options)

# Save the result presentation to a new PPTX file
ppt.SaveToFile(output_file, FileFormat.Pptx2013)
ppt.Dispose()
Apply for a Temporary License
If you'd like to remove the evaluation message from the generated documents, or to get rid of the function limitations, please request a 30-day trial license for yourself.
Python: Extract Text from PowerPoint Presentations
Directly extracting text has emerged as a crucial method for obtaining textual information from information-dense PowerPoint presentations. By utilizing Python programs, users can conveniently and quickly access the content within slides, enabling efficient collection of information and further data processing. This article shows how to use Spire.Presentation for Python to extract text from PowerPoint presentations, including text in slides, speaker notes, and comments.
- Extract Text from Presentation Slides with Python
- Extract Text from Speaker Notes with Python
- Extract Text from Presentation Comments with Python
Install Spire.Presentation for Python
This scenario requires Spire.Presentation for Python and plum-dispatch v1.7.4. They can be easily installed in your Windows through the following pip commands.
pip install Spire.Presentation
If you are unsure how to install, please refer to: How to Install Spire.Presentation for Python on Windows
Extract Text from Presentation Slides with Python
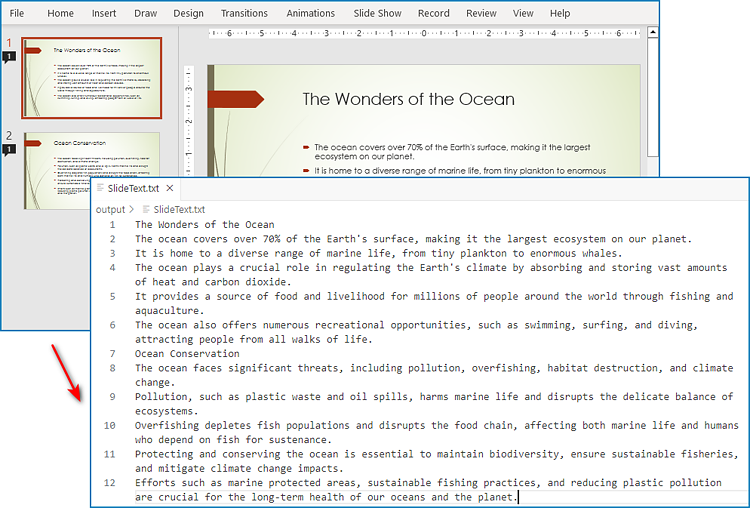
The text within PowerPoint presentation slides is placed within shapes. Therefore, developers can extract the text from the presentation by accessing all the shapes within each slide and extracting the text contained within them. The detailed steps are as follows:
- Create an object of Presentation class and load PowerPoint presentation using Presentation.LoadFromFile() method.
- Iterate through the slides in the presentation and then iterate through the shapes in each slide.
- Check if a shape is an IAutoShape instance. If it is, get the paragraphs in the shape through IAutoShape.TextFrame.Paragraphs property and then get the text in the paragraphs through Paragraph.Text property.
- Write the slide text to a text file.
- Python
from spire.presentation import *
from spire.presentation.common import *

# Create an object of Presentation class
pres = Presentation()

# Load a PowerPoint presentation
pres.LoadFromFile("Sample.pptx")

text = []
# Loop through each slide
for slide in pres.Slides:
    # Loop through each shape
    for shape in slide.Shapes:
        # Check if the shape is an IAutoShape instance
        if isinstance(shape, IAutoShape):
            # Extract the text from the shape
            for paragraph in (shape if isinstance(shape, IAutoShape) else None).TextFrame.Paragraphs:
                text.append(paragraph.Text)

# Write the text to a text file
f = open("output/SlideText.txt","w", encoding = 'utf-8')
for s in text:
    f.write(s + "\n")
f.close()
pres.Dispose()
Extract Text from Speaker Notes with Python
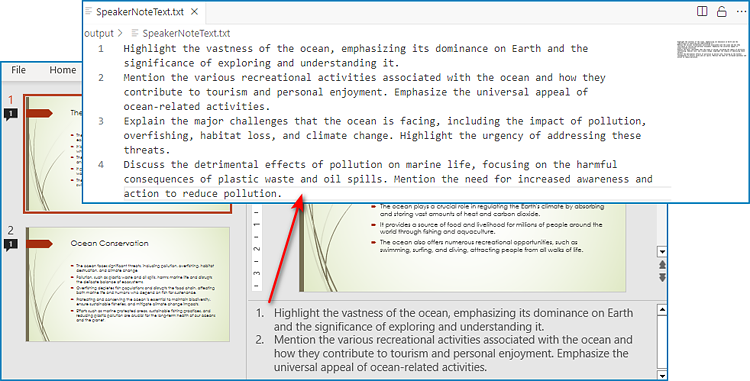
Speaker notes are additional information that provides guidance to the presenter and are not visible to the audience. The text in speaker notes of each slide is stored in the notes slide and developers can extract the text through NotesSlide.NotesTextFrame.Text property. The detailed steps for extracting text in speaker notes are as follows:
- Create an object of Presentation class and load PowerPoint presentation using Presentation.LoadFromFile() method.
- Iterate through each slide.
- Get the note slide through ISlide.NotesSlide property and retrieve the text through NotesSlide.NotesTextFrame.Text property.
- Write the speaker note text to a text file.
- Python
from spire.presentation import *
from spire.presentation.common import *

# Create an object of Presentation class
pres = Presentation()

# Load a PowerPoint presentation
pres.LoadFromFile("Sample.pptx")

list = []
# Iterate through each slide
for slide in pres.Slides:
    # Get the notes slide
    notesSlide = slide.NotesSlide
    # Get the notes
    notes = notesSlide.NotesTextFrame.Text
    list.append(notes)

# Write the notes to a text file
f = open("output/SpeakerNoteText.txt", "w", encoding="utf-8")
for note in list:
    f.write(note)
    f.write("\n")
f.close()
pres.Dispose()
Extract Text from Presentation Comments with Python
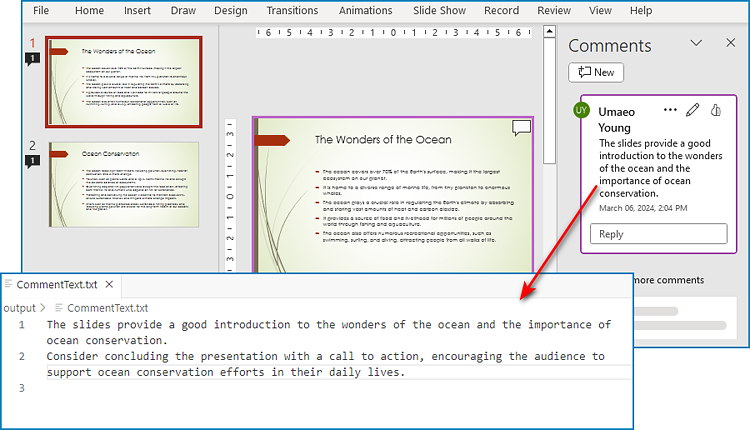
With Spire.Presentation for Python, developers can also extract the text from comments in PowerPoint presentations by getting comments from slides with ISlide.Comments property and retrieving text from comments with Comment.Text property. The detailed steps are as follows:
- Create an object of Presentation class and load PowerPoint presentation using Presentation.LoadFromFile() method.
- Iterate through each slide and get the comment from each slide through ISlide.Comments property.
- Iterate through each comment and retrieve the text from each comment through Comment.Text property.
- Write the comment text to a text file.
- Python
from spire.presentation import *
from spire.presentation.common import *

# Create an object of Presentation class
pres = Presentation()

# Load a PowerPoint presentation
pres.LoadFromFile("Sample.pptx")

list = []
# Iterate through all slides
for slide in pres.Slides:
    # Get all comments from the slide
    comments = slide.Comments
    # Iterate through the comments
    for comment in comments:
        # Get the comment text
        commentText = comment.Text
        list.append(commentText)

# Write the comments to a text file
f = open("output/CommentText.txt", "w", encoding="utf-8")
for i in range(len(list)):
    f.write(list[i] + "\n")
f.close()
pres.Dispose()
Apply for a Temporary License
If you'd like to remove the evaluation message from the generated documents, or to get rid of the function limitations, please request a 30-day trial license for yourself.
Python: Create Numbed or Bulleted Lists in PowerPoint
Using lists in PowerPoint allows you to present information in a structured and visually appealing way. They help break down complex ideas into digestible points, making it easier for your audience to understand and retain key concepts. Whether you're creating a slide deck for a business presentation, educational workshop, or conference talk, incorporating lists can enhance the visual appeal and effectiveness of your content. In this article, we will demonstrate how to create numbered lists and bulleted lists in PowerPoint presentations in Python using Spire.Presentation for Python.
- Create a Numbered List in PowerPoint in Python
- Create a Bulleted List with Symbol Bullets in PowerPoint in Python
- Create a Bulleted List with Image Bullets in PowerPoint in Python
Install Spire.Presentation for Python
This scenario requires Spire.Presentation for Python and plum-dispatch v1.7.4. They can be easily installed in your Windows through the following pip command.
pip install Spire.Presentation
If you are unsure how to install, please refer to this tutorial: How to Install Spire.Presentation for Python on Windows
Create a Numbered List in PowerPoint in Python
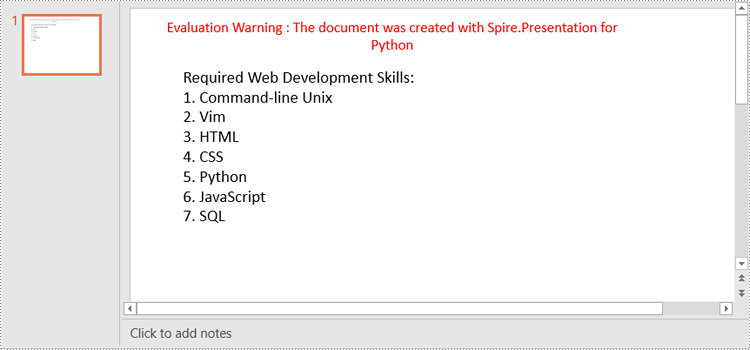
Spire.Presentation supports adding numerals or bullet points in front of paragraphs to create a numbered or bulleted list. To specify the bullet type, you can use the ParagraphProperties.BulletType property. The following are the steps to create a numbered list in a PowerPoint slide using Spire.Presentation for Python.
- Create a Presentation object.
- Get the first slide using Presentation.Slides[0] property.
- Append a shape to the slide using ISlide.Shapes.AppendShape() method and set the shape style.
- Specify the items of the numbered list inside a list.
- Create paragraphs based on the list items, and set the bullet type of these paragraphs to Numbered using ParagraphProperties.BulletType property.
- Set the numbered bullet style of these paragraphs using ParagraphProperties.BulletStyle property.
- Add these paragraphs to the shape using IAutoShape.TextFrame.Paragraphs.Append() method.
- Save the document to a PowerPoint file using Presentation.SaveToFile() method.
- Python
from spire.presentation.common import *
from spire.presentation import *

# Create an object of the Presentation class
presentation = Presentation()

# Get the first slide
slide = presentation.Slides[0]

# Add a shape to the slide and set the shape style
shape = slide.Shapes.AppendShape(ShapeType.Rectangle, RectangleF(50.0, 50.0, 300.0, 200.0))
shape.Fill.FillType = FillFormatType.none
shape.Line.FillType= FillFormatType.none

# Add text to the default paragraph
paragraph = shape.TextFrame.Paragraphs[0]
paragraph.Text = "Required Web Development Skills:"
paragraph.Alignment = TextAlignmentType.Left
paragraph.TextRanges[0].Fill.FillType = FillFormatType.Solid
paragraph.TextRanges[0].Fill.SolidColor.Color = Color.get_Black()

# Specify the list items
listItems = [
    " Command-line Unix",
    " Vim",
    " HTML",
    " CSS",
    " Python",
    " JavaScript",
    " SQL"
]

# Create a numbered list
for item in listItems:
    textParagraph = TextParagraph()
    textParagraph.Text = item
    textParagraph.Alignment = TextAlignmentType.Left
    textParagraph.TextRanges[0].Fill.FillType = FillFormatType.Solid
    textParagraph.TextRanges[0].Fill.SolidColor.Color = Color.get_Black()

    textParagraph.BulletType = TextBulletType.Numbered
    textParagraph.BulletStyle = NumberedBulletStyle.BulletArabicPeriod
    shape.TextFrame.Paragraphs.Append(textParagraph)


# Save the result document
presentation.SaveToFile("NumberedList.pptx", FileFormat.Pptx2013)
presentation.Dispose()
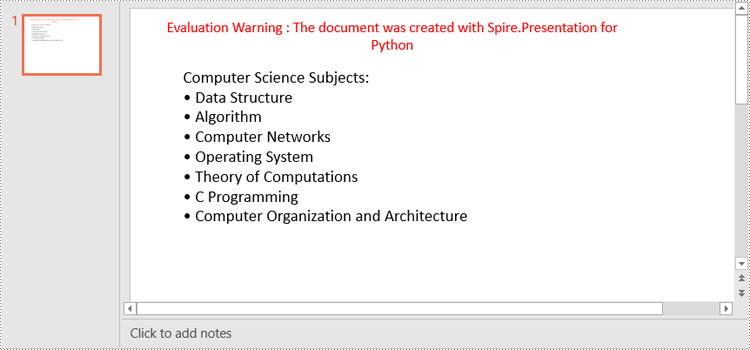
Create a Bulleted List with Symbol Bullets in PowerPoint in Python
The process of creating a bulleted list with symbol bullets is very similar to that of creating a numbered list. The only difference is that you need to set the bullet type of the paragraphs to Symbol. The following are the steps.
- Create a Presentation object.
- Get the first slide using Presentation.Slides[0] property.
- Append a shape to the slide using ISlide.Shapes.AppendShape() method and set the shape style.
- Specify the items of the bulleted list inside a list.
- Create paragraphs based on the list items, and set the bullet type of these paragraphs to Symbol using ParagraphProperties.BulletType property.
- Add these paragraphs to the shape using IAutoShape.TextFrame.Paragraphs.Append() method.
- Save the document to a PowerPoint file using Presentation.SaveToFile() method.
- Python
from spire.presentation.common import *
from spire.presentation import *

# Create an object of the Presentation class
presentation = Presentation()

# Get the first slide
slide = presentation.Slides[0]

# Add a shape to the slide and set the shape style
shape = slide.Shapes.AppendShape(ShapeType.Rectangle, RectangleF(50.0, 50.0, 350.0, 200.0))
shape.Fill.FillType = FillFormatType.none
shape.Line.FillType = FillFormatType.none

# Add text to the default paragraph
paragraph = shape.TextFrame.Paragraphs[0]
paragraph.Text = "Computer Science Subjects:"
paragraph.Alignment = TextAlignmentType.Left
paragraph.TextRanges[0].Fill.FillType = FillFormatType.Solid
paragraph.TextRanges[0].Fill.SolidColor.Color = Color.get_Black()

# Specify the list items
listItems = [
    " Data Structure",
    " Algorithm",
    " Computer Networks",
    " Operating System",
    " Theory of Computations",
    " C Programming",
    " Computer Organization and Architecture"
]

# Create a symbol bulleted list
for item in listItems:
    textParagraph = TextParagraph()
    textParagraph.Text = item
    textParagraph.Alignment = TextAlignmentType.Left
    textParagraph.TextRanges[0].Fill.FillType = FillFormatType.Solid
    textParagraph.TextRanges[0].Fill.SolidColor.Color = Color.get_Black()
    textParagraph.BulletType = TextBulletType.Symbol
    shape.TextFrame.Paragraphs.Append(textParagraph)

# Save the result document
presentation.SaveToFile("SymbolBulletedList.pptx", FileFormat.Pptx2013)
presentation.Dispose()
Create a Bulleted List with Image Bullets in PowerPoint in Python
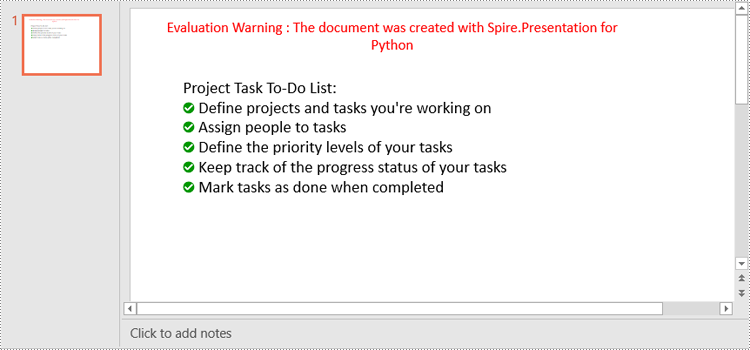
To use an image as bullets, you need to set the bullet type of the paragraphs to Picture and then set the image as bullet points using the ParagraphProperties.BulletPicture.EmbedImage property. The following are the detailed steps.
- Create a Presentation object.
- Get the first slide using Presentation.Slides[0] property.
- Append a shape to the slide using ISlide.Shapes.AppendShape() method and set the shape style.
- Specify the items of the bulleted list inside a list.
- Create paragraphs based on the list items, and set the bullet type of these paragraphs to Picture using ParagraphProperties.BulletType property.
- Set an image as bullet points using ParagraphProperties.BulletPicture.EmbedImage property.
- Add these paragraphs to the shape using IAutoShape.TextFrame.Paragraphs.Append() method.
- Save the document to a PowerPoint file using Presentation.SaveToFile() method.
- Python
from spire.presentation.common import *
from spire.presentation import *

# Create an object of the Presentation class
presentation = Presentation()

# Get the first slide
slide = presentation.Slides[0]

# Add a shape to the slide and set the shape style
shape = slide.Shapes.AppendShape(ShapeType.Rectangle, RectangleF(50.0, 50.0, 400.0, 180.0))
shape.Fill.FillType = FillFormatType.none
shape.Line.FillType = FillFormatType.none

# Add text to the default paragraph
paragraph = shape.TextFrame.Paragraphs[0]
paragraph.Text = "Project Task To-Do List:"
paragraph.Alignment = TextAlignmentType.Left
paragraph.TextRanges[0].Fill.FillType = FillFormatType.Solid
paragraph.TextRanges[0].Fill.SolidColor.Color = Color.get_Black()

# Specify the list items
listItems = [
    " Define projects and tasks you're working on",
    " Assign people to tasks",
    " Define the priority levels of your tasks",
    " Keep track of the progress status of your tasks",
    " Mark tasks as done when completed"
]

# Create an image bulleted list
for item in listItems:
    textParagraph = TextParagraph()
    textParagraph.Text = item
    textParagraph.Alignment = TextAlignmentType.Left
    textParagraph.TextRanges[0].Fill.FillType = FillFormatType.Solid
    textParagraph.TextRanges[0].Fill.SolidColor.Color = Color.get_Black()
    textParagraph.BulletType = TextBulletType.Picture
    stream = Stream("icon.png")
    imageData = presentation.Images.AppendStream(stream)
    textParagraph.BulletPicture.EmbedImage = imageData
    shape.TextFrame.Paragraphs.Append(textParagraph)
    stream.Close()

# Save the result document
presentation.SaveToFile("ImageBulletedList.pptx", FileFormat.Pptx2013)
presentation.Dispose()
Apply for a Temporary License
If you'd like to remove the evaluation message from the generated documents, or to get rid of the function limitations, please request a 30-day trial license for yourself.
Python: Replace Text in PowerPoint Presentations
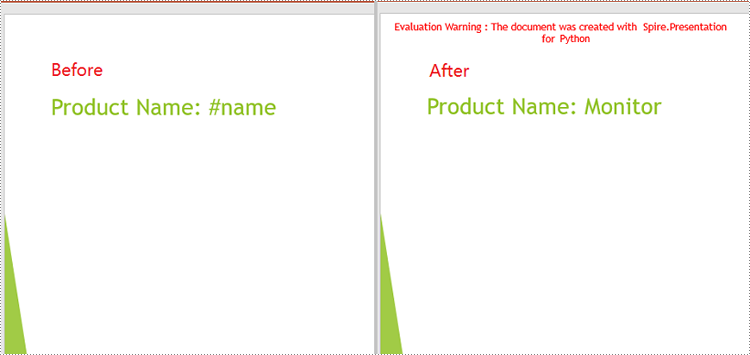
When editing or updating a large presentation, manually locating and modifying specific text elements can be a tedious and time-consuming process. By using the replace feature in PowerPoint, you can quickly and accurately make updates throughout the presentation, ensuring that the information remains accurate and consistent. In this article, we will demonstrate how to replace text in PowerPoint presentations in Python using Spire.Presentation for Python.
- Replace the First Occurrence of a Specific Text in PowerPoint in Python
- Replace All Occurrences of a Specific Text in PowerPoint in Python
- Replace Text Using a Regular Expression in PowerPoint in Python
Install Spire.Presentation for Python
This scenario requires Spire.Presentation for Python and plum-dispatch v1.7.4. They can be easily installed in your Windows through the following pip command.
pip install Spire.Presentation
If you are unsure how to install, please refer to this tutorial: How to Install Spire.Presentation for Python on Windows
Replace the First Occurrence of a Specific Text in PowerPoint in Python
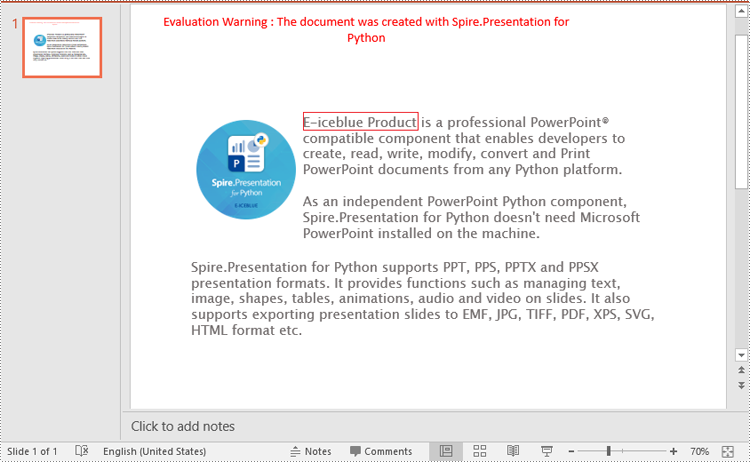
To replace the first occurrence of a specific text in a PowerPoint document, you can loop through all slides in the document, and then call the ISlide.ReplaceFirstText() method. The detailed steps are as follows.
- Create an object of the Presentation class.
- Load a PowerPoint document using Presentation.LoadFromFile() method.
- Loop through all slides in the PowerPoint document.
- Replace the first occurrence of a specific text with new text using ISlide.ReplaceFirstText() method.
- Save the result document using Presentation.SaveToFile() method.
- Python
from spire.presentation.common import *
from spire.presentation import *

# Create an object of the Presentation class
ppt = Presentation()
# Load a PowerPoint document
ppt.LoadFromFile("Sample.pptx")

# Loop through all slides in the document
for slide in ppt.Slides:
    # Replace the first occurrence of "Spire.Presentation for Python" with "E-iceblue Product"
    slide.ReplaceFirstText("Spire.Presentation for Python", "E-iceblue Product", False)
    break

# Save the result document
ppt.SaveToFile("ReplaceFirstTextOccurrence.pptx", FileFormat.Pptx2013)
ppt.Dispose()
Replace All Occurrences of a Specific Text in PowerPoint in Python
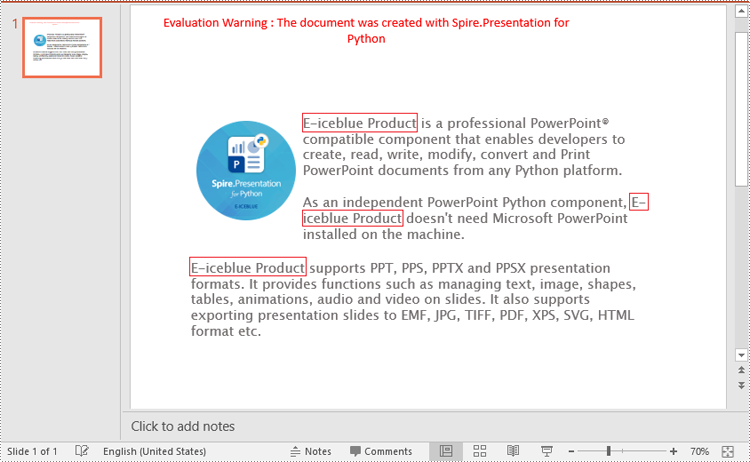
To replace all occurrences of a specific text in a PowerPoint document, you can loop through all slides in the document, and then use the ISlide.ReplaceAllText() method. The detailed steps are as follows.
- Create an object of the Presentation class.
- Load a PowerPoint document using Presentation.LoadFromFile() method.
- Loop through all slides in the PowerPoint document.
- Replace all occurrences of a specific text with new text using ISlide.ReplaceAllText() method.
- Save the result document using Presentation.SaveToFile() method.
- Python
from spire.presentation.common import *
from spire.presentation import *

# Create an object of the Presentation class
ppt = Presentation()
# Load a PowerPoint document
ppt.LoadFromFile("Sample.pptx")

# Loop through all slides in the document
for slide in ppt.Slides:
    # Replace all occurrences of "Spire.Presentation for Python" with "E-iceblue Product"
    slide.ReplaceAllText("Spire.Presentation for Python", "E-iceblue Product", False)

# Save the result document
ppt.SaveToFile("ReplaceAllTextOccurrences.pptx", FileFormat.Pptx2013)
ppt.Dispose()
Replace Text Using a Regular Expression in PowerPoint in Python
Spire.Presentation for Python provides the IShape.ReplaceTextWithRegex() method to replace text matching a regular expression pattern. The detailed steps are as follows.
- Create an object of the Presentation class.
- Load a PowerPoint document using Presentation.LoadFromFile() method.
- Loop through all slides in the PowerPoint document.
- Loop through all shapes on each slide.
- Replace text matching a regular expression pattern using IShape.ReplaceTextWithRegex() method.
- Save the result document using Presentation.SaveToFile() method.
- Python
from spire.presentation.common import *
from spire.presentation import *

# Create an object of the Presentation class
ppt = Presentation()
# Load a PowerPoint document
ppt.LoadFromFile("Sample1.pptx")

# Loop through all slides in the document
for slide in ppt.Slides:
    # Loop through all shapes on each slide
    for shape in slide.Shapes:
        # Replace text starting with # on the slide to "Monitor"
        shape.ReplaceTextWithRegex(Regex("#\w+"), "Monitor")

# Save the result document
ppt.SaveToFile("ReplaceTextUsingRegex.pptx", FileFormat.Pptx2013)
ppt.Dispose()
Apply for a Temporary License
If you'd like to remove the evaluation message from the generated documents, or to get rid of the function limitations, please request a 30-day trial license for yourself.
Python: Set or Change Fonts in PowerPoint
In a PowerPoint document, the choice of fonts plays a significant role in enhancing the overall visual appeal and effectiveness of the presentation. Different fonts can be used to establish a visual hierarchy, allowing you to emphasize key points, headings, or subheadings in your presentation and guide the audience's attention. This article introduces how to set or change fonts in a PowerPoint document in Python using Spire.Presentation for Python.
- Set Fonts when Creating a New PowerPoint Document in Python
- Change Fonts in an Existing PowerPoint Document in Python
Install Spire.Presentation for Python
This scenario requires Spire.Presentation for Python and plum-dispatch v1.7.4. They can be easily installed in your Windows through the following pip commands.
pip install Spire.Presentation
If you are unsure how to install, please refer to this tutorial: How to Install Spire.Presentation for Python on Windows
Set Fonts when Creating a New PowerPoint Document in Python
Spire.Presentation for Python offers the TextRange class to represent a range of text. A paragraph can consist of one or more text ranges. To apply font formatting to the characters in a text range, you can use the properties like LatinFont, IsBold, IsItalic, and FontHeight of the TextRange class. The following are the steps to set fonts when creating a new PowerPoint document in Python.
- Create a Presentation object.
- Get the first slide through Presentation.Slides[0] property.
- Add a shape to the slide using ISlide.Shapes.AppendShape() method.
- Add text to the shape using IAutoShape.AppendTextFrame() method.
- Get TextRange object through IAutoShape.TextFrame.TextRange property.
- Set the font information such as font name, font size, bold, italic, underline, and text color through the properties under the TextRange object.
- Save the presentation to a PPTX file using Presentation.SaveToFile() method.
- Python
from spire.presentation.common import *
import math
from spire.presentation import *

# Create a Presentation object
presentation = Presentation()

# Set slide size type
presentation.SlideSize.Type = SlideSizeType.Screen16x9

# Add a shape to the first slide
rec = RectangleF.FromLTRB (30, 100, 900, 250)
shape = presentation.Slides[0].Shapes.AppendShape(ShapeType.Rectangle, rec)

# Set line color and fill type of the shape
shape.ShapeStyle.LineColor.Color = Color.get_Transparent()
shape.Fill.FillType = FillFormatType.none

# Add text to the shape
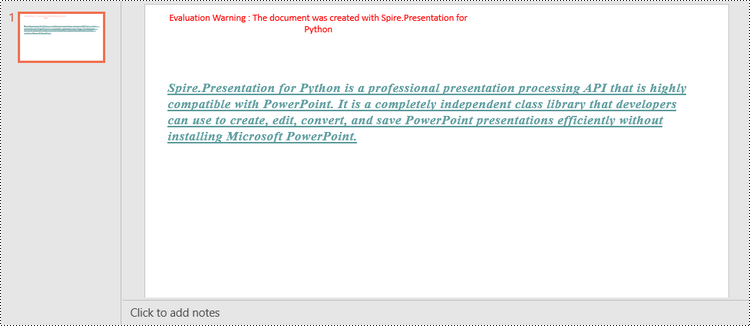
shape.AppendTextFrame("Spire.Presentation for Python is a professional presentation processing API that \
is highly compatible with PowerPoint. It is a completely independent class library that developers can \
use to create, edit, convert, and save PowerPoint presentations efficiently without installing Microsoft PowerPoint.")

# Get text of the shape as a text range
textRange = shape.TextFrame.TextRange

# Set font name
textRange.LatinFont = TextFont("Times New Roman")

# Set font style (bold & italic)
textRange.IsBold = TriState.TTrue
textRange.IsItalic = TriState.TTrue

# Set underline type
textRange.TextUnderlineType = TextUnderlineType.Single

# Set font size
textRange.FontHeight = 22

# Set text color
textRange.Fill.FillType = FillFormatType.Solid
textRange.Fill.SolidColor.Color = Color.get_CadetBlue()

# Set alignment
textRange.Paragraph.Alignment = TextAlignmentType.Left

# Set line spacing
textRange.LineSpacing = 0.5

# Save to file
presentation.SaveToFile("output/SetFont.pptx", FileFormat.Pptx2019)
presentation.Dispose()
Change Fonts in an Existing PowerPoint Document in Python
To change the font for a specific paragraph, we need to get the paragraph from the document. Then, iterate through the text ranges in the paragraph and reset the font information for each text range. Below are the steps to change the font of a paragraph in an existing PowerPoint document using Spire.Presentation for Python.
- Create a Presentation object.
- Get a specific slide through Presentation.Slides[index] property.
- Get a specific shape through ISlide.Shapes[index] property.
- Get a specific paragraph of the shape through IAutoShape.TextFrame.Paragraphs[index] property.
- Iterate through the text ranges in the paragraph.
- Set the font information such as font name, font size, bold, italic, underline, and text color of a specific text range through the properties under the TextRange object.
- Save the presentation to a PPTX file using Presentation.SaveToFile() method.
- Python
from spire.presentation.common import *
from spire.presentation import *

# Create a Presentation object
presentation = Presentation()

# Load a PowerPoint file
presentation.LoadFromFile("C:\\Users\\Administrator\\Desktop\\input.pptx")

# Get the first slide
slide = presentation.Slides[0]

# Get the first shape on the slide
shape = slide.Shapes[0]

# Get the first paragraph of the shape
paragraph = shape.TextFrame.Paragraphs[0]

# Create a font
newFont = TextFont("Times New Roman")

# Loop through the text ranges in the paragraph
for textRange in paragraph.TextRanges:

    # Apply font to a specific text range
    textRange.LatinFont = newFont

    # Set font to Italic
    textRange.Format.IsItalic = TriState.TTrue

    # Set font size
    textRange.FontHeight = 25

    # Set font color
    textRange.Fill.FillType = FillFormatType.Solid
    textRange.Fill.SolidColor.Color = Color.get_Purple()

# Save to file
presentation.SaveToFile("output/ChangeFont.pptx", FileFormat.Pptx2019)
presentation.Dispose()

Apply for a Temporary License
If you'd like to remove the evaluation message from the generated documents, or to get rid of the function limitations, please request a 30-day trial license for yourself.