Enhancing the visual appeal of your PowerPoint presentations is crucial for capturing your audience's attention. One effective way to achieve this is by applying advanced text effects such as shadows, transparency, and 3D effects. These techniques can add depth, dimension, and a modern look to your text, making your slides more engaging and professional. In this article, we'll demonstrate how to apply shadow, transparent and 3D effects to text in PowerPoint in Python using Spire.Presentation for Python.
- Apply Shadow Effect to Text in PowerPoint in Python
- Apply Transparent Effect to Text in PowerPoint in Python
- Apply 3D Effect to Text in PowerPoint in Python
Install Spire.Presentation for Python
This scenario requires Spire.Presentation for Python. It can be easily installed in your Windows through the following pip command.
pip install Spire.Presentation
If you are unsure how to install, please refer to this tutorial: How to Install Spire.Presentation for Python on Windows
Apply Shadow Effect to Text in PowerPoint in Python
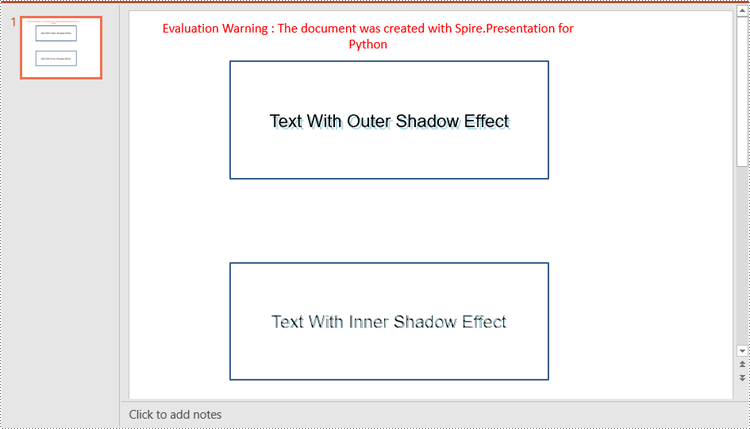
Spire.Presentation for Python offers the InnerShadowEffect and OuterShadowEffect classes for creating inner and outer shadow effects. These shadow effects can then be applied to the text within shapes by using the IAutoShape.TextFrame.TextRange.EffectDag.InnerShadowEffect and IAutoShape.TextFrame.TextRange.EffectDag.OuterShadowEffect properties. The detailed steps are as follows.
- Create an object of the Presentation class.
- Get a specific slide in the presentation using the Presentation.Slides[index] property.
- Add a shape to the slide using the ISilde.Shapes.AppendShape() method.
- Add text to the shape using the IAutoShape.AppendTextFrame() method.
- Create an inner or outer shadow effect using the InnerShadowEffect or OuterShadowEffect class.
- Set the blur radius, direction, distance and color, for the inner or outer shadow effect using the properties offered by the InnerShadowEffect or OuterShadowEffect class.
- Apply the inner or outer shadow effect to the text within the shape using the IAutoShape.TextFrame.TextRange.EffectDag.InnerShadowEffect or IAutoShape.TextFrame.TextRange.EffectDag.OuterShadowEffect property.
- Save the resulting presentation using the Presentation.SaveToFile() method.
- Python
from spire.presentation.common import *
from spire.presentation import *

# Create an object of the Presentation class
ppt = Presentation()

# Get the first slide
slide = ppt.Slides[0]

# Add the first rectangular shape to the slide
shape = slide.Shapes.AppendShape(ShapeType.Rectangle, RectangleF.FromLTRB(120, 60, 500, 200))
shape.Fill.FillType = FillFormatType.none

# Add text to the shape
shape.AppendTextFrame("Text With Outer Shadow Effect")
shape.TextFrame.Paragraphs[0].TextRanges[0].LatinFont = TextFont("Arial")
shape.TextFrame.Paragraphs[0].TextRanges[0].FontHeight = 21
shape.TextFrame.Paragraphs[0].TextRanges[0].Fill.FillType = FillFormatType.Solid
shape.TextFrame.Paragraphs[0].TextRanges[0].Fill.SolidColor.Color = Color.get_Black()

# Create an outer shadow effect
outerShadow = OuterShadowEffect()
# Set the blur radius, direction, distance and color for the outer shadow effect
outerShadow.BlurRadius = 0
outerShadow.Direction = 50
outerShadow.Distance = 10
outerShadow.ColorFormat.Color = Color.get_LightBlue()

# Apply the outer shadow effect to the text in the first rectangular shape
shape.TextFrame.TextRange.EffectDag.OuterShadowEffect = outerShadow

# Add the second rectangular shape to the slide
shape = slide.Shapes.AppendShape(ShapeType.Rectangle, RectangleF.FromLTRB(120, 300, 500, 440))
shape.Fill.FillType = FillFormatType.none

# Add text to the shape
shape.AppendTextFrame("Text With Inner Shadow Effect")
shape.TextFrame.Paragraphs[0].TextRanges[0].LatinFont = TextFont("Arial")
shape.TextFrame.Paragraphs[0].TextRanges[0].FontHeight = 21
shape.TextFrame.Paragraphs[0].TextRanges[0].Fill.FillType = FillFormatType.Solid
shape.TextFrame.Paragraphs[0].TextRanges[0].Fill.SolidColor.Color = Color.get_Black()

# Create an inner shadow effect
innerShadow = InnerShadowEffect()
# Set the blur radius, direction, distance and color for the inner shadow effect
innerShadow.BlurRadius = 0
innerShadow.Direction = 50
innerShadow.Distance = 10
innerShadow.ColorFormat.Color = Color.get_LightBlue()

# Apply the inner shadow effect to the text in the second rectangular shape
shape.TextFrame.TextRange.EffectDag.InnerShadowEffect = innerShadow

# Save the resulting presentation
ppt.SaveToFile("SetShadowEffect.pptx", FileFormat.Pptx2013)
ppt.Dispose()

Apply Transparent Effect to Text in PowerPoint in Python
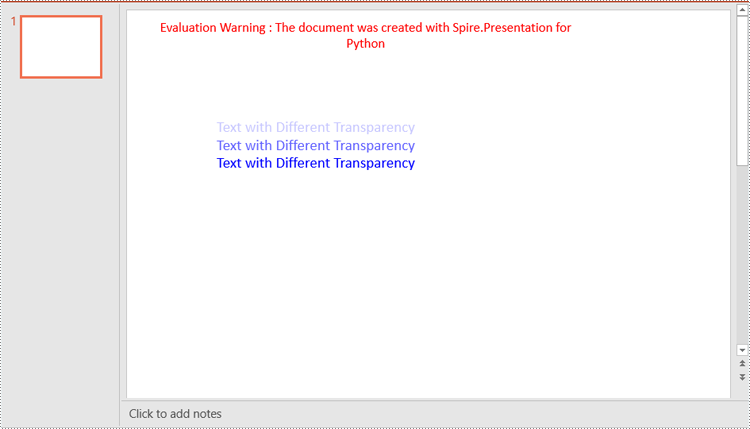
Spire.Presentation for Python does not offer a direct method to apply transparency effect to text, but you can control the transparency by adjusting the alpha value of the text color. The detailed steps are as follows.
- Create an object of the Presentation class.
- Get a specific slide in the presentation using the Presentation.Slides[index] property.
- Add a shape to the slide using the ISilde.Shapes.AppendShape() method.
- Retrieve the paragraph collection from the text frame within the shape using the IAutoShape.TextFrame.Paragraphs property, then remove any default paragraphs from the collection using the ParagraphList.Clear() method.
- Add new paragraphs to the collection using the ParagraphList.Append() method, and insert text into each paragraph using the TextParagraph.TextRanges.Append() method.
- Set the fill type of the text to solid using the TextRange.Fill.FillType property.
- Adjust the transparency of the text by setting the color with varying alpha values using the Color.FromArgb(alpha:int, red:int, green:int, blue:int) method, where the alpha value controls the transparency level—the lower the alpha, the more transparent the text.
- Save the resulting presentation using the Presentation.SaveToFile() method.
- Python
from spire.presentation.common import *
from spire.presentation import *

# Create an object of the Presentation class
ppt = Presentation()

# Get the first slide
slide = ppt.Slides[0]

# Add a rectangular shape to the slide
textboxShape = slide.Shapes.AppendShape(ShapeType.Rectangle, RectangleF.FromLTRB(100, 100, 400, 220))
# Make the border of the shape transparent
textboxShape.ShapeStyle.LineColor.Color = Color.get_Transparent()
# Set the shape's fill to none
textboxShape.Fill.FillType = FillFormatType.none

# Retrieve the paragraph collection from the text frame within the shape
paras = textboxShape.TextFrame.Paragraphs
# Remove any default paragraphs
paras.Clear()

# Add three new paragraphs to the text frame, each with a different transparency level for the text
alpha = 55  # Initial alpha value for text transparency
for i in range(3):
    # Create and add a new paragraph
    paras.Append(TextParagraph())
    # Add text to the paragraph
    paras[i].TextRanges.Append(TextRange("Text with Different Transparency"))
    # Set the text fill type to solid
    paras[i].TextRanges[0].Fill.FillType = FillFormatType.Solid
    # Set the text color with varying transparency, controlled by the alpha value
    paras[i].TextRanges[0].Fill.SolidColor.Color = Color.FromArgb(
        alpha,
        Color.get_Blue().R,
        Color.get_Blue().G,
        Color.get_Blue().B
    )
    # Increase alpha value to reduce transparency for the next paragraph
    alpha += 100

# Save the resulting presentation
ppt.SaveToFile("SetTransparency.pptx", FileFormat.Pptx2013)
ppt.Dispose()

Apply 3D Effect to Text in PowerPoint in Python
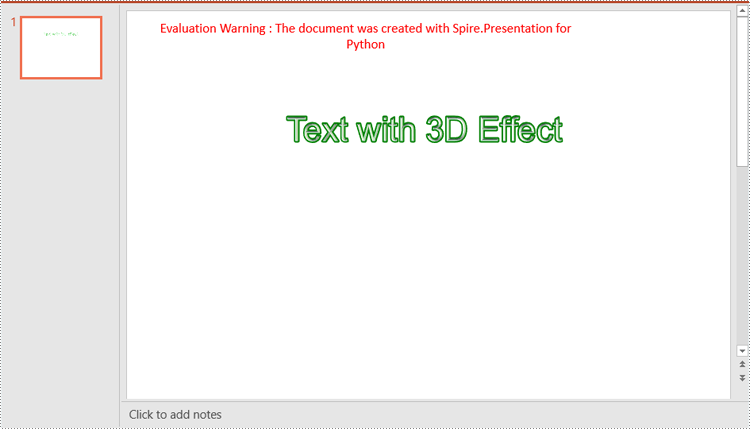
The FormatThreeD class in Spire.Presentation for Python is used for creating a 3D effect. You can access the FormatThreeD object using the IAutoShape.TextFrame.TextThreeD property, then use the properties of the FormatThreeD class to configure the settings for the 3D effect. The detailed steps are as follows.
- Create an object of the Presentation class.
- Get a specific slide in the presentation using the Presentation.Slides[index] property.
- Add a shape to the slide using the ISilde.Shapes.AppendShape() method.
- Add text to the shape using the IAutoshape.AppendTextFrame() method.
- Access the FormatThreeD object using the IAutoShape.TextFrame.TextThreeD property.
- Set the material type, top bevel type, contour color and width, and lighting type for the 3D effect through the properties of the FormatThreeD class.
- Save the resulting presentation using the Presentation.SaveToFile() method.
- Python
from spire.presentation.common import *
from spire.presentation import *

# Create an object of the Presentation class
ppt = Presentation()

# Get the first slide
slide = ppt.Slides[0]

# Add a rectangular shape to the slide
shape = slide.Shapes.AppendShape(ShapeType.Rectangle, RectangleF.FromLTRB(30, 40, 680, 240))
# Make the border of the shape transparent
shape.ShapeStyle.LineColor.Color = Color.get_Transparent()
# Set the shape's fill to none
shape.Fill.FillType = FillFormatType.none

# Add text to the shape
shape.AppendTextFrame("Text with 3D Effect")
# Set text color
textRange = shape.TextFrame.TextRange
textRange.Fill.FillType = FillFormatType.Solid
textRange.Fill.SolidColor.Color = Color.get_LightBlue()
# Set font
textRange.FontHeight = 40
textRange.LatinFont = TextFont("Arial")

# Access the FormatThreeD object
threeD = shape.TextFrame.TextThreeD
# Set the material type for the 3D effect
threeD.ShapeThreeD.PresetMaterial = PresetMaterialType.Metal
# Set the top bevel type for the 3D effect
threeD.ShapeThreeD.TopBevel.PresetType = BevelPresetType.Circle
# Set the contour color and width for the 3D effect
threeD.ShapeThreeD.ContourColor.Color = Color.get_Green()
threeD.ShapeThreeD.ContourWidth = 3
# Set the lighting type for the 3D effect
threeD.LightRig.PresetType = PresetLightRigType.Sunrise

# Save the resulting presentation
ppt.SaveToFile("Set3DEffect.pptx", FileFormat.Pptx2013)
ppt.Dispose()

Apply for a Temporary License
If you'd like to remove the evaluation message from the generated documents, or to get rid of the function limitations, please request a 30-day trial license for yourself.


