
.NET (1273)
Children categories
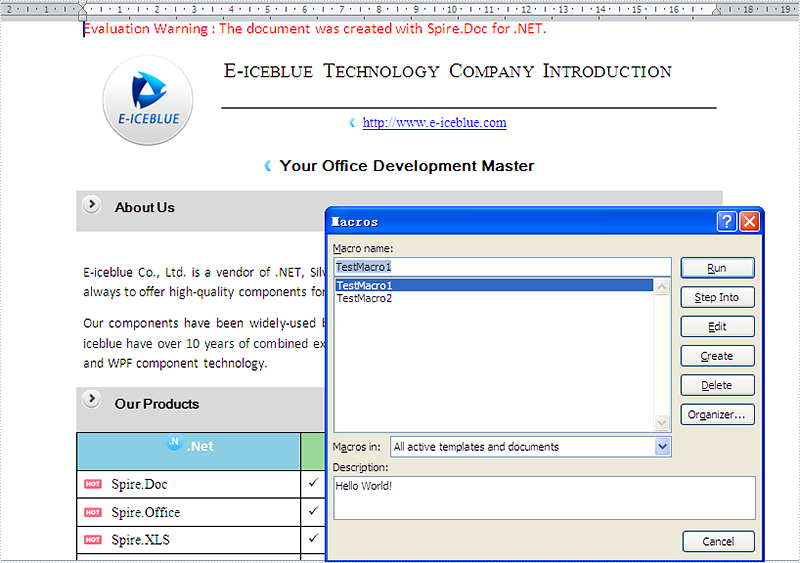
Word Marco is widely used to record the operation that needs to be done repeatedly and you can apply it with only a single click. It can save lots of time for you. It is not an easy work to load a word document with Macro in C# and sometimes, you need to remove the Marco in the word documents in C#. This article will focus on demonstrate how to load and save word document with Marco, and clear the Marco by using Spire.Doc in C# in simple lines of codes.
First, download Spire.Doc and install on your system. The Spire.Doc installation is clean, professional and wrapped up in a MSI installer.
Then adds Spire.Doc.dll as reference in the downloaded Bin folder though the below path: "..\Spire.Doc\Bin\NET4.0\ Spire.Doc.dll".
Here comes to the steps.
Step 1: Load and save the document with Marco. Spire.Doc for .NET supports .doc, .docx(Word 97-2003) document with macros and .docm(Word 2007 and Word 2010) document.
//Loading document with macros.
document.LoadFromFile(@"D:\Macros.docm", FileFormat.Docm);
//Save docm file.
document.SaveToFile("Sample.docm", FileFormat.Docm);
Step 2: Clear the Marco in word document. With Spire.Doc, you only need one line of code to remove all the Marcos at one time.
//Removes the macros from the document
document.ClearMacros();
//Save docm file.
document.SaveToFile("Sample.docm", FileFormat.Docm);
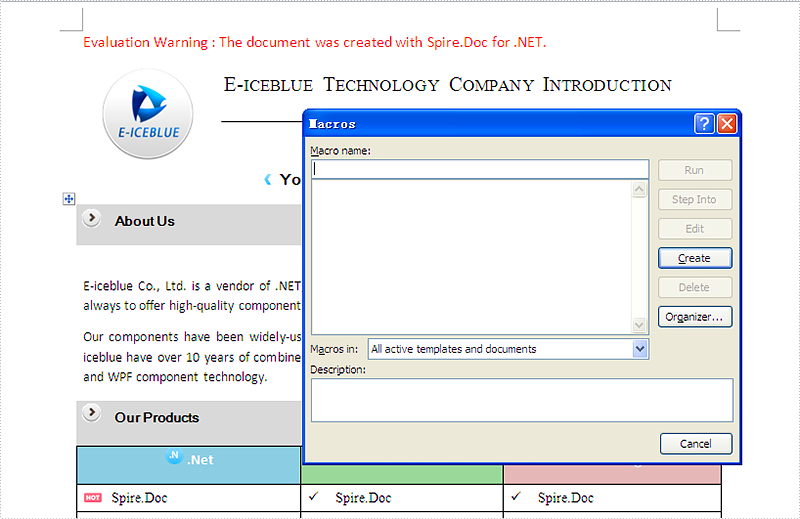
Here comes to the screenshot which has removed the Marco in word document.
Insert Image at Specified Location in C#, VB.NET
2014-03-06 02:26:37Image can add interest and take effect to your Word documents. Suppose you've written an article introducing a city about its beautiful scenery. Just using words describe, you cannot present perfect scenery to your readers, because that page of text looks indistinct and dull. You need image to embellish your scenery.
Spire.Doc for .NET, a professional .NET word component to fast generate, open, modify and save Word documents without using MS Office Automation, enables users to insert image into Word document and set its size according to page by using C#.NET. This guide introduces an easy method how to insert image via Spire.Doc for .NET.
At first, create new Word document and add section, paragraph for this document. Then, insert image in the new created paragraph. You can set this image's size, position, rotate it and choice the wrapping-style about the text. Download and Install Spire.Doc for .NET. Use the following code to insert image in Word by using C#.
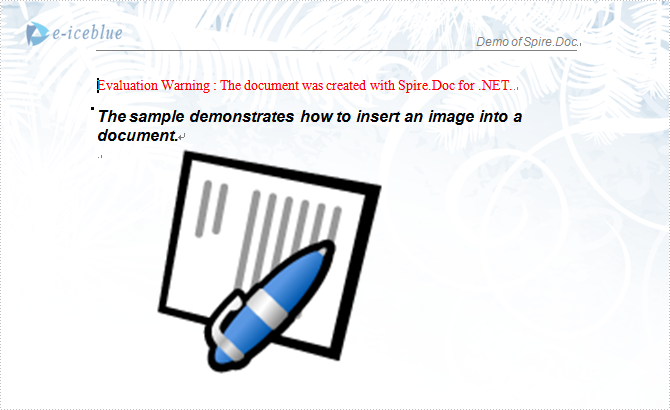
The sample demo shows how to insert an image into a document.
using System;
using Spire.Doc;
using Spire.Doc.Documents;
using Spire.Doc.Fields;
using System.Drawing;

namespace Insert_image_to_Word_Document
{
    class Program
    {
        static void Main(string[] args)
        {
 //Open a blank word document as template
            Document document = new Document(@"Blank.doc");
            Section section = document.Sections[0];
            Paragraph paragraph
                = section.Paragraphs.Count > 0 ? section.Paragraphs[0] : section.AddParagraph();
            paragraph.AppendText("The sample demonstrates how to insert an image into a document.");
            paragraph.ApplyStyle(BuiltinStyle.Heading2);
            paragraph = section.AddParagraph();

            //get original image
            Bitmap p = new Bitmap(Image.FromFile(@"Word.jpg"));

            //rotate image and insert image to word document
            p.RotateFlip(RotateFlipType.Rotate90FlipX);

            DocPicture picture = document.Sections[0].Paragraphs[0].AppendPicture(p);

            //set image's position
            picture.HorizontalPosition = 50.0F;
            picture.VerticalPosition = 60.0F;

            //set image's size
            picture.Width = 200;
            picture.Height = 200;

            //set textWrappingStyle with image;
            picture.TextWrappingStyle = TextWrappingStyle.Through;

            //Save doc file.
            document.SaveToFile("Sample.doc", FileFormat.Doc);

            //Launching the MS Word file.            System.Diagnostics.Process.Start("Sample.doc");
        }
       }
}
If you have finished the tutorial Spire.Doc Quick Start, the steps above will be simpler.
With Spire.Doc, you can insert an image into your Word documents and do more same thing in your ASP.NET, WPF and Silverlight applications without Word automation and any other third party add-ins.
When uploading or submitting PDF files on certain platforms, you are sometimes faced with the dilemma that the platforms require a specific version of PDF file. If your PDF files fail to meet the requirements, it is necessary to convert them to a different version for compatibility purposes. This article will demonstrate how to programmatically convert PDF between different versions using Spire.PDF for .NET.
Install Spire.PDF for .NET
To begin with, you need to add the DLL files included in the Spire.PDF for.NET package as references in your .NET project. The DLL files can be either downloaded from this link or installed via NuGet.
PM> Install-Package Spire.PDF
Change PDF Version in C# and VB.NET
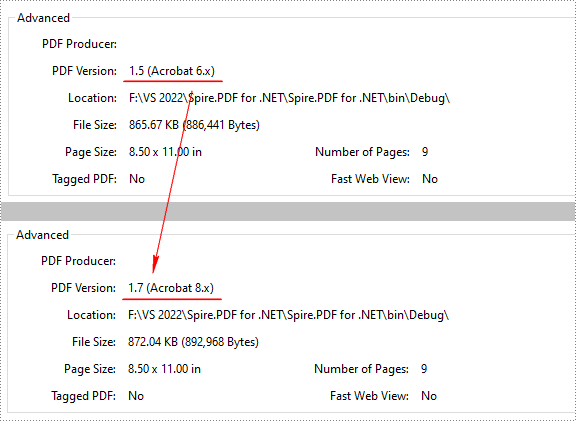
Spire.PDF for .NET supports PDF versions from 1.0 to 1.7. To convert a PDF file to a newer or older version, you can use the PdfDocument.FileInfo.Version property. The following are the detailed steps.
- Create a PdfDocument object.
- Load a sample PDF file using PdfDocument.LoadFromFile() method.
- Change the PDF version to a newer or older version using PdfDocument.FileInfo.Version property.
- Save the result document using PdfDocument.SaveToFile() method.
- C#
- VB.NET
using Spire.Pdf;

namespace ConvertPDFVersion
{
    class Program
    {
        static void Main(string[] args)
        {
            //Create a PdfDocument object
            PdfDocument pdf = new PdfDocument();

            //Load a sample PDF file
            pdf.LoadFromFile("sample.pdf");

            //Change the PDF to version 1.7
            pdf.FileInfo.Version = PdfVersion.Version1_7;

            //Save the result file
            pdf.SaveToFile("PDFVersion.pdf");
        }
    }
}
Apply for a Temporary License
If you'd like to remove the evaluation message from the generated documents, or to get rid of the function limitations, please request a 30-day trial license for yourself.
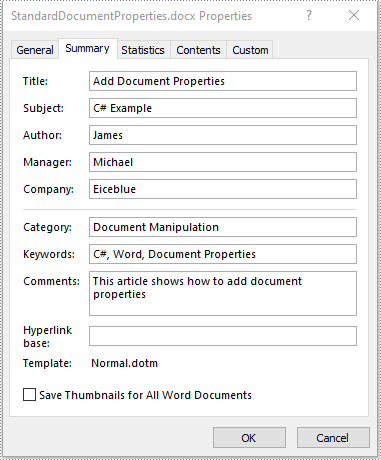
Document properties (also known as metadata) are a set of information about a document. All Word documents come with a set of built-in document properties, including title, author name, subject, keywords, etc. In addition to the built-in document properties, Microsoft Word also allows users to add custom document properties to Word documents. In this article, we will explain how to add these document properties to Word documents in C# and VB.NET using Spire.Doc for .NET.
- Add Built-in Document Properties to a Word Document
- Add Custom Document Properties to a Word Document
Install Spire.Doc for .NET
To begin with, you need to add the DLL files included in the Spire.Doc for.NET package as references in your .NET project. The DLL files can be either downloaded from this link or installed via NuGet.
PM> Install-Package Spire.Doc
Add Built-in Document Properties to a Word Document in C# and VB.NET
A built-in document property consists of a name and a value. You cannot set or change the name of a built-in document property as it's predefined by Microsoft Word, but you can set or change its value. The following steps demonstrate how to set values for built-in document properties in a Word document:
- Initialize an instance of Document class.
- Load a Word document using Document.LoadFromFile() method.
- Get the built-in document properties of the document through Document.BuiltinDocumentProperties property.
- Set values for specific document properties such as title, subject and author through Title, Subject and Author properties of BuiltinDocumentProperties class.
- Save the result document using Document.SaveToFile() method.
- C#
- VB.NET
using Spire.Doc;

namespace BuiltinDocumentProperties
{
    class Program
    {
        static void Main(string[] args)
        {
            //Create a Document instance
            Document document = new Document();
            //Load a Word document
            document.LoadFromFile("Sample.docx");

            //Add built-in document properties to the document
            BuiltinDocumentProperties standardProperties = document.BuiltinDocumentProperties;
            standardProperties.Title = "Add Document Properties";
            standardProperties.Subject = "C# Example";
            standardProperties.Author = "James";
            standardProperties.Company = "Eiceblue";
            standardProperties.Manager = "Michael";
            standardProperties.Category = "Document Manipulation";
            standardProperties.Keywords = "C#, Word, Document Properties";
            standardProperties.Comments = "This article shows how to add document properties";

            //Save the result document
            document.SaveToFile("StandardDocumentProperties.docx", FileFormat.Docx2013);
        }
    }
}
Add Custom Document Properties to a Word Document in C# and VB.NET
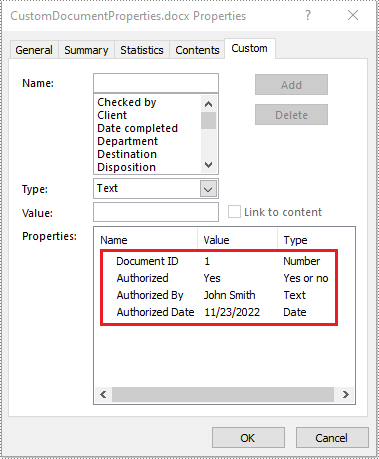
A custom document property can be defined by a document author or user. Each custom document property should contain a name, a value and a data type. The data type can be one of these four types: Text, Date, Number and Yes or No. The following steps demonstrate how to add custom document properties with different data types to a Word document:
- Initialize an instance of Document class.
- Load a Word document using Document.LoadFromFile() method.
- Get the custom document properties of the document through Document.CustomDocumentProperties property.
- Add custom document properties with different data types to the document using CustomDocumentProperties.Add(string, object) method.
- Save the result document using Document.SaveToFile() method.
- C#
- VB.NET
using Spire.Doc;
using System;

namespace CustomDocumentProperties
{
    class Program
    {
        static void Main(string[] args)
        {
            //Create a Document instance
            Document document = new Document();
            //Load a Word document
            document.LoadFromFile("Sample.docx");

            //Add custom document properties to the document
            CustomDocumentProperties customProperties = document.CustomDocumentProperties;
            customProperties.Add("Document ID", 1);
            customProperties.Add("Authorized", true);
            customProperties.Add("Authorized By", "John Smith");
            customProperties.Add("Authorized Date", DateTime.Today);

            //Save the result document
            document.SaveToFile("CustomDocumentProperties.docx", FileFormat.Docx2013);
        }
    }
}
Apply for a Temporary License
If you'd like to remove the evaluation message from the generated documents, or to get rid of the function limitations, please request a 30-day trial license for yourself.
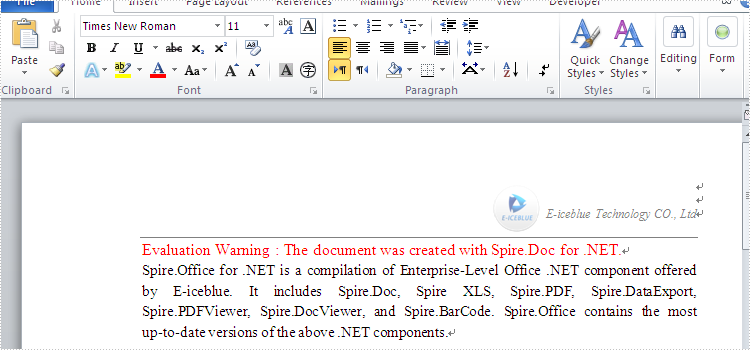
A document can have one or more pages. It is probably easy to add a header for all pages of the document. If you want to add the header only for the first page of the document, Spire.Doc for .NET component can provide you an easy and flexible solution to handle it. The following steps will guide how to add a header into the first page of a document using Spire.Doc for .NET component in C#. In the example, the header is got from an existing document.
Step 1: Load a word document, documen1.docx.
Document document1 = new Document();
document1.LoadFromFile("D:\\document1.docx");
Step 2: Get the header of document1.docx.
HeaderFooter header = document1.Sections[0].HeadersFooters.Header;
Step 3: Load another word document which will be added the header, document2.docx.
Document document2 = new Document();
document2.LoadFromFile("D:\\document2.docx");
Step 4: Get the first page header of document2.docx.
HeaderFooter firstPageHeader = document2.Sections[0].HeadersFooters.FirstPageHeader;
Step 5: Specify that the current section has a different header/footer for the first page.
foreach (Section section in document2.Sections)
{
section.PageSetup.DifferentFirstPageHeaderFooter = true;
}
Step 6: Removes all child objects in firstPageHeader.
firstPageHeader.Paragraphs.Clear();
Step 7: Add all child objects of the header to firstPageHeader.
foreach (DocumentObject obj in header.ChildObjects)
{
firstPageHeader.ChildObjects.Add(obj.Clone());
}
Step 8: Save document2.docx to a new document, header.docx.
document2.SaveToFile("D:\\Header.docx"", FileFormat.Docx);
Full code:
Document document1 = new Document();
document1.LoadFromFile(@"..\..\document1.docx");
Document document2 = new Document();
document2.LoadFromFile(@"..\..\document2.docx");
HeaderFooter header = document1.Sections[0].HeadersFooters.Header;
HeaderFooter firstPageHeader = document2.Sections[0].HeadersFooters.FirstPageHeader;

foreach (Section section in document2.Sections)
{
section.PageSetup.DifferentFirstPageHeaderFooter = true;
}

firstPageHeader.Paragraphs.Clear();
foreach (DocumentObject obj in header.ChildObjects)
{
firstPageHeader.ChildObjects.Add(obj.Clone());
}

document2.SaveToFile("Header.docx", FileFormat.Docx);
Screenshots:
document1.docx:

document2.docx:

Header.docx:
Converting Excel spreadsheets to PDF files is a common task for many users. PDFs maintain the professional formatting and layout of your spreadsheets, allowing you to share your work securely and reliably. The conversion process is straightforward, giving you an easy way to distribute Excel files without compromising the original content and appearance.
This guide will walk you through the steps to convert an Excel spreadsheet to a PDF file, including how to apply specific configurations, using C# and the Spire.XLS for .NET library.
- Convert a Worksheet to PDF with Default Page Settings in C#
- Fit Sheet on One Page while Converting a Worksheet to PDF in C#
- Customize Page Margins while Converting a Worksheet to PDF in C#
- Specify Page Size while Converting a Worksheet to PDF in C#
- Preserve Gridlines while Converting a Worksheet to PDF in C#
- Specify Page Orientation while Converting a Worksheet to PDF in C#
- Convert a Cell Range to PDF in C#
- Convert an Entire Workbook to PDF in C#
Install Spire.XLS for .NET
To begin with, you need to add the DLL files included in the Spire.XLS for .NET package as references in your .NET project. The DLL files can be either downloaded from this link or installed via NuGet.
PM> Install-Package Spire.XLS
Convert a Worksheet to PDF with Default Page Settings in C#
Page settings control how your worksheet prints or displays when converted to different formats. These settings let you manage orientation, paper size, margins, scaling, and more. If you've already set the desired page settings for your worksheet, you can convert it to PDF using the Worksheet.SaveToPdf() method.
The following are the steps to convert a worksheet to PDF with the default page settings.
- Create a Workbook object.
- Load an Excel file using Workbook.LoadFromFile() method.
- Get a specific worksheet through Workbook.Worksheets property.
- Convert it to PDF using Worksheet.SaveToPdf() method.
- C#
using Spire.Xls;

namespace ConvertExcelToPdfWithDefaultPageSettings
{
    class Program
    {
        static void Main(string[] args)
        {
            // Create a Workbook object
            Workbook workbook = new Workbook();

            // Load an Excel document
            workbook.LoadFromFile("C:\\Users\\Administrator\\Desktop\\Input.xlsx");

            // Get a specific worksheet
            Worksheet sheet = workbook.Worksheets[0];

            // Convert it to a PDF file
            sheet.SaveToPdf("WorksheetToPdf.pdf");

            // Dispose resources
            workbook.Dispose();
        }
    }
}
Fit Sheet on One Page while Converting a Worksheet to PDF in C#
Fitting the content onto a single page enhances the readability and allows viewers to take in the entire dataset at a glance, improving their understanding. To ensure that your worksheet content fits neatly on a single page when converting it to a PDF format, you need to set the Workbook.ConverterSetting.SheetFitToPage property to true.
The following are the detailed steps.
- Create a Workbook object.
- Load an Excel file using Workbook.LoadFromFile() method.
- Fit worksheet on one page by setting Workbook.ConverterSetting.SheetFitToPage property to true.
- Get a specific worksheet through Workbook.Worksheets property.
- Convert it to PDF using Worksheet.SaveToPdf() method.
- C#
using Spire.Xls;

namespace FitOnOnePage
{
    class Program
    {
        static void Main(string[] args)
        {
            // Create a Workbook object
            Workbook workbook = new Workbook();

            // Load an Excel document
            workbook.LoadFromFile("C:\\Users\\Administrator\\Desktop\\Input.xlsx");

            // Fit sheet on one page
            workbook.ConverterSetting.SheetFitToPage = true;

            // Get a specific worksheet
            Worksheet sheet = workbook.Worksheets[0];

            // Convert the worksheet to a PDF file
            sheet.SaveToPdf("FitOnePage.pdf");

            // Dispose resources
            workbook.Dispose();
        }
    }
}

Customize Page Margins while Converting a Worksheet to PDF in C#
Adjusting the page margin settings allows you to control the spacing between the content and the edges of the PDF page. The PageSetup class can be used to work with various page settings, including margins.
The steps to customize the page margins while converting a worksheet to PDF are as follows.
- Create a Workbook object.
- Load an Excel file using Workbook.LoadFromFile() method.
- Fit worksheet on one page by setting Workbook.ConverterSetting.SheetFitToPage property to true.
- Get a specific worksheet through Workbook.Worksheets property.
- Get the PageSetup object from the worksheet through Worksheet.PageSetup property.
- Set the top, bottom, right, left margins through TopMargin, BottomMargin, RightMargin, LeftMargin properties of the PageSetup object.
- Convert the worksheet to PDF using Worksheet.SaveToPdf() method.
- C#
using Spire.Xls;

namespace CustomizePageMargin
{
    class Program
    {
        static void Main(string[] args)
        {
            // Create a Workbook object
            Workbook workbook = new Workbook();

            // Load an Excel document
            workbook.LoadFromFile("C:\\Users\\Administrator\\Desktop\\Input.xlsx");

            // Fit sheet on one page
            workbook.ConverterSetting.SheetFitToPage = true;

            // Get a specific worksheet
            Worksheet sheet = workbook.Worksheets[0];

            // Get the PageSetup object
            PageSetup pageSetup = sheet.PageSetup;

            // Set page margins
            pageSetup.TopMargin = 0.5;
            pageSetup.BottomMargin = 0.5;
            pageSetup.LeftMargin = 0.3;
            pageSetup.RightMargin = 0.3;

            // Convert it to a PDF file
            sheet.SaveToPdf("CustomizeMargin.pdf");

            // Dispose resources
            workbook.Dispose();
        }
    }
}

Specify Page Size while Converting a Worksheet to PDF in C#
The PageSetup class includes the PaperSize property, which you can use to define the page size when converting a worksheet to PDF. This property enables you to specify standard paper sizes like A3, A4, B4, B5, or even a custom paper size to meet your specific requirements.
The following are the steps to specify page size while converting a worksheet to PDF.
- Create a Workbook object.
- Load an Excel file using Workbook.LoadFromFile() method.
- Fit worksheet on one page by setting Workbook.ConverterSetting.SheetFitToPage property to true.
- Fit worksheet on one page without changing the paper size by setting Workbook.ConverterSetting.SheetFitToPageRetainPaperSize to true.
- Get a specific worksheet through Workbook.Worksheets property.
- Get the PageSetup object from the worksheet through Worksheet.PageSetup property.
- Set the paper size through PageSetup.PaperSize property.
- Convert the worksheet to PDF using Worksheet.SaveToPdf() method.
- C#
using Spire.Xls;

namespace SpecifyPageSize
{
    class Program
    {
        static void Main(string[] args)
        {
            // Create a Workbook object
            Workbook workbook = new Workbook();

            // Load an Excel document
            workbook.LoadFromFile("C:\\Users\\Administrator\\Desktop\\Input.xlsx");

            // Fit sheet on one page
            workbook.ConverterSetting.SheetFitToPage = true;

            // Fit sheet on one page while retaining paper size
            workbook.ConverterSetting.SheetFitToPageRetainPaperSize = true;

            // Get a specific worksheet
            Worksheet sheet = workbook.Worksheets[0];

            // Get the PageSetup object
            PageSetup pageSetup = sheet.PageSetup;

            // Set the page size to A4
            pageSetup.PaperSize = PaperSizeType.PaperA4;

            // Convert the worksheet to a PDF file
            sheet.SaveToPdf("SpecifyPageSize.pdf");

            // Dispose resources
            workbook.Dispose();
        }
    }
}

Preserve Gridlines while Converting a Worksheet to PDF in C#
By preserving the gridlines during the conversion process, you can create PDF versions of your worksheets that closely mirror the original layout and enhance the overall usability and understanding of the data. To preserve the gridlines, set the PageSetup.IsPrintGridlines property to true.
The detailed steps are as follows.
- Create a Workbook object.
- Load an Excel file using Workbook.LoadFromFile() method.
- Fit worksheet on one page by setting Workbook.ConverterSetting.SheetFitToPage property to true.
- Get a specific worksheet through Workbook.Worksheets property.
- Get the PageSetup object from the worksheet through Worksheet.PageSetup property.
- Preserve gridlines by setting PageSetup.IsPrintGridlines property to true.
- Convert the worksheet to PDF using Worksheet.SaveToPdf() method.
- C#
using Spire.Xls;

namespace PreserveGridlines
{
    class Program
    {
        static void Main(string[] args)
        {

            // Create a Workbook object
            Workbook workbook = new Workbook();

            // Load an Excel document
            workbook.LoadFromFile("C:\\Users\\Administrator\\Desktop\\Input.xlsx");

            // Fit sheet on one page
            workbook.ConverterSetting.SheetFitToPage = true;

            // Get a specific worksheet
            Worksheet sheet = workbook.Worksheets[0];

            // Get the PageSetup object
            PageSetup pageSetup = sheet.PageSetup;

            // Preserve gridlines
            pageSetup.IsPrintGridlines = true;

            // Convert it to a PDF file
            sheet.SaveToPdf("PreserveGridlines.pdf");

            // Dispose resources
            workbook.Dispose();
        }
    }
}

Specify Page Orientation while Converting a Worksheet to PDF in C#
Selecting the appropriate orientation ensures the data, text, and other elements are properly displayed without being cropped or stretched. To specify the page orientation, you can use the PageSetup.Orientation property.
The following are the steps to specify page orientation while converting a worksheet to PDF.
- Create a Workbook object.
- Load an Excel file using Workbook.LoadFromFile() method.
- Get a specific worksheet through Workbook.Worksheets property.
- Get the PageSetup object from the worksheet through Worksheet.PageSetup property.
- Set the page orientation through PageSetup.Orientation property.
- Convert the worksheet to PDF using Worksheet.SaveToPdf() method.
- C#
using Spire.Xls;

namespace SpecifyPageOrientation
{
    class Program
    {
        static void Main(string[] args)
        {
            // Create a Workbook object
            Workbook workbook = new Workbook();

            // Load an Excel document
            workbook.LoadFromFile("C:\\Users\\Administrator\\Desktop\\Input.xlsx");

            // Get a specific worksheet
            Worksheet sheet = workbook.Worksheets[0];

            // Get the PageSetup object
            PageSetup pageSetup = sheet.PageSetup;

            // Set page orientation to Landscape or Portrait
            pageSetup.Orientation = PageOrientationType.Landscape;

            // Convert it to a PDF file
            sheet.SaveToPdf("PageOrientation.pdf");

            // Dispose resources
            workbook.Dispose();
        }
    }
}
Convert a Cell Range to PDF in C#
By converting only the necessary cell range, you can create a PDF that highlights the most critical data, insights, or information, without including extraneous content. To specify a cell range for conversion, you can use the PageSetup.PrintArea property.
The following are the steps to convert a call range of a worksheet to PDF.
- Create a Workbook object.
- Load an Excel file using Workbook.LoadFromFile() method.
- Get a specific worksheet through Workbook.Worksheets property.
- Get the PageSetup object from the worksheet through Worksheet.PageSetup property.
- Set the cell range to be converted through PageSetup.PrintArea property.
- Convert the cell range to PDF using Worksheet.SaveToPdf() method.
- C#
using Spire.Xls;

namespace CellRangeToPdf
{
    class Program
    {
        static void Main(string[] args)
        {
            // Create a Workbook object
            Workbook workbook = new Workbook();

            // Load an Excel document
            workbook.LoadFromFile("C:\\Users\\Administrator\\Desktop\\Input.xlsx");

            // Fit sheet on one page
            workbook.ConverterSetting.SheetFitToPage = true;

            // Get a specific worksheet
            Worksheet sheet = workbook.Worksheets[0];

            // Get the PageSetup object
            PageSetup pageSetup = sheet.PageSetup;

            // Set print area
            pageSetup.PrintArea = "A13:D22";

            // Convert it to a PDF file
            sheet.SaveToPdf("CellRangeToPdf.pdf");

            // Dispose resources
            workbook.Dispose();
        }
    }
}

Convert an Entire Workbook to PDF in C#
Converting an entire workbook to a single PDF, with each worksheet represented as a separate page, can offer benefits in terms of comprehensive reporting, streamlined distribution, preserving workbook structure, and improved document management.
To convert a workbook to a single PDF file, you can use the Workbook.SaveToFile() method. Before conversion, you may also need to configure the convert options and page settings.
The following are the steps to convert an entire worksheet to PDF using Spire.XLS.
- Create a Workbook object.
- Load an Excel file using Workbook.LoadFromFile() method.
- Set the convert options through Workbook.ConverterSetting property.
- Iterate through each worksheet in the workbook, and configure the page settings through Worksheet.PageSetup property.
- Convert the workbook to PDF using Workbook.SaveToFile() method.
- C#
using Spire.Xls;

namespace CellRangeToPdf
{
    class Program
    {
        static void Main(string[] args)
        {
            // Create a Workbook object
            Workbook workbook = new Workbook();

            // Load an Excel document
            workbook.LoadFromFile("C:\\Users\\Administrator\\Desktop\\Input.xlsx");

            // Fit each sheet on one page
            workbook.ConverterSetting.SheetFitToPage = true;

            // Fit sheet on one page while retaining paper size
            workbook.ConverterSetting.SheetFitToPageRetainPaperSize = true;

            // Iterate through the worksheets
            for (int i = 0; i < workbook.Worksheets.Count; i++)
            {
                // Get a specific worksheet
                Worksheet sheet = workbook.Worksheets[0];

                // Get the PageSetup object
                PageSetup pageSetup = sheet.PageSetup;

                // Set the page size to A4
                pageSetup.PaperSize = PaperSizeType.PaperA4;
            }

            // Convert the workbook to PDF
            workbook.SaveToFile("WorkbookToPdf.pdf", FileFormat.PDF);

            // Dispose resources
            workbook.Dispose();
        }
    }
}
Apply for a Temporary License
If you'd like to remove the evaluation message from the generated documents, or to get rid of the function limitations, please request a 30-day trial license for yourself.
Superscript and subscript are formatting styles that allow you to display characters or numerals above or below the regular text baseline respectively. By utilizing these formatting styles, you can emphasize certain elements, denote exponents, powers, chemical formulas, or mathematical equations, and present data in a more visually appealing and informative manner. In this article, we will demonstrate how to apply superscript and subscript styles in Excel in C# and VB.NET using Spire.XLS for .NET.
Install Spire.XLS for .NET
To begin with, you need to add the DLL files included in the Spire.XLS for .NET package as references in your .NET project. The DLL files can be either downloaded from this link or installed via NuGet.
PM> Install-Package Spire.XLS
Apply Superscript and Subscript in Excel in C# and VB.NET
To apply the superscript or subscript style to specific characters in a cell, you need to create a custom font, enable the superscript or subscript property of the font, and then assign the custom font to the specific characters within the cell. The detailed steps are as follows:
- Create a Workbook object.
- Get a specific worksheet using Workbook.Worksheets[int index] property.
- Get a specific cell using Worksheet.Range[string name] property and add rich text to the cell using CellRange.RichText.Text property.
- Create a custom font using Workbook.CreateFont() method.
- Enable the subscript property of the font by setting ExcelFont.IsSubscript property to true.
- Assign the custom font to specific characters of the rich text in the cell using CellRange.RichText.SetFont() method.
- Get a specific cell using Worksheet.Range[string name] property and add rich text to the cell using CellRange.RichText.Text property.
- Create a custom font using Workbook.CreateFont() method.
- Enable the superscript property of the font by setting ExcelFont.IsSuperscript property to true.
- Assign the custom font to specific characters of the rich text in the cell using CellRange.RichText.SetFont() method.
- Save the result file using Workbook.SaveToFile() method.
- C#
- VB.NET
using Spire.Xls;
using System.Drawing;

namespace ApplySuperscriptAndSubscript
{
    internal class Program
    {
        static void Main(string[] args)
        {
            //Create a Workbook object
            Workbook workbook = new Workbook();

            //Get the first worksheet
            Worksheet sheet = workbook.Worksheets[0];

            //Add text to specific cells
            sheet.Range["B2"].Text = "This is an example of subscript:";
            sheet.Range["D2"].Text = "This is an example of superscript:";

            //Add rich text to a specific cell
            CellRange range = sheet.Range["B3"];
            range.RichText.Text = "an = Sn - Sn-1";

            //Create a custom font
            ExcelFont font = workbook.CreateFont();
            //Enable the subscript property of the font
            font.IsSubscript = true;
            //Set font color
            font.Color = Color.Green;
            //Assign the font to specific characters of the rich text in the cell
            range.RichText.SetFont(6, 6, font);
            range.RichText.SetFont(11, 13, font);

            //Add rich text to a specific cell
            range = sheet.Range["D3"];
            range.RichText.Text = "a2 + b2 = c2";

            //Create a custom font
            font = workbook.CreateFont();
            //Enable the superscript property of the font
            font.IsSuperscript = true;
            //Assign the font to specific characters of the rich text in the cell
            range.RichText.SetFont(1, 1, font);
            range.RichText.SetFont(6, 6, font);
            range.RichText.SetFont(11, 11, font);

            //Auto-fit column widths
            sheet.AllocatedRange.AutoFitColumns();

            //Save the result file
            workbook.SaveToFile("ApplySubscriptAndSuperscript.xlsx", ExcelVersion.Version2013);
            workbook.Dispose();
        }
    }
}

Apply for a Temporary License
If you'd like to remove the evaluation message from the generated documents, or to get rid of the function limitations, please request a 30-day trial license for yourself.
Textboxes in Microsoft Word are versatile tools that enhance document layout and design. They allow users to position text independently of the main text flow, making it easier to create visually appealing documents. In some cases, you may need to extract text from textboxes for repurposing, or update the text inside a textbox to ensure clarity and relevance.
In this article, you will learn how to extract or update text in a textbox in a Word document using C# with Spire.Doc for .NET.
Install Spire.Doc for .NET
To begin with, you need to add the DLL files included in the Spire.Doc for .NET package as references in your .NET project. The DLL files can be either downloaded from this link or installed via NuGet.
PM> Install-Package Spire.Doc
Extract Text from Textbox in a Word Document
Using Spire.Doc for .NET, you can access a specific text box in a document with the Document.TextBoxes[index] property. Iterate through the text box's child objects to check if each one is a paragraph or a table. For paragraphs, retrieve the text using the Paragraph.Text property. For tables, loop through the cells to extract text from each cell.
The steps to extract text from a textbox in a Word document are as follows:
- Create a Document object.
- Load a Word file using Document.LoadFromFile() method.
- Get a specific textbox using Document.TextBoxes[index] property
- Iterate through the child objects of the textbox.
- Determine if a child object if a paragraph. If yes, get the text from the paragraph using Paragraph.Text property.
- Determine if a child object if a table. If yes, get the text from the table using ExtractTextFromTable() method.
- C#
using Spire.Doc;
using Spire.Doc.Documents;
using Spire.Doc.Fields;

namespace ExtractTextFromTextbox
{
    class Program
    {
        static void Main(string[] args)
        {
            // Create a Document object
            Document document = new Document();

            // Load a Word file
            document.LoadFromFile("C:\\Users\\Administrator\\Desktop\\Input.docx");

            // Get a specific textbox
            TextBox textBox = document.TextBoxes[0];

            // Create a StreamWriter to write extracted text to a txt file
            using (StreamWriter sw = File.CreateText("result.txt"))
            {
                // Iterate though child objects of the textbox
                foreach (DocumentObject objt in textBox.ChildObjects)
                {
                    // Determine if the child object is a paragraph
                    if (objt.DocumentObjectType == DocumentObjectType.Paragraph)
                    {
                        // Write paragraph text to the txt file
                        sw.Write((objt as Paragraph).Text);
                    }

                    // Determine if the child object is a table
                    if (objt.DocumentObjectType == DocumentObjectType.Table)
                    {
                        // Extract text from table to the txt file
                        ExtractTextFromTable(objt as Table, sw);
                    }
                }

            }

        }

        // Extract text from a table
        static void ExtractTextFromTable(Table table, StreamWriter sw)
        {
            for (int i = 0; i < table.Rows.Count; i++)
            {
                TableRow row = table.Rows[i];
                for (int j = 0; j < row.Cells.Count; j++)
                {
                    TableCell cell = row.Cells[j];
                    foreach (Paragraph paragraph in cell.Paragraphs)
                    {
                        sw.Write(paragraph.Text);
                    }
                }
            }
        }
    }
}

Update a Textbox in a Word Document
To update a text box, first clear its existing content using the TextBox.ChildObjects.Clear() method. Then, add a new paragraph and set its text.
The steps to update a textbox in a Word document are as follows:
- Create a Document object.
- Load a Word file using Document.LoadFromFile() method.
- Get a specific textbox using Document.TextBoxes[index] property
- Remove existing content of the textbox using TextBox.ChildObjects.Clear() method.
- Add a paragraph to the textbox using TextBox.Body.AddParagraph() method.
- Add text to the paragraph using Paragraph.AppendText() method.
- Save the document to a different Word file.
- C#
using Spire.Doc;
using Spire.Doc.Documents;
using Spire.Doc.Fields;

namespace UpdateTextbox
{
    class Program
    {
        static void Main(string[] args)
        {
            // Create a Document object
            Document document = new Document();

            // Load a Word file
            document.LoadFromFile("C:\\Users\\Administrator\\Desktop\\Input.docx");

            // Get a specific textbox
            TextBox textBox = document.TextBoxes[0];

            // Remove child objects of the textbox
            textBox.ChildObjects.Clear();

            // Add a new paragraph to the textbox
            Paragraph paragraph = textBox.Body.AddParagraph();

            // Set line spacing
            paragraph.Format.LineSpacing = 15f;

            // Add text to the paragraph
            TextRange textRange = paragraph.AppendText("The text in this textbox has been updated.");

            // Set font size
            textRange.CharacterFormat.FontSize = 15f;

            // Save the document to a different Word file
            document.SaveToFile("UpdateTextbox.docx", FileFormat.Docx2019);

            // Dispose resources
            document.Dispose();
        }

    }

}

Apply for a Temporary License
If you'd like to remove the evaluation message from the generated documents, or to get rid of the function limitations, please request a 30-day trial license for yourself.
You can hide the Excel row or column by using the c# code, but a row or column also becomes hidden when you want to show the full Excel worksheet. You can unhide the Excel row and column by using the c# code. This article aims at introducing the method sheet.ShowRow and sheet.ShowColumn in the Excel .NET component Spire.Xls to show the hidden row and column.
First, let’s preview the hidden row and column.

Here comes to the steps of the process.
Step 1: Create an instance of Spire.XLS.Workbook.
Workbook workbook = new Workbook();
Step 2: Load the existing Excel file that hidden the row and column in the specified path.
workbook.LoadFromFile("hide.xlsx");
Step 3: Get the first worksheet of the Excel file.
Worksheet sheet = workbook.Worksheets[0];
Step 4: Unhide the hidden row and column.
sheet.ShowRow(7);
sheet.ShowColumn(3);
Step 5: Generate the new Excel file.
workbook.SaveToFile("result.xlsx", ExcelVersion.Version2010);
Now let's preview the effect screenshot.

Here is the full code.
using Spire.Xls;
namespace UnhideExcelRow
{
    class Program
    {

      static void Main(string[] args)
        {
            Workbook workbook = new Workbook();
            workbook.LoadFromFile("hide.xlsx");
            Worksheet sheet = workbook.Worksheets[0];
            // unhide the hidden row and column of the worksheet.
            sheet.ShowRow(7);
            sheet.ShowColumn(3);
            workbook.SaveToFile("result.xlsx", ExcelVersion.Version2010);
        }


        }
    }
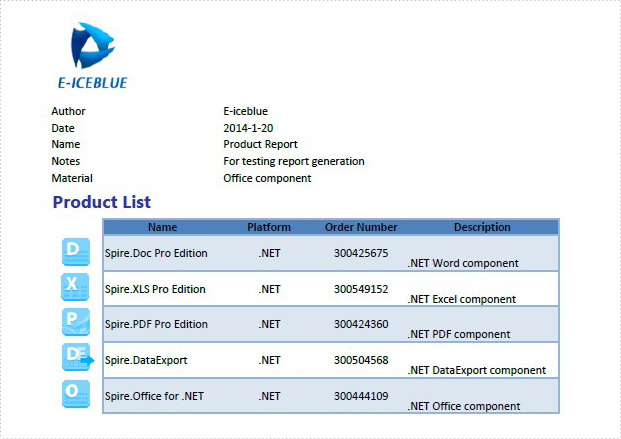
Excel header and footer gives additional information of a spreadsheet. And it can be in text and image. We have already shows you the text header and footer in excel worksheet, this guide focuses on introducing how to insert image header and footer for Excel files in C# by using Spire.XLS for .NET.
Firstly, Download Spire.XLS for .NET (or Spire.Office for .NET) and install it on your system. The Spire.XLS installation is clean, professional and wrapped up in a MSI installer.
Then, adds Spire.XLS.dll as reference in the downloaded Bin folder thought the below path: "..\Spire.XLS\Bin\NET4.0\ Spire.XLS.dll".
Now it comes to the details of how to add image header and footer in C#:
Step 1: Create a new excel document and load from the file.
Workbook workbook = new Workbook();
workbook.LoadFromFile(@"..\..\XLS1.xlsx");
Step 2: Get a first worksheet.
Worksheet sheet = workbook.Worksheets[0];
Step 3: Load the image and set header and footer style.
Image image = Image.FromFile(@"..\..\logo.png");

//Set Header format
sheet.PageSetup.LeftHeaderImage = image;
sheet.PageSetup.LeftHeader = "&G";

//Set Footer format
sheet.PageSetup.CenterFooterImage = image;
sheet.PageSetup.CenterFooter = "&G";
Step 4: Save the document to file.
workbook.SaveToFile(@"..\..\result.xlsx", ExcelVersion.Version2010);
Effected screenshot:
The full codes:
using Spire.Xls;
using System.Drawing;
namespace AddImageHeaderandFooter
{
    class Program
    {
        static void Main(string[] args)
        {
            Workbook workbook = new Workbook();
            workbook.LoadFromFile(@"..\..\XLS1.xlsx");
            Worksheet sheet = workbook.Worksheets[0];
            Image image = Image.FromFile(@"..\..\logo.png");

            sheet.PageSetup.LeftHeaderImage = image;
            sheet.PageSetup.LeftHeader = "&G";

            sheet.PageSetup.CenterFooterImage = image;
            sheet.PageSetup.CenterFooter = "&G";

            workbook.SaveToFile(@"..\..\result.xlsx", ExcelVersion.Version2010);
        }
    }
}
