목차
핍으로 설치
pip install Spire.Doc
관련된 링크들
템플릿은 미리 만들어진 구조와 레이아웃을 제공하므로 처음부터 문서를 만드는 데 드는 시간과 노력을 절약할 수 있습니다. 문서 레이아웃, 서식 스타일, 섹션 구성을 디자인하는 대신 요구 사항에 맞는 템플릿을 선택하고 콘텐츠를 추가하기만 하면 됩니다. 이는 일관된 모양과 느낌으로 여러 문서를 만들어야 할 때 특히 유용합니다. 이번 블로그에서는 Python을 사용하여 템플릿에서 Word 문서 만들기.
템플릿에서 Word 문서를 생성하는 세 가지 접근 방식에 대해 설명합니다.
- Python에서 자리 표시자 텍스트를 대체하여 템플릿에서 Word 문서 만들기
- Python에서 책갈피를 교체하여 템플릿에서 Word 문서 만들기
- Python에서 메일 병합을 수행하여 템플릿에서 Word 문서 만들기
템플릿에서 Word 문서를 생성하는 Python 라이브러리
먼저 템플릿에서 Word 문서 생성을 지원하는 필수 Python 모듈을 설치해야 합니다. 이번 블로그 포스팅에서는 Spire.Doc for Python 도서관.
Spire.Doc for Python Python 애플리케이션 내에서 Word 파일을 생성, 읽기, 편집 및 변환하기 위한 포괄적인 기능 세트를 제공합니다. Doc, Docx, Docm, Dot, Dotx, Dotm 등을 포함한 다양한 Word 형식을 완벽하게 지원합니다. 또한 Word 문서를 Word에서 PDF로, Word에서 RTF로,, Word에서 HTML로, Word에서 텍스트로, Word에서 이미지 로와 같은 다양한 형식으로 고품질 변환할 수 있습니다..
Spire.Doc for Python를 설치하려면 다음 pip 명령을 실행할 수 있습니다.
pip install Spire.Doc
자세한 설치 지침은 다음 설명서를 참조하세요. VS Code에서 Spire.Doc for Python를 설치하는 방법.
Python에서 자리 표시자 텍스트를 대체하여 템플릿에서 Word 문서 만들기
"자리표시자 텍스트"는 원하는 내용으로 쉽게 대체할 수 있는 임시 텍스트를 의미합니다. 자리 표시자 텍스트를 바꿔 템플릿에서 Word 문서를 만들려면 미리 정의된 자리 표시자 텍스트가 포함된 템플릿을 준비해야 합니다. 이 템플릿은 Microsoft Word 응용 프로그램을 사용하여 수동으로 만들거나 프로그래밍 방식으로 생성됨 Spire.Doc for Python 사용합니다.
Spire.Doc for Python 사용하여 자리 표시자 텍스트를 대체하여 템플릿에서 Word 문서를 만드는 단계는 다음과 같습니다.
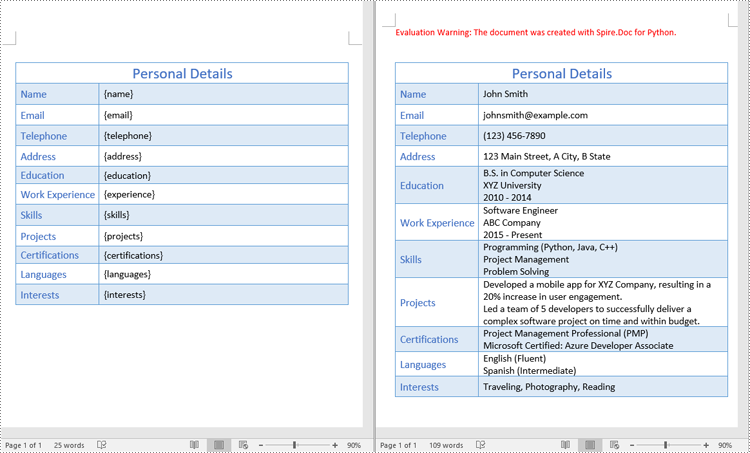
- Document 인스턴스를 생성한 다음 Document.LoadFromFile() 메서드를 사용하여 Word 템플릿을 로드합니다.
- 문서에서 바꾸기를 수행하기 위해 자리 표시자 텍스트를 해당 대체 텍스트에 매핑하는 사전을 정의합니다.
- 사전을 반복합니다.
- Document.Replace() 메서드를 사용하여 문서의 자리 표시자 텍스트를 해당 대체 텍스트로 바꿉니다.
- Document.SaveToFile() 메서드를 사용하여 결과 문서를 저장합니다.
다음은 Spire.Doc for Python을 사용하여 자리 표시자 텍스트를 바꿔 템플릿에서 Word 문서를 만드는 코드 예제입니다.
- Python
from spire.doc import *
from spire.doc.common import *

# Specify the input and output file paths
inputFile = "Placeholder_Template.docx"
outputFile = "CreateDocumentByReplacingPlaceholderText.docx"

# Create a Document object
document = Document()
# Load a Word template with placeholder text
document.LoadFromFile(inputFile)

# Create a dictionary to store the placeholder text and its corresponding replacement text
# Each key represents a placeholder, while the corresponding value represents the replacement text
text_replacements = {
    "{name}": "John Smith",
    "{email}": "[email protected]",
    "{telephone}": "(123) 456-7890",
    "{address}": "123 Main Street, A City, B State",
    "{education}": "B.S. in Computer Science \nXYZ University \n2010 - 2014",
    "{experience}": "Software Engineer \nABC Company \n2015 - Present",
    "{skills}": "Programming (Python, Java, C++) \nProject Management \nProblem Solving",
    "{projects}": "Developed a mobile app for XYZ Company, resulting in a 20% increase in user engagement. \nLed a team of 5 developers to successfully deliver a complex software project on time and within budget.",
    "{certifications}": "Project Management Professional (PMP) \nMicrosoft Certified: Azure Developer Associate",
    "{languages}": "English (Fluent) \nSpanish (Intermediate)",
    "{interests}": "Traveling, Photography, Reading"
}

# Loop through the dictionary
for placeholder_text, replacement_text in text_replacements.items():
    # Replace the placeholder text in the document with the replacement text
    document.Replace(placeholder_text, replacement_text, False, False)

# Save the resulting document
document.SaveToFile(outputFile, FileFormat.Docx2016)
document.Close()

팁: 이 예에서는 Word 템플릿의 자리 표시자 텍스트를 새 텍스트로 바꾸는 방법을 설명했습니다. Python용 Spire.Doc은 텍스트를 이미지로 바꾸기, 텍스트를 테이블로 바꾸기, 정규식을 사용하여 텍스트 바꾸기 등 다양한 시나리오에서 텍스트 바꾸기를 지원한다는 점은 주목할 가치가 있습니다. 이 문서에서 자세한 내용을 확인할 수 있습니다. Python: Word에서 텍스트 찾기 및 바꾸기.
Python에서 책갈피를 교체하여 템플릿에서 Word 문서 만들기
Word 문서의 책갈피는 문서 내의 특정 위치에 콘텐츠를 정확하게 삽입하거나 바꿀 수 있는 참조 지점 역할을 합니다. 책갈피를 교체하여 템플릿에서 Word 문서를 만들려면 미리 정의된 책갈피가 포함된 템플릿을 준비해야 합니다. 이 템플릿은 Microsoft Word 응용 프로그램을 사용하여 수동으로 만들거나 프로그래밍 방식으로 생성됨 Spire.Doc for Python 사용합니다.
Spire.Doc for Python을 사용하여 책갈피를 교체하여 템플릿에서 Word 문서를 만드는 단계는 다음과 같습니다.
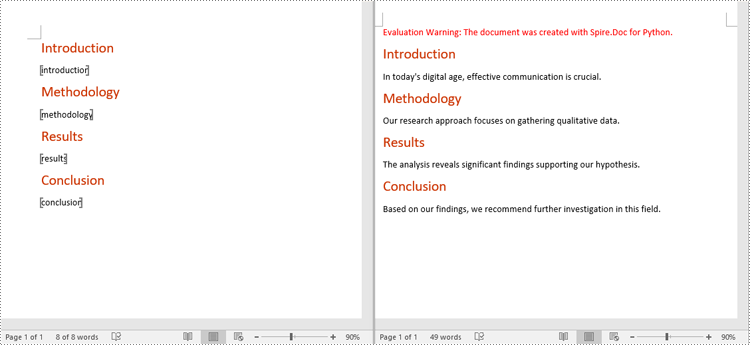
- Document 인스턴스를 만들고 Document.LoadFromFile() 메서드를 사용하여 Word 문서를 로드합니다.
- 문서에서 바꾸기를 수행하기 위해 책갈피 이름을 해당 대체 텍스트에 매핑하는 사전을 정의합니다.
- 사전을 반복합니다.
- BookmarksNavigator 인스턴스를 생성하고 BookmarkNavigator.MoveToBookmark() 메서드를 사용하여 이름으로 특정 책갈피를 탐색합니다.
- BookmarkNavigator.ReplaceBookmarkContent() 메서드를 사용하여 북마크 내용을 해당 대체 텍스트로 바꿉니다.
- Document.SaveToFile() 메서드를 사용하여 결과 문서를 저장합니다.
다음은 Spire.Doc for Python을 사용하여 책갈피를 바꿔 템플릿에서 Word 문서를 만드는 코드 예제입니다.
- Python
from spire.doc import *
from spire.doc.common import *

# Create a Document object
document = Document()
# Load a Word template with bookmarks
document.LoadFromFile("Template_Bookmark.docx")

# Create a dictionary to store the bookmark names and their corresponding replacement text
# Each key represents a bookmark name, while the corresponding value represents the replacement text
bookmark_replacements = {
    "introduction": "In today's digital age, effective communication is crucial.",
    "methodology": "Our research approach focuses on gathering qualitative data.",
    "results": "The analysis reveals significant findings supporting our hypothesis.",
    "conclusion": "Based on our findings, we recommend further investigation in this field."
}

# Loop through the dictionary
for bookmark_name, replacement_text in bookmark_replacements.items():
    # Replace the content of the bookmarks in the document with the corresponding replacement text
    bookmarkNavigator = BookmarksNavigator(document)
    bookmarkNavigator.MoveToBookmark(bookmark_name)
    bookmarkNavigator.ReplaceBookmarkContent(replacement_text, True)
    # Remove the bookmarks from the document
    document.Bookmarks.Remove(bookmarkNavigator.CurrentBookmark)

# Save the resulting document
document.SaveToFile("CreateDocumentByReplacingBookmark.docx", FileFormat.Docx2016)
document.Close()

Python에서 메일 병합을 수행하여 템플릿에서 Word 문서 만들기
편지 병합은 템플릿을 데이터 소스와 병합하여 템플릿에서 사용자 정의 문서를 만들 수 있는 Microsoft Word의 강력한 기능입니다. 메일 병합을 수행하여 템플릿에서 Word 문서를 만들려면 미리 정의된 병합 필드가 포함된 템플릿을 준비해야 합니다. 이 템플릿은 Microsoft Word 애플리케이션을 사용하여 수동으로 생성하거나 다음 코드를 사용하여 Spire.Doc for Python로 프로그래밍 방식으로 생성할 수 있습니다.
- Python
from spire.doc import *
from spire.doc.common import *

# Create a Document object
document = Document()
# Add a section
section = document.AddSection()
# Set page margins
section.PageSetup.Margins.All = 72.0

# Add a paragraph
paragraph = section.AddParagraph()
# Add text to the paragraph
paragraph.AppendText("Customer Name: ")

# Add a paragraph
paragraph = section.AddParagraph()
# Add a merge field to the paragraph
paragraph.AppendField("Recipient Name", FieldType.FieldMergeField)

# Save the resulting document
document.SaveToFile("Template.docx", FileFormat.Docx2013)
document.Close()
Spire.Doc for Python을 사용하여 메일 병합을 수행하여 템플릿에서 Word 문서를 만드는 단계는 다음과 같습니다.
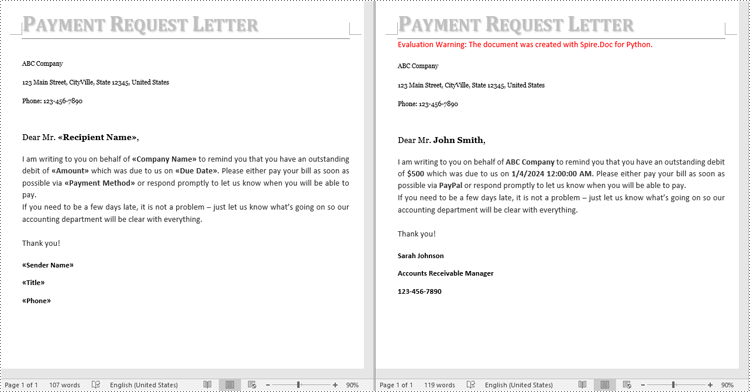
- Document 인스턴스를 생성한 다음 Document.LoadFromFile() 메서드를 사용하여 Word 템플릿을 로드합니다.
- 병합 필드 이름 목록을 정의합니다.
- 병합 필드 값 목록을 정의합니다.
- Document.MailMerge.Execute() 메서드를 사용하여 지정된 필드 이름과 필드 값을 사용하여 메일 병합을 수행합니다.
- Document.SaveToFile() 메서드를 사용하여 결과 문서를 저장합니다.
다음은 Spire.Doc for Python을 사용하여 메일 병합을 수행하여 템플릿에서 Word 문서를 만드는 코드 예제입니다.
- Python
from spire.doc import *
from spire.doc.common import *

# Create a Document object
document = Document()
# Load a Word template with merge fields
document.LoadFromFile("Template_MergeFields.docx")

# Define a list of field names
filedNames = ["Recipient Name", "Company Name", "Amount", "Due Date", "Payment Method", "Sender Name", "Title", "Phone"]

# Define a list of field values
filedValues = ["John Smith",  "ABC Company", "$500", DateTime.get_Now().Date.ToString(), "PayPal", "Sarah Johnson", "Accounts Receivable Manager", "123-456-7890"]

# Perform a mail merge operation using the specified field names and field values
document.MailMerge.Execute(filedNames, filedValues)

# Save the resulting document
document.SaveToFile("CreateDocumentByMailMerge.docx", FileFormat.Docx2016)
document.Close()

무료 라이센스 받기
평가 제한 없이 Spire.Doc for Python의 기능을 완전히 경험하려면 다음을 요청할 수 있습니다 30일 무료 평가판 라이센스.
결론
이 블로그에서는 Python 및 Spire.Doc for Python를 사용하여 3가지 방법으로 템플릿에서 Word 문서를 만드는 방법을 보여주었습니다. Word 문서를 생성하는 것 외에도 Spire.Doc for Python은 Word 문서를 조작하기 위한 다양한 기능을 제공합니다 선적 서류 비치 자세한 내용은. 질문이 있으시면 언제든지 저희 사이트에 게시해 주시기 바랍니다 법정 또는 다음을 통해 지원팀에 보내세요 이메일.

