
Program Guide for WPF (28)
Excel comments in individual cells are extra information that explain more about the data in these cells. The information can be notes for readers, reminders for yourself, and cross-references to other reports. In this article, I am going to introduce how to add and format Excel comments using Spire.XLS for WPF.
Before start, please download Spire.XLS Pack and add the Spire.XLS.Wpf.dll and Spire.License.dll from Bin folder to reference of your WPF project.
Code Snippets:
Step 1: Initialize a new Workbook, get the first worksheet from workbook.
Workbook wb = new Workbook();
Worksheet sheet = wb.Worksheets[0];
Step 2: Create a font style that will be used to format comment.
ExcelFont font = wb.CreateFont();
font.FontName = "Calibri";
font.Color = Color.Blue;
font.Size = 10;
font.IsBold = true;
Step 3: Add a comment to C4 and set the size of comment box, set the text and set font for specified range of characters.
ExcelComment comment = sheet.Range["C4"].Comment;
comment.Height = 80;
comment.Width = 200;
comment.RichText.Text = "This comment is made by Spire.XLS for WPF.";
comment.RichText.SetFont(23, 40, font);
Step 4: Save and launch the file.
wb.SaveToFile("result.xlsx", ExcelVersion.Version2013);
System.Diagnostics.Process.Start("result.xlsx");
Output:

Full Code:
using Spire.Xls;
using System.Drawing;
using System.Windows;

namespace WpfApplication1
{
    public partial class MainWindow : Window
    {
        public MainWindow()
        {
            InitializeComponent();
        }
        private void button1_Click(object sender, RoutedEventArgs e)
        {
            Workbook wb = new Workbook();
            Worksheet sheet = wb.Worksheets[0];

            ExcelFont font = wb.CreateFont();
            font.FontName = "Calibri";
            font.Color = Color.Blue;
            font.Size = 10;
            font.IsBold = true;

            ExcelComment comment = sheet.Range["C4"].Comment;
            comment.Height = 80;
            comment.Width = 200;
            comment.RichText.Text = "This comment is made by Spire.XLS for WPF.";
            comment.RichText.SetFont(23, 40, font);

            wb.SaveToFile("result.xlsx", ExcelVersion.Version2013);
            System.Diagnostics.Process.Start("result.xlsx");

        }
    }
}
Imports Spire.Xls
Imports System.Drawing
Imports System.Windows

Namespace WpfApplication1
	Public Partial Class MainWindow
		Inherits Window
		Public Sub New()
			InitializeComponent()
		End Sub
		Private Sub button1_Click(sender As Object, e As RoutedEventArgs)
			Dim wb As New Workbook()
			Dim sheet As Worksheet = wb.Worksheets(0)

			Dim font As ExcelFont = wb.CreateFont()
			font.FontName = "Calibri"
			font.Color = Color.Blue
			font.Size = 10
			font.IsBold = True

			Dim comment As ExcelComment = sheet.Range("C4").Comment
			comment.Height = 80
			comment.Width = 200
			comment.RichText.Text = "This comment is made by Spire.XLS for WPF."
			comment.RichText.SetFont(23, 40, font)

			wb.SaveToFile("result.xlsx", ExcelVersion.Version2013)
			System.Diagnostics.Process.Start("result.xlsx")

		End Sub
	End Class
End Namespace
Sometimes, hide row and column can make the data processing job easier and more efficient when working with a large excel file. However, hidden rows and columns are always hidden and invisible, for this reason, you need to unhide them before showing the whole excel file.
Spire.XLS for WPF provides developers four methods: HideRow(), HideColumn(), ShowRow() and ShowColumn() to hide or unhide excel row and column in WPF.
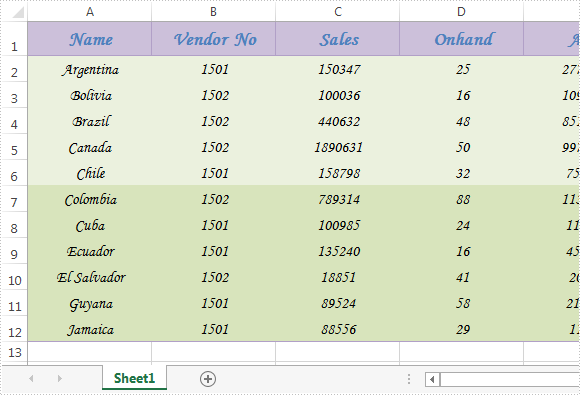
Please check the screenshot of the original excel worksheet:
Before using the code, make sure that Spire.XLS is installed on system correctly, next create a WPF application project and add the dll file from the installation folder as reference, after that use following namespace:
using System.Windows;
using Spire.Xls;
Code snippets:
Step 1: Initialize a new instance of Workbook class and load the original excel file.
Workbook workbook = new Workbook();
workbook.LoadFromFile("Excel.xlsx");
Step 2: Get the first worksheet of the file.
Worksheet sheet = workbook.Worksheets[0];
Step 3: Hide or unhide row and column.
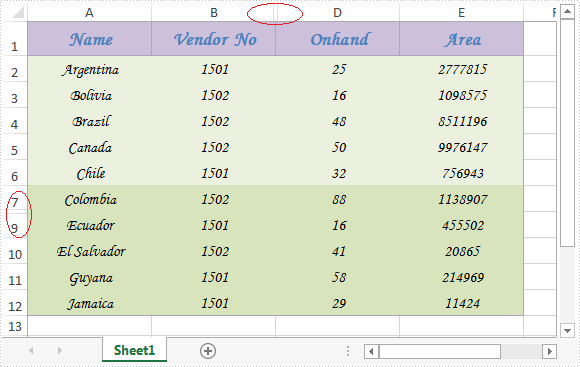
Hide the 8th row and the 3rd column:
sheet.HideRow(8);
sheet.HideColumn(3);
Unhide:
sheet.ShowRow(8);
sheet.ShowColumn(3);
Step 4: Save and launch the file.
Effective screenshot after hiding:
Full codes:
using Spire.Xls;
using System.Windows;

namespace WpfApplication1
{
    public partial class MainWindow : Window
    {
        public MainWindow()
        {
            InitializeComponent();
        }
        private void button1_Click(object sender, RoutedEventArgs e)
        {
            //initialize a new instance
            Workbook workbook = new Workbook();
            //load the sample excel file
            workbook.LoadFromFile("Excel.xlsx");
            //get its first worksheet
            Worksheet sheet = workbook.Worksheets[0];

            //hide the 8th row and the 3rd column of the first worksheet
            sheet.HideRow(8);
            sheet.HideColumn(3);
            /*//unhide
            sheet.ShowRow(8);
            sheet.ShowColumn(3);*/

            //save and launch the file
            workbook.SaveToFile("Sample.xlsx", ExcelVersion.Version2010);
            System.Diagnostics.Process.Start(workbook.FileName);
        }

    }
}
Create, Write and Save Excel File in WPF with C#, VB.NET
2016-01-29 08:39:34 Written by support iceblueCreating, Writing and Saving Excel file are basic tasks in our daily life. This guide will demonstrate how to create an Excel file, insert some data and save the file with specified file format using Spire.XLS for WPF.
Apart from creating Excel from scratch, Spire.XLS also supports to load an existing Excel file, modify the data and do a large range of manipulations in Excel.
Code Snippets:
Step 1: Initialize a new instance of Workbook class. By default, three blank worksheets will be added into the workbook accordingly.
Workbook workbook = new Workbook();
Step 2: Get the first worksheet from workbook and rename the sheet as "Test”.
Worksheet sheet = workbook.Worksheets[0];
sheet.Name = "Test";
Step 3: Insert some text value and number value into the specified cells.
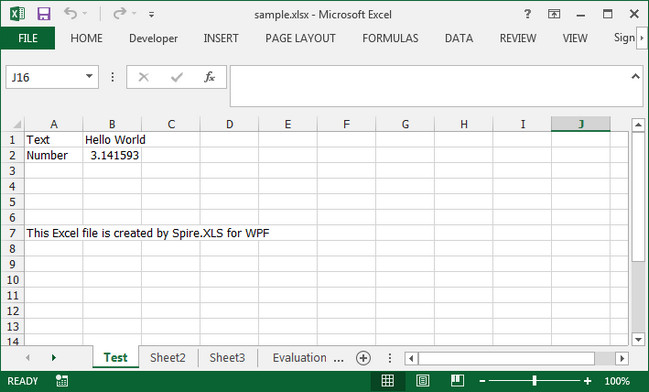
sheet.Range["A1"].Text = "Text";
sheet.Range["A2"].Text = "Number";
sheet.Range["B1"].Text = "Hello World";
sheet.Range["B2"].NumberValue = 3.1415926;
sheet.Range["A7"].Text = "This Excel file is created by Spire.XLS for WPF";
Step 4: Save the file in the format of Excel 2013.
workbook.SaveToFile("sample.xlsx",ExcelVersion.Version2013);
Output:
Full Code:
using Spire.Xls;
using System.Windows;

namespace WpfApplication1
{
    public partial class MainWindow : Window
    {
        public MainWindow()
        {
            InitializeComponent();
        }
        private void button1_Click(object sender, RoutedEventArgs e)
        {
            Workbook workbook = new Workbook();
            Worksheet sheet = workbook.Worksheets[0];
            sheet.Name = "Test";

            sheet.Range["A1"].Text = "Text";
            sheet.Range["A2"].Text = "Number";
            sheet.Range["B1"].Text = "Hello World";
            sheet.Range["B2"].NumberValue = 3.1415926;
            sheet.Range["A7"].Text = "This Excel file is created by Spire.XLS for WPF";

            workbook.SaveToFile("sample.xlsx", ExcelVersion.Version2013);
            System.Diagnostics.Process.Start("sample.xlsx");

        }
    }
}
Imports Spire.Xls
Imports System.Windows

Namespace WpfApplication1
	Public Partial Class MainWindow
		Inherits Window
		Public Sub New()
			InitializeComponent()
		End Sub
		Private Sub button1_Click(sender As Object, e As RoutedEventArgs)
			Dim workbook As New Workbook()
			Dim sheet As Worksheet = workbook.Worksheets(0)
			sheet.Name = "Test"

			sheet.Range("A1").Text = "Text"
			sheet.Range("A2").Text = "Number"
			sheet.Range("B1").Text = "Hello World"
			sheet.Range("B2").NumberValue = 3.1415926
			sheet.Range("A7").Text = "This Excel file is created by Spire.XLS for WPF"

			workbook.SaveToFile("sample.xlsx", ExcelVersion.Version2013)
			System.Diagnostics.Process.Start("sample.xlsx")

		End Sub
	End Class
End Namespace
How to Save Excel chart as Image for WPF applications
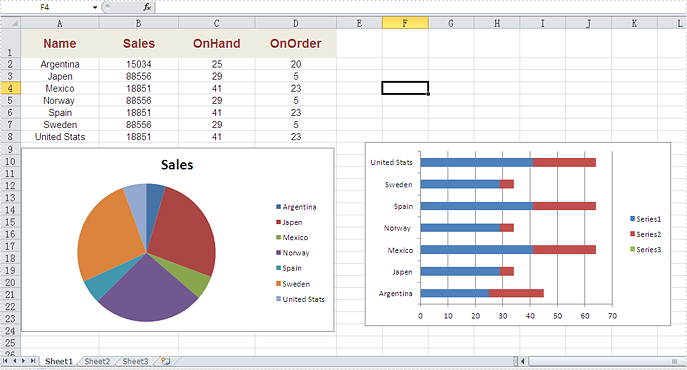
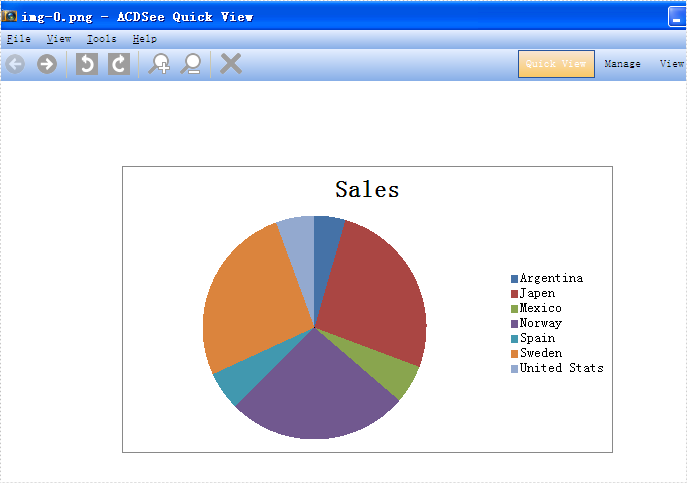
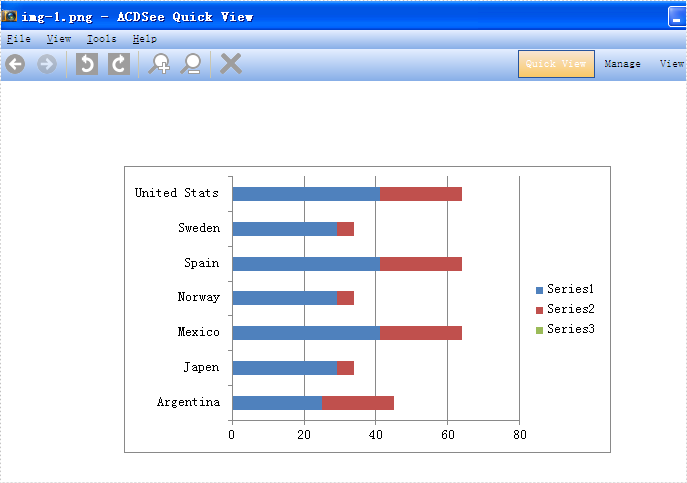
2016-01-27 08:43:53 Written by support iceblueWith the help of Spire.XLS for WPF, developers can easily save the whole Excel Worksheet to Image for their WPF applications. Sometimes we don’t want to share the whole Excel file with data to others and only want to show some charts on the Excel. Spire.XLS for WPF offers a method of workbook.SaveChartAsImage(); to enable us to save the Excel chart to image easily. In the following section, we will demonstrate how to save the Excel chart as image in .png for example for WPF applications.
Firstly, please view the whole Excel worksheet with data and two charts, a pie chart and a bar chart:
Note: Before Start, please download the latest version of Spire.XLS and add Spire.Xls.Wpf.dll in the bin folder as the reference of Visual Studio.
Here comes to the code snippets of how to save excel chart as image:
Step 1: Create a new Excel workbook and load from file.
Workbook workbook = new Workbook();
workbook.LoadFromFile("Sample.xlsx", ExcelVersion.Version2010);
Step 2: Get the first worksheet from workbook.
Worksheet sheet = workbook.Worksheets[0];
Step 3: Save all the charts in the first worksheet as images.
System.Drawing.Image[] imgs = workbook.SaveChartAsImage(sheet);

for (int i = 0; i < imgs.Length; i++)
{

    imgs[i].Save(string.Format("img-{0}.png", i), ImageFormat.Png);

}
Effective screenshots:
Full codes:
using Spire.Xls;
using System.Drawing.Imaging;
using System.Windows;

namespace WpfApplication1
{
    public partial class MainWindow : Window
    {
        public MainWindow()
        {
            InitializeComponent();
        }
        private void button2_Click(object sender, RoutedEventArgs e)
        {
            Workbook workbook = new Workbook();
            workbook.LoadFromFile("Sample.xlsx", ExcelVersion.Version2010);

            Worksheet sheet = workbook.Worksheets[0];
            System.Drawing.Image[] imgs = workbook.SaveChartAsImage(sheet);

            for (int i = 0; i < imgs.Length; i++)
            {

                imgs[i].Save(string.Format("img-{0}.png", i), ImageFormat.Png);

            }
        }
    }
}
Spire.XLS is a versatile Excel library that is designed for software developers to perform a wide range of Excel processing tasks on .NET, Silverlight and WPF Platform. As a combination of APIs and GUI controls, Spire.XLS does not need to install MS Excel or any third party libraries and supports to apply Excel on the formats of either Excel .xls 97-2003 or Excel .xlsx 2007, 2010 and 2013.
This API gives developers powerful tools for performing simple tasks as well as more complex tasks. Basic operation tasks such as create, save, protect and merge Excel files, add/delete/hide worksheets, edit spreadsheet cell data, generate charts can be all realized with high efficiency.
Document Operation |
|
Header and Footer |
|
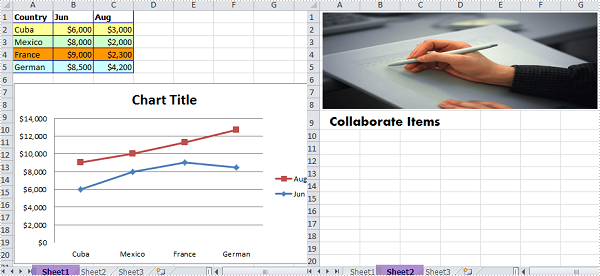
Since Excel spreadsheets or diagrams are difficult to distribute, it is reasonable that we frequently convert our Excel files to a web-friendly format, such as image. Plus, if we convert Excel to image, the data cannot be formatted and modified directly. In this article, I’ll introduce how to save each worksheet in an Excel file as an image to local folder in WPF using Spire.XLS for WPF.
The sample file for test contains three worksheets, sheet 1 and sheet 2 have some contents in them. What we need is to convert each worksheet that contains contents to image respectively.
Detailed Steps:
Step 1: Create a new project by choosing WPF Application in Visual Studio, add a button in MainWindow, double click the button to write code.
Step 2: Create a new instance of Spire.Xls.Workbook class and load the sample Excel file.
Workbook workbook = new Workbook();
workbook.LoadFromFile("sample.xlsx", ExcelVersion.Version2010);
Step 3: Use for sentence to traverse each worksheet in the Excel. Call Worksheet.SaveToImage() to save worksheet as image, set image format as png.
for (int i = 0; i < workbook.Worksheets.Count; i++)
{
    workbook.Worksheets[i].SaveToImage(string.Format("result-{0}.png", i));
}
Result:
Image 1
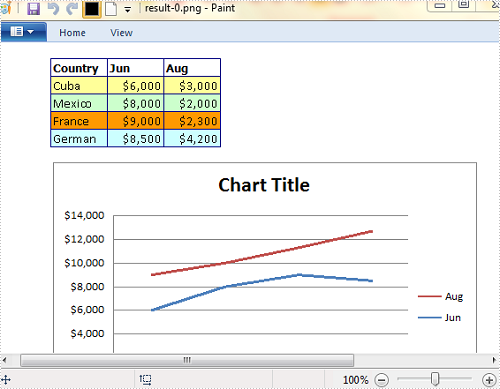
Image 2

Full Code:
using Spire.Xls;

namespace WpfApplication
{
    ///
    /// Interaction logic for MainWindow.xaml
    ///
    public partial class MainWindow : Window
    {
        public MainWindow()
        {
            InitializeComponent();
        }

        private void button1_Click(object sender, RoutedEventArgs e)
        {
            Workbook workbook = new Workbook();
            workbook.LoadFromFile("sample.xlsx", ExcelVersion.Version2010);
            for (int i = 0; i < workbook.Worksheets.Count; i++)
            {
                workbook.Worksheets[i].SaveToImage(string.Format("result-{0}.png", i));
            }
        }
    }
}
In this section, I will introduce a solution to export Excel to datatable through a datagridview via this WPF Excel component Spire.XLS for WPF. Using it, we can quickly export any Excel sheet to datatable. First let us see below picture:

When we export Excel to datatable, first we need to initialize a new instance of the class Spire.Xls.Workbook, here it is named “workbook”, then, after loading our Excel file from system by this method: Spire.Xls.Workbook.LoadFromFile(string fileName, ExcelVersion version); we need to decide which sheet will be exported to datatable. When using Spire.XLS for WPF, we do not need to install MS Excel, so suppose we do not know how many sheets in our Excel file, we can use this class System.Random provided by Microsoft to get the page count and export any sheet to datatable by calling the method: Spire.Xls.Worksheet.ExportDataTable(). After export data to datatable, with the help of the two properties of the class System.Data.Dataview:System.Data.Dataview.AutoGenerateColumns and System.Data.Dataview.ItemsSource. The datatable columns will be automatically created and all the data in datatable will be shown in datagrid.
Here we can download Spire.XLS for WPF and install it on system. After adding Spire.Xls dll on system, we can start our task of excel to datatable by below code:
using System.Data;
using Spire.Xls;

namespace wpfexceltodatatable
{
    public partial class MainWindow : Window
    {
        public MainWindow()
        {
            InitializeComponent();
        }
        private void button1_Click(object sender, RoutedEventArgs e)
        {
          //load an excel file
            Workbook workbook = new Workbook();
            workbook.LoadFromFile(@"..\excel.xls", ExcelVersion.Version97to2003);
            //get the count of excel worksheet
            int sheetCount = workbook.Worksheets.Count;
            Random r = new Random();
            int index = r.Next(0, sheetCount);
           //show datatable in datagrid
            Worksheet sheet = workbook.Worksheets[index];
            DataTable dataTable = sheet.ExportDataTable();
            DataView view = new DataView(dataTable);
            this.dataGrid1.ItemsSource = view;
            this.dataGrid1.AutoGenerateColumns = true;
        }
    }
}
Imports System.Data
Imports Spire.Xls

Namespace wpfexceltodatatable
	Public Partial Class MainWindow
		Inherits Window
		Public Sub New()
			InitializeComponent()
		End Sub
		Private Sub button1_Click(sender As Object, e As RoutedEventArgs)
			'load an excel file
			Dim workbook As New Workbook()
			workbook.LoadFromFile("..\excel.xls", ExcelVersion.Version97to2003)
			'get the count of excel worksheet
			Dim sheetCount As Integer = workbook.Worksheets.Count
			Dim r As New Random()
			Dim index As Integer = r.[Next](0, sheetCount)
			'show datatable in datagrid
			Dim sheet As Worksheet = workbook.Worksheets(index)
			Dim dataTable As DataTable = sheet.ExportDataTable()
			Dim view As New DataView(dataTable)
			Me.dataGrid1.ItemsSource = view
			Me.dataGrid1.AutoGenerateColumns = True
		End Sub
	End Class
End Namespace
Excel Background Image, one kind of page layout setting, is used to beautify files. Actually, with a beautiful background image, the Excel file will be more attractive to readers. Also, different from inserting image in Excel directly, background image will not cover data information. It means that all the data in Excel can be displayed even though background image is inserted.
Spire.XLS for WPF, a professional component to operate Excel files in WPF applications, enables users to insert background image in Excel. This guide will focus on how to realize this function by using C#, VB.NET.
Assign value for BackgroundImage property of PageSetup in Worksheet class to insert background image. Because the type of BackgroundImage is Bitmap, so the assigned value must be bitmap image. The following screenshot shows result after inserting background image.

Download and install Spire.XLS for WPF. Then add a button in MainWindow. Double click the button to use the following code to insert background image in Excel.
         Bitmap bm = new Bitmap(Image.FromFile(@"E:\Work\Documents\SampleImage\Flower.jpg"));
            sheet.PageSetup.BackgoundImage = bm;
         Dim bm As New Bitmap(Image.FromFile("E:\Work\Documents\SampleImage\Flower.jpg"))
        sheet.PageSetup.BackgoundImage = bm
Spire.XLS allows user to operate Excel document directly such as save to stream, save as web response, copy, lock/unlock worksheet, set up workbook properties, etc. As a professional WPF/.NET/Silverlight Excel component, it owns the ability of inserting content into Excel document, formatting cells and converting Excel documents to popular office file formats. Spire.XLS for WPF supports Excel 97-2003, Excel 2007 and Excel 2010.
Software developers are often asked to find a way to convert Microsoft Excel into PDF as PDF files are widely used for exchanging documents between organizations, government sectors and individuals. This solution demonstrates a way of converting Excel to PDF for WPF developers and maintains high visual fidelity in the conversion.
Spire.XLS for WPF is a WPF Excel component which enables your WPF applications to fast generate, read, write and modify Excel document without Microsoft Office Excel Automation. It also fully supports converting files from Excel to PDF, Excel to HTML, Excel to CSV, Excel to Text, Excel to Image and Excel to XML. All the conversion is independent of any other software.
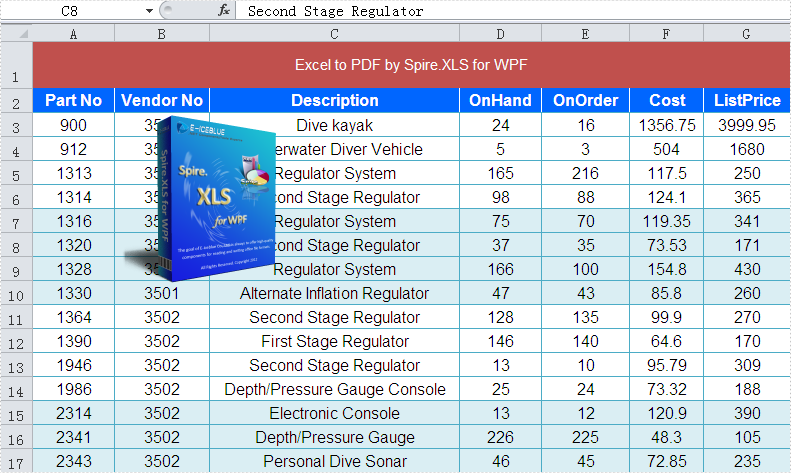
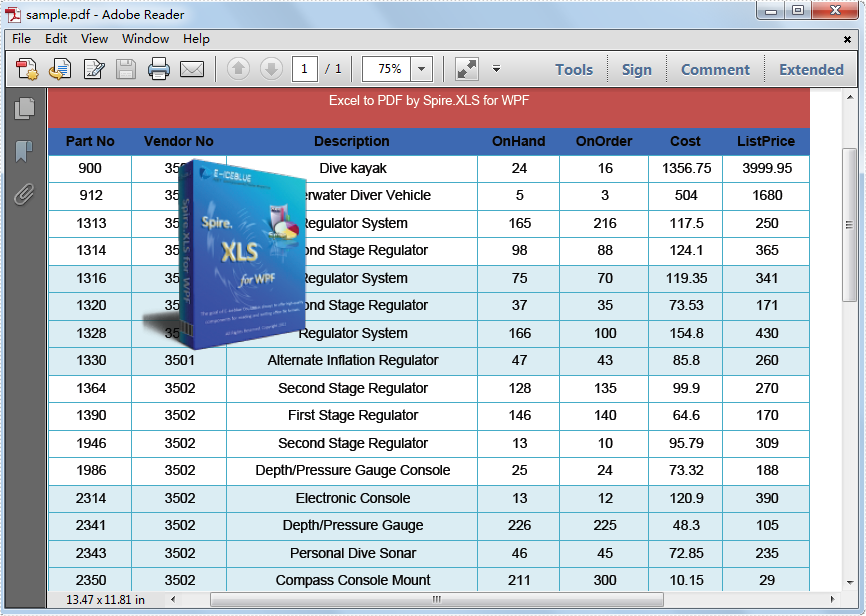
Any kind of trial and evaluation is always welcomed. Please feel free to download Spire.XLS for WPF to have a trial and convert your Excel to PDF for personal use. Below is a screenshot of the source Excel file we load in this demo. At the end, a screenshot of PDF will be demonstrated for comparison with the source Excel file.
Now this is the key procedure for converting Excel to PDF in WPF.
Step 1: Load Excel file or Create Excel from scratch.
In this step, instantiate an object of the Workbook class by calling its empty constructor and then you may open/load an existing template file or skip this step if you are creating the workbook from scratch.
// load Excel file
Workbook workbook = new Workbook();
workbook.LoadFromFile("D:\\test.xlsx");
[VB.NET]
' load Excel file
Dim workbook As New Workbook()
workbook.LoadFromFile("D:\test.xlsx")
Step 2: Set PDF template.
In this step, we will set PDF template which will be used below.
// Set PDF template
PdfDocument pdfDocument = new PdfDocument();
pdfDocument.PageSettings.Orientation = PdfPageOrientation.Landscape;
pdfDocument.PageSettings.Width = 970;
pdfDocument.PageSettings.Height = 850;
' Set PDF template
Dim pdfDocument As New PdfDocument()
pdfDocument.PageSettings.Orientation = PdfPageOrientation.Landscape
pdfDocument.PageSettings.Width = 970
pdfDocument.PageSettings.Height = 850
Step 3: Convert Excel to PDF in WPF.
Now we will use the template which we have already set above to convert Excel to PDF in WPF.
//Convert Excel to PDF using the template above
PdfConverter pdfConverter = new PdfConverter(workbook);
PdfConverterSettings settings = new PdfConverterSettings();
settings.TemplateDocument = pdfDocument;
pdfDocument = pdfConverter.Convert(settings);
'Convert Excel to PDF using the template above
Dim pdfConverter As New PdfConverter(workbook)
Dim settings As New PdfConverterSettings()
settings.TemplateDocument = pdfDocument
pdfDocument = pdfConverter.Convert(settings)
Step 4: Save and preview PDF.
Please use the codes below to save and preview PDF.
// Save and preview PDF
pdfDocument.SaveToFile("sample.pdf");
System.Diagnostics.Process.Start("sample.pdf");
' Save and preview PDF
pdfDocument.SaveToFile("sample.pdf")
System.Diagnostics.Process.Start("sample.pdf")
The picture below is a screenshot of the PDF, Please see:
It is not an easy task for WPF developers moving worksheet to another location in a workbook, as calculations or charts that are based on worksheet data might become inaccurate if you move the worksheet in WPF application. Here presents a solution that saves you from these worries. Apply Spire.Xls for WPF in your application, and you easily can move worksheet in your WPF application.
Spire.XLS for WPF is a professional Excel component which enables developers/programmers to fast generate, read, write and modify Excel document in WPF applications. Spire.XLS for .NET embed a method - Spire.Xls.WorkShee.MoveWorksheet(int destIndex) in its class design used to move a worksheet to another location in the spreadsheet. The method takes the target worksheet index as a parameter and lead no inaccuracy on these calculations or charts.
Now Feel free to download Spire.XLS for WPF and use the code samples below to move worksheet in WPF application.
using Spire.Xls;
using System.Windows;

namespace WpfApplication1
{
    public partial class MainWindow : Window
    {
        public MainWindow()
        {
            InitializeComponent();
        }
        private void button2_Click(object sender, RoutedEventArgs e)
        {
            //open Excel
            Workbook mywbk = new Workbook();
            mywbk.LoadFromFile(@"..\test.xls");

            // Locate the Worksheet
            Worksheet mysht = mywbk.Worksheets[0];

            //Move Worksheet
            mysht.MoveWorksheet(2);

            //Save and Launch
            mywbk.SaveToFile("result.xls");
            System.Diagnostics.Process.Start("result.xls");

        }
    }
}
Imports Spire.Xls
Imports System.Windows

Namespace WpfApplication1
	Public Partial Class MainWindow
		Inherits Window
		Public Sub New()
			InitializeComponent()
		End Sub
		Private Sub button2_Click(sender As Object, e As RoutedEventArgs)
			'open Excel
			Dim mywbk As New Workbook()
			mywbk.LoadFromFile("..\test.xls")

			' Locate the Worksheet
			Dim mysht As Worksheet = mywbk.Worksheets(0)

			'Move Worksheet
			mysht.MoveWorksheet(2)

			'Save and Launch
			mywbk.SaveToFile("result.xls")
			System.Diagnostics.Process.Start("result.xls")

		End Sub
	End Class
End Namespace

