
Program Guide for WPF (28)
How to add hyperlinks to external files in Excel for WPF Applications
2016-06-03 09:16:14 Written by support iceblueWhen demonstrating an excel report, you may also want to share information from other external files or websites. In Excel, we can add both URL hyperlinks and external files by right-clicking on cells, selecting hyperlink and then adding URL address or choosing files from disk. This article is aimed to explain how to add hyperlinks to external files in excel programmatically using Spire.XLS for WPF. To add URL hyperlinks, please refer to this article: How to Insert Hyperlink in Excel for WPF Applications.
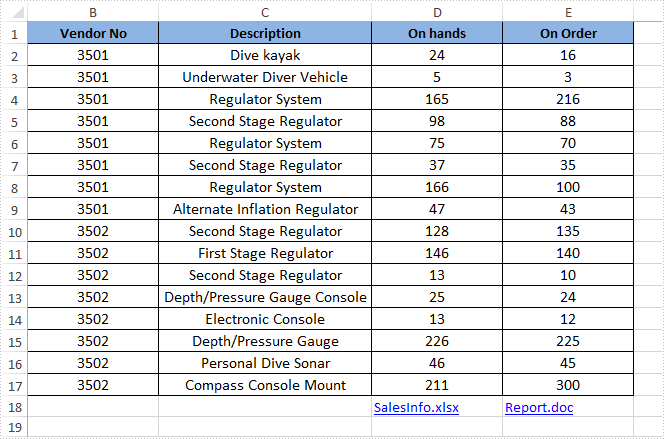
Please see the effective screenshot below after adding hyperlinks to external files:
Code Snippets:
Use the following namespace:
using System.Windows;
using Spire.Xls;
Step 1: Initialize a new Workbook object, load the sample excel file and get its first worksheet.
Workbook workbook = new Workbook();
workbook.LoadFromFile("Sample.xlsx");
Worksheet sheet = workbook.Worksheets[0];
Step 2: Get the cell/cell range that you want to add hyperlink to, then call the sheet.HyperLinks.Add(CellRange range) method to add the hyperlink to the cell/cell range.
CellRange range1 = sheet.Range["D18"];
HyperLink hyperlink1 = sheet.HyperLinks.Add(range1);
Step 3: Specify the hyperlink style and the hyperlink target, here we set its style to file and target to an external excel file.
hyperlink1.Type = HyperLinkType.File;
hyperlink1.Address = "SalesInfo.xlsx";
Step 4: Repeat step 2 and step 3 to add a hyperlink to another specific cell, set the hyperlink style to file and set its target to a word file.
CellRange range2 = sheet.Range["E18"];
HyperLink hyperlink2 = sheet.HyperLinks.Add(range2);
hyperlink2.Type = HyperLinkType.File;
hyperlink2.Address = "Report.doc";
Step 5: Save and launch the file.
workbook.SaveToFile("LinktoFile.xlsx", FileFormat.Version2010);
System.Diagnostics.Process.Start("LinktoFile.xlsx");
Full Codes:
using Spire.Xls;
using System.Windows;

namespace WpfApplication1
{
    public partial class MainWindow : Window
    {
        public MainWindow()
        {
            InitializeComponent();
        }
        private void button1_Click(object sender, RoutedEventArgs e)
        {
            Workbook workbook = new Workbook();
            workbook.LoadFromFile("Vendors Information.xlsx");
            Worksheet sheet = workbook.Worksheets[0];

            HyperLink Link = sheet.HyperLinks.Add(sheet.Range["A5"]);
            Link.TextToDisplay = sheet.Range["A5"].Text;
            Link.Type = HyperLinkType.Url;
            Link.Address = "https://en.wikipedia.org/wiki/Canada";

            HyperLink NewLink = sheet.HyperLinks.Add(sheet.Range["D13"]);
            NewLink.TextToDisplay = "https://www.google.com";
            NewLink.Type = HyperLinkType.Url;
            NewLink.Address = "https://www.google.com";

            workbook.SaveToFile("Hyperlink.xlsx", ExcelVersion.Version2010);
            System.Diagnostics.Process.Start("Hyperlink.xlsx");
        }
    }
}
Imports Spire.Xls
Imports System.Windows

Namespace WpfApplication1
	Public Partial Class MainWindow
		Inherits Window
		Public Sub New()
			InitializeComponent()
		End Sub
		Private Sub button1_Click(sender As Object, e As RoutedEventArgs)
			Dim workbook As New Workbook()
			workbook.LoadFromFile("Vendors Information.xlsx")
			Dim sheet As Worksheet = workbook.Worksheets(0)

			Dim Link As HyperLink = sheet.HyperLinks.Add(sheet.Range("A5"))
			Link.TextToDisplay = sheet.Range("A5").Text
			Link.Type = HyperLinkType.Url
			Link.Address = "https://en.wikipedia.org/wiki/Canada"

			Dim NewLink As HyperLink = sheet.HyperLinks.Add(sheet.Range("D13"))
			NewLink.TextToDisplay = "https://www.google.com"
			NewLink.Type = HyperLinkType.Url
			NewLink.Address = "https://www.google.com"

			workbook.SaveToFile("Hyperlink.xlsx", ExcelVersion.Version2010)
			System.Diagnostics.Process.Start("Hyperlink.xlsx")
		End Sub
	End Class
End Namespace
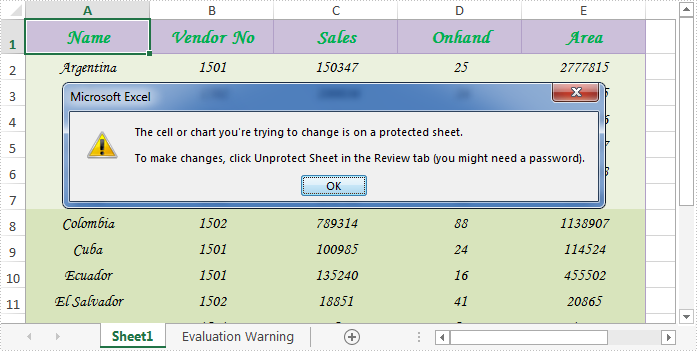
When sharing an excel worksheet, we may want to protect some valuable or important data from being changed by others. With Spire.XLS, we can easily achieve this by locking excel cells. Once locked, we will not be able to modify data from the protected cells until we unlock them. This article will explain how to lock or unlock excel cells in WPF using Spire.XLS for WPF.
Generally, there are two main steps when locking cells in an excel worksheet:
- Locking specific cells.
- Applying sheet protection – locking cells has no effect until we protect the worksheet.
Detail steps and code snippets are as following:
Step 1: Initialize a new instance of Workbook class, load the sample excel file and get its first worksheet.
Workbook workbook = new Workbook();
workbook.LoadFromFile("Sample.xlsx");
Worksheet sheet = workbook.Worksheets[0];
Step 2: Lock or unlock specified cells.
By default, all cells in an Excel worksheet are locked, so we need to unlock them first, next lock the specified cells and protect the worksheet with password.
sheet.Range.Style.Locked = false;
sheet.Range["A1:B3"].Style.Locked = true;
sheet.Protect("123", SheetProtectionType.All);
If you want to unlock excel cells, please use the following line of code:
sheet.Range["A1:B3"].Style.Locked = false;
Step 3: Save the changes and launch the file.
workbook.SaveToFile("locked.xlsx");
System.Diagnostics.Process.Start("locked.xlsx");
Effective screenshot after locking excel cells:
Full codes:
using Spire.Xls;
using System.Windows;

namespace WpfApplication1
{
    public partial class MainWindow : Window
    {
        public MainWindow()
        {
            InitializeComponent();
        }
        private void button1_Click(object sender, RoutedEventArgs e)
        {
            Workbook workbook = new Workbook();
            workbook.LoadFromFile("Sample.xlsx");
            Worksheet sheet = workbook.Worksheets[0];

            //Lock excel cells
            sheet.Range.Style.Locked = false;
            sheet.Range["A1:B3"].Style.Locked = true;
            sheet.Protect("123", SheetProtectionType.All);

            //Unlock excel cells
            // sheet.Range["A1:B3"].Style.Locked = false;

            workbook.SaveToFile("locked.xlsx");
            System.Diagnostics.Process.Start("locked.xlsx");
        }

    }
}
In some cases, we may need to add some textboxes to a chart in excel. While Spire.XLS provides us an easy solution to add textbox to an excel chart. This article will demonstrate how to add a textbox with borderline and a textbox without borderline to an excel chart in WPF using Spire.XLS in WPF.
Detail Steps and Code Snippets:
Use namespace:
using System.Windows;
using Spire.Xls;
using Spire.Xls.Core.Spreadsheet.Shapes;
Step 1: Create an excel workbook and get its first worksheet.
Workbook workbook = new Workbook();
Worksheet sheet = workbook.Worksheets[0];
Step 2: Add a blank chart to the first worksheet.
Chart chart = sheet.Charts.Add();
Step 3: Add textboxes to the chart.
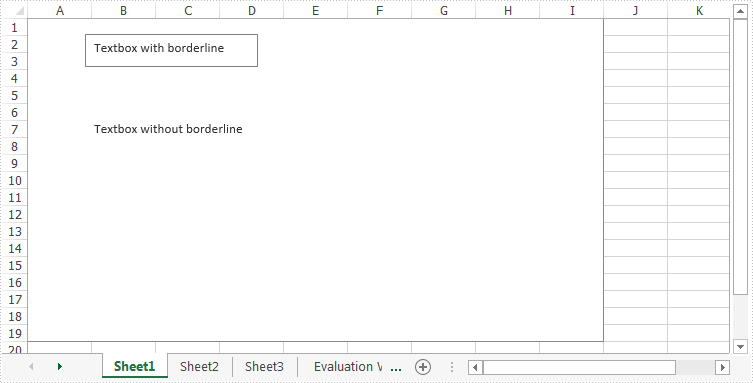
Invoking ITextBoxes.AddTextBox(int row, int column, int height, int width) method to add a textbox with borderline to the chart, then add some text to the textbox.
XlsTextBoxShape textbox = chart.TextBoxes.AddTextBox(50, 100, 100, 300) as XlsTextBoxShape;
textbox.Text = "Textbox with borderline";
However, Spire.XLS also enables us to add textbox without borderline to an excel chart by setting the line weight of the textbox to zero:
XlsTextBoxShape textbox1 = chart.TextBoxes.AddTextBox(300, 100, 100, 300) as XlsTextBoxShape;
textbox1.Text = "Textbox without borderline";
textbox1.Line.Weight = 0;
Step 4: Save and launch the file.
workbook.SaveToFile("AddTextbox.xlsx", ExcelVersion.Version2010);
System.Diagnostics.Process.Start("AddTextbox.xlsx");
Effective screenshot:
Full codes:
using Spire.Xls;
using Spire.Xls.Core.Spreadsheet.Shapes;
using System.Windows;

namespace WpfApplication1
{
    public partial class MainWindow : Window
    {
        public MainWindow()
        {
            InitializeComponent();
        }
        private void button2_Click(object sender, RoutedEventArgs e)
        {
            Workbook workbook = new Workbook();
            Worksheet sheet = workbook.Worksheets[0];

            //Add Chart
            Chart chart = sheet.Charts.Add();

            //Add Textbox with Borderline
            XlsTextBoxShape textbox = chart.TextBoxes.AddTextBox(50, 100, 100, 300) as XlsTextBoxShape;
            textbox.Text = "Textbox with borderline";

            //Add Textbox without Borderline
            XlsTextBoxShape textbox1 = chart.TextBoxes.AddTextBox(300, 100, 100, 300) as XlsTextBoxShape;
            textbox1.Text = "Textbox without borderline";
            textbox1.Line.Weight = 0;

            //Save and Launch the File
            workbook.SaveToFile("AddTextbox.xlsx", ExcelVersion.Version2010);
            System.Diagnostics.Process.Start("AddTextbox.xlsx");
        }
    }
}
How to Replace Selected Data in Excel on WPF Applications
2016-05-06 07:26:06 Written by support iceblueSpire.Xls enables developers to quickly find specific data, highlight the data as well as replace them with new data in excel files. We've already introduced how to find and highlight excel data, so this article is aimed to demonstrate how to replace selected data in excel on WPF applications using Spire.Xls for WPF.
Detail steps and code snippets:
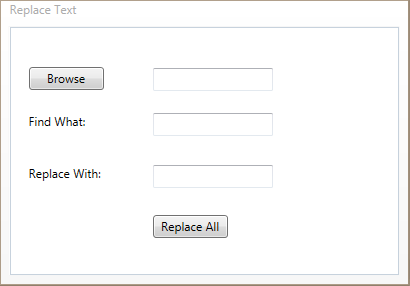
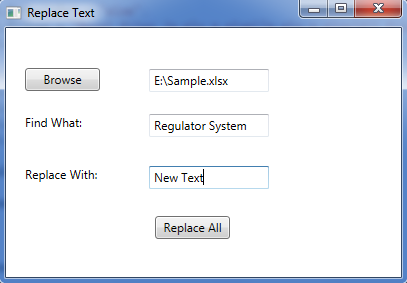
Step 1: Create a WPF Application, add two buttons, three text boxes, two text blocks into the Main Window and align them like below.
Step 2: Double click the Browse button, add following codes to initialize a new OpenFileDialog object and set its properties to select excel file, and save its file name to the first text box.
OpenFileDialog openFileDialog1 = new OpenFileDialog();

openFileDialog1.InitialDirectory = @"E:\";
openFileDialog1.Title = "Select Excel Files";

openFileDialog1.DefaultExt = "xlsx";
openFileDialog1.Filter = "Excel files (*.xls;*.xlsx)|*.xls;*.xlsx|All files (*.*)|*.*";
openFileDialog1.FilterIndex = 1;

openFileDialog1.CheckFileExists = true;
openFileDialog1.CheckPathExists = true;
openFileDialog1.RestoreDirectory = true;
openFileDialog1.ReadOnlyChecked = true;
openFileDialog1.ShowReadOnly = true;

if (openFileDialog1.ShowDialog().Value)
{
    textBox1.Text = openFileDialog1.FileName;
}
Step 3: Double click the Replace All button, add following codes to load the excel file, replace all of the text entered in the find box with new text entered in the replace box, then save the changes and launch the file.
//Load the sample excel file
Workbook workbook = new Workbook();
workbook.LoadFromFile(textBox1.Text);

//Get the first worksheet of the excel file
Worksheet sheet = workbook.Worksheets[0];

//Call Worksheet.FindAllString(string stringValue, bool formula, bool formulaValue) method to find all of the specific text from the first worksheet and save the results to a CellRange array
CellRange[] ranges = sheet.FindAllString(this.FindBox.Text, false, false);

//Loop through the array, replace the selected text with new text
foreach (CellRange range in ranges)
{
    range.Text = this.ReplaceBox.Text;
}

//Save the changes and launch the file
workbook.SaveToFile("Replaced.xlsx");
System.Diagnostics.Process.Start("Replaced.xlsx");
Result:
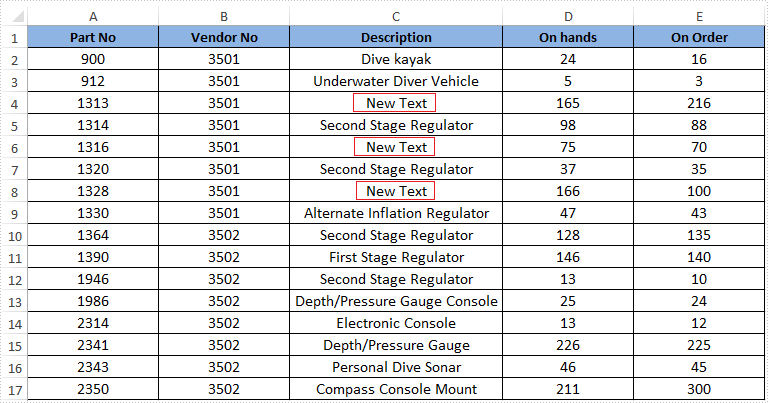
Run the project, you will get the following dialog box, Click Browse to choose excel file, then input the text that you want to find and the text used to replace, next click the Replace All button.
Effective screenshot of the result excel file:
Full codes:
using System.Windows;
using System.Windows.Controls;
using Microsoft.Win32;
using Spire.Xls;

namespace Replace_Selected_Excel_Data_in_WPF
{
    ///
    /// Interaction logic for MainWindow.xaml
    ///
    public partial class MainWindow : Window
    {
        public MainWindow()
        {
            InitializeComponent();
        }

        private void BrowseBtn_Click(object sender, RoutedEventArgs e)
        {
            OpenFileDialog openFileDialog1 = new OpenFileDialog();

            openFileDialog1.InitialDirectory = @"E:\";
            openFileDialog1.Title = "Select Excel Files";

            openFileDialog1.DefaultExt = "xlsx";
            openFileDialog1.Filter = "Excel files (*.xls;*.xlsx)|*.xls;*.xlsx|All files (*.*)|*.*";
            openFileDialog1.FilterIndex = 1;

            openFileDialog1.CheckFileExists = true;
            openFileDialog1.CheckPathExists = true;
            openFileDialog1.RestoreDirectory = true;
            openFileDialog1.ReadOnlyChecked = true;
            openFileDialog1.ShowReadOnly = true;

            if (openFileDialog1.ShowDialog().Value)
            {
                textBox1.Text = openFileDialog1.FileName;
            }
        }

        private void ReplaceBtn_Click(object sender, RoutedEventArgs e)
        {
            Workbook workbook = new Workbook();
            workbook.LoadFromFile(textBox1.Text);

            Worksheet sheet = workbook.Worksheets[0];

            CellRange[] ranges = sheet.FindAllString(this.FindBox.Text, false, false);
            foreach (CellRange range in ranges)
            {
                range.Text = this.ReplaceBox.Text;
            }

            workbook.SaveToFile("Replaced.xlsx");
            System.Diagnostics.Process.Start("Replaced.xlsx");
        }
    }
}
Spire.XLS supports to silently print an Excel file as well as print document with a print dialog, which is provided by System.Windows.Controls namespace in WPF, allowing users to select a specified printer and also the print pages. This article demonstrates how to print Excel file from a WPF application by invoking the print dialog in C# and VB.NET.
Necessary Namespaces:
using System.Windows;
using System.Windows.Controls;
using System.Drawing.Printing;
using Spire.Xls;
Code Snippet:
Step 1: Initialize an instance of Workbook and load a sample Excel file that you want to print.
Workbook workbook = new Workbook();
workbook.LoadFromFile("sample.xlsx");
Step 2: Create a new object of PrintDialog and set its properties such as PageRangeSelection and UserPageRangeEnabled.
PrintDialog dialog = new PrintDialog();
dialog.UserPageRangeEnabled = true;
PageRange rang = new PageRange(1, 3);
dialog.PageRange = rang;
PageRangeSelection seletion = PageRangeSelection.UserPages;
dialog.PageRangeSelection =seletion;
Step 3: Get the print document and invoke the print dialog to print.
PrintDocument pd = workbook.PrintDocument;
if (dialog.ShowDialog() == true)
{
    pd.Print();
}
Output:
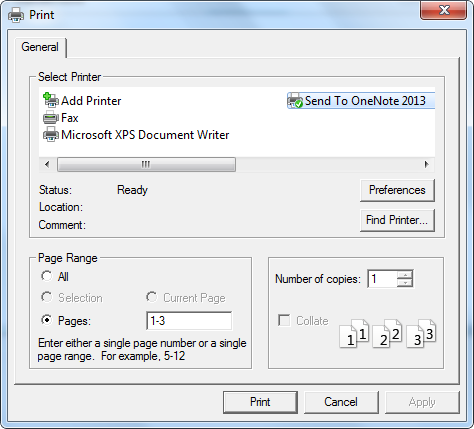
Full Code:
using Spire.Xls;
using System.Drawing;
using System.Drawing.Printing;
using System.Windows;
using System.Windows.Controls;

namespace WpfApplication1
{
    public partial class MainWindow : Window
    {
        public MainWindow()
        {
            InitializeComponent();
        }
        private void button1_Click(object sender, RoutedEventArgs e)
        {
            Workbook workbook = new Workbook();
            workbook.LoadFromFile("sample.xlsx");
            PrintDialog dialog = new PrintDialog();
            dialog.UserPageRangeEnabled = true;
            PageRange rang = new PageRange(1, 3);
            dialog.PageRange = rang;
            PageRangeSelection seletion = PageRangeSelection.UserPages;
            dialog.PageRangeSelection = seletion;
            PrintDocument pd = workbook.PrintDocument;
            if (dialog.ShowDialog() == true)
            {
                pd.Print();
            }
        }
    }
}
Imports Spire.Xls
Imports System.Drawing
Imports System.Drawing.Printing
Imports System.Windows
Imports System.Windows.Controls

Namespace WpfApplication1
	Public Partial Class MainWindow
		Inherits Window
		Public Sub New()
			InitializeComponent()
		End Sub
		Private Sub button1_Click(sender As Object, e As RoutedEventArgs)
			Dim workbook As New Workbook()
			workbook.LoadFromFile("sample.xlsx")
			Dim dialog As New PrintDialog()
			dialog.UserPageRangeEnabled = True
			Dim rang As New PageRange(1, 3)
			dialog.PageRange = rang
			Dim seletion As PageRangeSelection = PageRangeSelection.UserPages
			dialog.PageRangeSelection = seletion
			Dim pd As PrintDocument = workbook.PrintDocument
			If dialog.ShowDialog() = True Then
				pd.Print()
			End If
		End Sub
	End Class
End Namespace
How to Rename and Set Tab color for Excel Worksheet in WPF
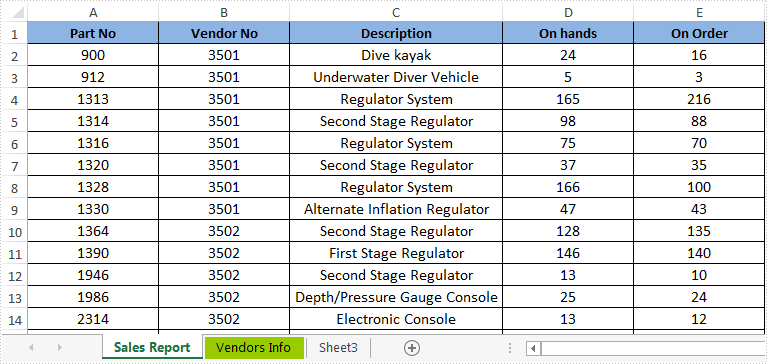
2016-04-21 07:29:11 Written by support iceblueRenaming excel worksheet can makes readers clearly understand what we want to present at their first sight, at the same time, we can also set tab color for a specific worksheet, in order to distinguish it from others and find it in a very short time.
This section will demonstrate how to rename and set tab color for excel worksheet in WPF using Spire.XLS for WPF.
Please follow the detail steps and code snippets below:
Use namespace:
using System.Drawing;
using System.Windows;
using Spire.Xls;
Step 1: Initialize a new instance of Workbook class and load the sample excel document from file.
Workbook workbook = new Workbook();
workbook.LoadFromFile("Sample.xlsx");
Step 2: Get the worksheets that need to be renamed and set tab color for. Here we choose the first and the second worksheets.
Worksheet sheet = workbook.Worksheets[0];
Worksheet sheet1 = workbook.Worksheets[1];
Step 3: Rename and set tab color.
Rename the first and the second worksheets.
sheet.Name = "Sales Report";
sheet1.Name = "Vendors Info";
Set tab color of the second worksheet as Lawn Green.
sheet1.TabColor = Color.LawnGreen;
Step 4: Save the changes and launch the file.
workbook.SaveToFile("Rename.xlsx");
System.Diagnostics.Process.Start("Rename.xlsx");
Result:
Full codes:
using Spire.Xls;
using System.Drawing;
using System.Windows;

namespace WpfApplication1
{
    public partial class MainWindow : Window
    {
        public MainWindow()
        {
            InitializeComponent();
        }
        private void button1_Click(object sender, RoutedEventArgs e)
        {
            //Load the excel file
            Workbook workbook = new Workbook();
            workbook.LoadFromFile("Sample.xlsx");

            Worksheet sheet = workbook.Worksheets[0];
            Worksheet sheet1 = workbook.Worksheets[1];

            //rename worksheets
            sheet.Name = "Sales Report";
            sheet1.Name = "Vendors Info";

            //set tab color
            sheet1.TabColor = Color.LawnGreen;

            //save and launch the file
            workbook.SaveToFile("Rename.xlsx");
            System.Diagnostics.Process.Start("Rename.xlsx");
        }
    }
}
Commonly, there are two possibilities when copying excel worksheet: copy worksheet within an excel workbook and copy worksheet to other excel workbooks. This article will be divided into two sections to introduce how to copy excel worksheet in WPF applications using Spire.XLS for WPF.
Section 1: Copy Excel Worksheet within an excel workbook
By invoking the Worksheet.CopyFrom() method, we can easily copy an excel worksheet including its cell format, image or something else to another worksheet of the same workbook.
Detail steps as below:
Step 1: Initialize a new instance of Workbook class, load the excel workbook from file and get the worksheet which needs to be copied. Here we choose the first worksheet.
Workbook workbook = new Workbook();
workbook.LoadFromFile("Sample.xlsx");
Worksheet worksheet = workbook.Worksheets[0];
Step 2: Add a new worksheet named copy of sheet1 to the excel workbook, and copy the first worksheet to the new added worksheet.
workbook.Worksheets.Add("copy of sheet1");
workbook.Worksheets[1].CopyFrom(worksheet);
Step 3: Save to the same workbook and launch the file.
workbook.SaveToFile("Sample.xlsx");
System.Diagnostics.Process.Start("Sample.xlsx");
Effective screenshot:

Section 2: Copy excel worksheet to other excel workbooks
If you need to copy a worksheet and save to another excel workbook, please refer to following code snippets:
Step 1: Load the excel workbook and get its first worksheet.
Workbook workbook1 = new Workbook();
workbook1.LoadFromFile("Sale.xlsx");
Worksheet worksheet = workbook1.Worksheets[0];
Step 2: Clone the first worksheet, then add to the excel workbook as a new worksheet.
Worksheet newsheet = (Worksheet)worksheet.Clone(worksheet.Parent);
workbook1.Worksheets.Add(newsheet);
Step 3: Save to another workbook and launch the file.
workbook1.SaveToFile("NewWorkbook.xlsx");
System.Diagnostics.Process.Start("NewWorkbook.xlsx");
Besides, Spire.XLS also provides another method which allows us to copy an excel worksheet from one excel workbook to another existing workbook, like following:
workbook.Worksheets.AddCopy(worksheet);
Full codes:
Section 1:
using Spire.Xls;
using System.Windows;

namespace WpfApplication1
{
    public partial class MainWindow : Window
    {
        public MainWindow()
        {
            InitializeComponent();
        }
        private void button1_Click(object sender, RoutedEventArgs e)
        {

            Workbook workbook = new Workbook();
            workbook.LoadFromFile("Sample.xlsx");
            Worksheet worksheet = workbook.Worksheets[0];

            workbook.Worksheets.Add("copy of sheet1");
            workbook.Worksheets[1].CopyFrom(worksheet);

            workbook.SaveToFile("Sample.xlsx");
            System.Diagnostics.Process.Start("Sample.xlsx");
        }
    }
}
Section 2:
using Spire.Xls;
using System.Windows;

namespace WpfApplication1
{
    public partial class MainWindow : Window
    {
        public MainWindow()
        {
            InitializeComponent();
        }
        private void button2_Click(object sender, RoutedEventArgs e)
        {
            Workbook workbook1 = new Workbook();
            workbook1.LoadFromFile("Sale.xlsx");
            Worksheet worksheet = workbook1.Worksheets[0];

            Worksheet newsheet = (Worksheet)worksheet.Clone(worksheet.Parent);
            workbook1.Worksheets.Add(newsheet);

            workbook1.SaveToFile("NewWorkbook.xlsx");
            System.Diagnostics.Process.Start("NewWorkbook.xlsx");
        }

    }
}
How to create Excel pie chart in C# on WPF applications
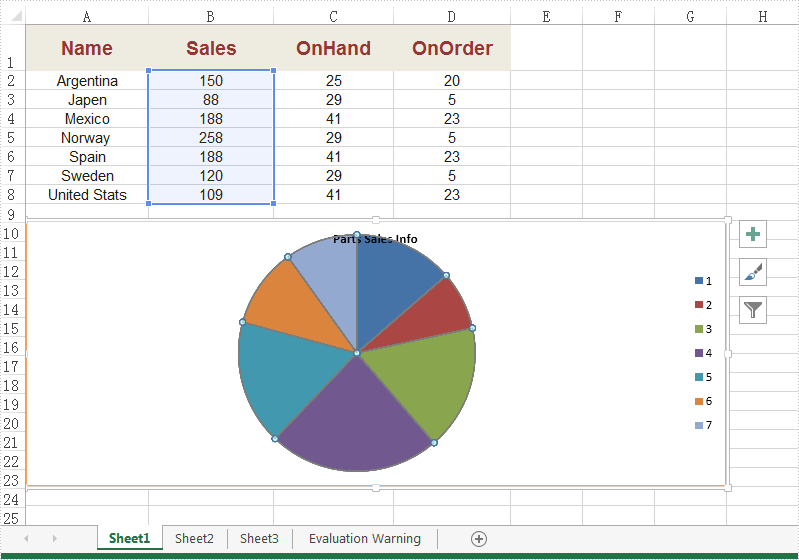
2016-03-31 07:50:31 Written by support iceblueWe always use chart in Excel documents to make the data more clear and visible. With the help of Spire.XLS, developers can easily create different kinds of charts, such as Pie chart, column chart, bar chart, radar chart and so on. This article will focus on demonstrate how to create Excel pie chart on WPF applications.
Note: Before Start, please download the latest version of Spire.XLS and add Spire.Xls.Wpf.dll in the bin folder as the reference of Visual Studio.
Here comes to the code snippets of how to create Excel pie chart:
Step 1: Create a new Excel workbook and load from file.
Workbook workbook = new Workbook();
workbook.LoadFromFile("Sample.xlsx");
Step 2: Get the first worksheet from workbook.
Worksheet sheet = workbook.Worksheets[0];
Step 3: Add Chart and set chart type.
Chart chart = sheet.Charts.Add(ExcelChartType.Pie);
Step 4: Set chart data range.
chart.DataRange = sheet.Range["B2:B8"];
chart.SeriesDataFromRange = false;
Step 5: Set the position, border, title and legend for the chart.
//Chart Position
chart.LeftColumn = 1;
chart.TopRow =12;
chart.RightColumn = 8;
chart.BottomRow = 26;

//Chart Border
chart.ChartArea.Border.Weight = ChartLineWeightType.Medium;
chart.ChartArea.Border.Color = System.Drawing.Color.SandyBrown;

//Chart Title
chart.ChartTitle = "Parts Sales Info";
chart.ChartTitleArea.Font.FontName = "Calibri";
chart.ChartTitleArea.Font.Size = 10;
chart.ChartTitleArea.Font.IsBold = true;

//Chart Legend
chart.Legend.Position = LegendPositionType.Right;
Step 6: Save the document to file and launch to preview it.
workbook.SaveToFile("ExcelPieChart.xlsx", ExcelVersion.Version2010);
System.Diagnostics.Process.Start("ExcelPieChart.xlsx");
Effective screenshot of the generated pie chart by Spire.XLS for WPF:
Full codes:
using Spire.Xls;
using System.Windows;

namespace WpfApplication1
{
    public partial class MainWindow : Window
    {
        public MainWindow()
        {
            InitializeComponent();
        }
        private void button2_Click(object sender, RoutedEventArgs e)
        {
            Workbook workbook = new Workbook();
            workbook.LoadFromFile("Sample.xlsx");
            Worksheet sheet = workbook.Worksheets[0];

            Chart chart = sheet.Charts.Add(ExcelChartType.Pie);

            chart.DataRange = sheet.Range["B2:B8"];
            chart.SeriesDataFromRange = false;

            chart.LeftColumn = 1;
            chart.TopRow = 12;
            chart.RightColumn = 8;
            chart.BottomRow = 26;

            chart.ChartArea.Border.Weight = ChartLineWeightType.Medium;
            chart.ChartArea.Border.Color = System.Drawing.Color.SandyBrown;

            chart.ChartTitle = "Parts Sales Info";
            chart.ChartTitleArea.Font.FontName = "Calibri";
            chart.ChartTitleArea.Font.Size = 10;
            chart.ChartTitleArea.Font.IsBold = true;

            chart.Legend.Position = LegendPositionType.Right;

            workbook.SaveToFile("ExcelPieChart.xlsx", ExcelVersion.Version2010);
            System.Diagnostics.Process.Start("ExcelPieChart.xlsx");
        }
    }
}
Whenever you are working with lots of data, it can be difficult to compare information in your workbook. You may want to see certain rows or columns all the time in your worksheet, especially header cells. By freezing rows or columns in place, you can keep rows or columns visible while scrolling through the rest of the worksheet.
In the following sections, I will demonstrate how to freeze Excel panes in WPF.
Step 1: Initialize a new instance of Workbook class. Load the word document from the file.
Workbook workbook = new Workbook();
workbook.LoadFromFile("SalesReport.xlsx");
Step 2: In our example, my workbook has several worksheets. We want to check the data from the second worksheet. Therefore, we select the second worksheet.
Worksheet sheet = workbook.Worksheets[1];
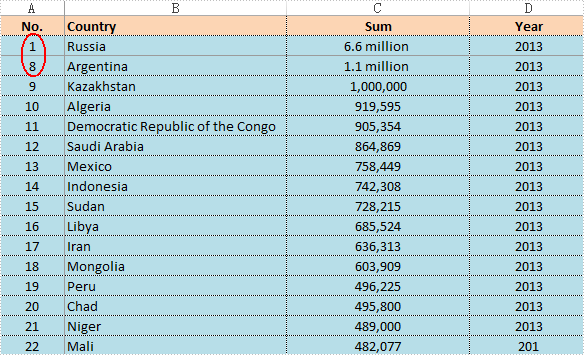
Step 3: In this case, we want to fix the first two rows and the leftmost column. The row and column will be frozen in place, as indicated by the solid grey line.
sheet.FreezePanes(2, 1);
Step 4: Save the workbook and launch the file.
workbook.SaveToFile("SalesReport Result.xlsx");
System.Diagnostics.Process.Start("SalesReport Result.xlsx");
Effective screenshot:
Full Codes:
using System.Windows;
using Spire.Xls;

namespace SalesReport
{
    ///
    /// Interaction logic for MainWindow.xaml
    ///
    public partial class MainWindow : Window
    {
        public MainWindow()
        {
            InitializeComponent();
        }

        private void button1_Click(object sender, RoutedEventArgs e)
        {
            //Load Excel File
            Workbook workbook = new Workbook();
            workbook.LoadFromFile("SalesReport.xlsx");

            //Select the second worksheet

            Worksheet sheet = workbook.Worksheets[1];

            //Select to freeze the first two rows and the leftmost column

            sheet.FreezePanes(3, 2);

            //Save and Launch

            workbook.SaveToFile("SalesReport Result.xlsx");
            System.Diagnostics.Process.Start("SalesReport Result.xlsx");
        }
    }
}
Imports System.Windows
Imports Spire.Xls

Namespace SalesReport
	'''
	''' Interaction logic for MainWindow.xaml
	'''
	Public Partial Class MainWindow
		Inherits Window
		Public Sub New()
			InitializeComponent()
		End Sub

		Private Sub button1_Click(sender As Object, e As RoutedEventArgs)
			'Load Excel File
			Dim workbook As New Workbook()
			workbook.LoadFromFile("SalesReport.xlsx")

			'Select the second worksheet

			Dim sheet As Worksheet = workbook.Worksheets(1)

			'Select to freeze the first two rows and the leftmost column

			sheet.FreezePanes(3, 2)

			'Save and Launch

			workbook.SaveToFile("SalesReport Result.xlsx")
			System.Diagnostics.Process.Start("SalesReport Result.xlsx")
		End Sub
	End Class
End Namespace
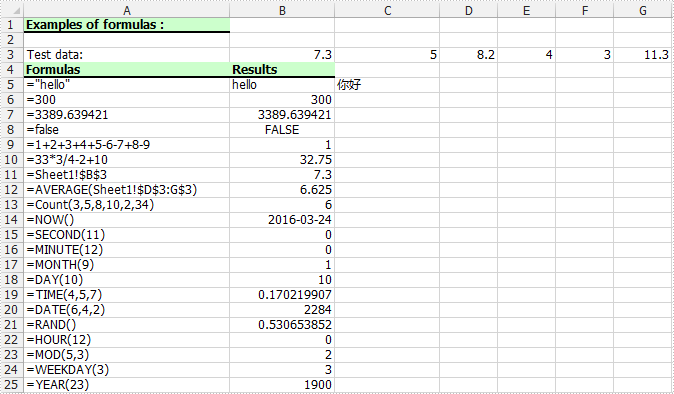
A formula is an expression which performs calculations or other actions on the data in your worksheet. Using Spire.XLS, programmers can easily add, modify and calculate formulas in Excel cells. This guide will present how to add commonly used formulas to Excel with C# in WPF application.
Spire.XLS provides a class named CellRange, containing properties such as Formula, FormulaValue and HasFormula which allow users to work with formulas in specific cells. For adding a formula, the syntax could be as easy as follows:
sheet.Range[int row, int column].Formula= "=NOW()";
Apart from adding a formula for date and time, Spire.XLS also supports text, math, logical, statistical, lookup, reference and etc. Following section shows a list of over 40 formula examples (partially shown in the below screenshot) created by Spire.XLS.
Entire Code:
using Spire.Xls;
using System.Windows;

namespace WpfApplication1
{
    public partial class MainWindow : Window
    {
        public MainWindow()
        {
            InitializeComponent();
        }
        private void button1_Click(object sender, RoutedEventArgs e)
        {
            Workbook workbook = new Workbook();
            Worksheet sheet = workbook.Worksheets[0];

            int currentRow = 1;
            string currentFormula = string.Empty;

            sheet.SetColumnWidth(1, 32);
            sheet.SetColumnWidth(2, 16);
            sheet.SetColumnWidth(3, 16);

            sheet.Range[currentRow++, 1].Value = "Examples of formulas :";
            sheet.Range[++currentRow, 1].Value = "Test data:";

            CellRange range = sheet.Range["A1"];
            range.Style.Font.IsBold = true;
            range.Style.FillPattern = ExcelPatternType.Solid;
            range.Style.KnownColor = ExcelColors.LightGreen1;
            range.Style.Borders[BordersLineType.EdgeBottom].LineStyle = LineStyleType.Medium;

            //test data
            sheet.Range[currentRow, 2].NumberValue = 7.3;
            sheet.Range[currentRow, 3].NumberValue = 5; ;
            sheet.Range[currentRow, 4].NumberValue = 8.2;
            sheet.Range[currentRow, 5].NumberValue = 4;
            sheet.Range[currentRow, 6].NumberValue = 3;
            sheet.Range[currentRow, 7].NumberValue = 11.3;

            sheet.Range[++currentRow, 1].Value = "Formulas"; ;
            sheet.Range[currentRow, 2].Value = "Results";
            range = sheet.Range[currentRow, 1, currentRow, 2];
            //range.Value = "Formulas";
            range.Style.Font.IsBold = true;
            range.Style.KnownColor = ExcelColors.LightGreen1;
            range.Style.FillPattern = ExcelPatternType.Solid;
            range.Style.Borders[BordersLineType.EdgeBottom].LineStyle = LineStyleType.Medium;
            //str.
            currentFormula = "=\"hello\"";
            sheet.Range[++currentRow, 1].Text = "=\"hello\"";
            sheet.Range[currentRow, 2].Formula = currentFormula;
            sheet.Range[currentRow, 3].Formula = "=\"" + new string(new char[] { '\u4f60', '\u597d' }) + "\"";

            //int.
            currentFormula = "=300";
            sheet.Range[++currentRow, 1].Text = currentFormula;
            sheet.Range[currentRow, 2].Formula = currentFormula;

            // float
            currentFormula = "=3389.639421";
            sheet.Range[++currentRow, 1].Text = currentFormula;
            sheet.Range[currentRow, 2].Formula = currentFormula;

            //bool.
            currentFormula = "=false";
            sheet.Range[++currentRow, 1].Text = currentFormula;
            sheet.Range[currentRow, 2].Formula = currentFormula;

            currentFormula = "=1+2+3+4+5-6-7+8-9";
            sheet.Range[++currentRow, 1].Text = currentFormula;
            sheet.Range[currentRow, 2].Formula = currentFormula;

            currentFormula = "=33*3/4-2+10";
            sheet.Range[++currentRow, 1].Text = currentFormula;
            sheet.Range[currentRow, 2].Formula = currentFormula;


            // sheet reference
            currentFormula = "=Sheet1!$B$3";
            sheet.Range[++currentRow, 1].Text = currentFormula;
            sheet.Range[currentRow, 2].Formula = currentFormula;

            // sheet area reference
            currentFormula = "=AVERAGE(Sheet1!$D$3:G$3)";
            sheet.Range[++currentRow, 1].Text = currentFormula;
            sheet.Range[currentRow, 2].Formula = currentFormula;

            // Functions
            currentFormula = "=Count(3,5,8,10,2,34)";
            sheet.Range[++currentRow, 1].Text = currentFormula;
            sheet.Range[currentRow, 2].Formula = currentFormula;


            currentFormula = "=NOW()";
            sheet.Range[++currentRow, 1].Text = currentFormula;
            sheet.Range[currentRow, 2].Formula = currentFormula;
            sheet.Range[currentRow, 2].Style.NumberFormat = "yyyy-MM-DD";

            currentFormula = "=SECOND(11)";
            sheet.Range[++currentRow, 1].Text = currentFormula;
            sheet.Range[currentRow++, 2].Formula = currentFormula;

            currentFormula = "=MINUTE(12)";
            sheet.Range[currentRow, 1].Text = currentFormula;
            sheet.Range[currentRow++, 2].Formula = currentFormula;

            currentFormula = "=MONTH(9)";
            sheet.Range[currentRow, 1].Text = currentFormula;
            sheet.Range[currentRow++, 2].Formula = currentFormula;

            currentFormula = "=DAY(10)";
            sheet.Range[currentRow, 1].Text = currentFormula;
            sheet.Range[currentRow++, 2].Formula = currentFormula;

            currentFormula = "=TIME(4,5,7)";
            sheet.Range[currentRow, 1].Text = currentFormula;
            sheet.Range[currentRow++, 2].Formula = currentFormula;

            currentFormula = "=DATE(6,4,2)";
            sheet.Range[currentRow, 1].Text = currentFormula;
            sheet.Range[currentRow++, 2].Formula = currentFormula;

            currentFormula = "=RAND()";
            sheet.Range[currentRow, 1].Text = currentFormula;
            sheet.Range[currentRow++, 2].Formula = currentFormula;

            currentFormula = "=HOUR(12)";
            sheet.Range[currentRow, 1].Text = currentFormula;
            sheet.Range[currentRow++, 2].Formula = currentFormula;

            currentFormula = "=MOD(5,3)";
            sheet.Range[currentRow, 1].Text = currentFormula;
            sheet.Range[currentRow++, 2].Formula = currentFormula;

            currentFormula = "=WEEKDAY(3)";
            sheet.Range[currentRow, 1].Text = currentFormula;
            sheet.Range[currentRow++, 2].Formula = currentFormula;

            currentFormula = "=YEAR(23)";
            sheet.Range[currentRow, 1].Text = currentFormula;
            sheet.Range[currentRow++, 2].Formula = currentFormula;

            currentFormula = "=NOT(true)";
            sheet.Range[currentRow, 1].Text = currentFormula;
            sheet.Range[currentRow++, 2].Formula = currentFormula;

            currentFormula = "=OR(true)";
            sheet.Range[currentRow, 1].Text = currentFormula;
            sheet.Range[currentRow++, 2].Formula = currentFormula;

            currentFormula = "=AND(TRUE)";
            sheet.Range[currentRow, 1].Text = currentFormula;
            sheet.Range[currentRow++, 2].Formula = currentFormula;

            currentFormula = "=VALUE(30)";
            sheet.Range[currentRow, 1].Text = currentFormula;
            sheet.Range[currentRow++, 2].Formula = currentFormula;

            currentFormula = "=LEN(\"world\")";
            sheet.Range[currentRow, 1].Text = currentFormula;
            sheet.Range[currentRow++, 2].Formula = currentFormula;

            currentFormula = "=MID(\"world\",4,2)";
            sheet.Range[currentRow, 1].Text = currentFormula;
            sheet.Range[currentRow++, 2].Formula = currentFormula;

            currentFormula = "=ROUND(7,3)";
            sheet.Range[currentRow, 1].Text = currentFormula;
            sheet.Range[currentRow++, 2].Formula = currentFormula;

            currentFormula = "=SIGN(4)";
            sheet.Range[currentRow, 1].Text = currentFormula;
            sheet.Range[currentRow++, 2].Formula = currentFormula;

            currentFormula = "=INT(200)";
            sheet.Range[currentRow, 1].Text = currentFormula;
            sheet.Range[currentRow++, 2].Formula = currentFormula;

            currentFormula = "=ABS(-1.21)";
            sheet.Range[currentRow, 1].Text = currentFormula;
            sheet.Range[currentRow++, 2].Formula = currentFormula;

            currentFormula = "=LN(15)";
            sheet.Range[currentRow, 1].Text = currentFormula;
            sheet.Range[currentRow++, 2].Formula = currentFormula;

            currentFormula = "=EXP(20)";
            sheet.Range[currentRow, 1].Text = currentFormula;
            sheet.Range[currentRow++, 2].Formula = currentFormula;

            currentFormula = "=SQRT(40)";
            sheet.Range[currentRow, 1].Text = currentFormula;
            sheet.Range[currentRow++, 2].Formula = currentFormula;

            currentFormula = "=PI()";
            sheet.Range[currentRow, 1].Text = currentFormula;
            sheet.Range[currentRow++, 2].Formula = currentFormula;

            currentFormula = "=COS(9)";
            sheet.Range[currentRow, 1].Text = currentFormula;
            sheet.Range[currentRow++, 2].Formula = currentFormula;

            currentFormula = "=SIN(45)";
            sheet.Range[currentRow, 1].Text = currentFormula;
            sheet.Range[currentRow++, 2].Formula = currentFormula;

            currentFormula = "=MAX(10,30)";
            sheet.Range[currentRow, 1].Text = currentFormula;
            sheet.Range[currentRow++, 2].Formula = currentFormula;

            currentFormula = "=MIN(5,7)";
            sheet.Range[currentRow, 1].Text = currentFormula;
            sheet.Range[currentRow++, 2].Formula = currentFormula;

            currentFormula = "=AVERAGE(12,45)";
            sheet.Range[currentRow, 1].Text = currentFormula;
            sheet.Range[currentRow++, 2].Formula = currentFormula;

            currentFormula = "=SUM(18,29)";
            sheet.Range[currentRow, 1].Text = currentFormula;
            sheet.Range[currentRow++, 2].Formula = currentFormula;

            currentFormula = "=IF(4,2,2)";
            sheet.Range[currentRow, 1].Text = currentFormula;
            sheet.Range[currentRow++, 2].Formula = currentFormula;

            currentFormula = "=SUBTOTAL(3,Sheet1!B2:E3)";
            sheet.Range[currentRow, 1].Text = currentFormula;
            sheet.Range[currentRow++, 2].Formula = currentFormula;
            workbook.SaveToFile(@"..\..\Sample.xls");
            System.Diagnostics.Process.Start(@"..\..\Sample.xls");
        }
    }
}
