Set an Array of Values into a Range in Excel Worksheet
Question:
I'm trying to set an array of values into a range in Excel Worksheet. This is possible via Microsoft Excel object and allows setting values very quickly. How to use Spire.XLS to manage it?
Answer:
It is possible to output an array of data to a range of worksheet via Spire.XLS. Using arrays sheet.InsertArray() method and the following sample source codes for your reference would be helpful.
using Spire.Xls;
namespace SetArrayofValues
{
    class Program
    {
            private void SetArrayValueExample()
        {
            Workbook workbook = new Workbook();
            workbook.CreateEmptySheets(1);

            Worksheet sheet = workbook.Worksheets[0];

            int maxRow = 10000;
            //int maxRow = 5;
            int maxCol = 200;

            //int maxCol = 5;
            object[,] myarray = new object[maxRow + 1, maxCol + 1];
            bool[,] isred = new bool[maxRow + 1, maxCol + 1];
            for (int i = 0; i <= maxRow; i++)
                for (int j = 0; j <= maxCol; j++)
                {
                    myarray[i, j] = i + j;
                    if ((int)myarray[i, j] > 8)
                        isred[i, j] = true;
                }

            sheet.InsertArray(myarray, 1, 1);

            workbook.SaveToFile("test.xls",ExcelVersion.Version97to2003);
        }


        }
    }
If this doesn't answer your question, please do not hesitate to add your question in our forum. Our technical support will answer soon (we promise response within 1 business day)!
How to Merge Cells in Excel
Merge Cells in Excel
Sometimes, we work on excel spreadsheet and need merge cells in no matter row or column. Merge multiple cells into one can help readers easily distinguish data information. And sometimes when a title is to be centered over a particular section of a worksheet, author usually will merge cells to make it look better.
How to Use C#/VB.NET to Achieve Cells Merge in Excel?
Spire.XLS for .NET, a .NET Excel component which enables .NET applications to fast generate, read, write and modify Excel document without Microsoft Office Excel Automation can help us decrypt Excel worksheet by using C#/VB.NET.
Microsoft Excel offers a Merge and Center button for uses to merge cells and center the content in cell. On the other hand, Spire.XLS for .NET also allows developers/programmers use C#/VB.NET to merge cells in Excel worksheet.
Through Spire.XLS for .NET, merge cells in Excel via C#/VB.NET can be as easy as in Microsoft Excel. Download Spire.XLS for .NET (or Spire.Office) with .NET framework 2.0 (or above) together and use the sample code below, we can easily use C#/VB.NET achieve cells merge in Excel.
using Spire.Xls;
namespace MergeCells
{

    class Program
    {

        static void Main(string[] args)
        {
            Workbook workbook = new Workbook();
            workbook.LoadFromFile("test.xls");
            workbook.Worksheets[0].Rows[0].Merge();
            workbook.SaveToFile("result.xls");

        }
    }
}
Imports Spire.Xls
Namespace MergeCells

	Class Program

		Private Shared Sub Main(args As String())
			Dim workbook As New Workbook()
			workbook.LoadFromFile("test.xls")
			workbook.Worksheets(0).Rows(0).Merge()
			workbook.SaveToFile("result.xls")

		End Sub
	End Class
End Namespace
Spire.XLS allows user to operate Excel document directly such as save to stream, save as web response, copy, lock/unlock worksheet, set up workbook properties, etc. As a professional .NET Excel component, it owns the ability of inserting content into Excel document, formatting cells and converting Excel documents to popular office file formats. Spire.XLS for .NET supports Excel 97-2003, Excel 2007 and Excel 2010.
C#/VB.NET: Copy Worksheets in Excel
Excel copy function enables you to not only copy worksheets within Excel workbook but also copy worksheets between different Excel workbooks. This article will introduce solutions to copy worksheets within one Excel workbook and among different workbooks via Spire.XLS for .NET in C#, VB.NET. Besides, all the cell formats in the original Excel worksheets will be completely remained.
Install Spire.XLS for .NET
To begin with, you need to add the DLL files included in the Spire.XLS for .NET package as references in your .NET project. The DLLs files can be either downloaded from this link or installed via NuGet.
- Package Manager
PM> Install-Package Spire.XLS
Copy Excel Worksheets within Excel Workbook
The following are the steps to duplicate worksheets within an Excel workbook.
- Initialize an instance of Workbook class.
- Load an Excel file using Workbook.LoadFromFile() method.
- Add a new blank sheet to the workbook using WorksheetCollection.Add() method.
- Copy the original worksheet to the new sheet using Worksheet.CopyFrom() method.
- Use Workbook.SaveToFile() method to save the changes to another file.
- C#
- VB.NET
using Spire.Xls;
namespace CopyExcelworksheet
{
class Program
{
static void Main(string[] args)
{
//Load the sample Excel
Workbook workbook = new Workbook();
workbook.LoadFromFile("Sample.xlsx");
//Add worksheet and set its name
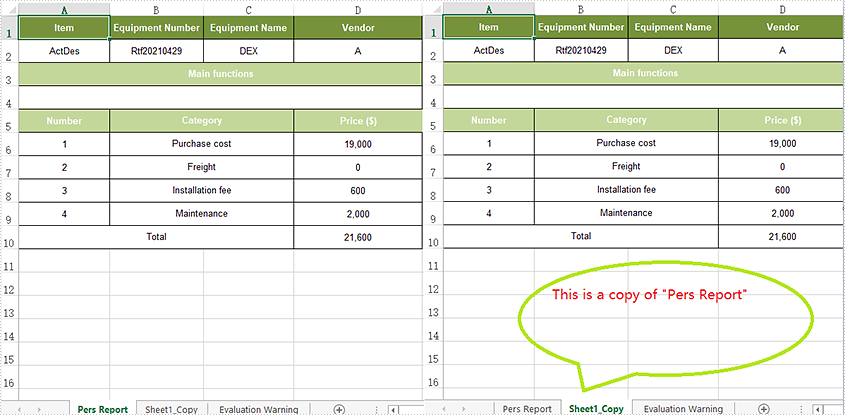
workbook.Worksheets.Add("Sheet1_Copy");
//copy worksheet to the new added worksheets
workbook.Worksheets[1].CopyFrom(workbook.Worksheets[0]);
//Save the Excel workbook.
workbook.SaveToFile("Duplicatesheet.xlsx", ExcelVersion.Version2013);
System.Diagnostics.Process.Start("Duplicatesheet.xlsx");
}
}
}
Imports Spire.Xls

Namespace CopyExcelworksheet

    Class Program

        Private Shared Sub Main(ByVal args() As String)
            'Load the sample Excel
            Dim workbook As Workbook = New Workbook
            workbook.LoadFromFile("Sample.xlsx")
            'Add worksheet and set its name
            workbook.Worksheets.Add("Sheet1_Copy")
            'copy worksheet to the new added worksheets
            workbook.Worksheets(1).CopyFrom(workbook.Worksheets(0))
            'Save the Excel workbook.
            workbook.SaveToFile("Duplicatesheet.xlsx", ExcelVersion.Version2013)
            System.Diagnostics.Process.Start("Duplicatesheet.xlsx")
        End Sub
    End Class
End Namespace
Copy Excel Worksheets between Excel Workbooks
The following are the steps to duplicate worksheets within an Excel workbook.
- Initialize an instance of Workbook class.
- Load an Excel file using Workbook.LoadFromFile() method.
- Get the first worksheet.
- Load another Excel sample document
- Add a new blank sheet to the second workbook using WorksheetCollection.Add() method.
- Copy the original worksheet to the new sheet using Worksheet.CopyFrom() method.
- Use Workbook.SaveToFile() method to save the changes to another file.
- C#
- VB.NET
using Spire.Xls;
namespace CopyExcelworksheet
{
class Program
{
static void Main(string[] args)
{
//Load the sample Excel and get the first worksheet
Workbook workbook = new Workbook();
workbook.LoadFromFile("Sample.xlsx");
Worksheet sheet = workbook.Worksheets[0];
//Load the second Excel workbook
Workbook workbook2 = new Workbook();
workbook2.LoadFromFile("New.xlsx");
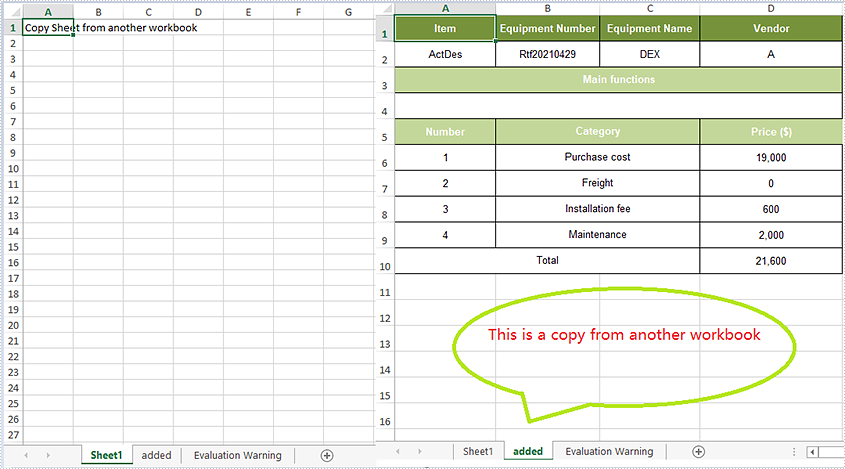
//Add a new worksheet and set its name
Worksheet targetWorksheet = workbook2.Worksheets.Add("added");
//Copy the original worksheet to the new added worksheets
targetWorksheet.CopyFrom(sheet);
//Save the Excel workbook.
workbook2.SaveToFile("CopySheetBetweenWorkbooks.xlsx", FileFormat.Version2013);
System.Diagnostics.Process.Start("CopySheetBetweenWorkbooks.xlsx");
}
}
}
Imports Spire.Xls

Namespace CopyExcelworksheet

    Class Program

        Private Shared Sub Main(ByVal args() As String)
            'Load the sample Excel and get the first worksheet
            Dim workbook As Workbook = New Workbook
            workbook.LoadFromFile("Sample.xlsx")
            Dim sheet As Worksheet = workbook.Worksheets(0)
            'Load the second Excel workbook
            Dim workbook2 As Workbook = New Workbook
            workbook2.LoadFromFile("New.xlsx")
            'Add a new worksheet and set its name
            Dim targetWorksheet As Worksheet = workbook2.Worksheets.Add("added")
            'Copy the original worksheet to the new added worksheets
            targetWorksheet.CopyFrom(sheet)
            'Save the Excel workbook.
            workbook2.SaveToFile("CopySheetBetweenWorkbooks.xlsx", FileFormat.Version2013)
            System.Diagnostics.Process.Start("CopySheetBetweenWorkbooks.xlsx")
        End Sub
    End Class
End Namespace
Apply for a Temporary License
If you'd like to remove the evaluation message from the generated documents, or to get rid of the function limitations, please request a 30-day trial license for yourself.
Decrypt Excel Worksheet in C#, VB.NET
Why Decrypt Excel Worksheet?
To protect our Excel file data information, we can encrypt Excel worksheet by setting password. But we may sometimes forget the password and we can't read the excel data information neither. So, if this happens we need decrypt Excel worksheet. It’s not easy to decrypt Excel Worksheet which has been encrypted because the reason why we encrypt it is to prevent it from reading by people without password. And now, we do not have password.
How to Use C#/VB.NET to Decrypt Excel Worksheet?
Spire.XLS for .NET, a .NET Excel component which enables .NET applications to fast generate, read, write and modify Excel document without Microsoft Office Excel Automation can help us decrypt Excel worksheet by using C#/VB.NET.
Spire.XLS for .NET presents a very easy solution for developers/programmers decrypting Excel worksheet. We just need sheet.Unprotect( "password" ) method and normal encrypted excel worksheet can be decrypted.
Download Spire.XLS for .NET (or Spire.Office) with .NET framework 2.0 (or above) together. The sample code below will show you how to use C#/VB.NET decrypt Excel worksheet through Spire.XLS for .NET.
using Spire.Xls;
namespace DescryptWorksheet
{
    class Program
    {

        static void Main(string[] args)
        {
            Workbook workbook = new Workbook();
            workbook.LoadFromFile("test.xls");
            Worksheet sheet = workbook.Worksheets[0];
            sheet.Unprotect("password");
            workbook.SaveToFile("result.xls", ExcelVersion.Version97to2003);

        }
    }
}
Spire.XLS allows users to operate Excel document directly such as save to stream, save as web response, copy, lock/unlock worksheet, set up workbook properties, etc. As a professional .NET Excel component, it owns the ability of inserting content into Excel document, formatting cells and converting Excel documents to popular office file formats. Spire.XLS for .NET supports Excel 97-2003, Excel 2007 and Excel 2010.
C#/VB.NET: Protect or Unprotect Excel Documents
When sharing Excel files with other people or sending files out of your organization, you may want to protect sensitive data from being changed, moved, or deleted. The easiest way to prevent accidental or deliberate changes in the contents is to restrict editing on a worksheet or password protect an entire workbook. In this article, you will learn how to protect and unprotect a workbook or a worksheet in C# and VB.NET using Spire.XLS for .NET.
- Password Protect an Entire Workbook
- Protect a Worksheet with a Specific Protection Type
- Allow Users to Edit Ranges in a Protected Worksheet
- Lock Specific Cells in a Worksheet
- Unprotect a Password Protected Worksheet
- Remove or Reset Password of an Encrypted Workbook
Install Spire.XLS for .NET
To begin with, you need to add the DLL files included in the Spire.XLS for .NET package as references in your .NET project. The DLL files can be either downloaded from this link or installed via NuGet.
PM> Install-Package Spire.XLS
Password Protect an Entire Workbook in C# and VB.NET
By encrypting an Excel document with a password, you ensure that only you and authorized individuals can read or edit it. The following are the steps to password protect a workbook using Spire.XLS for .NET.
- Create a Workbook object.
- Load an Excel file using Workbook.LoadFromFile() method.
- Protect the workbook using a password using Workbook.Protect() method.
- Save the workbook to another Excel file using Workbook.SaveToFile() method.
- C#
- VB.NET
using Spire.Xls;
namespace PasswordProtectWorkbook
{
class Program
{
static void Main(string[] args)
{
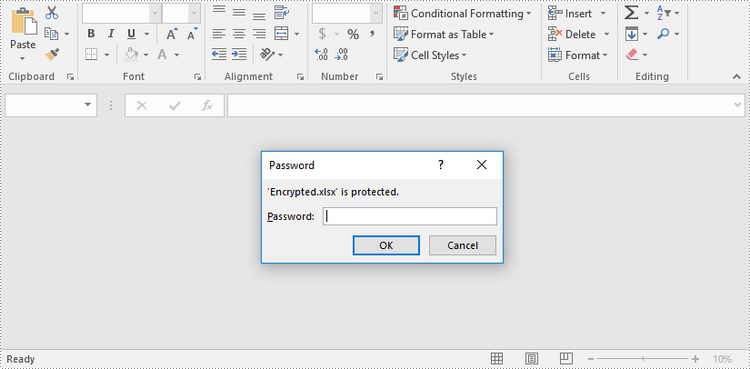
//Create a Workbook object
Workbook workbook = new Workbook();
//Load an Excel file
workbook.LoadFromFile(@"C:\Users\Administrator\Desktop\sample.xlsx");
//Protect workbook with a password
workbook.Protect("psd-123");
//Save the workbook to another Excel file
workbook.SaveToFile("Encrypted.xlsx", ExcelVersion.Version2016);
}
}
}
Protect a Worksheet with a Specific Protection Type in C# and VB.NET
If you wish to grant people permission to read your Excel document but restrict the types of modifications they are allowed to make on a worksheet, you can protect the worksheet with a specific protection type. The table below lists a variety of pre-defined protection types under the SheetProtectionType enumeration.
| Protection Type | Allow users to |
| Content | Modify or insert content. |
| DeletingColumns | Delete columns. |
| DeletingRows | Delete rows. |
| Filtering | Set filters. |
| FormattingCells | Format cells. |
| FormattingColumns | Format columns. |
| FormattingRows | Format rows. |
| InsertingColumns | Insert columns. |
| InsertingRows | Insert rows. |
| InsertingHyperlinks | Insert hyperlinks . |
| LockedCells | Select locked cells. |
| UnlockedCells | Select unlocked cells. |
| Objects | Modify drawing objects. |
| Scenarios | Modify saved scenarios. |
| Sorting | Sort data. |
| UsingPivotTables | Use pivot table and pivot chart. |
| All | Do any operations listed above on the protected worksheet. |
| None | Do nothing on the protected worksheet. |
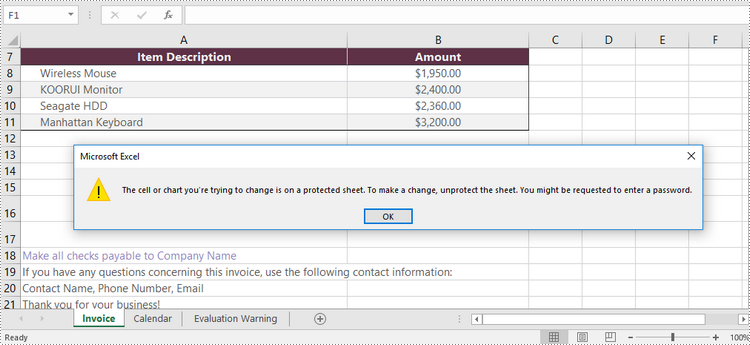
The following are the steps to protect a worksheet with a specific protection type using Spire.XLS for .NET.
- Create a Workbook object.
- Load an Excel file using Workbook.LoadFromFile() method.
- Get a specific worksheet through Workbook.Worksheets[index] property.
- Protect the worksheet with a protection type using Worksheet.Protect(string password, SheetProtectionType options) method.
- Save the workbook to another Excel file using Workbook.SaveToFile() method.
- C#
- VB.NET
using Spire.Xls;

namespace ProtectWorksheetWithSpecificProtectionType
{
    class Program
    {
        static void Main(string[] args)
        {
            //Create a Workbook object
            Workbook workbook = new Workbook();

            //Load an Excel file
            workbook.LoadFromFile(@"C:\Users\Administrator\Desktop\sample.xlsx");

            //Get a specific worksheet
            Worksheet worksheet = workbook.Worksheets[0];

            //Protect the worksheet with the permission password and the specific protect type
            worksheet.Protect("psd-permission", SheetProtectionType.None);

            //Save the workbook to another Excel file
            workbook.SaveToFile("ProtectWorksheet.xlsx", ExcelVersion.Version2016);
        }
    }
}
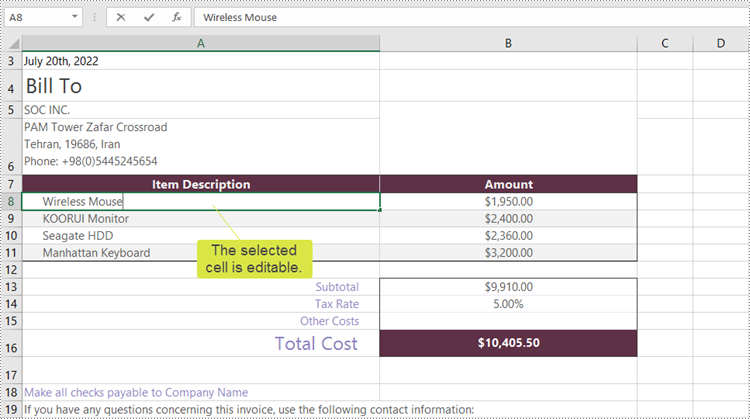
Allow Users to Edit Ranges in a Protected Worksheet in C# and VB.NET
In certain cases, you may need to allow users to be able to edit selected ranges in a protected worksheet. The following steps demonstrate how to.
- Create a Workbook object.
- Load an Excel file using Workbook.LoadFromFile() method.
- Get a specific worksheet through Workbook.Worksheets[index] property.
- Specify editable cell ranges using Worksheet.AddAllowEditRange() method.
- Protect the worksheet with a protection type using Worksheet.Protect(string password, SheetProtectionType options) method.
- Save the workbook to another Excel file using Workbook.SaveToFile() method.
- C#
- VB.NET
using Spire.Xls;

namespace AllowEditRanges
{
    class Program
    {
        static void Main(string[] args)
        {
            //Create a Workbook object
            Workbook workbook = new Workbook();

            //Load an Excel file
            workbook.LoadFromFile(@"C:\Users\Administrator\Desktop\sample.xlsx");

            //Get the first worksheet
            Worksheet sheet = workbook.Worksheets[0];

            //Add ranges that allow editing
            sheet.AddAllowEditRange("Range One", sheet.Range["A5:A6"]);
            sheet.AddAllowEditRange("Range Two", sheet.Range["A8:B11"]);

            //Protect the worksheet with a password and a protection type
            sheet.Protect("psd-permission", SheetProtectionType.All);

            //Save the workbook to another Excel file
            workbook.SaveToFile("AllowEditRange.xlsx", ExcelVersion.Version2016);
        }
    }
}
Unprotect a Password Protected Worksheet in C# and VB.NET
To remove the protection of a password-protected worksheet, invoke the Worksheet.Unprotect() method and pass in the original password as a parameter. The detailed steps are as follows.
- Create a Workbook object.
- Load an Excel file using Workbook.LoadFromFile() method.
- Get a specific worksheet through Workbook.Worksheets[index] property.
- Remove the protection using Worksheet.Unprotect(string password) method.
- Save the workbook to another Excel file using Workbook.SaveToFile() method.
- C#
- VB.NET
using Spire.Xls;

namespace UnprotectWorksheet
{
    class Program
    {
        static void Main(string[] args)
        {
            //Create a Workbook object
            Workbook workbook = new Workbook();

            //Load an Excel file containing protected worksheet
            workbook.LoadFromFile(@"C:\Users\Administrator\Desktop\ProtectedWorksheet.xlsx");

            //Get the first worksheet
            Worksheet sheet = workbook.Worksheets[0];

            //Unprotect the worksheet using the specified password
            sheet.Unprotect("psd-permission");

            //Save the workbook to anther Excel file
            workbook.SaveToFile("UnprotectWorksheet.xlsx", ExcelVersion.Version2016);
        }
    }
}
Remove or Reset Password of an Encrypted Workbook in C# and VB.NET
To remove or reset password of an encrypted workbook, you can use the Workbook.Unprotect() method and the Workbook.Protect() method, respectively. The following steps show you how to load an encrypted Excel document and delete or change the password of it.
- Create a Workbook object.
- Specify the open password through Workbook.OpenPassword property.
- Load the encrypted Excel file using Workbook.LoadFromFile() method.
- Remove the encryption using Workbook.Unprotect() method. Or change the password using Workbook.Protect() method.
- Save the workbook to another Excel file using Workbook.SaveToFile() method.
- C#
- VB.NET
using Spire.Xls;

namespace RemoveOrResetPassword
{
    class Program
    {
        static void Main(string[] args)
        {
            //Create a Workbook object
            Workbook workbook = new Workbook();

            //Specify the open password
            workbook.OpenPassword = "psd-123";

            //Load an encrypted Excel file
            workbook.LoadFromFile(@"C:\Users\Administrator\Desktop\Encrypted.xlsx");

            //Unprotect workbook
            workbook.UnProtect();

            //Reset password
            //workbook.Protect("newpassword");

            //Save the workbook to another Excel file
            workbook.SaveToFile("Unprotect.xlsx", ExcelVersion.Version2016);
        }
    }
}
Apply for a Temporary License
If you'd like to remove the evaluation message from the generated documents, or to get rid of the function limitations, please request a 30-day trial license for yourself.
Easily Lock Excel Worksheet in C#, VB.NET
The most important reason that people lock worksheet when perform tasks in Excel is to protect the original Excel file from editing or modifying by other people. Through Microsoft Excel, you can set the entire Excel worksheet by setting its property as Read Only or just set partial region area cells as Read Only via protecting worksheet. While how to lock worksheet with C#, VB.NET will be the core topic in this section.
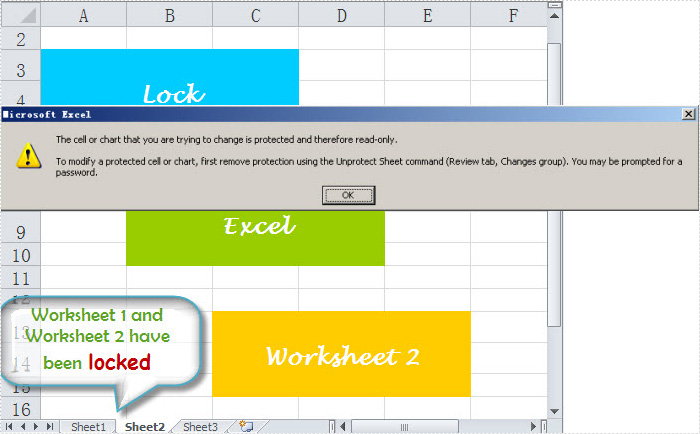
Spire.XLS for .NET, as a fast and reliable excel component, enables you to lock your worksheet by setting Worksheet class property: Worksheet.Range.Style.Locked = true. By this component, you can lock any worksheet that you need. In this solution, worksheet one and worksheet two are locked as you view in below picture:
Now, before the detail code, you have to add Spire.Xls dll by download Spire.XLS for .NET.
using Spire.Xls;

namespace lock_excel_worksheet
{
    class Program
    {
        static void Main(string[] args)
        {
            Workbook workbook = new Workbook();
            workbook.LoadFromFile(@"..\lock worksheet.xls");
            workbook.Worksheets[0].Range.Style.Locked = true;
            workbook.Worksheets[1].Range.Style.Locked = true;
            workbook.Worksheets[0].Protect("", SheetProtectionType.All);
            workbook.Worksheets[1].Protect("", SheetProtectionType.All);
            workbook.SaveToFile("result.xls",ExcelVersion.Version97to2003);
        }
    }
}
Imports Spire.Xls

Namespace lock_excel_worksheet

    Class Program

        Private Shared Sub Main(ByVal args() As String)
            Dim workbook As Workbook = New Workbook
            workbook.LoadFromFile("..\lock worksheet.xls")
            workbook.Worksheets(0).Range.Style.Locked = true
            workbook.Worksheets(1).Range.Style.Locked = true
            workbook.Worksheets(0).Protect("", SheetProtectionType.All)
            workbook.Worksheets(1).Protect("", SheetProtectionType.All)
            workbook.SaveToFile("result.xls",ExcelVersion.Version97to2003)
        End Sub
    End Class
End Namespace
Spire.XLS allows user to operate Excel document directly such as save to stream, save as web response, copy, lock/unlock worksheet, set up workbook properties, etc. As a professional .NET/Silverlight Excel component, it owns the ability of inserting content into Excel document, formatting cells and converting Excel documents to popular office file formats. Spire.XLS for .NET supports Excel 97-2003, Excel 2007 and Excel 2010.
Export Data from Listview to CSV
Why Export Listview to CSV?
CSV file (Comma Separated Values, sometimes also called Comma Delimited) is a specially formatted plain text file which stores spreadsheet or basic database-style information in a very simple format, with one record on each line, and each field within that record separated by a comma. It is often used to exchange data between disparate applications. CSV has become a pseudo standard throughout the industry, even among non-Microsoft platforms because it is used in Microsoft Excel.
CSV files are often used as a simple way to transfer a large volume of spreadsheet or database information between programs, without worrying about special file types. For example, transferring a home-made address book from Excel into a database program such as Filemaker Pro could be done by exporting the file as a CSV from Excel, then importing that CSV into File maker.
How to Export Listview to CSV?
Spire.DataExport for .NET presents an easy solution for exporting Listvie to CSV. Spire.DataExport is a 100% pure .NET component suit for exporting data into MS Excel, MS Word, HTML, XML, PDF, MS Access, DBF, SQL Script, SYLK, DIF, CSV ,MS Clipboard format. Quickly and easily export data from Command, ListView, DataTable components. Save you much time and money by using Spire.DataExport.
Download Spire.DataExport (or Spire.Office) with .NET framework 2.0 (or above) together and use the code below to Export Listview to CSV:
this.txtExport1.ActionAfterExport = Spire.DataExport.Common.ActionType.OpenView;
    this.txtExport1.DataFormats.CultureName = "en-us";
    this.txtExport1.DataFormats.Currency = "c";
    this.txtExport1.DataFormats.DateTime = "yyyy-M-d H:mm";
    this.txtExport1.DataFormats.Float = "g";
    this.txtExport1.DataFormats.Integer = "g";
    this.txtExport1.DataFormats.Time = "H:mm";
    this.txtExport1.DataEncoding = Spire.DataExport.Common.EncodingType.ASCII;
    this.txtExport1.DataSource = ExportSource.ListView;
    this.txtExport1.ListView = this.ListView1
    txtExport1.ExportType = TextExportType.CSV;
    txtExport1.FileName = "sample.csv";
    txtExport1.SaveToFile();
Me.txtExport1.ActionAfterExport = Spire.DataExport.Common.ActionType.OpenView
            Me.txtExport1.DataFormats.CultureName = "en-us"
            Me.txtExport1.DataFormats.Currency = "c"
            Me.txtExport1.DataFormats.DateTime = "yyyy-M-d H:mm"
            Me.txtExport1.DataFormats.Float = "g"
            Me.txtExport1.DataFormats.Integer = "g"
            Me.txtExport1.DataFormats.Time = "H:mm"
            Me.txtExport1.DataEncoding = Spire.DataExport.Common.EncodingType.ASCII
            Me.txtExport1.DataSource = Common.ExportSource.ListView
            Me.txtExport1.ListView = Me.ListView1
txtExport1.ExportType = TextExportType.CSV
                        txtExport1.FileName = "sample.csv"
                        txtExport1.SaveToFile()
Export Data from Listview to XML
Why Export Listview to Office OpenXML?
Office OpenXML has its own advantages. Office OpenXML, or Extensible Markup Language is a set of rules for encoding documents in machine-readable form. The real power of Office OpenXML comes from the fact that with Office OpenXML, not only can you define your own set of tags, but the rules specified by those tags need not be limited to formatting rules. And the most benefit of Office OpenXML is that because you are writing your own markup language, you are not restricted to a limited set of tags defined by proprietary vendors. Furthermore, Office OpenXML allows you to define all sorts of tags with all sorts of rules, such as tags representing business rules or tags representing data description or data relationships.
How to Export Listview to Office OpenXML?
As a professional and powerful .NET component suit for data exporting, Spire.DataExport for .NET can export data from Database to MS Excel,MS Word, HTML, Office OpenXML, PDF, MS Access, DBF, SQL Script, SYLK, DIF, CSV ,MS Clipboard format and of course enable to export ListView to Office OpenXML.
Spire.DataExport for .NET offers an easy solution on Exporting listview to Office OpenXML. Download Spire.DataExport (or Spire.Office) with .NET framework 2.0 (or above) together and use the code below to Export Listview to Office OpenXML:
this.xmlExport1.ActionAfterExport = Spire.DataExport.Common.ActionType.OpenView;
			this.xmlExport1.DataFormats.CultureName = "zh-CN";
			this.xmlExport1.DataFormats.Currency = "c";
			this.xmlExport1.DataFormats.DateTime = "yyyy-M-d H:mm";
			this.xmlExport1.DataFormats.Float = "g";
			this.xmlExport1.DataFormats.Integer = "g";
			this.xmlExport1.DataFormats.Time = "H:mm";
			this.xmlExport1.FileName = "sample.xml";
            this.xmlExport1.DataSource = Common.ExportSource.ListView;
            this.xmlExport1.ListView = this.listView1;
oleDbConnection1.Open();
try{
xmlExport1.SaveToFile();
}
Finally
{
oleDbConnection1.Close();

}
Me.xmlExport1.ActionAfterExport = Spire.DataExport.Common.ActionType.OpenView
            Me.xmlExport1.DataFormats.CultureName = "zh-CN"
            Me.xmlExport1.DataFormats.Currency = "c"
            Me.xmlExport1.DataFormats.DateTime = "yyyy-M-d H:mm"
            Me.xmlExport1.DataFormats.Float = "g"
            Me.xmlExport1.DataFormats.Integer = "g"
            Me.xmlExport1.DataFormats.Time = "H:mm"
            Me.xmlExport1.FileName = "sample.xml"
            Me.xmlExport1.DataSource = Common.ExportSource.ListView
            Me.xmlExport1.ListView = Me.listView1
oleDbConnection1.Open()
            Try
                 xmlExport1.SaveToFile()
Finally
                Me.oleDbConnection1.Close()
            End Try
Export Data from Listview to RTF
Why Export Listview to RTF?
RTF (Rich Text Format) is one of three core file formats which Microsoft supports natively along with DOC and DOCX. It's a cross-platform file extension supported by almost all word processors regardless of operating system. RTF word processing files are typically smaller, safer and can be used across a variety of operating systems. Main advantages of RTF:
- File Transparency
- No Risk of Viruses
- Smaller File Size for Text Documents
How to Export Listview to RTF?
Spire.DataExport for .NET as a professional .NET component suit for data exporting can easily help to export Listview to RTF. Download Spire.DataExport (or Spire.Office) with .NET framework 2.0 (or above) together and use the code below to Export Listview to RTF:
this.rtfExport1.ActionAfterExport = Spire.DataExport.Common.ActionType.OpenView;
			this.rtfExport1.DataFormats.CultureName = "en-us";
			this.rtfExport1.DataFormats.Currency = "c";
			this.rtfExport1.DataFormats.DateTime = "yyyy-M-d H:mm";
			this.rtfExport1.DataFormats.Float = "g";
			this.rtfExport1.DataFormats.Integer = "g";
			this.rtfExport1.DataFormats.Time = "H:mm";
			this.rtfExport1.FileName = "sample.doc";
			this.rtfExport1.RTFOptions.DataStyle.Font = new System.Drawing.Font("Arial", 10F, System.Drawing.FontStyle.Regular, System.Drawing.GraphicsUnit.World);
			this.rtfExport1.RTFOptions.FooterStyle.Font = new System.Drawing.Font("Arial", 10F, System.Drawing.FontStyle.Regular, System.Drawing.GraphicsUnit.World);
			this.rtfExport1.RTFOptions.HeaderStyle.Font = new System.Drawing.Font("Arial", 10F, System.Drawing.FontStyle.Regular, System.Drawing.GraphicsUnit.World);
			this.rtfExport1.RTFOptions.TitleStyle.Alignment = Spire.DataExport.RTF.RtfTextAlignment.Center;
			this.rtfExport1.RTFOptions.TitleStyle.Font = new System.Drawing.Font("Arial", 10F, System.Drawing.FontStyle.Bold);
                             this.rtfExport1.DataSource = ExportSource.ListView;
                            this.rtfExport1.ListView = this.ListView1
          rtfExport1.SaveToFile();
Me.rtfExport1.ActionAfterExport = Spire.DataExport.Common.ActionType.OpenView
            Me.rtfExport1.DataFormats.CultureName = "en-us"
            Me.rtfExport1.DataFormats.Currency = "c"
            Me.rtfExport1.DataFormats.DateTime = "yyyy-M-d H:mm"
            Me.rtfExport1.DataFormats.Float = "g"
            Me.rtfExport1.DataFormats.Integer = "g"
            Me.rtfExport1.DataFormats.Time = "H:mm"
            Me.rtfExport1.FileName = "sample.doc"
            Me.rtfExport1.RTFOptions.DataStyle.Font = New System.Drawing.Font("Arial", 10.0!, System.Drawing.FontStyle.Regular, System.Drawing.GraphicsUnit.World)
            Me.rtfExport1.RTFOptions.FooterStyle.Font = New System.Drawing.Font("Arial", 10.0!, System.Drawing.FontStyle.Regular, System.Drawing.GraphicsUnit.World)
            Me.rtfExport1.RTFOptions.HeaderStyle.Font = New System.Drawing.Font("Arial", 10.0!, System.Drawing.FontStyle.Regular, System.Drawing.GraphicsUnit.World)
            Me.rtfExport1.RTFOptions.TitleStyle.Alignment = Spire.DataExport.RTF.RtfTextAlignment.Center
            Me.rtfExport1.RTFOptions.TitleStyle.Font = New System.Drawing.Font("Arial", 10.0!, System.Drawing.FontStyle.Bold)
            Me.rtfExport1.DataSource = Common.ExportSource.ListView
            Me.cellExport1.ListView = Me.ListView1
            Me.cellExport1.SaveToFile()
Export Data from Listview to HTML
Spire.DataExport for .NET, is a professional .NET component suit for data exporting. It allows programmers export data from database to MS Excel, MS Word, HTML, XML, PDF, MS Access, DBF, SQL Script, SYLK, DIF, CSV ,MS Clipboard format. Here we will introduce how to export data from listview to HTML.
As the predominant markup language for web pages, HTMLwhich stands for HyperText Markup Language is written in the form of HTML elements consisting of tags, enclosed in angle brackets (like ), within the web page content. It's the basic building-blocks of webpages. HTML has many advantages such as:
- Easy to use
- Loose syntax (although, being too flexible will not comply with standards)
- Supported on almost every browser, if not all browsers
- Free - You need not buy any software
- Easy to learn & code even for novice programmers
- Very similar to XML syntax, which is increasingly used for data storage
- Widely used; established on almost every website, if not all websites
Spire.DataExport presents an easy way to export data from Listview to HTML. Download Spire.DataExport (or Spire.Office) with .NET framework 2.0 (or above) together and use the code below to export data from Listview to HTML with C#/VB.NET.
Spire.DataExport.HTML.HTMLExport htmlExport1;
this.htmlExport1.ActionAfterExport = Spire.DataExport.Common.ActionType.OpenView;
			this.htmlExport1.DataFormats.CultureName = "zh-CN";
			this.htmlExport1.DataFormats.Currency = "c";
			this.htmlExport1.DataFormats.DateTime = "yyyy-M-d H:mm";
			this.htmlExport1.DataFormats.Float = "g";
			this.htmlExport1.DataFormats.Integer = "g";
			this.htmlExport1.DataFormats.Time = "H:mm";
			this.htmlExport1.FileName = "sample.html";
			this.htmlExport1.HtmlStyle = Spire.DataExport.HTML.HtmlStyle.MSMoney;
			this.htmlExport1.HtmlTableOptions.BackColor = System.Drawing.Color.FromArgb(((System.Byte)(222)), ((System.Byte)(231)), ((System.Byte)(222)));
			this.htmlExport1.HtmlTableOptions.FontColor = System.Drawing.Color.Black;
			this.htmlExport1.HtmlTableOptions.HeadersBackColor = System.Drawing.Color.FromArgb(((System.Byte)(206)), ((System.Byte)(198)), ((System.Byte)(181)));
			this.htmlExport1.HtmlTableOptions.HeadersFontColor = System.Drawing.Color.Black;
			this.htmlExport1.HtmlTableOptions.OddBackColor = System.Drawing.Color.FromArgb(((System.Byte)(255)), ((System.Byte)(251)), ((System.Byte)(240)));
			this.htmlExport1.HtmlTextOptions.BackgroundColor = System.Drawing.Color.White;
			this.htmlExport1.HtmlTextOptions.Font = new System.Drawing.Font("Arial", 8F);
			this.htmlExport1.HtmlTextOptions.LinkActiveColor = System.Drawing.Color.Blue;
			this.htmlExport1.HtmlTextOptions.LinkColor = System.Drawing.Color.Red;
			this.htmlExport1.HtmlTextOptions.LinkVisitedColor = System.Drawing.Color.Purple;
            this.htmlExport1.DataSource = Common.ExportSource.ListView;
            this.htmlExport1.ListView = this.listView1;
            htmlExport1.SaveToFile();
htmlExport1 As Spire.DataExport.HTML.HTMLExport
            Me.htmlExport1.ActionAfterExport = Spire.DataExport.Common.ActionType.OpenView
            Me.htmlExport1.DataFormats.CultureName = "zh-CN"
            Me.htmlExport1.DataFormats.Currency = "c"
            Me.htmlExport1.DataFormats.DateTime = "yyyy-M-d H:mm"
            Me.htmlExport1.DataFormats.Float = "g"
            Me.htmlExport1.DataFormats.Integer = "g"
            Me.htmlExport1.DataFormats.Time = "H:mm"
            Me.htmlExport1.FileName = "sample.html"
            Me.htmlExport1.HtmlStyle = Spire.DataExport.HTML.HtmlStyle.MSMoney
            Me.htmlExport1.HtmlTableOptions.BackColor = System.Drawing.Color.FromArgb(CType(222, Byte), CType(231, Byte), CType(222, Byte))
            Me.htmlExport1.HtmlTableOptions.FontColor = System.Drawing.Color.Black
            Me.htmlExport1.HtmlTableOptions.HeadersBackColor = System.Drawing.Color.FromArgb(CType(206, Byte), CType(198, Byte), CType(181, Byte))
            Me.htmlExport1.HtmlTableOptions.HeadersFontColor = System.Drawing.Color.Black
            Me.htmlExport1.HtmlTableOptions.OddBackColor = System.Drawing.Color.FromArgb(CType(255, Byte), CType(251, Byte), CType(240, Byte))
            Me.htmlExport1.HtmlTextOptions.BackgroundColor = System.Drawing.Color.White
            Me.htmlExport1.HtmlTextOptions.Font = New System.Drawing.Font("Arial", 8.0!)
            Me.htmlExport1.HtmlTextOptions.LinkActiveColor = System.Drawing.Color.Blue
            Me.htmlExport1.HtmlTextOptions.LinkColor = System.Drawing.Color.Red
            Me.htmlExport1.HtmlTextOptions.LinkVisitedColor = System.Drawing.Color.Purple
            Me.htmlExport1.DataSource = Common.ExportSource.ListView
            Me.htmlExport1.ListView = Me.listView1
           htmlExport1.SaveToFile()