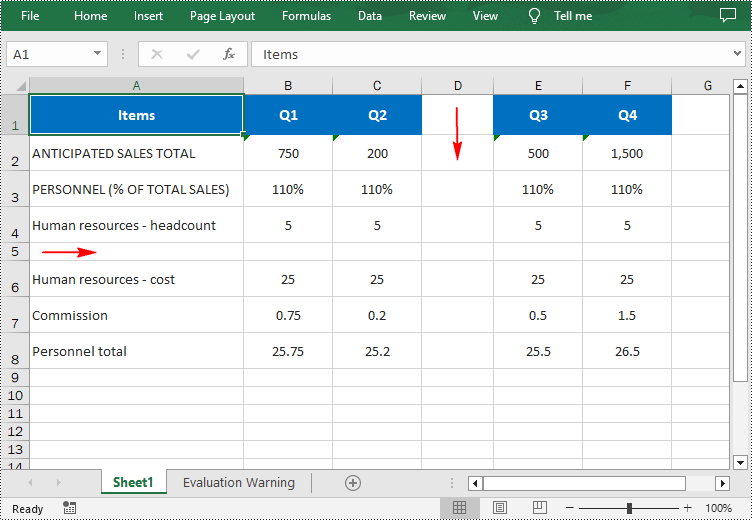
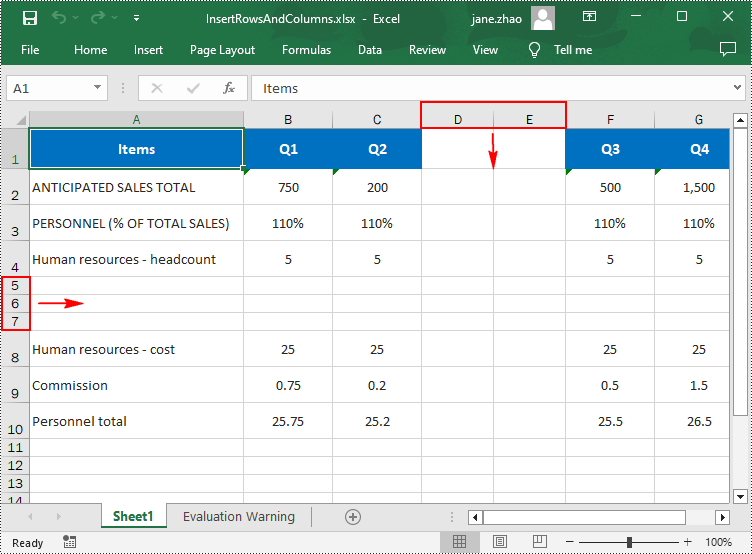
When working with Excel spreadsheets, it is common to add additional rows or columns as your data set grows or the scope of your project expands. By inserting rows and columns, you can quickly modify the structure of your spreadsheet to accommodate new information. In this article, you will learn how to insert rows and columns in Excel in C# using Spire.XLS for .NET.
Install Spire.XLS for .NET
To begin with, you need to add the DLL files included in the Spire.XLS for .NET package as references in your .NET project. The DLL files can be either downloaded from this link or installed via NuGet.
PM> Install-Package Spire.XLS
Insert a Row and a Column in Excel in C#
Spire.XLS for .NET provides the Worksheet.InsertRow(int rowIndex) and Worksheet.InsertColumn(int columnIndex) methods for inserting a blank row and a blank column in an Excel worksheet. The following are the detailed steps:
- Create a Workbook instance.
- Load a sample Excel file using Workbook.LoadFromFile() method.
- Get a specified worksheet using Workbook.Worksheets[sheetIndex] property.
- Insert a row into the worksheet using Worksheet.InsertRow(int rowIndex) method.
- Insert a column into the worksheet using Worksheet.InsertColumn(int columnIndex) method.
- Save the result file using Workbook.SaveToFile() method.
- C#
using Spire.Xls;

namespace InsertRowColumn
{
    class Program
    {
        static void Main(string[] args)
        {
            //Create a Workbook instance
            Workbook workbook = new Workbook();

            //Load an Excel document
            workbook.LoadFromFile("input.xlsx");

            //Get a specified worksheet
            Worksheet worksheet = workbook.Worksheets[0];

            //Insert a blank row as the 5th row in the worksheet
            worksheet.InsertRow(5);

            //Insert a blank column as the 4th column in the worksheet
            worksheet.InsertColumn(4);

            //Save the result file
            workbook.SaveToFile("InsertRowAndColumn.xlsx", ExcelVersion.Version2016);
        }
    }
}

Insert Multiple Rows and Columns in Excel in C#
To insert multiple rows and columns into a worksheet, you can use the Worksheet.InsertRow(int rowIndex, int rowCount) and Worksheet.InsertColumn(int columnIndex, int columnCount) methods. The following are detailed steps.
- Create a Workbook instance.
- Load a sample Excel file using Workbook.LoadFromFile() method.
- Get a specified worksheet using Workbook.Worksheets[sheetIndex] property.
- Insert multiple rows into the worksheet using Worksheet.InsertRow(int rowIndex, int rowCount) method.
- Insert multiple columns into the worksheet using Worksheet.InsertColumn(int columnIndex, int columnCount) method.
- Save the result file using Workbook.SaveToFile() method.
- C#
using Spire.Xls;

namespace InsertRowColumn
{
    class Program
    {
        static void Main(string[] args)
        {
            //Create a Workbook instance
            Workbook workbook = new Workbook();

            //Load an Excel document
            workbook.LoadFromFile(@"E:\PythonExcel\input1.xlsx");

            //Get a specified worksheet
            Worksheet worksheet = workbook.Worksheets[0];

            //Insert three blank rows into the worksheet
            worksheet.InsertRow(5, 3);

            //Insert two blank columns into the worksheet
            worksheet.InsertColumn(4, 2);

            //Save the result file
            workbook.SaveToFile("InsertRowsAndColumns.xlsx", ExcelVersion.Version2016);
        }
    }
}

Apply for a Temporary License
If you'd like to remove the evaluation message from the generated documents, or to get rid of the function limitations, please request a 30-day trial license for yourself.

