A named range in Excel is a user-defined name given to a specific cell or range of cells. It allows you to assign a meaningful and descriptive name to a set of data, making it easier to refer to that data in formulas, functions, and other parts of the spreadsheet. In this article, you will learn how to create, edit or delete named ranges in Excel in C# and VB.NET using Spire.XLS for .NET.
- Create a Named Range in Excel in C# and VB.NET
- Edit an Existing Named Range in Excel in C# and VB.NET
- Delete a Named Range from Excel in C# and VB.NET
Install Spire.XLS for .NET
To begin with, you need to add the DLL files included in the Spire.XLS for .NET package as references in your .NET project. The DLL files can be either downloaded from this link or installed via NuGet.
PM> Install-Package Spire.XLS
Create a Named Range in Excel in C# and VB.NET
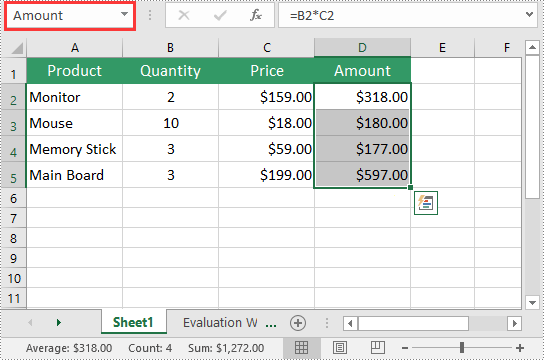
You can use the Workbook.NameRanges.Add(string name) method provided by Spire.XLS for .NET to add a named range to an Excel workbook. Once the named range is added, you can define the cell or range of cells it refers to using the INamedRange.RefersToRange property.
The following steps explain how to create a named range in Excel using Spire.XLS for .NET:
- Initialize an instance of the Workbook class.
- Load an Excel workbook using the Workbook.LoadFromFile() method.
- Add a named range to the workbook using the Workbook.NameRanges.Add(string name) method.
- Get a specific worksheet in the workbook using the Workbook.Worksheets[int index] property.
- Set the cell range that the named range refers to using the INamedRange.RefersToRange property.
- Save the result file using the Workbook.SaveToFile() method.
- C#
- VB.NET
using Spire.Xls;
using Spire.Xls.Core;

namespace CreateNamedRanges
{
    internal class Program
    {
        static void Main(string[] args)
        {
            //Initialize an instance of the Workbook class
            Workbook workbook = new Workbook();
            //Load an Excel workbook
            workbook.LoadFromFile(@"Sample.xlsx");

            //Add a named range to the workbook
            INamedRange namedRange = workbook.NameRanges.Add("Amount");

            //Get a specific worksheet in the workbook
            Worksheet sheet = workbook.Worksheets[0];

            //Set the cell range that the named range references
            namedRange.RefersToRange = sheet.Range["D2:D5"];

            //Save the result file to a specific location
            string result = "CreateNamedRange.xlsx";
            workbook.SaveToFile(result, ExcelVersion.Version2013);
            workbook.Dispose();
        }
    }
}

Edit an Existing Named Range in Excel in C# and VB.NET
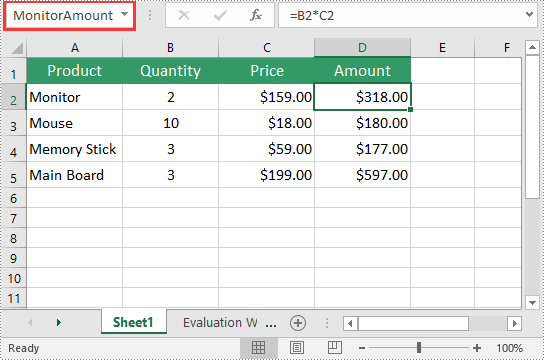
After you've created a named range, you may want to modify its name or adjust the cells it refers to.
The following steps explain how to modify the name and cell references of an existing named range in Excel using Spire.XLS for .NET:
- Initialize an instance of the Workbook class.
- Load an Excel workbook using the Workbook.LoadFromFile() method.
- Get a specific named range in the workbook using the Workbook.NameRanges[int index] property.
- Modify the name of the named range using the INamedRange.Name property.
- Modify the cells that the named range refers to using the INamedRange.RefersToRange property.
- Save the result file using the Workbook.SaveToFile() method.
- C#
- VB.NET
using Spire.Xls;
using Spire.Xls.Core;

namespace ModifyNamedRanges
{
    internal class Program
    {
        static void Main(string[] args)
        {
            //Initialize an instance of the Workbook class
            Workbook workbook = new Workbook();
            //Load an Excel workbook
            workbook.LoadFromFile(@"CreateNamedRange.xlsx");

            //Get a specific named range in the workbook
            INamedRange namedRange = workbook.NameRanges[0];

            //Change the name of the named range
            namedRange.Name = "MonitorAmount";

            //Set the cell range that the named range references
            namedRange.RefersToRange = workbook.Worksheets[0].Range["D2"];

            //Save the result file to a specific location
            string result = "ModifyNamedRange.xlsx";
            workbook.SaveToFile(result, ExcelVersion.Version2013);
            workbook.Dispose();
        }
    }
}

Delete a Named Range from Excel in C# and VB.NET
If you have made significant changes to the structure or layout of your spreadsheet, it might be necessary to delete a named range that is no longer relevant or accurate.
The following steps explain how to delete a named range from Excel using Spire.XLS for .NET:
- Initialize an instance of the Workbook class.
- Load an Excel workbook using the Workbook.LoadFromFile() method.
- Remove a specific named range by its index or name using the Workbook.NameRanges.RemoveAt(int index) or Workbook.NameRanges.Remove(string name) method.
- Save the result file using the Workbook.SaveToFile() method.
- C#
- VB.NET
using Spire.Xls;
using Spire.Xls.Core;

namespace RemoveNamedRanges
{
    internal class Program
    {
        static void Main(string[] args)
        {
            //Initialize an instance of the Workbook class
            Workbook workbook = new Workbook();
            //Load an Excel workbook
            workbook.LoadFromFile(@"CreateNamedRange.xlsx");

            //Remove a specific named range by its index
            workbook.NameRanges.RemoveAt(0);

            //Remove a specific named range by its name
            //workbook.NameRanges.Remove("Amount");

            //Save the result file to a specific location
            string result = "RemoveNamedRange.xlsx";
            workbook.SaveToFile(result, ExcelVersion.Version2013);
            workbook.Dispose();
        }
    }
}

Apply for a Temporary License
If you'd like to remove the evaluation message from the generated documents, or to get rid of the function limitations, please request a 30-day trial license for yourself.


