Converting Image to PDF with Python: 4 Code Examples
Table of Contents
Install with Pip
pip install Spire.PDF
Related Links
Converting an image to PDF is a convenient and efficient way to transform a visual file into a portable, universally readable format. Whether you're working with a scanned document, a photo, or a digital image, converting it to PDF provides numerous benefits. It maintains the image's original quality and guarantees compatibility across diverse devices and operating systems. Moreover, converting images to PDF allows for easy sharing, printing, and archiving, making it a versatile solution for various professional, educational, and personal purposes. This article provides several examples showing you how to convert images to PDF using Python.
- Convert an Image to a PDF Document in Python
- Convert Multiple Images to a PDF Document in python
- Create a PDF from Multiple Images Customizing Page Margins in Python
- Create a PDF with Several Images per Page in Python
PDF Converter API for Python
If you want to turn image files into PDF format in a Python application, Spire.PDF for Python can help with this. It enables you to build a PDF document with custom page settings (size and margins), add one or more images to every single page, and save the final document as a PDF file. Various image forms are supported which include PNG, JPEG, BMP, and GIF images.
In addition to the conversion from images to PDF, this library supports converting PDF to Word, PDF to Excel, PDF to HTML, PDF to PDF/A with high quality and precision. As an advanced Python PDF library, it also provides a rich API for developers to customize the conversion options to meet a variety of conversion requirements.
The library can be installed by running the following pip command.
pip install Spire.PDF
Steps to Convert an Image to PDF in Python
- Initialize PdfDocument class.
- Load an image file from path using FromFile method.
- Add a page with the specified size to the document.
- Draw the image on the page at the specified location using DrawImage method.
- Save the document to a PDF file using SaveToFile method.
Convert an Image to a PDF Document in Python
This code example converts an image file to a PDF document using the Spire.PDF for Python library by creating a blank document, adding a page with the same dimensions as the image, and drawing the image onto the page.
- Python
from spire.pdf.common import *
from spire.pdf import *

# Create a PdfDocument object
doc = PdfDocument()

# Set the page margins to 0
doc.PageSettings.SetMargins(0.0)

# Load a particular image
image = PdfImage.FromFile("C:\\Users\\Administrator\\Desktop\\Images\\img-1.jpg")

# Get the image width and height
width = image.PhysicalDimension.Width
height = image.PhysicalDimension.Height

# Add a page that has the same size as the image
page = doc.Pages.Add(SizeF(width, height))

# Draw image at (0, 0) of the page
page.Canvas.DrawImage(image, 0.0, 0.0, width, height)

# Save to file
doc.SaveToFile("output/ImageToPdf.pdf")
doc.Dispose()

Convert Multiple Images to a PDF Document in python
This example illustrates how to convert a collection of images into a PDF document using Spire.PDF for Python. The following code snippet reads images from a specified folder, creates a PDF document, adds each image to a separate page in the PDF, and saves the resulting PDF file.
- Python
from spire.pdf.common import *
from spire.pdf import *
import os

# Create a PdfDocument object
doc = PdfDocument()

# Set the page margins to 0
doc.PageSettings.SetMargins(0.0)

# Get the folder where the images are stored
path = "C:\\Users\\Administrator\\Desktop\\Images\\"
files = os.listdir(path)

# Iterate through the files in the folder
for root, dirs, files in os.walk(path):
    for file in files:

        # Load a particular image
        image = PdfImage.FromFile(os.path.join(root, file))

        # Get the image width and height
        width = image.PhysicalDimension.Width
        height = image.PhysicalDimension.Height

        # Add a page that has the same size as the image
        page = doc.Pages.Add(SizeF(width, height))

        # Draw image at (0, 0) of the page
        page.Canvas.DrawImage(image, 0.0, 0.0, width, height)

# Save to file
doc.SaveToFile('output/ImagesToPdf.pdf')
doc.Dispose()

Create a PDF from Multiple Images Customizing Page Margins in Python
This code example creates a PDF document and populates it with images from a specified folder, adjusts the page margins and saves the resulting document to a file.
- Python
from spire.pdf.common import *
from spire.pdf import *
import os

# Create a PdfDocument object
doc = PdfDocument()

# Set the left, top, right, bottom page margin
doc.PageSettings.SetMargins(30.0, 30.0, 30.0, 30.0)

# Get the folder where the images are stored
path = "C:\\Users\\Administrator\\Desktop\\Images\\"
files = os.listdir(path)

# Iterate through the files in the folder
for root, dirs, files in os.walk(path):
    for file in files:

        # Load a particular image
        image = PdfImage.FromFile(os.path.join(root, file))

        # Get the image width and height
        width = image.PhysicalDimension.Width
        height = image.PhysicalDimension.Height

        # Specify page size
        size = SizeF(width + doc.PageSettings.Margins.Left + doc.PageSettings.Margins.Right, height + doc.PageSettings.Margins.Top+ doc.PageSettings.Margins.Bottom)

        # Add a page with the specified size
        page = doc.Pages.Add(size)

        # Draw image on the page at (0, 0)
        page.Canvas.DrawImage(image, 0.0, 0.0, width, height)

# Save to file
doc.SaveToFile('output/CustomizeMargins.pdf')
doc.Dispose()

Create a PDF with Several Images per Page in Python
This code demonstrates how to use the Spire.PDF library in Python to create a PDF document with two images per page. The images in this example are the same size, if your image size is not consistent, then you need to adjust the code to achieve a desired result.
- Python
from spire.pdf.common import *
from spire.pdf import *
import os

# Create a PdfDocument object
doc = PdfDocument()

# Set the left, top, right, bottom page margins
doc.PageSettings.SetMargins(15.0, 15.0, 15.0, 15.0)

# Get the folder where the images are stored
path = "C:\\Users\\Administrator\\Desktop\\Images\\"
files = os.listdir(path)

# Iterate through the files in the folder
for root, dirs, files in os.walk(path):

    for i in range(len(files)):

        # Load a particular image
        image = PdfImage.FromFile(os.path.join(root, files[i]))

        # Get the image width and height
        width = image.PhysicalDimension.Width
        height = image.PhysicalDimension.Height

        # Specify page size
        size = SizeF(width + doc.PageSettings.Margins.Left + doc.PageSettings.Margins.Right, height*2 + doc.PageSettings.Margins.Top+ doc.PageSettings.Margins.Bottom + 15.0)

        if i % 2 == 0:

            # Add a page with the specified size
            page = doc.Pages.Add(size)

            # Draw first image on the page at (0, 0)
            page.Canvas.DrawImage(image, 0.0, 0.0, width, height)
        else :

            # Draw second image on the page at (0, height + 15)
            page.Canvas.DrawImage(image, 0.0, height + 15.0, width, height)

# Save to file
doc.SaveToFile('output/SeveralImagesPerPage.pdf')
doc.Dispose()

Conclusion
In this blog post, we explored how to use Spire.PDF for python to create PDF documents from images, containing one or more images per page. Additionally, we demonstrated how to customize the PDF page size and the margins around the images. For more tutorials, please check out our online documentation. If you have any questions, feel free to contact us by email or on the forum.
Python PDF to Text Conversion: Retrieve Text from PDFs
Table of Contents
Install with Pip
pip install Spire.PDF
Related Links
In today's digital age, the ability to extract information from PDF documents quickly and efficiently is crucial for various industries and professionals. Whether you're a researcher, data analyst, or simply dealing with a large volume of PDF files, being able to convert PDFs to editable text format can save you valuable time and effort. This is where Python, a versatile and powerful programming language, comes to the rescue with its extensive features for converting PDF to text in Python.
In this article, we will explore how to use Python for PDF to text conversion, unleashing the power of Python in PDF file processing. This article includes the following topics:
- Python API for PDF to Text Conversion
- Guide for Converting PDF to Text in Python
- Python to Convert PDF to Text Without Keeping Layout
- Python to Convert PDF to Text and Keep Layout
- Python to Convert a Specified PDF Page Area to Text
- Get a Free License for the API to Convert PDF to Text in Python
- Learn More About PDF Processing with Python
Python API for PDF to Text Conversion
To use Python for PDF to text conversion, a PDF processing API – Spire.PDF for Python is needed. This Python library is designed for PDF document manipulation in Python programs, which empowers Python programs with various PDF processing abilities.
We can download Spire.PDF for Python and add it to our project, or simply install it through PyPI with the following code:
pip install Spire.PDF
Guide for Converting PDF to Text in Python
Before we proceed with converting PDF to text using Python, let's take a look at the main advantages it can offer us:
- Editability: Converting PDF to text enables you to edit the document more easily, as text files can be opened and edited on most devices.
- Accessibility: Text files are generally more accessible than PDFs. Whether it's a desktop or mobile phone, text files can be viewed on devices with ease.
- Integration with other applications: Text files can be seamlessly integrated into various applications and workflows.
Steps for converting PDF documents to text files in Python:
- Install Spire.PDF for Python.
- Import modules.
- Create an object of PdfDocument class and load a PDF file using LoadFromFile() method.
- Create an object of PdfTextExtractOptions class and set the text extracting options, including extracting all text, showing hidden text, only extracting text in a specified area, and simple extraction.
- Get a page in the document using PdfDocument.Pages.get_Item() method and create PdfTextExtractor objects based on each page to extract the text from the page using Extract() method with specified options.
- Save the extracted text as a text file and close the PdfDocument object.
Python to Convert PDF to Text Without Keeping Layout
When using the simple extraction method to extract text from PDF, the program will not retain the blank areas and keep track of the current Y position of each string and insert a line break into the output if the Y position has changed.
- Python
from spire.pdf import PdfDocument
from spire.pdf import PdfTextExtractOptions
from spire.pdf import PdfTextExtractor

# Create an object of PdfDocument class and load a PDF file
pdf = PdfDocument()
pdf.LoadFromFile("Sample.pdf")

# Create a string object to store the text
extracted_text = ""

# Create an object of PdfExtractor
extract_options = PdfTextExtractOptions()
# Set to use simple extraction method
extract_options.IsSimpleExtraction = True

# Loop through the pages in the document
for i in range(pdf.Pages.Count):
    # Get a page
    page = pdf.Pages.get_Item(i)
    # Create an object of PdfTextExtractor passing the page as paramter
    text_extractor = PdfTextExtractor(page)
    # Extract the text from the page
    text = text_extractor.ExtractText(extract_options)
    # Add the extracted text to the string object
    extracted_text += text

# Write the extracted text to a text file
with open("output/ExtractedText.txt", "w") as file:
    file.write(extracted_text)
pdf.Close()

Python to Convert PDF to Text and Keep Layout
When using the default extraction method to extract text from PDF, the program will extract text line by line including blanks.
- Python
from spire.pdf import PdfDocument
from spire.pdf import PdfTextExtractOptions
from spire.pdf import PdfTextExtractor

# Create an object of PdfDocument class and load a PDF file
pdf = PdfDocument()
pdf.LoadFromFile("Sample.pdf")

# Create a string object to store the text
extracted_text = ""

# Create an object of PdfExtractor
extract_options = PdfTextExtractOptions()

# Loop through the pages in the document
for i in range(pdf.Pages.Count):
    # Get a page
    page = pdf.Pages.get_Item(i)
    # Create an object of PdfTextExtractor passing the page as paramter
    text_extractor = PdfTextExtractor(page)
    # Extract the text from the page
    text = text_extractor.ExtractText(extract_options)
    # Add the extracted text to the string object
    extracted_text += text

# Write the extracted text to a text file
with open("output/ExtractedText.txt", "w") as file:
    file.write(extracted_text)
pdf.Close()

Python to Convert a Specified PDF Page Area to Text
- Python
from spire.pdf import PdfDocument
from spire.pdf import PdfTextExtractOptions
from spire.pdf import PdfTextExtractor
from spire.pdf import RectangleF

# Create an object of PdfDocument class and load a PDF file
pdf = PdfDocument()
pdf.LoadFromFile("Sample.pdf")

# Create an object of PdfExtractor
extract_options = PdfTextExtractOptions()

# Set to extract specific page area
extract_options.ExtractArea = RectangleF(50.0, 220.0, 700.0, 230.0)

# Get a page
page = pdf.Pages.get_Item(0)

# Create an object of PdfTextExtractor passing the page as paramter
text_extractor = PdfTextExtractor(page)

# Extract the text from the page
extracted_text = text_extractor.ExtractText(extract_options)

# Write the extracted text to a text file
with open("output/ExtractedText.txt", "w") as file:
    file.write(extracted_text)
pdf.Close()

Get a Free License for the API to Convert PDF to Text in Python
Users can apply for a free temporary license to try Spire.PDF for Python and evaluate the Python PDF to Text Conversion features without any limitations.
Learn More About PDF Processing with Python
Apart from converting PDF to text with Python, we can also explore more PDF processing features of this API through the following sources:
- How to Extract Text from PDF Documents with Python
- Tutorials for PDF Processing with Python
- Converting Image-Based PDF Documents to Text (OCR)
Conclusion
In this blog post, we have explored Python in PDF to text conversion. By following the operational steps and referring to the code examples in the article, we can achieve fast PDF to text conversion in Python programs. Additionally, the article provides insights into the benefits of converting PDF documents to text files. More importantly, we can gain further knowledge on handling PDF documents with Python and methods to convert image-based PDF documents to text through OCR tools from the references in the article. If any issues arise during the usage of Spire.PDF for Python, technical support can be obtained by reaching out to our team via the Spire.PDF forum or email.
Read Excel Files with Python
Table of Contents
Install with Pip
pip install Spire.XLS
Related Links
Excel files (spreadsheets) are used by people worldwide for organizing, analyzing, and storing tabular data. Due to their popularity, developers frequently encounter situations where they need to extract data from Excel or create reports in Excel format. Being able to read Excel files with Python opens up a wide range of possibilities for data processing and automation. In this article, you will learn how to read data (text or number values) from a cell, a cell range, or an entire worksheet by using the Spire.XLS for Python library.
- Read Data of a Particular Cell in Python
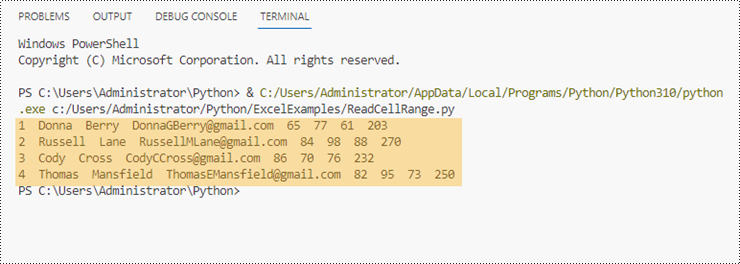
- Read Data from a Cell Range in Python
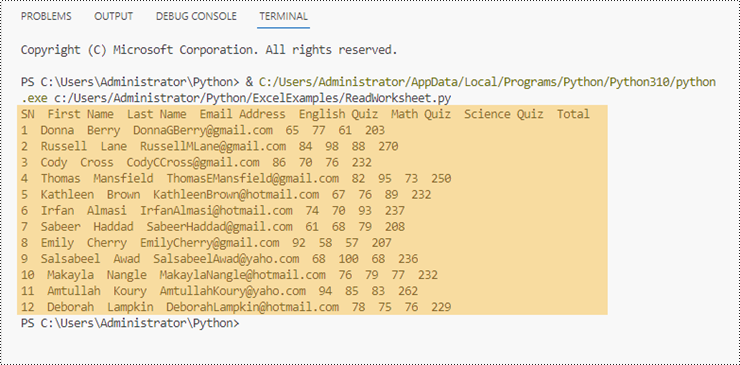
- Read Data from an Excel Worksheet in Python
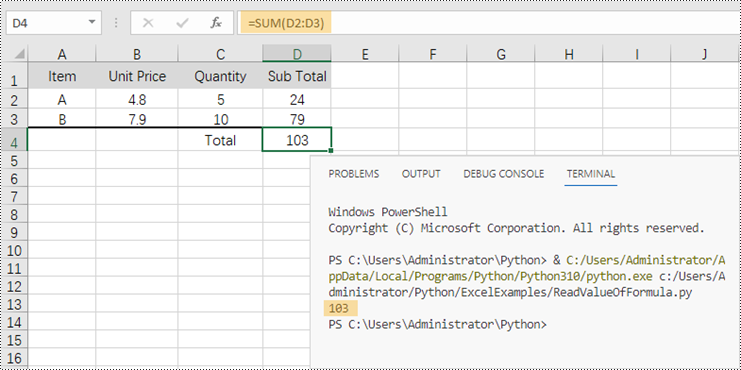
- Read Value Rather than Formula in a Cell in Python
Python Library for Reading Excel
Spire.XLS for Python is a reliable enterprise-level Python library for creating, writing, reading and editing Excel documents (XLS, XLSX, XLSB, XLSM, ODS) in a Python application. It provides a comprehensive set of interfaces, classes and properties that allow programmers to read and write Excel files with ease. Specifically, a cell in a worksheet can be accessed using the Worksheet.Range property and the value of the cell can be obtained using the CellRange.Value property.
The library is easy to install by running the following pip command. If you’d like to manually import the necessary dependencies, refer to How to Install Spire.XLS for Python in VS Code
pip install Spire.XLS
Classes and Properties in Spire.XLS for Python API
- Workbook class: Represents an Excel workbook model, which you can use to create a workbook from scratch or load an existing Excel document and do modification on it.
- Worksheet class: Represents a worksheet in a workbook.
- CellRange class: Represents a specific cell or a cell range in a workbook.
- Worksheet.Range property: Gets a cell or a range and returns an object of CellRange class.
- Worksheet.AllocatedRange property: Gets the cell range containing data and returns an object of CellRange class.
- CellRange.Value property: Gets the number value or text value of a cell. But if a cell has a formula, this property returns the formula instead of the result of the formula.
Read Data of a Particular Cell in Python
With Spire.XLS for Python, you can easily get the value of a certain cell by using the CellRange.Value property. The steps to read data of a particular Excel cell in Python are as follows.
- Instantiate Workbook class
- Load an Excel document using LoadFromFile method.
- Get a specific worksheet using Workbook.Worksheets[index] property.
- Get a specific cell using Worksheet.Range property.
- Get the value of the cell using CellRange.Value property
- Python
from spire.xls import *
from spire.xls.common import *

# Create a Workbook object
wb = Workbook()

# Load an Excel file
wb.LoadFromFile("C:\\Users\\Administrator\\Desktop\\Data.xlsx")

# Get a specific worksheet
sheet = wb.Worksheets[0]

# Get a specific cell
certainCell = sheet.Range["D9"]

# Get the value of the cell
print("D9 has the value: " + certainCell.Value)

Read Data from a Cell Range in Python
We already know how to get the value of a cell, to get the values of a range of cells, such as certain rows or columns, we just need to use loop statements to iterate through the cells, and then extract them one by one. The steps to read data from an Excel cell range in Python are as follows.
- Instantiate Workbook class
- Load an Excel document using LoadFromFile method.
- Get a specific worksheet using Workbook.Worksheets[index] property.
- Get a specific cell range using Worksheet.Range property.
- Use for loop statements to retrieve each cell in the range, and get the value of a specific cell using CellRange.Value property
- Python
from spire.xls import *
from spire.xls.common import *

# Create a Workbook object
wb = Workbook()

# Load an existing Excel file
wb.LoadFromFile("C:\\Users\\Administrator\\Desktop\\Data.xlsx")

# Get a specific worksheet
sheet = wb.Worksheets[0]

# Get a cell range
cellRange = sheet.Range["A2:H5"]

# Iterate through the rows
for i in range(len(cellRange.Rows)):

    # Iterate through the columns
    for j in range(len(cellRange.Rows[i].Columns)):

        # Get data of a specific cell
        print(cellRange[i + 2, j + 1].Value + "  ", end='')

    print("")
Read Data from an Excel Worksheet in Python
Spire.XLS for Python offers the Worksheet.AllocatedRange property to automatically obtain the cell range that contains data from a worksheet. Then, we traverse the cells within the cell range rather than the entire worksheet, and retrieve cell values one by one. The following are the steps to read data from an Excel worksheet in Python.
- Instantiate Workbook class
- Load an Excel document using LoadFromFile method.
- Get a specific worksheet using Workbook.Worksheets[index] property.
- Get the cell range containing data from the worksheet using Worksheet.AllocatedRange property.
- Use for loop statements to retrieve each cell in the range, and get the value of a specific cell using CellRange.Value property
- Python
from spire.xls import *
from spire.xls.common import *

# Create a Workbook object
wb = Workbook()

# Load an existing Excel file
wb.LoadFromFile("C:\\Users\\Administrator\\Desktop\\Data.xlsx")

# Get the first worksheet
sheet = wb.Worksheets[0]

# Get the cell range containing data
locatedRange = sheet.AllocatedRange

# Iterate through the rows
for i in range(len(sheet.Rows)):

    # Iterate through the columns
    for j in range(len(locatedRange.Rows[i].Columns)):

        # Get data of a specific cell
        print(locatedRange[i + 1, j + 1].Value + "  ", end='')

    print("")
Read Value Rather than Formula in a Cell in Python
As mentioned earlier, when a cell contains a formula, the CellRange.Value property returns the formula itself, not the value of the formula. If you want to get the value, you need to use the str(CellRange.FormulaValue) method. The following are the steps to read value rather than formula in an Excel cell in Python.
- Instantiate Workbook class
- Load an Excel document using LoadFromFile method.
- Get a specific worksheet using Workbook.Worksheets[index] property.
- Get a specific cell using Worksheet.Range property.
- Determine if the cell has a formula using CellRange.HasFormula property.
- Get the formula value of the cell using str(CellRange.FormulaValue) method
- Python
from spire.xls import *
from spire.xls.common import *

# Create a Workbook object
wb = Workbook()

# Load an Excel file
wb.LoadFromFile("C:\\Users\\Administrator\\Desktop\\Formula.xlsx")

# Get a specific worksheet
sheet = wb.Worksheets[0]

# Get a specific cell
certainCell = sheet.Range["D4"]

# Determine if the cell has formula
if(certainCell.HasFormula):

    # Get the formula value of the cell
    print(str(certainCell.FormulaValue))
Conclusion
In this blog post, we learned how to read data from cells, cell regions, and worksheets in Python with the help of Spire.XLS for Python API. We also discussed how to determine if a cell has a formula and how to get the value of the formula. This library supports extraction of many other elements in Excel such as images, hyperlinks and OEL objects. Check out our online documentation for more tutorials. If you have any questions, please contact us by email or on the forum.
Python: Merge Word Documents
Table of Contents
Install with Pip
pip install Spire.Doc
Related Links
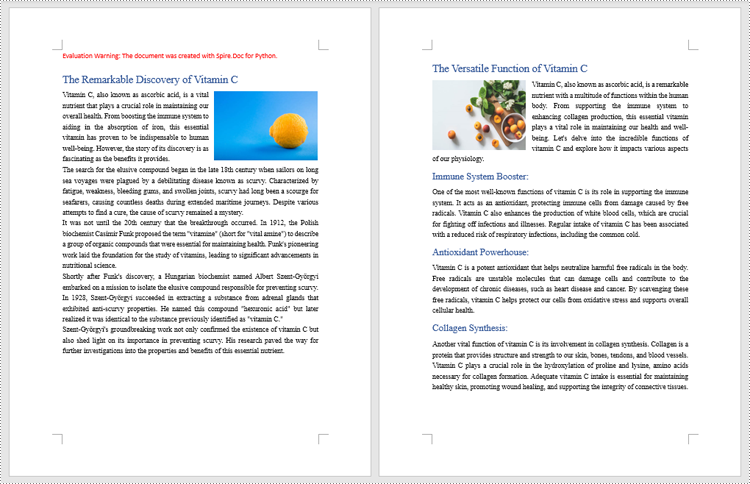
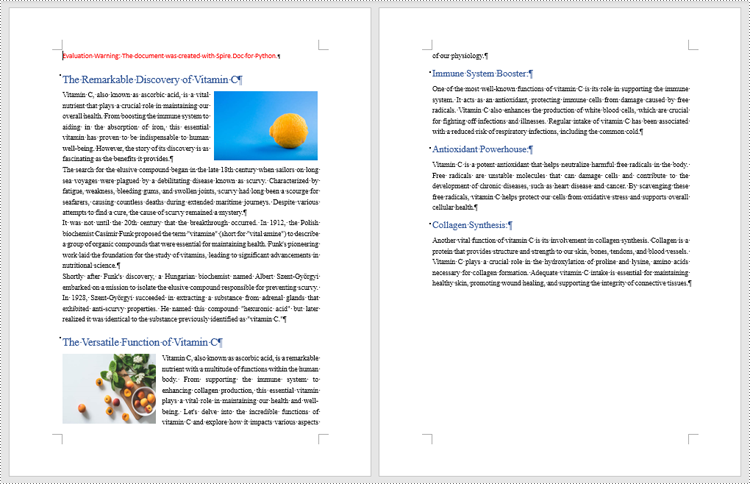
Dealing with a large number of Word documents can be very challenging. Whether it's editing or reviewing a large number of documents, there's a lot of time wasted on opening and closing documents. What's more, sharing and receiving a large number of separate Word documents can be annoying, as it may require a lot of repeated sending and receiving operations by both the sharer and the receiver. Therefore, in order to enhance efficiency and save time, it is advisable to merge related Word documents into a single file. From this article, you will know how to use Spire.Doc for Python to easily merge Word documents through Python programs.
- Merge Word Documents by Inserting Files with Python
- Merge Word Documents by Cloning Contents with Python
Install Spire.Doc for Python
This scenario requires Spire.Doc for Python and plum-dispatch v1.7.4. They can be easily installed in your VS Code through the following pip command.
pip install Spire.Doc
If you are unsure how to install, please refer to this tutorial: How to Install Spire.Doc for Python in VS Code
Merge Word Documents by Inserting Files with Python
The method Document.insertTextFromFile() is used to insert other Word documents to the current one, and the inserted content will start from a new page. The detailed steps for merging Word documents by inserting are as follows:
- Create an object of Document class and load a Word document using Document.LoadFromFile() method.
- Insert the content from another document to it using Document.InsertTextFromFile() method.
- Save the document using Document.SaveToFile() method.
- Python
from spire.doc import *
    from spire.doc.common import *

    # Create an object of Document class and load a Word document
    doc = Document()
    doc.LoadFromFile("Sample1.docx")

    # Insert the content from another Word document to this one
    doc.InsertTextFromFile("Sample2.docx", FileFormat.Auto)

    # Save the document
    doc.SaveToFile("output/InsertDocuments.docx")
    doc.Close()
Merge Word Documents by Cloning Contents with Python
Merging Word documents can also be achieved by cloning contents from one Word document to another. This method maintains the formatting of the original document, and content cloned from another document continues at the end of the current document without starting a new Page. The detailed steps are as follows:
- Create two objects of Document class and load two Word documents using Document.LoadFromFile() method.
- Get the last section of the destination document using Document.Sections.get_Item() method.
- Loop through the sections in the document to be cloned and then loop through the child objects of the sections.
- Get a section child object using Section.Body.ChildObjects.get_Item() method.
- Add the child object to the last section of the destination document using Section.Body.ChildObjects.Add() method.
- Save the result document using Document.SaveToFile() method.
- Python
from spire.doc import *
    from spire.doc.common import *

    # Create two objects of Document class and load two Word documents
    doc1 = Document()
    doc1.LoadFromFile("Sample1.docx")
    doc2 = Document()
    doc2.LoadFromFile("Sample2.docx")

    # Get the last section of the first document
    lastSection = doc1.Sections.get_Item(doc1.Sections.Count - 1)

    # Loop through the sections in the second document
    for i in range(doc2.Sections.Count):
        section = doc2.Sections.get_Item(i)
        # Loop through the child objects in the sections
        for j in range(section.Body.ChildObjects.Count):
            obj = section.Body.ChildObjects.get_Item(j)
            # Add the child objects from the second document to the last section of the first document
            lastSection.Body.ChildObjects.Add(obj.Clone())

    # Save the result document
    doc1.SaveToFile("output/MergeByCloning.docx")
    doc1.Close()
    doc2.Close()
Apply for a Temporary License
If you'd like to remove the evaluation message from the generated documents, or to get rid of the function limitations, please request a 30-day trial license for yourself.