C#: Insert or Remove Section Breaks in Word
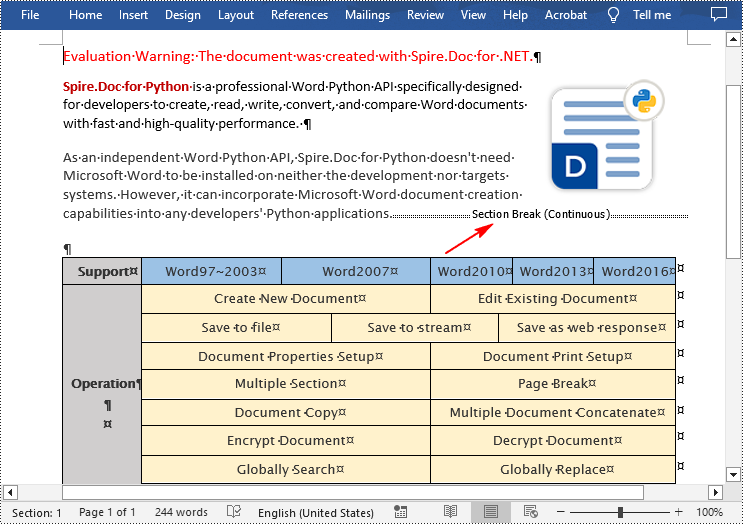
Section breaks allow you to divide a document into sections, each with its own formatting and layout settings, giving you greater control over the overall structure and appearance of your document. Whether you're compiling a complex report or a lengthy dissertation, mastering section breaks can greatly improve your document management skills. This article will demonstrate how to insert or remove section breaks in Word in C# using Spire.Doc for .NET.
Install Spire.Doc for .NET
To begin with, you need to add the DLL files included in the Spire.Doc for.NET package as references in your .NET project. The DLL files can be either downloaded from this link or installed via NuGet.
PM> Install-Package Spire.Doc
Insert Section Breaks in Word in C#
Spire.Doc for .NET provides the Paragraph.InsertSectionBreak(SectionBreakType breakType) method to insert a specified type of section break to a paragraph. The following table provides an overview of the supported section break types, along with their corresponding Enums and descriptions:
| Section Break | Enum | Description |
| New page | SectionBreakType.NewPage | Start the new section on a new page. |
| Continuous | SectionBreakType.NoBreak | Start the new section on the same page, allowing for continuous content flow. |
| Odd page | SectionBreakType.OddPage | Start the new section on the next odd-numbered page. |
| Even page | SectionBreakType.EvenPage | Start the new section on the next even-numbered page. |
| New column | SectionBreakType.NewColumn | Start the new section in the next column if columns are enabled. |
The following are the detailed steps to insert a continuous section break:
- Create a Document instance.
- Load a Word document using Document.LoadFromFile() method.
- Get a specified section using Document.Sections[] property.
- Get a specified paragraph of the section using Section.Paragraphs[] property.
- Add a section break to the end of the paragraph using Paragraph.InsertSectionBreak() method.
- Save the result document using Document.SaveToFile() method.
- C#
using Spire.Doc;
using Spire.Doc.Documents;

namespace InsertSectionBreak
{
    class Program
    {
        static void Main(string[] args)
        {
            //Create a Document instance
            Document doc = new Document();

            //Load a Word document
            doc.LoadFromFile("sample.docx");

            //Get the first section in the document
            Section sec = doc.Sections[0];

            //Get the second paragraph in the section
            Paragraph para = sec.Paragraphs[1];

            //Insert a continuous section break
            para.InsertSectionBreak(SectionBreakType.NoBreak);

            //Save the result document
            doc.SaveToFile("InsertSectionBreak.docx", FileFormat.Docx);
        }
    }
}
Remove Section Breaks in Word in C#
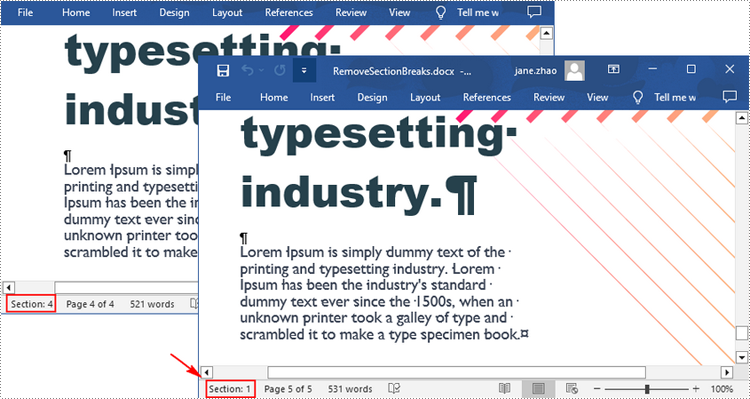
To delete all sections breaks in a Word document, we need to access the first section in the document, then copy the contents of the other sections to the first section and delete them. The following are the detailed steps:
- Create a Document instance.
- Load a Word document using Document.LoadFromFile() method.
- Get the first section using Document.Sections[] property.
- Iterate through other sections in the document.
- Get the second section, and then iterate through to get its child objects.
- Clone the child objects of the second section and add them to the first section using Section.Body.ChildObjects.Add() method.
- Delete the second section using Document.Sections.Remove() method.
- Repeat the process to copy and delete the remaining sections.
- Save the result document using Document.SaveToFile() method.
- C#
using Spire.Doc;

namespace DeleteSectionBreak
{
    class Program
    {
        static void Main(string[] args)
        {
            //Create a Document instance
            Document doc = new Document();

            //Load a Word document
            doc.LoadFromFile("Report.docx");

            //Get the first section in the document
            Section sec = doc.Sections[0];

            //Iterate through other sections in the document
            for (int i = 0; i < doc.Sections.Count - 1; i++)
            {
                //Get the second section in the document
                Section section = doc.Sections[1];

                //Iterate through all child objects of the second section
                for (int j = 0; j < section.Body.ChildObjects.Count; j++)
                {
                    //Get the child objects
                    DocumentObject obj = section.Body.ChildObjects[j];
                    //Clone the child objects to the first section
                    sec.Body.ChildObjects.Add(obj.Clone());
                }

                //Remove the second section
                doc.Sections.Remove(section);
            }

            //Save the result document
            doc.SaveToFile("RemoveSectionBreaks.docx", FileFormat.Docx);
        }
    }
}
Apply for a Temporary License
If you'd like to remove the evaluation message from the generated documents, or to get rid of the function limitations, please request a 30-day trial license for yourself.
C#/VB.NET: Set Line Spacing and Paragraph Spacing in Word
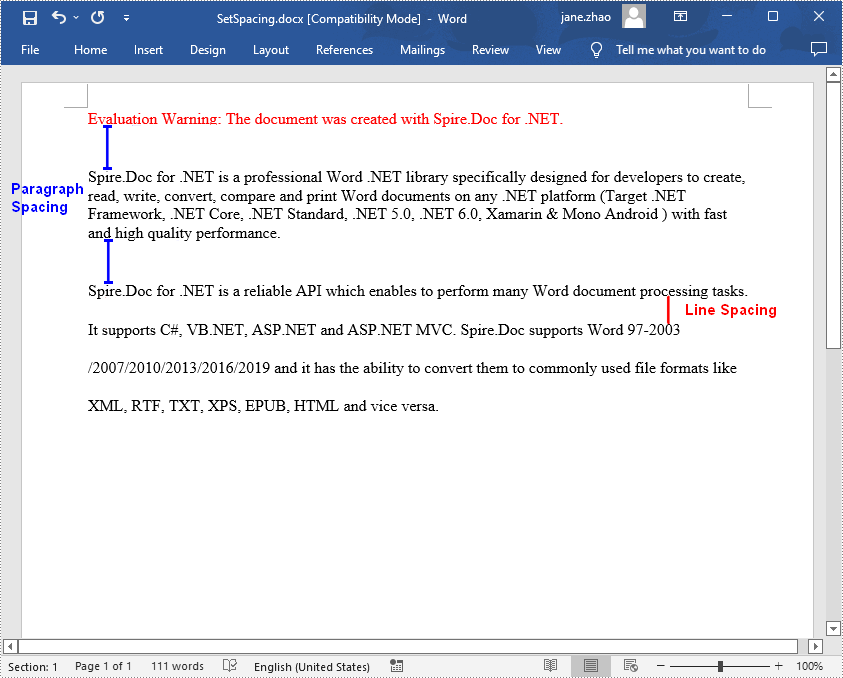
Line spacing is the amount of white space between each line in a paragraph, while paragraph spacing is the amount of white space before and after each paragraph in a document. In MS Word, you can adjust the spacing manually if the default spacing does not meet your needs. In this article, you will learn how to programmatically set line spacing and paragraph spacing in Word using Spire.Doc for .NET.
Install Spire.Doc for .NET
To begin with, you need to add the DLL files included in the Spire.Doc for.NET package as references in your .NET project. The DLL files can be either downloaded from this link or installed via NuGet.
PM> Install-Package Spire.Doc
Set Line Spacing and Paragraph Spacing in Word
Loose line or paragraph spacing can make text more readable, while tight line or paragraph spacing can fit more text in a document. Below are the steps to adjust the line spacing and paragraph spacing in a Word document.
- Create a Document instance.
- Add a section to the document using Document.AddSection() method, and then add a paragraph to the section.
- Set the before and after spacing for the paragraph using Paragraph.Format.BeforeSpacing and Paragraph.Format.AfterSpacing properties.
- Add another paragraph and set line spacing in the paragraph using Paragraph.Format.LineSpacing property.
- Save the result document using Document.SaveToFile() method.
- C#
- VB.NET
using Spire.Doc;
using Spire.Doc.Documents;

namespace SetSpacing
{
    class Program
    {
        static void Main(string[] args)
        {
            //Create a Document instance
            Document document = new Document();

            //Add a section
            Section section = document.AddSection();

            //Add a paragraph
            Paragraph paragraph = section.AddParagraph();
            paragraph.AppendText("Spire.Doc for .NET is a professional Word .NET library specifically designed for developers to " +
                "create, read, write, convert, compare and print Word documents on any .NET platform " +
                "(Target .NET Framework, .NET Core, .NET Standard, .NET 5.0, .NET 6.0, Xamarin & Mono Android ) with fast and high quality performance.");

            //Set spacing before the paragraph
            paragraph.Format.BeforeSpacing = 30;

            //Set spacing after the paragraph
            paragraph.Format.AfterSpacing = 30;

            //Add another paragraph
            Paragraph paragraph2 = section.AddParagraph();
            paragraph2.AppendText("Spire.Doc for .NET is a reliable API which enables to perform many Word document processing tasks. " +
                "It supports C#, VB.NET, ASP.NET and ASP.NET MVC. Spire.Doc supports Word 97-2003 /2007/2010/2013/2016/2019 " +
                "and it has the ability to convert them to commonly used file formats like XML, RTF, TXT, XPS, EPUB, HTML and vice versa. ");

            //Set line spacing in the paragraph
            paragraph2.Format.LineSpacing = 25;

            //Save the result document
            document.SaveToFile("SetSpacing.docx", FileFormat.Docx);
        }
    }
}
Apply for a Temporary License
If you'd like to remove the evaluation message from the generated documents, or to get rid of the function limitations, please request a 30-day trial license for yourself.
Create PDF/A and insert hyperlink to image in C#
PDF/A is widely used for long term archiving for PDF format. By using Spire.PDF, you can create PDF/A file directly. This article mainly shows how to set up PDF/A file; it will also demonstrate how to add image and insert hyperlink to image in C#.
Make sure Spire.PDF for .NET (version 2.9.43 or above) has been installed correctly and then add Spire.Pdf.dll as reference in the downloaded Bin folder though the below path: "..\Spire.Pdf\Bin\NET4.0\ Spire.Pdf.dll".
Here comes to the steps:
Step 1: Create a PDF/A document.
// create a PDF/A document and add contents to it
PdfDocument document = new PdfDocument(PdfConformanceLevel.Pdf_A1B);
PdfPageBase page = document.Pages.Add();
page.Canvas.DrawString("Hello World", new PdfFont(PdfFontFamily.Helvetica, 30f), new PdfSolidBrush(Color.Black), 10, 10);
Step 2: Load an image from file and insert to the PDF.
//insert an image
PdfImage image = PdfImage.FromFile(@"D:\PDF.png");
Step 3: Add a hyper link to the image.
//Add a link to image
PointF location = new PointF(100, 100);
RectangleF linkBounds = new RectangleF(location, new SizeF(image.Width, image.Height));
Spire.Pdf.Annotations.PdfUriAnnotation link = new Spire.Pdf.Annotations.PdfUriAnnotation(linkBounds, "http://www.e-iceblue.com/Introduce/pdf-for-net-introduce.html");
link.Border = new PdfAnnotationBorder(0);
page.Canvas.DrawImage(image, linkBounds);
page.AnnotationsWidget.Add(link);
Step 4: Save the PDF document.
//Save the document to file in PDF format
document.SaveToFile("PDFA.pdf");
Effective screenshot:
Insert a footnote in a paragraph
This article shows how to place a footnote in a paragraph using Spire.Doc for .NET, for example, after the word "Spire.Doc" in the following example:


Step 1: Load a word document, Sample.docx.
Document document1 = new Document();
document1.LoadFromFile("D:\\Sample.docx",FileFormat.Docx2010);
Step 2: Get the first paragraph of the first section of Sample.docx.
Paragraph paragraph1 = document1.Sections[0].Paragraphs[0];
Step 3: Add a footnote for paragraph1.
Footnote footnote1 = paragraph1.AppendFootnote(FootnoteType.Footnote);
Step 4: Find the word "Spire.Doc" and insert footnote1 after it.
DocumentObject obj=null;
for (int i = 0; i < paragraph1.ChildObjects.Count; i++)
{
   obj=paragraph1.ChildObjects[i];
   if (obj.DocumentObjectType == DocumentObjectType.TextRange)
   {
      TextRange textRange = obj as TextRange;
// Find the word "Spire.Doc" in paragraph1
if (textRange.Text == "Spire.Doc")
{
//Set bold format for the word "Spire.Doc"
textRange.CharacterFormat.Bold = true;
//Insert footnote1 after the word "Spire.Doc"
paragraph1.ChildObjects.Insert(i + 1, footnote1);
break;
}
     }
 }
Step 5: Type the footnote1 text and set the text's FontName, FontSize and Color.
TextRange text = footnote1.TextBody.AddParagraph().AppendText("Welcome to evaluate Spire.Doc");
text.CharacterFormat.FontName = "Arial Black";
text.CharacterFormat.FontSize = 10;
text.CharacterFormat.TextColor = Color.DarkGray;
Step 6: Set FontName, FontSize, Bold and Color for the footnote1 number.
footnote1.MarkerCharacterFormat.FontName = "Calibri";
footnote1.MarkerCharacterFormat.FontSize = 12;
footnote1.MarkerCharacterFormat.Bold = true;
footnote1.MarkerCharacterFormat.TextColor = Color.DarkGreen;
Step 7: Save Sample.docx to a new document, Footnote.docx.
document1.SaveToFile("D:\\ Footnote.docx"", FileFormat.Docx2010);
Full code:
Document document1 = new Document();
document1.LoadFromFile("D:\\Sample.docx" ,FileFormat.Docx2010);
Paragraph paragraph 1= document1.Sections[0].Paragraphs[0];
Footnote footnote1 = paragraph.AppendFootnote(FootnoteType.Footnote);
DocumentObject obj=null;
for (int i = 0; i < paragraph1.ChildObjects.Count; i++)
{
obj=paragraph1.ChildObjects[i];
if (obj.DocumentObjectType == DocumentObjectType.TextRange)
{
TextRange textRange = obj as TextRange;
// Find the word "Spire.Doc" in paragraph1
if (textRange.Text == "Spire.Doc")
{
//Set bold format for the word "Spire.Doc"
textRange.CharacterFormat.Bold = true;
//Insert footnote1 after the word "Spire.Doc"
paragraph1.ChildObjects.Insert(i + 1, footnote1);
break;
}
}
}
TextRange text = footnote1.TextBody.AddParagraph().AppendText("Welcome to evaluate Spire.Doc");
text.CharacterFormat.FontName = "Arial Black";
text.CharacterFormat.FontSize = 10;
text.CharacterFormat.TextColor = Color.DarkGray;

footnote1.MarkerCharacterFormat.FontName = "Calibri";
footnote1.MarkerCharacterFormat.FontSize = 12;
footnote1.MarkerCharacterFormat.Bold = true;
footnote1.MarkerCharacterFormat.TextColor = Color.DarkGreen;
document1.SaveToFile("Footnote.docx",FileFormat.Docx2010);
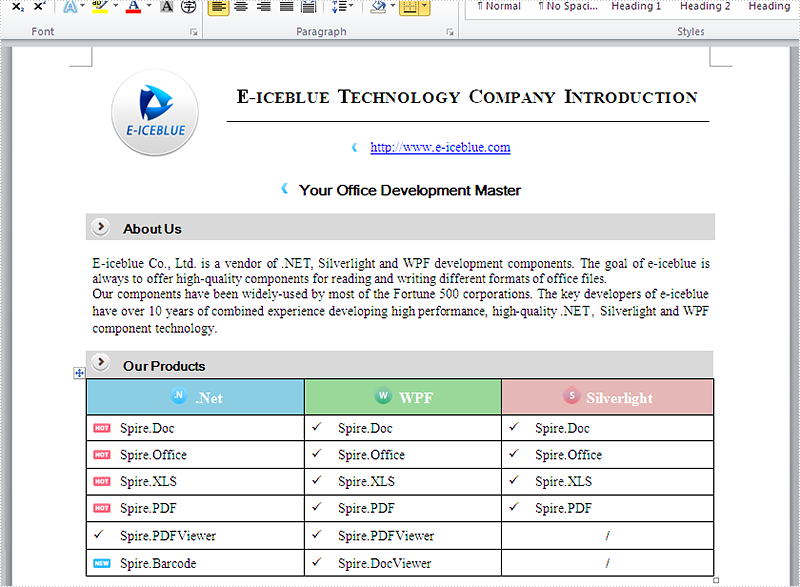
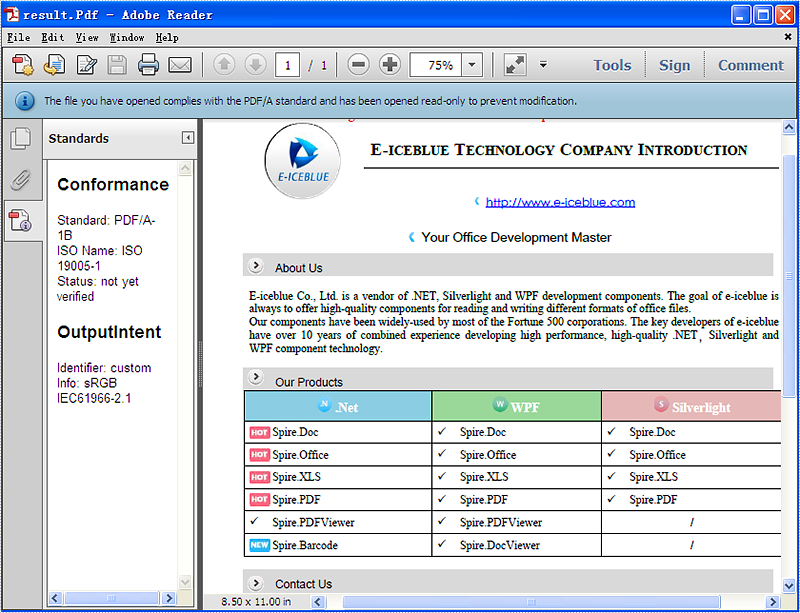
How to Convert Word to PDF/A in C# ?
PDF/A is an ISO-standardized version of the Portable Document Format (PDF) specialized for the digital preservation of electronic documents. It is widely used for long term archiving for PDF format. This article mainly shows how to convert word document (doc and docx) to PDF/A in C# by using Spire.Doc.
Make sure Spire.Doc for .NET Version 5.0.26 (or above) has been installed correctly and then add Spire.Doc.dll as reference in the downloaded Bin folder though the below path: "..\Spire.Doc\Bin\NET4.0\ Spire.Doc.dll".
First, check the original word document that will be converted to PDF/A.
Here comes to the details of how developers convert word document to PDF/A directly by using Spire.Doc:
Step 1: Load a word document from the file.
Document document = new Document();
document.LoadFromFile(@"D:\test.docx",FileFormat.Docx);
Step 2: Sets the Pdf document's Conformance-level to PDF_A1B.
ToPdfParameterList toPdf = new ToPdfParameterList();
toPdf.PdfConformanceLevel = Spire.Pdf.PdfConformanceLevel.Pdf_A1B;
Step 3: Save word document to PDF
document.SaveToFile("result.Pdf",toPdf);
Please check the effective screenshot of the result PDF in PDF/A format.
New Method to Merge Word Documents
When dealing with Word documents, sometimes developers need to merge multiple files into a single file. Spire.Doc, especially designed for developers enables you to manipulate doc files easily and flexibly.
There is already a document introducing how to merge doc files. Check it here:
.NET Merge Word - Merge Multiple Word Documents into One in C# and VB.NET
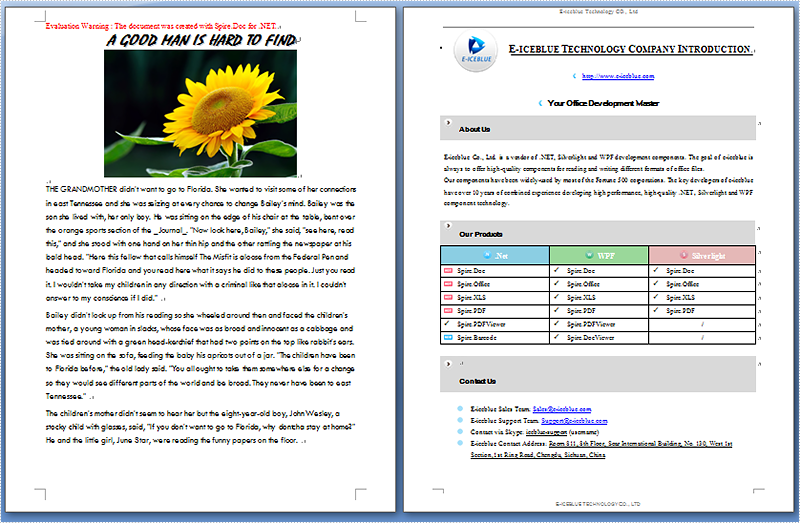
Using the method above, you have to copy sections one by one. But the new method just concatenates them. It has improved and is very easy to use
Step 1: Load the original word file "A Good Man.docx".
document.LoadFromFile("A Good Man.docx", FileFormat.Docx);
Step 2: Merge another word file "Original Word.docx" to the original one.
document.InsertTextFromFile("Original Word.docx", FileFormat.Docx);
Step 3: Save the file.
document.SaveToFile("MergedFile.docx", FileFormat.Docx);
Full code and screenshot:
static void Main(string[] args)
{
    Document document = new Document();
    document.LoadFromFile("A Good Man.docx", FileFormat.Docx);

    document.InsertTextFromFile("Original Word.docx", FileFormat.Docx);

    document.SaveToFile("MergedFile.docx", FileFormat.Docx);
    System.Diagnostics.Process.Start("MergedFile.docx");
}
Full code and screenshot:
using Spire.Doc;
namespace MergeWord
{
    class Program
    {
        static void Main(string[] args)
        {
            Document document = new Document();
            document.LoadFromFile("A Good Man.docx", FileFormat.Docx);

            document.InsertTextFromFile("Original Word.docx", FileFormat.Docx);

            document.SaveToFile("MergedFile.docx", FileFormat.Docx);
            System.Diagnostics.Process.Start("MergedFile.docx");
        }
    }
}
Load Word with Marco and remove word Marco in C#
Word Marco is widely used to record the operation that needs to be done repeatedly and you can apply it with only a single click. It can save lots of time for you. It is not an easy work to load a word document with Macro in C# and sometimes, you need to remove the Marco in the word documents in C#. This article will focus on demonstrate how to load and save word document with Marco, and clear the Marco by using Spire.Doc in C# in simple lines of codes.
First, download Spire.Doc and install on your system. The Spire.Doc installation is clean, professional and wrapped up in a MSI installer.
Then adds Spire.Doc.dll as reference in the downloaded Bin folder though the below path: "..\Spire.Doc\Bin\NET4.0\ Spire.Doc.dll".
Here comes to the steps.
Step 1: Load and save the document with Marco. Spire.Doc for .NET supports .doc, .docx(Word 97-2003) document with macros and .docm(Word 2007 and Word 2010) document.
//Loading document with macros.
document.LoadFromFile(@"D:\Macros.docm", FileFormat.Docm);
//Save docm file.
document.SaveToFile("Sample.docm", FileFormat.Docm);
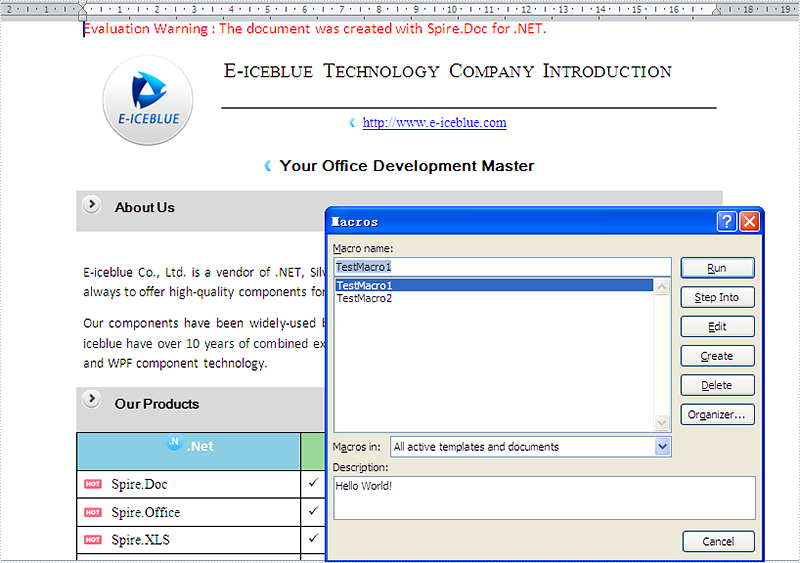
Step 2: Clear the Marco in word document. With Spire.Doc, you only need one line of code to remove all the Marcos at one time.
//Removes the macros from the document
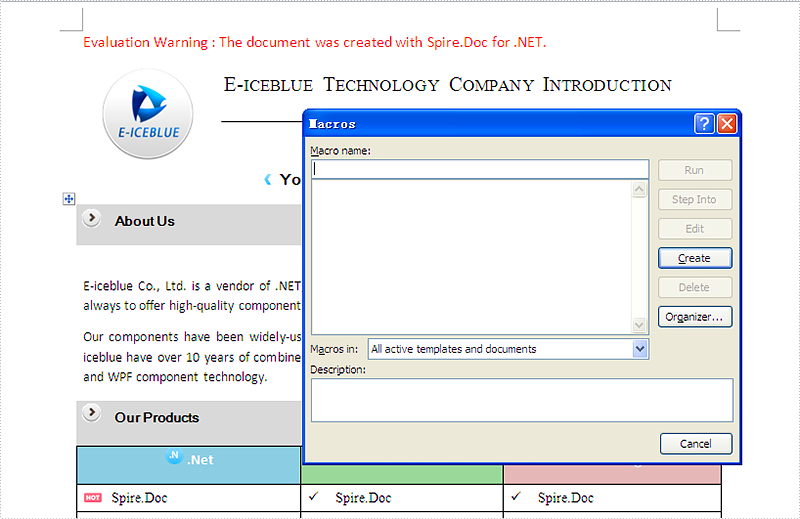
document.ClearMacros();
//Save docm file.
document.SaveToFile("Sample.docm", FileFormat.Docm);
Here comes to the screenshot which has removed the Marco in word document.
Insert Image at Specified Location in C#, VB.NET
Image can add interest and take effect to your Word documents. Suppose you've written an article introducing a city about its beautiful scenery. Just using words describe, you cannot present perfect scenery to your readers, because that page of text looks indistinct and dull. You need image to embellish your scenery.
Spire.Doc for .NET, a professional .NET word component to fast generate, open, modify and save Word documents without using MS Office Automation, enables users to insert image into Word document and set its size according to page by using C#.NET. This guide introduces an easy method how to insert image via Spire.Doc for .NET.
At first, create new Word document and add section, paragraph for this document. Then, insert image in the new created paragraph. You can set this image's size, position, rotate it and choice the wrapping-style about the text. Download and Install Spire.Doc for .NET. Use the following code to insert image in Word by using C#.
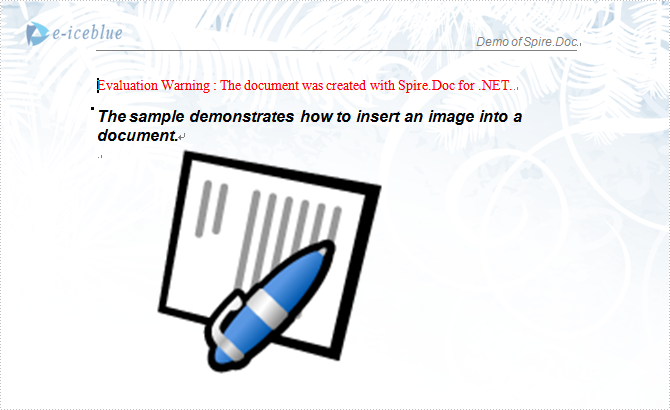
The sample demo shows how to insert an image into a document.
using System;
using Spire.Doc;
using Spire.Doc.Documents;
using Spire.Doc.Fields;
using System.Drawing;

namespace Insert_image_to_Word_Document
{
    class Program
    {
        static void Main(string[] args)
        {
 //Open a blank word document as template
            Document document = new Document(@"Blank.doc");
            Section section = document.Sections[0];
            Paragraph paragraph
                = section.Paragraphs.Count > 0 ? section.Paragraphs[0] : section.AddParagraph();
            paragraph.AppendText("The sample demonstrates how to insert an image into a document.");
            paragraph.ApplyStyle(BuiltinStyle.Heading2);
            paragraph = section.AddParagraph();

            //get original image
            Bitmap p = new Bitmap(Image.FromFile(@"Word.jpg"));

            //rotate image and insert image to word document
            p.RotateFlip(RotateFlipType.Rotate90FlipX);

            DocPicture picture = document.Sections[0].Paragraphs[0].AppendPicture(p);

            //set image's position
            picture.HorizontalPosition = 50.0F;
            picture.VerticalPosition = 60.0F;

            //set image's size
            picture.Width = 200;
            picture.Height = 200;

            //set textWrappingStyle with image;
            picture.TextWrappingStyle = TextWrappingStyle.Through;

            //Save doc file.
            document.SaveToFile("Sample.doc", FileFormat.Doc);

            //Launching the MS Word file.            System.Diagnostics.Process.Start("Sample.doc");
        }
       }
}
If you have finished the tutorial Spire.Doc Quick Start, the steps above will be simpler.
With Spire.Doc, you can insert an image into your Word documents and do more same thing in your ASP.NET, WPF and Silverlight applications without Word automation and any other third party add-ins.
C#/VB.NET: Change PDF Version
When uploading or submitting PDF files on certain platforms, you are sometimes faced with the dilemma that the platforms require a specific version of PDF file. If your PDF files fail to meet the requirements, it is necessary to convert them to a different version for compatibility purposes. This article will demonstrate how to programmatically convert PDF between different versions using Spire.PDF for .NET.
Install Spire.PDF for .NET
To begin with, you need to add the DLL files included in the Spire.PDF for.NET package as references in your .NET project. The DLL files can be either downloaded from this link or installed via NuGet.
PM> Install-Package Spire.PDF
Change PDF Version in C# and VB.NET
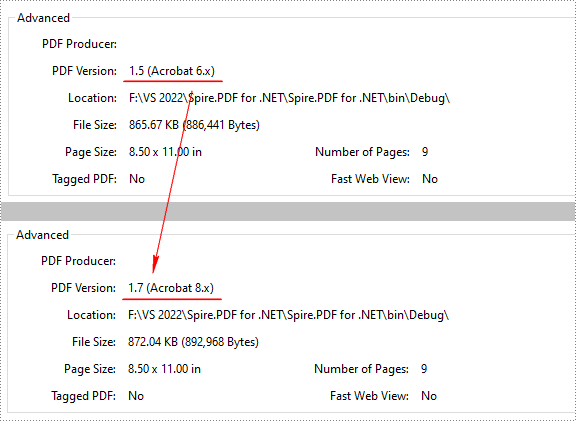
Spire.PDF for .NET supports PDF versions from 1.0 to 1.7. To convert a PDF file to a newer or older version, you can use the PdfDocument.FileInfo.Version property. The following are the detailed steps.
- Create a PdfDocument object.
- Load a sample PDF file using PdfDocument.LoadFromFile() method.
- Change the PDF version to a newer or older version using PdfDocument.FileInfo.Version property.
- Save the result document using PdfDocument.SaveToFile() method.
- C#
- VB.NET
using Spire.Pdf;

namespace ConvertPDFVersion
{
    class Program
    {
        static void Main(string[] args)
        {
            //Create a PdfDocument object
            PdfDocument pdf = new PdfDocument();

            //Load a sample PDF file
            pdf.LoadFromFile("sample.pdf");

            //Change the PDF to version 1.7
            pdf.FileInfo.Version = PdfVersion.Version1_7;

            //Save the result file
            pdf.SaveToFile("PDFVersion.pdf");
        }
    }
}
Apply for a Temporary License
If you'd like to remove the evaluation message from the generated documents, or to get rid of the function limitations, please request a 30-day trial license for yourself.
C#/VB.NET: Add Document Properties to Word Documents
Document properties (also known as metadata) are a set of information about a document. All Word documents come with a set of built-in document properties, including title, author name, subject, keywords, etc. In addition to the built-in document properties, Microsoft Word also allows users to add custom document properties to Word documents. In this article, we will explain how to add these document properties to Word documents in C# and VB.NET using Spire.Doc for .NET.
- Add Built-in Document Properties to a Word Document
- Add Custom Document Properties to a Word Document
Install Spire.Doc for .NET
To begin with, you need to add the DLL files included in the Spire.Doc for.NET package as references in your .NET project. The DLL files can be either downloaded from this link or installed via NuGet.
PM> Install-Package Spire.Doc
Add Built-in Document Properties to a Word Document in C# and VB.NET
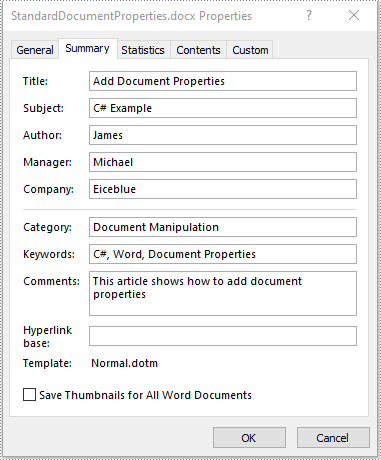
A built-in document property consists of a name and a value. You cannot set or change the name of a built-in document property as it's predefined by Microsoft Word, but you can set or change its value. The following steps demonstrate how to set values for built-in document properties in a Word document:
- Initialize an instance of Document class.
- Load a Word document using Document.LoadFromFile() method.
- Get the built-in document properties of the document through Document.BuiltinDocumentProperties property.
- Set values for specific document properties such as title, subject and author through Title, Subject and Author properties of BuiltinDocumentProperties class.
- Save the result document using Document.SaveToFile() method.
- C#
- VB.NET
using Spire.Doc;

namespace BuiltinDocumentProperties
{
    class Program
    {
        static void Main(string[] args)
        {
            //Create a Document instance
            Document document = new Document();
            //Load a Word document
            document.LoadFromFile("Sample.docx");

            //Add built-in document properties to the document
            BuiltinDocumentProperties standardProperties = document.BuiltinDocumentProperties;
            standardProperties.Title = "Add Document Properties";
            standardProperties.Subject = "C# Example";
            standardProperties.Author = "James";
            standardProperties.Company = "Eiceblue";
            standardProperties.Manager = "Michael";
            standardProperties.Category = "Document Manipulation";
            standardProperties.Keywords = "C#, Word, Document Properties";
            standardProperties.Comments = "This article shows how to add document properties";

            //Save the result document
            document.SaveToFile("StandardDocumentProperties.docx", FileFormat.Docx2013);
        }
    }
}
Add Custom Document Properties to a Word Document in C# and VB.NET
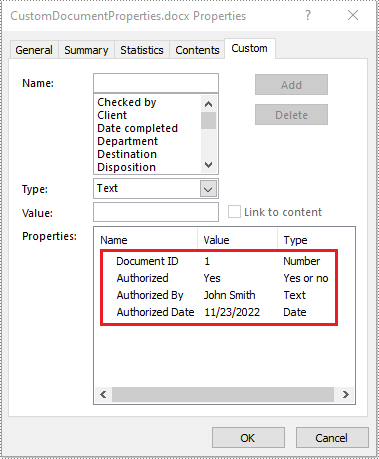
A custom document property can be defined by a document author or user. Each custom document property should contain a name, a value and a data type. The data type can be one of these four types: Text, Date, Number and Yes or No. The following steps demonstrate how to add custom document properties with different data types to a Word document:
- Initialize an instance of Document class.
- Load a Word document using Document.LoadFromFile() method.
- Get the custom document properties of the document through Document.CustomDocumentProperties property.
- Add custom document properties with different data types to the document using CustomDocumentProperties.Add(string, object) method.
- Save the result document using Document.SaveToFile() method.
- C#
- VB.NET
using Spire.Doc;
using System;

namespace CustomDocumentProperties
{
    class Program
    {
        static void Main(string[] args)
        {
            //Create a Document instance
            Document document = new Document();
            //Load a Word document
            document.LoadFromFile("Sample.docx");

            //Add custom document properties to the document
            CustomDocumentProperties customProperties = document.CustomDocumentProperties;
            customProperties.Add("Document ID", 1);
            customProperties.Add("Authorized", true);
            customProperties.Add("Authorized By", "John Smith");
            customProperties.Add("Authorized Date", DateTime.Today);

            //Save the result document
            document.SaveToFile("CustomDocumentProperties.docx", FileFormat.Docx2013);
        }
    }
}
Apply for a Temporary License
If you'd like to remove the evaluation message from the generated documents, or to get rid of the function limitations, please request a 30-day trial license for yourself.

