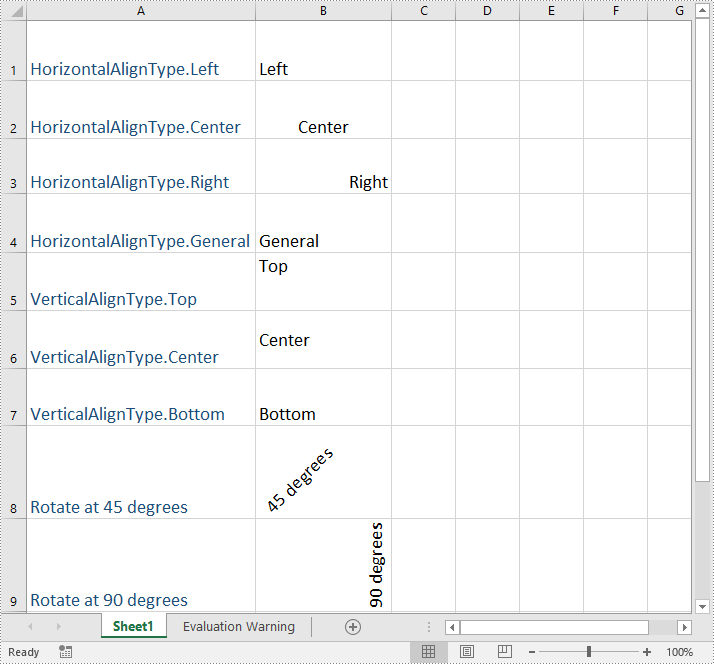
Text alignment and orientation are essential formatting features in Excel that allow you to position and orient text within cells according to your specific needs. By adjusting text alignment and orientation, you can enhance the readability and aesthetics of your spreadsheet. In this article, we will explain how to set text alignment and orientation in Excel in C# and VB.NET using Spire.XLS for .NET.
Install Spire.XLS for .NET
To begin with, you need to add the DLL files included in the Spire.XLS for.NET package as references in your .NET project. The DLL files can be either downloaded from this link or installed via NuGet.
PM> Install-Package Spire.XLS
Set Text Alignment and Orientation in Excel in C# and VB.NET
You can set the horizontal or vertical alignment of text in individual cells or a range of cells using the CellRange.Style.HorizontalAlignment or CellRange.Style.VerticalAlignment properties. In addition, you are also able to change the orientation of text by assigning a rotation value to the corresponding cell or cells using the CellRange.Style.Rotation property. The detailed steps are as follows:
- Create a Workbook object.
- Load an Excel file using Workbook.LoadFromFile() method.
- Get a specific worksheet using Workbook.Worksheets[int index] property.
- Access specific cells in the worksheet using Worksheet.Range[string name] property and then set the horizontal alignment of text in them using CellRange.Style.HorizontalAlignment property.
- Access specific cells in the worksheet using Worksheet.Range[string name] property and then set the vertical alignment of text in them using CellRange.Style.VerticalAlignment property.
- Access specific cells in the worksheet using Worksheet.Range[string name] property and then change their text orientation using CellRange.Style.Rotation property.
- Save the result file using Workbook.SaveToFile() method.
- C#
- VB.NET
using Spire.Xls;

namespace TextAlignmentAndRotation
{
    internal class Program
    {
        static void Main(string[] args)
        {
            //Create a Workbook object
            Workbook workbook = new Workbook();

            //Load an Excel file
            workbook.LoadFromFile(@"Sample.xlsx");

            //Get the first worksheet
            Worksheet sheet = workbook.Worksheets[0];

            //Set the horizontal alignment for text in a specific cell to Left
            sheet.Range["B1"].Style.HorizontalAlignment = HorizontalAlignType.Left;

            //Set the horizontal alignment for text in a specific cell to Center
            sheet.Range["B2"].Style.HorizontalAlignment = HorizontalAlignType.Center;

            //Set the horizontal alignment for text in a specific cell to Right
            sheet.Range["B3"].Style.HorizontalAlignment = HorizontalAlignType.Right;

            //Set the horizontal alignment for text in a specific cell to General
            sheet.Range["B4"].Style.HorizontalAlignment = HorizontalAlignType.General;

            //Set the vertical alignment for text in a specific cell to Top
            sheet.Range["B5"].Style.VerticalAlignment = VerticalAlignType.Top;

            //Set the vertical alignment for text in a specific cell to Center
            sheet.Range["B6"].Style.VerticalAlignment = VerticalAlignType.Center;

            //Set the vertical alignment for text in a specific cell to Bottom
            sheet.Range["B7"].Style.VerticalAlignment = VerticalAlignType.Bottom;

            //Change the text orientation in specific cells by assigning a rotation value
            sheet.Range["B8"].Style.Rotation = 45;
            sheet.Range["B9"].Style.Rotation = 90;

            //Set the row height for specific cells
            sheet.Range["B8:C9"].RowHeight = 70;

            //Save the result file
            workbook.SaveToFile("TextAlignmentAndOrientation.xlsx", ExcelVersion.Version2016);
            workbook.Dispose();
        }
    }
}

Apply for a Temporary License
If you'd like to remove the evaluation message from the generated documents, or to get rid of the function limitations, please request a 30-day trial license for yourself.

