
Comment in Excel is a function that allows users to add extra details or remarks as explanatory notes. Comments can be in the form of text or images. It enables users to provide additional information to explain or supplement the data in specified cells. After adding a comment, users can view the content of the comment by hovering the mouse over the cell with the comment. This feature enhances the readability and comprehensibility of the document, helping readers better understand and handle the data in Excel. In this article, we will show you how to add comments in Excel by using Spire.XLS for Python.
Install Spire.XLS for Python
This scenario requires Spire.XLS for Python and plum-dispatch v1.7.4. They can be easily installed in your Windows through the following pip command.
pip install Spire.XLS
If you are unsure how to install, please refer to this tutorial: How to Install Spire.XLS for Python on Windows
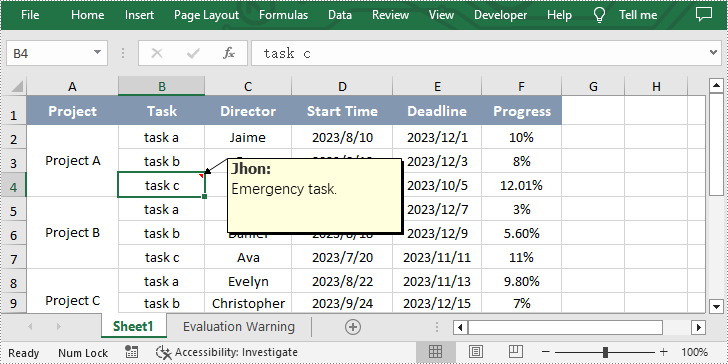
Add Comment with Text in Excel
Spire.XLS for Python allows users to add comment with text in Excel by calling CellRange.AddComment() method. The following are detailed steps.
- Create an object of Workbook class.
- Load an Excel file using Workbook.LoadFromFile() method.
- Get the first worksheet of this file using Workbook.Worksheets[] property.
- Get the specified cell by using Worksheet.Range[] property.
- Set the author and content of the comment and add them to the obtained cell using CellRange.AddComment() method.
- Set the font of the comment.
- Save the result file using Workbook.SaveToFile() method.
- Python
from spire.xls import *
from spire.xls.common import *

inputFile = "sample.xlsx"
outputFile = "CommentWithAuthor.xlsx"

#Create an object of Workbook class
workbook = Workbook()

#Load the sample file from disk
workbook.LoadFromFile(inputFile)

#Get the first worksheet
sheet = workbook.Worksheets[0]

#Get the specified cell
range = sheet.Range["B4"]

#Set the author and content of the comment
author = "Jhon"
text = "Emergency task."

#Add comment to the obtained cell
comment = range.AddComment()
comment.Width = 200
comment.Visible = True
comment.Text = author + ":\n" + text

#Set the font of the comment
font = workbook.CreateFont()
font.FontName = "Tahoma"
font.KnownColor = ExcelColors.Black
font.IsBold = True
comment.RichText.SetFont(0, len(author), font)

#Save the result file
workbook.SaveToFile(outputFile, ExcelVersion.Version2013)
workbook.Dispose()
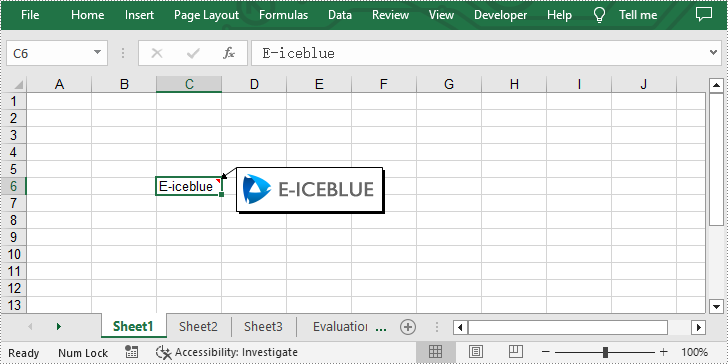
Add Comment with Picture in Excel
Additionally, Spire.XLS for Python also enable users to add comment with picture to the specified cell in Excel by using CellRange.AddComment() and ExcelCommentObject.Fill.CustomPicture() methods. The following are detailed steps.
- Create an object of Workbook class.
- Get the first worksheet using Workbook.Worksheets[] property.
- Get the specified cell by using Worksheet.Range[] property and set text for it.
- Add comment to the obtained cell by using CellRange.AddComment() method.
- Load an image and fill the comment with it by calling ExcelCommentObject.Fill.CustomPicture() method.
- Set the height and width of the comment.
- Save the result file using Workbook.SaveToFile() method.
- Python
from spire.xls import *
from spire.common import *

inputFile = "logo.png"
outputFile = "CommentWithPicture.xlsx"

#Create an object of Workbook class
workbook = Workbook()

#Get the first worksheet
sheet = workbook.Worksheets[0]

#Get the specified cell and set text for it
range = sheet.Range["C6"]
range.Text = "E-iceblue"

#Add comment to the obtained cell
comment = range["C6"].AddComment()

#Load an image file and fill the comment with it
image = Image.FromFile(inputFile)
comment.Fill.CustomPicture(image, "logo.png")

#Set the height and width of the comment
comment.Height = image.Height
comment.Width = image.Width
comment.Visible = True

#Save the result file
workbook.SaveToFile(outputFile, ExcelVersion.Version2010)
workbook.Dispose()
Apply for a Temporary License
If you'd like to remove the evaluation message from the generated documents, or to get rid of the function limitations, please request a 30-day trial license for yourself.
