Print (2)
Excel documents are easy to print, but it would be a bit tricky if you have some special printing requirements. For example, printing only selected range of a sheet, repeating the header row on each page, or fitting a worksheet on one page. This article covers how to set Excel print options via page setup and how to send an Excel document to printer in C# and VB.NET by using Spire.XLS for .NET.
- Set Excel Print Options via Page Setup in C# and VB.NET
- Print Excel Documents Using Print Dialog in C# and VB.NET
- Silently Print Excel Documents in C# and VB.NET
Install Spire.XLS for .NET
To begin with, you need to add the DLL files included in the Spire.XLS for .NET package as references in your .NET project. The DLL files can be either downloaded from this link or installed via NuGet.
PM> Install-Package Spire.XLS
Set Excel Print Options via Page Setup in C# and VB.NET
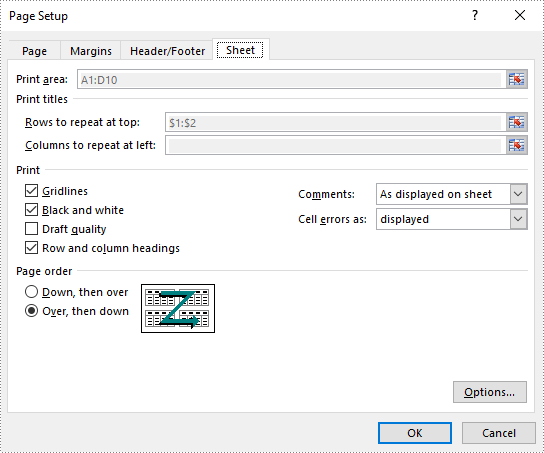
Excel Page Setup provides options to control how a worksheet will be printed, such as whether to print comments, whether to print gridlines and specify the cell range to print. Spire.XLS offers the PageSetup object to deal with these things. The following are the steps to set Excel print options through PageSetup using Spire.XLS for .NET.
- Create a Workbook object.
- Load an Excel file using Workbook.LoadFromFile() method.
- Get a specific worksheet through Workbook.Worksheets[index] property.
- Get PageSetup object through Worksheet.PageSetup property.
- Set page margins, print area, pint title row, print quality, etc. through the properties under PageSetup object.
- Save the workbook to another Excel file using Workbook.SaveToFile() method.
- C#
- VB.NET
using Spire.Xls;

namespace PrintOptions
{
    class Program
    {
        static void Main(string[] args)
        {
            //Create a workbook
            Workbook workbook = new Workbook();

            //Load an Excel document
            workbook.LoadFromFile(@"C:\Users\Administrator\Desktop\sample.xlsx");

            //Get the first worksheet
            Worksheet worksheet = workbook.Worksheets[0];

            //Get the PageSetup object of the first worksheet
            PageSetup pageSetup = worksheet.PageSetup;

            //Set page margins
            pageSetup.TopMargin = 0.3;
            pageSetup.BottomMargin = 0.3;
            pageSetup.LeftMargin = 0.3;
            pageSetup.RightMargin = 0.3;

            //Specify print area
            pageSetup.PrintArea = "A1:D10";

            //Specify title row
            pageSetup.PrintTitleRows = "$1:$2";

            //Allow to print with row/column headings
            pageSetup.IsPrintHeadings = true;

            //Allow to print with gridlines
            pageSetup.IsPrintGridlines = true;

            //Allow to print comments as displayed on worksheet
            pageSetup.PrintComments = PrintCommentType.InPlace;

            //Set printing quality (dpi)
            pageSetup.PrintQuality = 300;

            //Allow to print worksheet in black & white mode
            pageSetup.BlackAndWhite = true;

            //Set the printing order
            pageSetup.Order = OrderType.OverThenDown;

            //Fit worksheet on one page
            pageSetup.IsFitToPage = true;

            //Save the workbook
            workbook.SaveToFile("PagePrintOptions.xlsx", ExcelVersion.Version2016);
        }
    }
}

Print Excel Documents Using Print Dialog in C# and VB.NET
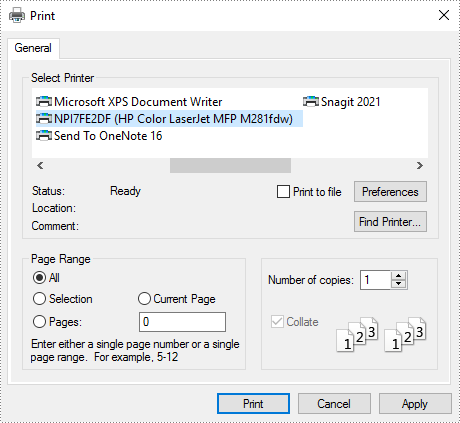
A Print Dialog box lets users to select options for a particular print job. For example, the user can specify the printer to use. The following are the steps to send an Excel document to a print dialog using Spire.XLS for .NET.
- Create a Workbook object.
- Load an Excel file using Workbook.LoadFromFile() method.
- Create a PrintDialog object.
- Specify printer settings through the properties under PrintDialog object.
- Apply the print dialog to workbook.
- Get PrintDocument object from the workbook through Workbook.PrintDocument property.
- Invoke the print dialog and start printing using PrintDocument.Print() method.
- C#
- VB.NET
using System;
using Spire.Xls;
using System.Drawing.Printing;
using System.Windows.Forms;

namespace PrintExcelUsingPrintDialog
{
    public partial class Form1 : Form
    {
        public Form1()
        {
            InitializeComponent();
        }

        private void button1_Click(object sender, EventArgs e)
        {
            //Create a Workbook object
            Workbook workbook = new Workbook();

            //Load an Excel file
            workbook.LoadFromFile(@"C:\Users\Administrator\Desktop\sample.xlsx");

            //Fit worksheet on one page
            PageSetup pageSetup = workbook.Worksheets[0].PageSetup;
            pageSetup.IsFitToPage = true;

            //Create a PrintDialog object
            PrintDialog dialog = new PrintDialog();

            //Specify printer settings
            dialog.AllowCurrentPage = true;
            dialog.AllowSomePages = true;
            dialog.AllowSelection = true;
            dialog.UseEXDialog = true;
            dialog.PrinterSettings.Duplex = Duplex.Simplex;

            //Apply the dialog to workbook
            workbook.PrintDialog = dialog;

            //Create a PrintDocument object based on the workbook
            PrintDocument printDocument = workbook.PrintDocument;

            //Invoke the print dialog
            if (dialog.ShowDialog() == DialogResult.OK)
            {
                printDocument.Print();
            }
        }
    }
}

Silently Print Excel Documents in C# and VB.NET
If you do not want to see the print dialog or the print process, you can silently print Excel documents to a specified printer. The following are the steps.
- Create a Workbook object.
- Load an Excel file using Workbook.LoadFromFile() method.
- Set the print controller to StandardPrintController, which will prevent print process from showing.
- Get PrinterSettings object from the workbook through Workbook.PrintDocument.PrinterSettings property.
- Specify printer name, duplex mode and print pages through the properties under PrinerSettings object.
- Print the workbook using Workbook.PrintDocument.Print() method.
- C#
- VB.NET
using Spire.Xls;
using System.Drawing.Printing;

namespace SilentlyPrint
{
    class Program
    {
        static void Main(string[] args)
        {
            //Create a Workbook object
            Workbook workbook = new Workbook();

            //Load an Excel file
            workbook.LoadFromFile(@"C:\Users\Administrator\Desktop\sample.xlsx");

            //Fit worksheet on one page
            PageSetup pageSetup = workbook.Worksheets[0].PageSetup;
            pageSetup.IsFitToPage = true;

            //Set the print controller to StandardPrintController, which will prevent print process from showing
            workbook.PrintDocument.PrintController = new StandardPrintController();

            //Get PrinterSettings from the workbook
            PrinterSettings settings = workbook.PrintDocument.PrinterSettings;

            //Specify printer name, duplex mode and print pages
            settings.PrinterName = "HP LaserJet P1007";
            settings.Duplex = Duplex.Simplex;
            settings.FromPage = 1;
            settings.ToPage = 3;

            //Print the workbook
            workbook.PrintDocument.Print();
        }
    }
}
Apply for a Temporary License
If you'd like to remove the evaluation message from the generated documents, or to get rid of the function limitations, please request a 30-day trial license for yourself.
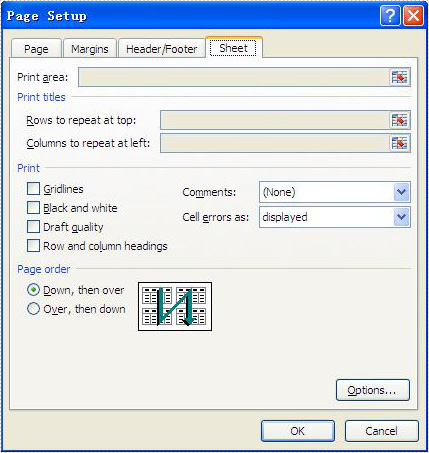
Excel print options (also called as sheet options) allow users to control how worksheet pages are printed, such as set print paper size, print area, print titles, page order and so on. This article mainly discusses how developers set print options in C# by using Spire.XLS.
Here comes to the details of how developers configure print options in C#:
- Download Spire.XLS for .NET (or Spire.Office for .NET) and install it on your system.
- Add Spire.XLS.dll as reference in the downloaded Bin folder thought the below path: "..\Spire.XLS\Bin\NET4.0\ Spire.XLS.dll".
- You can use the class PageSetup to set the print options.
Set print paper size:
By default, the paper size is A4; you can set the PaperSize property of the worksheet to set the print paper size you desired.
//set print paper size as A3
sheet.PageSetup.PaperSize = PaperSizeType.PaperA3;
Set Print Area:
By default, the print area means all areas of the worksheet that contain data. You can set the PrintArea property of the worksheet to set the print area you want.
//set print area from cell "B2" to cell "F8"
sheet.PageSetup.PrintArea = "B2:F8";
Set Print Titles:
Spire.XLS allows you to designate row and column headers to repeat on all pages of a printed worksheet. To do so, use the PageSetup class' PrintTitleColumns and PrintTitleRows properties.
//Set column numbers A & B as title columns
sheet.PageSetup.PrintTitleColumns = "$A:$B";

//Set row numbers 1 & 2 as title rows
sheet.PageSetup.PrintTitleRows = "$1:$2";
Set Page Order:
The PageSetup class provides the Order property that is used to order multiple pages of your worksheet to be printed. There are two possibilities to order the pages as follows:
//set page order from down then over
sheet.PageSetup.Order = OrderType.DownThenOver;

//set page order from over then down
sheet.PageSetup.Order = OrderType.OverThenDown;
Below picture shows the Microsoft Excel's page print options:

