Python: Detect and Remove Digital Signatures in Excel Files
Digital signatures serve as a critical layer of security, ensuring that an Excel file has not been altered since it was signed and verifying the identity of its originator. However, there are scenarios where the detection and removal of these digital signatures become necessary, such as when consolidating multiple documents, updating content, or preparing files for systems that do not support digitally signed documents. This article shows how to detect and remove digital signatures in Excel files with Python code using Spire.XLS for Python, providing a simple way to batch process Excel file digital signatures.
- Detecting the Presence of Digital Signatures in Excel Files
- Removing Digital Signatures from Excel Files
Install Spire.XLS for Python
This scenario requires Spire.XLS for Python and plum-dispatch v1.7.4. They can be easily installed in your Windows through the following pip commands.
pip install Spire.XLS
If you are unsure how to install, please refer to: How to Install Spire.XLS for Python on Windows
Detecting the Presence of Digital Signatures in Excel Files
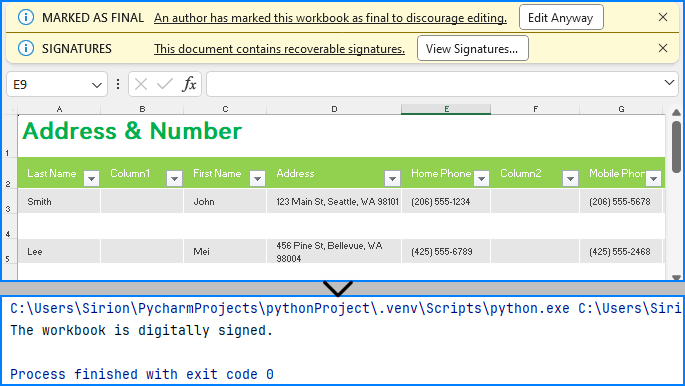
Spire.XLS for Python provides the Workbook class to deal with Excel files and the Workbook.IsDigitallySigned property to check if an Excel file has digital signatures. Developers can use the Boolean value returned by this property to determine whether the Excel file contains a digital signature.
The detailed steps for detecting if an Excel file has digital signatures are as follows:
- Create an instance of Workbook class.
- Load an Excel file using Workbook.LoadFromFile() method.
- Check whether the workbook is digitally signed by the value of the Workbook.IsDigitallySigned property.
- Python
from spire.xls import *

# Create an instance of Workbook
workbook = Workbook()

# Load an Excel file
workbook.LoadFromFile("Sample.xlsx")

# Check whether the workbook is digitally signed
if workbook.IsDigitallySigned is False:
    print("The workbook is not digitally signed.")
else:
    print("The workbook is digitally signed.")
Removing Digital Signatures from Excel Files
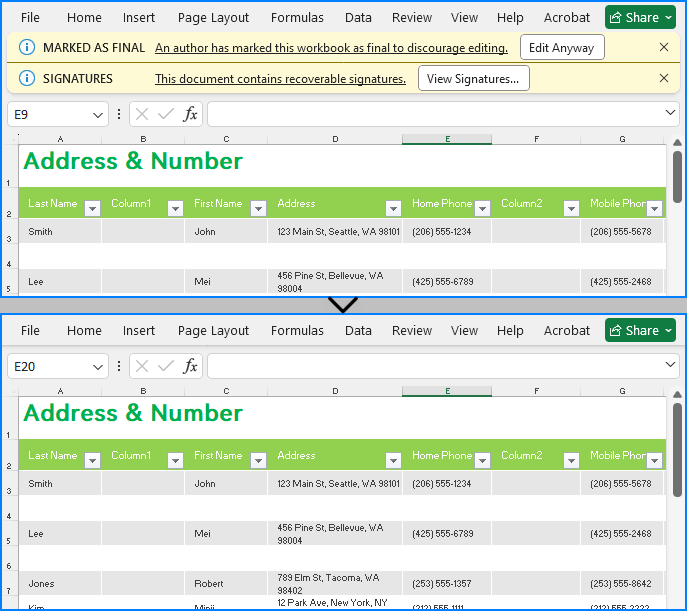
Developers can use the Workbook.RemoveAllDigitalSignatures() method to effortlessly delete all digital signatures in an Excel workbook. The detailed steps are as follows:
- Create an instance of Workbook class.
- Load an Excel file using Workbook.LoadFromFile() method.
- Remove all digital signatures from the workbook using Workbook.RemoveAllDigitalSignatures() method.
- Save the workbook using Workbook.SaveToFile() method.
- Python
from spire.xls import *

# Create an instance of Workbook
workbook = Workbook()

# Load an Excel file
workbook.LoadFromFile("Sample.xlsx")

# Remove digital signatures
workbook.RemoveAllDigitalSignatures()

# Save the document
workbook.SaveToFile("output/RemoveExcelDigitalSignature.xlsx", FileFormat.Version2016)
workbook.Dispose()
Apply for a Temporary License
If you'd like to remove the evaluation message from the generated documents, or to get rid of the function limitations, please request a 30-day trial license for yourself.
Python: Protect or Unprotect Excel Files
Excel files often contain sensitive and confidential information, such as financial data, personal information, trade secrets, or proprietary formulas. When sharing these files over the internet or between organizations, there might be a risk of data leaks, theft, or unauthorized modifications. To address this concern, Excel provides a comprehensive set of protection features, such as password-protecting workbooks, restricting editing on worksheets, and locking cells, which enable users to establish multiple layers of security to control data access and maintain the integrity of their Excel files. In this article, you will learn how to protect and unprotect Excel workbooks and worksheets in Python using Spire.XLS for Python.
- Password Protect an Entire Workbook
- Protect a Worksheet with a Specific Protection Type
- Allow Users to Edit Ranges in a Protected Worksheet
- Unprotect a Password Protected Worksheet
- Remove or Reset the Password of an Encrypted Workbook
Install Spire.XLS for Python
This scenario requires Spire.XLS for Python and plum-dispatch v1.7.4. They can be easily installed in your Windows through the following pip commands.
pip install Spire.XLS
If you are unsure how to install, please refer to this tutorial: How to Install Spire.XLS for Python on Windows
Password Protect an Entire Workbook in Python
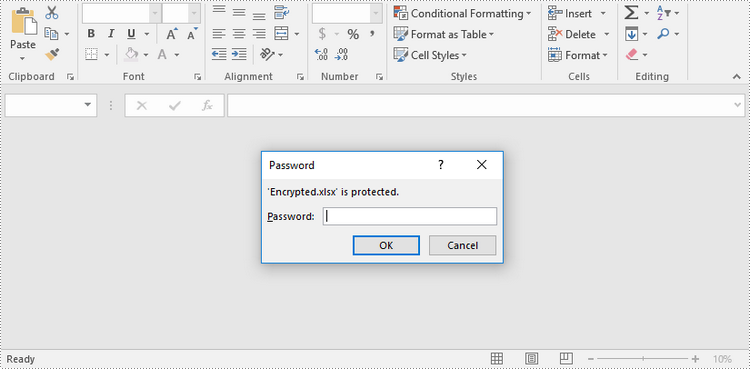
By encrypting an Excel document with a password, you ensure that the data within the document remains secure and inaccessible to unauthorized individuals. The following are the steps to password-protect a workbook using Spire.XLS for Python.
- Create a Workbook object.
- Load an Excel file using Workbook.LoadFromFile() method.
- Protect the workbook with a password using Workbook.Protect() method.
- Save the workbook to another Excel file using Workbook.SaveToFile() method.
- Python
from spire.xls import *
from spire.xls.common import *

# Create a Workbook object
workbook = Workbook()

# Load an Excel workbook
workbook.LoadFromFile("Sample.xlsx")

# Protect the workbook with a password
workbook.Protect("psd-123")

# Save the workbook to another Excel file
workbook.SaveToFile("Encrypted.xlsx", ExcelVersion.Version2016)
workbook.Dispose()
Protect a Worksheet with a Specific Protection Type in Python
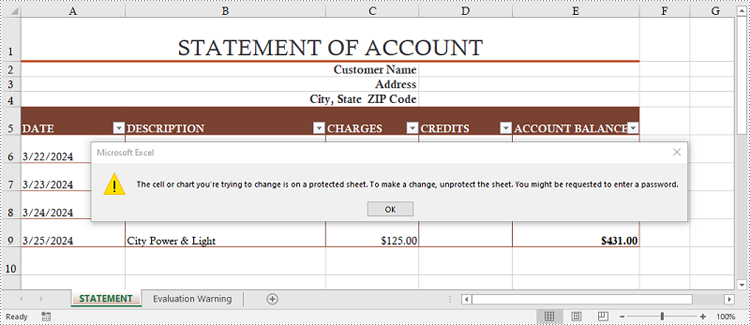
If you want to authorize others to view your Excel document while limiting the types of changes they can make to a worksheet, you can protect the worksheet with a specific protection type. The table below lists a variety of pre-defined protection types under the SheetProtectionType enumeration.
| Protection Type | Allow users to |
| Content | Modify or insert content. |
| DeletingColumns | Delete columns. |
| DeletingRows | Delete rows. |
| Filtering | Set filters. |
| FormattingCells | Format cells. |
| FormattingColumns | Format columns. |
| FormattingRows | Format rows. |
| InsertingColumns | Insert columns. |
| InsertingRows | Insert rows. |
| InsertingHyperlinks | Insert hyperlinks . |
| LockedCells | Select locked cells. |
| UnlockedCells | Select unlocked cells. |
| Objects | Modify drawing objects. |
| Scenarios | Modify saved scenarios. |
| Sorting | Sort data. |
| UsingPivotTables | Use pivot table and pivot chart. |
| All | Do any operations listed above on the protected worksheet. |
| none | Do nothing on the protected worksheet. |
The following steps show you how to protect a worksheet with a specific protection type using Spire.XLS for Python.
- Create a Workbook object.
- Load an Excel file using Workbook.LoadFromFile() method.
- Get a specific worksheet through Workbook.Worksheets[index] property.
- Protect the worksheet with a password and a specific protection type using Worksheet.Protect(password:str, options:SheetProtectionType) method.
- Save the workbook to another Excel file using Workbook.SaveToFile() method.
- Python
from spire.xls import *
from spire.xls.common import *

# Create a Workbook object
workbook = Workbook()

# Load an Excel workbook
workbook.LoadFromFile("Sample.xlsx")

# Get the first worksheet
worksheet = workbook.Worksheets[0]

# Protect the worksheet with a password and a specific protection type
worksheet.Protect("psd-permission", SheetProtectionType.none)

# Save the workbook to another Excel file
workbook.SaveToFile("ProtectWorksheet.xlsx", ExcelVersion.Version2016)
workbook.Dispose()
Allow Users to Edit Ranges in a Protected Worksheet in Python
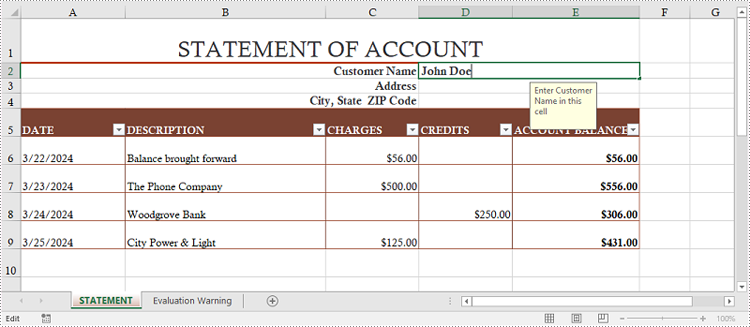
In certain cases, you may want to allow users to edit certain ranges of a worksheet while preserving the integrity of other data. The following steps demonstrate how to accomplish this feature using Spire.XLS for Python.
- Create a Workbook object.
- Load an Excel file using Workbook.LoadFromFile() method.
- Get a specific worksheet through Workbook.Worksheets[index] property.
- Specify editable cell ranges using Worksheet.AddAllowEditRange() method.
- Protect the worksheet with a password and a specific protection type using Worksheet.Protect(password:str, options:SheetProtectionType) method.
- Save the workbook to another Excel file using Workbook.SaveToFile() method.
- Python
from spire.xls import *
from spire.xls.common import *

# Create a Workbook object
workbook = Workbook()

# Load an Excel workbook
workbook.LoadFromFile("Sample.xlsx")

# Get the first worksheet
sheet = workbook.Worksheets[0]

# Add ranges that allow editing
sheet.AddAllowEditRange("Range One", sheet.Range["A5:A6"])
sheet.AddAllowEditRange("Range Two", sheet.Range["A8:B11"])

# Protect the worksheet with a password and a protection type
sheet.Protect("psd-permission", SheetProtectionType.All)

# Save the workbook to another Excel file
workbook.SaveToFile("AllowEditRange.xlsx", ExcelVersion.Version2016)
workbook.Dispose()
Unprotect a Password Protected Worksheet in Python
To remove the protection of a password-protected worksheet, you need to invoke the Worksheet.Unprotect() method and pass the original password to the method as a parameter. The detailed steps are as follows.
- Create a Workbook object.
- Load an Excel file using Workbook.LoadFromFile() method.
- Get a specific worksheet through Workbook.Worksheets[index] property.
- Remove the password protection using Worksheet.Unprotect(password:str) method.
- Save the workbook to another Excel file using Workbook.SaveToFile() method.
- Python
from spire.xls import *
from spire.xls.common import *

# Create a Workbook object
workbook = Workbook()

# Load an Excel workbook containing protected worksheet
workbook.LoadFromFile("ProtectWorksheet.xlsx")

# Get the first worksheet
sheet = workbook.Worksheets[0]

# Unprotect the worksheet using the specified password
sheet.Unprotect("psd-permission")

# Save the workbook to another Excel file
workbook.SaveToFile("UnprotectWorksheet.xlsx", ExcelVersion.Version2016)
workbook.Dispose()
Remove or Reset the Password of an Encrypted Workbook in Python
To remove or reset password of an encrypted workbook, you can use the Workbook.Unprotect() or the Workbook.Protect() method. The following steps show you how to load an encrypted Excel document and delete or change the password of it.
- Create a Workbook object.
- Specify the open password through Workbook.OpenPassword property.
- Load the encrypted Excel file using Workbook.LoadFromFile() method.
- Remove the encryption using Workbook.Unprotect() method. Or change the password using Workbook.Protect() method.
- Save the workbook to another Excel file using Workbook.SaveToFile() method.
- Python
from spire.xls import *
from spire.xls.common import *

# Create a Workbook object
workbook = Workbook()

# Specify the open password
workbook.OpenPassword = "psd-123"

# Load an encrypted Excel workbook
workbook.LoadFromFile("Encrypted.xlsx")

# Unprotect the workbook
workbook.UnProtect()

# Reset password
# workbook.Protect("newpassword")

# Save the workbook to another Excel file
workbook.SaveToFile("UnprotectWorkbook.xlsx", ExcelVersion.Version2016)
workbook.Dispose()
Apply for a Temporary License
If you'd like to remove the evaluation message from the generated documents, or to get rid of the function limitations, please request a 30-day trial license for yourself.
Python: Lock Specific Cells in Excel
Locking cells is often used to protect the contents of specific cell ranges in a spreadsheet from accidental modification, which is useful in situations such as sharing a worksheet or protecting specific data. When you lock a cell, no one else can edit it unless they know the password or have the appropriate permissions. This feature is important for data security and integrity. In this article, we will show you how to lock specific cells, columns or rows in Excel on python platforms by using Spire.XLS for Python.
Install Spire.XLS for Python
This scenario requires Spire.XLS for Python and plum-dispatch v1.7.4. They can be easily installed in your Windows through the following pip commands.
pip install Spire.XLS
If you are unsure how to install, please refer to this tutorial: How to Install Spire.XLS for Python on Windows
Lock Specific Cells in Python
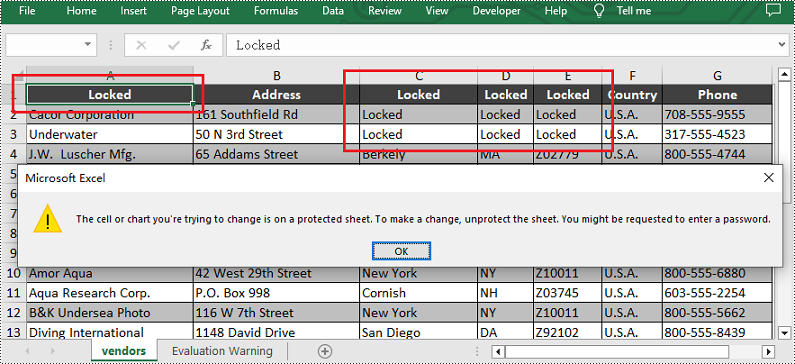
Spire.XLS for Python supports users to lock a specified range of cells by setting the Worksheet.Range[].Style.Locked property to "True". Below are the detailed steps.
- Create a Workbook instance and load a sample excel file using Workbook.LoadFromFile() method.
- Get the first worksheet using Workbook.Worksheets[] property.
- Unlock all cells in the used range of the worksheet by setting the Worksheet.Range.Style.Locked property to "False".
- Set text for the specific cells using Worksheet.Range[].Text property and then lock them by setting the Worksheet.Range[].Style.Locked property to "True".
- Protect the worksheet using XlsWorksheetBase.Protect() method.
- Save the result file using Workbook.SaveToFile() method.
- Python
from spire.xls import *
from spire.xls.common import *

inputFile = "C:/Users/Administrator/Desktop/Sample.xlsx"
outputFile = "C:/Users/Administrator/Desktop/LockSpecificCells.xlsx"

# Create a Workbook instance and load a sample file
workbook = Workbook()
workbook.LoadFromFile(inputFile)

# Get the first worksheet
sheet = workbook.Worksheets[0]

# Unlock all cells in the used range of the worksheet
sheet.Range.Style.Locked = False

# Lock a specific cell in the sheet
sheet.Range["A1"].Text = "Locked"
sheet.Range["A1"].Style.Locked = True

# Lock a specific range of cells in the sheet
sheet.Range["C1:E3"].Text = "Locked"
sheet.Range["C1:E3"].Style.Locked = True

# Protect the worksheet with a password
sheet.Protect("123456", SheetProtectionType.All)

# Save the result file
workbook.SaveToFile(outputFile, ExcelVersion.Version2013)
workbook.Dispose()
Lock a Specific Column in Python
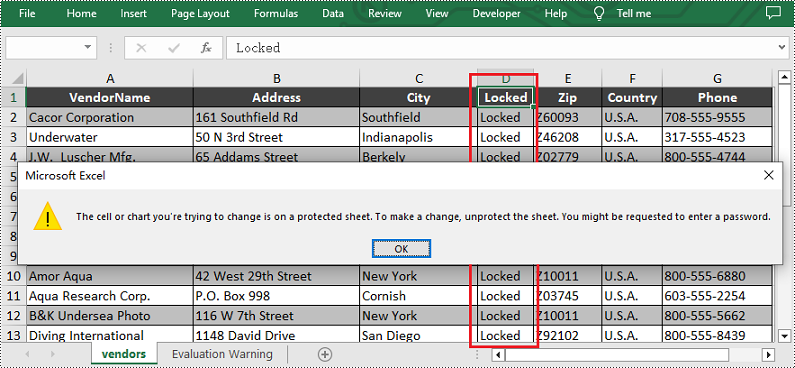
If you want to lock a specific column in the worksheet, please set the Worksheet.Columns[].Style.Locked property to "True". Other steps are similar to the above method. Below are the detailed steps.
- Create a Workbook instance and load a sample excel file using Workbook.LoadFromFile() method.
- Get the first worksheet using Workbook.Worksheets[] property.
- Unlock all cells in the used range of the worksheet by setting the Worksheet.Range.Style.Locked property to "False".
- Set text for the fourth column using the Worksheet.Columns[].Text property and then lock it by setting the Worksheet.Columns[].Style.Locked property to "True".
- Protect the worksheet with a password by calling XlsWorksheetBase.Protect() method.
- Save the result file using Workbook.SaveToFile() method.
- Python
from spire.xls import *
from spire.xls.common import *

inputFile = "C:/Users/Administrator/Desktop/Sample.xlsx"
outputFile = "C:/Users/Administrator/Desktop/LockSpecificColumn.xlsx"

# Create a Workbook instance and load a sample file
workbook = Workbook()
workbook.LoadFromFile(inputFile)

# Get the first worksheet
sheet = workbook.Worksheets[0]

# Unlock all cells in the used range of the worksheet
sheet.Range.Style.Locked = False

# Lock the fourth column in the sheet
sheet.Columns[3].Text = "Locked"
sheet.Columns[3].Style.Locked = True

# Protect the worksheet with a password
sheet.Protect("123456", SheetProtectionType.All)

# Save the result file
workbook.SaveToFile(outputFile, ExcelVersion.Version2013)
workbook.Dispose()
Lock a Specific Row in Python
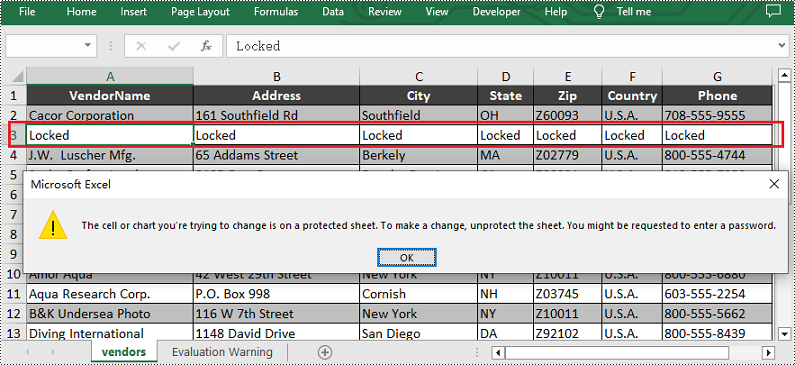
Similarly, if you want to lock a certain row, please set the Worksheet.Rows[].Style.Locked property to "True". Here are the detailed steps.
- Create a Workbook instance and load a sample excel file using Workbook.LoadFromFile() method.
- Get the first worksheet using Workbook.Worksheets[] property.
- Unlock all cells in the used range of the worksheet by setting the Worksheet.Range.Style.Locked property to "False".
- Set text for the third row using the Worksheet.Rows[].Text property and then lock it by setting the Worksheet.Rows[].Style.Locked property to "True".
- Protect the worksheet with a password using XlsWorksheetBase.Protect() method.
- Save the result file using Workbook.SaveToFile() method.
- Python
from spire.xls import *
from spire.xls.common import *

inputFile = "C:/Users/Administrator/Desktop/Sample.xlsx"
outputFile = "C:/Users/Administrator/Desktop/LockSpecificRow.xlsx"

# Create a Workbook instance and load a sample file
workbook = Workbook()
workbook.LoadFromFile(inputFile)

# Get the first worksheet
sheet = workbook.Worksheets[0]

# Unlock all cells in the used range of the worksheet
sheet.Range.Style.Locked = False

# Lock the third row in the worksheet
sheet.Rows[2].Text = "Locked"
sheet.Rows[2].Style.Locked = True

# Protect the worksheet with a password
sheet.Protect("123456", SheetProtectionType.All)

# Save the result file
workbook.SaveToFile(outputFile, ExcelVersion.Version2013)
workbook.Dispose()
Apply for a Temporary License
If you'd like to remove the evaluation message from the generated documents, or to get rid of the function limitations, please request a 30-day trial license for yourself.