
Locking cells is often used to protect the contents of specific cell ranges in a spreadsheet from accidental modification, which is useful in situations such as sharing a worksheet or protecting specific data. When you lock a cell, no one else can edit it unless they know the password or have the appropriate permissions. This feature is important for data security and integrity. In this article, we will show you how to lock specific cells, columns or rows in Excel on python platforms by using Spire.XLS for Python.
Install Spire.XLS for Python
This scenario requires Spire.XLS for Python and plum-dispatch v1.7.4. They can be easily installed in your Windows through the following pip commands.
pip install Spire.XLS
If you are unsure how to install, please refer to this tutorial: How to Install Spire.XLS for Python on Windows
Lock Specific Cells in Python
Spire.XLS for Python supports users to lock a specified range of cells by setting the Worksheet.Range[].Style.Locked property to "True". Below are the detailed steps.
- Create a Workbook instance and load a sample excel file using Workbook.LoadFromFile() method.
- Get the first worksheet using Workbook.Worksheets[] property.
- Unlock all cells in the used range of the worksheet by setting the Worksheet.Range.Style.Locked property to "False".
- Set text for the specific cells using Worksheet.Range[].Text property and then lock them by setting the Worksheet.Range[].Style.Locked property to "True".
- Protect the worksheet using XlsWorksheetBase.Protect() method.
- Save the result file using Workbook.SaveToFile() method.
- Python
from spire.xls import *
from spire.xls.common import *
inputFile = "C:/Users/Administrator/Desktop/Sample.xlsx"
outputFile = "C:/Users/Administrator/Desktop/LockSpecificCells.xlsx"
# Create a Workbook instance and load a sample file
workbook = Workbook()
workbook.LoadFromFile(inputFile)
# Get the first worksheet
sheet = workbook.Worksheets[0]
# Unlock all cells in the used range of the worksheet
sheet.Range.Style.Locked = False
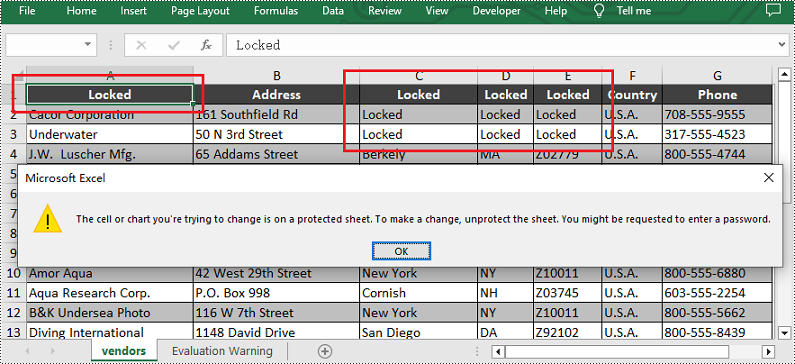
# Lock a specific cell in the sheet
sheet.Range["A1"].Text = "Locked"
sheet.Range["A1"].Style.Locked = True
# Lock a specific range of cells in the sheet
sheet.Range["C1:E3"].Text = "Locked"
sheet.Range["C1:E3"].Style.Locked = True
# Protect the worksheet with a password
sheet.Protect("123456", SheetProtectionType.All)
# Save the result file
workbook.SaveToFile(outputFile, ExcelVersion.Version2013)
workbook.Dispose()
Lock a Specific Column in Python
If you want to lock a specific column in the worksheet, please set the Worksheet.Columns[].Style.Locked property to "True". Other steps are similar to the above method. Below are the detailed steps.
- Create a Workbook instance and load a sample excel file using Workbook.LoadFromFile() method.
- Get the first worksheet using Workbook.Worksheets[] property.
- Unlock all cells in the used range of the worksheet by setting the Worksheet.Range.Style.Locked property to "False".
- Set text for the fourth column using the Worksheet.Columns[].Text property and then lock it by setting the Worksheet.Columns[].Style.Locked property to "True".
- Protect the worksheet with a password by calling XlsWorksheetBase.Protect() method.
- Save the result file using Workbook.SaveToFile() method.
- Python
from spire.xls import *
from spire.xls.common import *
inputFile = "C:/Users/Administrator/Desktop/Sample.xlsx"
outputFile = "C:/Users/Administrator/Desktop/LockSpecificColumn.xlsx"
# Create a Workbook instance and load a sample file
workbook = Workbook()
workbook.LoadFromFile(inputFile)
# Get the first worksheet
sheet = workbook.Worksheets[0]
# Unlock all cells in the used range of the worksheet
sheet.Range.Style.Locked = False
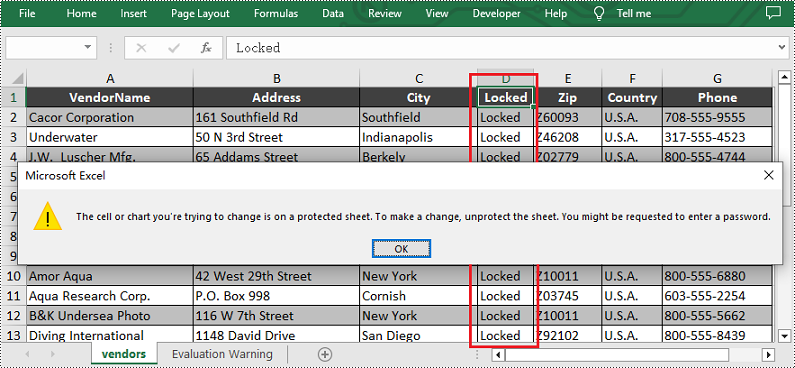
# Lock the fourth column in the sheet
sheet.Columns[3].Text = "Locked"
sheet.Columns[3].Style.Locked = True
# Protect the worksheet with a password
sheet.Protect("123456", SheetProtectionType.All)
# Save the result file
workbook.SaveToFile(outputFile, ExcelVersion.Version2013)
workbook.Dispose()
Lock a Specific Row in Python
Similarly, if you want to lock a certain row, please set the Worksheet.Rows[].Style.Locked property to "True". Here are the detailed steps.
- Create a Workbook instance and load a sample excel file using Workbook.LoadFromFile() method.
- Get the first worksheet using Workbook.Worksheets[] property.
- Unlock all cells in the used range of the worksheet by setting the Worksheet.Range.Style.Locked property to "False".
- Set text for the third row using the Worksheet.Rows[].Text property and then lock it by setting the Worksheet.Rows[].Style.Locked property to "True".
- Protect the worksheet with a password using XlsWorksheetBase.Protect() method.
- Save the result file using Workbook.SaveToFile() method.
- Python
from spire.xls import *
from spire.xls.common import *
inputFile = "C:/Users/Administrator/Desktop/Sample.xlsx"
outputFile = "C:/Users/Administrator/Desktop/LockSpecificRow.xlsx"
# Create a Workbook instance and load a sample file
workbook = Workbook()
workbook.LoadFromFile(inputFile)
# Get the first worksheet
sheet = workbook.Worksheets[0]
# Unlock all cells in the used range of the worksheet
sheet.Range.Style.Locked = False
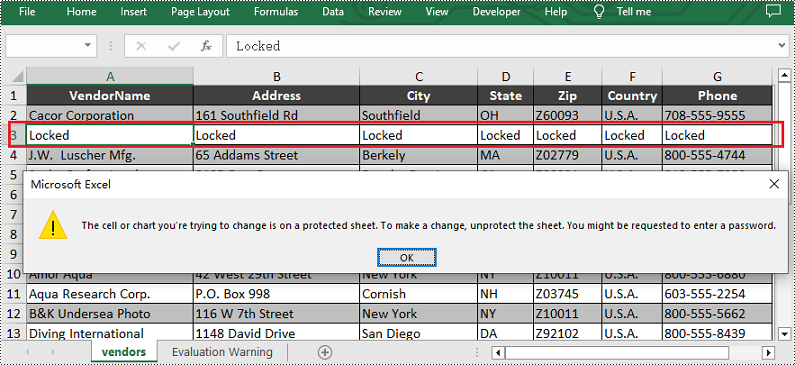
# Lock the third row in the worksheet
sheet.Rows[2].Text = "Locked"
sheet.Rows[2].Style.Locked = True
# Protect the worksheet with a password
sheet.Protect("123456", SheetProtectionType.All)
# Save the result file
workbook.SaveToFile(outputFile, ExcelVersion.Version2013)
workbook.Dispose()
Apply for a Temporary License
If you'd like to remove the evaluation message from the generated documents, or to get rid of the function limitations, please request a 30-day trial license for yourself.
