Python: Insert or Remove Shapes in Excel
Shapes are a powerful tool in Excel that enables you to transform raw data into visually appealing and informative representations. By inserting and customizing shapes, you can create clear, engaging, and visually impactful spreadsheets that effectively communicate your data and captivate your audience. In this article, we will demonstrate how to insert and remove shapes in Excel in Python using Spire.XLS for Python.
Install Spire.XLS for Python
This scenario requires Spire.XLS for Python and plum-dispatch v1.7.4. They can be easily installed in your Windows through the following pip command.
pip install Spire.XLS
If you are unsure how to install, please refer to this tutorial: How to Install Spire.XLS for Python on Windows
Insert Shapes in Excel in Python
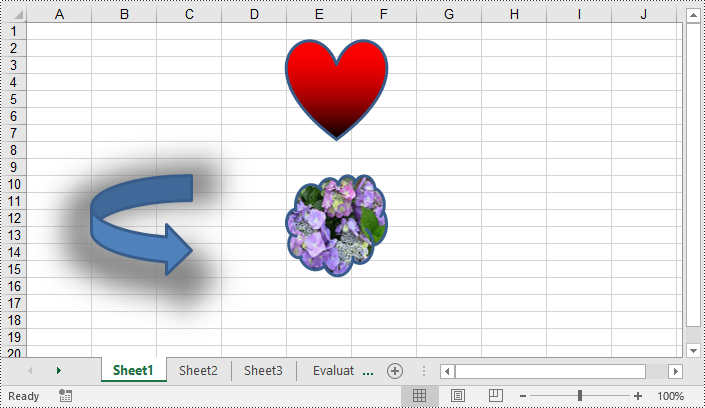
You can add numerous types of shapes, such as lines, rectangles, triangles, and stars, to an Excel worksheet by using the Worksheet.PrstGeomShapes.AddPrstGeomShape() method provided by Spire.XLS for Python. Once added, you can customize the shapes, such as adding text to the shapes, filling the shapes with solid or gradient colors or images, and setting shadow styles for the shapes. The detailed steps are as follows.
- Create an object of the Workbook class.
- Get the first worksheet using Workbook.Worksheets[] property.
- Add a shape to the worksheet using Worksheet.PrstGeomShapes.AddPrstGeomShape() method.
- Add text to the shape using IPrstGeomShape.Text property.
- Fill the shape with a color using IPrstGeomShape.Fill.ForeColor property.
- Set the fill type of the shape as solid using IPrstGeomShape.Fill.FillType property.
- Repeat the above steps to add more shapes to the worksheet.
- Save the result file using Workbook.SaveToFile() method.
- Python
from spire.xls import *
from spire.xls.common import *

# Create a Workbook object
workbook = Workbook()
# Get the first worksheet
sheet = workbook.Worksheets[0]

# Add a triangle shape to the worksheet
triangle = sheet.PrstGeomShapes.AddPrstGeomShape(2, 2, 100, 100, PrstGeomShapeType.Triangle)
# Add text to the shape
triangle.Text = "Text"
# Fill the triangle with a solid color
triangle.Fill.ForeColor = Color.get_Yellow()
triangle.Fill.FillType = ShapeFillType.SolidColor

# Add a heart shape to the worksheet
heart = sheet.PrstGeomShapes.AddPrstGeomShape(2, 5, 100, 100, PrstGeomShapeType.Heart)
# Fill the heart with a gradient color
heart.Fill.ForeColor = Color.get_Red()
heart.Fill.FillType = ShapeFillType.Gradient

# Add an arrow shape with the default color to the worksheet
arrow = sheet.PrstGeomShapes.AddPrstGeomShape(10, 2, 100, 100, PrstGeomShapeType.CurvedRightArrow)
# Set shadow style for the arrow
arrow.Shadow.Angle = 90
arrow.Shadow.Distance = 10
arrow.Shadow.Size = 150
arrow.Shadow.Color = Color.get_Gray()
arrow.Shadow.Blur = 30
arrow.Shadow.Transparency = 1
arrow.Shadow.HasCustomStyle = True

# Add a cloud shape to the worksheet
cloud = sheet.PrstGeomShapes.AddPrstGeomShape(10, 5, 100, 100, PrstGeomShapeType.Cloud)
# Fill the cloud with a custom picture
cloud.Fill.CustomPicture(Image.FromFile("Hydrangea.jpg"), "Hydrangea.jpg")
cloud.Fill.FillType = ShapeFillType.Picture

# Save the result file
workbook.SaveToFile("InsertShapes.xlsx", ExcelVersion.Version2013)
workbook.Dispose()

Remove Shapes from Excel in Python
Shapes can improve the visual appearance of your workbook, but they can also increase the file size of it. Removing unnecessary shapes helps reduce the file size, making it more manageable and easier to share or store. Spire.XLS for Python enables you to remove specific shapes from a worksheet effortlessly by using the Worksheet.PrstGeomShapes[index].Remove() method. The detailed steps are as follows.
- Create an object of the Workbook class.
- Load an Excel file using Workbook.LoadFromFile() method.
- Remove a specific shape from the Worksheet using Worksheet.PrstGeomShapes[index].Remove() method.
- Save the result file using Workbook.SaveToFile() method.
- Python
from spire.xls import *
from spire.xls.common import *

# Create a Workbook object
workbook = Workbook()
# Load an Excel file
workbook.LoadFromFile("InsertShapes.xlsx")

# Get the first worksheet
sheet = workbook.Worksheets[0]

# Remove the first shape from the worksheet
sheet.PrstGeomShapes[0].Remove()

#Save to file.
workbook.SaveToFile("RemoveShapes.xlsx", ExcelVersion.Version2013)
workbook.Dispose()
Apply for a Temporary License
If you'd like to remove the evaluation message from the generated documents, or to get rid of the function limitations, please request a 30-day trial license for yourself.
Python: Add or Edit Content Controls in Excel Documents
Content controls play an important role in Excel, providing powerful functionality for data input, display, and user interaction. These controls include text boxes, radio buttons, checkboxes, drop-down lists, and more. They offer users more efficient, intuitive, and flexible ways of handling data, making Excel a powerful tool for data management and analysis. This article will introduce how to use Spire.XLS for Python to add content controls to Excel documents or edit content controls in Excel documents using Python.
- Add Content Controls to an Excel document in Python
- Edit Content Controls in an Excel document in Python
Install Spire.XLS for Python
This scenario requires Spire.XLS for Python and plum-dispatch v1.7.4. They can be easily installed in your Windows through the following pip commands.
pip install Spire.XLS
If you are unsure how to install, please refer to this tutorial: How to Install Spire.XLS for Python on Windows
Add Content Controls to an Excel document in Python
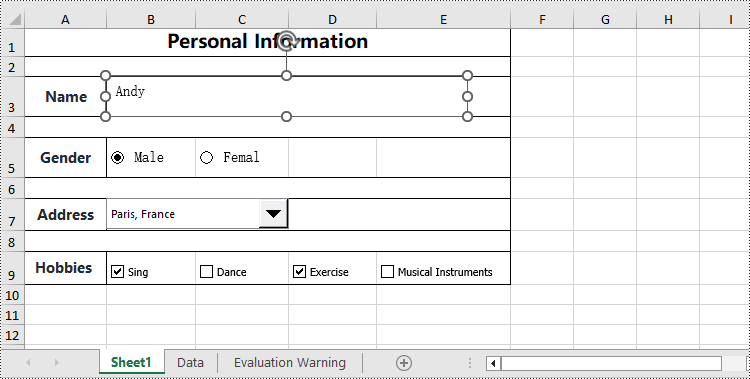
Spire.XLS for Python allows you to add content controls supported by Excel, such as text boxes, radio buttons, drop-down lists (also known as combo boxes), checkboxes, and more. The following are the detailed steps:
- Create an object of the Workbook class.
- Use the Workbook.LoadFromFile() method to load an Excel data document.
- Use the Workbook.Worksheets[] property to retrieve the desired worksheet.
- Add a text box using the Worksheet.TextBoxes.AddTextBox() method.
- Add a radio button using the Worksheet.RadioButtons.Add() method.
- Add a combo box using the Worksheet.ComboBoxes.AddComboBox() method.
- Add a checkbox using the Worksheet.CheckBoxes.AddCheckBox() method.
- Use the Workbook.SaveToFile() method to save the resulting file.
- Python
from spire.xls.common import *
from spire.xls import *

# Create a new Workbook object
workbook = Workbook()

# Load an existing Excel file
workbook.LoadFromFile("Data/Sample01.xlsx")

# Select the first worksheet
worksheet = workbook.Worksheets[0]

# Set the height of the text box (unit: points)
height = 40

# Add a text box to the worksheet
textbox = worksheet.TextBoxes.AddTextBox(3, 2, height, 400)
textbox.Line.ForeKnownColor = ExcelColors.Black
textbox.Text = "Andy"

# Add radio buttons to the worksheet
radioButton1 = worksheet.RadioButtons.Add(5, 2, height, 60)
radioButton1.Text = "Male"
radioButton1.CheckState=CheckState.Checked
radioButton2 = worksheet.RadioButtons.Add(5, 3, height, 60)
radioButton2.Text = "Female"

# Assign a data range from another worksheet to a combo box
dataSheet = workbook.Worksheets[1]
comboBoxShape = worksheet.ComboBoxes.AddComboBox(7, 2, 30, 200)
comboBoxShape.ListFillRange = dataSheet.Range["A1:A7"]
comboBoxShape.SelectedIndex=1

# Add check boxes to the worksheet
checkBox = worksheet.CheckBoxes.AddCheckBox(9, 2, height, 60)
checkBox.CheckState = CheckState.Checked
checkBox.Text = "Sing"
checkBox = worksheet.CheckBoxes.AddCheckBox(9, 3, height, 60)
checkBox.CheckState = CheckState.Unchecked
checkBox.Text = "Dance"
checkBox = worksheet.CheckBoxes.AddCheckBox(9, 4, height, 60)
checkBox.CheckState = CheckState.Checked
checkBox.Text = "Exercise"
checkBox = worksheet.CheckBoxes.AddCheckBox(9, 5, height, 100)
checkBox.CheckState = CheckState.Unchecked
checkBox.Text = "Musical Instruments"

# Save the modified workbook to a new file
workbook.SaveToFile("AddContentControls.xlsx", ExcelVersion.Version2016)

# Clean up and release the workbook object
workbook.Dispose()
Edit Content Controls in an Excel document in Python
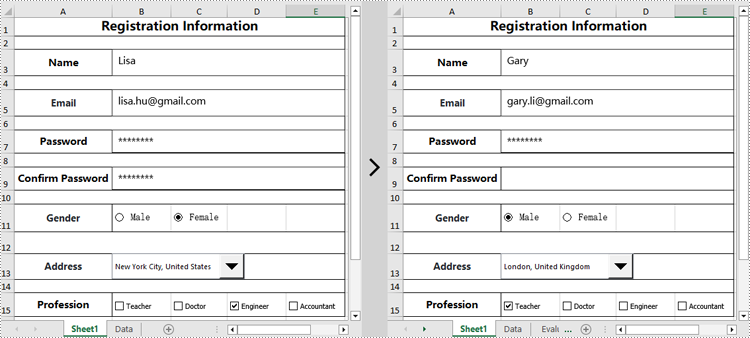
Spire.XLS for Python can also modify the properties of existing content controls in an Excel document, such as changing the text of a text box, resetting the selected item of a drop-down list, hiding a specific content control, and more. Here are the detailed steps:
- Create an object of the Workbook class.
- Use the Workbook.LoadFromFile() method to load an Excel document.
- Use the Workbook.Worksheets[] property to retrieve the desired worksheet.
- Modify the display content of a text box using the Worksheet.TextBoxes[].Text property.
- Set whether to display a specific text box using the Worksheet.TextBoxes[].Visible property.
- Set whether a radio button is checked using the Worksheet.RadioButtons[].CheckState property.
- Set the selected item of a combo box using the Worksheet.ComboBoxes[].SelectedIndex property.
- Set whether a checkbox is checked using the Worksheet.CheckBoxes[].CheckState property.
- Use the Workbook.SaveToFile() method to save the resulting file.
- Python
from spire.xls.common import *
from spire.xls import *

# Create a Workbook object
workbook = Workbook()

# Load Excel data from file
workbook.LoadFromFile("Data/Sample02.xlsx")

# Get the first worksheet
worksheet = workbook.Worksheets[0]

# Set the text content of the first textbox to "Gary"
worksheet.TextBoxes[0].Text = "Gary"

# Set the text content of the second textbox to "gary.li@gmail.com"
worksheet.TextBoxes[1].Text = "gary.li@gmail.com"

# Hide the fourth textbox
worksheet.TextBoxes[3].Visible = False

# Check the first radio button
worksheet.RadioButtons[0].CheckState = CheckState.Checked

# Set the selected index of the first combobox to 0 (the first option)
worksheet.ComboBoxes[0].SelectedIndex = 0

# Check the first checkbox
worksheet.CheckBoxes[0].CheckState = CheckState.Checked

# Uncheck the third checkbox
worksheet.CheckBoxes[2].CheckState = CheckState.Unchecked

# Save the modified workbook to a new file
workbook.SaveToFile("EditContentControls.xlsx", ExcelVersion.Version2016)

# Clean up and release the workbook object
workbook.Dispose()
Apply for a Temporary License
If you'd like to remove the evaluation message from the generated documents, or to get rid of the function limitations, please request a 30-day trial license for yourself.
Python: Insert or Extract OLE Objects in Excel
OLE enables users to incorporate diverse file types-such as images, charts, documents, and multimedia-directly into Excel workbooks, fostering a more dynamic and comprehensive representation of information. By inserting OLE objects, users can create interactive and engaging spreadsheets that integrate a variety of data formats to simplify analyses and presentations in a single Excel environment. In this article, you will learn how to insert linked or embedded OLE objects to Excel in Python as well as how to extract OLE objects from Excel in Python using Spire.XLS for Python.
- Insert a Linked OLE Object to Excel in Python
- Insert an Embedded Object to Excel in Python
- Extract OLE Objects from Excel in Python
Install Spire.XLS for Python
This scenario requires Spire.XLS for Python and plum-dispatch v1.7.4. They can be easily installed in your Windows through the following pip command.
pip install Spire.XLS
If you are unsure how to install, please refer to this tutorial: How to Install Spire.XLS for Python on Windows
Insert a Linked OLE Object to Excel in Python
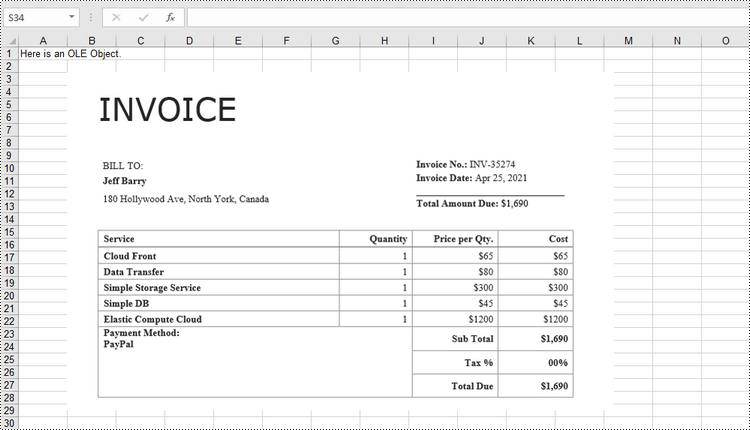
To insert an OLE object to a worksheet, you use the Worksheet.OleObjects.Add(fileName, image, linkType) method, in which:
- the fileName parameter specifies the path of an external file to be inserted,
- the image parameter specifies a thumbnail of the first page or a document icon that the OLE object will be displayed as,
- the linkType parameter determines whether the OLE object is inserted to the document as an embedded source or a linked source.
The following are the steps to insert a linked OEL object to Excel using Spire.XLS for Python.
- Create a Workbook object.
- Get the first worksheet through Workbook.Worksheet[index] property.
- Load an image using Image.FromFile() method.
- Insert an OLE object to the worksheet using Worksheet.OleObjects.Add() method, and specify the link type as OleLinkType.Link.
- Specify the OLE object location through IOleObject.Location property.
- Specify the OLE object type through IOleObject.ObjectType property.
- Save the workbook to an Excel file using Workbook.SaveToFile() method.
- Python
from spire.xls import *
from spire.xls.common import *

# Create a Workbook object
workbook = Workbook()

# Get the first worksheet
sheet = workbook.Worksheets[0]

# Add text to A1
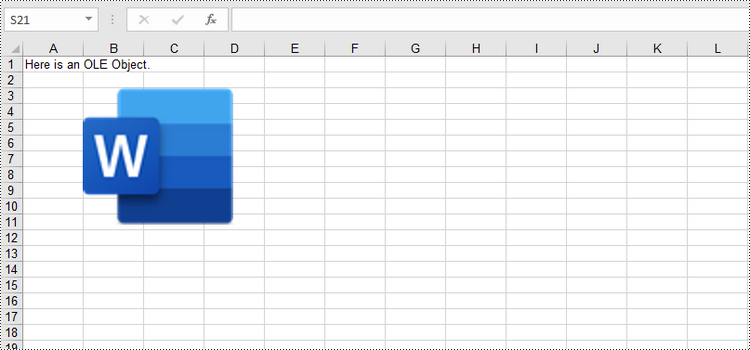
sheet.Range["A1"].Text = "Here is an OLE Object."

# Load an image to be displayed as an icon of ole object
image = Image.FromFile("C:/Users/Administrator/Desktop/word_icon.png")
with Stream() as stream:
    image.Save(stream,ImageFormat.get_Png())

    # Add an ole object to the worksheet that links to an external file
    oleObject = sheet.OleObjects.Add("C:/Users/Administrator/Desktop/invoice.docx", stream, OleLinkType.Link)

# Specify ole object location
oleObject.Location = sheet.Range["B3"]

# Specify ole object type
oleObject.ObjectType = OleObjectType.WordDocument

# Save to file
workbook.SaveToFile("output/OleObject.xlsx", ExcelVersion.Version2016)
workbook.Dispose()
Insert an Embedded OLE Object to Excel in Python
To insert an embedded OEL object to Excel, you specify the link type as OleLinkType.Embed while invoking the Worksheet.OleObjects.Add() method. The detailed steps are as follows.
- Create a Workbook object.
- Get the first worksheet through Workbook.Worksheet[index] property.
- Load an image using Image.FromFile() method.
- Insert an OLE object to the worksheet using Worksheet.OleObjects.Add() method, and specify the link type as OleLinkType.Embed.
- Specify the OLE object location through IOleObject.Location property.
- Specify the OLE object type through IOleObject.ObjectType property.
- Save the workbook to an Excel file using Workbook.SaveToFile() method.
- Python
from spire.xls import *
from spire.xls.common import *

# Create a Workbook object
workbook = Workbook()

# Get the first worksheet
sheet = workbook.Worksheets[0]

# Add text to A1
sheet.Range["A1"].Text = "Here is an OLE Object."

# Load an image that represents ole object
image = Image.FromFile("C:/Users/Administrator/Desktop/screenshot.png")
with Stream() as stream:
    image.Save(stream,ImageFormat.get_Png())

    # Add an ole object to the worksheet as embedded source
    oleObject = sheet.OleObjects.Add("C:/Users/Administrator/Desktop/invoice.docx", stream, OleLinkType.Embed)

# Specify ole object location
oleObject.Location = sheet.Range["B3"]

# Specify ole object type
oleObject.ObjectType = OleObjectType.WordDocument

# Save to file
workbook.SaveToFile("output/OleObject.xlsx", ExcelVersion.Version2016)
workbook.Dispose()
Extract OLE Objects from Excel in Python
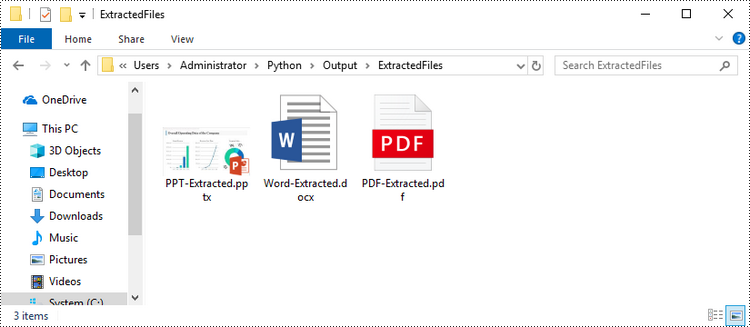
Spire.XLS for Python provides the Worksheet.HasOleObjects property to determine whether a worksheet has OLE objects. If it does, get all the objects through the Worksheet.OleObjects property. Then, determine the type of a particular OEL object and save the OEL as a file of the appropriate document type. The following are the steps to extract OLE objects from Excel using Spire.XLS for Python.
- Create a Workbook object.
- Get a specific worksheet through Workbook.Worksheet[index] property.
- Determine if the worksheet contains OLE objects through Worksheet.HasOleObjects property.
- Get all the OLE objects from the worksheet through Worksheet.OleObjects property.
- Determine the type of a particular OEL object and save the OEL as a file of the appropriate document type.
- Python
from spire.xls import *
from spire.xls.common import *

# Write data to file
def WriteAllBytes(fname:str,data):
    fp = open(fname,"wb")
    for d in data:
        fp.write(d)
    fp.close()

# Create a Workbook object
workbook = Workbook()

# Load an Excel document
workbook.LoadFromFile("C:\\Users\\Administrator\\Desktop\\OleObjects.xlsx")

# Get the first worksheet
sheet = workbook.Worksheets[0]

# Determine if the worksheet has ole objects
if sheet.HasOleObjects:

    # Iterate through the found objects
    for obj in sheet.OleObjects:

        # If the object type is a Word document, save it to a .docx file
        type = obj.ObjectType
        if type is OleObjectType.WordDocument:
            WriteAllBytes("output/ExtractedFiles/Word-Extracted.docx", obj.OleData)

        # If the object type is an Adobe Acrobat document, save it to a .pdf file
        if type is OleObjectType.AdobeAcrobatDocument:
            WriteAllBytes("output/ExtractedFiles/PDF-Extracted.pdf", obj.OleData)

        # If the object type is a PowerPoint document, save it to a .pptx file
        if type is OleObjectType.PowerPointPresentation:
            WriteAllBytes("output/ExtractedFiles/PPT-Extracted.pptx", obj.OleData)
workbook.Dispose()
Apply for a Temporary License
If you'd like to remove the evaluation message from the generated documents, or to get rid of the function limitations, please request a 30-day trial license for yourself.
Python: Add, Update, or Delete Textboxes in Excel
Textboxes in Excel provide a flexible way to add textual information or annotations to worksheets, charts, or other objects. They allow users to display explanatory text, labels, or comments that are not directly related to the data itself. In this guide, we will explore how to add, update, and delete textboxes in Excel in Python using Spire.XLS for Python.
- Add a Textbox to Excel in Python
- Update a Textbox in Excel in Python
- Delete a Textbox in Excel in Python
Install Spire.XLS for Python
This scenario requires Spire.XLS for Python and plum-dispatch v1.7.4. They can be easily installed in your Windows through the following pip command.
pip install Spire.XLS
If you are unsure how to install, please refer to this tutorial: How to Install Spire.XLS for Python on Windows
Add a Textbox to Excel in Python
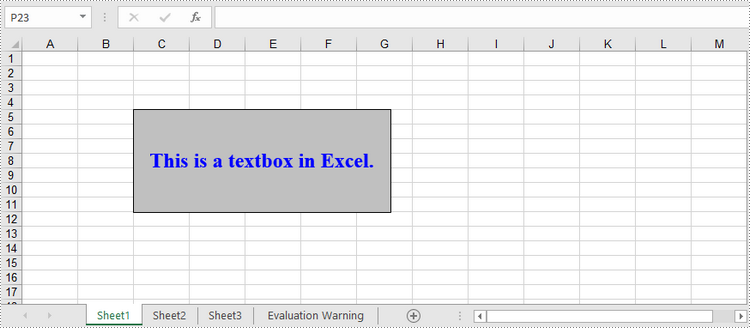
A textbox can be added to the specified location of a worksheet using Worksheet.TextBoxes.AddTextBox() method. The TextBox object has a set of properties that allow you to set the text and formatting of the textbox. The detailed steps to create a textbox using Spire.XLS for Python are as follows.
- Create a Workbook object.
- Get a specific worksheet through Workbook.Worksheets[index] property.
- Add a textbox to the worksheet at the specified location using Worksheet.TextBoxes.AddTextBox() method.
- Set text of the textbox through TextBox.Text property.
- Set formatting of the text through other properties under the TextBox object.
- Save the workbook to an Excel file using Workbook.SaveToFile() method.
- Python
from spire.xls import *
from spire.xls.common import *

# Create a Workbook object
workbook = Workbook()

# Get the first worksheet
sheet = workbook.Worksheets[0]

# Add a textbox to the worksheet, specifying location and size
textBox = sheet.TextBoxes.AddTextBox(5, 3, 120, 300)

# Set fill color of the textbox
textBox.Fill.FillType = ShapeFillType.SolidColor
textBox.Fill.ForeKnownColor = ExcelColors.Gray25Percent

# Add text to the textbox and set the text alignment
textBox.Text = "This is a textbox in Excel."
textBox.HAlignment = CommentHAlignType.Center
textBox.VAlignment = CommentVAlignType.Center

# Set font for the text
font = workbook.CreateFont()
font.FontName = "Times New Roman"
font.Size = 18
font.IsBold = True
font.Color = Color.get_Blue()
richText = textBox.RichText
rt = RichText(richText)
rt.SetFont(0, len(textBox.Text) - 1, font)

# Save the workbook to an Excel file
workbook.SaveToFile('output/InsertTextbox.xlsx', ExcelVersion.Version2016)
workbook.Dispose()
Update a Textbox in Excel in Python
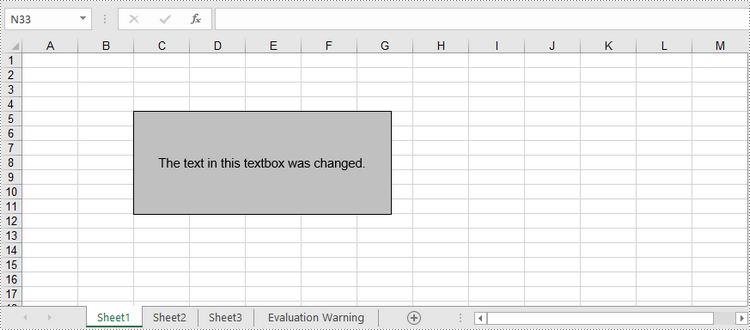
A certain textbox can be accessed through Worksheet.TextBoxes[index] property and the text inside the box can be obtained or modified through TextBox.Text property. The following are the steps to update a textbox using Spire.XLS for Python.
- Create a Workbook object.
- Load an Excel file using Workbook.LoadFromFile() method.
- Get a specific worksheet through Workbook.Worksheets[index] property.
- Add a textbox to the worksheet at the specified location using Worksheet.TextBoxes.AddTextBox() method.
- Reset text of the textbox through TextBox.Text property.
- Save the workbook to a different Excel file using Workbook.SaveToFile() method.
- Python
from spire.xls import *
from spire.common import *

# Create a Workbook object
workbook = Workbook()

# Load an Excel file
workbook.LoadFromFile('C:\\Users\\Administrator\\Desktop\\Textbox.xlsx')

# Get the first worksheet
sheet = workbook.Worksheets[0]

# Get the first textbox
tb = sheet.TextBoxes[0]

# Change the text of textbox
tb.Text = "The text in this textbox was changed."

# Save the workbook to a different Excel file
workbook.SaveToFile('output/UpdateTextbox.xlsx', ExcelVersion.Version2016)
workbook.Dispose()
Delete a Textbox in Excel in Python
To remove a specific textbox, you use Worksheet.TextBox[index].Remove() method. The detailed steps are as follows.
- Create a Workbook object.
- Load an Excel file using Workbook.LoadFromFile() method.
- Get a specific sheet through Workbook.Worksheets[index] property.
- Remove a specific textbox by using Worksheet.TextBoxes[index].Remove() method.
- Save the workbook to a different Excel file using Workbook.SaveToFile() method.
- Python
from spire.xls import *
from spire.common import *

# Create a Workbook object
workbook = Workbook()

# Load an Excel file
workbook.LoadFromFile('C:\\Users\\Administrator\\Desktop\\Textbox.xlsx')

# Get the first worksheet
sheet = workbook.Worksheets[0]

# Remove the first textbox
sheet.TextBoxes[0].Remove()

# Save the workbook to a different Excel file
workbook.SaveToFile('output/RemoveTextbox.xlsx', ExcelVersion.Version2016)
workbook.Dispose()
Apply for a Temporary License
If you'd like to remove the evaluation message from the generated documents, or to get rid of the function limitations, please request a 30-day trial license for yourself.