C#/VB.NET: Remove Paragraphs in a Word Document
When processing a Word document, you may need to remove some paragraphs. For example, after you copied contents from the Internet with a lot of redundant paragraphs to your document, you need to delete the extra paragraphs and keep only those that are useful. The deletion can be easily achieved by Spire.Doc for .NET by programming with no need for other software. This article will show you the detailed steps of removing paragraphs in a Word document using Spire.Doc for .NET.
Install Spire.Doc for .NET
To begin with, you need to add the DLL files included in the Spire.Doc for.NET package as references in your .NET project. The DLL files can be either downloaded from this link or installed via NuGet.
PM> Install-Package Spire.Doc
Delete a Specific Paragraph in a Word Document
Spire.Doc for .NET provides a method RemoveAt() under ParagraphCollection to remove paragraphs.
The detailed steps of removing a specific paragraph are as follows:
- Create an object of Document class.
- Load a Word document using Document.LoadFromFile() method.
- Get the first section using Document.Section[] property.
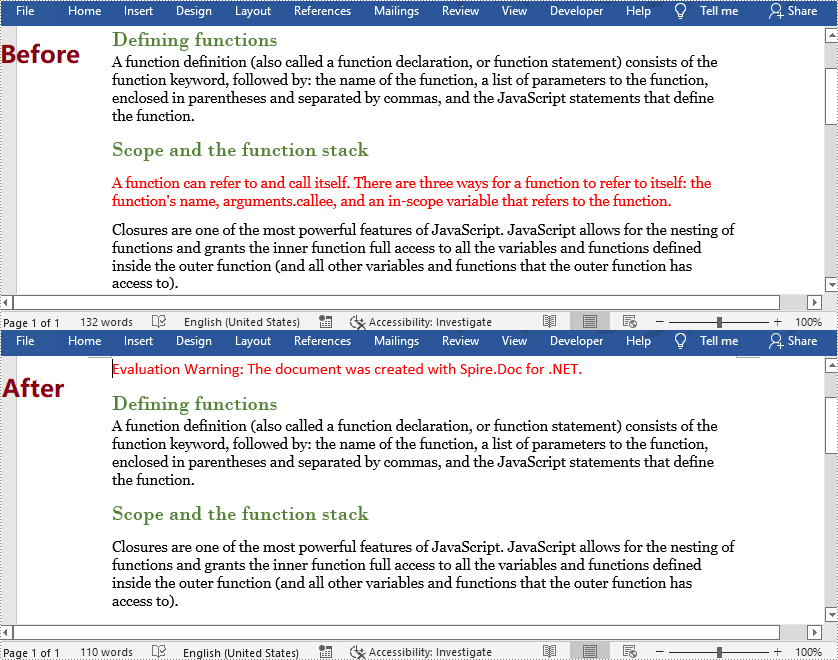
- Remove the 4th paragraph using Section.Paragraphs.RemoveAt() method.
- Save the document using Document.SaveToFile() method.
- C#
- VB.NET
using System;
using Spire.Doc;

namespace RemoveParagraphs
{
    internal class Program
    {
        static void Main(string[] args)
        {
            //Create an object of Document class
            Document document = new Document();

            //Load a Word document
            document.LoadFromFile("Sample.docx");

            //Get the first section
            Section section = document.Sections[0];

            //Remove the first paragraph in the section
            section.Paragraphs.RemoveAt(3);

            //Save the document
            document.SaveToFile("RemoveParagraphs.docx", FileFormat.Docx2013);
        }
    }
}
Delete All Paragraphs in a Word Document
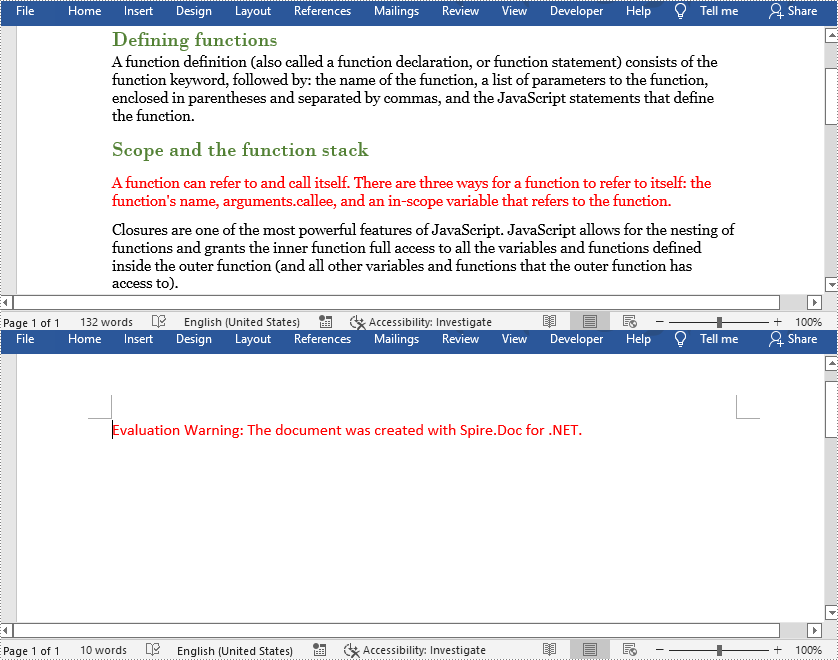
To remove all paragraphs, you can use the method Clear() under ParagraphCollection provided by Spire.Doc for .NET.
The detailed steps are as follows:
- Create an object of Document class.
- Load a Word Document using Document.LoadFromFile() method.
- Loop through all sections, and remove all paragraphs in each section using Section.Paragraphs.Clear() method.
- Save the document using Document.SaveToFile() method.
- C#
- VB.NET
using System;
using Spire.Doc;

namespace RemoveAllParagraphs
{
    internal class Program
    {
        static void Main(string[] args)
        {
            //Create an object of Document class
            Document document = new Document();

            //Load a Word document
            document.LoadFromFile("Sample.docx");

            //Loop through all sections
            foreach (Section section in document.Sections)
            {
                //Remove all paragraphs in the section
                section.Paragraphs.Clear();
            }

            //Save the document
            document.SaveToFile("RemoveAllParagraphs.docx", FileFormat.Docx2013);
        }
    }
}
Apply for a Temporary License
If you'd like to remove the evaluation message from the generated documents, or to get rid of the function limitations, please request a 30-day trial license for yourself.
Get Paragraphs by Style Name in Word in C#, VB.NET
By using Spire.Doc, you can not only retrieve the style names of all paragraphs in a Word document, but also get the paragraphs with a specific style name. This is useful especially when you need to get the text in Title, Heading 1, Subtitle, etc.
| Paragraph Style Names in Word | Paragraph Style Names in Spire.Doc |
| Title | Title |
| Heading 1 | Heading1 |
| Heading 2 | Heading2 |
| Heading 3 | Heading3 |
| Heading 4 | Heading3 |
| Subtitle | Subtitle |
Step 1: Load a sample Word file when initializing the Document object.
Document doc = new Document("sample.docx");
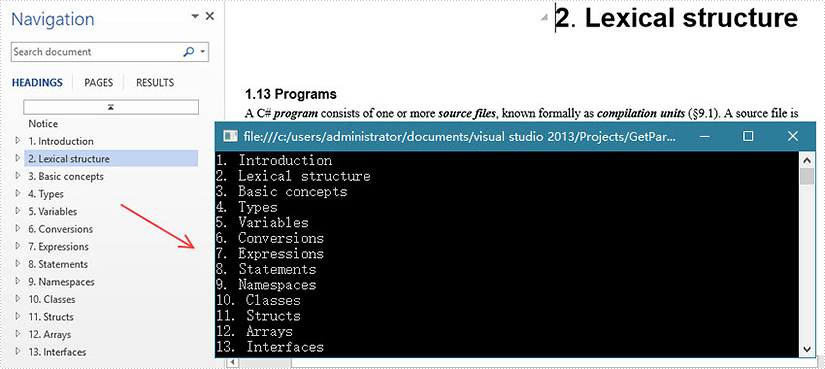
Step 2: Traverse the sections and paragraphs in the document and determine if the paragraph style name is "Heading1", if so, write the paragraph text on screen.
foreach (Section section in doc.Sections)
{
    foreach (Paragraph paragraph in section.Paragraphs)
    {
        if (paragraph.StyleName == "Heading1")
        {
            Console.WriteLine(paragraph.Text);
        }
    }
}
Output:
Full Code:
using Spire.Doc;
using Spire.Doc.Documents;
using System;
namespace GetParagh
{
 class Program
    {

     static void Main(string[] args)
     {
         Document doc = new Document("sample.docx");
         foreach (Section section in doc.Sections)
         {
             foreach (Paragraph paragraph in section.Paragraphs)
             {
                 if (paragraph.StyleName == "Heading1")
                 {
                     Console.WriteLine(paragraph.Text);
                 }
             }
         }
     }

    }
}
Imports Spire.Doc
Imports Spire.Doc.Documents
Namespace GetParagh
	Class Program

		Private Shared Sub Main(args As String())
			Dim doc As New Document("sample.docx")
			For Each section As Section In doc.Sections
				For Each paragraph As Paragraph In section.Paragraphs
					If paragraph.StyleName = "Heading1" Then
						Console.WriteLine(paragraph.Text)
					End If
				Next
			Next
		End Sub

	End Class
End Namespace
How to set the spacing before and after the paragraph in C#
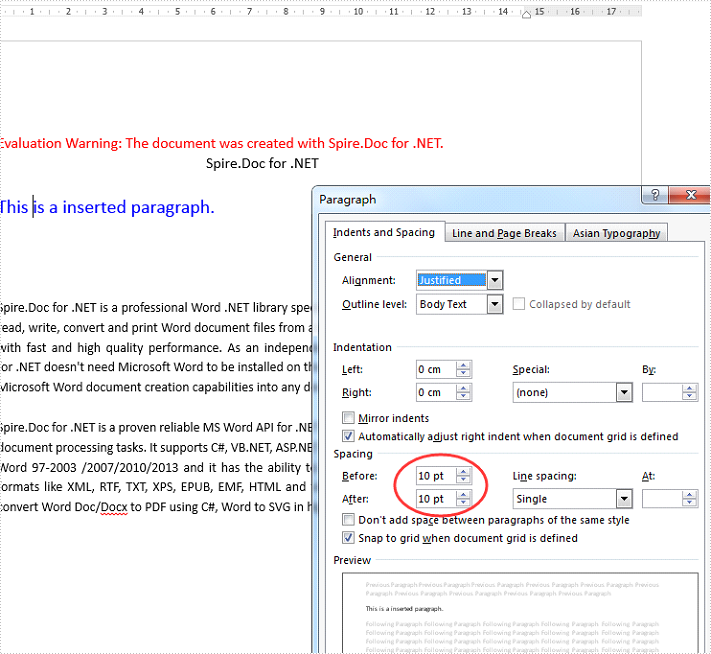
With Spire.Doc, we can set the formats for paragraph in C#. This article will focus on demonstrate how to set the spacing before and after the paragraph in C#.
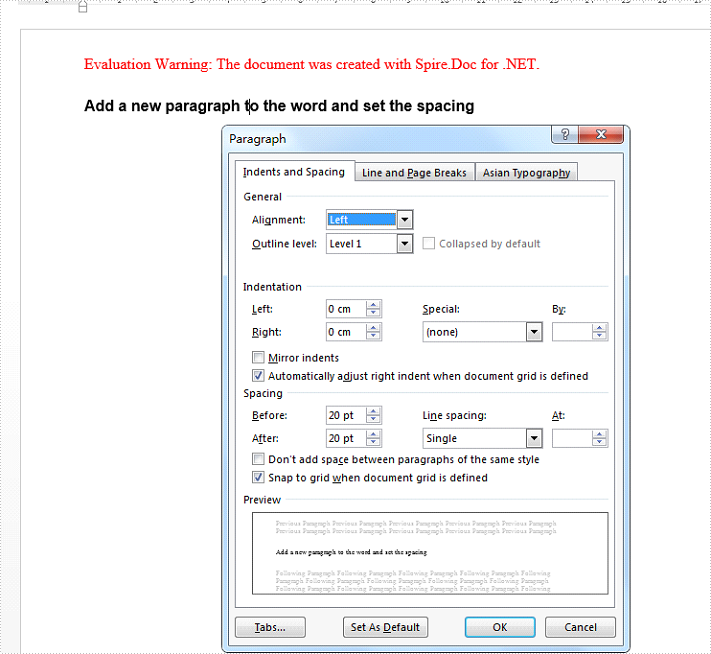
Set the spacing before and after the paragraph for a newly added paragraph added by the method of paragraph.AppendHTML() to a new blank word document.
//create a new word document and add a section and paragraph to it.
Document doc = new Document();
Section sec = doc.AddSection();
Paragraph para = sec.AddParagraph();
//Add the text strings to the paragraph and set the style
para.AppendHTML("Add a new paragraph to the word and set the spacing
");
para.ApplyStyle(BuiltinStyle.Heading1);
//set the spacing before and after
para.Format.BeforeAutoSpacing = false;
para.Format.BeforeSpacing = 20;
para.Format.AfterAutoSpacing = false;
para.Format.AfterSpacing = 20;
//save the document to file
doc.SaveToFile("Result1.docx");
using Spire.Doc;
using Spire.Doc.Documents;
using Spire.Doc.Fields;
namespace SetSpacing
{
 class Program
    {

     static void Main(string[] args)
     {
         //create a new word document and load the sample from file
         Document document = new Document();
         document.LoadFromFile("sample.docx", FileFormat.Docx);

         //Add the text strings to the paragraph and set the style
         Paragraph para = new Paragraph(document);
         TextRange textRange1 = para.AppendText("This is a inserted paragraph.");
         textRange1.CharacterFormat.TextColor = Color.Blue;
         textRange1.CharacterFormat.FontSize = 15;

         //set the spacing before and after
         para.Format.BeforeAutoSpacing = false;
         para.Format.BeforeSpacing = 10;
         para.Format.AfterAutoSpacing = false;
         para.Format.AfterSpacing = 10;

         //insert the added paragraph to the word document
         document.Sections[0].Paragraphs.Insert(1, para);

         //save the document to file
         document.SaveToFile("Result2.docx", FileFormat.Docx2010);
     }

    }
}
Add Tab Stops to Word Paragraphs in C#
Tab stops are markers placed on the ruler that define how text or numbers are aligned on a line. To add tab stops to a paragraph in Microsoft Word, we need to open the Tabs dialog box and then set the tab stop position, alignment and leader as shown below.
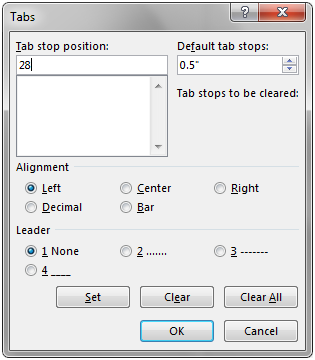
This article elaborates how to add tab stops to paragraphs in word document programmatically using Spire.Doc.
Detail steps:
Step 1: Instantiate a Document object and add a section to it.
Document document = new Document();
Section section = document.AddSection();
Step 2: Add paragraph 1 to the section.
Paragraph paragraph1 = section.AddParagraph();
Step 3: Add tab stops to paragraph 1.
//Add tab and set its position (in points)
Tab tab = paragraph1.Format.Tabs.AddTab(28);
//Set tab alignment
tab.Justification = TabJustification.Left;
//move to next tab and append text
paragraph1.AppendText("\tWashing Machine");

//Add another tab and set its position (in points)
tab = paragraph1.Format.Tabs.AddTab(280);
//Set tab alignment
tab.Justification = TabJustification.Left;
//Specify tab leader type
tab.TabLeader = TabLeader.Dotted;
//move to next tab and append text
paragraph1.AppendText("\t$650");
Step 4: Add paragraph 2 to the section.
Paragraph paragraph2 = section.AddParagraph();
Step 5: Add tab stops to paragraph 2.
//Add tab and set its position (in points)
tab = paragraph2.Format.Tabs.AddTab(28);
//Set tab alignment
tab.Justification = TabJustification.Left;
//move to next tab and append text
paragraph2.AppendText("\tRefrigerator");

//Add another tab and set its position (in points)
tab = paragraph2.Format.Tabs.AddTab(280);
//Set tab alignment
tab.Justification = TabJustification.Left;
//Specify tab leader type
tab.TabLeader = TabLeader.NoLeader;
//move to next tab and append text
paragraph2.AppendText("\t$800");
Step 6: Save and close the document object.
document.SaveToFile("Tab.docx", FileFormat.Docx2013);
document.Close();
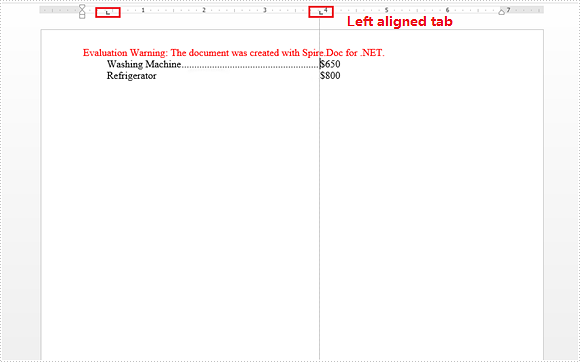
Screenshot:
Full code:
using Spire.Doc;
using Spire.Doc.Documents;
namespace AddTapStops
{
 class Program
    {

     static void Main(string[] args)
     {
         //Instantiate a Document object
         Document document = new Document();
         //Add a section
         Section section = document.AddSection();

         //Add paragraph 1
         Paragraph paragraph1 = section.AddParagraph();

         //Add tab and set its position (in points)
         Tab tab = paragraph1.Format.Tabs.AddTab(28);
         //Set tab alignment
         tab.Justification = TabJustification.Left;
         //move to next tab and append text
         paragraph1.AppendText("\tWashing Machine");

         //Add another tab and set its position (in points)
         tab = paragraph1.Format.Tabs.AddTab(280);
         //Set tab alignment
         tab.Justification = TabJustification.Left;
         //Specify tab leader type
         tab.TabLeader = TabLeader.Dotted;
         //move to next tab and append text
         paragraph1.AppendText("\t$650");

         //Add paragraph 2
         Paragraph paragraph2 = section.AddParagraph();

         //Add tab and set its position (in points)
         tab = paragraph2.Format.Tabs.AddTab(28);
         //Set tab alignment
         tab.Justification = TabJustification.Left;
         //move to next tab and append text
         paragraph2.AppendText("\tRefrigerator"); //move to next tab and append text

         //Add another tab and set its position (in points)
         tab = paragraph2.Format.Tabs.AddTab(280);
         //Set tab alignment
         tab.Justification = TabJustification.Left;
         //Specify tab leader type
         tab.TabLeader = TabLeader.NoLeader;
         //move to next tab and append text
         paragraph2.AppendText("\t$800");

         //Save and close the document object
         document.SaveToFile("Tab.docx", FileFormat.Docx2013);
         document.Close();

     }

    }
}
C#/VB.NET: Remove Empty Lines in Word
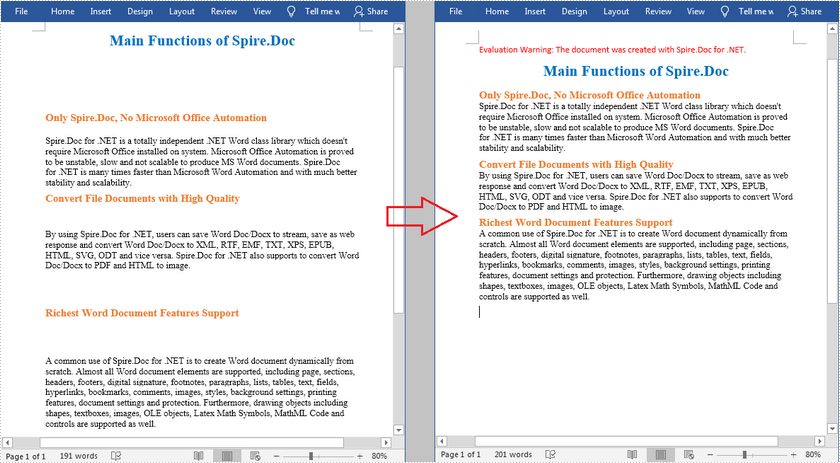
When coping content from the Internet into a Word document, you may find that there are a lot of blank lines between paragraphs, which will not only make the document look lengthier but also affect the readability. In this article, you will learn how to programmatically remove empty lines/blank paragraphs in an existing Word document using Spire.Doc for .NET.
Install Spire.Doc for .NET
To begin with, you need to add the DLL files included in the Spire.Doc for .NET package as references in your .NET project. The DLL files can be either downloaded from this link or installed via NuGet.
PM> Install-Package Spire.Doc
Remove Empty Lines in an Existing Word Document
The detailed steps are as follows:
- Create a Document instance.
- Load a sample Word document using Document.LoadFromFile() method.
- Loop through all paragraphs in the document and determine whether the paragraph is a blank paragraph.
- Remove blank paragraphs from the document using DocumentObjectCollection.Remove() method.
- Save the document to another file using Document.SaveToFile() method.
- C#
- VB.NET
using Spire.Doc;
using Spire.Doc.Documents;
using System;

namespace RemoveEmptyLines
{
    class Program
    {

        static void Main(string[] args)
        {

            //Create a Document instance
            Document doc = new Document();

            //Load a sample Word document
            doc.LoadFromFile(@"D:\Files\input.docx");

            //Loop through all paragraphs in the document
            foreach (Section section in doc.Sections)
            {
                for (int i = 0; i < section.Body.ChildObjects.Count; i++)
                {
                    if (section.Body.ChildObjects[i].DocumentObjectType == DocumentObjectType.Paragraph)
                    {
                        //Determine if the paragraph is a blank paragraph
                        if (String.IsNullOrEmpty((section.Body.ChildObjects[i] as Paragraph).Text.Trim()))
                        {
                            //Remove blank paragraphs
                            section.Body.ChildObjects.Remove(section.Body.ChildObjects[i]);
                            i--;
                        }
                    }

                }
            }

            //Save the document
            doc.SaveToFile("RemoveEmptyLines.docx", FileFormat.Docx2013);

        }

    }
}
Apply for a Temporary License
If you'd like to remove the evaluation message from the generated documents, or to get rid of the function limitations, please request a 30-day trial license for yourself.
How to Insert RTF String to Word Documents in C#, VB.NET
RTF is a document language used for encoding formatted text and graphics for easy transfer between applications. This article presents how to insert a piece of RTF encoded string to Word document using Spire.Doc.
Step 1: Initialize an instance of Document class, add a section to it.
Document doc = new Document();
Section section = doc.
Step 2: Add a paragraph to the section.
Paragraph para = section.AddParagraph();
Step 3: Declare a String variable to store the RTF string.
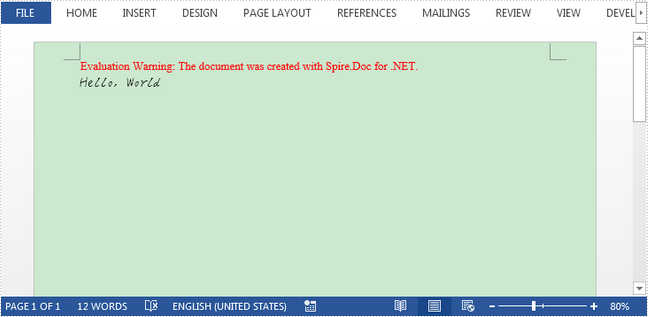
String rtfString = @"{\rtf1\ansi\deff0 {\fonttbl {\f0 hakuyoxingshu7000;}}\f0\fs28 Hello, World}";
Step 4: Append RTF string to paragraph.
para.AppendRTF(rtfString);
Step 5: Save the file.
doc.SaveToFile("Output.docx");
Output:
Full Code:
using Spire.Doc;
using Spire.Doc.Documents;
using System;
namespace InsertRTF
{
 class Program
    {

     static void Main(string[] args)
     {
         Document doc = new Document();
         Section section = doc.AddSection();
         Paragraph para = section.AddParagraph();

         String rtfString = @"{\rtf1\ansi\deff0 {\fonttbl {\f0 hakuyoxingshu7000;}}\f0\fs28 Hello, World}";
         para.AppendRTF(rtfString);

         doc.SaveToFile("Output.docx");

     }

    }
}
Imports Spire.Doc
Imports Spire.Doc.Documents
Namespace InsertRTF
	Class Program

		Private Shared Sub Main(args As String())
			Dim doc As New Document()
			Dim section As Section = doc.AddSection()
			Dim para As Paragraph = section.AddParagraph()

			Dim rtfString As [String] = "{\rtf1\ansi\deff0 {\fonttbl {\f0 hakuyoxingshu7000;}}\f0\fs28 Hello, World}"
			para.AppendRTF(rtfString)

			doc.SaveToFile("Output.docx")

		End Sub

	End Class
End Namespace
How to manage pagination on word document in C#
When we want to manage the pagination for the paragraphs, we can insert a page break directly. But later we may find that it is hard to add or remove text above the page break and then we have to remove the whole page break. With Microsoft word, we can also use the Paragraph dialog to manage the pagination flexible for the word paragraph as below:
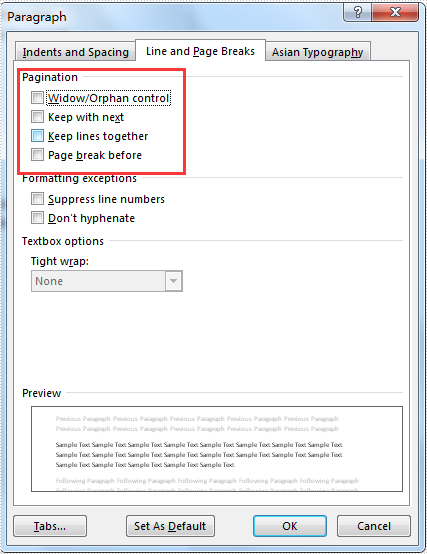
We have already shown you how to insert page break to the word document, this article we will show you how to manage the pagination by using the Paragraph.Format offered by Spire.Doc. Here comes to the steps of how to manage the pagination for the word document paragraph in C#:
Step 1: Create a new word document and load the document from file.
Document doc = new Document();
doc.LoadFromFile("sample.docx");
Step 2: Get the first section and the paragraph we want to manage the pagination
Section sec = doc.Sections[0];
Paragraph para = sec.Paragraphs[4];
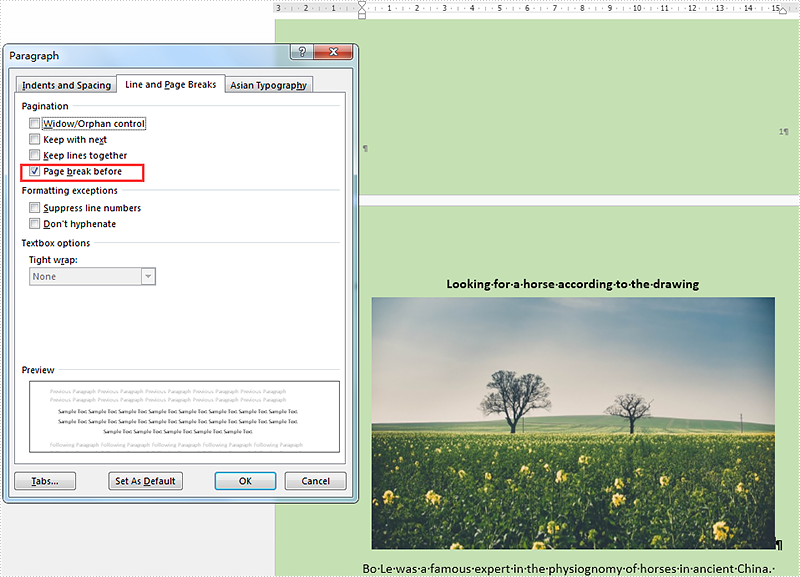
Step 3: Set the pagination format as Format.PageBreakBefore for the checked paragraph.
para.Format.PageBreakBefore = true;
Step 4: Save the document to file.
doc.SaveToFile("result.docx",FileFormat.Docx2010);
Effective screenshot after managing the pagination for the word document:
Full codes:
using Spire.Doc;
using Spire.Doc.Documents;
namespace ManagePage
{
 class Program
    {

     static void Main(string[] args)
     {
         Document doc = new Document();
         doc.LoadFromFile("sample.docx");

         Section sec = doc.Sections[0];
         Paragraph para = sec.Paragraphs[4];
         para.Format.PageBreakBefore = true;

         doc.SaveToFile("result.docx", FileFormat.Docx2010);

     }

    }
}
How to hide word paragraph in C#
When we operate the word document, we can hide some texts or the whole paragraph on the Microsoft Word after click the font box to hide the selected texts. Please check the screenshot of how Microsoft hide the text as below:
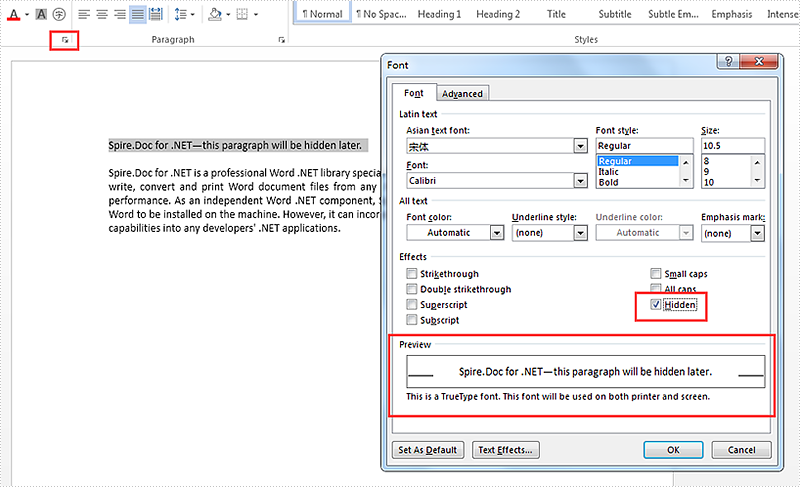
Spire.Doc offers a CharacterFormat.Hidden property to enable developers to hide the specified text or the whole paragraph. This article will demonstrate how to hide the whole paragraph on the word document in C#.
Here comes to the code snippets:
Step 1: Create a new word document and load from file.
Document doc = new Document();
doc.LoadFromFile("sample.docx");
Step 2: Get the first section and the first paragraph from the word document.
Section sec = doc.Sections[0];
Paragraph para = sec.Paragraphs[0];
Step 3: Get the first TextRange and set CharacterFormat.Hidden property as true to hide the texts.
(para.ChildObjects[0] as TextRange).CharacterFormat.Hidden = true;
Step 4: Save the document to file.
doc.SaveToFile("result.docx", FileFormat.Docx);
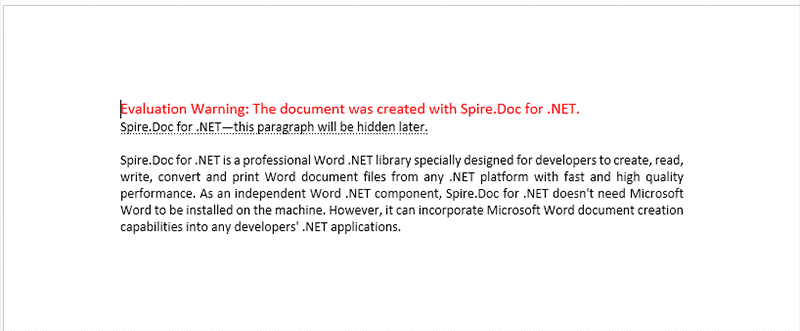
Effective screenshot after the paragraph is hidden:

After we set the options to display the hidden text, the hidden text will show like this:
Full codes:
using Spire.Doc;
using Spire.Doc.Documents;
using Spire.Doc.Fields;
namespace HideParagh
{
 class Program
    {

      static void Main(string[] args)
        {
            Document doc = new Document();
            doc.LoadFromFile("sample.docx");
            Section sec = doc.Sections[0];
            Paragraph para = sec.Paragraphs[0];

            (para.ChildObjects[0] as TextRange).CharacterFormat.Hidden = true;

            doc.SaveToFile("result.docx", FileFormat.Docx);
        }
    }
}
C#: Insert Paragraphs in Word
Inserting paragraphs in Word is a fundamental skill for creating well-structured and organized documents. Paragraphs can break down large blocks of text, making it easier for readers to follow the flow of ideas and find specific information. In Word, you can add new paragraphs to represent new ideas or add additional information. This article will demonstrate how to insert a new paragraph in Word in C# using Spire.Doc for .NET.
- Add a Paragraph at the End of a Word Document in C#
- Insert a Paragraph at a Specified Location in Word in C#
Install Spire.Doc for .NET
To begin with, you need to add the DLL files included in the Spire.Doc for .NET package as references in your .NET project. The DLL files can be either downloaded from this link or installed via NuGet.
PM> Install-Package Spire.Doc
Add a Paragraph at the End of a Word Document in C#
To add a new paragraph at the end, you need to get the last section of the Word document through the Document.LastSection property, and then add a paragraph at the end of the section through the Section.AddParagraph() method. The following are the detailed steps:
- Create a Document instance.
- Load a Word document using Document.LoadFromFile() method.
- Get the last section of the document using Document.LastSection property.
- Add a paragraph at the end of the section using Section.AddParagraph() method, and then add text to it using Paragraph.AppendText() method.
- Create a ParagraphStyle object and set the font name, size, style of the paragraph text.
- Apply the paragraph style using Paragraph.ApplyStyle() method
- Save the result document using Document.SaveToFile() method.
- C#
using Spire.Doc;
using Spire.Doc.Documents;
using System.Drawing;

namespace AddParagraph
{
    class Program
    {
        static void Main(string[] args)
        {
            //Create a Document object
            Document doc = new Document();

            //Load a Word document
            doc.LoadFromFile("Test.docx");

            //Get the last section
            Section section = doc.LastSection;

            //Add a paragraph at the end and set its text content
            Paragraph para = section.AddParagraph();
            para.AppendText("Add a paragraph to the end of the document.");

            //Set the paragraph style
            ParagraphStyle style = new ParagraphStyle(doc);
            style.Name = "Style1";
            style.CharacterFormat.FontName = "Times New Roman";
            style.CharacterFormat.FontSize = 12;
            style.CharacterFormat.TextColor = Color.Blue;
            style.CharacterFormat.Bold = true;
            doc.Styles.Add(style);
            para.ApplyStyle("Style1");
            para.Format.BeforeSpacing = 10;

            //Save the result file
            doc.SaveToFile("AddParagraph.docx", FileFormat.Docx2016);
        }
    }
}

Insert a Paragraph at a Specified Location in Word in C#
You can also add a paragraph and then insert it to a specified position through the Section.Paragraphs.Insert(int index, IParagraph paragraph) method. The following are the detailed steps:
- Create a Document instance.
- Load a Word document using Document.LoadFromFile() method.
- Get a specified section using Document.Sections[] property.
- Add a paragraph using Section.AddParagraph() method, and then add text to it using Paragraph.AppendText() method.
- Set the font name, size, style of the paragraph text.
- Insert the newly added paragraph at a specified index using Section.Paragraphs.Insert(int index, IParagraph paragraph) method.
- Save the result document using Document.SaveToFile() method.
- C#
using Spire.Doc;
using Spire.Doc.Documents;
using Spire.Doc.Fields;
using System.Drawing;

namespace InsertParagraph
{
    class Program
    {
        static void Main(string[] args)
        {
            //Create a Document object
            Document doc = new Document();

            //Load a Word document
            doc.LoadFromFile("Test.docx");


            //Get the first section
            Section section = doc.Sections[0];

            //Add a paragraph and set its text content
            Paragraph para = section.AddParagraph();
            TextRange textRange = para.AppendText("Insert a paragraph at a specified location in the Word document.");

            //Set the font name, size, color and style
            textRange.CharacterFormat.TextColor = Color.Blue;
            textRange.CharacterFormat.FontName = "Times New Roman";
            textRange.CharacterFormat.FontSize = 14;
            textRange.CharacterFormat.UnderlineStyle = UnderlineStyle.Single;

            //Insert the paragraph as the third paragraph
            section.Paragraphs.Insert(2, para);

            //Set spacing after the paragraph
            para.Format.AfterSpacing = 10;

            //Save the result file
            doc.SaveToFile("InsertParagraph.docx", FileFormat.Docx2016);
        }
    }
}

Apply for a Temporary License
If you'd like to remove the evaluation message from the generated documents, or to get rid of the function limitations, please request a 30-day trial license for yourself.
Set text alignment when append HTML string code to .doc in C#
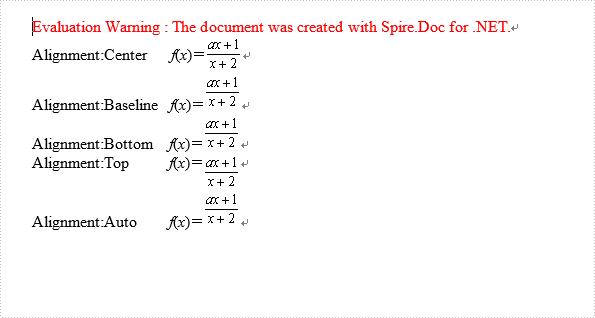
We can set Asian typography for paragraph for .doc files, there are four text alignments: Top, Center, Baseline, Bottom and Auto. In this article let's see how to set alignment when append HTML string code to .doc in C#.
Download Spire.Doc 5.3.83 or upper version, then add reference to your project.
Here are the steps:
Step 1: Create a HTML file contain the following code.
<html>
<body>
<i>f</i>(<i>x</i>)=<img align="middle" src="data:image/png;base64,iVBORw0KGgoAAAANSUhEUgAAACcAAAAlCAYAAADBa/A+AAAAAXNSR0IArs4c6QAAAARnQU1BAACxjwv8YQUAAAAJcEhZcwAADsMAAA7DAcdvqGQAAADvSURBVFhH7ZNbCsUwCES7/03nIkSwRh1rL00+PCCJVaeTPq5xMG2uSpuLuC7fwlZzZOxYc0TZnDwZ76WYzjVRjQnn57oQmdC5x9ses6IHUO7xd3NW8xNzVPPCwrtOLBXdbAlHgpJMX9SzVGQz7fUw55Eo87ZnqVAzh8x5z8jrHpl6pBNPb6bNVWlzVW7m5N+zKyT9Wqu0OYn3fVl8am754IHBz5+cpGxOP3qda9CNLNAMVESmmG3mMjw1lzrwXF0iEap5gUj1zNUlI0Jk+4i05lxNWCR1ysIh0Ixb1SJQCNQJ1pERgRU30uaqHGxujB+eJddCfZBWMwAAAABJRU5ErkJggg==" />
Step 2: Create a new document and add new section.
Document doc2 = new Document();
doc2.AddSection();
Step 3: Create new paragraph p and set its property of TextAlignment as "Center".
p.AppendText("Alignment:Center      ");
p.AppendHTML(File.ReadAllText(@"test.html"));
p.Format.TextAlignment = TextAlignment.Center;
Step 4: Set other options to make a contrast, Auto is Baseline by default.
Paragraph p1 = doc2.Sections[0].AddParagraph();
p1.AppendText("Alignment:Baseline   ");
p1.AppendHTML(File.ReadAllText(@"test.html"));
p1.Format.TextAlignment = TextAlignment.Baseline;

Paragraph p2 = doc2.Sections[0].AddParagraph();
p2.AppendText("Alignment:Bottom    ");
p2.AppendHTML(File.ReadAllText(@"test.html"));
p2.Format.TextAlignment = TextAlignment.Bottom;

Paragraph p3 = doc2.Sections[0].AddParagraph();
p3.AppendText("Alignment:Top          ");
p3.AppendHTML(File.ReadAllText(@"test.html"));
p3.Format.TextAlignment = TextAlignment.Top;

Paragraph p4 = doc2.Sections[0].AddParagraph();
p4.AppendText("Alignment:Auto        ");
p4.AppendHTML(File.ReadAllText(@"test.html"));
p4.Format.TextAlignment = TextAlignment.Auto;
Step 5: Save and review.
doc2.SaveToFile(@"test.doc", FileFormat.Doc);
System.Diagnostics.Process.Start("test.doc");
The screen shot:
Full Code Here:
using Spire.Doc;
using Spire.Doc.Documents;
using System.IO;
namespace SetTextAlignment
{
 class Program
    {

      static void Main(string[] args)
        {
            Document doc2 = new Document();
            doc2.AddSection();
            Paragraph p = doc2.Sections[0].AddParagraph();
            p.AppendText("Alignment:Center      ");
            p.AppendHTML(File.ReadAllText(@"test.html"));
            p.Format.TextAlignment = TextAlignment.Center;

            Paragraph p1 = doc2.Sections[0].AddParagraph();
            p1.AppendText("Alignment:Baseline   ");
            p1.AppendHTML(File.ReadAllText(@"test.html"));
            p1.Format.TextAlignment = TextAlignment.Baseline;

            Paragraph p2 = doc2.Sections[0].AddParagraph();
            p2.AppendText("Alignment:Bottom    ");
            p2.AppendHTML(File.ReadAllText(@"test.html"));
            p2.Format.TextAlignment = TextAlignment.Bottom;

            Paragraph p3 = doc2.Sections[0].AddParagraph();
            p3.AppendText("Alignment:Top          ");
            p3.AppendHTML(File.ReadAllText(@"test.html"));
            p3.Format.TextAlignment = TextAlignment.Top;

            Paragraph p4 = doc2.Sections[0].AddParagraph();
            p4.AppendText("Alignment:Auto        ");
            p4.AppendHTML(File.ReadAllText(@"test.html"));
            p4.Format.TextAlignment = TextAlignment.Auto;

            doc2.SaveToFile(@"test.doc", FileFormat.Doc);
            System.Diagnostics.Process.Start("test.doc");

        }
    }
}