Count the number of words in a document in C#, VB.NET
When you type in a document, Word automatically counts the number of pages and words in your document and displays them on the status bar – Word Count, at the bottom of the workspace. But how can we get the number of words, characters in an existing Word document through programming? This article aims to give you a simple solution offered by Spire.Doc.
Test file:
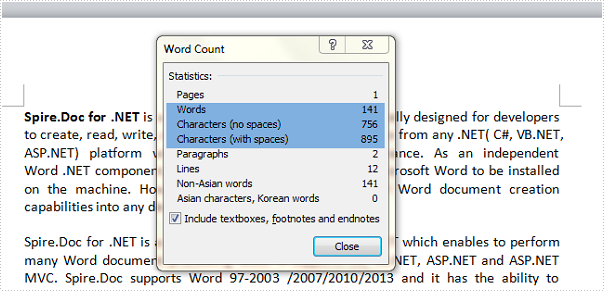
Detailed Steps for Getting the Number of Words and Characters
Step 1: Create a new instance of Spire.Doc.Document class and load the test file.
Document doc = new Document();
doc.LoadFromFile("test.docx", FileFormat.Docx2010);
Step 2: Display the number of words, characters including or excluding spaces on console.
Console.WriteLine("CharCount: " + doc.BuiltinDocumentProperties.CharCount);
Console.WriteLine("CharCountWithSpace: " + doc.BuiltinDocumentProperties.CharCountWithSpace);
Console.WriteLine("WordCount: " + doc.BuiltinDocumentProperties.WordCount);
Output:

Full Code:
using Spire.Doc;
using System;
namespace CountNumber
{
    class Program
    {
        static void Main(string[] args)
        {
            Document doc = new Document();
            doc.LoadFromFile("test.docx", FileFormat.Docx2010);
            Console.WriteLine("CharCount: " + doc.BuiltinDocumentProperties.CharCount);
            Console.WriteLine("CharCountWithSpace: " + doc.BuiltinDocumentProperties.CharCountWithSpace);
            Console.WriteLine("WordCount: " + doc.BuiltinDocumentProperties.WordCount);
            Console.ReadKey();
        }
    }
}
Imports Spire.Doc
Namespace CountNumber
	Class Program
		Private Shared Sub Main(args As String())
			Dim doc As New Document()
			doc.LoadFromFile("test.docx", FileFormat.Docx2010)
			Console.WriteLine("CharCount: " + doc.BuiltinDocumentProperties.CharCount)
			Console.WriteLine("CharCountWithSpace: " + doc.BuiltinDocumentProperties.CharCountWithSpace)
			Console.WriteLine("WordCount: " + doc.BuiltinDocumentProperties.WordCount)
			Console.ReadKey()
		End Sub
	End Class
End Namespace
New Method to Merge Word Documents
When dealing with Word documents, sometimes developers need to merge multiple files into a single file. Spire.Doc, especially designed for developers enables you to manipulate doc files easily and flexibly.
There is already a document introducing how to merge doc files. Check it here:
.NET Merge Word - Merge Multiple Word Documents into One in C# and VB.NET
Using the method above, you have to copy sections one by one. But the new method just concatenates them. It has improved and is very easy to use
Step 1: Load the original word file "A Good Man.docx".
document.LoadFromFile("A Good Man.docx", FileFormat.Docx);
Step 2: Merge another word file "Original Word.docx" to the original one.
document.InsertTextFromFile("Original Word.docx", FileFormat.Docx);
Step 3: Save the file.
document.SaveToFile("MergedFile.docx", FileFormat.Docx);
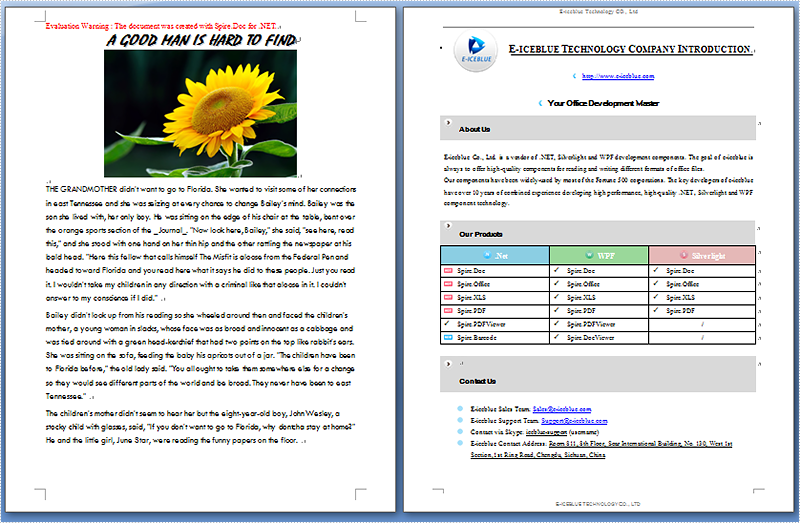
Full code and screenshot:
static void Main(string[] args)
{
    Document document = new Document();
    document.LoadFromFile("A Good Man.docx", FileFormat.Docx);

    document.InsertTextFromFile("Original Word.docx", FileFormat.Docx);

    document.SaveToFile("MergedFile.docx", FileFormat.Docx);
    System.Diagnostics.Process.Start("MergedFile.docx");
}
Full code and screenshot:
using Spire.Doc;
namespace MergeWord
{
    class Program
    {
        static void Main(string[] args)
        {
            Document document = new Document();
            document.LoadFromFile("A Good Man.docx", FileFormat.Docx);

            document.InsertTextFromFile("Original Word.docx", FileFormat.Docx);

            document.SaveToFile("MergedFile.docx", FileFormat.Docx);
            System.Diagnostics.Process.Start("MergedFile.docx");
        }
    }
}
C#/VB.NET: Add Document Properties to Word Documents
Document properties (also known as metadata) are a set of information about a document. All Word documents come with a set of built-in document properties, including title, author name, subject, keywords, etc. In addition to the built-in document properties, Microsoft Word also allows users to add custom document properties to Word documents. In this article, we will explain how to add these document properties to Word documents in C# and VB.NET using Spire.Doc for .NET.
- Add Built-in Document Properties to a Word Document
- Add Custom Document Properties to a Word Document
Install Spire.Doc for .NET
To begin with, you need to add the DLL files included in the Spire.Doc for.NET package as references in your .NET project. The DLL files can be either downloaded from this link or installed via NuGet.
PM> Install-Package Spire.Doc
Add Built-in Document Properties to a Word Document in C# and VB.NET
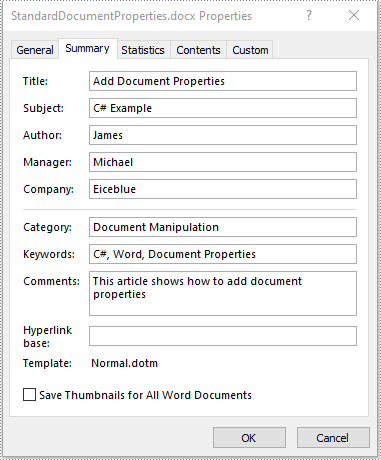
A built-in document property consists of a name and a value. You cannot set or change the name of a built-in document property as it's predefined by Microsoft Word, but you can set or change its value. The following steps demonstrate how to set values for built-in document properties in a Word document:
- Initialize an instance of Document class.
- Load a Word document using Document.LoadFromFile() method.
- Get the built-in document properties of the document through Document.BuiltinDocumentProperties property.
- Set values for specific document properties such as title, subject and author through Title, Subject and Author properties of BuiltinDocumentProperties class.
- Save the result document using Document.SaveToFile() method.
- C#
- VB.NET
using Spire.Doc;

namespace BuiltinDocumentProperties
{
    class Program
    {
        static void Main(string[] args)
        {
            //Create a Document instance
            Document document = new Document();
            //Load a Word document
            document.LoadFromFile("Sample.docx");

            //Add built-in document properties to the document
            BuiltinDocumentProperties standardProperties = document.BuiltinDocumentProperties;
            standardProperties.Title = "Add Document Properties";
            standardProperties.Subject = "C# Example";
            standardProperties.Author = "James";
            standardProperties.Company = "Eiceblue";
            standardProperties.Manager = "Michael";
            standardProperties.Category = "Document Manipulation";
            standardProperties.Keywords = "C#, Word, Document Properties";
            standardProperties.Comments = "This article shows how to add document properties";

            //Save the result document
            document.SaveToFile("StandardDocumentProperties.docx", FileFormat.Docx2013);
        }
    }
}
Add Custom Document Properties to a Word Document in C# and VB.NET
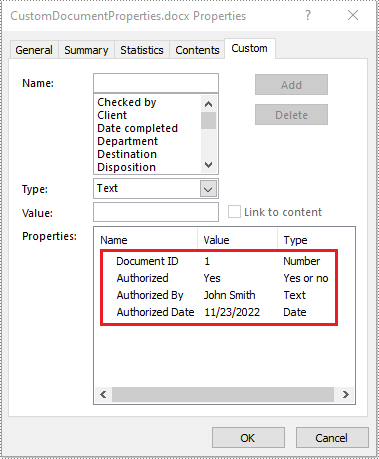
A custom document property can be defined by a document author or user. Each custom document property should contain a name, a value and a data type. The data type can be one of these four types: Text, Date, Number and Yes or No. The following steps demonstrate how to add custom document properties with different data types to a Word document:
- Initialize an instance of Document class.
- Load a Word document using Document.LoadFromFile() method.
- Get the custom document properties of the document through Document.CustomDocumentProperties property.
- Add custom document properties with different data types to the document using CustomDocumentProperties.Add(string, object) method.
- Save the result document using Document.SaveToFile() method.
- C#
- VB.NET
using Spire.Doc;
using System;

namespace CustomDocumentProperties
{
    class Program
    {
        static void Main(string[] args)
        {
            //Create a Document instance
            Document document = new Document();
            //Load a Word document
            document.LoadFromFile("Sample.docx");

            //Add custom document properties to the document
            CustomDocumentProperties customProperties = document.CustomDocumentProperties;
            customProperties.Add("Document ID", 1);
            customProperties.Add("Authorized", true);
            customProperties.Add("Authorized By", "John Smith");
            customProperties.Add("Authorized Date", DateTime.Today);

            //Save the result document
            document.SaveToFile("CustomDocumentProperties.docx", FileFormat.Docx2013);
        }
    }
}
Apply for a Temporary License
If you'd like to remove the evaluation message from the generated documents, or to get rid of the function limitations, please request a 30-day trial license for yourself.
C#/VB.NET: Merge Word Documents
Long papers or research reports are often completed collaboratively by multiple people. To save time, each person can work on their assigned parts in separate documents and then merge these documents into one after finish editing. Apart from manually copying and pasting content from one Word document to another, this article will demonstrate the following two ways to merge Word documents programmatically using Spire.Doc for .NET .
Install Spire.Doc for .NET
To begin with, you need to add the DLL files included in the Spire.Doc for.NET package as references in your .NET project. The DLL files can be either downloaded from this link or installed via NuGet.
PM> Install-Package Spire.Doc
Merge Documents by Inserting the Entire File
The Document.InsertTextFromFile() method provided by Spire.Doc for .NET allows merging Word documents by inserting other documents entirely into a document. Using this method, the contents of the inserted document will start from a new page. The detailed steps are as follows:
- Create a Document instance.
- Load the original Word document using Document.LoadFromFile() method.
- Insert another Word document entirely to the original document using Document.InsertTextFromFile() method.
- Save the result document using Document.SaveToFile() method.
- C#
- VB.NET
using Spire.Doc;

namespace MergeWord
{
    class Program
    {
        static void Main(string[] args)
        {
            //Create a Document instance
            Document document = new Document();

            //Load the original Word document
            document.LoadFromFile("Doc1.docx", FileFormat.Docx);

            //Insert another Word document entirely to the original document
            document.InsertTextFromFile("Doc2.docx", FileFormat.Docx);

            //Save the result document
            document.SaveToFile("MergedWord.docx", FileFormat.Docx);
        }
    }
}
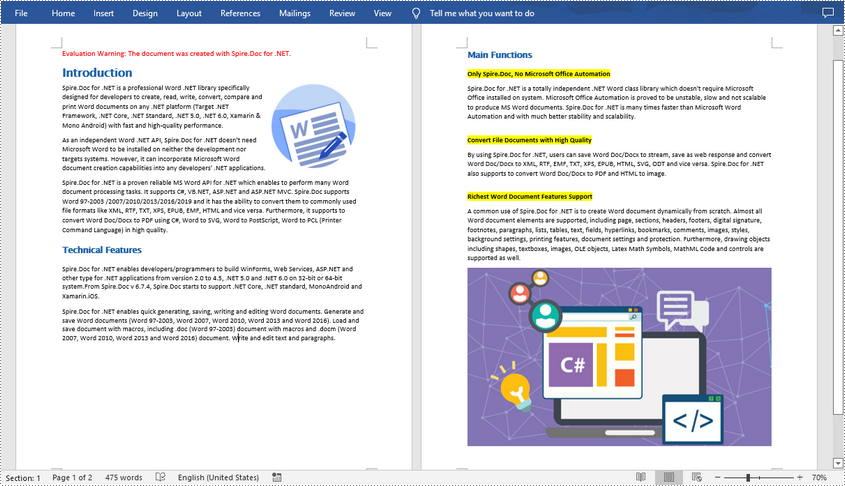
Merge Documents by Cloning Contents
If you want to merge documents without starting a new page, you can clone the contents of other documents to add to the end of the original document. The detailed steps are as follows:
- Load two Word documents.
- Loop through the second document to get all the sections using Document.Sections property, and then loop through all the sections to get their child objects using Section.Body.ChildObjects property.
- Get the last section of the first document using Document.LastSection property, and then add the child objects to the last section of the first document using LastSection.Body.ChildObjects.Add() method.
- Save the result document using Document.SaveToFile() method.
- C#
- VB.NET
using Spire.Doc;

namespace MergeWord
{
    class Program
    {
        static void Main(string[] args)
        {
            //Load two Word documents
            Document doc1 = new Document("Doc1.docx");
            Document doc2 = new Document("Doc2.docx");

            //Loop through the second document to get all the sections
            foreach (Section section in doc2.Sections)
            {

                //Loop through the sections of the second document to get their child objects
                foreach (DocumentObject obj in section.Body.ChildObjects)
                {

                    // Get the last section of the first document
                     Section lastSection = doc1.LastSection;

                    //Add all child objects to the last section of the first document
                    lastSection.Body.ChildObjects.Add(obj.Clone());
                }
            }

            // Save the result document
            doc1.SaveToFile("MergeDocuments.docx", FileFormat.Docx);
        }
    }
}
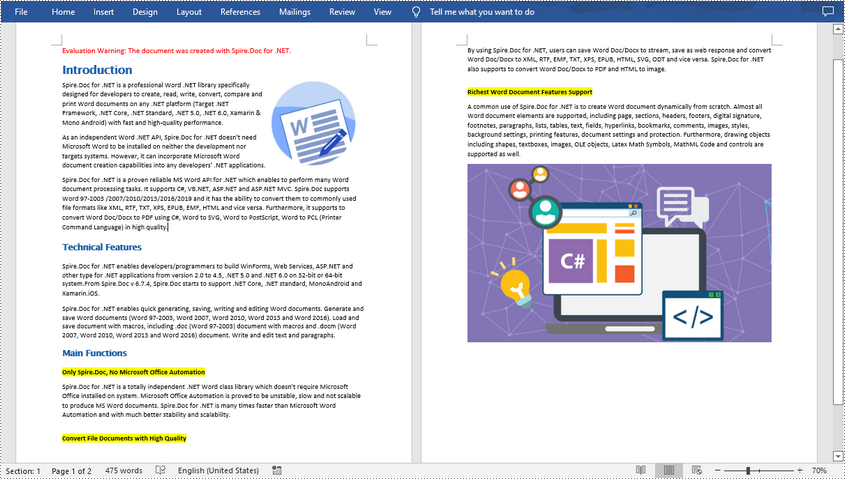
Apply for a Temporary License
If you'd like to remove the evaluation message from the generated documents, or to get rid of the function limitations, please request a 30-day trial license for yourself.
Set Word View Modes in C#, VB.NET
Users can change Word view mode according to own reading habit. This guide introduces a solution to set Word view modes in C# and VB.NET.
There are several Word View Modes provided with customers, including Print Layout, Web Layout, Full Screen, Draft, Outline and Zoom in/out with specified percentage. The view mode can be selected when opening to make the document to be presented to match readers’ reading habit. This guide focuses on demonstrating how to set Word view mode in C# and VB.NET via Spire.Doc for .NET. The screenshot presents the result after setting Word view mode.
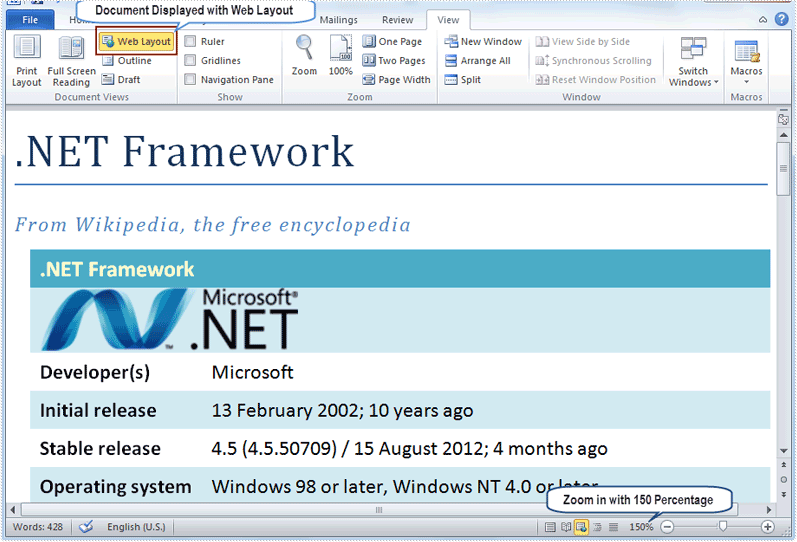
Spire.Doc for .NET, specializing in operating Word in .NET, offers a ViewSetup class to enable users to set Word view modes through assigning specified values for its properties. In this example, the Word view modes will be set as Web Layout with zoom out 150 percent. Therefore, the set properties of ViewSetup class include DocumentViewType, ZoomPercent and ZoomType.
DocumentViewTyp: There are five types provided by Spire.Doc for .NET: None, NormalLayout, OutlineLayout, PrintLayout and WebLayout.
ZoomPercent: The default ZoomPercent is 100. User can set other percent according to requirements. In this example, ZoomPercent is set as 150.
ZoomType: There are four zoom types provided by Spire.Doc for .NET: Full Page to automatically recalculate zoom percentage to fit one full page; None to use the explicit zoom percentage; PageWidth to automatically recalculate zoom percentage to fit page width; TextFit to automatically recalculate zoom percentage to fit text. Because the zoom percentage is set as 150, so the ZoomType is set as None in this example.
Download and install Spire.Doc for .NET and follow the code:
using Spire.Doc;

namespace WordViewMode
{
    class Program
    {
        static void Main(string[] args)
        {
            Document doc = new Document();
            doc.LoadFromFile(@"E:\Work\Documents\WordDocuments\.NET Framework.docx");

            doc.ViewSetup.DocumentViewType = DocumentViewType.WebLayout;
            doc.ViewSetup.ZoomPercent = 150;
            doc.ViewSetup.ZoomType = ZoomType.None;

            doc.SaveToFile("WordViewMode.docx", FileFormat.Docx2010);
            System.Diagnostics.Process.Start("WordViewMode.docx");
        }
    }
}
Imports Spire.Doc

Namespace WordViewMode
    Friend Class Program
        Shared Sub Main(ByVal args() As String)
            Dim doc As New Document()
            doc.LoadFromFile("E:\Work\Documents\WordDocuments\.NET Framework.docx")

            doc.ViewSetup.DocumentViewType = DocumentViewType.WebLayout
            doc.ViewSetup.ZoomPercent = 150
            doc.ViewSetup.ZoomType = ZoomType.None

            doc.SaveToFile("WordViewMode.docx", FileFormat.Docx2010)
            System.Diagnostics.Process.Start("WordViewMode.docx")
        End Sub
    End Class
End Namespace
Spire.Doc, professional Word component, is specially designed for developers to fast generate, write, modify and save Word documents in .NET, Silverlight and WPF with C# and VB.NET. Also, it supports conversion between Word and other popular formats, such as PDF, HTML, Image, Text and so on, in .NET and WPF platform.
C#: Mail Merge in Word Documents
Mail Merge is a powerful feature in Microsoft Word that allows you to create multiple documents such as letters, labels, envelopes, and even e-mails from a single template document and a data source. It's particularly useful for tasks like sending personalized correspondence to a large number of recipients without having to write each letter individually.
In this article, you will learn how to perform a mail merge in a Word document using Spire.Doc for .NET.
- Understanding the Components of Mail Merge
- Create a Template Word Document
- Simple Mail Merge in a Word Document
- Mail Merge with a Region
- Mail Merge with Nested Regions
Install Spire.Doc for .NET
To begin with, you need to add the DLL files included in the Spire.Doc for .NET package as references in your .NET project. The DLL files can be either downloaded from this link or installed via NuGet.
PM> Install-Package Spire.Doc
Understanding the Components of Mail Merge
- Main Document: This is the template file where you design your letter, label, or other types of documents with placeholders (also known as merge fields) that will be filled in by data from the data source.
- Data Source: This is the spreadsheet or database containing the information you want to use to populate your main document. It can be an Excel sheet, Access database, CSV file, XML file or even a simple text file.
- Merge Fields: These are placeholders in the main document that will be replaced with data from the corresponding record in the data source.
Create a Template Word Document
To generate a template Word document with merge fields, it’s recommended that you use Word editors such as Microsoft Word. The visual interface of the Word editor allows you to design a unique layout, formatting, and other elements interactively for your template.
The following screenshot shows the addition of merge fields to a Word document using MS Word. Remember to use the "Image:FieldName" format if you want to merge an image into a merge field.
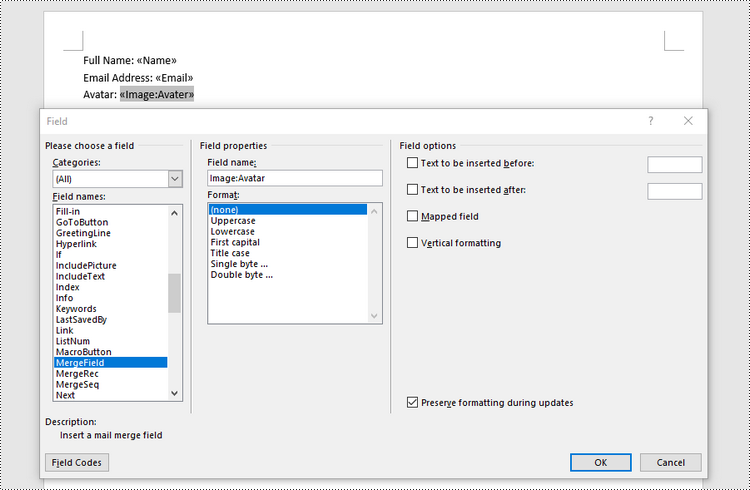
If you wish to create a template Word document using C# code, you can follow these steps.
- Create a Document object.
- Add a section.
- Add a paragraph to the section.
- Add merge fields to the paragraph using Paragraph.AppendField() method.
- Save the document to a Word file.
- C#
using Spire.Doc;
using Spire.Doc.Documents;

namespace CreateTemplate
{
    class Program
    {
        static void Main(string[] args)
        {
            // Create a Document object
            Document document = new Document();

            // Add a section
            Section section = document.AddSection();

            // Add a paragraph
            Paragraph paragraph = section.AddParagraph();

            // Add text and mail merge fields to the paragraph
            paragraph.AppendText("Full Name: ");
            paragraph.AppendField("Name", FieldType.FieldMergeField);
            paragraph.AppendBreak(BreakType.LineBreak);
            paragraph.AppendText("Email Address: ");
            paragraph.AppendField("Email", FieldType.FieldMergeField);
            paragraph.AppendBreak(BreakType.LineBreak);
            paragraph.AppendText("Avatar: ");
            paragraph.AppendField("Image:Avatar", FieldType.FieldMergeField);

            // Save the document
            document.SaveToFile("Template.docx", FileFormat.Docx2019);

            // Dispose resources
            document.Dispose();
        }
    }
}
Simple Mail Merge in a Word Document
Spire.Doc offers the MailMerge.Execute() method to perform the specified mail merge operation in a Word document. This method has 6 overloads allowing users to perform a mail merge from different data sources, such as DataTable, DataView, and string arrays.
The steps to perform a mail merge using data provided in arrays are as follows.
- Create a Document object.
- Load a template Word document from a specified file path.
- Define an array to hold the field names.
- Define an array to hold the values that will be used to fill the fields
- Mail merge data into the fields using MailMerge.Execute() method.
- Save the document to a different Word file.
- C#
using Spire.Doc;
using Spire.Doc.Reporting;
using System.Drawing;

namespace MailMergeInDocument
{
    class Program
    {
        static void Main(string[] args)
        {
            // Create a Document object
            Document document = new Document();

            // Load the template Word document
            document.LoadFromFile("C:\\Users\\Administrator\\Desktop\\Template.docx");

            // Specify field names
            String[] fieldNames = {

                "Name",
                "Email",
                "Avatar"
            };

            // Specify values that'll be used to fill the fields
            String[] fieldValues = {

                "John Smith",
                "[email protected]",
                "C:\\Users\\Administrator\\Desktop\\avatar.png"
            };

            // Register an event which occurs when merging the image filed
            document.MailMerge.MergeImageField += new MergeImageFieldEventHandler(MailMerge_MergeImageField);

            // Mail merge data to the document
            document.MailMerge.Execute(fieldNames, fieldValues);

            // Save the document
            document.SaveToFile("MailMerge.docx", FileFormat.Docx2019);

            // Dispose resources
            document.Dispose();
        }

        // Fill an image field with a picture
        private static void MailMerge_MergeImageField(object sender, MergeImageFieldEventArgs field)
        {
            string filePath = field.FieldValue as string;

            if (!string.IsNullOrEmpty(filePath))
            {
                field.Image = Image.FromFile(filePath);
            }
        }
    }
}

Mail Merge with a Region
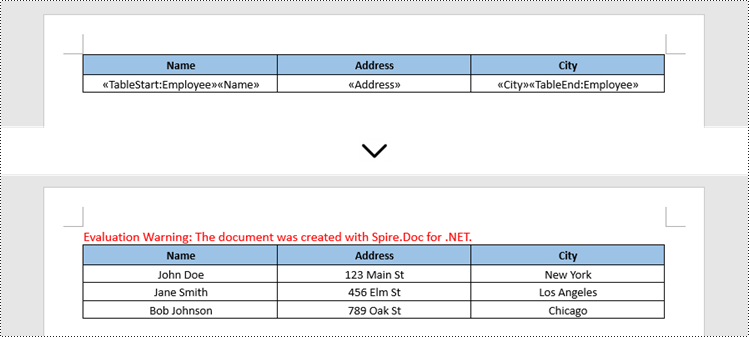
A region refers to a specific area within a document where you want to insert data from your data source. Mail Merge will repeat that region for each record in the data source. Spire.Doc offers the MailMerge.ExecuteWidthRegion() method to execute mail merge with a region.
The steps to perform a mail merge with a region using the data provided by a DataTable are as follows.
- Create a Document object.
- Load a template Word document from a specified file path.
- Create a DataTable object, which will be used as the data source.
- Execute mail merge with the region using MailMerge.ExecuteWidthRegion() method.
- Save the document to a different Word file.
- C#
using Spire.Doc;
using System.Data;

namespace MailMergeWithGroup
{
    class Program
    {
        static void Main(string[] args)
        {

            // Create a Document object
            Document document = new Document();

            // Load a template Word document
            document.LoadFromFile("C:\\Users\\Administrator\\Desktop\\Template.docx");

            // Create a datatable, specifying table name
            DataTable table = new DataTable("Employee");

            // Add sample data to table
            table.Columns.Add("Name");
            table.Columns.Add("Address");
            table.Columns.Add("City");
            table.Rows.Add("John Doe", "123 Main St", "New York");
            table.Rows.Add("Jane Smith", "456 Elm St", "Los Angeles");
            table.Rows.Add("Bob Johnson", "789 Oak St", "Chicago");

            // Mail merge within the region
            document.MailMerge.ExecuteWidthRegion(table);

            // Save the document
            document.SaveToFile("MailMergeWithRegion.docx", FileFormat.Docx2019);

            // Dispose resources
            document.Dispose();
        }
    }
}
Mail Merge with Nested Regions
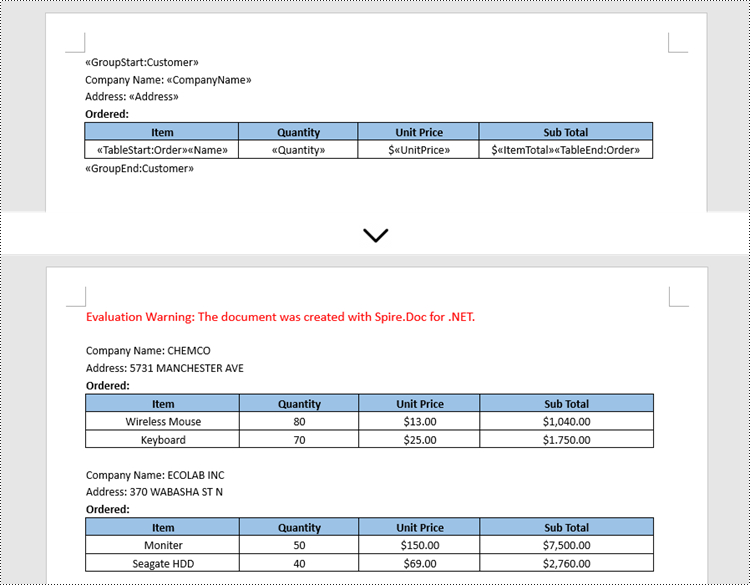
Mail merge for nested groups works by replacing merge fields within nested regions with data that is organized in a hierarchical structure. Nested regions allow you to create more complex layouts where the content of one region depends on the data in another region.
The steps to perform a mail merge with nested regions using the data from an XML file are as follows.
- Create a Document object.
- Load a template Word document from a specified file path.
- Read data from an XML file to a DataSet object.
- Create a List<DictionaryEntry> object to store the merge field information.
- Create DicitionaryEntry objects and add them to the list, which specify the merge field names and associated expressions.
- Execute mail merge with the nested regions using MailMerge.ExecuteWidthNestedRegion() method.
- Save the document to a different Word file.
- C#
using Spire.Doc;
using System.Collections;
using System.Data;

namespace MailMergeWithNestedRegions
{
    class Program
    {
        static void Main(string[] args)
        {
            // Create a Document object
            Document document = new Document();

            // Load a template Word document
            document.LoadFromFile("C:\\Users\\Administrator\\Desktop\\Template.docx");

            // Read data from an XML file to a DataSet object
            DataSet dataSet = new DataSet();
            dataSet.ReadXml("C:\\Users\\Administrator\\Desktop\\Orders.xml");

            // Create a List object to store the merge field information
            List list = new List();

            // Create two DicitionaryEntry objects and add them to the list (each object specifies the merge field name and associated expression)
            DictionaryEntry dictionaryEntry = new DictionaryEntry("Customer", string.Empty);
            list.Add(dictionaryEntry);

            dictionaryEntry = new DictionaryEntry("Order", "Customer_Id = %Customer.Customer_Id%");
            list.Add(dictionaryEntry);

            // Perform the mail merge operation with the nested region
            document.MailMerge.ExecuteWidthNestedRegion(dataSet, list);

            // Save to file
            document.SaveToFile("MailMergeWithNestedRegions.docx", FileFormat.Docx2019);

            // Dispose resources
            document.Dispose();
        }
    }
}
Apply for a Temporary License
If you'd like to remove the evaluation message from the generated documents, or to get rid of the function limitations, please request a 30-day trial license for yourself.
C#: Edit Word Documents
Editing a Word document is necessary when you want to improve readability, correct errors, refine formatting, maintain consistency, adapt content, facilitate collaboration, and optimize the document for any other purposes. Programmatically editing a Word document using C# can be a powerful approach to automate document processing and manipulation tasks.
In this article, you will learn how to edit a Word document using C# and the Spire.Doc for .NET library.
- Modify Text in a Word Document
- Change Formatting of Text in a Word Document
- Add New Elements to a Word Document
- Remove Paragraphs from a Word Document
Install Spire.Doc for .NET
To begin with, you need to add the DLL files included in the Spire.Doc for .NET package as references in your .NET project. The DLL files can be either downloaded from this link or installed via NuGet.
PM> Install-Package Spire.Doc
Modify Text in a Word Document in C#
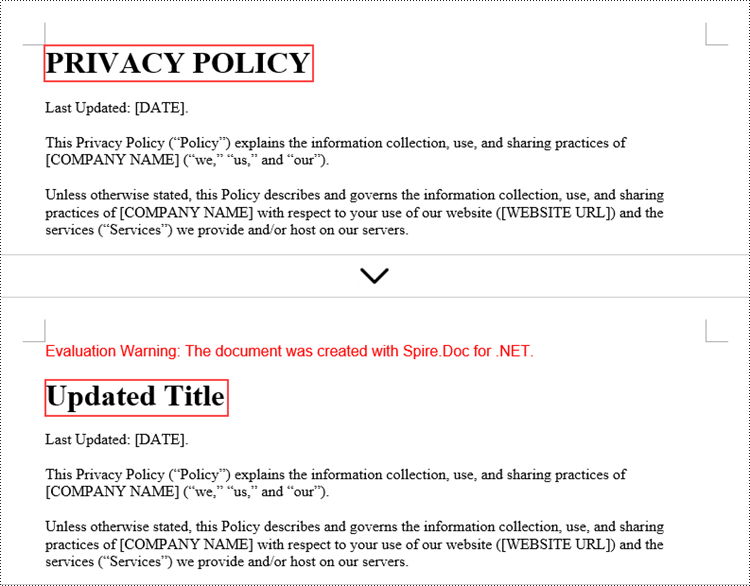
Spire.Doc allows you to programmatically access specific sections and paragraphs in Word documents. To retrieve a particular section, use the Document.Sections[index] property. Then, to get a particular paragraph within that section, leverage the Section.Paragraphs[index] property. Finally, you can update the text content of the paragraph using the Paragraph.Text property.
The steps to modify text in a Word document using C# are as follows:
- Create a Document object.
- Load a Word file from the given file path.
- Get a specific section through Document.Sections[index] property.
- Get a specific paragraph through Section.Paragraphs[index] property.
- Reset the text of the paragraph through Paragraph.Text property.
- Save the updated document to a different Word file.
- C#
using Spire.Doc;
using Spire.Doc.Documents;

namespace ModifyText
{
    class Program
    {
        static void Main(string[] args)
        {
            // Create a new document object
            Document document = new Document();

            // Load an existing Word file
            document.LoadFromFile("C:\\Users\\Administrator\\Desktop\\input.docx");

            // Get a specific section
            Section section = document.Sections[0];

            // Get a specific paragraph
            Paragraph paragraph = section.Paragraphs[0];

            // Modify the text of the paragraph
            paragraph.Text = "Updated Title";

            // Save the document to a different Word file
            document.SaveToFile("ModifyText.docx", FileFormat.Docx);

            // Dispose resource
            document.Dispose();
        }
    }
}
Change Formatting of Text in a Word Document in C#
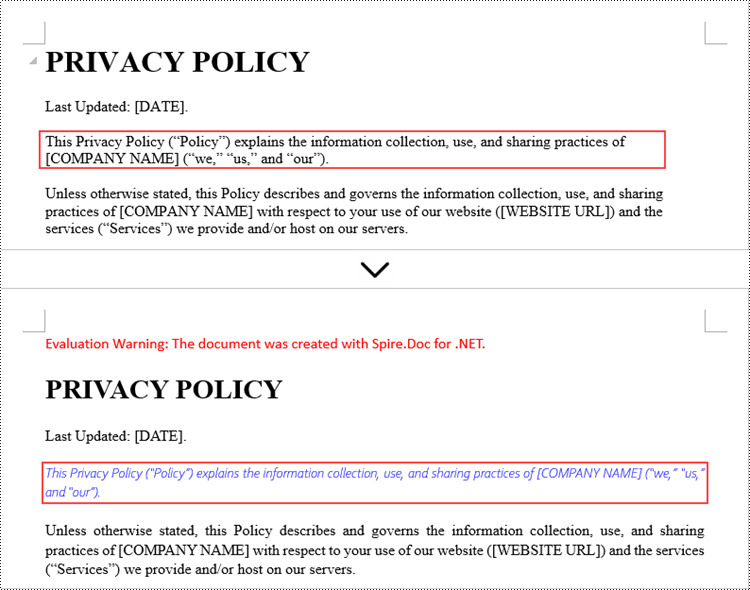
To change the text formatting within a paragraph, first obtain the paragraph object, then iterate through its child objects to locate the individual text ranges. For each text range, you can reset the formatting using the CharacterFormat property of the TextRange.
The steps to change text formatting in a Word document are as follows:
- Create a Document object.
- Load a Word file from the given file path.
- Get a specific section through Document.Sections[index] property.
- Get a specific paragraph through Section.Paragraphs[index] property.
- Iterate through the child objects in the paragraph.
- Determine if a child object is a text range.
- Get a specific text range.
- Reset the text formatting through TextRange.CharacterFormat property.
- Save the updated document to a different Word file.
- C#
using Spire.Doc;
using Spire.Doc.Documents;
using Spire.Doc.Fields;
using System.Drawing;

namespace ChangeTextFont
{
    class Program
    {
        static void Main(string[] args)
        {

            // Create a new document object
            Document document = new Document();

            // Load an existing Word file
            document.LoadFromFile("C:\\Users\\Administrator\\Desktop\\input.docx");

            // Get a specific section
            Section section = document.Sections[0];

            // Get a specific paragraph
            Paragraph paragraph = section.Paragraphs[2];

            // Iterate through the child objects in the paragraph
            for (int i = 0; i < paragraph.ChildObjects.Count; i++)
            {

                // Determine if a child object is text range
                if (paragraph.ChildObjects[i] is TextRange)
                {
                    // Get a specific text range
                    TextRange textRange = (TextRange)paragraph.ChildObjects[i];

                    // Reset font name for it
                    textRange.CharacterFormat.FontName = "Corbel Light";

                    // Reset font size for it
                    textRange.CharacterFormat.FontSize = 11;

                    // Reset text color for it
                    textRange.CharacterFormat.TextColor = Color.Blue;

                    // Apply italic to the text range
                    textRange.CharacterFormat.Italic = true;
                }
            }

            // Save the document to a different Word file
            document.SaveToFile("ChangeFont.docx", FileFormat.Docx);

            // Dispose resource
            document.Dispose();
        }
    }
}
Add New Elements to a Word Document in C#
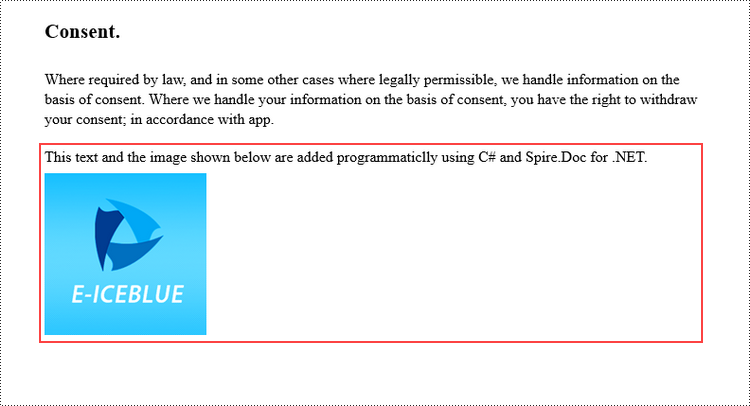
In addition to modifying the existing content in a Word document, you can also insert various types of new elements, such as text, images, tables, lists, and charts. As most elements are paragraph-based, you have the flexibility to add a new paragraph at the end of the document or insert it mid-document. You can then populate this new paragraph with the desired content, whether that's plain text, images, or other elements.
Below are the steps to add new elements (text and images) to a Word document using C#:
- Create a Document object.
- Load a Word file from the given file path.
- Get a specific section through Document.Sections[index] property.
- Add a paragraph to the section using Section.AddParagraph() method.
- Add text to the paragraph using Paragraph.AppendText() method.
- Add an image to the paragraph using Paragraph.AppendPicture() method.
- Save the updated document to a different Word file.
- C#
using Spire.Doc;
using Spire.Doc.Documents;

namespace AddNewElementsToWord
{
    class Program
    {
        static void Main(string[] args)
        {
            // Create a new document object
            Document document = new Document();

            // Load an existing Word file
            document.LoadFromFile("C:\\Users\\Administrator\\Desktop\\input.docx");

            // Get the last section
            Section lastSection = document.LastSection;

            // Add a paragraph to the section
            Paragraph paragraph = lastSection.AddParagraph();

            // Add text to the paragraph
            paragraph.AppendText("This text and the image shown below are added programmatically using C# and Spire.Doc for .NET.");

            // Add an image to the paragraph
            paragraph.AppendPicture("C:\\Users\\Administrator\\Desktop\\logo.png");

            // Create a paragraph style
            ParagraphStyle style = new ParagraphStyle(document);
            style.Name = "FontStyle";
            style.CharacterFormat.FontName = "Times New Roman";
            style.CharacterFormat.FontSize = 12;
            document.Styles.Add(style);

            // Apply the style to the paragraph
            paragraph.ApplyStyle(style.Name);

            // Save the document to a different Word file
            document.SaveToFile("AddNewElements.docx", FileFormat.Docx);

            // Dispose resource
            document.Dispose();
        }
    }
}
Remove Paragraphs from a Word Document in C#
With the Spire.Doc library, you can perform a variety of document operations, including updating existing content, adding new elements, as well as removing elements from a Word document. For example, to remove a paragraph from the document, you can use the Section.Paragraphs.RemoveAt() method.
The following are the steps to remove paragraphs from a Word document using C#:
- Create a Document object.
- Load a Word file from the given file path.
- Get a specific section through Document.Sections[index] property.
- Remove a specific paragraph from the section using Section.Paragraphs.RemoveAt() method.
- Save the updated document to a different Word file.
- C#
using Spire.Doc;

namespace RemoveParagraphs
{
    class Program
    {
        static void Main(string[] args)
        {
            // Create a new document object
            Document document = new Document();

            // Load an existing Word file
            document.LoadFromFile("C:\\Users\\Administrator\\Desktop\\input.docx");

            // Get a specific section
            Section section = document.Sections[0];

            // Remove a specific paragraph
            section.Paragraphs.RemoveAt(0);

            // Save the document to a different Word file
            document.SaveToFile("RemoveParagraph.docx", FileFormat.Docx);

            // Dispose resource
            document.Dispose();
        }
    }
}
Apply for a Temporary License
If you'd like to remove the evaluation message from the generated documents, or to get rid of the function limitations, please request a 30-day trial license for yourself.
C#: Create a Word Document from Scratch
Generating Word documents programmatically in C# is a powerful way to automate report creation, invoices, or any other dynamic document. With Spire.Doc for .NET, a robust and easy-to-use library, you can efficiently build Word files from scratch with full control over formatting and content. This guide will walk you through key features such as adding titles, headings, and paragraphs for structured text, inserting images for visual elements, creating tables to organize data, and adding lists for better readability.
By leveraging Spire.Doc, you can seamlessly generate professional, well-formatted Word documents directly from your .NET applications. Let's dive in and explore how to implement these functionalities step by step.
- Add Titles, Headings, and Paragraphs to a Word Document
- Add an Image to a Word Document
- Add a Table to a Word Document
- Add a List to a Word Document
Install Spire.Doc for .NET
To begin with, you need to add the DLL files included in the Spire.Doc for .NET package as references in your .NET project. The DLL files can be either downloaded from this link or installed via NuGet.
PM> Install-Package Spire.Doc
Add Titles, Headings, and Paragraphs to a Word Document in C#
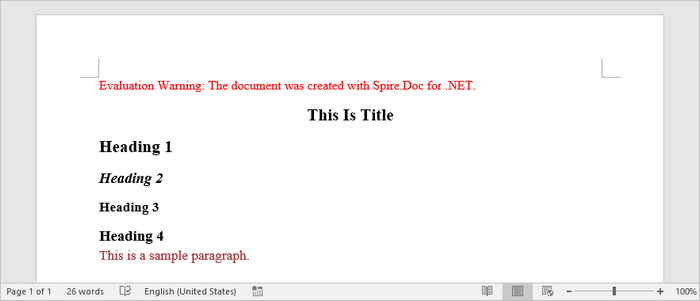
When creating structured Word documents with Spire.Doc for .NET, the core functionality revolves around the Document and Section classes. New paragraphs are added using AddParagraph(), while text content is inserted via AppendText(). For consistent formatting, you can apply built-in styles such as Title or Heading 1-4, which ensure a professional and standardized layout. Alternatively, custom styles can be defined for precise control over fonts, colors, and sizing, allowing for tailored document design.
Steps for adding titles, headings, and parargraphs to a Word documents in C#:
- Create a Document object.
- Add a section to the document with Document.AddSection().
- Add paragraphs to the section using Section.AddParagraph().
- Use Paragraph.ApplyStyle() to apply built-in styles (Title, Heading1, Heading2, Heading3) to specific paragraphs.
- Define a custom paragraph style with ParagraphStyle() and apply it to a designated paragraph.
- Save the document as a DOCX file.
- C#
using Spire.Doc;
using Spire.Doc.Documents;
using Spire.Doc.Fields;
using System.Drawing;

namespace CreateSimpleWordDocument
{
    class Program
    {
        static void Main(string[] args)
        {
            // Create a Document object
            Document document = new Document();

            // Add a section
            Section section = document.AddSection();

            // Set page margins
            section.PageSetup.Margins.All = 60f;

            // Add a title paragraph
            Paragraph title_para = section.AddParagraph();
            TextRange textRange = title_para.AppendText("This Is Title");
            title_para.ApplyStyle(BuiltinStyle.Title);
            textRange.CharacterFormat.FontName = "Times Now Roman";

            // Add a couple of heading paragraphs
            Paragraph heading_one = section.AddParagraph();
            textRange = heading_one.AppendText("Heading 1");
            heading_one.ApplyStyle(BuiltinStyle.Heading1);
            textRange.CharacterFormat.FontName = "Times Now Roman";

            Paragraph heading_two = section.AddParagraph();
            textRange = heading_two.AppendText("Heading 2");
            heading_two.ApplyStyle(BuiltinStyle.Heading2);
            textRange.CharacterFormat.FontName = "Times Now Roman";

            Paragraph heading_three = section.AddParagraph();
            textRange = heading_three.AppendText("Heading 3");
            heading_three.ApplyStyle(BuiltinStyle.Heading3);
            textRange.CharacterFormat.FontName = "Times Now Roman";

            Paragraph heading_four = section.AddParagraph();
            textRange = heading_four.AppendText("Heading 4");
            heading_four.ApplyStyle(BuiltinStyle.Heading4);
            textRange.CharacterFormat.FontName = "Times Now Roman";

            // Add a normal paragraph
            Paragraph normal_para = section.AddParagraph();
            normal_para.AppendText("This is a sample paragraph.");

            // Create a paragraph style
            ParagraphStyle style = new ParagraphStyle(document);
            style.Name = "paraStyle";
            style.CharacterFormat.FontName = "Times New Roman";
            style.CharacterFormat.FontSize = 13f;
            style.CharacterFormat.TextColor = Color.Brown;
            document.Styles.Add(style);

            // Apply the custom style to the paragraph
            normal_para.ApplyStyle("paraStyle");

            // Save the document
            document.SaveToFile("AddText.docx", FileFormat.Docx);

            // Dispose resources
            document.Dispose();
        }
    }
}
Add an Image to a Word Document in C#
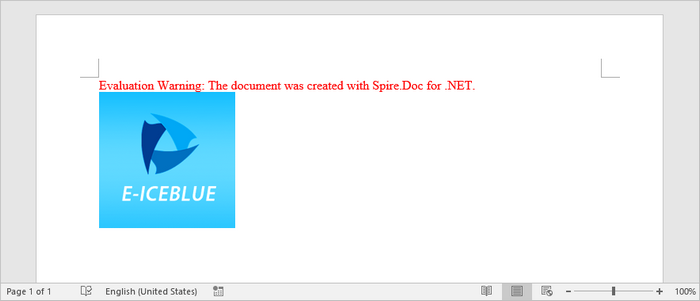
To insert an image into a Word document, first create a dedicated paragraph element to serve as the image container. By using the AppendPicture() method, you can load an image from the file system and embed it directly into the document structure.
Steps for adding an image to a Word doucment in C#:
- Create a Document object.
- Add a section to the document with Document.AddSection().
- Add a paragraph to the section using Section.AddParagraph().
- Use the Paragraph.AppendPicture() method to add an image to the paragraph.
- Save the document as a DOCX file.
- C#
using Spire.Doc;
using Spire.Doc.Documents;
using System.Drawing;

namespace AddImage
{
    class Program
    {
        static void Main(string[] args)
        {
            // Create a Document object
            Document document = new Document();

            // Add a section
            Section section = document.AddSection();

            // Set page margins
            section.PageSetup.Margins.All = 60f;

            // Add a paragraph
            Paragraph image_para = section.AddParagraph();

            // Append an image
            image_para.AppendPicture(Image.FromFile("C:\\Users\\Administrator\\Desktop\\logo.png"));

            //Save the document
            document.SaveToFile("AddImage.docx", FileFormat.Docx);

            // Dispose resources
            document.Dispose();
        }
    }
}
Add a Table to a Word Document in C#
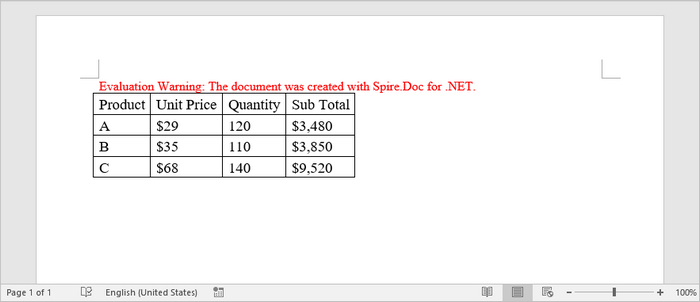
The table creation process begins with the AddTable() method, which establishes the basic table structure. You can precisely define the table dimensions by specifying the required number of rows and columns through the ResetCells() method. Once initialized, each cell can be populated by first adding a paragraph element using AddParagraph(), then inserting your textual content with AppendText().
Steps for adding a table to a Word document in C#:
- Create a Document object.
- Add a section to the document with Document.AddSection().
- Create a two-dimensional array to hold the table data, including headers and values.
- Use Section.AddTable() to create a table.
- Call Table.ResetCells() to define the number of rows and columns in the table based on your data.
- Iterate through the data array, adding text to each cell using the TableCell.AddParagraph() and Paragraph.AppendText() methods.
- Save the document as a DOCX file.
- C#
using Spire.Doc;
using Spire.Doc.Documents;

namespace AddTable
{
    class Program
    {
        static void Main(string[] args)
        {
            // Create a Document object
            Document document = new Document();

            // Add a section
            Section section = document.AddSection();

            // Set page margins
            section.PageSetup.Margins.All = 60f;

            // Define table data as a 2D array
            string[,] data = new string[4, 4]
            {
                { "Product", "Unit Price", "Quantity", "Sub Total" },
                { "A", "$29", "120", "$3,480" },
                { "B", "$35", "110", "$3,850" },
                { "C", "$68", "140", "$9,520" }
            };

            // Add a table
            Table table = section.AddTable(showBorder: true);

            // Set row number and column number
            table.ResetCells(data.GetLength(0), data.GetLength(1));

            // Write data to cells
            for (int r = 0; r < data.GetLength(0); r++)
            {
                TableRow row = table.Rows[r];
                row.Height = 20;
                row.HeightType = TableRowHeightType.Exactly;

                for (int c = 0; c < data.GetLength(1); c++)
                {
                    var cell = row.Cells[c];
                    cell.CellFormat.VerticalAlignment = VerticalAlignment.Middle;
                    var textRange = cell.AddParagraph().AppendText(data[r, c]);
                    textRange.CharacterFormat.FontName = "Times New Roman";
                    textRange.CharacterFormat.FontSize = 14;
                }
            }

            // Automatically adjusts the column widths of a table to fit its contents
            table.AutoFit(AutoFitBehaviorType.AutoFitToContents);

            // Save the document to file
            document.SaveToFile("AddTable.docx", FileFormat.Docx);

            // Dispose resources
            document.Dispose();
        }
    }
}
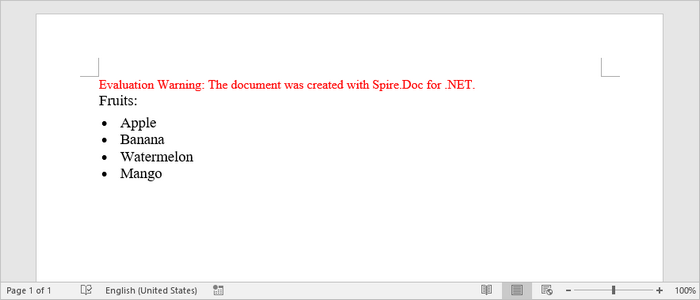
Add a List to a Word Document in C#
The ListStyle class provides the foundation for implementing both bulleted and numbered lists in your document. By configuring this class, you can establish consistent visual formatting for all list items. Once your list style is defined, simply apply it to target paragraphs using the ApplyStyle() method.
Steps for adding a list to a Word document in C#:
- Create a Document object.
- Add a section to the document with Document.AddSection().
- Define a list style using ListStyle().
- Add paragraphs to the section using Section.AddParagraph().
- Apply the defined list style to the paragraphs using Paragraph.ListFormat.ApplyStyle().
- Save the document as a DOCX file.
- C#
using Spire.Doc;
using Spire.Doc.Documents;
using Spire.Doc.Fields;

namespace AddList
{
    class Program
    {
        static void Main(string[] args)
        {
            // Create a Document object
            Document document = new Document();

            // Add a section
            Section section = document.AddSection();

            // Set page margins
            section.PageSetup.Margins.All = 60f;

            // Create a bulleted list style
            ListStyle listStyle = new ListStyle(document, ListType.Bulleted);
            listStyle.Name = "bulletedList";
            listStyle.Levels[0].BulletCharacter = "\x00B7";
            listStyle.Levels[0].CharacterFormat.FontName = "Symbol";
            listStyle.Levels[0].TextPosition = 20;
            document.ListStyles.Add(listStyle);

            // Add a paragraph
            Paragraph paragraph = section.AddParagraph();
            TextRange textRange = paragraph.AppendText("Fruits:");
            paragraph.Format.AfterSpacing = 5f;
            textRange.CharacterFormat.FontName = "Times New Roman";
            textRange.CharacterFormat.FontSize = 14;

            // Add another five paragraphs as bulleted list items
            foreach (var fruit in new[] { "Apple", "Banana", "Watermelon", "Mango" })
            {
                paragraph = section.AddParagraph();
                textRange = paragraph.AppendText(fruit);
                paragraph.ListFormat.ApplyStyle(listStyle.Name);
                paragraph.ListFormat.ListLevelNumber = 0;
                textRange.CharacterFormat.FontName = "Times New Roman";
                textRange.CharacterFormat.FontSize = 14;
            }

            // Save the document to file
            document.SaveToFile("AddList.docx", FileFormat.Docx);

            // Dispose resources
            document.Dispose();
        }
    }
}
Get a Free License
To fully experience the capabilities of Spire.Doc for .NET without any evaluation limitations, you can request a free 30-day trial license.
Solutions to Open Word in C#, VB.NET
No matter what users want to do on Word document, they should open it. This guide demonstrates several solutions to open Word in C# and VB.NET via Spire.Doc for .NET.
Open Existing Word
Spire.Doc for .NET provides a Document(String) constructor to enable users to initialize a new instance of Document class from the specified existing document.
Document document = new Document(@"E:\Work\Documents\Spire.Doc for .NET.docx");
Dim document As New Document("E:\Work\Documents\Spire.Doc for .NET.docx")
Spire.Doc for .NET also provides Document.LoadFromFile(String) method of Document class to open a Word document. The Word document can be .doc(Word 97-2003), .docx(Word 2007 and 2010) and .docm(Word with macro).
  Document document = new Document();
            document.LoadFromFile(@"E:\Work\Documents\Spire.Doc for .NET.docx");
 Dim document As New Document()
            document.LoadFromFile("E:\Work\Documents\Spire.Doc for .NET.docx")
Open Word in Read Mode
Spire.Doc for .NET provides Document.LoadFromFileInReadMode(String, FileFormat) method of Document class to load Word in Read-Only mode.
            Document document = new Document();
            document.LoadFromFileInReadMode(@"E:\Work\Documents\Spire.Doc for .NET.docx",FileFormat.Docx);
            Dim document As New Document()
            document.LoadFromFileInReadMode("E:\Work\Documents\Spire.Doc for .NET.docx", FileFormat.Docx)
Load Word from Stream
Spire.Doc for .NET provides the constructor Document(Stream) to initialize a new instance of Document class from specified data stream and the method Document.LoadFromStream(Stream, FileFormat) to open document from Stream in XML or Microsoft Word document.
            Stream stream = File.OpenRead(@"E:\Work\Documents\Spire.Doc for .NET.docx");
            Document document = new Document(stream);
            Stream stream = File.OpenRead(@"E:\Work\Documents\Spire.Doc for .NET.docx");
            Document document = new Document();
            document.LoadFromStream(stream, FileFormat.Docx);
            Dim stream As Stream = File.OpenRead("E:\Work\Documents\Spire.Doc for .NET.docx")
            Dim document As New Document(stream)
            Dim stream As Stream = File.OpenRead("E:\Work\Documents\Spire.Doc for .NET.docx")
            Dim document As New Document()
            document.LoadFromStream(stream, FileFormat.Docx)
Spire.Doc, an easy-to-use component to operate Word document, allows developers to fast generate, write, edit and save Word (Word 97-2003, Word 2007, Word 2010) in C# and VB.NET for .NET, Silverlight and WPF.
