Java: Count the Number of Words in a Word Document
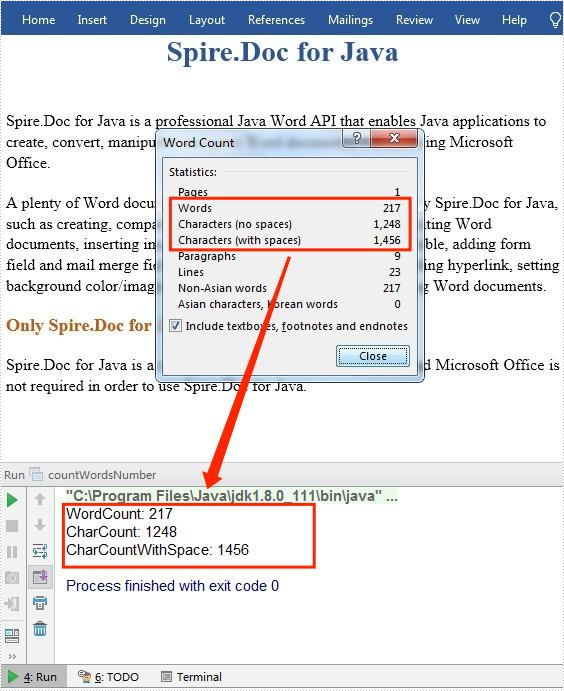
Microsoft Word provides a real-time word counter that counts the number of words in a document when you type. Beyond that, Microsoft Word also counts the number of pages, paragraphs and characters with or without spaces. In this article, you will learn how to programmatically count the number of words or characters in an existing Word document using Spire.Doc for Java.
Install Spire.Doc for Java
First of all, you're required to add the Spire.Doc.jar file as a dependency in your Java program. The JAR file can be downloaded from this link. If you use Maven, you can easily import the JAR file in your application by adding the following code to your project's pom.xml file.
<repositories>
    <repository>
        <id>com.e-iceblue</id>
        <name>e-iceblue</name>
        <url>https://repo.e-iceblue.com/nexus/content/groups/public/</url>
    </repository>
</repositories>
<dependencies>
    <dependency>
        <groupId>e-iceblue</groupId>
        <artifactId>spire.doc</artifactId>
        <version>12.11.0</version>
    </dependency>
</dependencies>
Count the Number of Words in a Word Document
The detailed steps are as follows:
- Create a Document instance.
- Load a sample Word document using Document.loadFromFile() method.
- Count the number of words using Document.getBuiltinDocumentProperties().getWordCount() method.
- Count the number of characters without spaces using Document.getBuiltinDocumentProperties().getCharCount() method.
- Count the number of characters with spaces using Document.getBuiltinDocumentProperties().getCharCountWithSpace() method.
- Java
import com.spire.doc.*;
public class countWordsNumber {
    public static void main(String[] args) {
        //Create a Document instance
        Document document = new Document();

        //Load a sample Word document
        document.loadFromFile("Demo.docx");

        //Count the number of words
        System.out.println("WordCount: " + document.getBuiltinDocumentProperties().getWordCount());

        //Count the number of characters without spaces
        System.out.println("CharCount: " + document.getBuiltinDocumentProperties().getCharCount());

        //Count the number of characters with spaces
        System.out.println("CharCountWithSpace: " + document.getBuiltinDocumentProperties().getCharCountWithSpace());
    }
}
Apply for a Temporary License
If you'd like to remove the evaluation message from the generated documents, or to get rid of the function limitations, please request a 30-day trial license for yourself.
Java: Insert Math Equations in Word
Math equations are mathematical expressions commonly used in physics, engineering, computer science, and economics fields. When creating a professional Word document, you may sometimes need to include math equations to explain complex concepts, solve problems, or support specific arguments. In this article, you will learn how to insert math equations into Word documents in Java using Spire.Doc for Java.
Install Spire.Doc for Java
First of all, you're required to add the Spire.Doc.jar file as a dependency in your Java program. The JAR file can be downloaded from this link. If you use Maven, you can easily import the JAR file in your application by adding the following code to your project's pom.xml file.
<repositories>
    <repository>
        <id>com.e-iceblue</id>
        <name>e-iceblue</name>
        <url>https://repo.e-iceblue.com/nexus/content/groups/public/</url>
    </repository>
</repositories>
<dependencies>
    <dependency>
        <groupId>e-iceblue</groupId>
        <artifactId>spire.doc</artifactId>
        <version>12.11.0</version>
    </dependency>
</dependencies>
Insert Math Equations into a Word Document in Java
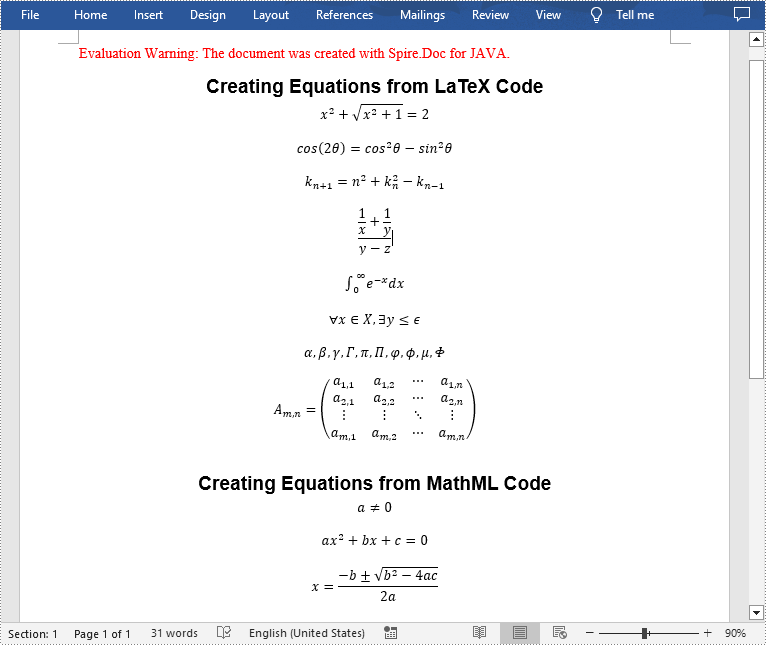
Spire.Doc for Java allows generating math equations from LaTeX code and MathML code using OfficeMath.fromLatexMathCode(String latexMathCode) and OfficeMath.fromMathMLCode(String mathMLCode) methods. The following are the detailed steps.
- Create two string arrays from LaTeX code and MathML code.
- Create a Document instance and add a section to it using Document.addSection() method.
- Iterate through each LaTeX code in the string array.
- Create a math equation from the LaTeX code using OfficeMath.fromLatexMathCode() method.
- Add a paragraph to the section, then add the math equation to the paragraph using Paragraph.getItems().add() method.
- Iterate through each MathML code in the string array.
- Create a math equation from the MathML code using OfficeMath.fromMathMLCode() method.
- Add a paragraph to the section, then add the math equation to the paragraph using Paragraph.getItems().add() method.
- Save the result document using Document.saveToFile() method.
- Java
import com.spire.doc.*;
import com.spire.doc.documents.*;
import com.spire.doc.fields.omath.*;

public class AddMathEquations {
    public static void main(String[] args){

        //Create a string array from LaTeX code
        String[] latexMathCode = {
                "x^{2}+\\sqrt{x^{2}+1}=2",
                "\\cos (2\\theta) = \\cos^2 \\theta - \\sin^2 \\theta",
                "k_{n+1} = n^2 + k_n^2 - k_{n-1}",
                "\\frac {\\frac {1}{x}+ \\frac {1}{y}}{y-z}",
                "\\int_0^ \\infty \\mathrm {e}^{-x} \\, \\mathrm {d}x",
                "\\forall x \\in X, \\quad \\exists y \\leq \\epsilon",
                "\\alpha, \\beta, \\gamma, \\Gamma, \\pi, \\Pi, \\phi, \\varphi, \\mu, \\Phi",
                "A_{m,n} = \\begin{pmatrix} a_{1,1} & a_{1,2} & \\cdots & a_{1,n} \\\\ a_{2,1} & a_{2,2} & \\cdots & a_{2,n} \\\\ \\vdots  & \\vdots  & \\ddots & \\vdots  \\\\ a_{m,1} & a_{m,2} & \\cdots & a_{m,n} \\end{pmatrix}",
        };

        //Create a string array from MathML code
        String[] mathMLCode = {
                "<math xmlns=\"http://www.w3.org/1998/Math/MathML\"><mi>a</mi><mo>≠</mo><mn>0</mn></math>",
                "<math xmlns=\"http://www.w3.org/1998/Math/MathML\"><mi>a</mi><msup><mi>x</mi><mn>2</mn></msup><mo>+</mo><mi>b</mi><mi>x</mi><mo>+</mo><mi>c</mi><mo>=</mo><mn>0</mn></math>",
                "<math xmlns=\"http://www.w3.org/1998/Math/MathML\"><mi>x</mi><mo>=</mo><mrow><mfrac><mrow><mo>−</mo><mi>b</mi><mo>±</mo><msqrt><msup><mi>b</mi><mn>2</mn></msup><mo>−</mo><mn>4</mn><mi>a</mi><mi>c</mi></msqrt></mrow><mrow><mn>2</mn><mi>a</mi></mrow></mfrac></mrow></math>",
        };

        //Create a Document instance
        Document doc = new Document();

        //Add a section
        Section section = doc.addSection();

        //Add a paragraph to the section
        Paragraph textPara = section.addParagraph();
        textPara.appendText("Creating Equations from LaTeX Code");
        textPara.applyStyle(BuiltinStyle.Heading_1);
        textPara.getFormat().setHorizontalAlignment(HorizontalAlignment.Center);

        //Iterate through each LaTeX code in the string array
        for (int i = 0; i < latexMathCode.length; i++)
        {
            //Create a math equation from the LaTeX code
            OfficeMath officeMath = new OfficeMath(doc);
            officeMath.fromLatexMathCode(latexMathCode[i]);

            //Add the math equation to the section
            Paragraph paragraph = section.addParagraph();
            paragraph.getItems().add(officeMath);
            section.addParagraph();
        }

        //Add a paragraph to the section
        textPara = section.addParagraph();
        textPara.appendText("Creating Equations from MathML Code");
        textPara.applyStyle(BuiltinStyle.Heading_1);
        textPara.getFormat().setHorizontalAlignment(HorizontalAlignment.Center);

        //Iterate through each MathML code in the string array
        for (int j = 0; j < mathMLCode.length; j++)
        {
            //Create a math equation from the MathML code
            OfficeMath officeMath = new OfficeMath(doc);
            officeMath.fromMathMLCode(mathMLCode[j]);

            //Add the math equation to the section
            Paragraph paragraph = section.addParagraph();
            paragraph.getItems().add(officeMath);
            section.addParagraph();
        }

        //Save the result document
        doc.saveToFile("AddMathEquations.docx", FileFormat.Docx_2016);
        doc.dispose();
    }
}
Apply for a Temporary License
If you'd like to remove the evaluation message from the generated documents, or to get rid of the function limitations, please request a 30-day trial license for yourself.
Java: Compare Two Word Documents
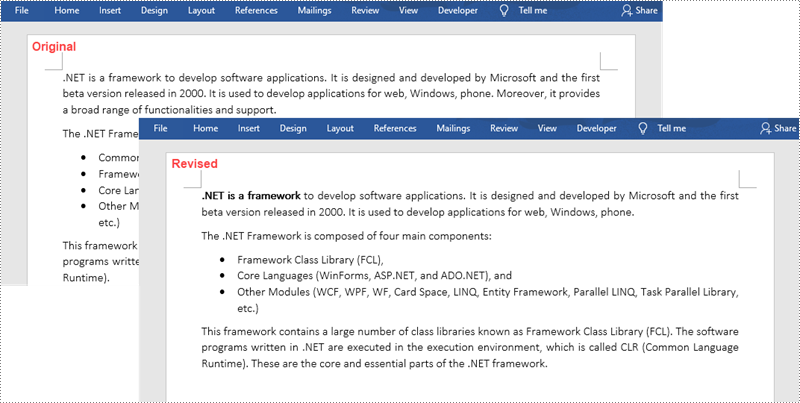
Document comparison is the process of checking new versions of a document against previous copies in order to identify changes made by different contributors. These differences may include additions or omissions of words, sentences or paragraphs, and formatting adjustments. This article demonstrates how to compare two Word documents in Java using Spire.Doc for Java.
- Compare Two Documents and Save Result in a Third Word Document
- Compare Two Documents and Return Insertions and Deletions in Lists
Below is a screenshot of the two Word documents that’ll be compared.
Install Spire.Doc for Java
First, you're required to add the Spire.Doc.jar file as a dependency in your Java program. The JAR file can be downloaded from this link. If you use Maven, you can easily import the JAR file in your application by adding the following code to your project's pom.xml file.
<repositories>
    <repository>
        <id>com.e-iceblue</id>
        <name>e-iceblue</name>
        <url>https://repo.e-iceblue.com/nexus/content/groups/public/</url>
    </repository>
</repositories>
<dependencies>
    <dependency>
        <groupId>e-iceblue</groupId>
        <artifactId>spire.doc</artifactId>
        <version>12.11.0</version>
    </dependency>
</dependencies>
Compare Two Documents and Save Result in a Third Word Document
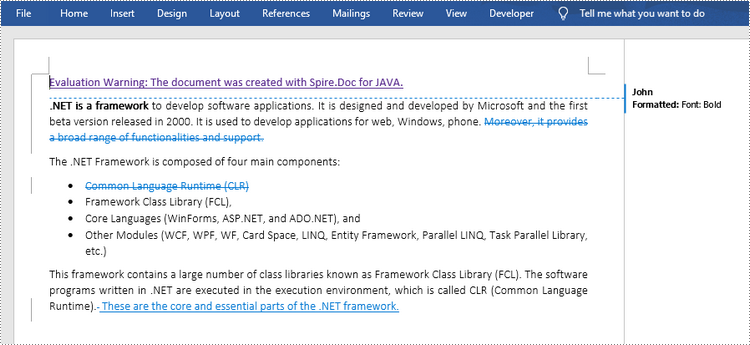
Saving the comparison result in a separate Word document allows users to see all the changes made to the original document, including insertions, deletions as well as modifications on formatting. The following are the steps to compare two documents and save the result in a third Word document using Spire.Doc for Java.
- Load two Word documents separately while initialing the Document objects.
- Compare these two documents using Document.compare() method.
- Save the result in a third Word document using Document.saveToFile() method.
- Java
import com.spire.doc.Document;
import com.spire.doc.FileFormat;

public class CompareDocuments {

    public static void main(String[] args) {

        //Load one Word document
        Document doc1 = new Document("C:\\Users\\Administrator\\Desktop\\original.docx");

        //Load the other Word document
        Document doc2 = new Document("C:\\Users\\Administrator\\Desktop\\revised.docx");

        //Compare two documents
        doc1.compare(doc2, "John");

        //Save the differences in a third document
        doc1.saveToFile("Differences.docx", FileFormat.Docx_2013);
        doc1.dispose();
    }
}
Compare Two Documents and Return Insertions and Deletions in Lists
Sometimes, we may only care about the insertions and deletions instead of the whole differences. The following are the steps to get insertions and deletions in two separate lists.
- Load two Word documents separately while initialing the Document objects.
- Compare two documents using Document.compare() method.
- Get the revisions using the constructor function of the DifferRevisions class.
- Get a list of insertions using DifferRevisions.getInsertRevisions() method.
- Get a list of deletions using DifferRevisions.getDeleteRevisions() method.
- Loop through the elements in the two lists to get the specific insertion and deletion.
- Java
import com.spire.doc.DifferRevisions;
import com.spire.doc.Document;
import com.spire.doc.DocumentObject;
import com.spire.doc.fields.TextRange;
import com.spire.ms.System.Collections.Generic.List;

public class CompareReturnResultsInLists {

    public static void main(String[] args) {

        //Load one Word document
        Document doc1 = new Document("C:\\Users\\Administrator\\Desktop\\original.docx");

        //Load the other Word document
        Document doc2 = new Document("C:\\Users\\Administrator\\Desktop\\revised.docx");

        //Compare the two Word documents
        doc1.compare(doc2, "Author");

        //Get the revisions
        DifferRevisions differRevisions = new DifferRevisions(doc1);

        //Return the insertion revisions in a list
        List insertRevisionsList = differRevisions.getInsertRevisions();

        //Return the deletion revisions in a list
        List  deleteRevisionsList = differRevisions.getDeleteRevisions();

        //Create two int variables
        int m = 0;
        int n = 0;

        //Loop through the insertion revision list
        for (int i = 0; i < insertRevisionsList.size(); i++)
        {
            if (insertRevisionsList.get(i) instanceof TextRange)
            {
                m += 1;
                //Get the specific revision and get its content
                TextRange textRange = (TextRange)insertRevisionsList.get(i) ;
                System.out.println("Insertion #" + m + ":" + textRange.getText());
            }
        }
        System.out.println("============================================");
        //Loop through the deletion revision list
        for (int i = 0; i < deleteRevisionsList.size() ; i++)
        {
            if (deleteRevisionsList.get(i) instanceof TextRange)
            {
                n += 1;
                //Get the specific revision and get its content
                TextRange textRange = (TextRange) deleteRevisionsList.get(i) ;
                System.out.println("Deletion #" + n + ":" + textRange.getText());
            }
        }
    }
}

Apply for a Temporary License
If you'd like to remove the evaluation message from the generated documents, or to get rid of the function limitations, please request a 30-day trial license for yourself.
Add, Count, Retrieve and Remove Variables in Word in Java
This article demonstrates how to add, count, retrieve and remove variables in a Word document in Java using Spire.Doc for Java library.
Add a Variable
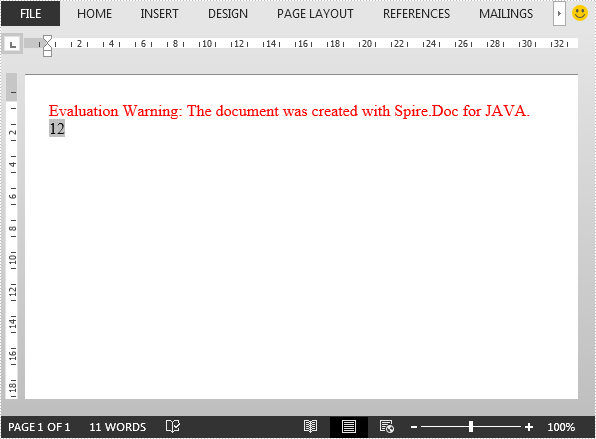
The following example adds a document variable named "A1" with a value of 12 to a Word document.
import com.spire.doc.Document;
import com.spire.doc.FieldType;
import com.spire.doc.FileFormat;
import com.spire.doc.Section;
import com.spire.doc.documents.Paragraph;

public class AddVariables {
    public static void main(String[] args){
        //Create a Document instance
        Document document = new Document();
        //Add a section
        Section section = document.addSection();

        //Add a paragraph to the section
        Paragraph paragraph = section.addParagraph();

        //Add a DocVariable field to the paragraph
        paragraph.appendField("A1", FieldType.Field_Doc_Variable);

        //Add a document variable to the DocVariable field
        document.getVariables().add("A1", "12");

        //Update fields in the document
        document.isUpdateFields(true);

        //Save the result document
        document.saveToFile("AddVariables.docx", FileFormat.Docx_2013);
    }
}
Count the number of Variables
import com.spire.doc.Document;

public class CountVariables {
    public static void main(String[] args){
        //Load the Word document
        Document document = new Document();
        document.loadFromFile("AddVariables.docx");

        //Get the number of variables in the document
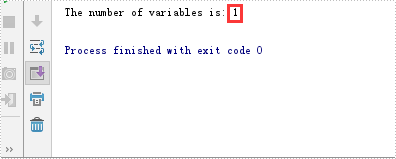
        int number = document.getVariables().getCount();

        StringBuilder content = new StringBuilder();
        content.append("The number of variables is: " + number);

        System.out.println(content.toString());
    }
}
Retrieve Name and Value of a Variable
import com.spire.doc.Document;

public class RetrieveVariables {
    public static void main(String[] args){
        //Load the Word document
        Document document = new Document();
        document.loadFromFile("AddVariables.docx");

        //Retrieve the name of a variable by index
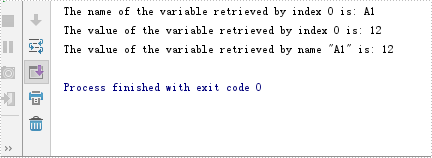
        String s1 = document.getVariables().getNameByIndex(0);

        //Retrieve the value of a variable by index
        String s2 = document.getVariables().getValueByIndex(0);

        //Retrieve the value of a variable by name
        String s3 = document.getVariables().get("A1");

        System.out.println("The name of the variable retrieved by index 0 is: " + s1);
        System.out.println("The value of the variable retrieved by index 0 is: " + s2);
        System.out.println("The value of the variable retrieved by name \"A1\" is: " + s3);
    }
}
Remove a specific Variable
import com.spire.doc.Document;
import com.spire.doc.FileFormat;

public class RemoveVariables {
    public static void main(String[] args){
        //Load the Word document
        Document document = new Document();
        document.loadFromFile("AddVariables.docx");

        //Remove a variable by name
        document.getVariables().remove("A1");

        //Update fields in the document
        document.isUpdateFields (true);

        //Save the result document
        document.saveToFile("RemoveVariables.docx", FileFormat.Docx_2013);
    }
}
Insert Math Equations and Symbols in Word Document in Java
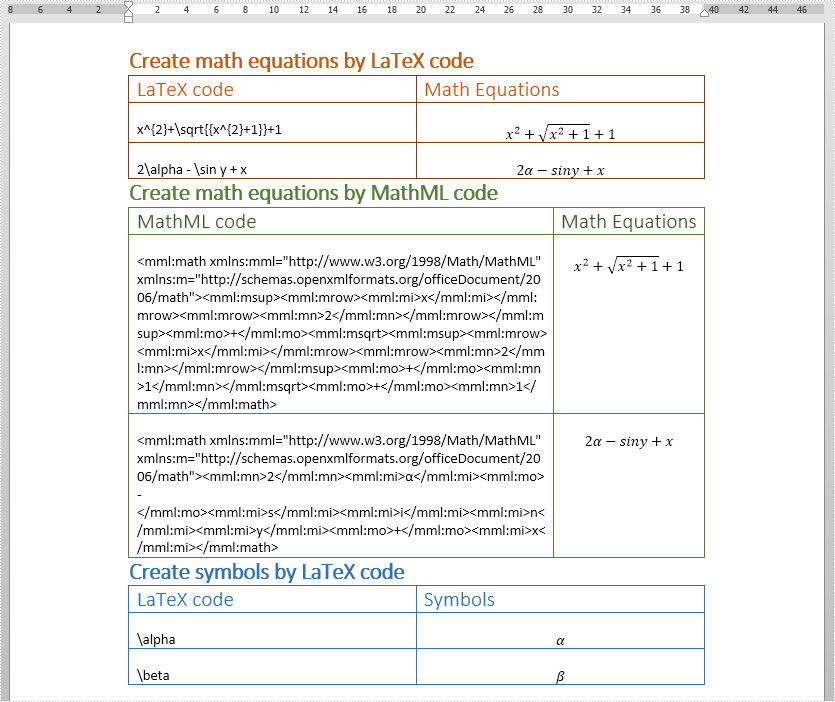
This article demonstrates how to insert math equations i.e. Latex and MathML equations and Symbols in a Word document in Java using Spire.Doc for Java.
import com.spire.doc.Document;
import com.spire.doc.FileFormat;
import com.spire.doc.Section;
import com.spire.doc.Table;
import com.spire.doc.documents.Paragraph;
import com.spire.doc.fields.omath.OfficeMath;

public class AddMathEquationsAndSymbols {
    public static void main(String[] args){
        //Latex code
        String[] latexMathCode1 = {
                "x^{2}+\\sqrt{{x^{2}+1}}+1",
                "2\\alpha - \\sin y + x",
        };

        //MathML code
        String[] mathMLCode = {
                "<mml:math xmlns:mml=\"http://www.w3.org/1998/Math/MathML\" xmlns:m=\"http://schemas.openxmlformats.org/officeDocument/2006/math\"><mml:msup><mml:mrow><mml:mi>x</mml:mi></mml:mrow><mml:mrow><mml:mn>2</mml:mn></mml:mrow></mml:msup><mml:mo>+</mml:mo><mml:msqrt><mml:msup><mml:mrow><mml:mi>x</mml:mi></mml:mrow><mml:mrow><mml:mn>2</mml:mn></mml:mrow></mml:msup><mml:mo>+</mml:mo><mml:mn>1</mml:mn></mml:msqrt><mml:mo>+</mml:mo><mml:mn>1</mml:mn></mml:math>",
                "<mml:math xmlns:mml=\"http://www.w3.org/1998/Math/MathML\" xmlns:m=\"http://schemas.openxmlformats.org/officeDocument/2006/math\"><mml:mn>2</mml:mn><mml:mi>α</mml:mi><mml:mo>-</mml:mo><mml:mi>s</mml:mi><mml:mi>i</mml:mi><mml:mi>n</mml:mi><mml:mi>y</mml:mi><mml:mo>+</mml:mo><mml:mi>x</mml:mi></mml:math>",
        };

        //Latex code
        String[] latexMathCode2 = {
                "\\alpha",
                "\\beta",
        };

        //Create a Document instance
        Document doc = new Document();
        //Load the Word document
        doc.loadFromFile("MathEquationTemplate.docx");
        //Get the first section
        Section section = doc.getSections().get(0);

        Paragraph paragraph = null;
        OfficeMath officeMath;

        //Insert Latex equations
        Table table1 = section.getTables().get(0);
        for (int i = 0; i < latexMathCode1.length; i++) {
            paragraph = table1.getRows().get(i + 1).getCells().get(0).addParagraph();
            paragraph.setText(latexMathCode1[i]);
            paragraph = table1.getRows().get(i + 1).getCells().get(1).addParagraph();
            officeMath = new OfficeMath(doc);
            officeMath.fromLatexMathCode(latexMathCode1[i]);
            paragraph.getItems().add(officeMath);
        }

        //Insert MathML equations
        Table table2 = section.getTables().get(1);
        for (int i = 0; i < mathMLCode.length; i++) {
            paragraph = table2.getRows().get(i + 1).getCells().get(0).addParagraph();
            paragraph.setText(mathMLCode[i]);
            paragraph = table2.getRows().get(i + 1).getCells().get(1).addParagraph();
            officeMath = new OfficeMath(doc);
            officeMath.fromMathMLCode(mathMLCode[i]);
            paragraph.getItems().add(officeMath);
        }

        //Insert Symbols
        Table table3 = section.getTables().get(2);
        for (int i = 0; i < latexMathCode2.length; i++) {
            //Insert Latex code to the first column of the table
            paragraph = table3.getRows().get(i + 1).getCells().get(0).addParagraph();
            paragraph.setText(latexMathCode2[i]);
            //Insert symbols to the second column of the table
            paragraph = table3.getRows().get(i + 1).getCells().get(1).addParagraph();
            officeMath = new OfficeMath(doc);
            officeMath.fromLatexMathCode(latexMathCode2[i]);
            paragraph.getItems().add(officeMath);
        }

        //Save the document
        String result = "addMathEquationAndSymbols.docx";
        doc.saveToFile(result, FileFormat.Docx_2013);
    }
}
Output:
Java: Accept or Reject Tracked Changes in Word
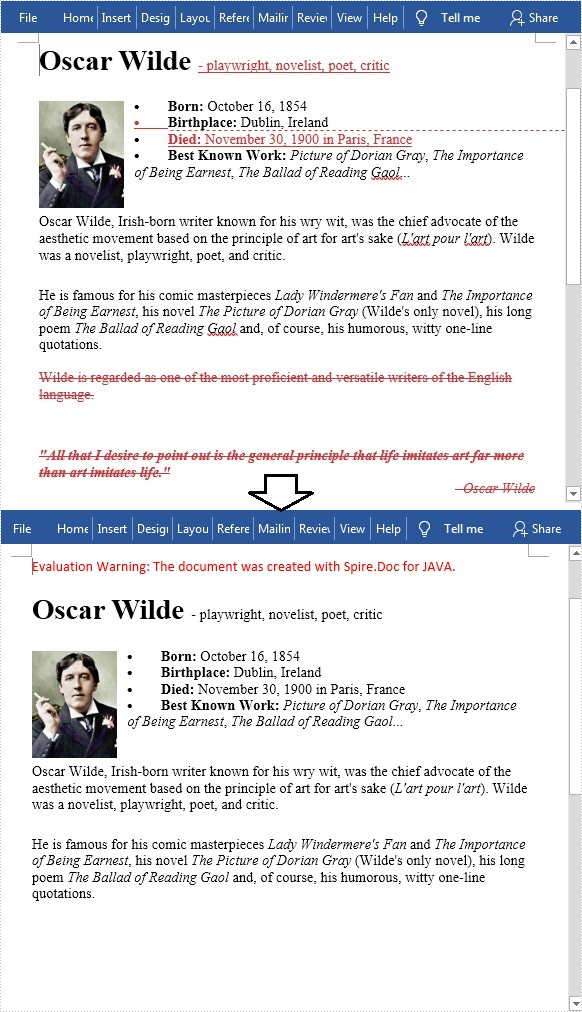
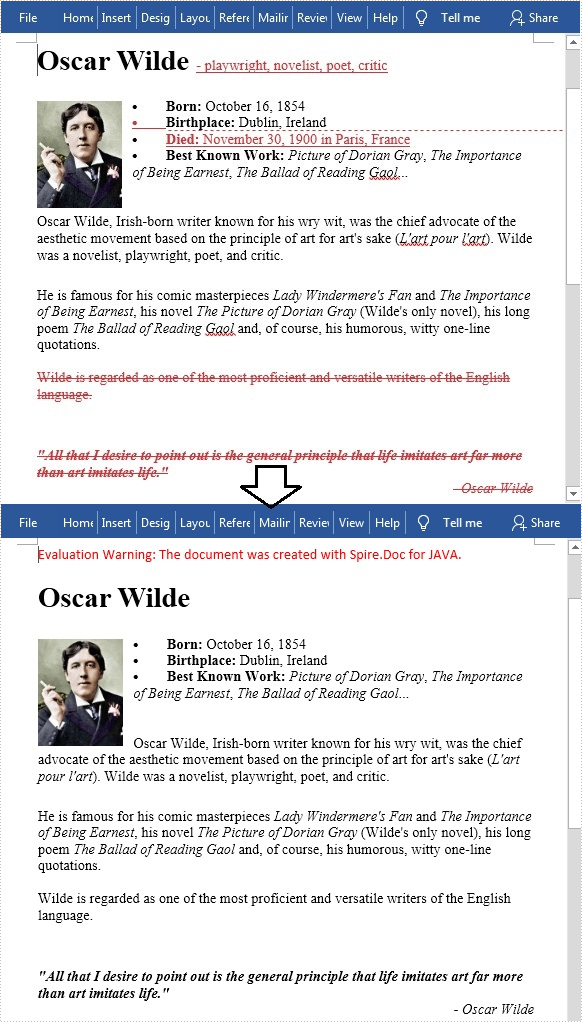
Track Changes is a built-in feature in Microsoft Word which allows you to see all changes that were made to the document, and you can decide whether to accept or reject those changes. It is very useful especially when you are collaborating with multiple people on the same contracts or school assignments. In this article, you will learn how to programmatically accept or reject all tracked changes in a Word document using Spire.Doc for Java.
Install Spire.Doc for Java
First of all, you're required to add the Spire.Doc.jar file as a dependency in your Java program. The JAR file can be downloaded from this link. If you use Maven, you can easily import the JAR file in your application by adding the following code to your project's pom.xml file.
<repositories>
    <repository>
        <id>com.e-iceblue</id>
        <name>e-iceblue</name>
        <url>https://repo.e-iceblue.com/nexus/content/groups/public/</url>
    </repository>
</repositories>
<dependencies>
    <dependency>
        <groupId>e-iceblue</groupId>
        <artifactId>spire.doc</artifactId>
        <version>12.11.0</version>
    </dependency>
</dependencies>
Accept All Tracked Changes in a Word document
The detailed steps are as follows.
- Create a Document instance.
- Load a sample Word document using Document.loadFromFile() method.
- Accept all changes in the document using Document.acceptChanges() method.
- Save the document to another file using Document.saveToFile() method.
- Java
import com.spire.doc.Document;
import com.spire.doc.FileFormat;

public class AcceptTrackedChanges {
    public static void main(String[] args) {

        //Create a Document instance
        Document doc = new Document();

        //Load the sample Word document
        doc.loadFromFile("test file.docx");

        //Accept all changes in the document
        doc.acceptChanges();

        //Save the document
        doc.saveToFile("AcceptAllChanges.docx", FileFormat.Docx);
    }
}
Reject All Tracked Changes in a Word document
The detailed steps are as follows.
- Create a Document instance.
- Load a sample Word document using Document.loadFromFile() method.
- Reject all changes in the document using Document.rejectChanges() method.
- Save the document to another file using Document.saveToFile() method.
- Java
import com.spire.doc.Document;
import com.spire.doc.FileFormat;

public class RejectTrackedChanges {
    public static void main(String[] args) {

        //Create a Document instance
        Document doc = new Document();

        //Load the sample Word document
        doc.loadFromFile("test file.docx");

        //Reject all changes in the document
        doc.rejectChanges();

        //Save the document
        doc.saveToFile("RejectAllChanges.docx", FileFormat.Docx);
    }
}
Apply for a Temporary License
If you'd like to remove the evaluation message from the generated documents, or to get rid of the function limitations, please request a 30-day trial license for yourself.
Java: Create a Table of Contents in Word
The table of contents is a field in a Word document that displays the headings of all levels and their corresponding page numbers in the document. Moreover, the table of contents can be updated after changes are made to the content of the document, and new headings and page numbers can be generated according to the new document content. Therefore, the table of contents can be a great convenience both when editing documents and reading them, while also making them more professional. This article is going to show how to insert the table of contents into Word documents through Java programs using Spire.Doc for Java.
- Create a Table of Contents with the Default Format
- Create a Table of Contents with Customized Format
Install Spire.Doc for Java
First, you're required to add the Spire.Doc.jar file as a dependency in your Java program. The JAR file can be downloaded from this link. If you use Maven, you can easily import the JAR file in your application by adding the following code to your project's pom.xml file.
<repositories>
    <repository>
        <id>com.e-iceblue</id>
        <name>e-iceblue</name>
        <url>https://repo.e-iceblue.com/nexus/content/groups/public/</url>
    </repository>
</repositories>
<dependencies>
    <dependency>
        <groupId>e-iceblue</groupId>
        <artifactId>spire.doc</artifactId>
        <version>12.11.0</version>
    </dependency>
</dependencies>
Create a Table of Contents with the Default Format
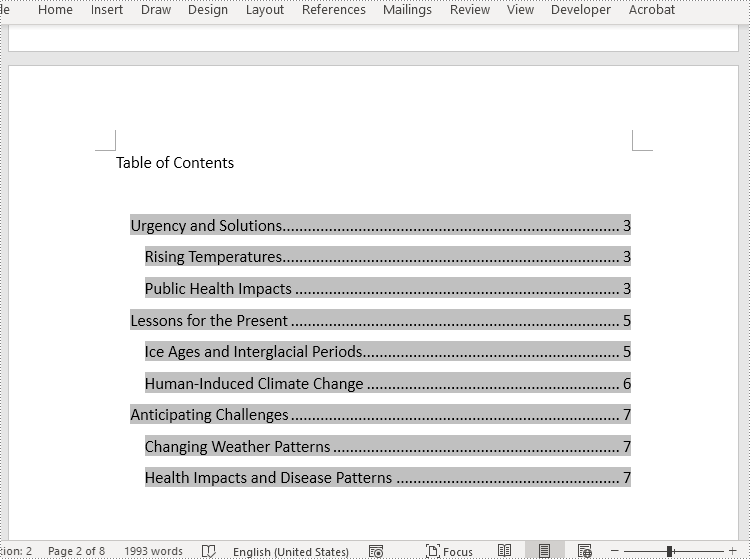
Before creating a table of contents, it is necessary to set the level for each heading, so that the table of contents can be generated according to each heading and its level. The level of a heading can be set by using the Paragraph.getListFormat().setListLevelNumber(int) method.
Spire.Doc for Java provides the Paragraph.appendTOC() method to insert a table of contents into a paragraph. The detailed steps for inserting a table of contents with the default style in a Word document are as follows:
- Create an object of Document class.
- Load a Word document using Document.loadFromFile() method.
- Add a section to the document using Document.addSection() method and insert it into the document after the cover section using Document.getSections().insert() method.
- Add a paragraph to the section using Section.addParagraph() method.
- Create a table of contents in the paragraph using Paragraph.appendTOC() method.
- Update the table of contents to display the headings in the document and their page numbers using Document.updateTableOfContents() method.
- Save the document using Document.saveToFile() method.
- Java
import com.spire.doc.Document;
import com.spire.doc.Section;
import com.spire.doc.documents.Paragraph;
import com.spire.doc.fields.TableOfContent;

public class insertTableOfContents {
    public static void main(String[] args) {
        //Create an object of Document class
        Document doc = new Document();

        //Load a Word document
        doc.loadFromFile("Sample.docx");

        //Add a section and insert it into the document after the cover section
        Section section = doc.addSection();
        doc.getSections().insert(1, section);

        //Add a paragraph to the section
        Paragraph paragraph = section.addParagraph();
        paragraph.appendText("Table of Contents\r\n");
        paragraph.getStyle().getCharacterFormat().setFontSize(14f);

        //Create a table of contents in the paragraph
        paragraph.appendTOC(2, 3);

        //Update the table of contents
        doc.updateTableOfContents();

        //Save the document
        doc.saveToFile("CreateTableOfContents.docx");
    }
}
Create a Table of Contents with Customized Format
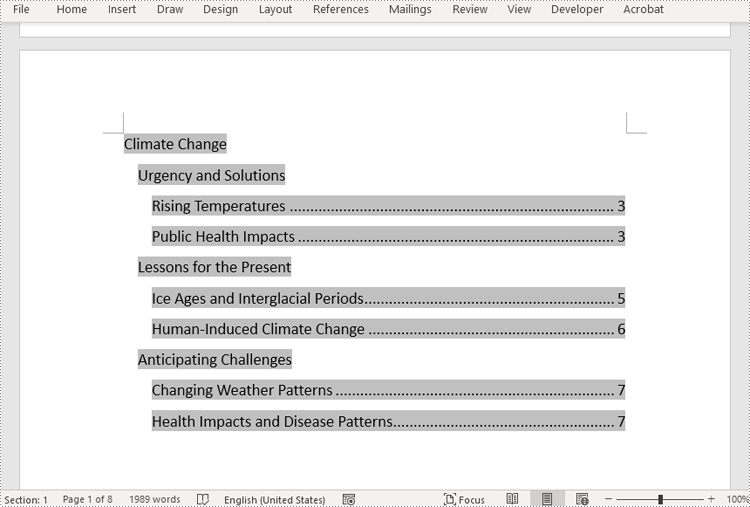
In Spire.Doc for Java, the TableOfContent class represents a table of contents of a Word document. The parts displayed in the table of contents can be customized by the switches while initializing an instance of the TableOfContent class. For example, the switches, "{\\o \"1-3\" \\n 1-2}", mean displaying the first to third level headings while omitting the page numbers of the first and second level headings.
The detailed steps for customizing a table of contents in a Word document are as follows:
- Create an object of Document class.
- Load a Word document using Document.loadFromFile() method.
- Insert a section after the cover section using Document.getSections().insert() method and add a paragraph to the section using Section.addParagraph() method.
- Create an instance of TableOfContent class to create a table of contents that displays the first to third level headings and omits page numbers of the first and second level headings.
- Insert the table of contents to the paragraph using Paragraph.getItems().add() method.
- Insert a field separator mark and a field end mark to the paragraph using Paragraph.appendFieldMark() method to end the table of contents field.
- Set the instance as the table of contents of the document using Document.setTOC() method.
- Update the table of contents to display the current contents for the document using Document.updateTableOfContents() method.
- Save the document using Document.saveToFile() method.
- Java
import com.spire.doc.Document;
import com.spire.doc.Section;
import com.spire.doc.documents.FieldMarkType;
import com.spire.doc.documents.Paragraph;
import com.spire.doc.fields.TableOfContent;

public class insertTableOfContentsWithCustomizedStyle {
    public static void main(String[] args) {
        //Create an object of Document class
        Document doc = new Document();

        //Load a Word document
        doc.loadFromFile("Sample.docx");

        //Insert a section after the first section and add a paragraph in the section
        Section section = doc.addSection();
        doc.getSections().insert(1, section);
        Paragraph paragraph = section.addParagraph();
        paragraph.getStyle().getCharacterFormat().setFontSize(14f);

        //Initialize an instance of TableOfContent class
        TableOfContent toc = new TableOfContent(doc, "{\\o \"1-3\" \\n 1-2}");

        //Insert the table of contents to the document
        paragraph.getItems().add(toc);

        //Insert field marks to end the field
        paragraph.appendFieldMark(FieldMarkType.Field_Separator);
        paragraph.appendFieldMark(FieldMarkType.Field_End);

        //Set the created table of contents as the table of contents of the document
        doc.setTOC(toc);

        //Update the table of contents
        doc.updateTableOfContents();

        //Save the document
        doc.saveToFile("TableOfContentsWithCustomizedStyle.docx");
        doc.dispose();
    }
}
Apply for a Temporary License
If you'd like to remove the evaluation message from the generated documents, or to get rid of the function limitations, please request a 30-day trial license for yourself.
Add Content Controls to Word Document in Java
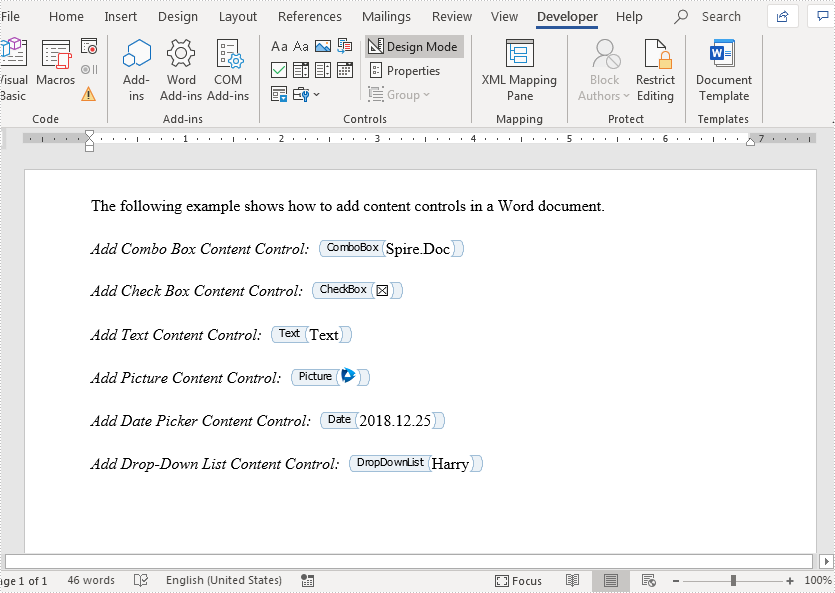
This article demonstrates how to add combo box, check box, text, picture, date picker and drop-down list content controls to a Word document using Spire.Doc for Java.
import com.spire.doc.*;
import com.spire.doc.documents.*;
import com.spire.doc.fields.*;

import java.util.Date;

public class ContentControls {
    public static void main(String[] args){
        //create a new Word document
        Document document = new Document();
        Section section = document.addSection();
        Paragraph paragraph = section.addParagraph();
        TextRange txtRange = paragraph.appendText("The following example shows how to add content controls in a Word document.");
        section.addParagraph();

        //add combo box content control
        paragraph = section.addParagraph();
        txtRange = paragraph.appendText("Add Combo Box Content Control:  ");
        txtRange.getCharacterFormat().setItalic(true);
        StructureDocumentTagInline sd = new StructureDocumentTagInline(document);
        paragraph.getChildObjects().add(sd);
        sd.getSDTProperties().setSDTType(SdtType.Combo_Box);
        sd.getSDTProperties().setAlias("ComboBox");
        sd.getSDTProperties().setTag("ComboBox");
        SdtComboBox cb = new SdtComboBox();
        cb.getListItems().add(new SdtListItem("Spire.Doc"));
        cb.getListItems().add(new SdtListItem("Spire.XLS"));
        cb.getListItems().add(new SdtListItem("Spire.PDF"));
        sd.getSDTProperties().setControlProperties(cb);
        TextRange rt = new TextRange(document);
        rt.setText(cb.getListItems().get(0).getDisplayText());
        sd.getSDTContent().getChildObjects().add(rt);
        section.addParagraph();

        //Add checkbox content control
        paragraph = section.addParagraph();
        txtRange = paragraph.appendText("Add Check Box Content Control:  ");
        txtRange.getCharacterFormat().setItalic(true);
        sd = new StructureDocumentTagInline(document);
        paragraph.getChildObjects().add(sd);
        sd.getSDTProperties().setSDTType(SdtType.Check_Box);
        sd.getSDTProperties().setAlias("CheckBox");
        sd.getSDTProperties().setTag("CheckBox");
        SdtCheckBox scb = new SdtCheckBox();
        sd.getSDTProperties().setControlProperties(scb);
        rt = new TextRange(document);
        sd.getChildObjects().add(rt);
        scb.setChecked(true);
        section.addParagraph();

        //add text content control
        paragraph = section.addParagraph();
        txtRange = paragraph.appendText("Add Text Content Control:  ");
        txtRange.getCharacterFormat().setItalic(true);
        sd = new StructureDocumentTagInline(document);
        paragraph.getChildObjects().add(sd);
        sd.getSDTProperties().setSDTType(SdtType.Text);
        sd.getSDTProperties().setAlias("Text");
        sd.getSDTProperties().setTag("Text");
        SdtText text = new SdtText(true);
        text.isMultiline(true);
        sd.getSDTProperties().setControlProperties(text);
        rt = new TextRange(document);
        rt.setText("Text");
        sd.getSDTContent().getChildObjects().add(rt);
        section.addParagraph();

        //add picture content control
        paragraph = section.addParagraph();
        txtRange = paragraph.appendText("Add Picture Content Control:  ");
        txtRange.getCharacterFormat().setItalic(true);
        sd = new StructureDocumentTagInline(document);
        paragraph.getChildObjects().add(sd);
        sd.getSDTProperties().setControlProperties(new SdtPicture());
        sd.getSDTProperties().setAlias("Picture");
        sd.getSDTProperties().setTag("Picture");
        DocPicture pic = new DocPicture(document);
        pic.setWidth(10f);
        pic.setHeight(10f);
        pic.loadImage("logo.png");
        sd.getSDTContent().getChildObjects().add(pic);
        section.addParagraph();

        //add date picker content control
        paragraph = section.addParagraph();
        txtRange = paragraph.appendText("Add Date Picker Content Control:  ");
        txtRange.getCharacterFormat().setItalic(true);
        sd = new StructureDocumentTagInline(document);
        paragraph.getChildObjects().add(sd);
        sd.getSDTProperties().setSDTType(SdtType.Date_Picker);
        sd.getSDTProperties().setAlias("Date");
        sd.getSDTProperties().setTag("Date");
        SdtDate date = new SdtDate();
        date.setCalendarType(CalendarType.Default);
        date.setDateFormat("yyyy.MM.dd");
        date.setFullDate(new Date());
        sd.getSDTProperties().setControlProperties(date);
        rt = new TextRange(document);
        rt.setText("2018.12.25");
        sd.getSDTContent().getChildObjects().add(rt);
        section.addParagraph();

        //add drop-down list content control
        paragraph = section.addParagraph();
        txtRange = paragraph.appendText("Add Drop-Down List Content Control:  ");
        txtRange.getCharacterFormat().setItalic(true);
        sd = new StructureDocumentTagInline(document);
        paragraph.getChildObjects().add(sd);
        sd.getSDTProperties().setSDTType(SdtType.Drop_Down_List);
        sd.getSDTProperties().setAlias("DropDownList");
        sd.getSDTProperties().setTag("DropDownList");
        SdtDropDownList sddl = new SdtDropDownList();
        sddl.getListItems().add(new SdtListItem("Harry"));
        sddl.getListItems().add(new SdtListItem("Jerry"));
        sd.getSDTProperties().setControlProperties(sddl);
        rt = new TextRange(document);
        rt.setText(sddl.getListItems().get(0).getDisplayText());
        sd.getSDTContent().getChildObjects().add(rt);

        //save the resultant document
        document.saveToFile("addContentControls.docx", FileFormat.Docx_2013);
    }
}
Output:
Java: Insert Page Breaks and Section Breaks to Word
In document creation, divisions of content are frequently required to fulfill specific layout requirements and establish logical structures. The insertion of section breaks and page breaks is the most commonly employed method for dividing content, as it enables flexible control over page and section organization. Moreover, page breaks and section breaks are quite helpful in formatting purposes and the establishment of distinct document styles. This article aims to demonstrate how to use Spire.Doc for Java to insert page breaks and section breaks into Word documents through Java programs.
Install Spire.Doc for Java
First, you're required to add the Spire.Doc.jar file as a dependency in your Java program. The JAR file can be downloaded from this link. If you use Maven, you can easily import the JAR file in your application by adding the following code to your project's pom.xml file.
<repositories>
    <repository>
        <id>com.e-iceblue</id>
        <name>e-iceblue</name>
        <url>https://repo.e-iceblue.com/nexus/content/groups/public/</url>
    </repository>
</repositories>
<dependencies>
    <dependency>
        <groupId>e-iceblue</groupId>
        <artifactId>spire.doc</artifactId>
        <version>12.11.0</version>
    </dependency>
</dependencies>
Insert Page Breaks into Word Documents
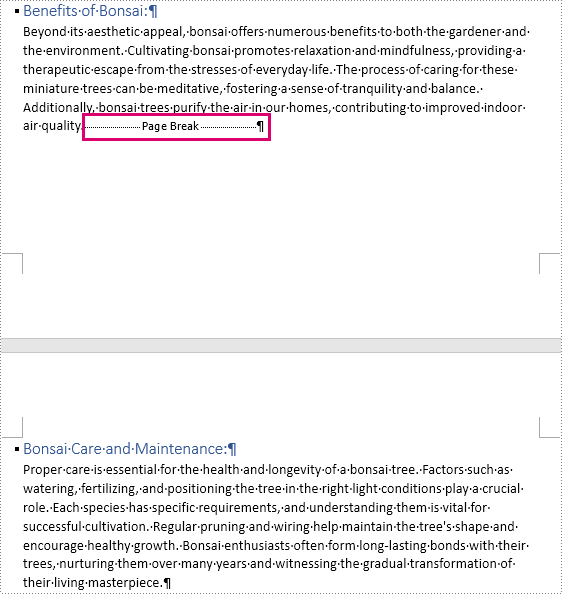
Spire.Doc for Java provides the Paragraph.appendBreak(BreakType.PageBreak) method to insert a page break at the end of a paragraph. The detailed steps are as follows:
- Create an object of Document class.
- Load a Word document using Document.loadFromFile() method.
- Get the first section using Document.getSections().get() method.
- Get the eighth paragraph of the section using Section.getParagraphs().get() method.
- Add a page break to the end of the paragraph using Paragraph.appendBreak(BreakType.PageBreak) method.
- Save the document using Document.saveToFile() method.
- Java
import com.spire.doc.Document;
import com.spire.doc.FileFormat;
import com.spire.doc.Section;
import com.spire.doc.documents.BreakType;
import com.spire.doc.documents.Paragraph;

public class InsertPageBreak {
    public static void main(String[] args) {
        //Create an object of Document class
        Document doc = new Document();

        //Load a Word document
        doc.loadFromFile("Sample.docx");

        //Get the first section
        Section section = doc.getSections().get(0);

        //Get the eighth paragraph
        Paragraph paragraph = section.getParagraphs().get(7);

        //Add a page break to the end of the paragraph
        paragraph.appendBreak(BreakType.Page_Break);

        //Save the document
        doc.saveToFile("PageBreak.docx", FileFormat.Auto);
    }
}
Insert Section Breaks into Word Documents
Inserting section breaks involves using the Paragraph.insertSectionBreak(SectionBreakType) method. This method allows users to specify the type of section break you want to insert. he following table provides an overview of the section break types, along with their corresponding Enums and descriptions:
| Section Break | Enum | Description |
| New page | SectionBreakType.New_Page | Start the new section on a new page. |
| Continuous | SectionBreakType.No_Break | Start the new section without starting a new page, allowing for continuous content flow. |
| Odd page | SectionBreakType.Odd_Page | Start the new section on the next odd-numbered page. |
| Even page | SectionBreakType.Even_Page | Start the new section on the next even-numbered page. |
| New column | SectionBreakType.New_Column | Start the new section in the next column if columns are enabled. |
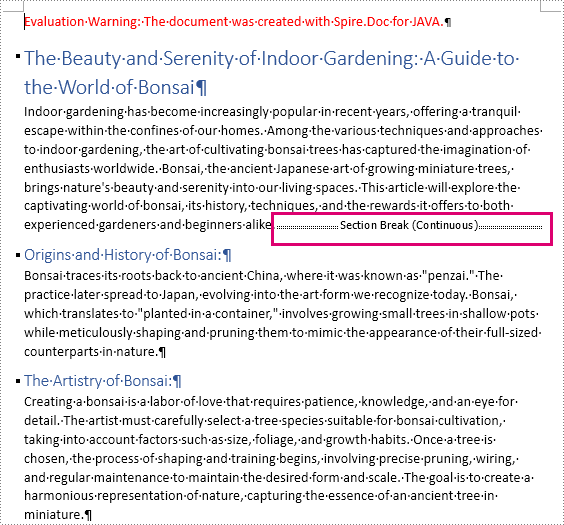
The detailed steps for inserting a continuous section break are as follows:
- Create an object of Document class.
- Load a Word document using Document.loadFromFile() method.
- Get the first section using Document.getSections().get() method.
- Get the second paragraph of the section using Section.getParagraphs().get() method.
- Add a continuous section break to the end of the paragraph using Paragraph.insertSectionBreak(SectionBreakType.No_Break) method.
- Save the document using Document.saveToFile() method.
- Java
import com.spire.doc.Document;
import com.spire.doc.FileFormat;
import com.spire.doc.Section;
import com.spire.doc.documents.Paragraph;
import com.spire.doc.documents.SectionBreakType;

public class InsertSectionBreak {
    public static void main(String[] args) {
        //Create an object of Document class
        Document doc = new Document();

        //Load a Word document
        doc.loadFromFile("Sample.docx");

        //Get the first section
        Section section = doc.getSections().get(0);

        //Get the second paragraph
        Paragraph paragraph = section.getParagraphs().get(1);

        //Insert a section break
        paragraph.insertSectionBreak(SectionBreakType.No_Break);

        //Save the document
        doc.saveToFile("SectionBreak.docx", FileFormat.Auto);
    }
}
Apply for a Temporary License
If you'd like to remove the evaluation message from the generated documents, or to get rid of the function limitations, please request a 30-day trial license for yourself.
Java: Read or Remove Properties from Word Documents
Document properties are some important information contained in Word documents, including title, subject, author, company, keywords, etc. Reading this information can help identify the document, quickly determine the document type or source, and improve the efficiency of document storage and organization. However, if the document properties such as author and company are inappropriate for others to know, you can remove them to protect privacy. This article is going to show how to read or remove document properties in Word documents programmatically using Spire.Doc for Java.
- Read Built-in and Custom Properties from Word Documents
- Remove Built-in and Custom Properties from Word Documents
Install Spire.Doc for Java
First, you're required to add the Spire.Doc.jar file as a dependency in your Java program. The JAR file can be downloaded from this link. If you use Maven, you can easily import the JAR file in your application by adding the following code to your project's pom.xml file.
<repositories>
    <repository>
        <id>com.e-iceblue</id>
        <name>e-iceblue</name>
        <url>https://repo.e-iceblue.com/nexus/content/groups/public/</url>
    </repository>
</repositories>
<dependencies>
    <dependency>
        <groupId>e-iceblue</groupId>
        <artifactId>spire.doc</artifactId>
        <version>12.11.0</version>
    </dependency>
</dependencies>
Read Built-in and Custom Properties from Word Documents
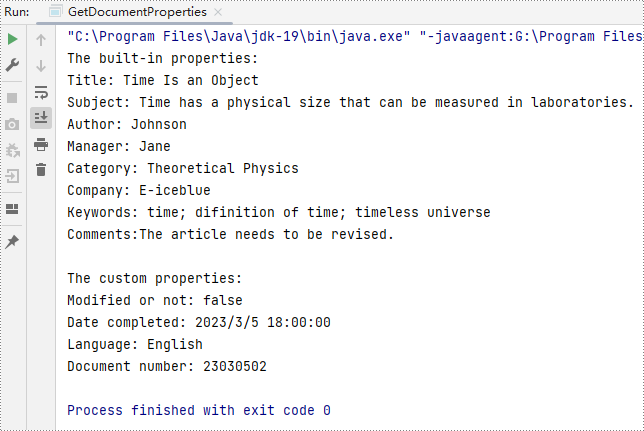
There are two types of properties in Word documents: built-in properties and custom properties. Built-in properties are some predefined properties, while custom properties are properties with custom names, types, and values. The detailed steps for reading the two kinds of document properties are as follows:
- Create an object of Document.
- Load a Word document using Document.loadFromFile() method.
- Get all the built-in properties and custom properties using Document.getBuiltinDocumentProperties() method and Document.getCustomDocumentProperties() method.
- Get each built-in property using methods under BuiltinDocumentProperties class.
- Loop through the custom properties to get their name and value using methods under CustomDocumentProperties class.
- Java
import com.spire.doc.BuiltinDocumentProperties;
import com.spire.doc.CustomDocumentProperties;
import com.spire.doc.Document;

public class GetDocumentProperties {
    public static void main(String[] args) {

        //Create an object of Document
        Document document = new Document();

        //Load a Word document
        document.loadFromFile("C:/Sample.docx");

        //Create an object of StringBuilder
        StringBuilder properties = new StringBuilder();

        //Get all the built-in properties and custom properties
        BuiltinDocumentProperties builtinDocumentProperties = document.getBuiltinDocumentProperties();
        CustomDocumentProperties customDocumentProperties = document.getCustomDocumentProperties();

        //Get each built-in property
        String title = builtinDocumentProperties.getTitle();
        String subject = builtinDocumentProperties.getSubject();
        String author = builtinDocumentProperties.getAuthor();
        String manager = builtinDocumentProperties.getManager();
        String category = builtinDocumentProperties.getCategory();
        String company = builtinDocumentProperties.getCompany();
        String keywords = builtinDocumentProperties.getKeywords();
        String comments = builtinDocumentProperties.getComments();

        //Set string format for displaying
        String builtinProperties = String.format("The built-in properties:\r\nTitle: " + title
                + "\r\nSubject: " + subject + "\r\nAuthor: " + author
                + "\r\nManager: " + manager + "\r\nCategory: " + category
                + "\r\nCompany: " + company + "\r\nKeywords: "+ keywords
                + "\r\nComments:" + comments
        );

        //Add the built-in properties to the StringBuilder object
        properties.append(builtinProperties);

        //Get each custom property
        properties.append("\r\n\r\nThe custom properties:");
        for (int i = 0; i < customDocumentProperties.getCount(); i++) {
            String customProperties = String.format("\r\n" + customDocumentProperties.get(i).getName() + ": " + document.getCustomDocumentProperties().get(i).getValue());

            //Add the custom properties to the StringBuilder object
            properties.append(customProperties);
        }

        //Output the properties of the document
        System.out.println(properties);
    }
}
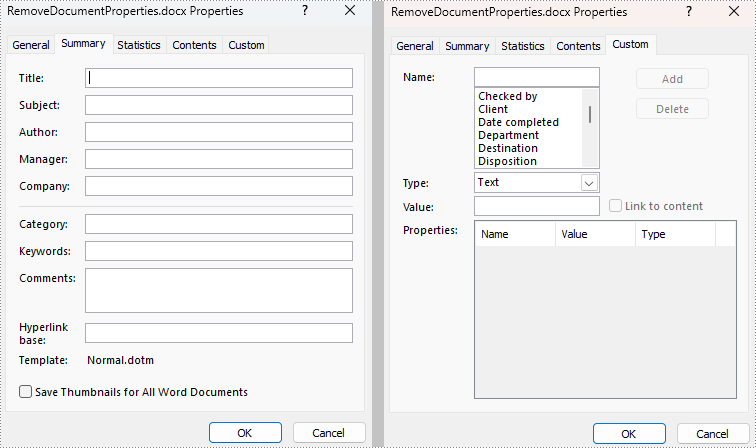
Remove Built-in and Custom Properties from Word Documents
Built-in document properties can be removed by setting their values as empty. For custom document properties, we can use the CustomDocumentProperties.get().getName() method to get their name and then use CustomDocumentProperties.remove() method to remove them. The detailed steps are as follows:
- Create an object of Document.
- Load a Word document using Document.loadFromFile() method.
- Get all built-in properties and custom properties using Document.getBuiltinDocumentProperties() method and Document.getCustomDocumentProperties() method.
- Remove the built-in properties by setting their values as empty using methods under BuiltinDocumentProperties class.
- Get the count of custom properties using CustomDocumentProperties.getCount() method.
- Loop through the custom properties, get their names by using CustomDocumentProperties.get().getName() method, and remove each custom property by their name using CustomDocumentProperties.remove() method.
- Save the document using Document.saveToFile() method.
- Java
import com.spire.doc.BuiltinDocumentProperties;
import com.spire.doc.CustomDocumentProperties;
import com.spire.doc.Document;
import com.spire.doc.FileFormat;

public class RemoveDocumentProperties {
    public static void main(String[] args) {

        //Create an object of Document
        Document document = new Document();

        //Load a Word document
        document.loadFromFile("C:/Sample.docx");

        //Get all built-in properties and custom properties
        BuiltinDocumentProperties builtinDocumentProperties = document.getBuiltinDocumentProperties();
        CustomDocumentProperties customDocumentProperties = document.getCustomDocumentProperties();

        //Remove built-in properties by setting their value to empty
        builtinDocumentProperties.setTitle("");
        builtinDocumentProperties.setSubject("");
        builtinDocumentProperties.setAuthor("");
        builtinDocumentProperties.setManager("");
        builtinDocumentProperties.setCompany("");
        builtinDocumentProperties.setCategory("");
        builtinDocumentProperties.setKeywords("");
        builtinDocumentProperties.setComments("");

        //Get the count of custom properties
        int count = customDocumentProperties.getCount();

        //Loop through the custom properties to remove them
        for (int i = count; i > 0; i-- ){

            //Get the name of a custom property
            String name = customDocumentProperties.get(i-1).getName();

            //Remove the custom property by its name
            customDocumentProperties.remove(name);
        }

        //Save the document
        document.saveToFile("RemoveDocumentProperties.docx", FileFormat.Auto);
        document.dispose();
    }
}
Apply for a Temporary License
If you'd like to remove the evaluation message from the generated documents, or to get rid of the function limitations, please request a 30-day trial license for yourself.