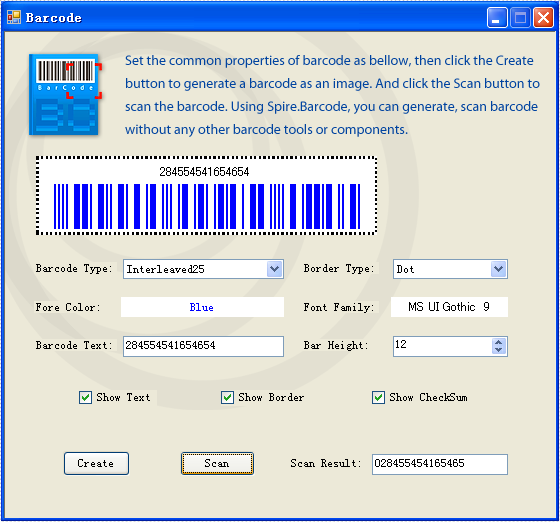
C#/VB.NET: Convert PDF to Images (JPG, PNG, BMP)
PDF files have the advantage of being highly interactive and easy to transfer, but in certain cases, it is also necessary to convert PDF to images for embedding in web pages or displaying on some platforms that do not support PDF format. In this article, you will learn how to convert PDF to JPG, PNG or BMP image formats in C# and VB.NET using Spire.PDF for .NET.
Install Spire.PDF for .NET
To begin with, you need to add the DLL files included in the Spire.PDF for.NET package as references in your .NET project. The DLL files can be either downloaded from this link or installed via NuGet.
PM> Install-Package Spire.PDF
Convert a Specific PDF Page to an Image in C# and VB.NET
Spire.PDF for .NET offers the PdfDocument.SaveAsImage() method to convert a particular page in PDF to an image. Then, you can save the image as a JPEG, PNG, BMP, EMF, GIF or WMF file. The following are the detailed steps.
- Create a Document instance.
- Load a sample PDF document using PdfDocument.LoadFromFile() method.
- Convert a specific page to an image and set the image Dpi using PdfDocument.SaveAsImage(int pageIndex, PdfImageType type, int dpiX, int dpiY) method.
- Save the image as a PNG, JPG or BMP file using Image.Save(string filename, ImageFormat format) method.
- C#
- VB.NET
using Spire.Pdf;
using Spire.Pdf.Graphics;
using System.Drawing;
using System.Drawing.Imaging;

namespace PDFtoImage
{
    class Program
    {
        static void Main(string[] args)
        {
            //Create a PdfDocument instance
            PdfDocument pdf = new PdfDocument();

            //Load a sample PDF document
            pdf.LoadFromFile("E:\\Files\\input.pdf");

            //Convert the first page to an image and set the image Dpi
            Image image = pdf.SaveAsImage(0, PdfImageType.Bitmap, 500, 500);

            //Save the image as a JPG file
            image.Save("ToJPG.jpg", ImageFormat.Jpeg);

            //Save the image as a PNG file
            //image.Save("ToPNG.png", ImageFormat.Png);

            //Save the image as a BMP file
            //image.Save("ToBMP.bmp", ImageFormat.Bmp);
        }
    }
}

Convert an Entire PDF Document to Multiple Images in C# and VB.NET
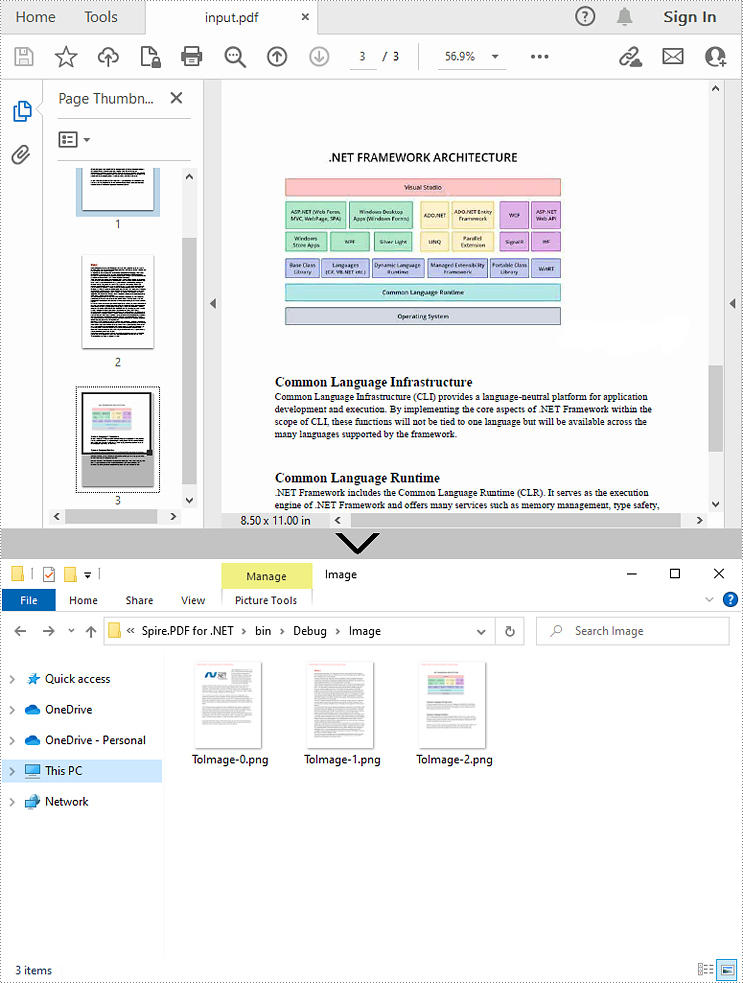
If you want to convert the whole PDF document into multiple individual images, you can loop through all the pages in the PDF and then save them as JPG, PNG or BMP images. The following are the detailed steps.
- Create a PdfDocument instance.
- Load a sample PDF document using PdfDocument.LoadFromFile() method.
- Loop through all pages of the document and set the image Dpi when converting them to images using PdfDocument.SaveAsImage(int pageIndex, PdfImageType type, int dpiX, int dpiY) method.
- Save images as PNG files using Image.Save() method.
- C#
- VB.NET
using Spire.Pdf;
using Spire.Pdf.Graphics;
using System;
using System.Drawing;
using System.Drawing.Imaging;

namespace PDFtoImage
{
    class Program
    {
        static void Main(string[] args)
        {
            //Create a PdfDocument instance
            PdfDocument pdf = new PdfDocument();

            //Load a sample PDF document
            pdf.LoadFromFile("input.pdf");

            //Loop through each page in the PDF
            for (int i = 0; i < pdf.Pages.Count; i++)
            {
                //Convert all pages to images and set the image Dpi
                Image image = pdf.SaveAsImage(i, PdfImageType.Bitmap, 500, 500);

                //Save images as PNG format to a specified folder
                String file = String.Format("Image\\ToImage-{0}.png", i);
                image.Save(file, ImageFormat.Png);

            }
        }
    }
}
Apply for a Temporary License
If you'd like to remove the evaluation message from the generated documents, or to get rid of the function limitations, please request a 30-day trial license for yourself.
How to dynamically create excel file and save it to stream in your .NET applications?
This article reveals using Spire.XLS for .NET to create a new Excel file dynamically and save it to stream. Alternatively, loading Excel file from stream in C# will also be fully described in this article as an additional function of Spire.XLS for .NET.
First we need to complete the preparatory work:
- Download the latest Spire.XLS and install it on your machine.
- Add the Spire.XLS.dll files as reference.
- Open bin folder and select the three dll files under .NET 4.0.
- Right click property and select properties in its menu.
- Set the target framework as .NET 4.
Here comes to the explanation of the code:
Dynamically create Excel file and save it to stream
Firstly you can initiate an object of Spire.XLS.workbook
Workbook wbToStream= new Workbook();
Add Spire.XlS.Worksheet object by using the WorkSheet properties of Spire.XlS.Workbook. After that, write text in cell by take advantage of Range properties of Worksheet.
Worksheet sheet = wbFromStream.Worksheets[0];
sheet.Range["C10"].Text = "The sample demonstrates how to save an Excel workbook to stream.";
Then call the method SaveToStream of the Spire.XLS.Workbook object and save all the data which is in XLS format to stream.
wbToStream.SaveToStream(file_stream);
Let’s preview the sample Excel:

Load Excel file from stream in C#
You can initiate an object of Spire.Xls.Workbook
Workbook wbFromStream = new Workbook();
Load data which is in .xls format from steam by calling the method "LoadFromStream" of the Spire.XLS.Workbook object.
wbFromStream.LoadFromStream(fileStream);
Save the object of Spire.XLS.Workbook as an .xls file.
wbFromStream.SaveToFile("From_stream.xls",ExcelVersion.Version97to2003);
Look at this screenshot:

And what below is the full code used in the two functions:
static void Main(string[] args)
{
 //A: Dynamically create Excel file and save it to stream
 Workbook wbToStream= new Workbook();
 Worksheet sheet = wbToStream.Worksheets[0];
 sheet.Range["C10"].Text = "The sample demonstrates how to save an Excel workbook to stream.";
 FileStream file_stream = new FileStream("To_stream.xls", FileMode.Create);
 wbToStream.SaveToStream(file_stream);
 file_stream.Close();
 System.Diagnostics.Process.Start("To_stream.xls");

//B. Load Excel file from stream
 Workbook wbFromStream = new Workbook();
 FileStream fileStream = File.OpenRead("sample.xls");
 fileStream.Seek(0, SeekOrigin.Begin);
 wbFromStream.LoadFromStream(fileStream);
 wbFromStream.SaveToFile("From_stream.xls",ExcelVersion.Version97to2003);
 fileStream.Dispose();
 System.Diagnostics.Process.Start("From_stream.xls");
}
C#/VB.NET: Convert Word to XPS
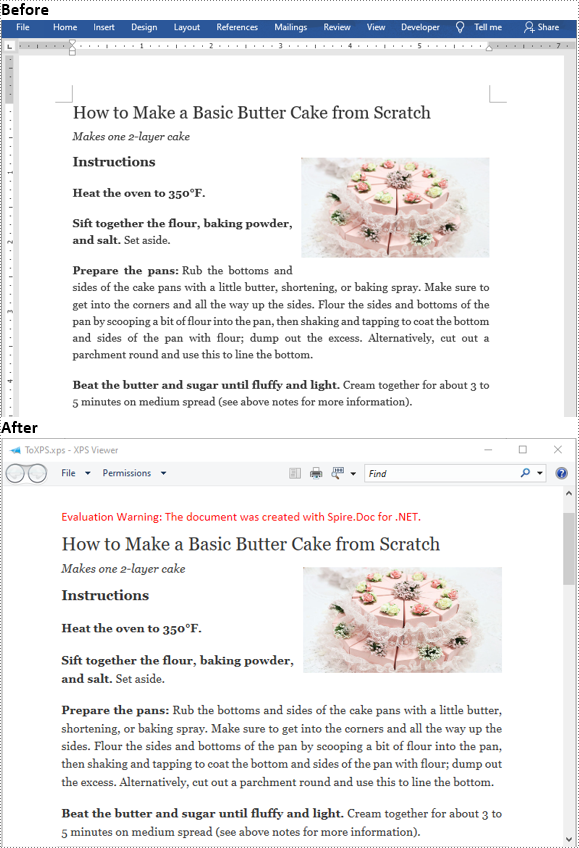
XPS (XML Paper Specification) is a fixed-layout document format designed to preserve document fidelity and provide device-independent document appearance. It is similar to PDF, but is based on XML rather than PostScript. If you want to save a Word document to a fixed-layout file format, XPS would be an option. This article will demonstrate how to convert Word documents to XPS in C# and VB.NET using Spire.Doc for .NET.
Install Spire.Doc for .NET
To begin with, you need to add the DLL files included in the Spire.Doc for.NET package as references in your .NET project. The DLL files can be either downloaded from this link or installed via NuGet.
PM> Install-Package Spire.Doc
Convert Word to XPS in C# and VB.NET
The following are the detailed steps to convert a Word document to XPS using Spire.Doc for .NET:
- Initialize an instance of Document class.
- Load a Word document using Document.LoadFromFile() method.
- Save the Word document to XPS using Document.SaveToFile(string filePath, FileFormat fileFormat) method.
- C#
- VB.NET
using Spire.Doc;
namespace ConvertWordToXps
{
    class Program
    {
        static void Main(string[] args)
        {
            //Create a Document instance
            Document doc = new Document();
            //Load a Word document
            doc.LoadFromFile("Sample.docx");
            //convert the document to XPS
            doc.SaveToFile("ToXPS.xps", FileFormat.XPS);
        }
    }
}
Apply for a Temporary License
If you'd like to remove the evaluation message from the generated documents, or to get rid of the function limitations, please request a 30-day trial license for yourself.
Convert XPS Files to PDF format in C#
XPS is short for XML Paper Specification developed by Microsoft, which is a specification for a page description language and a fixed-document format. It comes out by Microsoft’s initiative to associate file creation with reading in its Windows operating system. Like PDF, XPS plays a loyal role to preserve document with offering device-independent document appearance. Editing in XPS or in PDF seems difficult.
As a flexible and professional component, Spire.PDF for .NEToffers a large variety conversion, among which the conversion from XPS to PDF is one of its popular feature. In addition, Spire.PDF for .NET can be applied in WinForm, ASP.NET and Console Application.
The following code example shows how to convert XPS files to PDF document.
Step 1: Introduce a class named pdfDocument which is used to initialize a Spire.PDF.PdfDocument, and load a XPS file by calling the method of LoadForm File.
PdfDocument doc = new PdfDocument();
doc.LoadFromFile(xpsFile,FileFormat.XPS);
Step 2: Only needs one row of simple code. Call the SavetoFile method of Spire.PDF.pdfDocument to save all the data as PDF formart.
doc.SaveToFile(pdfFile, FileFormat.PDF);
After this code, run this application and you will see the PDF converted from XPS.
Screenshot before converting XPS to PDF:

Screenshot after converting XPS to PDF:

Programme Guide for Spire.Barcode
Spire.BarCode for .NET is a professional barcode component specially designed for .NET developers (C#, VB.NET, ASP.NET) to generate, read 1D & 2D barcodes. Developers and programmers can use Spire.BarCode to add Enterprise-Level barcode formats to their .net applications (ASP.NET, WinForms) quickly and easily. Below is how to use Spire.BarCode for .NET.
Step 1: Create Project
Create a C#/VB.NET Windows Forms Application project in visual studio, name it Barcode.
Step 2: Add Spire.Barcode.dll
- In Toolbox, right-click the blank area, select "Add Tab", name it "Spire.Barcode Controls".
- Right-click "Spire.Barcode Controls", select "Choose Items", select ".NET Framework Components", Click "Browse", find the Spire.Barcode.dll and double-click it.
- Then you will see "BarCodeControl" shown in "Spire.Barcode Controls" in Toolbox.
Step 3: Add Controls
Here is what the window looks like:
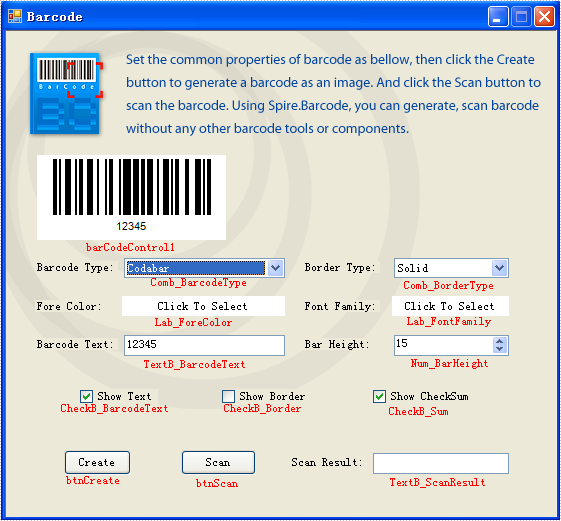
Step 4: Generate Barcode Image
btnCreate_Click is the method to generate barcode image. There are two import classes-BarCodeControl and BarCodeGenerator in this method. BarCodeControl stores information about barcode.
Here are some introductions about some of its properties:
| Name of Property | Description |
| Data | Stores the data that is to be encoded to one-dimension barcode. |
| Data2D | Stores the data that is to be encoded to two-dimension barcode. |
| Type | Indicates the type of barcode that is to be generated. |
| HasBorder | Indicates whether barcode image has border. |
| BorderDashStyle | Stores the type of border barcode image has. |
| BarHeight | Stores the height of barcode image. |
| CheckB_BarcodeText | Indicates whether to show the barcode text. |
| TextFont | Stores the font of barcode text. |
| ForeColor | Stores the fore color of barcode image. |
| CheckB_Sum | Indicates whether to show the checksum digit in Code128 and EAN128 Barcodes. |
BarCodeGenerator is the class to generate barcode image. Its constructor takes one parameter – a BarCodeControl instance. It has a method called GenerateImage() whose return value is Image object to generate image.
//Generate the barcode based on the this.barCodeControl1
BarCodeGenerator generator = new BarCodeGenerator(this.barCodeControl1);
Image barcode = generator.GenerateImage();

//save the barcode as an image
barcode.Save("barcode.png");
'Generate the barcode based on the barCodeControl1
Dim generator As New BarCodeGenerator(barCodeControl1)
Dim barcode As Image = generator.GenerateImage()

'save the barcode as an image
barcode.Save("barcode.png")
Step 5: Scan Barcode Image
BarcodeScanner is the class to scan barcode image. Call its method Scan with the Bitmap object containing the barcode image, it returns a string [] value where the scanning result is stored.
And btnScan_Click uses the class BarcodeScanner to scan barcode image in its code.
Here is the code in btnScan_Click.
private void btnScan_Click(object sender, EventArgs e)
{
//scan the barcode
string[] datas = Spire.Barcode.BarcodeScanner.Scan("barcode.png");

//show the scan result
this.TextB_ScanResult.Text = datas[0];
}
Private Sub btnScan_Click(ByVal sender As Object, ByVal e As EventArgs) Handles btnScan.Click
'scan the barcode
Dim datas() As String = Spire.Barcode.BarcodeScanner.Scan("barcode.png")

'show the scan result
Me.TextB_ScanResult.Text = datas(0)
End Sub
Step 6. Running
Run the project. You will see a window opened.
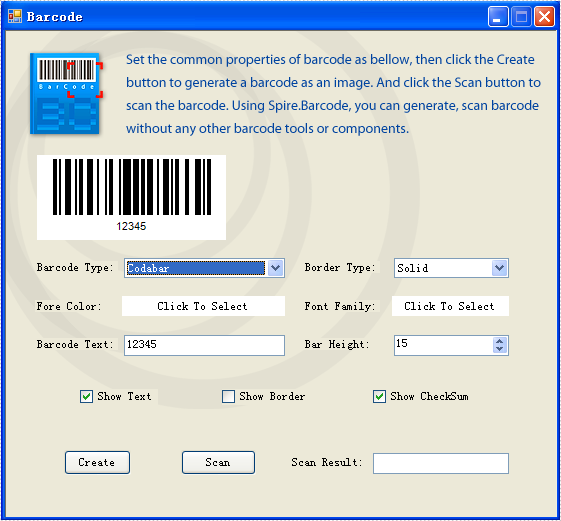
Put in some settings and click the button "Create". You will see the generated barcode image.

Click the button "Scan". You will see the barcode text shown in TextB_ScanResult.
