The ability to add or delete rows and columns in a Word table is crucial for maintaining the accuracy, clarity, and relevance of the information presented. By adding additional rows and columns, you can modify the original structure of a table to accommodate changes in the underlying data. Conversely, removing unnecessary rows and columns helps to streamline your document and make it easier to read. In this article, you will learn how to add or delete table rows and columns in Word in C# using Spire.Doc for .NET.
- Add or Insert Rows in a Word Table in C#
- Add or Insert Columns in a Word Table in C#
- Delete Rows and Columns from a Word Table in C#
Install Spire.Doc for .NET
To begin with, you need to add the DLL files included in the Spire.Doc for.NET package as references in your .NET project. The DLL files can be either downloaded from this link or installed via NuGet.
PM> Install-Package Spire.Doc
Add or Insert Rows in a Word Table in C#
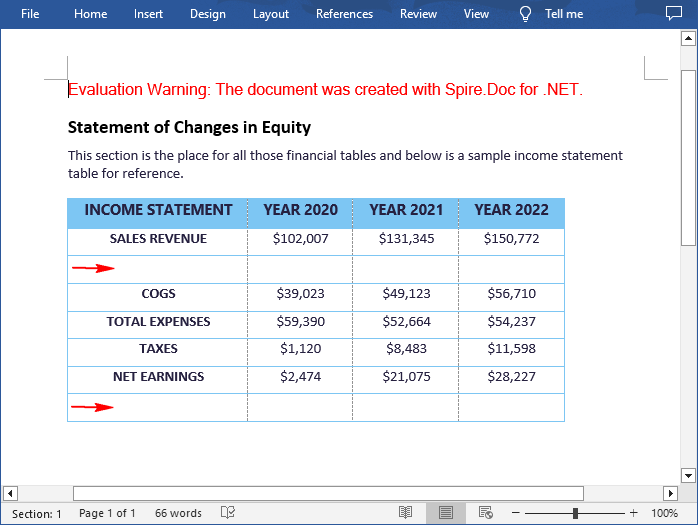
Spire.Doc for .NET allows to add a row to the end of a Word table or insert a row at a specific location in a Word table using the Table.AddRow() or Table.Rows.Insert() method. The following are the detailed steps.
- Create a Document object.
- Load a Word document using Document.LoadFromFile() method.
- Get the first section using Document.Sections[] property.
- Get a specified table in the section using Section.Tables[] property.
- Insert a row at a specific location in the table using Table.Rows.Insert(intindex, TableRow row) method.
- Add a row to the end of the table using Table.AddRow() method.
- Save the result document using Document.SaveToFile() method.
- C#
using Spire.Doc;

namespace AddRows
{
    class Program
    {
        static void Main(string[] args)
        {
            //Create a Document object
            Document doc = new Document();

            //Load a Word document
            doc.LoadFromFile("Tables.docx");

            //Get the first section
            Section section = doc.Sections[0];

            //Get the first table in the section
            Table table = section.Tables[0] as Table;

            //Insert a row into the table as the third row
            table.Rows.Insert(2, table.AddRow());

            //Add a row at the end of the table
            table.AddRow();

            //Save the result document
            doc.SaveToFile("AddRows.docx", FileFormat.Docx2016);
        }
    }
}

Add or Insert Columns in a Word Table in C#
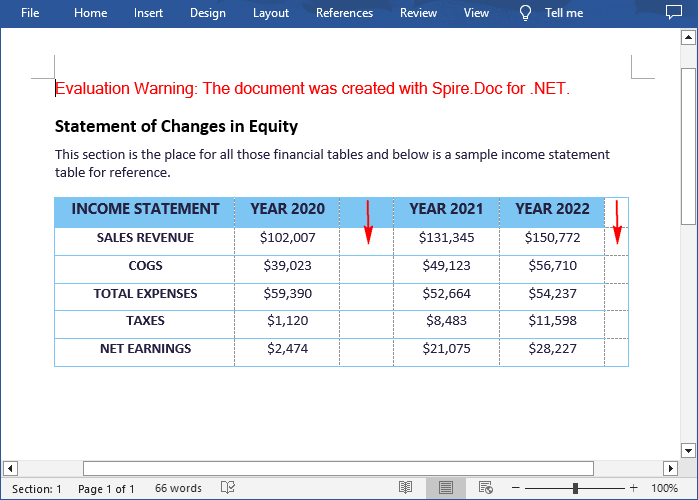
Spire.Doc for .NET does not have a direct method for adding or inserting columns in a Word table. However, you can achieve this task by adding or inserting cells at a specific location in each table row using the TableRow.AddCell() or TableRow.Cells.Insert() method. The following are the detailed steps.
- Create a Document object.
- Load a Word document using Document.LoadFromFile() method.
- Get the first section using Document.Sections[] property.
- Get a specified table in the section using Section.Tables[] property.
- Loop through to get each row in the table.
- Create a TableCell object, and then insert it at a specific location in each row using TableRow.Cells.Insert() method.
- Set the cell width using TableRow.Cells[].SetCellWidth() method.
- Add a cell to the end of each row using TableRow.AddCell() method.
- Save the result document using Document.SaveToFile() method.
- C#
using Spire.Doc;

namespace AddColumns
{
    class Program
    {
        static void Main(string[] args)
        {
            //Create a Document object
            Document doc = new Document();

            //Load a Word document
            doc.LoadFromFile("Tables.docx");

            //Get the first section
            Section section = doc.Sections[0];

            //Get the first table in the section
            Table table = section.Tables[0] as Table;

            //Loop through the rows in the table
            for (int i = 0; i < table.Rows.Count; i++)
            {
                //Get a specified row
                TableRow row = table.Rows[i];

                //Create a TableCell object
                TableCell cell = new TableCell(table.Document);

                //Insert the cell as the third cell of the row
                row.Cells.Insert(2, cell);

                //Set the cell width
                row.Cells[2].SetCellWidth(40, CellWidthType.Point);

                //Add a cell to the end of the row
                row.AddCell();
            }

            //Save the result document
            doc.SaveToFile("AddColumns.docx", FileFormat.Docx2016);

        }
    }
}

Delete Rows and Columns from a Word Table in C#
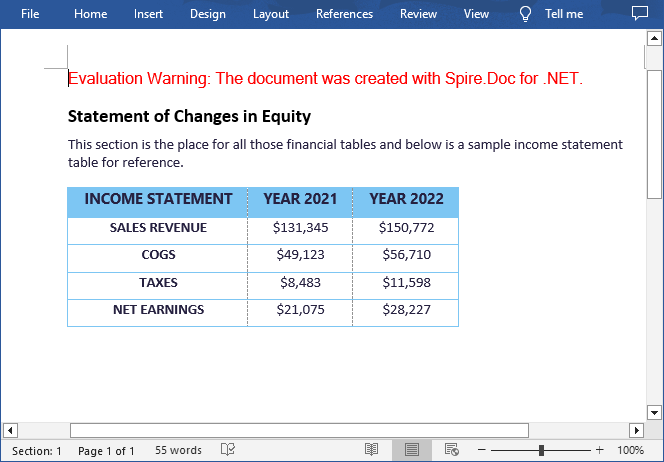
To remove a specific row from a Word table, you can use the Table.Rows.RemoveAt() method directly. While to remove a specific column, you need to remove the corresponding cell from each table row using the TableRow.Cells.RemoveAt() method. The following are the detailed steps.
- Create a Document object.
- Load a Word document using Document.LoadFromFile() method.
- Get the first section using Document.Sections[] property.
- Get a specified table in the section using Section.Tables[] property.
- Remove a specific row from the table using Table.Rows.RemoveAt(int index) method.
- Loop through to get each row in the table.
- Remove a specific cell from each row using TableRow.Cells.RemoveAt(int index) method.
- Save the result document using Document.SaveToFile() method.
- C#
using Spire.Doc;

namespace AddColumns
{
    class Program
    {
        static void Main(string[] args)
        {
            //Create a Document object
            Document doc = new Document();

            //Load a Word document
            doc.LoadFromFile("Tables.docx");

            //Get the first section
            Section section = doc.Sections[0];

            //Get the first table in the section
            Table table = section.Tables[0] as Table;

            //Remove the 4th row
            table.Rows.RemoveAt(3);

            //Loop through the rows in the table
            for (int i = 0; i < table.Rows.Count; i++)
            {
                //Get a specified row
                TableRow row = table.Rows[i];

                //Remove the 2nd cell from the row
                row.Cells.RemoveAt(1);
            }

            //Save the result document
            doc.SaveToFile("RemoveRowsColumns.docx", FileFormat.Docx2016);

        }
    }
}

Apply for a Temporary License
If you'd like to remove the evaluation message from the generated documents, or to get rid of the function limitations, please request a 30-day trial license for yourself.

